Mac tip – Set languages on your Mac

First time Mac users probably do not realize how easy it is to work with multiple languages on their computer, and even to toggle with multiple users working with different languages. As you’ll see, not only can you change the language in which everything is displayed, you can also set the keyboard input to your favorite language. Let’s see how it all works.

To start out, you need to go into System Preferences and select International (easy, it’s the one at the top with the UN flag) You’ll see three tabs: Languages, Formats and Input Menu. The first one lets you order languages according to their importance. Make sure the top one is your main language, but don’t forget to also select other languages that you might end up using and try to place them according to their importance in the list. I usually set up English first, then French, Spanish, Portuguese and Italian. If you have multiple users on your Mac, make sure each one sets up his own list of languages he prefers to work with.

Next you’ll want to go to the Formats tab. This is more important than you might think as it’ll allow you to decide what currency, time format, region and calendar are being used. These don’t necessarily need to match the language, so you can have your menus displayed in Swedish, yet use the Yen as main currency and set up the American date format.
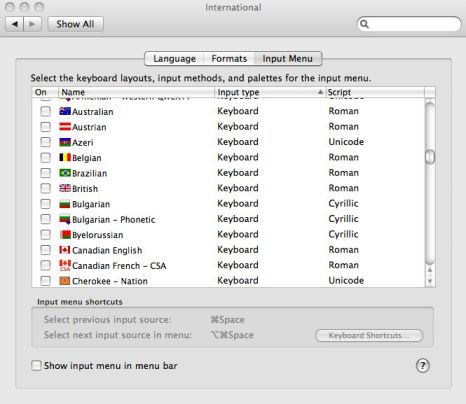
International

The last tab, Input Menu is where you’ll select keyboard languages. These are normally indicated thanks to a small flag on the top right of your menu bar. This may sound futile, but you’ll probably end up using it more than you think. For example, if you’ve bought your Mac in Spain, you’ll end up with a Spanish keyboard, right? What if you are accustomed to working with a British keyboard though? Just select the British layout in the Input Menu. From the top right you’ll be able to toggle between layouts. I also suggest checking the Keyboard Viewer option, which shows the keyboard in the selected language.

If you’ve set up Fast User Switching in Account Preferences, then you’ll find it’s very easy to switch between users. Just click on the user name at the top right of your menu bar and select the user you want to work with. If your users are configured in different languages, it also means these setups are only a click away.

Flash Player 10 released

Adobe Flash Player 10Adobe Labs, never the sort of developer to take a proper break, has released version 10 of their ubiquitous Flash Player. Although the application is still in development, you can still give it a try by downloading it from the Adobe Labs page. Flash Payer 10, code named “Astro”, comes with a number of major enhancements.

In a bid to keep programmers away from Microsoft’s Silverlight, Adobe have added many customization features.  For one, you can create your own filters and effects and share them on the Adobe Exchange site with other users. It’s worth taking a look at this site as there are already a lot of excellent elements available. If you have the Pixel Bender Toolkit set up, you’ll be glad to know that you can still use it to create your own graphics and effects.

Another way of keeping the developer crowd happy is by integrating a number of APIs for 3D effects, drawing, and sound. Adobe claims 3D effects will be “fast, lightweight and native” and that, thanks to the APIs, even more advanced effects will be easier to create by anyone. As for drawing, the most notable feature is that you’ll be able to draw “sophisticated shapes” directly instead of painfully coding them. Last but not least, audio enhancements will come with the use of both Pixel Bender and ActionScript, which should let you carry out “application-level audio mixing”. Looking into the release notes, I’ve also noticed a new Speex Audio Codec and dynamic streaming.

But enough words, the best way to really experience the new features in Flash Player 10 is to install it, and watch the demo video created by Adobe.

3 parental control tools for Mac reviewed

Parental ControlsThe web is an amazing space, with truly endless possibilities. Yet if you have young children it can also be a pretty dangerous place. It’s clear that there is a lot of undesirable content, and unfortunately most of it is only a few clicks away, from all the spam you get in your inbox everyday to simply what comes up in search engine results, ads in pages, links in web pages or badly intentioned people lurking around. It’s simply too risky to let your kids surf the web without any sort of monitoring, until they are old enough to conciously decide what to look at.

With Leopard, Apple has introduced some settings to help parents protect their children while they use the computer. Parental Controls, found in System Preferences, let you adjust a content filter, set safe browsing times during the day, and give login in keys to each one of your children. Set up is simple, doesn’t take much time, and ensures that your children never end up on the wrong kind of websites.

Those of you who haven’t made the jump to Leopard will probably deplore the lack of Parental Controls in their Mac. However, you can still monitor your kids’ use of the computer with a few other very effective applications. Here is a quick roundup of three useful programs.

CutX for Safari is an add-on that will only work with Apple’s browser, so if you use Firefox, then it won’t work. Safari users however will like how it lets you set up simple lists of banned words and sites, select sites to authorize and block downloads. You can even prevent access to the Safari preferences as an extra precautionary measure.

Mac Minder is not tied to any browser and not only lets you block what you don’t want your kids seeing on the internet but also lets you monitor their usage, logins and logouts. You can also schedule specific usage times and block certain users at certain hours.

Last but not least, ContentBarrier lets you create custom profiles for each one of your kids, giving different logins, access times and privileges. You can block offensive and undesirable content from the web and closely monitor what your children have been up to on your Mac.

Downloading and managing Mac fonts

humanoid fontIf you work in design, illustration or publishing you tend to need new fonts frequently, even if you have a few favorites. It’s always nice to discover new fonts as you might find a design that you particularly like and that you can use for a specific project. In my opinion, the best fonts are the ones created by independent designers, who take time to really craft something that stands out from the rest. But it’s not always easy to find them. Let’s face it, most font packs also have to be bought, because you know somebody has spent some time and effort creating them. That’s why it’s always great to find lists of free fonts to download.

I found one today, on Free Mac Fonts, which is organized alphabetically and easily has hundreds of fonts to download. All are saved as .sit files, which can only be opened up on Mac. Instead of downloading like crazy until you don’t know which one is which and where to save them all, I suggest you download a font manager to handle them. Luckily there are a lot to choose from.

Typeset is great to preview and print out lists of fonts, FontAgent Pro has Photoshop CS3 and handles large sets of fonts while Suitcase offers its own Font Doctor repair tool and auto-activation with FontSense. Try them out and see which one you feel more comfortable working with. Once you’ve made up your mind, you can start grabbing those fonts online.

Mozilla releases Snowl messaging extension

SnowlWith their new Snowl add-on, Mozilla want you to organize the flows of conversations you have on the web. The extension, which is only yet a  prototype, can still be downloaded and tested if you have a Mozilla Add-ons account. Once set up and your Firefox browser restarted you’ll be asked to configure Snowl. You can add as many RSS feeds as you want, import OPML files and access a Twitter account.

Snowl offers you two different views:  Message List and River of Messages, both accessible from the ‘View’ menu in Firefox. The River of Messages view is great for quickly browsing through multiple feeds and updating on news. Message List is more of a traditional mail client sort of view, with the list of new items at the top and a preview pane at the bottom. While RSS feeds are displayed in a classic way, I like how Snowl divides tweets by friend, although somehow not all of mine were displayed.

Over on the Mozilla Labs blog,  the developers of Snowl explain that the ultimate goal of the extension  is not only to display feeds, after all you can already do that in Firefox, but also to simplify how you engage in conversations. Yet I couldn’t find any option in the add-on that would allow me to interact, like by commenting on a post or twittering a piece of information. I’m a little surprised that Mozilla would have released the Snowl prototype so early. Wouldn’t it have been better to release it with at least some conversational features implemented? That might have spawned more useful feedback from users.

Anyways, if you follow a number of message groups, have a twitter account and like to engage in conversations, Snowl might just be the extension for you. Give it a try and make sure to let the Mozilla guys know what you think of it so they can improve it.

Mac tip – Use Quicksilver and Flickr Uploadr

QuicksilverQuicksilver is one of the most beloved apps of Mac users, even though it hasn’t been updated in a while. If you know how to use it well, the productivity tool can not only help you find anything in a matter of seconds but also gives you complete control over all your files. Consider it as a really powerful Swiss army knife for your Mac.

People who have mastered it know that it realizes its full potential when it’s used to control another program, just like Mac’s Automator tool can. Automator is more complicated to work with though, because you actually need to create rules and filters, so that it performs a specific action. Quicksilver is more organic, and while you can not automatize anything, you can use the program as a Dashboard from which you launch and perform actions.

Just as an example of how you can work with Quicksilver and your favorite programs, UsingMac have written a clever post on how to couple Quicksilver with Flickr Uploadr. Select your pictures, open up Quicksilver (Option+Space),  find Flickr Uploadr via the 1st pane, then choose ‘Open File’ from the second pane. Then press CMD+G to bring the photos to the Flickr application. The photos will load up automatically in the application. Once they’re ready, all you need to do is upload them to your Flickr account. It’s a shame that you can’t actually perform the upload process directly from Quicksilver, unfortunately the application does not have access to this specific function.

Video: Tweak your Vista appearance

What does it take to change the appearance of your Vista computer? Is there a way to play around with the taskbar’s transparency level? A while back Nick gave us some tips on how to tweak transparency on Windows XP.  Elena also came up with the Transbar application and explained how you could use it in XP. In the following video we show you how you can make your Vista taskbar transparent with Transbar and give you a few quick tips on changing the appearance of your desktop. Enjoy!

insertvideo(“vista_appearance”, “1017”, null , null, true, “false”, url + “images/watermark_final.png”);

Mac Tip – Choose which apps start-up with your Mac

Ever wondered why some programs start automatically every time you launch your Mac? Why these and not others? Is there a way to choose which ones start when I log in? Here is where we help you answer these questions. You can easily select which ones start once your Mac is put into first gear. For instance you can have Apple Mail and Skype launch automatically, or get your browser to open up first thing. For the lazier among you it means you don’t even have to worry about opening those programs.

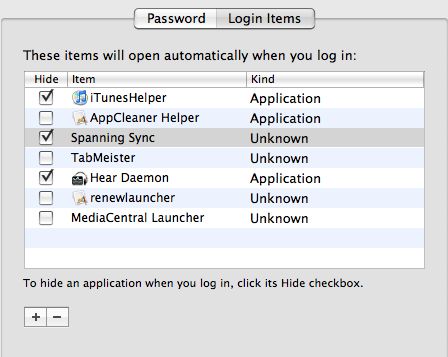
login items

Here’s how you can set your custom login items. Go to Apple>System Preferences and select Accounts. Choose your account name then press the ‘Login Items’ tab. You’ll see the programs that automatically launch at startup. Uncheck the ones you don’t want to start at login. If you want to add more programs, simply click the ‘+’ button and add them from your list of applications. If you want to remove a program, select it and press the ‘-‘ button. Make sure that the programs you have added are checked, otherwise they won’t start up at login.

If your chosen program requires a password, be aware that you won’t be able to launch it at startup. Similarly, avoid adding too many login items. Your Mac will probably not like being requested to open up ten programs all at once.

Adobe Photoshop Lightroom 2 released

LightroomAdobe has silently rollled out version 2 of their successful photo editing program, Adobe Photoshop Lightroom. With updates not being too frequent for Lightroom (version 2 was in Beta for a while) the list of improvements is pretty big and comprised of significant new features.

You can now process a specific selection of your image and not just the whole of it. This is great for editing different parts of your picture and paritcularly useful if there are many details to work with. Lightroom also now comes with ‘Suggested Keywords’. If you want your picture to be easy to find in your photo library or on photo sharing sites like Flickr you need to associate tags to them. Lightroom now suggests new keywords based on the ones you have already entered.

A number of tools like printing, healing brush, angling, cropping and photo sharpening have been enhanced and are much more powerful to work with. One feature which surprisingly wasn’t available in the previous version is Smart Collections. Lightroom now includes this so you can organize photos according to specific filters. You can also set a Target Collection to quickly store pictures.

Any serious photographer knows the importance of taking care of metadata for all their photos. In an interesting experiment, Lightroom 2 opens up its metadata SDK to developers. We’ll soon see what they manage to make out of it.

Not to forget, the Lightroom community itself. Adobe’s  photo editing software enjoys a strong following, which has already started on releasing additional resources complementing Lightroom 2. John Nack of Adobe lists out a few of them, like the Lightroom 2 Learning Center, and a number of in depth reviews of the new version. So what are you waiting for? Update your Lightroom and try out the new features!

Mac tip – Shut down Spotlight

SpotlightI’ve always said that Spotlight is a brilliant tool and something I simply can’t live without. Whether launching an application, looking for a file or just checking through my mail, I just need to use Spotlight. Remembering the times when the Apple search function wasn’t around, doing all these tasks was just a little bit more tedious and inexorably involved having to search through files. I’ve already written previously on Spotlight, giving you a tip on how to use it with Cover Flow, how to repair it or giving you a list of alternative launchers.

As effective as Spotlight is, it isn’t error proof, especially when you consider that it’s literally on all the time, analyzing and indexing files. As said before, I’ve already covered how to repair Spotlight if something goes wrong with it. But what if it’s still not functioning properly and giving you a hard time? Your last resort is to shut it down completely.

Look for the two following files and move them to a safe place, from where they can easily be recovered. Do not erase them!

/System/Library/LaunchAgents/com.apple.Spotlight.plist
/System/Library/LaunchDaemons/com.apple.metadata.mds.plist

Then reboot your system so that launchd does not try to start them. Normally since the files are not there anymore Spotlight will not be able to perform its indexing tasks. Take a look every now and then to make sure your system hasn’t recreated the files. If so, make sure to move them to another safe place. Once you think it’s time to relaunch Spotlight, simple put the files back in their destination.

[Via: Macosxhints]