Meta is shutting down the Facebook Gaming app

There were quite a few years there were Facebook just kept getting bigger and kept expanding with new features and apps. Ever since the rebrand to Meta, however, which many believe was to try and take the focus of Facebook’s increasingly tarnished reputation, the company has been shutting down apps regularly. Today we can report that the latest app to get the chop from Meta is Facebook Gaming. Here is what you need to know.

Facebook Download Now

The announcement went out to Facebook Gaming users yesterday, telling them that the Facebook Gaming app would be shutting down on both Android and iOS apps from October 28. After that date, users will only be able to access the service from a Facebook Gaming tab on the regular Facebook app.

The good news then for both users and content creators on the platform that is Facebook’s version of Twitch and YouTube streaming is that the service is not being completely discontinued. However, there is no escaping the fact that this isn’t a positive message that Meta is sending out about the future of the service.

This latest cancellation follows Meta’s recent pulling of multiple Facebook apps including Facebook Podcasts and Facebook Live Shopping. The company has also halted the development of its planned digital wallet app called Novi and is reported to have stopped working on its rumored smartwatch. Maybe the rebrand just wasn’t powerful enough.

It is worth pointing out, however, that in the case of Facebook Gaming losing its own specialized app, YouTube did something similar back in 2019 and that YouTube Gaming has so far been able to rack up over 2.3 billion views already this year. This would indicate that the move could just simply be a consolidation by Meta as Facebook Gaming, although not as popular as YouTube Gaming, is not too far behind YouTube for views with about 1.4 billion views so far this year.

In the recent Facebook news, you should now have much greater control over what you see on your Facebook feed.

Microsoft builds To Do app right into Outlook

The Microsoft To Do app is designed to help you focus on the tasks at hand as well as help you rack basic lists and projects in your life such as what you need to buy the next time you go grocery shopping. As when we are working many of the tasks that we need to add to our To Do lists come from emails from managers and colleagues, Microsoft has today announced that it is integrating the To Do app directly into Outlook. Here is what you need to know.

Outlook Download Now

The integration will give Microsoft Outlook users full access to the To Do app from within Outlook. Furthermore, as well as being able to use the full features of To Do, Outlook users will also be able to take advantage of several optimization features that become possible thanks to both apps coming together.

The first major integration feature is flagged emails. The feature automatically creates a to-do list relating to all flagged emails received in the user’s inbox, with the tasks that make up the app allowing the user to quickly access the email, bringing together both the To Do list functionality and the Outlook inbox functionality together for quick and easy access.

There will also be increased integration with Microsoft Planner, which is the software giant’s project management tool. Planner offers much wider project management features on top of basic to-do list functionality but there is no doubting the utility that to-do lists offer project managers, which again makes this a very sensible integration indeed.

The new updated feature should be rolling out to Outlook users as we speak meaning it could already be active on your version of the app. However, Microsoft does report that the feature will not be on by default for all users so it could be worth heading to Outlook settings to see if you need to switch it on before using it.

In other recent Microsoft News, the company has been working hard to bolster security on the Microsoft Edge browser.

These Chrome extensions with over 1 million downloads are stealing your data

Chrome extensions add utility to an already extremely useful Google Chrome browser. Unfortunately, however, just like with any other sort of downloadable app or file we need to be careful when installing them onto our devices. We recently covered a fake Chrome extension that was masquerading as the plugin for a popular Windows app. Today, however, we bring you news of several extensions that are secretly tracking their users’ browser activity.

Google Chrome Download Now

Cybersecurity researchers at McAfee have uncovered five Google Chrome extensions that when installed onto Chrome secretly monitor the user’s web activity. Furthermore, whenever the user then visits e-commerce websites, they secretly add affiliate cookies to make it look like they came to the website via a referral for which the scammer receives a fee.

Unfortunately, as McAfee reports, these extensions have been downloaded over 1.4 million times between them and offer a variety of different functions all designed to lure unsuspecting victims in. These include enabling multiple users to watch Netflix together, take screenshots of websites, and take advantage of website coupon savings. The full list of the false extensions highlighted by McAfee, comp0lete with the number of installs they’ve received and their Extension IDs so you can check if you have them installed on your version of Chrome or not are as follows:

Netflix Party with 800,000 installs

mmnbenehknklpbendgmgngeaignppnbe

Netflix Party 2 with 300,000 installs

flijfnhifgdcbhglkneplegafminjnhn               

FlipShope Price Tracker Extension with 80,000 installs

adikhbfjdbjkhelbdnffogkobkekkkej

Full Page Screenshot Capture Screenshotting with 200,000 installs

pojgkmkfincpdkdgjepkmdekcahmckjp

AutoBuy Flash Sales with 20,000 installs

gbnahglfafmhaehbdmjedfhdmimjcbed

Unfortunately, this news clearly indicates that you can’t trust a Chrome extension simply because it has a lot of installs already. You need to run extra checks to make sure you are not going to fall victim to a scam. This means always checking the permissions that these apps ask for when you are installing them. If anything looks off then you should do further research into the extension itself and into alternative extensions to see what kind of permissions they are asking for.

In other Chrome cybersecurity news, if you haven’t updated Chrome recently you should probably do it now as Google has been patching some serious security flaws.

A new Assassin’s Creed game is coming in Spring 2023

Ubisoft is holding a big Assassin’s Creed event on September 10, 2022. However, there have been quite a few rumors leading up to this event. One, in particular, is about a new Assassin’s Creed game coming to the franchise, named Mirage.

Assassin's Creed DOWNLOAD

A popular YouTuber, J0natan, announced that Assassin’s Creed Mirage, a brand new game that developers haven’t yet confirmed, will be released in Spring 2023. According to him, the game will take place in Baghdad in the late 800s. Apparently, the game franchise is aiming to return to its roots with this game, with no leveling and a few other gameplay tweaks.

Another reporter, Jason Schreier, commented on the post clarifying that, according to his sources close to the developers, some of the reported leaks may be true, while others simply aren’t. According to Jason, the game’s name, Mirage, and the tentative release date are accurate. Also, the setting in Baghdad and the return-to-basics approach is also true. However, the rumors about being able to explore multiple cities divided by deserts and rivers are false. 

Another rumor is that the player character will be Basim, the character from Assassin’s Creed: Valhalla, in his youth before he joined the Hidden Ones. Some of the back-to-basics changes players can expect will be no dialogue choices or the ability to change the character’s gender. 

There are leaks that suggest that this back-to-basics approach for the new game has something to do with a potential remake of the original Assassin’s Creed. Some believe this remake will be a part of Mirage’s Season Pass. The leaks also suggest there may be a Constantinople DLC.

For now, these reports are nothing but rumors, but we hope to learn more at Ubisoft’s Assassin’s Creed event in September. During this event, we’ll also be learning more about the ambitious Assassin’s Creed Infinity. So there’s a lot of exciting news coming for fans of the franchise soon.

The Callisto Protocol rewards players for dying in different ways

This isn’t a joke. The Callisto Protocol is actually going to reward you for dying in as many ways as possible. This special reward that you’ll get is a trophy for natural curiosity – the kind of curiosity you can only exhibit in a video game where you can respawn. As it turns out, there are many ways to die in the game, and the developers want you to find every last one. 

The Callisto Protocol DOWNLOAD

In a previous article pertaining to The Callisto Protocol, we described the protagonist’s death scene in vivid detail, just as it happened in the then newly released trailer. However, since then, new footage has emerged, and in every single piece of media, our protagonist is subjected to a brand-new death. This seems to be a running theme in the game, and one almost has to wonder whether each death has something to teach us. 

These sentiments are actually echoed by the game’s development team. In a recent interview, Mark James, developer at Striking Distance Studios, revealed that there may well be a lesson behind each death. ‘You are gonna die in our game. A lot of people ask how many times are you going to die? We actually have an achievement in there for seeing all of the deaths. Each monster has its own way it kills you. The variables are huge in the way they [enemies] attack you or you attack them, so you might actually die more or less.’ 

The Callisto Protocol dying

But these deaths won’t come as a punishment, as in other games. Instead, The Callisto Protocol will feature a mechanic used liberally in the Lara Croft series – the game will show you a deeply graphic and painfully realistic death scene every time your character dies. We’ve seen a few of these so far, and judging by what we’ve seen, The Callisto Protocol is not going to shy away from guts and gore to get its point across.  

Each death you experience is meant to teach you more about the monsters, the environment, and your own actions. You’ll, therefore, be able to see what action led to your death in that instance so that you can try something different when you respawn. 

We don’t know how many of these unique deaths there are going to be. That’s one thing that the developers are remaining silent on. However, we do know that it’ll be enough such that speedrunning such an achievement isn’t too easy. 
If you’d like to read about the gory trailer hinted at earlier, we’ve got an article that covers it in fairly graphic detail. This game is definitely not for the faint of heart.

The Callisto Protocol has a new gritty trailer READ MORE

Rollerdrome Review | Fast shooting Action

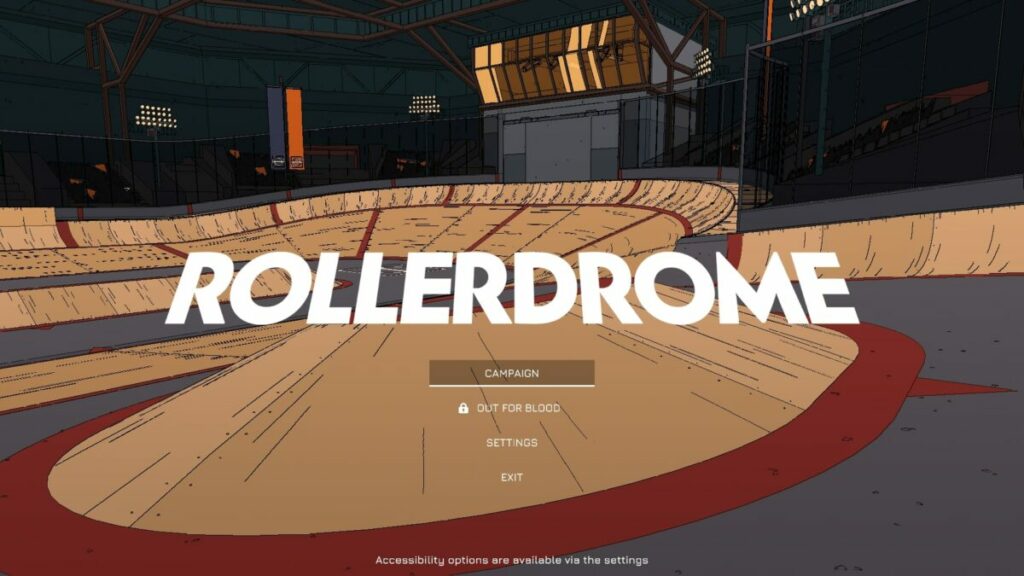
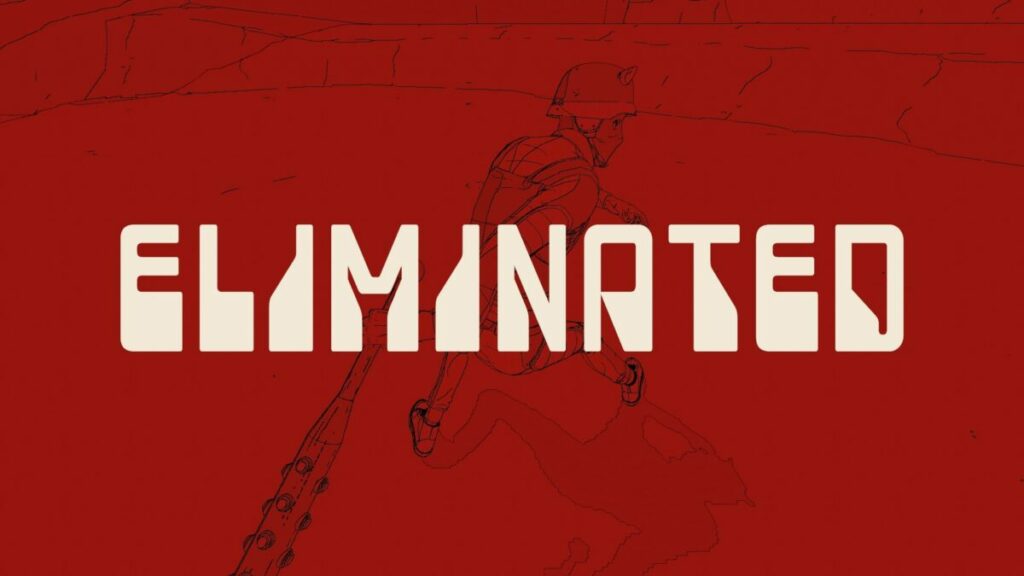
Rollerdrome is a third-person skater-shooting game set in a post-apocalyptic future. Roll17 developed it with Private Division as the publisher, released on Aug 16, 2022. It features tricks you pull off on your rollerblades while shooting away at opponents in the arena. 

Rollerdrome DOWNLOAD

In between matches, you learn that the Matterhorn corporation behind the event is up to something. It’s a mixture of exploring the mysteries while remaining alive for as long as possible. Read more about what the game is about in this exciting Rollerdrome review.

A malicious corporation in Rollerdome

Welcome to the Hunger Games on rollerblades. As much as there’s a focus on the action and shooting, Rollerdrome actually has a background story that will keep you intrigued. It will make you want to complete the levels quickly to see what happens next.

A dark and twisted future

Rollerdrome is set in 2030 in the not-so-distant future. Massive corporations have taken over, and the world is a complete mess. To keep the populace happy and entertained, they’ve created huge arenas where champions compete for life or death. Humans either face other humans or against bots that spawn.

Rollerdrome review

The Colosseum with rollerblades

The science fiction game takes us to a future that’s much like the past. Imagine Colosseum environments where the crowds watch as you destroy anyone that comes before you. The trick is that you need to do so on rollerblades, as running around on your feet is simply boring.

Rollerdrome review

Mystery and intrigue

The corporation behind the entire event is called Matterhorn. The reason why this is important becomes more relevant later in the story. While I won’t spoil too much for you, suffice it to say that the company has some secret plans that you discover, putting you in a difficult situation. Somehow, you need to keep skating and surviving so you can stop them.

Rollerdrome review

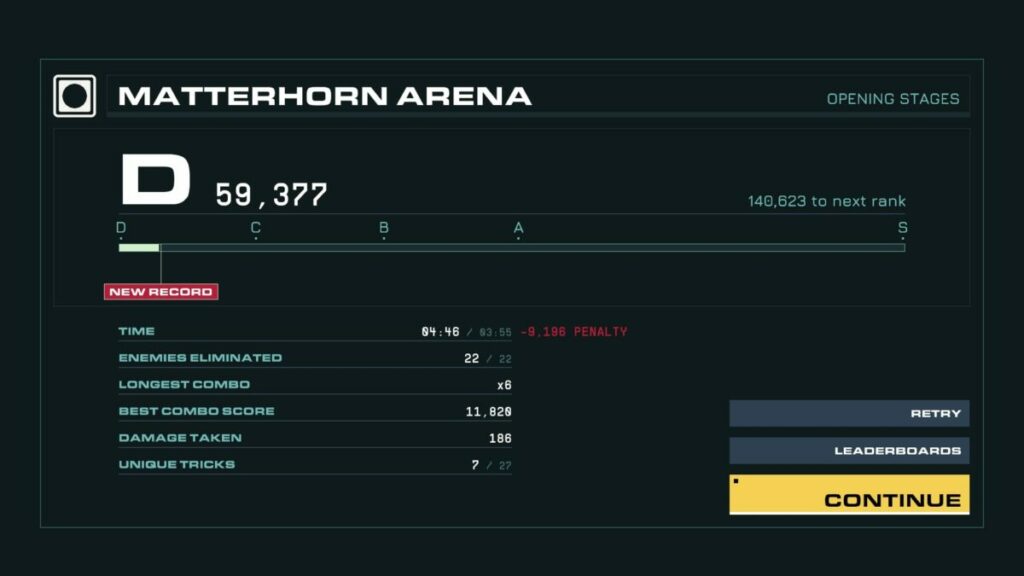
Multiplayer leaderboard

Once you progress further into Rollerdrome, you’ll unlock a mode where you can challenge other players for the top scores. You won’t ever see them, so it’s not a PvP multiplayer mode. Instead, you’ll complete maps and then compare your points with others on the leaderboard.

How long to play Rollerdrome?

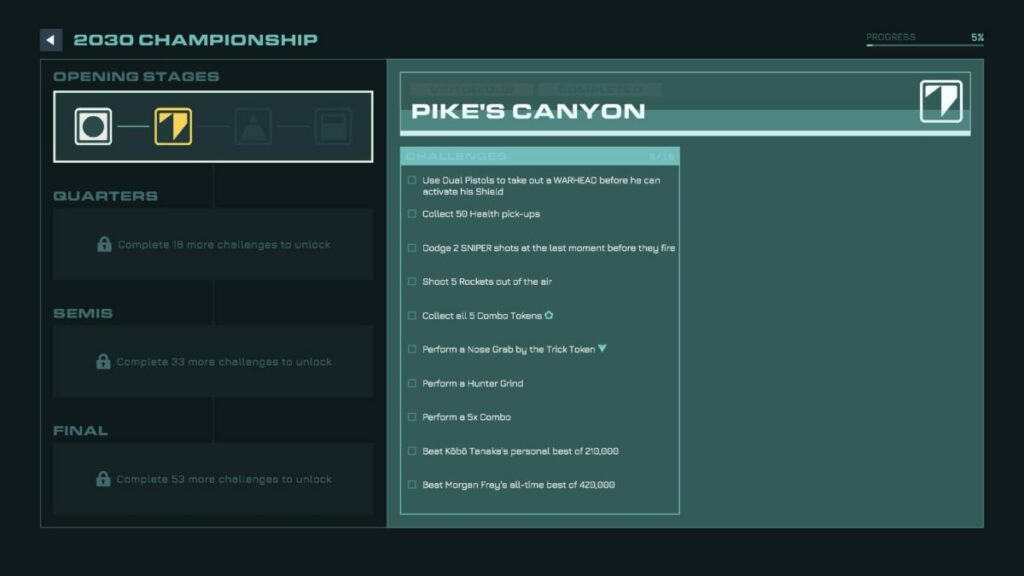
If you manage to master the gameplay mechanics and proceed quickly through the 12 levels in Rollerdrome, it will take you about four hours to complete the game. Gamers like me that want to collect every token and complete every challenge can expect anywhere up to six hours. Once you unlock the multiplayer leaderboard mode at a later stage, the game time possibilities are endless.

Rollerdrome shooting and skating action

I’ll leave the rest of the Rollerdrome story elements for you to work out. I’m eager to get to the gameplay aspects, as that’s where all the action is. It’s also the only exciting segment.

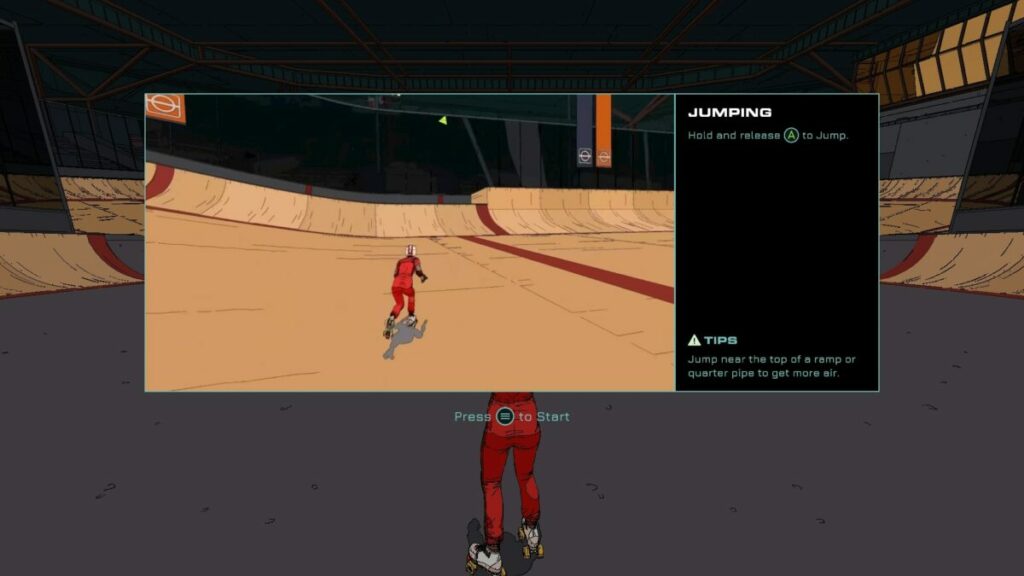
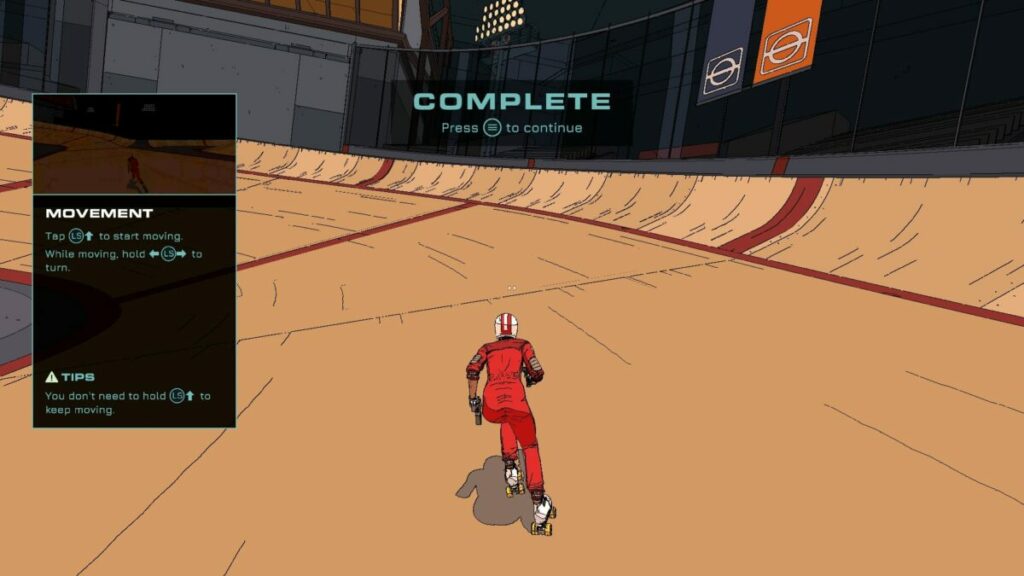
The tutorial for Rollerdrome

When you venture into Rollerdrome, your champion needs to qualify to take part in the tournament. In other words, you’ve entered the tutorial. The game shows you the essential controls and what you need to do to survive. It’s effective, and it won’t be picky about small things you do wrong. 

Rollerdrome review

Skating around the Rollerdrome arena

Here’s the fun part. As soon as you press up on your controller’s left stick, your champion starts skating. You don’t even need to hold it in, as the character continues on her own. From there, you can turn left and right as needed, making your way around the various arenas.

The maps have different layouts, mostly consisting of ramps and hills. There are also glass windows meant to keep you in, but you can break through them for the fun factor. However, it’s clear the audience must be watching from home, as there’s no one in the grandstands. It’s probably safer that way with bullets flying everywhere.

Rollerdrome review

Shooting enemies and missiles

That brings me to the next part of my Rollerdrome review. You don’t only skate, but you’ll also have to shoot enemies that appear in the arena. They teleport in, and you’ll have to clear all of them to complete the level. There’s a slight penalty for how long you take to do so, so you need to kill them quickly.

Rollerdrome makes the shooting action intensely fun. It’s the most enjoyable part of the game. After you ramp up in the air, you can slow down time to aim and kill enemies from the sky. If you run out of ammo, just perform a few tricks to restock. You also need to watch out for missiles heading your way, which you can target and blow out of the sky or redirect back to the enemy.

I should spend a moment explaining some of the enemy types you’ll encounter. First, you’ll see brawlers who wait on the arena floor to bash your head in. Then there are the long-range snipers trying to kill you from afar. Later, you’ll see more advanced opponents, such as massive mech units and guys with rocket launchers. Luckily, you’ll get better weapons at later stages.

Rollerdrome review

Perform tricks without failing

Another enjoyable element of Rollerdrome is that there’s little chance you’ll fall on your face when performing a trick. Tony Hawk, eat your heart out. Even if you’re spinning in the air when you meet the ground, your hero automatically adjusts so as not to crash. This feature keeps the action going and avoids frustration with all the enemies around you.

If you really want to show off, you can dodge a bullet at the last moment while pulling off a trick in the air. It’s the most satisfying movement in Rollerdrome I’ve experienced so far. I jumped up a ramp, spun around and held my blades to restock my ammo, and then dodge a sniper bullet as I came back down. The moment was epic, and I even received a trophy/achievement for it.

I bet if I was trying to do that intentionally, I would have failed.

Rollerdrome review

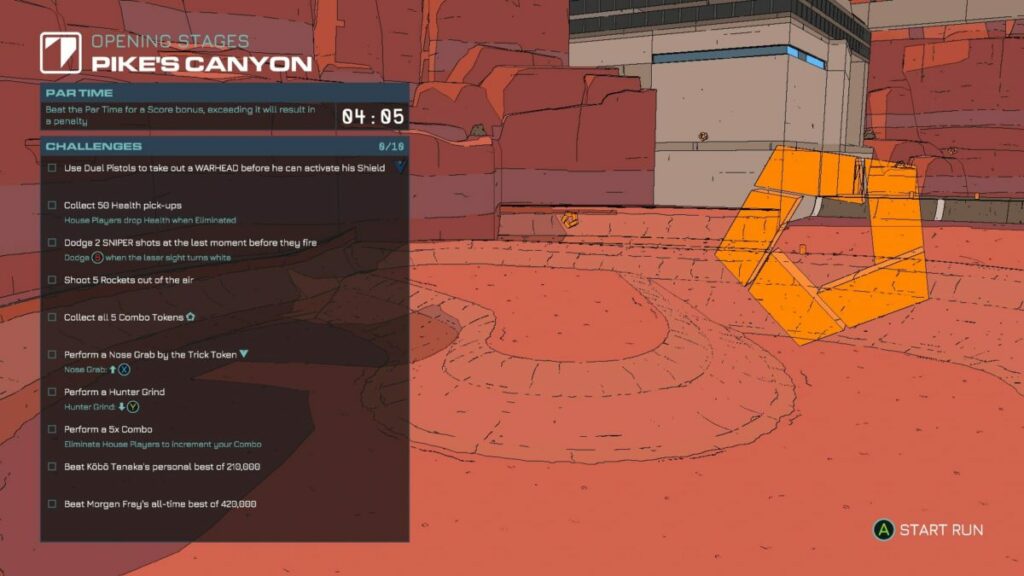
Various missions and challenges

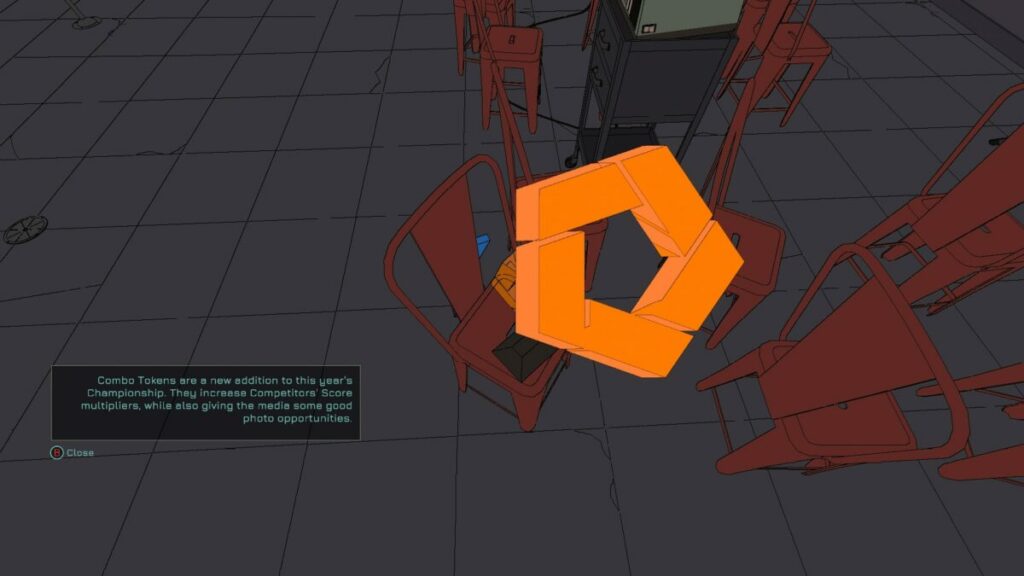
The stages in Rollerdrome aren’t simply about skating around the arena and shooting enemies. That’s right; there’s more. Every map has specific challenges for you to complete. Future levels and arenas require that you complete a certain number of these tasks to unlock them. One element to look out for is a blue or orange token, which is usually part of the objectives. You’ll need to ramp up or perform a trick to obtain it.
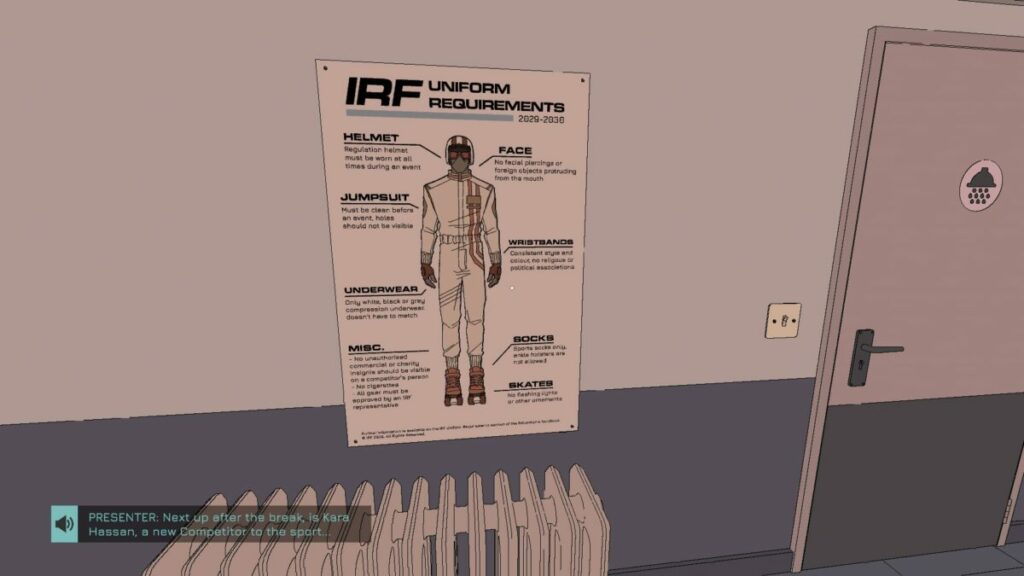
Rollerdrome review

Exploring the bases

When you’re not skating around on Rollerdrome, you’ll be in your locker room or within the base of the arena. There are items lying around for you to explore, which is where the story element comes in. You’ll be investigating what the corporation is up to and making a plan to stop them.

Rollerdrome review

Alternatives to Rollerdrome

It’s quite obvious from the start that Rollerdrome is much like a Tony Hawk Pro Skater game, just with blood and mayhem. In a way, it’s also like Tron Bike Stunt Racing 3d Stunt Bike Racing with the action and destruction. Put Quake Champions on rollerblades, and you get a general idea.

Rollerdrome PC requirements

If you want to enjoy all the action, bullets, and chaos that will ensue in Rollerdrome, you’ll need a computer with decent specs. It doesn’t take up too much space, but it’s the memory and graphics card that are important. Here’s what you’ll need:

  • OS: Windows 10 64-bit
  • Memory: 4 GB RAM
  • Processor: Intel Core i5-2125/AMD A12-9800
  • Storage: 4 GB
  • Graphics: GeForce GT 630/Radeon HD 6770/Intel Iris Pro 580

Basic graphics and pumping sounds

After I played the game for a few hours and before I wrote my Rollerdrome review, I went to have a look at what some other players and reviewers were saying about it. I was shocked to see that most of them love the graphics while not enjoying the gameplay. I’m clearly a different type of gamer, as my opinion is the other way around.

Cartoonish graphics with complex environments

I wasn’t all that impressed with the graphics. It’s basic at best, with a 3D cartoonish layout that seems to try and be like the good old days of gaming. I feel more could have been done to make Rollerdrome look spectacular. Just making different, huge maps with destruction everywhere doesn’t do it for me. 

Rollerdrome review

Interesting characters and opponent designs

The one element of the visuals that wasn’t too bad was the character and enemy designs. Sure, there’s a lot of copy and paste, unfortunately. Still, the developer put some thought into what each type of enemy should look like, even if they usually look the same on different maps. You’ll know a sniper when you see it, in other words.

Fast-paced music to match the action

The music was enjoyable, and it makes you want to tap your foot while skating around the arena and blasting at enemies. It matches the comic art style of the game while making your heart beat with every note. Also, yay for voice acting, which was delivered beautifully.

Rollerdrome review

Final Verdict of Rollerdrome

Rollerdrome is actually an enjoyable game. I didn’t want to put my control down at the end and longed for more. Sure, there’s the Out for Blood mode where you can compete with leaderboards, but I really enjoyed the missions. Once you get past the unimpressive comic graphics, you’ll love flipping in the air, pulling tricks, and shooting weapons.

However, it’s back to Ikonei Island: An Earthlock Adventure for me, which has me hooked. Mirror Forge is set to expand on the demo that’s currently available, and I also want to spend some more time with the mobs on Minecraft. See you next time, and be sure to check out my other Softonic articles.

Pros

  • Skate, jump, dodge, and shoot
  • Intense, fun action
  • Several challenging levels
  • A new take on the skating genre
  • An intriguing storyline

Cons

  • Graphics aren’t that impressive
  • No PvP multiplayer mode

Developer: Roll17

Publisher: Private Division

Game Modes: Campaign, multiplayer leaderboard

Platform reviewed: Windows 11 – Steam

How to use Microsoft Paint 3D in 6 simple steps

Paint 3D is a unique creative application that updated the classic Microsoft Paint tool to provide additional features for 3D modeling in Windows 10. Microsoft Paint has been included with every version of Windows, offering users a basic raster editor that lets them draw, scribble, or doodle with any Windows-compatible device. While Paint 3D comes inbuilt into Windows 10, the only way to enable the latest version on Windows 11 is through a software download.

Microsoft Paint 3D Download

Explore how to create dynamic 3D drawings and change their characteristics with Microsoft Paint 3D in this brief introductory guide.

  1. Launch Microsoft Paint 3D

    If you don't have a version of Windows 10 with Paint 3D already installed, start by downloading the app

    If you’re running the Windows 10 operating system with the Creators Update, you should already have Paint 3D installed on your device. If not, download the application since 3D is unavailable in previous versions of Windows 10 and the current edition of Windows 11.

    Once you’ve installed the software, you’re ready to start creating 3D objects within a scene by using the Magic Select tool. The editor supports 3D and 2D images alike and is very simple to use. To launch the program, head over to the Windows Ink Workspace or choose Start > All Apps and locate Microsoft Paint 3D.

  2. Insert an image into Paint 3D

    Choose a two-dimensional file that will easily convert into a 3D object

    Begin by downloading a basic template. Or, if you wish, use an existing file on your device. Advanced drawing artists may want to sketch the image directly onto the canvas with a stylus. We’ll get into how at a later step. But, for beginners, it is best to start with a basic 2D file that will readily translate into a nice 3D object. After selecting a file, access the Hamburger Menu dropdown in Windows and choose Insert.

    Take a moment to select your canvas and resize it using the Canvas tab, and bring your object to the desired scale. We recommend the Transparent Canvas if you don’t want the final product to display a white background. If you have the precise dimensions, enter them in the width and height boxes. To crop this image, click on the Select button, and access the crop tool. Press Crop to reframe the image template.

  3. Mask your image into a 3D object

    Locate the 3D Object feature in Paint 3D to render your two dimensional image into a 3D shape

    Your object is still two-dimensional, so you need to access the 3D Object tab before rendering it into 3D. For illustration purposes, let’s assume you chose a basic 2D sphere as your template. Now, using your stylus, draw a facial expression on the object by hand after choosing the Objects > 3D doodle. Those who aren’t artistically inclined can access the various custom Microsoft stickers under the Stickers tab and apply one of these graphics to the sphere.

  4. Change the color of your object

    Change the color of your object completely with the Fill tool

    To change the color of your object, locate the Tools tab. From there, choose the Fill, and find your preferred color by selecting Color. Use your mouse to tap on the object, and the action will fill it with your preferred shade.

    If you want to fill multiple objects, use either the Multiselect or Select all tools, and apply the new color to each file. To duplicate an object, all you need to do is select it and click on Copy and then Paste. Resize the objects by manipulating the anchors at their corners to establish their appropriate scale within your scene.

  5. Rotate your 3D object

    Rotate your image by degrees using 3D Paint's Perspective Anchors

    You already rendered your creation into 3D with the 3D Object mask in a previous step, so now you can rotate it using the Perspective Anchors to reposition the figure(s) within the three-dimensional canvas. If you’re working with multiple objects, try resizing them while rotating the figures around at different angles to give more depth and dimension to your canvas.

    Finally, to preview your work in 3D, click on the object, and select the 3D preview icon, sliding it up or down. Save the project to your desktop or a folder by clicking Menu > Export file.

Ready to start exploring Microsoft Paint 3D?

Paint 3D is a no-cost, accessible digital content creation tool that lets you generate models from scratch or convert existing 2D templates into professional-grade 3D objects. Even if you’re a non-artist or complete beginner, Microsoft’s Paint 3D offers a great opportunity to unlock your creative side, and the software is entirely free to use. For more on the latest graphic design tools, check out our tutorial on how to paint strikingly realistic watercolors with Procreate.

9 tips to take control of your privacy on iOS 15/iOS 16

Your phone is full of revealing personal data like your search history, location data, and emails and texts with friends and family. This can make it low-hanging fruit for busybodies to target, whether it’s corporations that want to monetize you, nosy loved ones, or strangers with bad intentions.

iOS 16 Download

It can be hard to even find out which apps are collecting what information about you much less stop or limit them. Here are nine simple tweaks you can make in the latest versions of iOS to keep your private life as private as possible. Some of these might make your day-to-day life a little less convenient, but we’ll discuss exactly what trade-offs each comes with so you can choose for yourself which ones are worth it to you.

  1. Control app behavior tracking

    The Tracking menu in iOS

    Apps are constantly asking you for permission to access your contacts, calendar, camera, microphone, and other sensors and services so they can track your behavior. If you’d prefer not to be spied on, you can nip these requests in the bud by going to Settings > Privacy > Tracking and disabling the Allow Apps to Request to Track option at the top.

    If you’d prefer to only limit some apps and let others track your behavior, leave the Allow Apps to Request to Track option green. You can scroll down the list of apps below it and turn off permissions selectively.

  2. Track your apps with App Privacy Report

    The App Privacy Report in iOS

    If you’d like to learn more about how your apps are tracking you, turn on Apple’s App Privacy Report. Once activated, it begins to gather information about how often the apps on your phone are accessing private data, like your contacts, notes, and messages, and sensor data, like your location, microphone, and camera.

    Visit Settings > Privacy, and tap the button labeled App Privacy Report at the bottom of the menu. Next, tap Turn On App Privacy Report to start tracking your apps.

  3. Control access to your Location Services

    The Location Services menu in iOS

    One of the most egregious app overreaches is unnecessarily spying on your location. Go to Settings > Privacy > Location Services, and scroll down to see which apps have access. You’ll notice the options are Always, Never, and While Using.

    The apps that display a solid purple arrow are tracking your location right now. The ones with a gray arrow have tracked you sometime in the last day. The ones with a hollow purple arrow are using geo-fencing to provide you region-related services and notifications.

    You can select While Using for the apps you’d like to let keep their GPS functionality or Never for apps that don’t need to know where you are. Very few apps will need the omnipresent, battery-draining Always option.

  4. Control system services that track your location

    The system services that can track your location in iOS

    Stay in the Location Services window, and scroll down to the bottom. Tap on System Services. Here you can see all the system processes that have access to your location data by default.

    You can turn off location tracking for any service you decide doesn’t need to know where you are. Tap its green toggle switch on the right to turn it gray. We recommend leaving location on for only the most essential services like Emergency Calls & SOS, Find My iPhone, and Networking & Wireless.

  5. Clear your significant locations

    The Significant Locations menu in iOS

    Apple’s Maps app tracks the places you visit often, adding them to its list of your Significant Locations. This allows Maps to personalize some route information, but it can also provide details about your routine to bad actors.

    If you want to disable the feature, go to your Settings > Privacy > Location Services > System Services menu and scroll to the bottom to find the Significant Locations menu. Tap the green switch to turn it off. You can also erase your frequent location history by tapping the Clear History option at the bottom of the menu.

  6. Keep your mail activity private

    The Mail Privacy Protection menu in iOS

    Some marketers have started adding tracking technology to their emails that runs in the background to check if you’ve viewed the email and from what IP address. You can block these trackers by going to Settings > Mail > Privacy Protection and toggling the green switch to gray by the option labeled Protect Mail Activity.

    Senders will no longer be able to tell if you’ve opened their email, and your IP address will remain anonymous so marketers can’t use it to track your online activity. They will still see if you click a link in their email, though.

  7. Hide your real email address

    Hide My Email in iOS’ iCloud menu

    iCloud+ subscribers now have a Hide My Email option. This allows you to generate unique email addresses that forward to your actual email address so you can keep your real email private.

    When Safari or Mail asks you for your email address, tap the empty email field, and hit Hide My Email in the popup menu. You can create as many random simulated email accounts as you need. Manage or delete them from your Settings menu by tapping your name then iCloud > Hide My Email.

  8. Prevent websites from tracking you

    Prevent Cross-Site Tracking in the Safari menu in iOS

    Keep nosy websites from following you as you browse the internet in Safari by visiting Settings > Safari. Scroll down until you see the section labeled Privacy & Security, and disable the green toggle switch next to the Prevent Cross-Site Tracking option.

  9. Make your IP address invisible

    Hide IP Address in the Safari menu in iOS

    You can go a step further to shut out snooping websites in Safari by making your IP address invisible to web trackers. Without your IP address, trackers will have no way to uniquely identify you online.

    Right below the Prevent Cross-Site Tracking button we showed you above, you’ll see the option to Hide IP Address. Toggle the green switch to gray to turn it off.

Cut down on data harvesting with these privacy tips

It’s impossible to completely stop the data-driven marketing machine, but you can severely limit it with the above ideas. Some of these settings have a way of turning back on after iOS updates, so be sure to check on them every so often.

If you’d like to keep your iPhone even more private and secure, explore some of the essential security and privacy apps for iPhone.

The latest features of Adobe Acrobat Pro

For a long time now, many people have only viewed Acrobat as a PDF reader or basic editor. As with the sands of time, things change, and so has this program. Adobe has released some new updates that took effect this month with incredible features. If you have the Adobe Acrobat Pro free trial, you’ll also be able to check them out.

Adobe indicated on its blog that the new updates will affect the Adobe Acrobat Pro desktop app and the online cloud system. The new features are available for both, but you apply them in different ways. The latest tools include creating a web form, branding your account, collecting payments online, and requesting signatures in bulk.

As you can see, Adobe Acrobat has moved away from simply opening a PDF document. The web form tool lets you quickly create a form that you can embed onto your site. While there are templates you can use, they’re easy to adjust with other details. From there, your visitors can complete and submit.

The latest features of Adobe Acrobat Pro

Many email and online signatures look bland with only variety in the font type and color. Adobe Acrobat Pro now lets you add your logo so you can brand your electronic signatures quickly and easily. Not only can you place them at the end of emails, but there’s a section on forms where you can also attach them.

The latest features of Adobe Acrobat Pro

You should already know about the ability to add spaces for signatures on forms as a previous Adobe Acrobat Pro update. Now, you can also ask for payments on your forms and documents. It’s almost like a call to action where it reminds the reader to make payment for your services.

The latest features of Adobe Acrobat Pro

Sticking with signatures, you can now request them in bulk from several recipients by sending them to various email addresses. While you only send one version, each recipient will receive a unique copy. It saves you time having to create a version for each person.

The latest features of Adobe Acrobat Pro

These new features are incredible, and it’s another way that Adobe strives to make your life and work easier. However, you won’t be able to see many of these tools with a standard Acrobat Pro DC download. 

Be sure to check out the Adobe Acrobat Pro free download to get a taste of what you can do.

FAQs about Adobe Acrobat Pro

Is there a free version of Adobe Pro?

At the moment, the only free version of Adobe Acrobat Pro is the free trial. You’ll have seven days to test all the new features of this PDF toolkit, giving you a taste of what you can accomplish. Once the trial period is over, you’ll pay for the subscription based on the option you selected before the trial.

Try Adobe Acrobat Pro for free FREE TRIAL

What is the difference between Acrobat Pro vs Standard?

While the standard version provides you with the standard tools, it excludes the more advanced features. For example, you can edit your PDF documents, create and sign forms, add passwords, and track responses. With Adobe Acrobat Pro, you can convert PDFs to different formats, redact confidential information, compare documents, and add branding to your signatures and forms.

Is it worth it to buy Adobe Acrobat Pro?

The best part of Adobe Acrobat Pro is that it’s designed to make the professional’s working life easier. The PDF toolkit is incredibly comprehensive and easy to use, giving you the power to deliver quality services and documents. Also, it has several security measures to ensure that only the intended recipients view confidential information.

Can Adobe Acrobat Pro help with productivity?

Have you ever had to work in different free programs for one task? Thankfully, Adobe Acrobat Pro helps improve productivity and efficiency by combining several functions in one app. You don’t have to stress about deadlines when you have this all-in-one solution.

Is Adobe Acrobat Pro a one-time purchase?

At the moment, you can purchase Adobe Acrobat Pro with monthly or annual subscriptions. There are pricing plans for individuals, businesses, and students, with the last option only available in select locations. The annual option lets you pay once-off for an entire year before the renewal kicks in.

Several solutions at your fingertips

I suspect this won’t be the last feature we see for Adobe Acrobat Pro. The company is set on ensuring you receive plenty of tools to work on your tools in one central location. Maybe it’s time we return to this familiar, trustworthy brand and see how it’s much more than a PDF editor today.

6 fixes for Unexpected Store Exception errors on Windows 11

Nobody likes the Blue Screen of Death, but unfortunately, it’s a part of the Windows 11 ecosystem that serves a vital purpose. You see, users usually focus on the ‘:(‘ and the fact that everything they’d been working on has been relegated to the Windows 11 void. However, there’s another part of the BSOD experience that gives you information on why your day has been so rudely interrupted.

Windows 11 DOWNLOAD

Located below the usual BSOD message, there’s a stop code, usually accompanied by a QR code. While this stop code doesn’t tell you everything you need to know, it does give you a place to start. The stop code we’re talking about today is the Unexpected Store Exception

What is the Unexpected Store Exception?

The Unexpected Store Exception stop code generally indicated that specific components of the Microsoft Store application had encountered an exception that was not expected and, therefore, could not be mitigated before it caused an issue. The resultant issue is that your Windows 11 OS crashes, and you’re served the dreaded Blue Screen of Death. 

‘Okay, cool. So my Microsoft Store ran into a little bit of a snafu and crashed Windows? That sounds descriptive enough.’ You’d think that, but unfortunately, merely knowing which app likely caused the crash doesn’t tell you how to fix it. That’s where this article comes in. As it turns out, there are no less than six methods to use if you want to minimize the likelihood of such a crash happening again.

Well, in terms of it being caused by the Unexpected Store Exception, at least. To paraphrase Hamlet: ‘There are more things in Heaven and Earth that can crash your Windows 11 OS than you can successfully mitigate, Horatio.’

Fix #1: Dedicated repair app

In general, it’s always a good idea to have some kind of Windows repair utility handy just in case your OS gives you issues. PC Repair Tools by Layer-Solutions-Inc is a good tool to have on hand. In the case of an OS crash, simply restart your system and run the PC Repair Tools utility. This tool is designed to combat the most common issues and system failures that plague the Windows ecosystem. 

The program was recently updated and it now has a brand new Startup Program manager that will decrease the demand on your PC by automatically ending programs upon restart that you may not need. 

Unexpected Store Exception errors on Windows 11

Fix #2: Hardware components

One of the biggest causes of this stop code is an issue with hardware components. Therefore, once you’ve run a dedicated repair app to try and repair anything that may be wrong with the Windows 11 OS, you should check that all your components are installed correctly. The prime culprit is usually your hard drive. Ensure that your hard drive is plugged in correctly and that there are no loose connections. While you’re at it, check that all of your other hardware components are connected securely as well. 

Unexpected Store Exception errors on Windows 11

Fix #3: Windows 11 driver updates

If checking that your hardware components are properly connected didn’t help the situation, your issue might be the status of your device’s various drivers. If this is your first time coming across the word ‘driver’ in terms of PC repair, here’s what that means: Essentially, a driver, or device driver, is a particular collection of files that delivers instructions to a specific piece of hardware.

The drivers communicate with your device’s OS in order to give these instructions so that each part of your PC knows exactly what to do and how to do it. If you want a nifty way to remember this, just keep in mind that the driver drives the various processes of your PC. Every major component and action that your PC has or performs requires a driver. Therefore, when these act out or become outdated, it can affect a great many processes on your PC.

All you need to do to fix these drivers is: 

  • Hit the Windows key + S. This will launch the Search menu. Here, you’ll want to type in Device Manager and then hit the most relevant search result. 
  • Once you’ve opened the device manager, you’ll want to double-click where you Display adapters. This lets you view the associated devices. Here, for instance, you’ll see something like Intel(R) Graphics. 
  • Now that you can see your display adapter, you’ll want to right-click on the associated display adapter and hit Update Driver. In my case, I’ll right-click on Intel(R) Graphics.
  • You should now see a context menu for the device you requested an update for. Click on the first option; Search automatically for drivers. This will initiate a search of your entire computer for the associated driver update , which will then be installed automatically. 

In some cases, you’ll need to use a third-party application to update your drivers. Most PC manufacturers have their own driver update utilities, but third-party apps sometimes have a greater variety of available drivers. 

If you’re looking for a decent and reliable device driver update utility, try Driver Booster Free. While this option is marketed as free, you may need to issue payment for advanced driver management services. However, even these are affordable compared to the industry average for driver repairs. 

Unexpected Store Exception errors on Windows 11

Fix #4: Run SFC

SFC is your Windows 11 PC’s built-in terminal for detecting corrupted files and data. This is one of those tools that many users don’t know exists, and that makes you feel like you’re obtaining an honorary degree in coding. Here’s how to access and operate it:

  • First, you’ll want to hit the Windows key + S to launch your PC’s Search utility. Enter the term Windows Terminal into the search box and then click on the first result. Your first result should be the Windows Terminal app
  • Next, you’ll need to hit Yes when the User Account Control interface pops up and asks whether you want the terminal to make changes to your device. 
  • The terminal app should now open without delay. Once the app is open, head to the top of the interface. You should see something resembling your Microsoft Edge tabs. Next to the open tab, you’ll see a plus sign and a downward pointing arrow – also known as a vee. Click on the vee and then select Command Prompt
  • A quicker way to get to your Command Prompt utility is to hit Ctrl + Shift + 2. 
  • Now, you’ll see a black screen with white writing. The entire portion below the Microsoft header is essentially an input terminal that you can type commands – or prompts – into. The utility will then run your commands and return a result, depending on the command you initiate. In this case, you’re just going type sfc /scannow into the text field next to C:\Users\(your name). Next, you’re going to hit Enter and run the command. 
  • Once your PC has run the command you just entered, you’re going to enter another. This time, type chkdsk /r into the text field and then hit Enter once more. This will run the Check Disk utility. Once you’ve clicked Enter, you should see a short paragraph appear telling you that ‘Chkdsk cannot run because the volume is in use by another process.’ You’re going to be given two choices, Y, or N. You need to type in Y and then hit Enter once more. 

That’s it. That’s the entire process. You’ve done it. The utility will now check your entire hard drive for any problems that may be causing the Unexpected Store Exception to appear. It’ll also identify bad sectors on your hard drive and will either try to repair them or simply tells your computer not to use them.

unexpected store exception errors on Windows 11

Fix #5: Uninstall conflicting apps

Sometimes, the issue can be as simple as a program or set of applications conflicting with the program or app in question. If this is the case, there’s a simple fix: Just remove the conflicting app!

Here’s how to get that done:

  • Head to your home screen and then hit the Windows key + I. This will launch your Settings app. From here, you’ll want to click on Apps. You’ll find this option in the leftmost navigation pane in the Settings interface. 
  • Next, you’ll want to hit Apps & features, an option you’ll see on the right–hand side of the Settings interface. You’ll now be served a list of all the apps you have installed on your PC. 
  • Lastly, you’ll need to peruse the list of installed apps and features and find any apps that may be conflicting with others or corrupted. When you find an app that you would like to remove, all you need to do is click on the kebab menu next to the app and then choose Uninstall. The app might start an installation wizard that will guide you through the uninstallation process, but this is usually relatively pain free. 

The biggest issue here is going to be finding the conflicting app. Unfortunately, we don’t have a fix-all solution for you here. However, we can suggest that you remove any apps you installed around the time the issue started happening. Also, the first app that you’ll want to uninstall is your third-party antivirus, as this class of apps is usually the culprit.

If you’re looking for a qualitative alternative to whichever antivirus you were using, we’d recommend switching to Avast. Although, any option bearing the name Kaspersky or Norton is also usually a capable alternative. 

Unexpected Store Exception errors on Windows 11

Fix #6: Reinstall Windows 11

This is your last resort with pretty much any issue you may be having with Windows 11. This is, however, also the easiest option on the list. Over time, your Windows 11 OS may become corrupted, or your PC may become so full of junk that the only option is to essentially press restart on the entire thing and just start again from scratch.

However, there are a few things to note before reinstalling Windows 11:

#1: If you have a limitless internet connection, you’re fine. Windows 11 will install normally using files from the internet. If your internet connection is metered, we’d suggest starting from some kind of installation media. This will require downloading the Windows Media Creation Tool and then setting up the appropriate reinstallation media.

You can either use a USB flash drive or a disk that you’ll insert into the CD-ROM drive of your PC. If your PC doesn’t have a disk drive, or if you simply prefer the diskless option, you could also create a virtual disk with an app like UltraISO. If you choose to use a USB flash drive, ensure that it has at least 8 GB of free space. 

#2: It’s always good practice to create a backup of your system before you perform a factory reset. This way, should anything go wrong, you can still roll back to a stable version of the OS. 

#3: If you have any important files on your PC, ensure that you either make copies to store on an external hard drive, or simply upload your files to your favorite cloud management service such as Microsoft’s OneDrive or Google Drive. 

Performing a factory reset on your Windows 11 device is another article on its own, which you can read at your leisure. We’ve taken the liberty of creating a step-by-step guide on how to perform a factory reset on both Windows 11 and Windows 10 devices, which you can find in the link at the beginning of this paragraph.

Unexpected Store Exception errors on Windows 11