You already know that, on many occasions, work rhythms can be quite frantic. Having your mind on a thousand things and trying to get to all places is not ideal, not to mention how dangerous it can become if you turn it into a routine. In this case, Adobe can help you lighten your workload, at least when it comes to “paperwork.” Specifically, we are referring to Acrobat Studio. This is the Korean company’s solution for increasing your productivity without sacrificing your health. The focus on collaboration, the enhanced tools with […]
You already know that, on many occasions, work rhythms can be quite frantic. Having your mind on a thousand things and trying to be everywhere is not ideal, not to mention how dangerous it can become if it turns into a routine. In this case, Adobe can help lighten the workload, at least when it comes to “paperwork.”
Specifically, we are referring to Acrobat Studio. This is the solution from the Korean company to help you increase your productivity without sacrificing your health. The focus on collaboration, the AI-powered tools, and its great security are some of the pillars that make Acrobat Studio a very interesting option for both small and large companies.
As defined by Adobe, Acrobat Studio is the company’s “comprehensive solution” for creating PDFs. In addition to the tools we already know from Acrobat, it also provides us with access to PDF Spaces and design features alongside Adobe Express Premium.
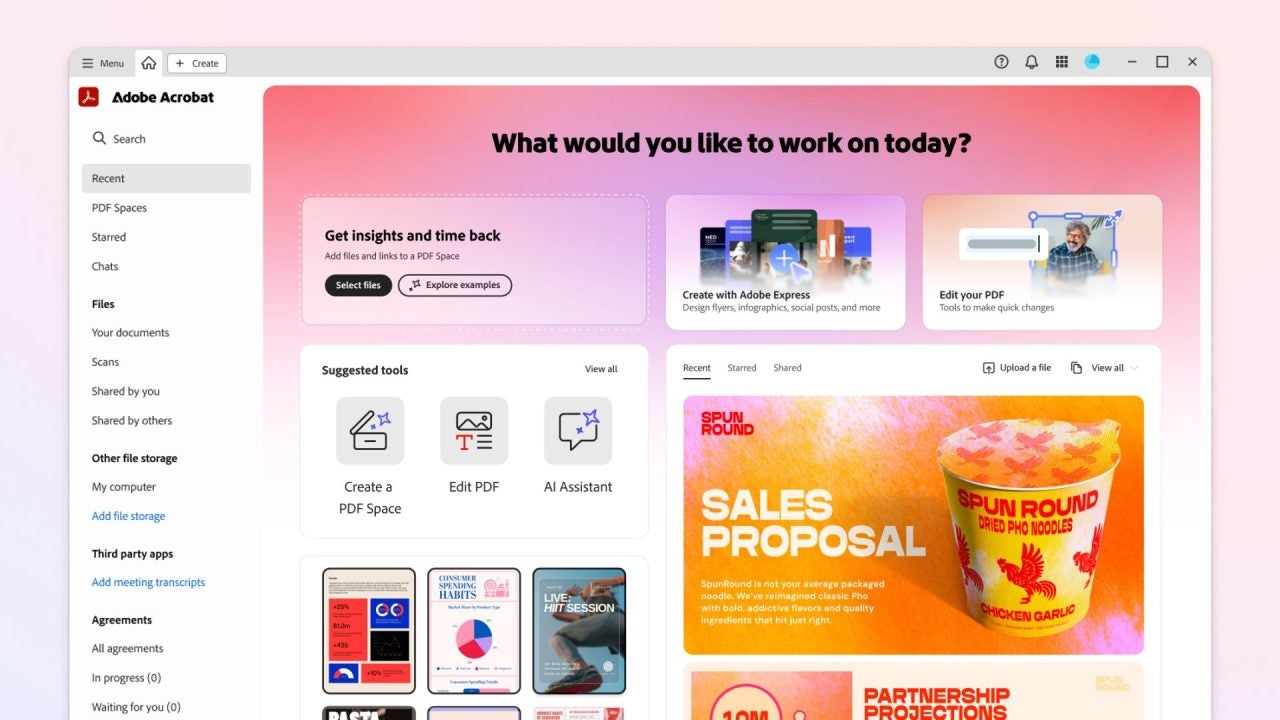
Now, we will delve into how to use PDF Spaces. Thanks to this, we can gather several files and analyze their content from the same place. To use them, select PDF Spaces in the left panel of the Acrobat page.
Next, select Create a PDF Space. In the dialog box that opens, you will see numerous options. You can choose to select which files to open from Adobe’s cloud storage, upload files from your PC, add text from Paste copied text…
After adding all the files you want, select Add to PDF Space. You will then see the files listed on the left, a series of small summaries of each document generated automatically, and a chat panel where you can ask questions to the AI agent.
If you want to change the name of your PDF Space, click above on the name that was automatically set, type a new name, and select Save.
How to share your PDF Spaces with other users
The key point of PDF Spaces is its use as a collaborative tool. From there, users with access will be able to view, review, and edit the files.
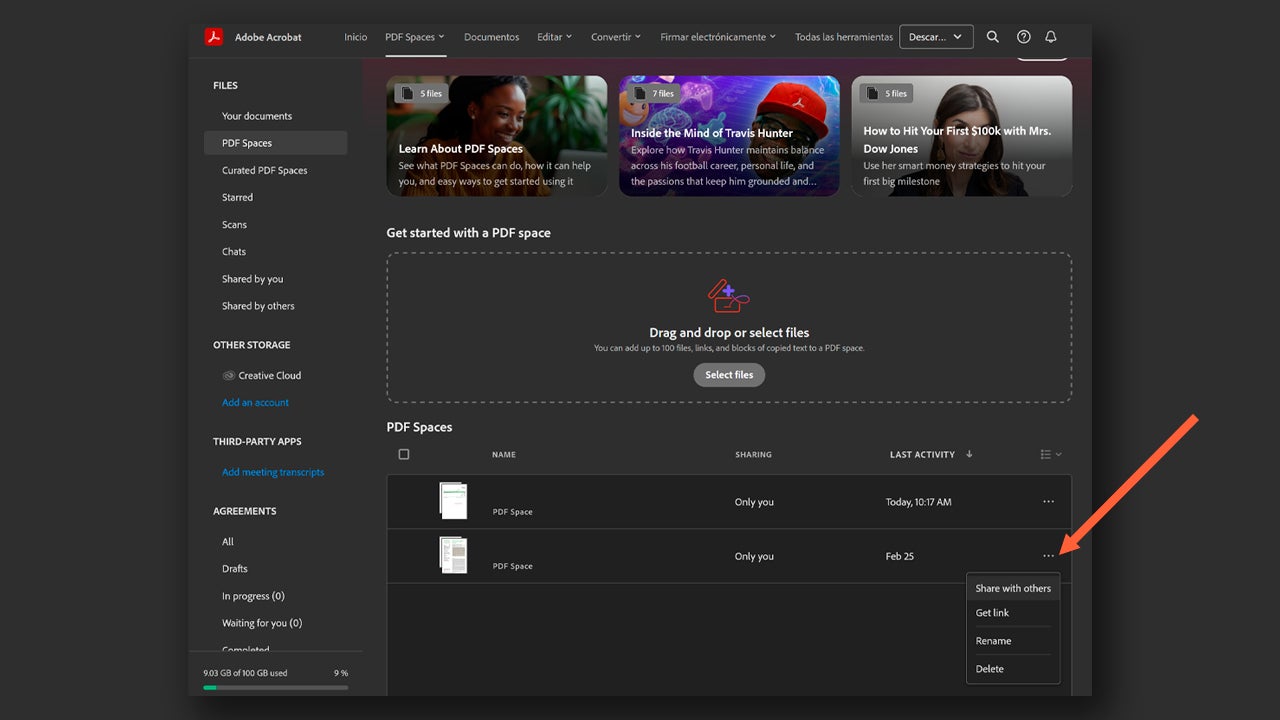
From your browser, access the homepage of Acrobatand click on PDF Spaces. Once here, scroll down and go to the space you want to share. There, select the three dots you will see on the right and click on Share with others.
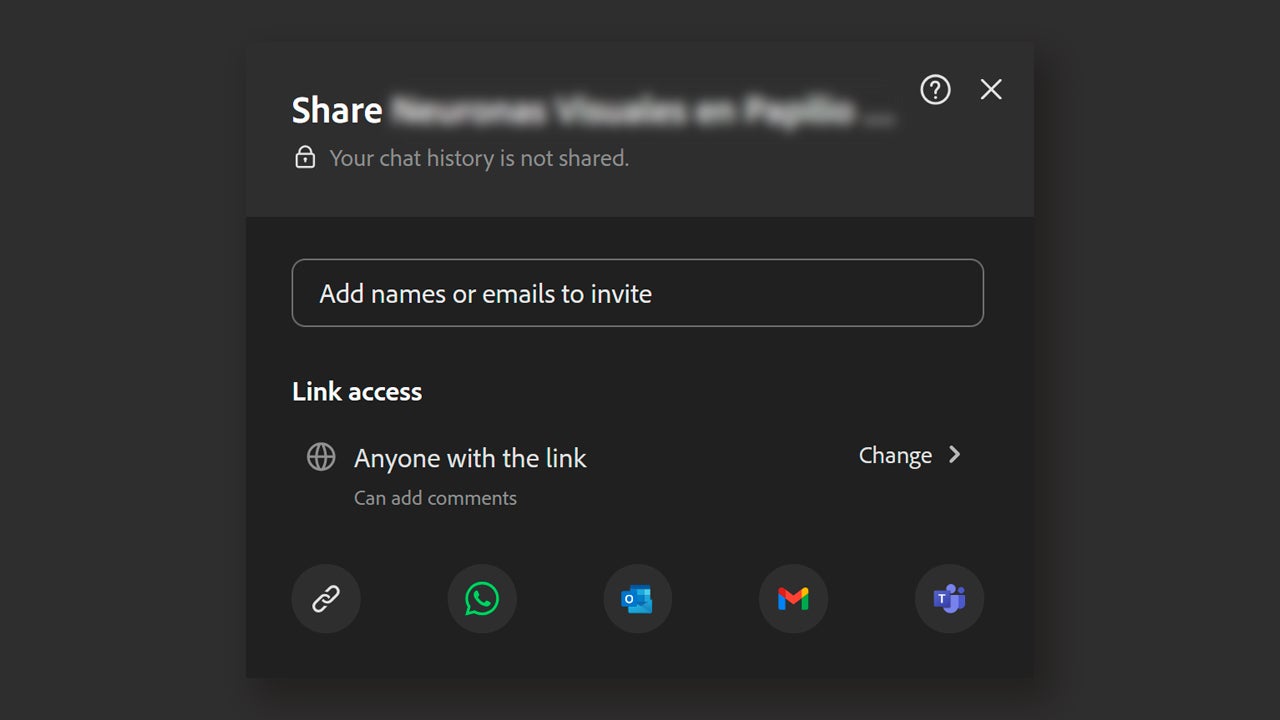
In this panel, you can do several things. The first is that you can write the emails of the users you would like to grant access to that space. You can also generate a link from which anyone who clicks on it will be able to access the space. You have shortcuts to platforms like WhatsApp or Microsoft Teams to share your Space.
This is how you can create summaries with AI
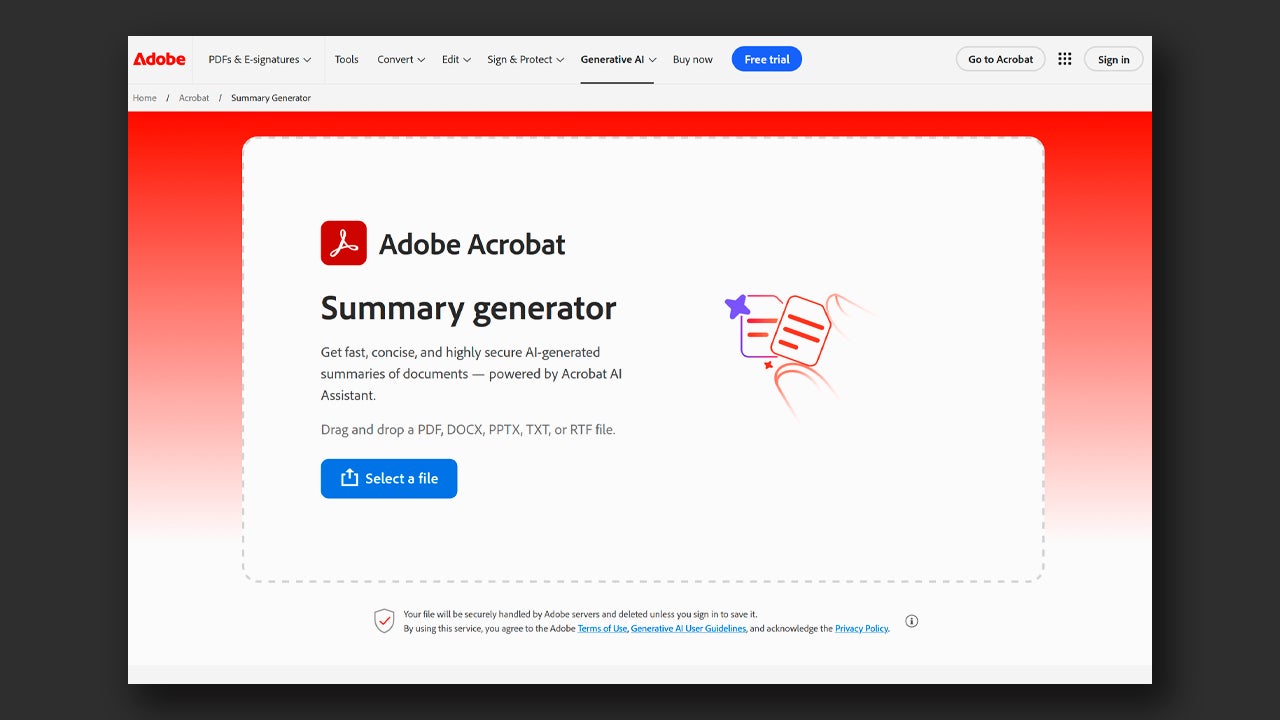
You have several ways to use the AI-generated summary feature with Adobe. One of them is through the Adobe Acrobat website. To use it, go to the website and upload your file by dragging it to the indicated area.
Once it has loaded, Acrobat will automatically generate a summary in a short time. If it suits you, you can use the suggested questions to obtain a bit more specific information.
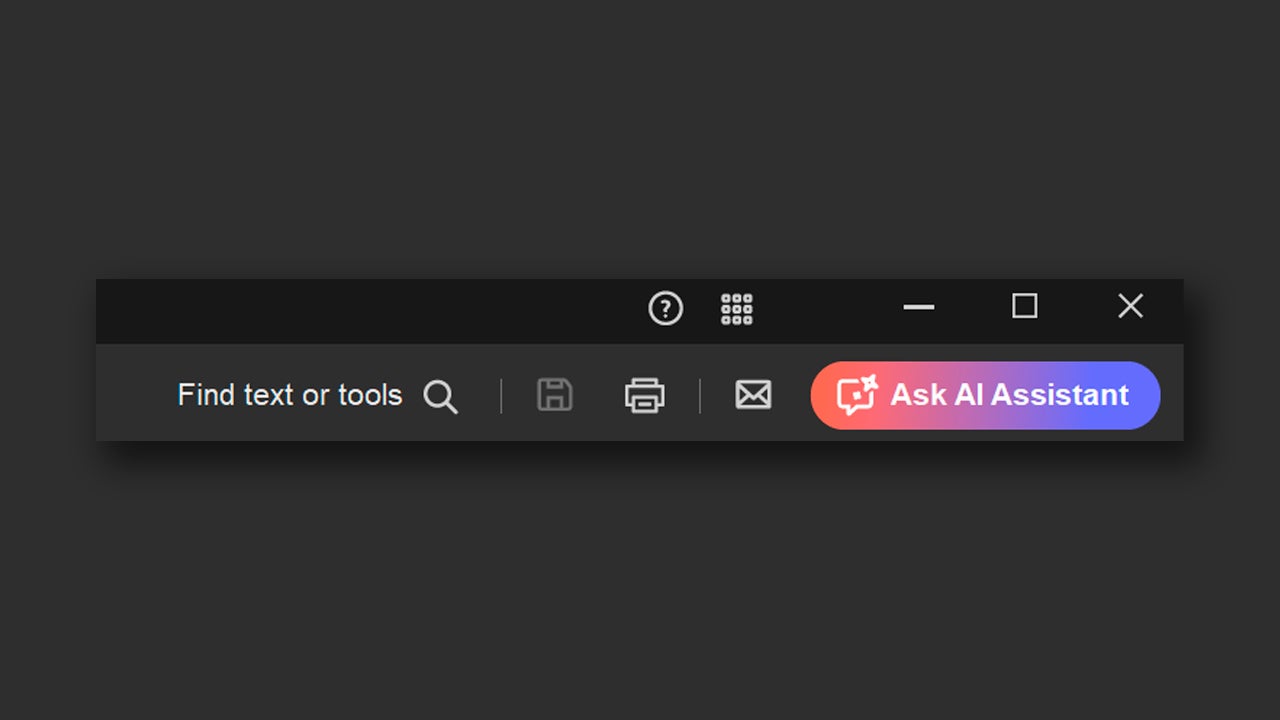
If you use Adobe Acrobat from its desktop version, you will be able to use this feature if you have an active subscription to AI Assistant. To access these functions, you will need to click on the Ask AI Assistant button, located at the top right.
Edit PDF files with AI
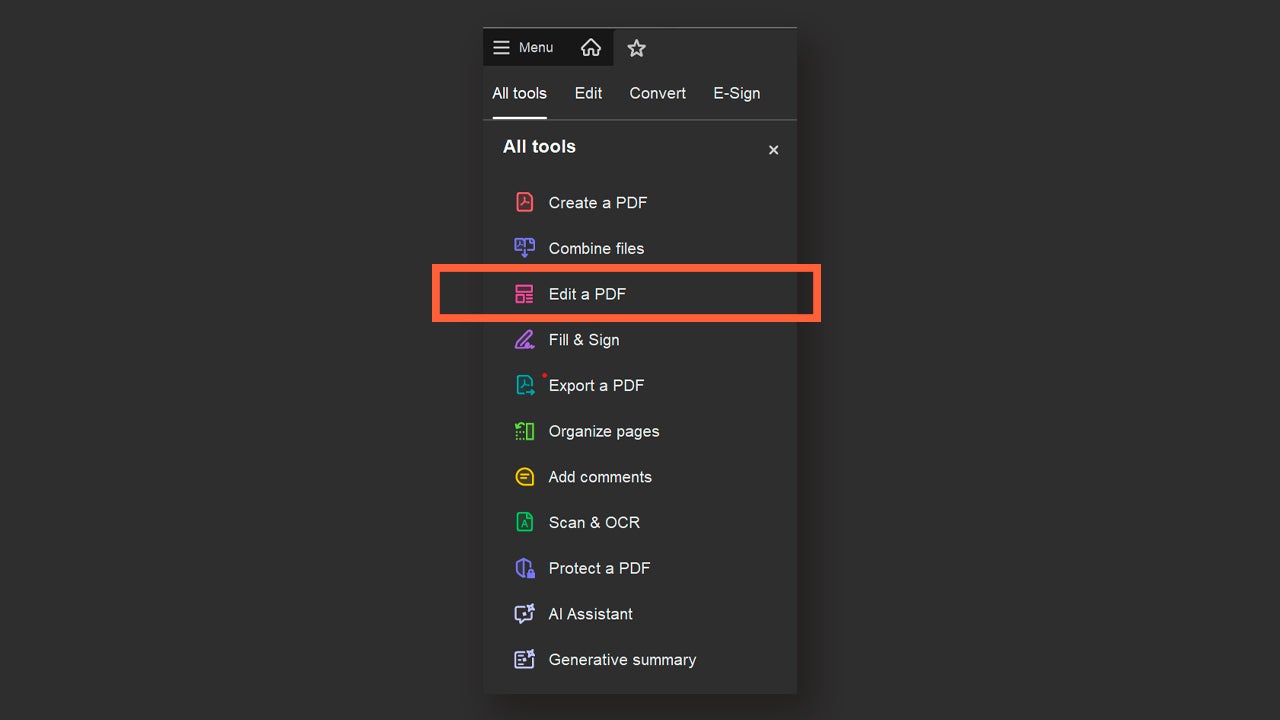
To edit PDF files with Adobe Acrobat, you first need to start with the obvious: opening the file in Acrobat. Then, click on the Edit PDF tool. You will find it in the toolbar located on the right.
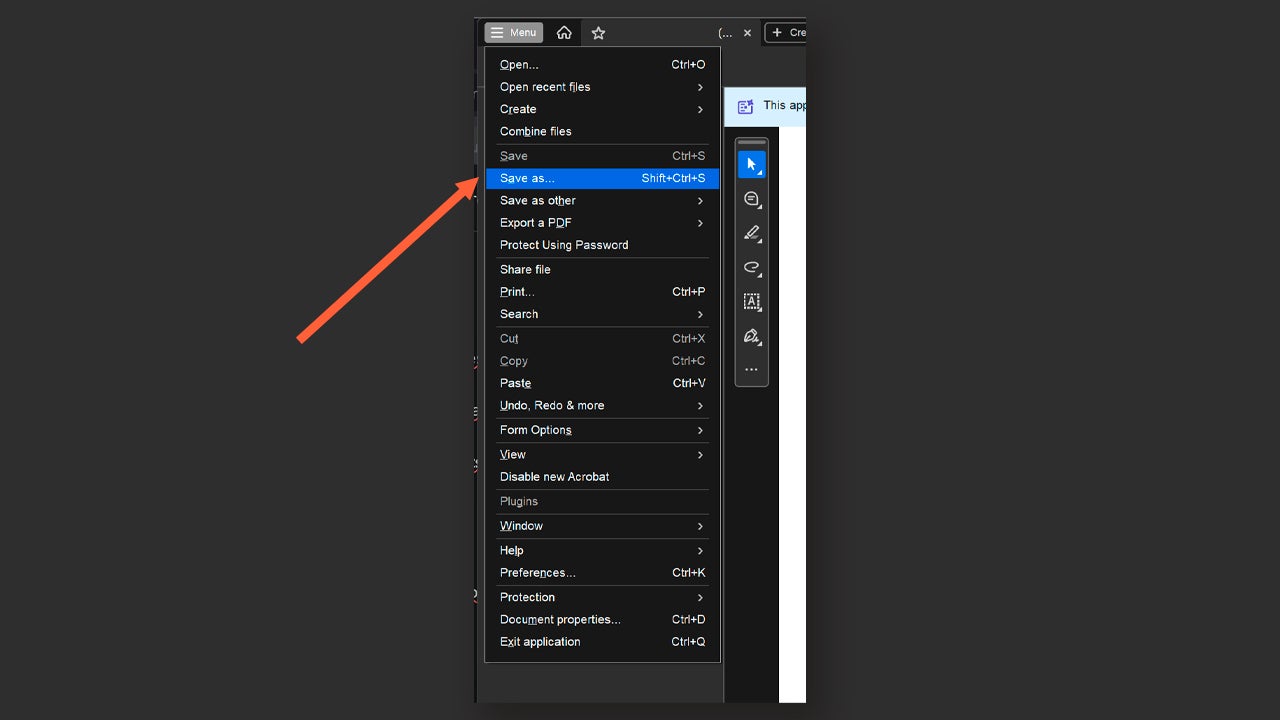
From here you can do many things: add more text, edit it, change the font, change images… You will see that the list is long. When you finish, you can save your edited file. You can click on the save icon, located right next to the Ask AI Assistant button. You can also go to Menu and select Save as.. if you want to save it in a more specific location.
How can I access Acrobat Studio?
If you are wondering how you can make use of Acrobat Studio, we explain it to you here. Acrobat Studio is a specific subscription of Acrobat Pro. Through this link, you can see the different available plans and what each one includes.
If you have an Adobe business account, it will be the main administrator who must grant you a license from the Adobe Admin Console. If you are already subscribed to Adobe, you should check what type of plan you have, as not all include access to Acrobat Studio or Acrobat Pro.
Capturing all the nuances of a scene with your camera can be challenging. Thanks to techniques like HDR (High Dynamic Range), we can make our photography show details in both shadows and highlights. And if your camera gets a bit stuck, we can use Adobe Photoshop and Lightroom to achieve that perfect balance. What is HDR? HDR stands for High Dynamic Range. It is a photographic technique that aims to capture a wider range of lights and shadows than what a camera can normally record in a single shot. […]
Capturing all the nuances of a scene with your camera can be challenging. Thanks to techniques like HDR (High Dynamic Range), we can make our photography show details in both shadows and highlights. And if your camera gets a bit stuck, we can use Adobe Photoshop and Lightroom to achieve that perfect balance.
HDR stands for High Dynamic Range, or Alto Rango Dinámico in Spanish. It is a photographic technique that aims to capture a wider range of lights and shadows than what a camera can normally record in a single shot. This is achieved through the “merging” of different photos with different exposures of the same scene.
Thanks to HDR technique, we will have correctly exposed photographs in both light and darkness. For example, imagine a place with a very bright sky and a foreground in shadow. If you expose for the sky, the ground will be very dark, but if you expose for the ground, the sky will be blown out. HDR solves this by combining different exposures to create a more balanced photograph.
Source: Adobe Blog
Prepare your HDR photos in Adobe Lightroom
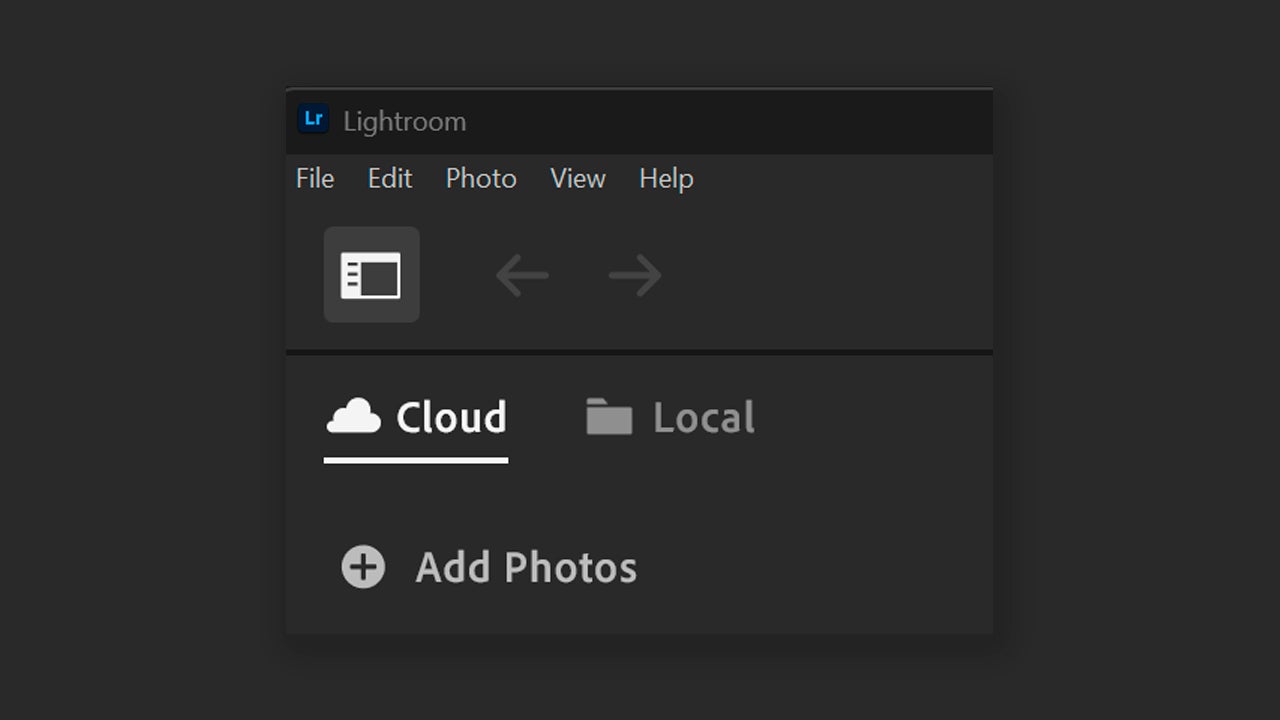
Before getting into stronger adjustments, Lightroom is the ideal starting point to organize and edit your HDR photos. To do this, we first need to open Lightroom and add our captures from the camera:
Connect your camera or your card to the computer. Then, select the Add Photos option that you will find in the upper left corner next to the “+” symbol. You can also click on File > Add Photos… If you want to open photos that you already have on your PC, the procedure you will need to follow is the same.
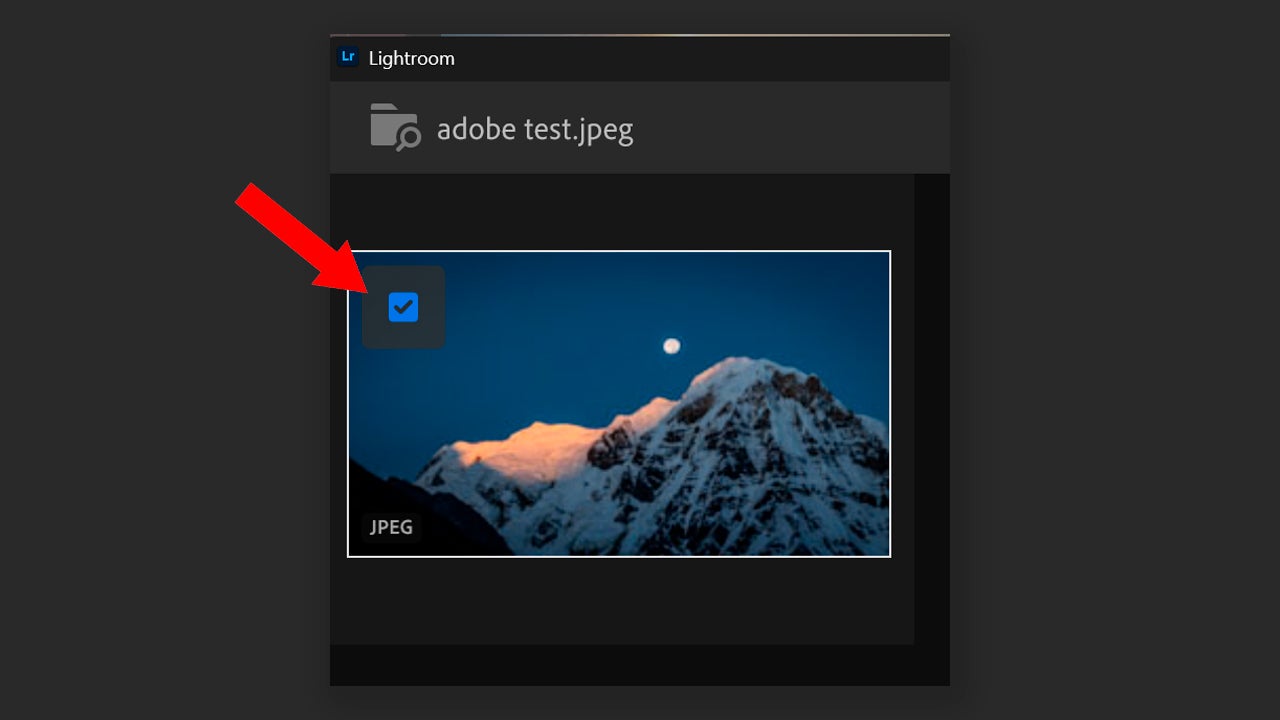
Once you have selected them, click on Review for Import. Doing so will show you a preview of the chosen photographs. To import them to Lightroom make sure they are selected and that the blue checkmark symbol appears in the upper left corner. Finally, click on Add (…) Photos.
When adding photos, Lightroom is capable of detecting duplicates if there are any. On the Import screen, you will see a warning with the text Previously Added over the thumbnails of the images you have already added. Remember to import your images in RAW format for easier editing.
The photos are already added, now it’s time to get to work. To achieve the HDR effect correctly, you need to have at least three photographs with the same framing and different exposures. Lightroom has the Merge to HDR option, which combines several photos to create one in HDR and also allows us to edit them:
First, we will activate HDR Output. We will need to select Develop > Basics > HDR. If you want it to be active by default, click on Edit > Preferences > Presets.
Perfect your HDR photographs in Photoshop
After merging our photos to create the HDR image, it’s time to continue refining details in Photoshop.
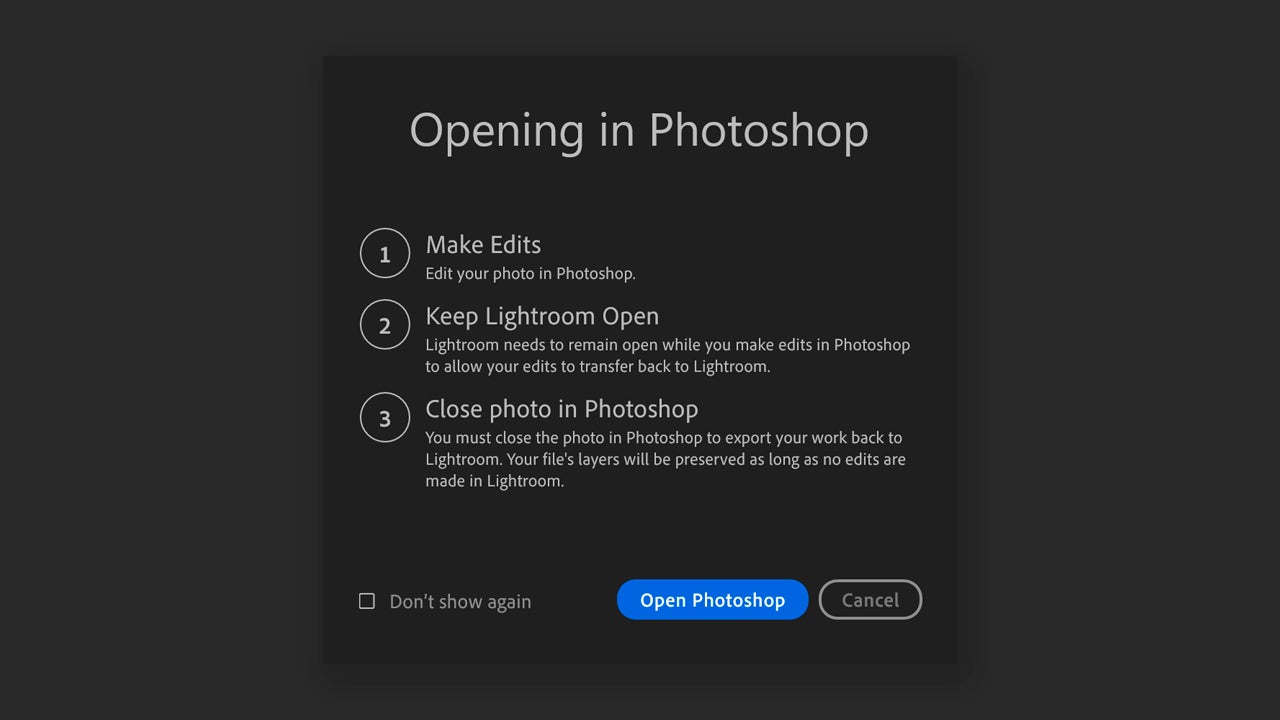
From Lightroom, select your finished HDR image and right-click to choose Edit in Photoshop. Next, you will see a box where Lightroom will inform you that you should keep the program open while editing in Photoshop. Finally, you will need to close the photo in Photoshop for the changes to update in Lightroom.
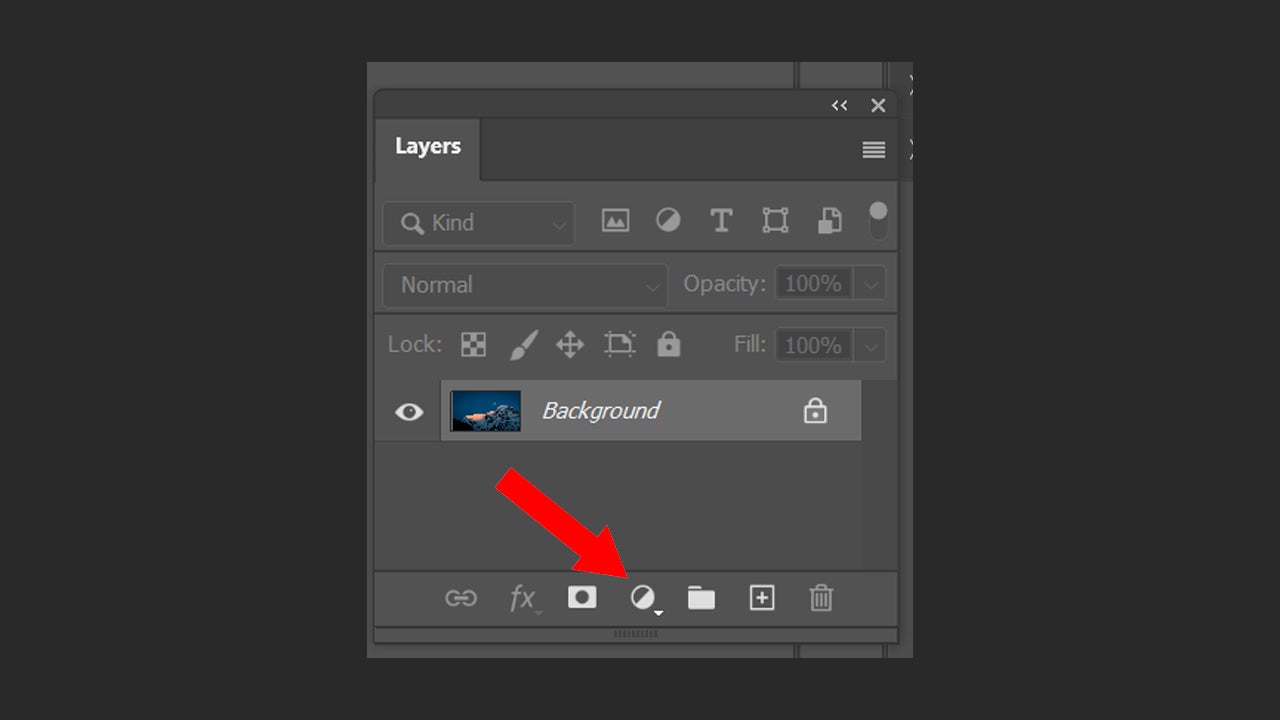
One of the great advantages of Photoshop is that it allows you to work in layers. This means you can alter the image without needing to change the original. You can, for example, add adjustment layers to modify exposure, curves, hue, or saturation.
To add an adjustment layer in Photoshop, go to the Layers panel and click on the symbol that resembles a crescent moon, as shown in the image.
By doing so, you will see a large list of adjustments. In case we wanted to change the colors, for example, we would click on Color Balance. For brightness and contrast, it would be Brightness/Contrast. Get creative and experiment.
When you finish doing it, click on File > Save. Go back to Lightroom; here you will see your photograph with the changes made in Photoshop if you select All Photos and click on the most recent one.
Here we have only shown you the basic process, but the combination of Photoshop and Lightroom can lead to spectacular photography. Try switching between the two to give a different touch to your captures.
Creating beautiful graphics within Adobe Premiere Pro may seem like a titanic task from the outside, especially if you don’t have enough experience. However, it’s not as difficult as you think; especially if you already know how to handle design programs like Adobe Photoshop. Adobe has a great advantage over other design programs: its ecosystem. This allows us to easily switch between programs and, as in this case, create professional graphics. Photoshop and Premiere Pro, an ideal couple Indeed, they are made for each other. Photoshop is not only useful for photo retouching or design of […]
Creating beautiful graphics within Adobe Premiere Pro may seem like a titanic task from the outside, especially if you don’t have enough experience. However, it’s not as difficult as you think; especially if you already know how to handle design programs like Adobe Photoshop.
Adobe has a great advantage over other design programs: its ecosystem. This allows us to easily switch between programs and, as in this case, create professional graphics.
Indeed, they are made for each other. Photoshop is not just for photo retouching or poster design: its tools can help us create visual elements that we can then take to Premiere Pro.
However, having a good command of Photoshop is key, at least to bring your ideas to life just as you have them in mind. At Softonic, we have several tutorials in case you need to know how to perform certain editing tasks, so feel free to check them out if you’re interested.
Preparing Graphics in Photoshop
First of all, we need to make sure that we prepare our designs correctly in Photoshop. To do this, you have to keep in mind some key points such as:
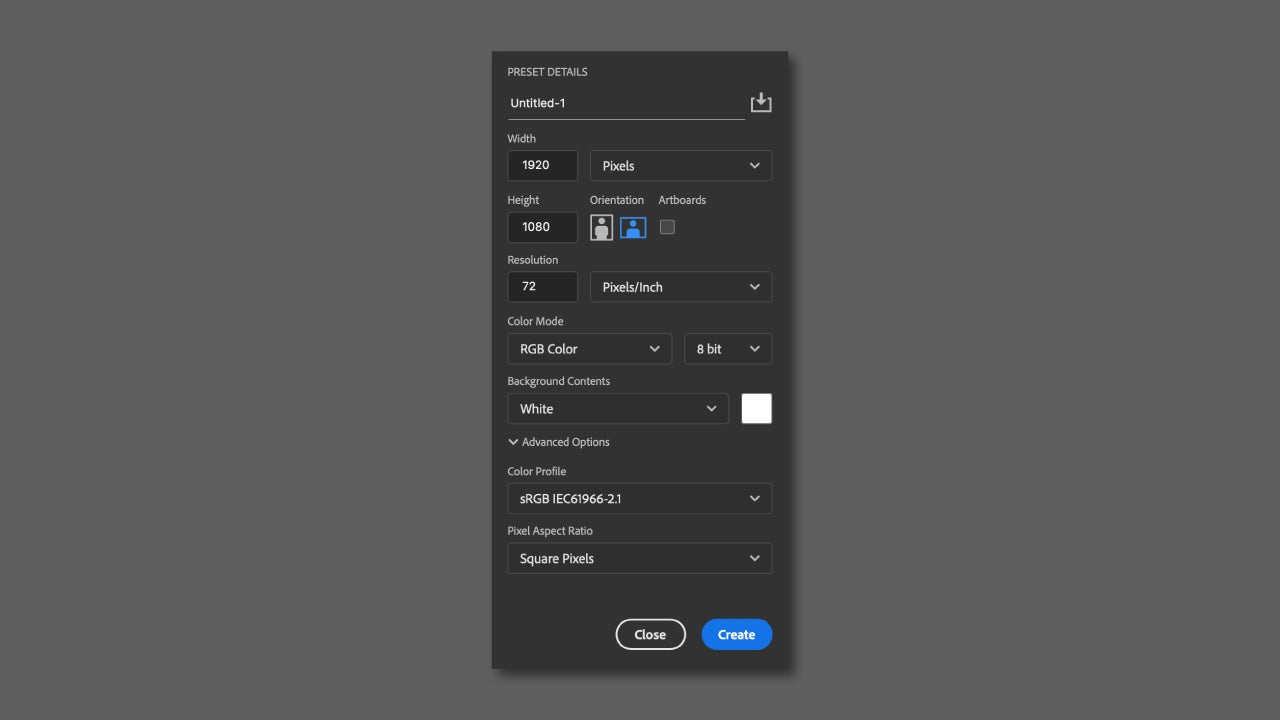
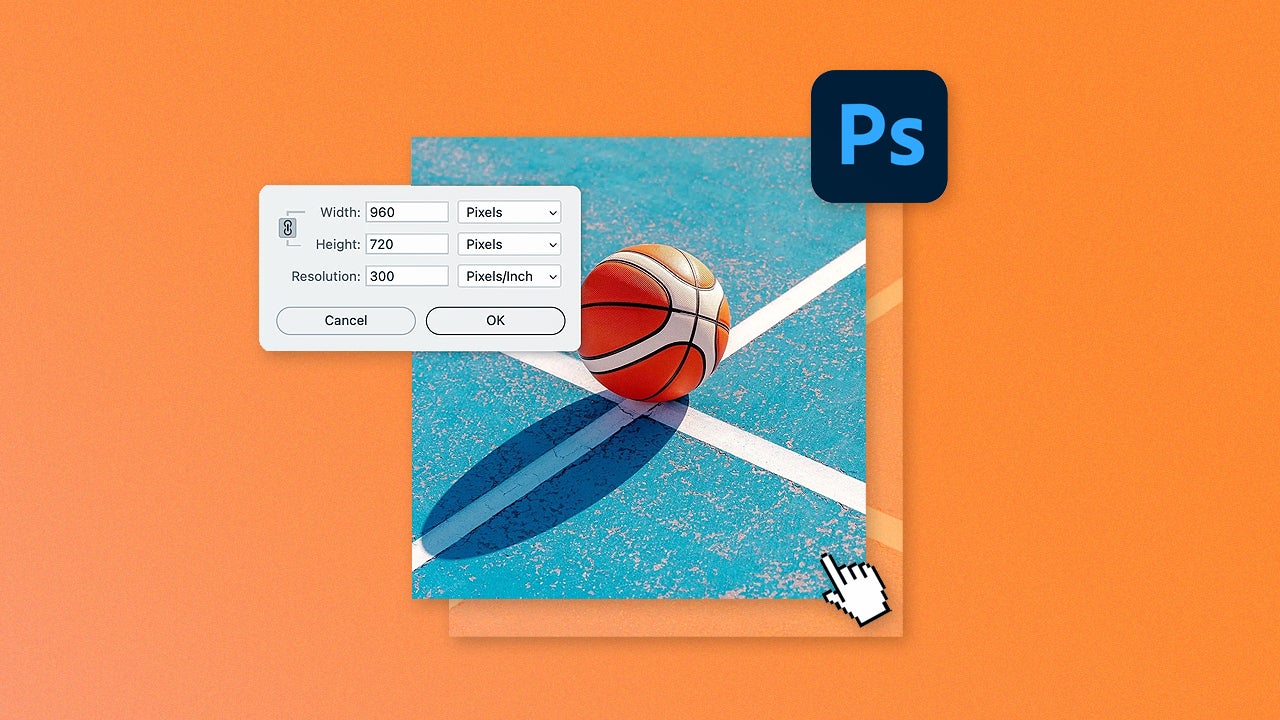
Create your canvas with the right dimensions: In Premiere Pro, you work with very specific resolutions, such as Full HD or 4K. If we work with a canvas that does not have those dimensions, our design will not fit correctly. For example, if the video you are creating is Full HD, make the canvas size 1920 x 1080 pixels and 72 ppi resolution.
Organize the layers well in Photoshop: Each layer you want to animate should be separated and clearly named to avoid confusion. While it’s not mandatory, it will make things much easier for you. In fact, think of each layer as if it were a piece that you can later move in Premiere.
Do not flatten the file: Save the project in .PSD format to be able to edit it again at any time and keep the layers.
Import and Animate Graphics in Premiere Pro
Once you have your .PSD file ready, open your project in Premiere Pro and go to File > Import… Now, select the file and when the options box appears, choose Import As> Individual Layers. This way, Premiere will keep all the layers as separate clips. Here you can choose which layers to keep from the document to import into Premiere. Click OK and you will have finished.
Now it’s time to give “life” to our motion graphics:
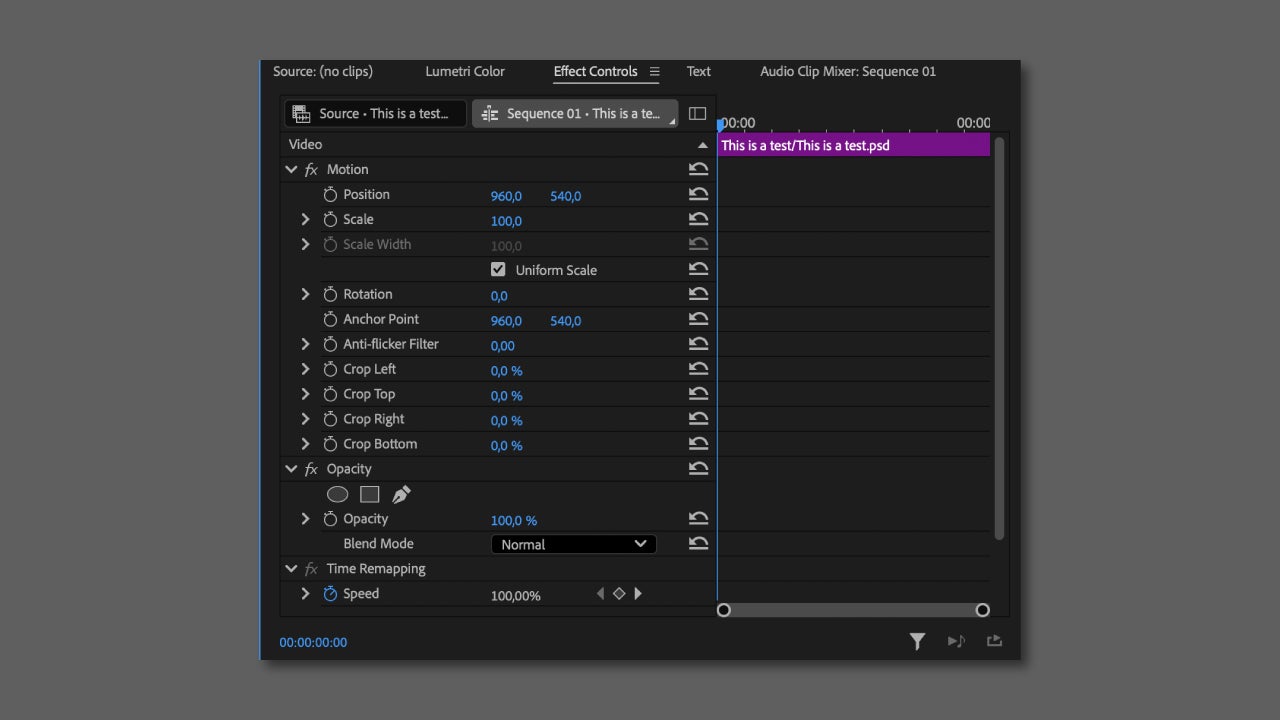
From the Effects Control panel, you can animate and change the position, scale, rotation, or opacity of the graphics.
Activate the timer next to the property you want to animate and move the time head to define the action.
You can modify the transition speed of the keyframes from Effects Control. If you wish, combine your animated layers with others from the Effects panel to achieve more eye-catching transitions or effects.
After giving it movement, it’s now time to fine-tune and sync with the music or the sound effects of your video (if you decide to add them).
Export your video
When you finish editing your graphics, it will be time to export the project to video. Do a final check to see that everything is ready and start the export:
Premiere will export what is in the workspace (what occupies the gray bar). Keep this in mind if you want to export the entire video or just a piece.
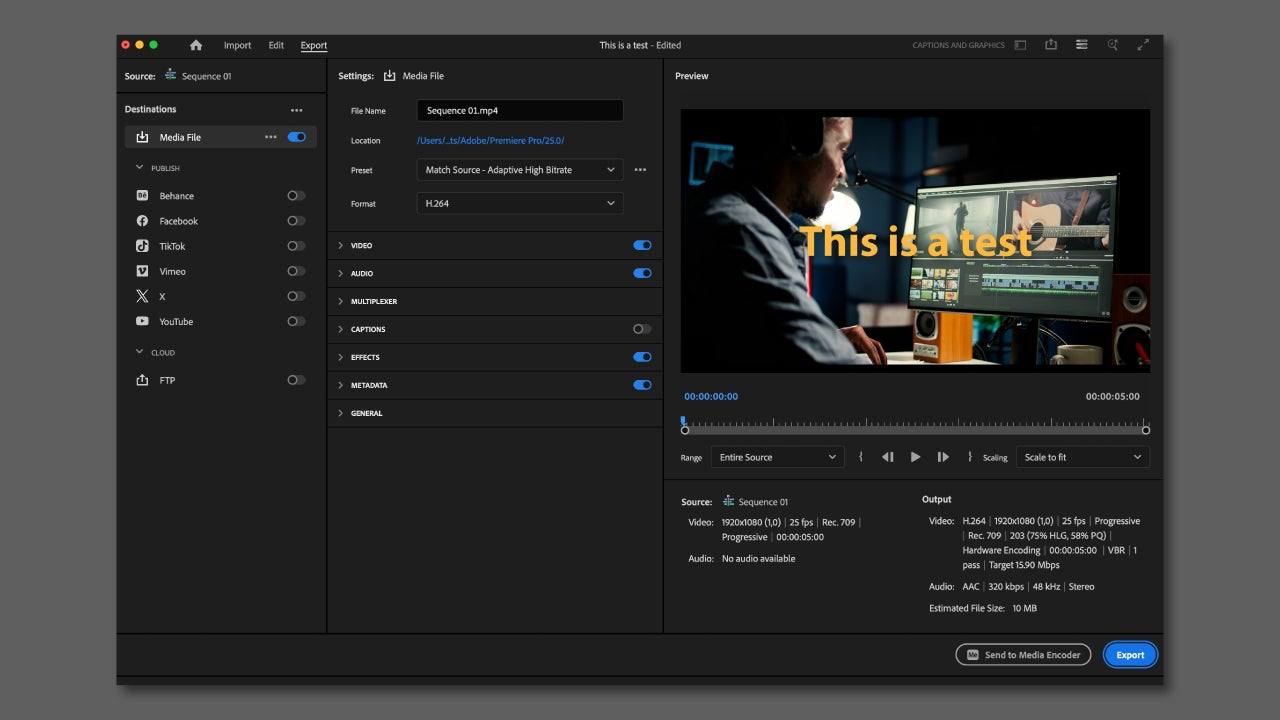
With the sequence already selected, go to File > Export > Media. You can also use the keyboard shortcut Ctrl + M on Windows or cmd + M on MacOS.
Now it’s time to choose the format. You will see that you have many options to choose from, but the most versatile codec is H.264. This is ideal for videos that will be viewed on YouTube or social media.
From the preset list, you will find optimized options according to the platform where they will be viewed. Select one of these options if you want to ensure that the resolution and compression fit well.
Choose what to name the video and where it will be saved on your PC. Very important: do not forget to check the boxes for Video and Audio so that everything is saved correctly.
To export your video, you have two options, choosing between exporting from Premiere Pro or from Adobe Media Encoder. The main difference is that one allows you to edit while exporting the video in the background (Adobe Media Encoder) and the other option does not (Premiere Pro).
If you want to export your video from Premiere, simply choose Export. Otherwise, click on Send to Media Encoder. Once the process is complete, check that your video has been exported correctly, and if not, make the necessary adjustments and repeat the process.
If you look at what is behind every audiovisual super production, there is a constant that keeps repeating: they all have a great team of professionals. However, even the most professional can encounter organizational problems, or rather the lack of it. Within cinema or television, many creative decisions need to be made in real time and for that, their tools must also be up to par, as is the case with Adobe Premiere Pro. In addition to being one of the best editing programs of the moment, it also has features that facilitate team editing […]
If you look at what is behind every audiovisual super production, there is a constant that keeps repeating: they all have a great team of professionals. However, even the most professional can encounter problems with organization, or rather the lack of it. Within cinema or television, many creative decisions need to be made in real time, and for that, their tools must also be up to the task, as is the case with Adobe Premiere Pro.
In addition to being one of the best editing programs at the moment, it also has features that facilitate team editing without complications or time loss. Below, we will explain what they consist of and how you can use them in your projects.
The function of Team Projects remains the center of collaborative work in Premiere Pro. By using it, we can edit simultaneously in the same project stored in the cloud, with automatic updates and integrated version control.
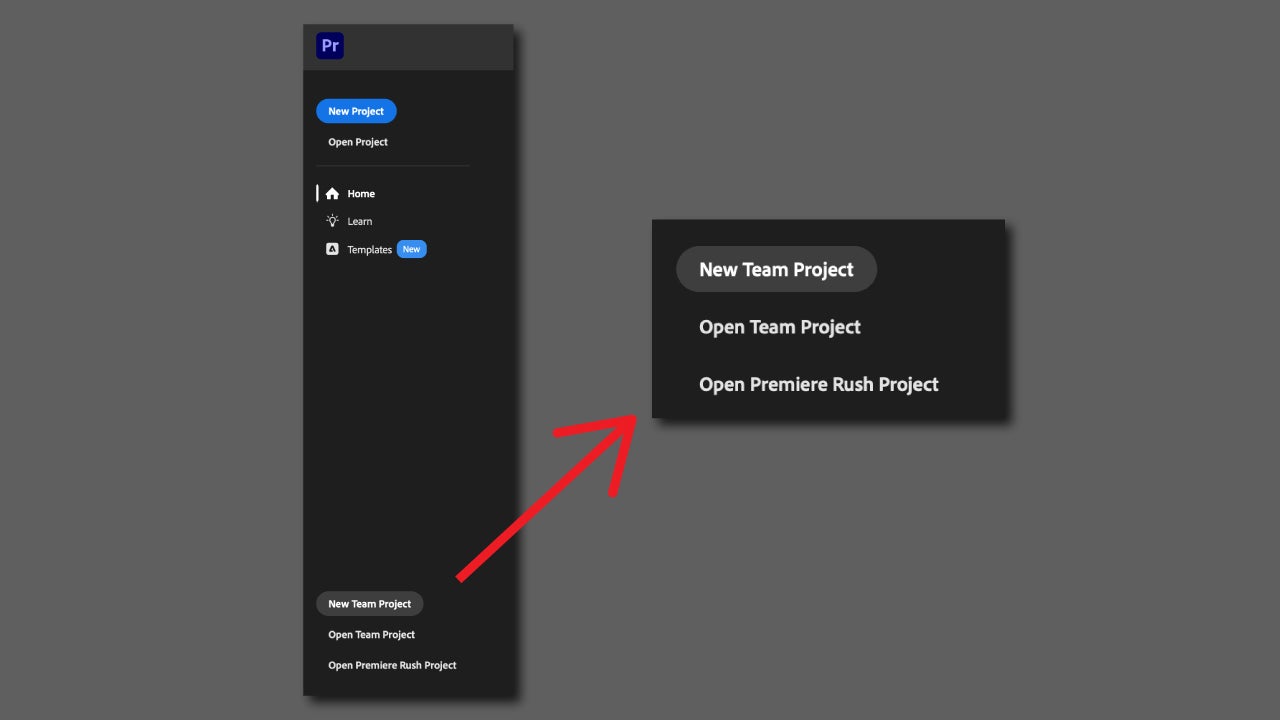
As soon as you open Adobe Premiere Pro, click below on New Team Project. You can also click on File > New > Team Project.
Assign a name to the project and select collaborators from your Creative Cloud account. To do this, you will need to click on Edit and add the emails of your collaborators. You will also be able to configure some video options, color, and more before starting.
Once created, all members will be able to import material, edit sequences, and save changes without interfering with each other.
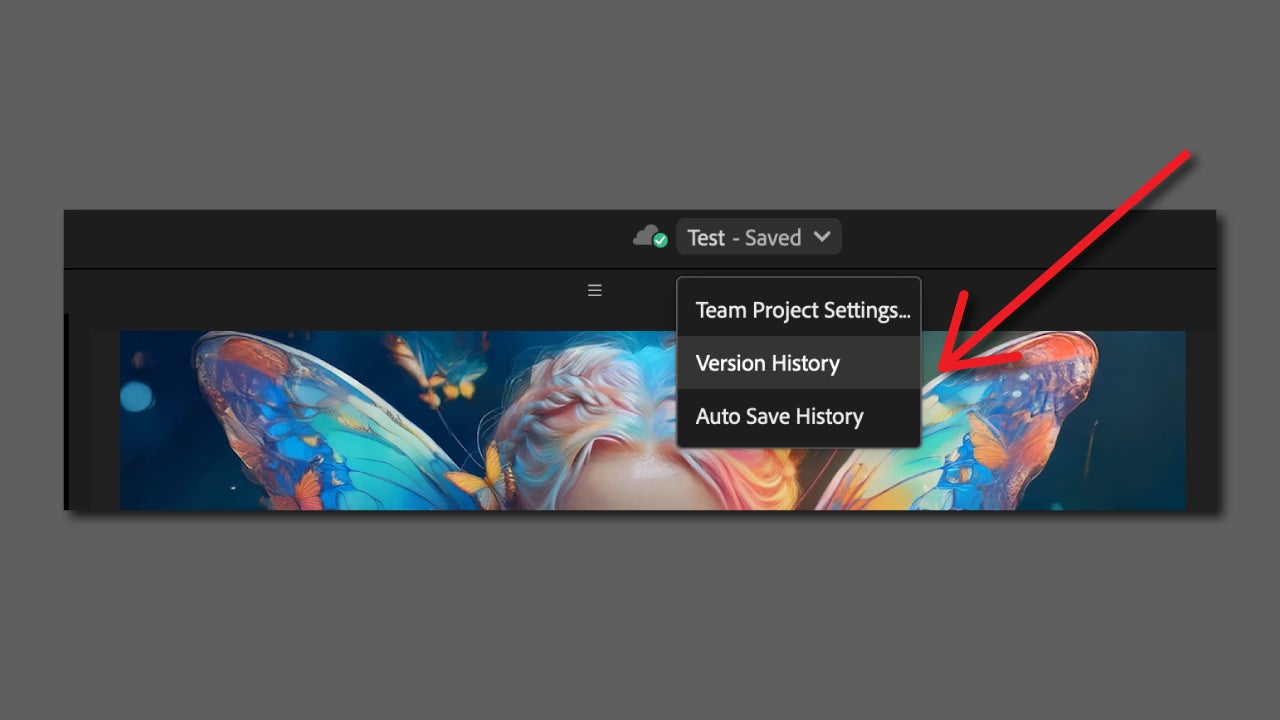
Auto-save will be enabled by default, so every change you make will be saved in the cloud. You can revert to previous versions of your project by clicking on the name that appears above and selecting Version History.
Sharing media with Adobe Frame.io
Frame.io is a video collaboration platform developed by Adobe that is fully integrated within Premiere Pro and After Effects. Essentially, it is an ideal program for teams that edit video remotely.
What makes it so ideal? Basically, any team editor can directly upload their sequences from the timeline to Frame.io and the rest can leave comments anchored to specific moments of the project. This makes reviews much faster and more agile.
If you want to try it, you will have to do the following:
Select Window > Workspaces > Review.
Log in to your Frame.io account from the Frame.io: Comments panel. Frame.io is already included in your Creative Cloud subscription.
To share the timeline on Frame.io, select Export & Share. Name it and check that the settings are correct. When you’re done, click on Export.
From now on, you will receive notifications within Premiere when there are new comments from project collaborators.
How to invite other users to collaborate in Adobe Premiere
From Frame.io you can add new collaborators without too much hassle. Here’s how to do it:
Log in with your Adobe account on the Frame.io page.
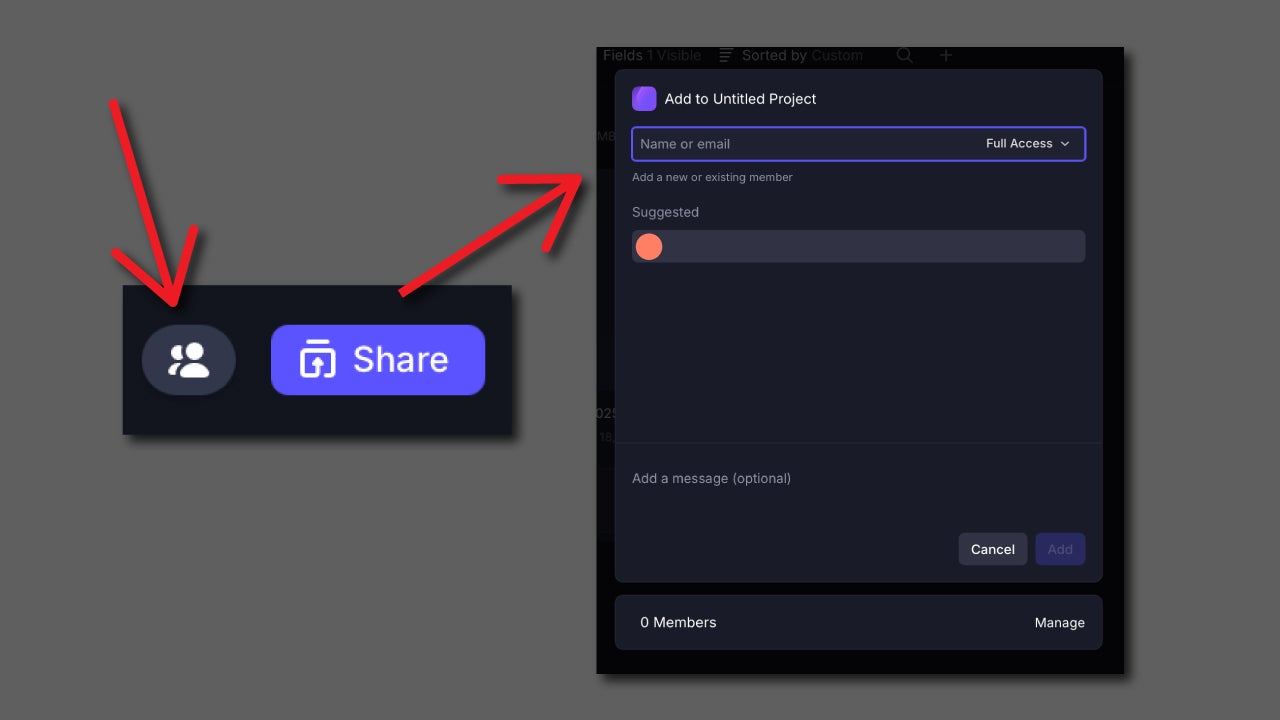
Click on your project. Once inside, select the user icon that you will find right next to the Share button.
Enter the email of the user you want to invite to your project. You will be able to manage that user’s permissions from the dropdown on the right, where you will need to choose whether they can edit, comment, or have full access to the project.
Other tools that will help you: this is how Media Intelligence works
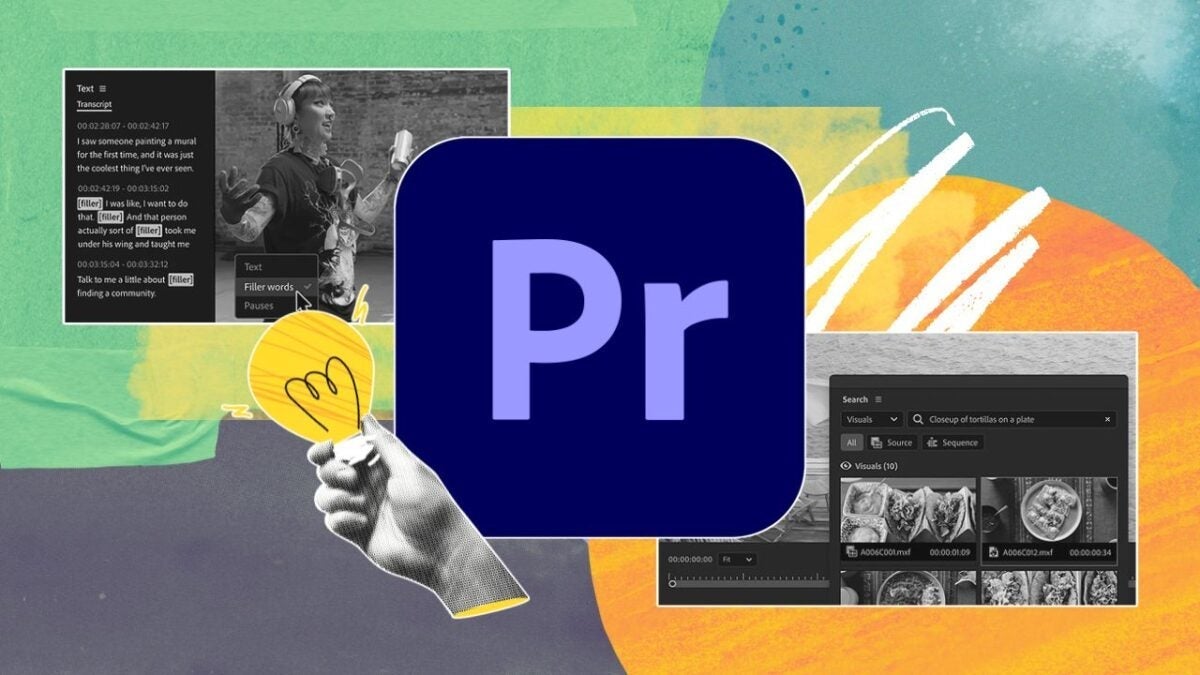
Editing together with your team will be much easier if you can also quickly access clips or other materials. Thanks to artificial intelligence, Adobe analyzes your resources so you can search for any image, conversation, or written content without wasting much time in the process.
Import your resources.
Let Premiere analyze the contents. Depending on the volume, it will take more or less time to process. You can check the progress from Window > Progress.
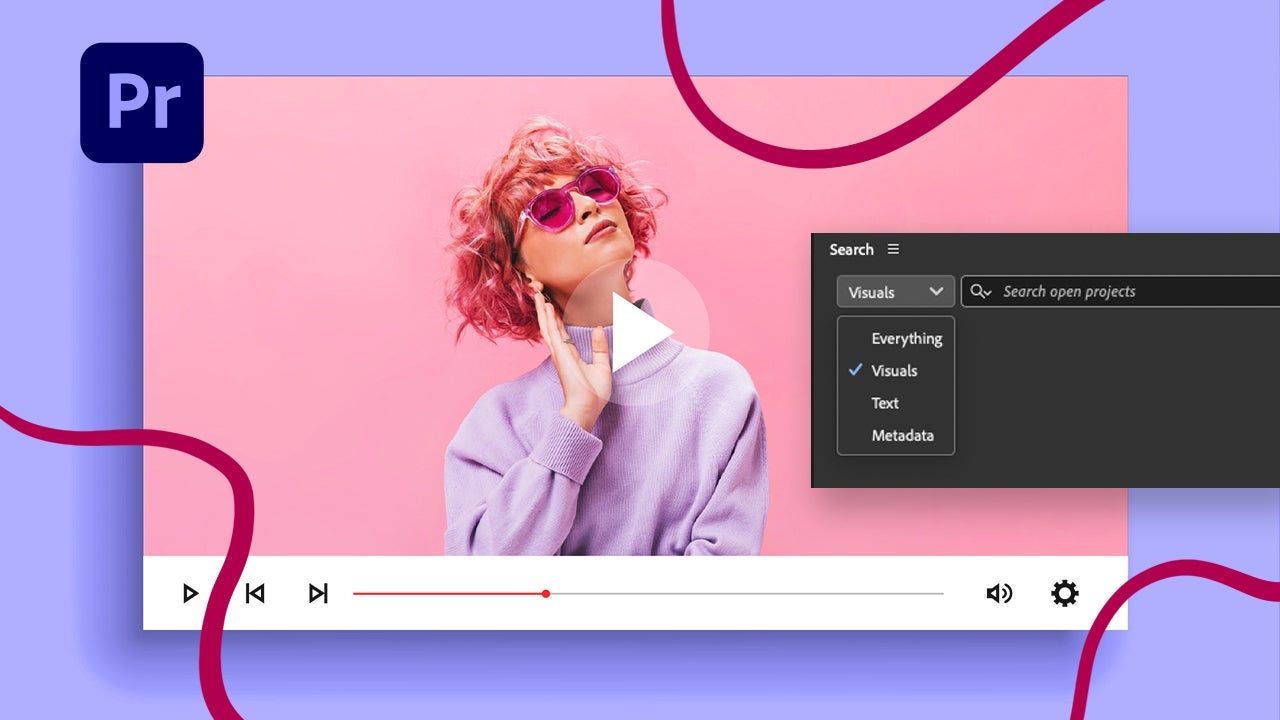
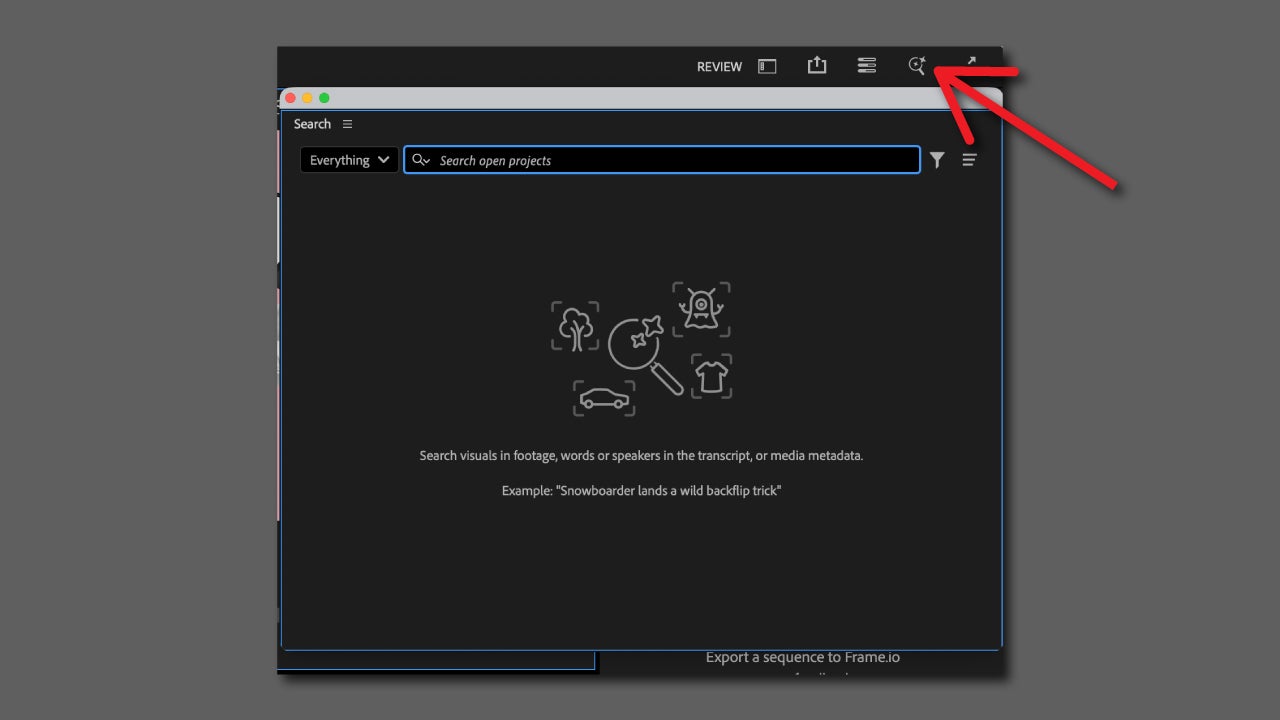
Select the magnifying glass icon, which is located at the top right of Premiere. This will open the Search panel.
Type what you want to search for. Visual search will yield better results the more specific you are in your description.
Here we emphasize again how important it is to be specific in your search. This will help you find what you’re looking for faster without having to try several different searches.
That said, you need to keep in mind an important limitation: for now, visual searches are only compatible with English. A small drawback that, most likely, Adobe will resolve in the not-too-distant future.
If you are creative and work with Adobe, you already know: Illustrator and Photoshop do not compete, they complement each other. Today we propose a practical journey for you to start working with both and combine the best of both worlds. But before we begin… If you want to combine both programs to get the most out of them, there are some aspects you should keep in mind, such as compatibility. From Photoshop, go to Preferences > File Handling and look for the section Maximize PSD and PSB File Compatibility. Choose the Ask option so that Photoshop allows you to decide whether or not to enhance […]
If you are creative and work with Adobe, you already know: Illustrator and Photoshop do not compete, they complement each other. Today we propose a practical journey for you to start working with both and combine the best of both worlds.
If you want to combine both programs to get the most out of them, there are some aspects you should keep in mind, such as compatibility. From Photoshop, go to Preferences > File Handling and look for the section Maximize PSD and PSB File Compatibility. Choose the Ask option so that Photoshop allows you to decide whether or not to enhance the compatibility of the files when they are saved. This way, you can decide based on the situation.
Also use the same color settings in both Photoshop and Illustratorto avoid surprises with the appearance of your projects.
How to open Photoshop files in Illustrator
Opening a PSD file in Illustrator is a much simpler process than you think. With this method we will teach you now, you will be able to convert the layers of Photoshop into Illustrator objects.
Open Adobe Illustrator and go to File > Open.
Search your computer for the .PSD file and click Open.
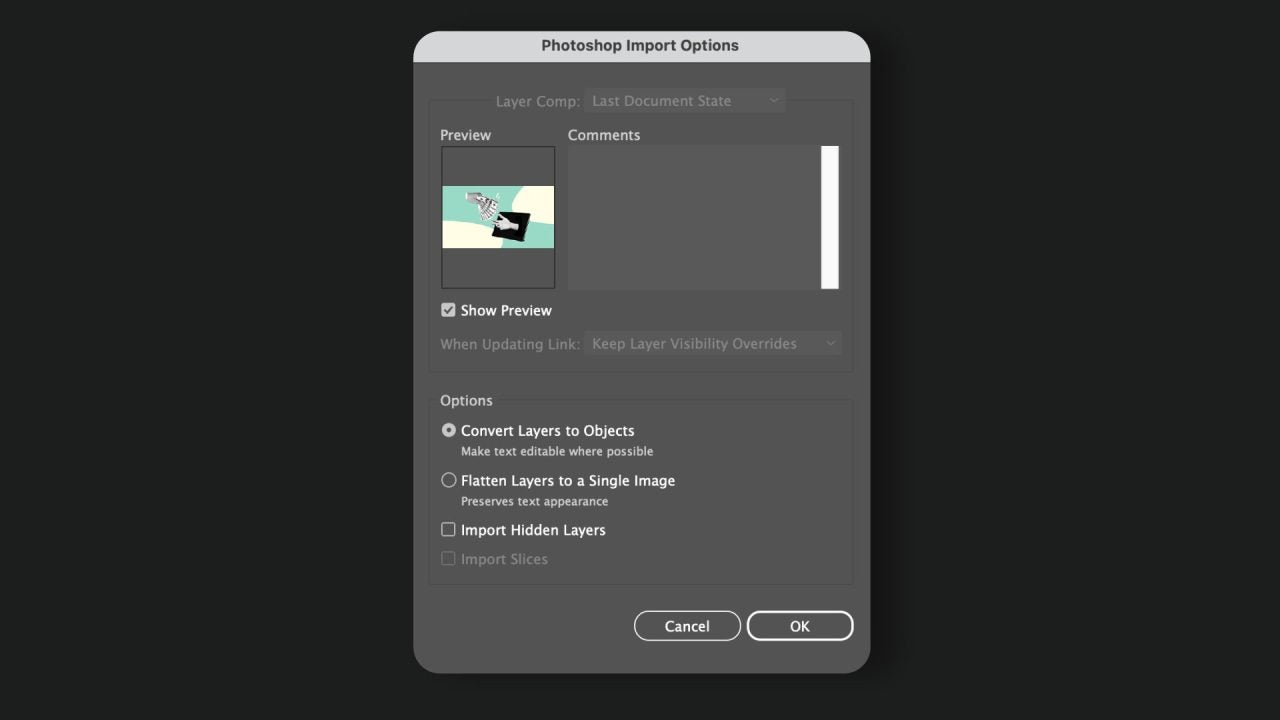
Next, you will see the Photoshop Import Options dialog box. Once here, you can choose from these options:
Convert Layers to Objects: Recommended if you want to edit your PSD. It preserves masks, blending modes, and transparency; when possible, it allows you to edit the texts. Keep in mind that it DOES NOT support adjustment layers or layer styles: those parts will be merged/rasterized to maintain the appearance.
Flatten Layers to a Single Image: This will be useful if you only need the image to be flat. Everything will be in a rasterized layer and disables layer editing.
Further down, you will find the options for Import Hidden Layers and Import Slices. These will only be active if your PSD has hidden layers or slices. You can select them if you deem it necessary.
Accept to start working. The Photoshop layers will appear as sub-layers in the Layers panel of Illustrator.
This is how you can place a Photoshop image in your Illustrator project
If you work with Photoshop and Illustrator at the same time, inserting your Photoshop images directly into your Illustrator project can save you a lot of time. For example, you can choose to place the PSD file as linked or embedded:
Place a PSD as linked
When you place a PSD as linked, any changes you make in Photoshop will automatically update in Illustrator. It’s a very convenient way to work, as everything you do in Photoshop will be instantly reflected without having to re-import that file again. To insert a PSD as linked within your Illustrator project, follow these steps:
Open your Illustrator file within Illustrator and click on File > Place.
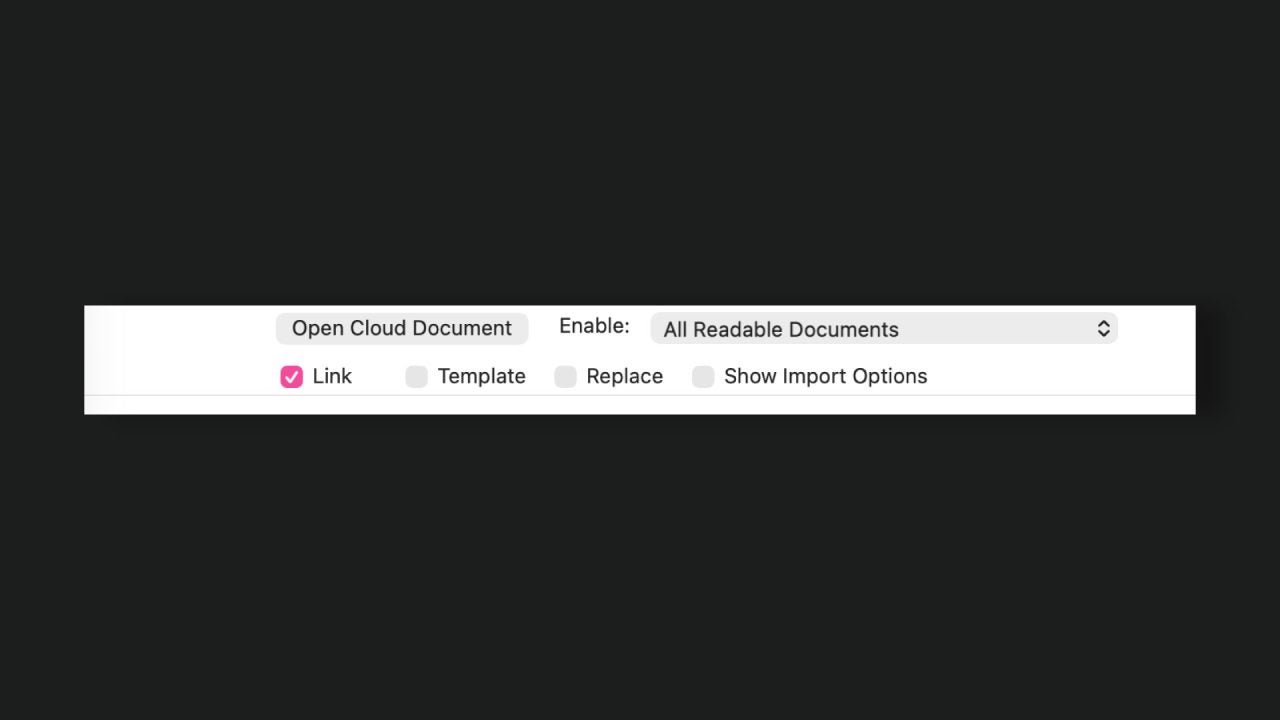
Select the PSD you want to link, check the Link box, and press the Place button.
Place it on the canvas. You will see the link icon from the Links panel. If you don’t see it, go to Window > Links. From now on, updating the PSD in Photoshop will update the link in Illustrator.
This is how an embedded PSD works
The main advantage of embedding a PSD within an Illustrator project is that it does not depend on the original file or its location. This way, you also avoid annoying messages like Missing Link and ensure that the PSD in question does not change when moving the Illustrator file around. Here’s how you can embed a PSD:
Go to File > Place and choose the PSD to place. Here, make sure to uncheck the Link option and check Show Import Options. Then, click on Place.
Within the Photoshop Import Options box, choose how you want your PSD to be imported.
Move a path created in Photoshop to Illustrator
The most experienced with Photoshop know well that the use of vectors is not something exclusive to Illustrator. And if you have ever wondered if it is possible to transfer a vector drawing made in Photoshop to Illustrator, the answer is yes, it is possible:
Within Photoshop, select the layer that contains the path. Then go to File > Export > Path to Illustrator.
You can also copy the path itself from the Paths panel. If you don’t see it, click on Window > Paths.
Now, the path will be saved as a new file with the .ai extension.
You have already seen how both programs can help you work on the same canvas without suffering along the way. Use the best of Photoshop and Illustrator to apply it to your designs and give them a more professional touch.
El aprendizaje ha dejado de estar limitado a los libros de texto clásicos y las notas escritas a mano. Hoy en día, tanto los estudiantes como los profesores tienen numerosas herramientas digitales que ayudan a adaptar la enseñanza a nuestras necesidades. Una de estas herramientas es Adobe Acrobat. Con este programa, cualquier material educativo puede transformarse en un recurso interactivo que facilita la comprensión, la colaboración y la organización tanto dentro como fuera del aula. Porque, aunque pensamos en Adobe Acrobat como un lector de PDF, la verdad es que puede ser mucho más. Texto e imagen combinados Muchos estudiantes […]
Learning has ceased to be limited to classic textbooks and handwritten notes. Nowadays, both students and teachers have numerous digital tools that help adapt teaching to our needs.
One of these tools is Adobe Acrobat. With this program, any educational material can be transformed into an interactive resource that facilitates understanding, collaboration, and organization both inside and outside the classroom. Because, although we think of Adobe Acrobat as a PDF reader, the truth is that it can be much more.
Many students know it: a boring PDF can waste a lot of your time. However, a well-prepared one can make a difference. Add graphics, include images, or link to videos: this way, even the most complex concepts can make sense. If you want to bring a little more life to your PDFs with multimedia resources, here we teach you step by step.
How to insert an image into a PDF
With Adobe Acrobat, inserting images into a PDF is a very simple and quick process, as you will see below:
Open your PDF with Adobe Acrobat Pro or Standard. Double-clicking your file will automatically open it in Acrobat, as long as it is your default PDF reader. If not, you can also open it from Acrobat by selecting File > Open.
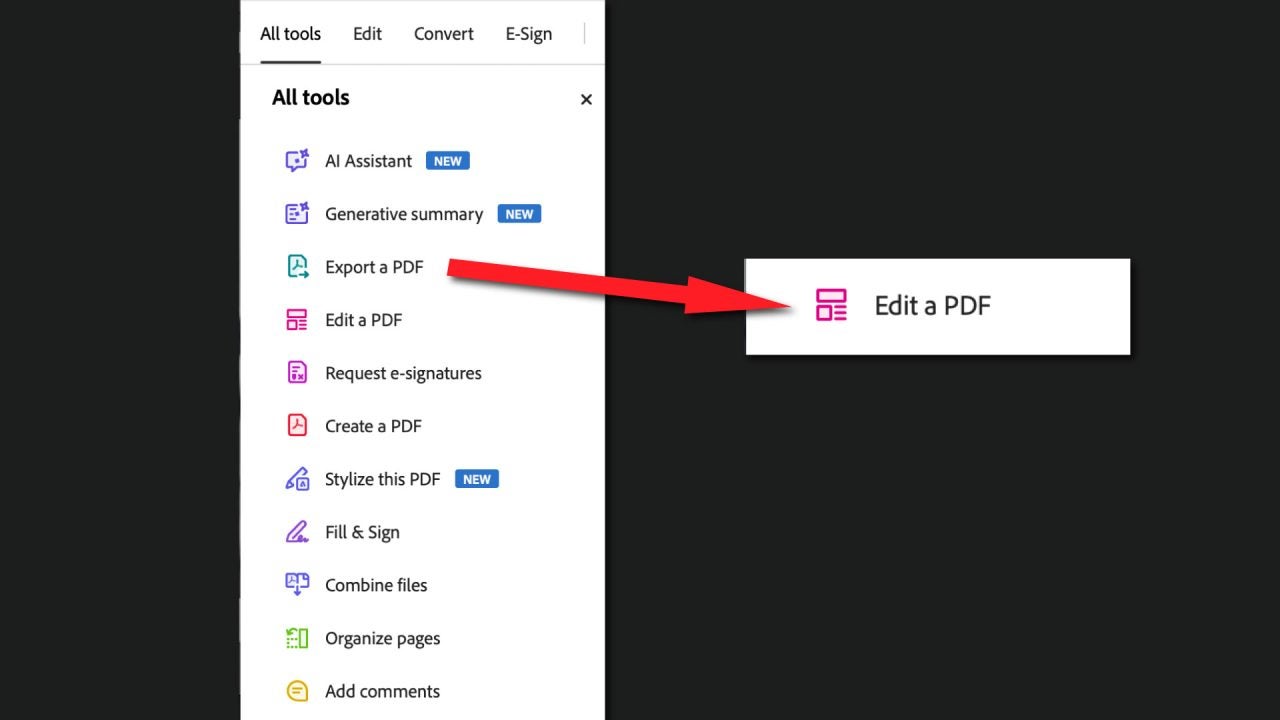
From All Tools, the menu on the right, click on Edit a PDF.
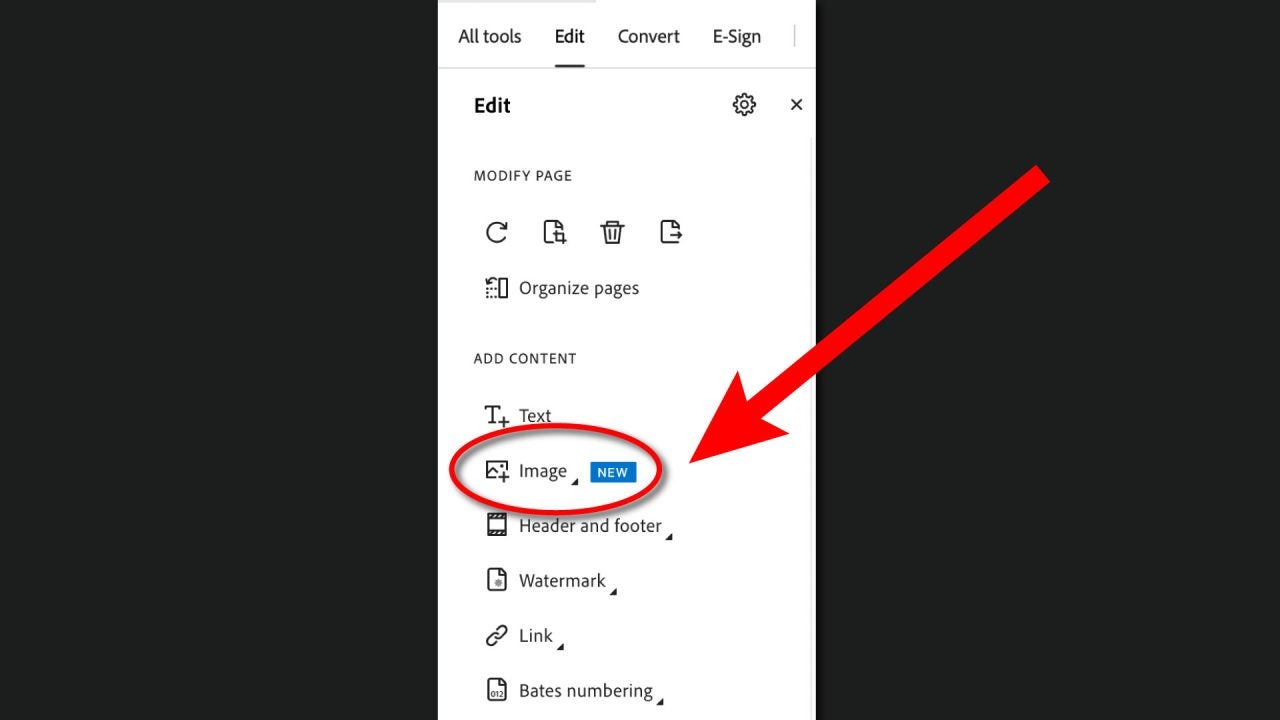
In the Add Content section, select Image.
Here you will have two options, Choose Image or Generate Image. With the first one, we will have to select the photo we want to add from our PC. The second one, as you can imagine, uses artificial intelligence through Adobe Express to generate an image.
Finally, go to File > Save/Save As to save your edited PDF.
How to add external links
Just like images, links to external websites also serve to expand the information in our PDF. It doesn’t matter if they are links to YouTube or downloadable material, all of them have a place in your documents. Moreover, with Adobe Acrobat, it will be very easy for you to add them:
Just like before, open your PDF with Adobe Acrobat Pro or Standard.
Go to All Tools > Edit a PDF.
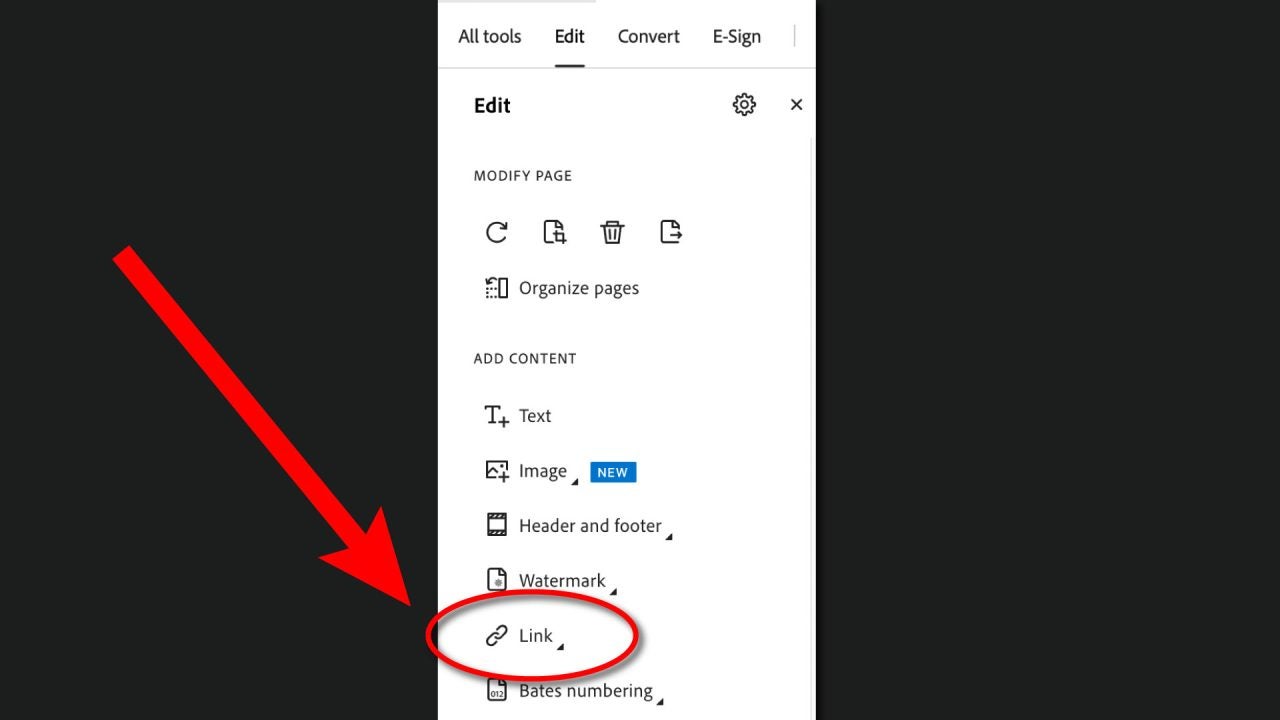
In the Add Content section, click on More and select Link > Add or edit a link.
Draw the clickable area. Then, a box will appear where you can configure the appearance of the link and where it will take you from Actions.
To add a link, from Select Action click on Open a web link and then, Add.
When you’re done, don’t forget to check that your link works correctly.
Keep in mind that when you click on your links, your PC may display a security warning. Just click on Allow when it appears to use them normally.
Collaboration Tools
Learning improves significantly if, in addition to accessing information, we share ideas. The collaboration tools of Adobe Acrobat allow both students and teachers to work from the same document easily, providing revisions, comments, observations…
Open your PDF in Adobe Acrobat Standard or Pro.
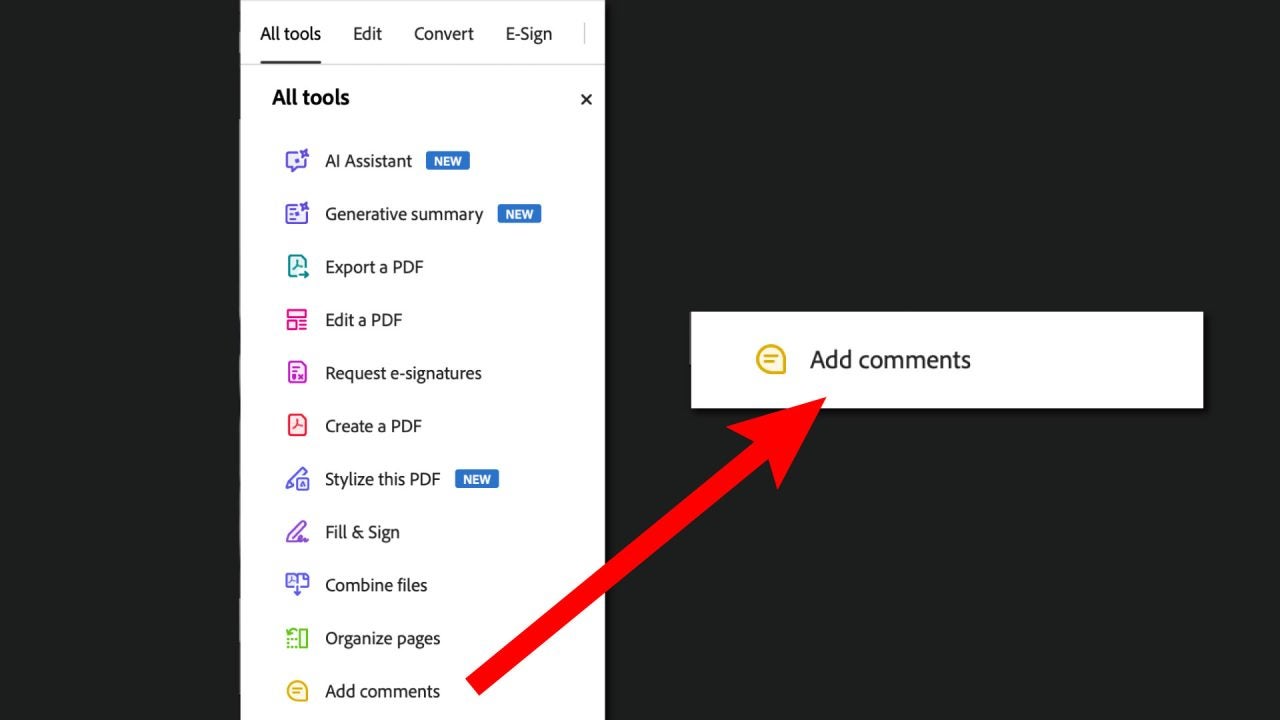
Go to All Tools and select the Addcomments icon.
By clicking on it, you will see several options. Stay on the Add a comment. option.
Now you just have to click anywhere on the PDF and write the comment you want to add. Within the comment, you can also mention other users to notify them of your notes.
By clicking on your comments, you can change the highlight color or delete them if you need to. Additionally, Acrobat allows you to attach external files along with your comments.
A PDF can be much more than just a simple static document: with Adobe Acrobat you can add buttons, links, drop-down menus, or even form fields to make it more dynamic and useful. This type of interactive PDF will be very handy for presentations, catalogs, portfolios, and a long etcetera. As you can imagine, there are many ways to prepare an interactive PDF. Among all the paths you can take, today we are going to suggest one for you to start shaping your ideas in a relatively easy way. Prepare the content before you start Before diving into assembling anything in Acrobat, it is advisable […]
A PDF can be much more than just a static document: with Adobe Acrobatyou can add buttons, links, drop-down menus, or even form fields to make it more dynamic and useful. This type of interactive PDFs will come in handy for presentations, catalogs, portfolios, and much more.
As you can imagine, there are many ways to create an interactive PDF. Among all the paths you can take, today we are going to suggest one for you to start shaping your ideas in a relatively easy way.
Prepare the content before starting
Before you start creating anything in Acrobat, it is advisable to create the visual part in another program such as, for example, Adobe Illustrator. From here you can create high-quality vector graphics and illustrations that, when exported to PDF, will look sharp on any screen.
Imagine you are creating a catalog. If you want to make it more attractive, you can start with a cover and then add graphics inside. On the other hand, you can also design buttons to integrate them later into your PDF. And of course, don’t forget to gather all the content you might need later (texts, images, etc.)
Why we should use Adobe Illustrator for our PDFs
Adobe Illustrator is an ideal program for designing buttons, icons, and visuals because it works with vector graphics. This means you can adapt your creations to any size and without losing quality. As you can see, it is especially useful if we are creating PDFs, whether to be viewed on screen or for printing.
At Softonic, we have several tutorials that will help you make the most of Adobe Illustrator, whether you are a beginner or already know a bit about the program.
Import your Illustrator creations to Acrobat Pro
If you have set up your entire document in Illustrator, now it’s time to prepare the file for export as a PDF. Before you start, organize your document into well-defined layers (illustrations, texts, etc.), as this will make any type of editing easier later on.
Don’t forget to check the color mode of the document. If the intention is for it to be displayed on screens, use RGB. If you need to print it, then use CMYK. To change this, you can go to File > Document Color Mode.
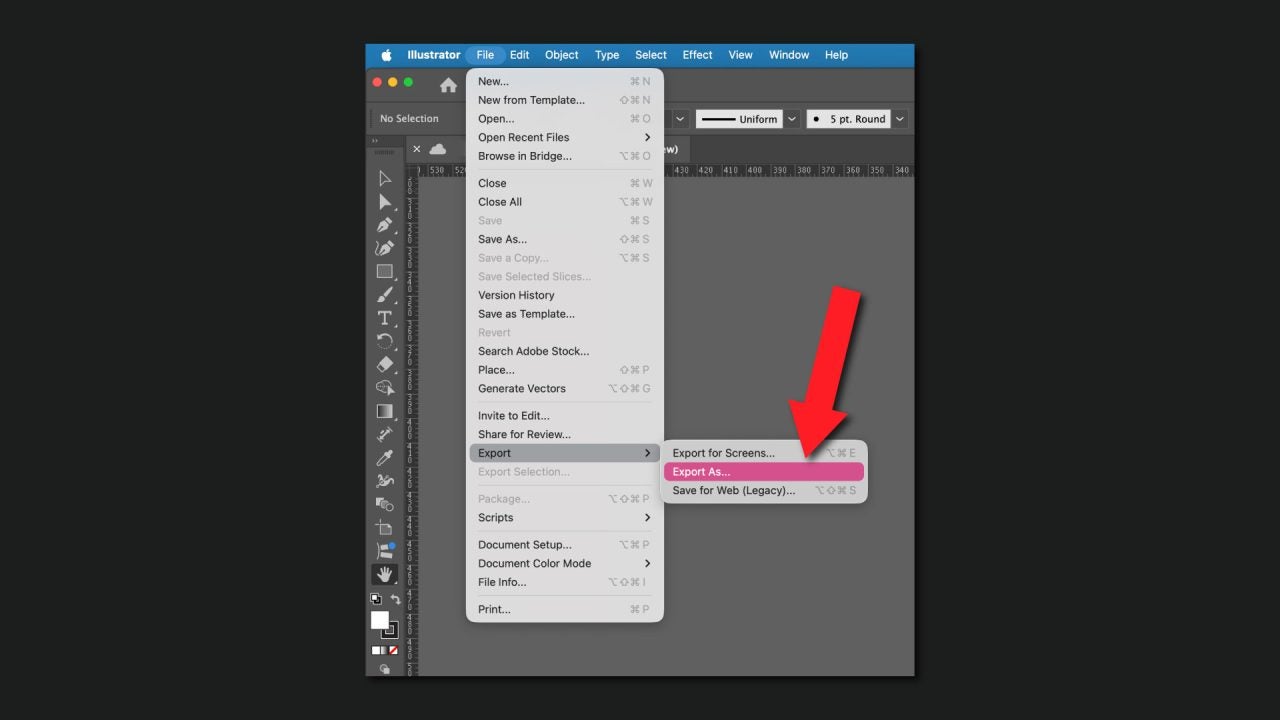
After these checks, click on File > Export > Export As.. and select PDF. You can also save the file as a PDF directly from File > Save As…
Everything described above will help you save any project you have laid out or designed entirely from Illustrator as a PDF. If you have the desktop application of Adobe Acrobat, you can also create a PDF from scratch there.
Adobe Acrobat is compatible with many types of Adobe files, such as those belonging to Photoshop (.psd), Illustrator (.ai, .eps), or InDesign (.indd, .indb).
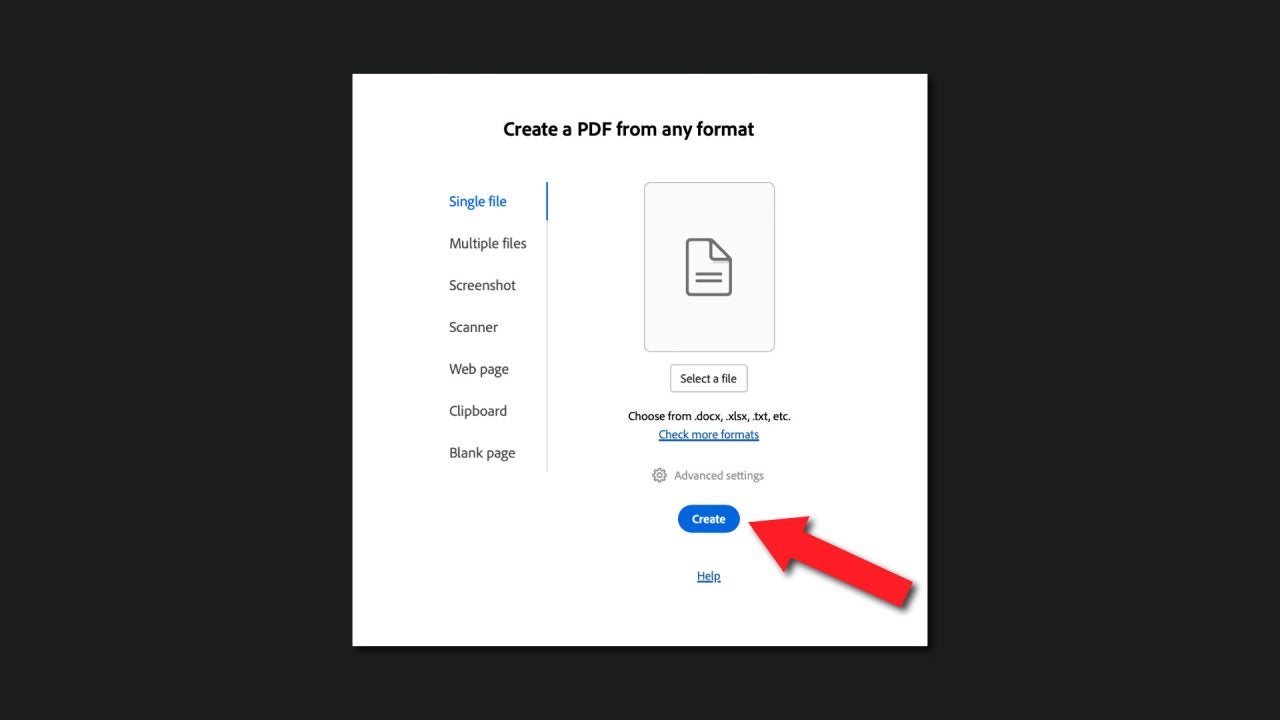
Open Adobe Acrobat and click on the Create tab.
Drag the file you want to convert to PDF into the program. It will open, and you can save it as a PDF from File > Save As…
Select where you want to save the future PDF and make sure that Format is set to Adobe PDF Files. Finally, click on Save.
How to add buttons and links
Although you may think otherwise, creating interactive content in Adobe Acrobat is easier than you think. One type of structure that will help make your PDF more enjoyable to consult is to integrate an interactive table of contents.
This allows any user to quickly navigate between sections of a PDF without getting lost. If you want to create one, do the following:
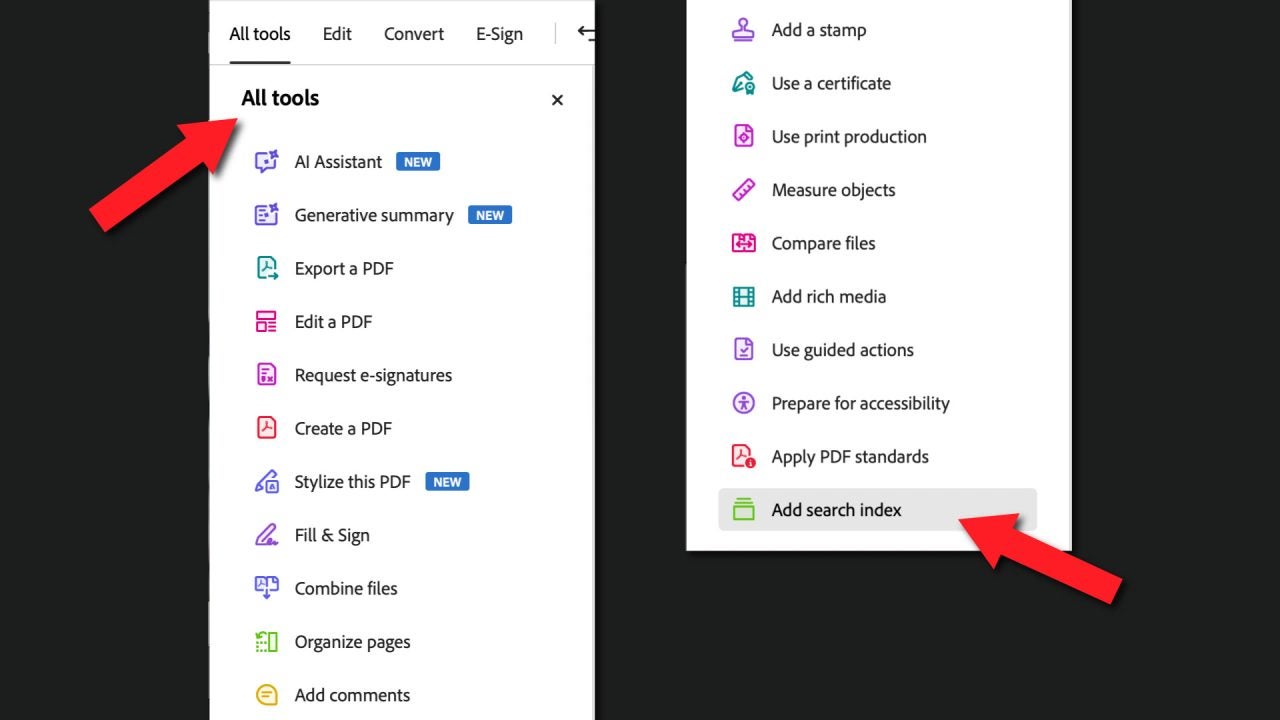
With the document already open in Adobe Acrobat, go to All Tools > Add search index.
Click on Manage embedded index and then, on Embed Index.
To confirm, press OK.
You can include hyperlinks in your documents that lead to other websites, YouTube videos, or any social media. Add them like this:
Go back to All Tools and click on Edit a PDF.
Select the text or image you want to add a link to.
Right-click on the item in question and click on Create Link.
Select what you want it to do: go to a specific page in the PDF, open a file… when you’re ready, click on Next and follow the instructions on the screen.
To add buttons to your PDF that further facilitate navigation, follow these simple steps:
When you have the document open in Acrobat, click on Edit and go to the Add content section. Below you will see a long list of options that can be expanded further by selecting More. Look for Button and click on it.
Select the area of the document where you want to place the button and define its size.
Finally, right-click on the newly created button. To customize the design and configure what it can do, select All Properties. You will see sections like Appearance, Position, and more. Feel free to change whatever you want.
The era of boring PDFs is over
The combination of Adobe Acrobat and Illustrator can make a simple PDF much more eye-catching and also easier to consult. With Illustrator, we can add a distinctive visual touch while Acrobat makes it more interactive. Feel free to combine both programs to make your documents more interesting.
El color lo cambia todo en una producción audiovisual. Si no me crees, piensa en series como Breaking Bad o Euphoria. Mientras que los tonos amarillos de la primera pueden transmitir tensión, los colores neón de la serie de HBO nos transportan a un mundo más onírico. Gracias a Adobe Premiere Pro, te será aún más fácil encontrar la paleta perfecta. Su amplia variedad de herramientas combinadas con el poder de la inteligencia artificial nos permitirá lograr cualquier estilo de acabado, ya sea más cinematográfico o casual. La importancia del color No importa si es un TikTok, un video de YouTube o […]
Color changes everything in an audiovisual production. If you don’t believe me, think of series like Breaking Bad or Euphoria. While the yellow tones of the former can convey tension, the neon colors of the HBO series transport us to a more dreamlike world.
Thanks to Adobe Premiere Pro, it will be even easier for you to find the perfect palette. Its wide variety of tools combined with the power of artificial intelligence will allow us to achieve any style of finish, whether more cinematic or casual.
It doesn’t matter if it’s a TikTok, a YouTube video, or a short: beyond aesthetics, colors influence how we perceive what we are watching. A warm tone can convey closeness or joy, while cool colors generate calm, tension, or even sadness.
Just like with Breaking Bad or Euphoria, it’s enough to remember how other series and movies use colors to create unique atmospheres that remain etched in the viewer’s memory. In addition to conveying emotions, you can also make your videos stand out even more. In the end, color speaks as much as images or sound.
Lumetri Color: what it is and how it works
When we need to work with color in Adobe Premiere Pro, we will mainly do it from the Lumetri Color panel. It’s used for both basic color correction (contrast, temperature, saturation, etc.) and for creating more creative styles.
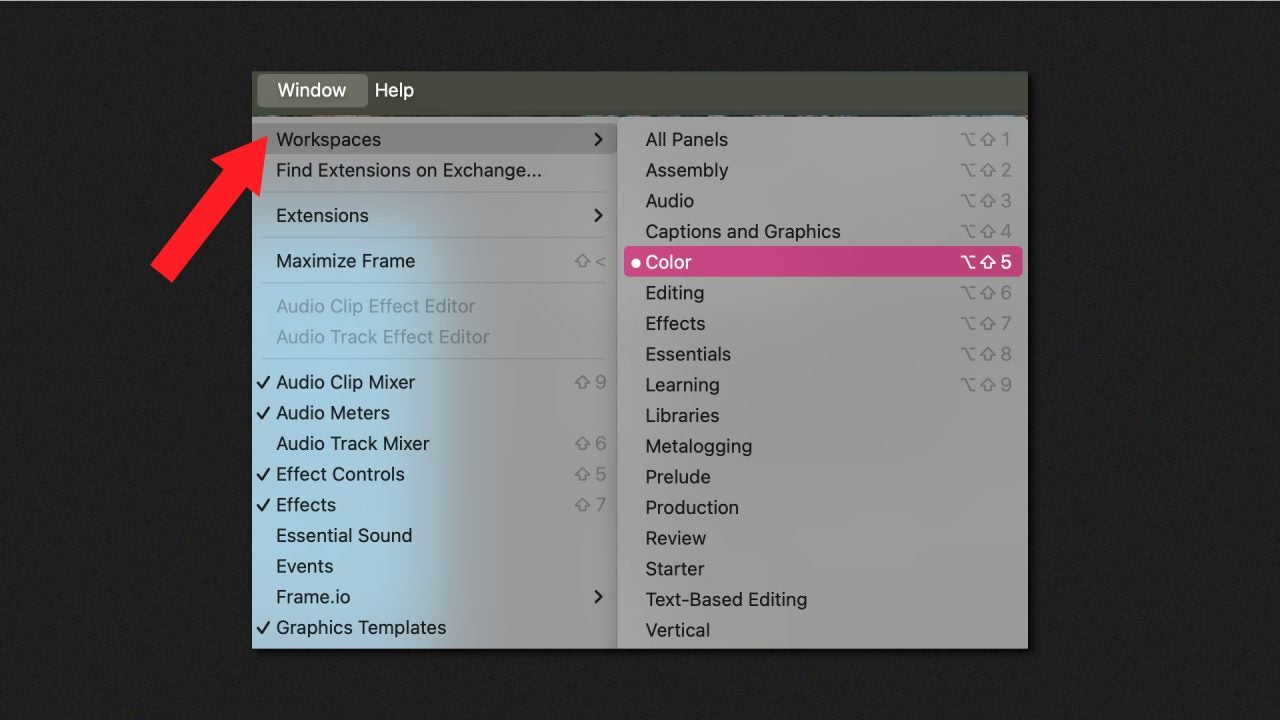
Before we start adjusting the colors of our project, we will set up the program layout to streamline the work. Click on Window > Workspaces > Color so that Premiere changes the panel arrangement. This will allow us to see the Lumetri Color panel on the right and the Lumetri Scopes panel on the left.
From the Lumetri Color panel, we will see the basic adjustments we talked about earlier: Basic Correction, Curves, Creative, and others. On the other hand, Lumetri Scopes will show us analysis of luminance and chromaticity in the form of waves.
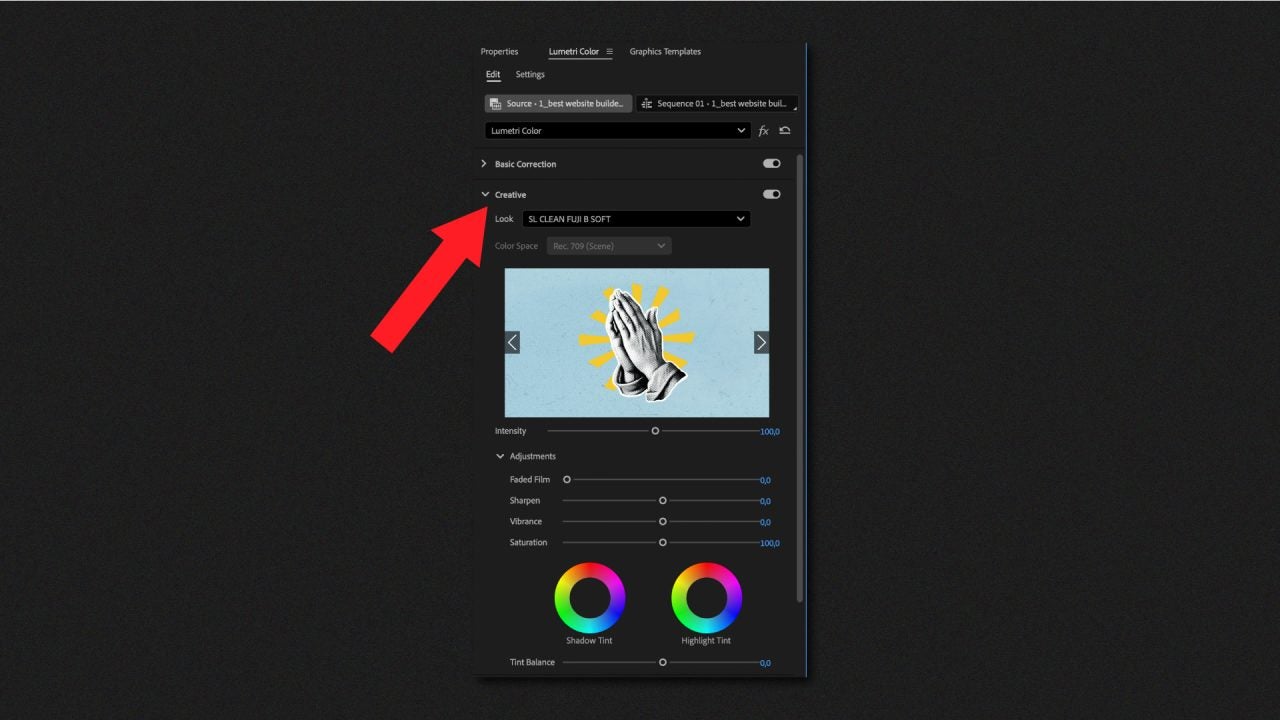
The Lumetri Color panel also has a section that you’ll find very interesting called Creative. By clicking there, you will find several presets to try out. Additionally, you will be able to preview how the different effects would look on your clips and adjust the saturation and intensity of each preset.
From here, If you have multiple sequences, you can also make the color match between them. To do this, follow these steps:
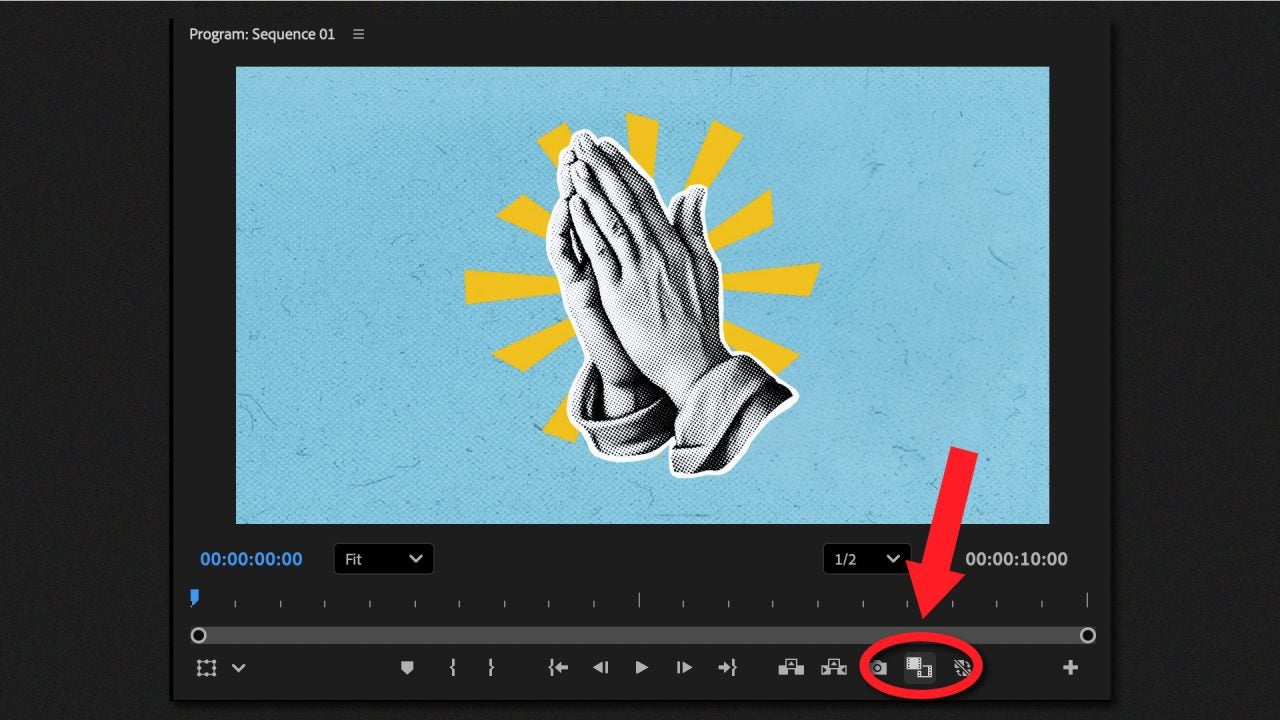
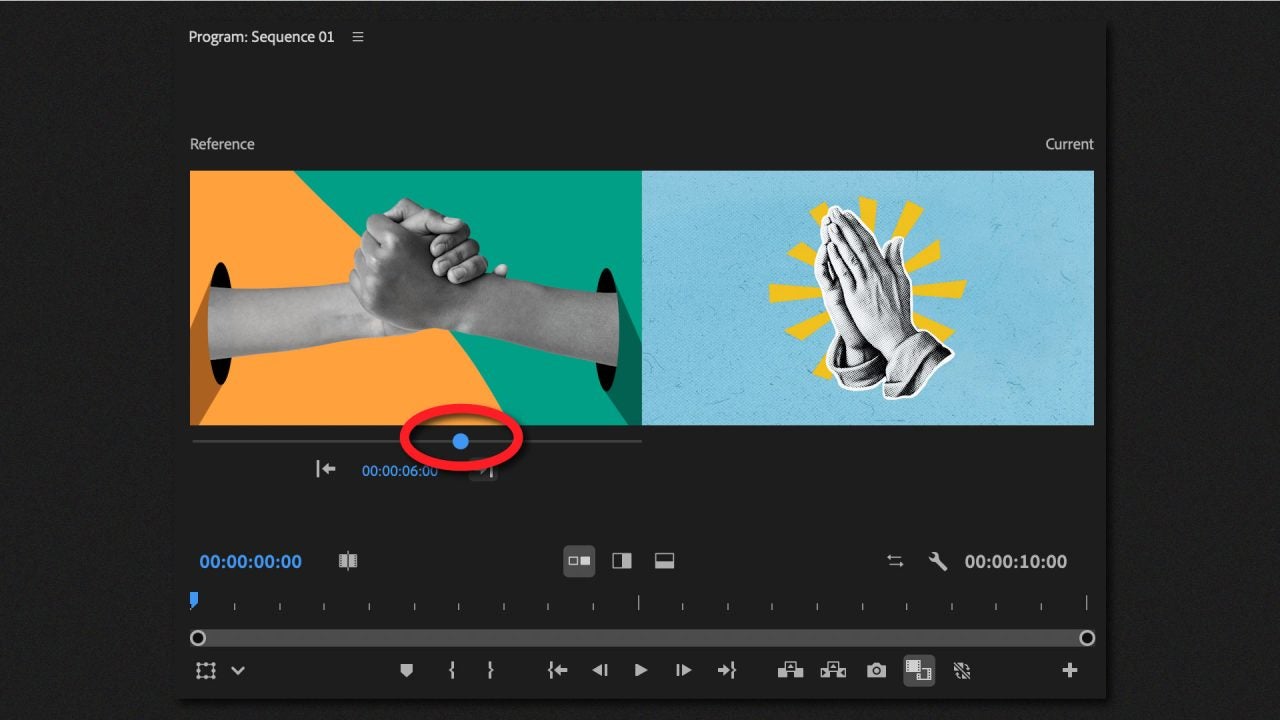
Click on the Comparison View button. You will find it in the Lumetri Color panel and below the viewing monitor itself. This will allow you to select different frames and compare the colors.
Now we’ll choose the frames of the clips that we want to match with the color. To do this, go to the timeline that you’ll see just below Reference and place it where you need. This will be displayed on the left. In the overall timeline is where you will need to move the playback head to change the frame on the right.
Within Lumetri Color, go to Color Wheels & Match and click on Apply Match. If you want, you can try other frames to experiment with different tones.
This is how Auto Color works in Premiere Pro
Just like in many other Adobe programs, we will see features powered by artificial intelligence within Premiere Pro. One of them is Auto Color, which uses Adobe Sensei technology to automatically apply color corrections. To use it, follow these steps:
Place the playback line at the point of the clip you want to alter.
Go to the Lumetri Color panel. If you changed the workspace as we explained earlier, you will probably find it on your right. If you don’t see it, click on Window and look for Lumetri Color.
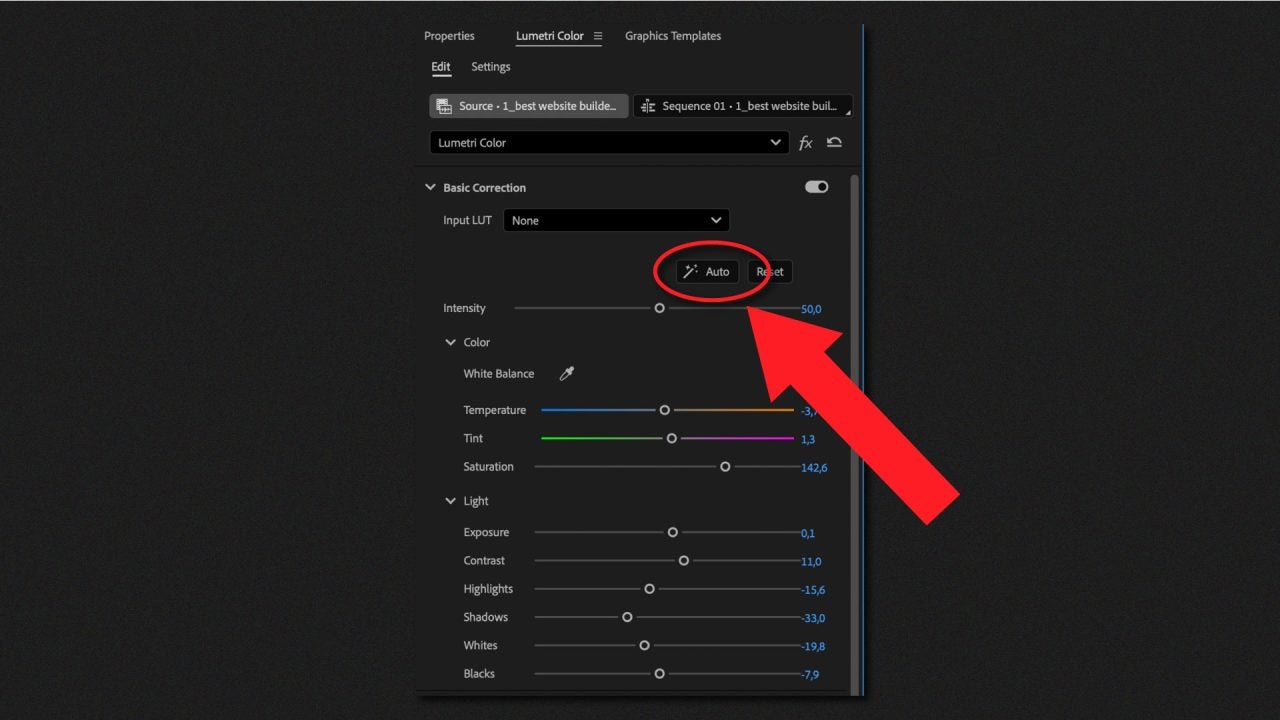
Open the Basic Correction section and click on the Auto button. You will see the light and color sliders update immediately.
You can modify the intensity of the changes using the Intensity slider that you will see just below.
Color as a Creative Tool
Without a doubt, color is one of the most powerful tools when it comes to storytelling, and with Adobe Premiere Pro you no longer need to be an expert to take advantage of it. Whether for a personal project or to give a professional finish to your work, Adobe Premiere Pro gives you the freedom to experiment and transform your videos into pieces that convey exactly what you want.
The BlueStacks Store is groundbreaker, with a wide gameplay offering,unbeatable deals, exclusive in-game offers, and generous cash back rewards for any mobile gamer. With an ever-growing library of games, including favorites such as Call of Duty: Warzone Mobile, Roblox, and Minecraft, the BlueStacks Store caters to every kind of gamer. And with many more games coming in regularly, there’s always something new to find.
Bluestacks, officially authorized by Google, is determined to ensure premium mobile gaming is accessible and affordable on your platform, and that is why it makes available different games from all genres. From the most popular games such as COD Mobile, Plants vs. Zombies 2, and RAID: Shadow Legends to those produced exclusively for BlueStacks, including Magic Forest: Dragon Quest, West Survival: Pioneers, and Legend City. Their exclusives have been crafted to add excitement to your gaming experience with unique content and features that you are not going to find anywhere else.
By combining fan-favs with a curated selection of exclusives, the BlueStacks Store enables players to get the full potential of games from their favorite genres. Whether you’re in the heart of a Battle Royale strategizing your next victory or deep into a top-notch single player immersive role-playing game, BlueStacks features cashback rewards and smooth purchases to help make your gaming unparalleled.
Unlock Huge Savings with BlueStacks’ with Exclusive In-App Discounts
The BlueStacks Store is the game-changer, with unbeatable deals, exclusive in-game offers, and generous cash back rewards for any mobile gamer. With an ever-growing library of games, including favorites such as Call of Duty: Warzone Mobile, Roblox, and Minecraft, the BlueStacks Store caters to every kind of gamer. And with many more games coming in regularly, there’s always something new to find.
Benefits of Using the BlueStacks Store for Gamers
Earn Cashback on Every Purchase
The BlueStacks Store is built for gamers, with cashback rewarding select purchases. You get credits with in-app purchases to put toward future upgrades so that you can squeeze the most benefit from every dollar you spend. This applies even more in cases when there is a sale going on, stacking cashback together with sale discounts helps you maximize your savings.
Discover Exclusive Promotions and Limited-Time Discounts
Access special promotions through the halloween campaign, double eleven (11.11) sale or the juicy Black Friday offers, as well as discounts on premium content, where powerful items will show up and resources can be unlocked at a fraction of the cost. Check out the Deals Page for the best deals: from popular titles to hidden gems, all catered toward your gaming pleasure.
Convenience of PC Play with BlueStacks
Among the many unique value propositions of the BlueStacks platform, the ability to bring mobile gaming onto PC stands out. By harnessing the power of BlueStacks, gamers can experience their favorite titles with precision, performance, and ease of use like never before:
Mouse and Keyboard Integration: Break the chains of touchscreen limitations in games and gain precise control. From competing in fast-paced battles or managing resources in strategy games, mouse and keyboard support provides an overwhelming advantage.
Larger Screens, Better Visibility: Enjoy high-definition display of games on your large PC monitor. It’s much easier to immerse yourself within the rich graphics and intricate gameplay.
Customizable Controls. Create controls that work best for you and fit your style. Advanced keymapping in BlueStacks works great and it’s got you covered, adapting seamlessly to any type of game.
Seamless Multitasking: You can run multiple games and apps simultaneously using the multi-instance feature from BlueStacks. Manage different accounts within an uninterrupted gaming experience.
From action-type shooters to casual puzzle games, BlueStacks enhances any mobile title into a complete PC gaming experience by adding comfort and control for gamers of any skill level.
Saving money with The BlueStacks Store
From premium character skins to strong boosts and limited-time exclusive bundles, the BlueStacks Store helps you level up without having to stretch your wallet. The Deals Page is where you find discounts on popular and niche titles alike, making sure the experience stays personalized and affordable.
Exclusive In-App Purchase Discounts
The BlueStacks Store is full of exclusive in-game purchase discounts, so players can access premium content with special items at much lower costs than usual. Whether it’s leveling up character abilities or acquiring rare skins and resources, these discounts make improving your gameplay affordable and fun.
For many, in-app purchases are an unnecessarily expensive addition to games, creating a paywall to content. The BlueStacks Store smashes these barriers as it introduces more tenable solutions to enable player advancement, enabling them to compete and enjoy to the fullest of their favorite games. This opens up more avenues toward making gaming more inclusive, wherein each player has access to high-quality upgrades and exclusive content.
Discover the Deals Page
If you check the Deals Page in the BlueStacks Store, you’ll find an array of curated deals on popular titles. It gets updated regularly and can fit your gaming tastes whether that’s action-adventure, hardcore strategy-based RPGs, or battle royales on-the-go. There’s something in it for every type of player.
The Cashback System and Nowbux
The BlueStacks Store takes the concept of saving a step further with its cashback system, powered by its exclusive virtual currency, nowbux. Nowbux rewards mean that gamers get a portion of their spend back in virtual credit to use on future in-app purchases across supported titles.
Earn Cashback: You get a certain percent back with eligible in-app purchase in the form of nowbux. The cashback adds up fairly quickly and gives you even more ways to access premium content with no additional charge.
Use Nowbux to Save More: You can use nowbux to unlock special deals or buy in-game items for games like Ace Defender: Dragon War or West Survival: Pioneers. The more you buy, the closer you get to new rewards with nowbux.
Special Rewards and Promotions: Many campaigns running in the BlueStacks Store enhance the value of Nowbux. Active users can earn through campaigns in the “earn section” of the store or receive bonus Nowbux for simple actions like logging in for the first time.
Nowbux makes in-app gaming purchases more rewarding, as your spending works harder for you. Integration of Nowbux with a cashback system provides the Bluestacks Store with a seamless facility to reinvest savings into your favorite games, unlock more and get value with every purchase.
Tips to Maximize Savings with the BlueStacks Store
To make the most of your gaming experience with the BlueStacks Store, consider these actionable strategies:
Browse the Deals Page Regularly: Keep checking the Deals page, where special promotions and other limited-time discounts are announced. As it keeps being updated, it is the best way to keep on top of exclusive deals for your favourite games.
Leverage Cashback Rewards: Whatever cashback credits you earn on purchases can be used to save even more on future purchases. The best value on your transactions is realized by strategically earning nowbux.
Explore Bundles and Promotions: Check for promoted bundles that offer premium packages at a discounted price and combine those with your cashback.
How to Access and Use the BlueStacks Store
Getting Started with the BlueStacks Store
It is easy to access the BlueStacks Store. Setting up an accounting requires only a few steps. First, download and install the BlueStacks app on your PC if you haven’t done so already. Once it’s installed, fire up BlueStacks, then log in if you have an account or create a new one if you are a first-timer.
Navigating the Deals and Finding Discounts
After logging in, click on the BlueStacks Store in the main menu. You will be greeted by a list of games, many with exclusive discounts on in-app purchases, and specially prepared bundles to enhance gameplay.
Simply find your perfect deal and then follow the steps that appear on the screen to make your purchase. Make sure you save even more by earning nowbux, there’s a tab in the top right where you can see the currently active campaigns for accumulating some. Combining discounts with nowbux makes premium content available at unbeatable value, especially since sales are rotated and updated often.
Discover the BlueStacks Store: Your Gateway to Premium Gaming
The BlueStacks Store is a one-stop-shop that upgrades your game with the best in-app offers, cashback rewards, and intuitive deals to give you the best content out there at unbeatable value. Explore the BlueStacks Store today and unlock the savings you’ve been waiting for! Browse for the best offers, earn, and maximize your savings.
It is likely that, on many occasions, the thought of using Adobe Illustrator to create graphics or charts has crossed your mind. However, many dismiss it almost instantly due to the fear that it might be complicated or difficult to learn. Nothing could be further from the truth. Adobe Illustrator is an excellent program for creating graphics. The possibilities it offers, whether in shapes, styles, or colors, allow us to bring to life what we have in mind with great ease. If you want to learn how to use Illustrator’s graphic tools, stay and learn with these simple steps. […]
It is likely that, on many occasions, you have considered using Adobe Illustrator to create graphics or tables. However, many dismiss it almost immediately because they fear it might be complicated or difficult to learn. Nothing could be further from the truth.
Adobe Illustrator is an excellent program for creating graphics. The range of possibilities it offers, whether in shapes, styles, or colors, allows us to bring our ideas to life with great ease. If you want to know how to use Illustrator’s graphic tools, stay and learn with these simple steps.
In Adobe Illustrator, we have a fantastic feature dedicated exclusively to graph creation. The icon you will see by default in the toolbar is the Column Graph Tool, but if you right-click, you will see the rest of its options. If you can’t find the icon, press the J key.
To start, select one of the chart options that appear. If you want to create a column chart, you should choose Column Graph Tool.
Now, it’s time to define the dimension that the chart will occupy in its entirety. Click on your canvas and drag the mouse to create a square of the size you prefer.
If you need it to have specific dimensions, click on the canvas and enter the measurements manually. Don’t worry too much; you can change the chart size at any point.
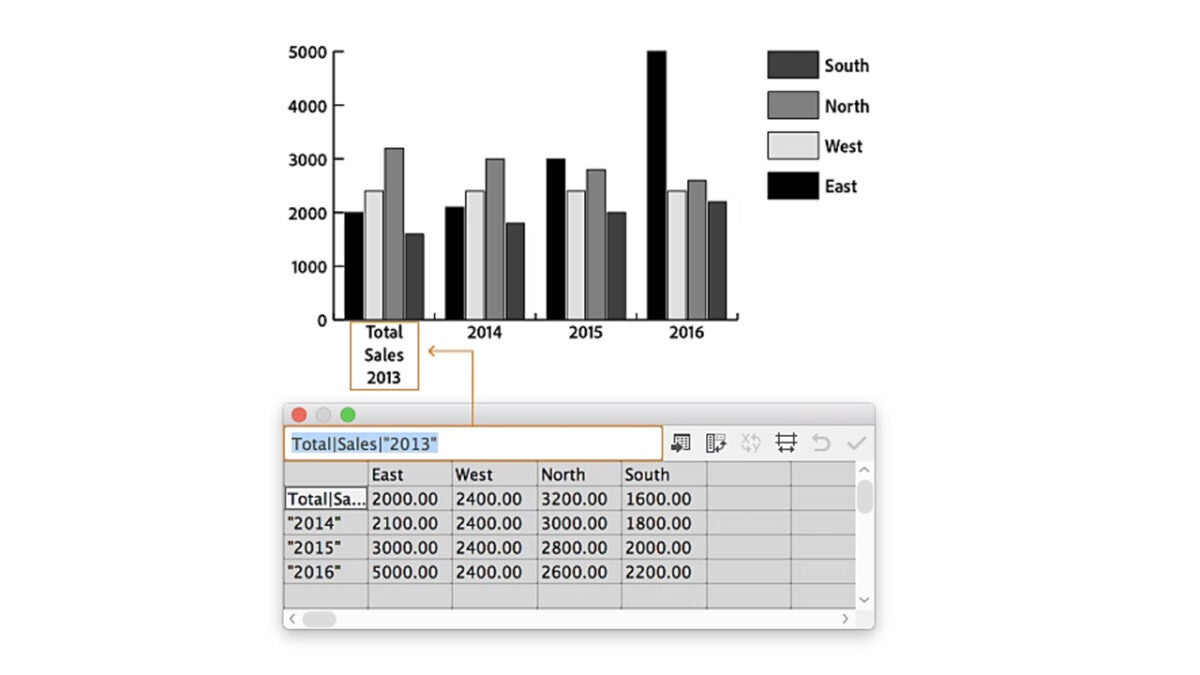
At this point, we will need to enter the data that the chart will represent. In the first row, place the attribute. The following rows will be used to enter the numerical data. Below is an example of how you could place them and where each data would go.
If you have the information saved in an Excel file, Illustrator will allow you to import the file so you don’t have to enter it manually.
To adjust the width of the columns, click on the Cell Style button and enter any value between 0 and 20 within Column width (the width).
Although we have focused here on bar charts, the procedure is quite similar to other styles, such as column, line, or radar charts, among others. By following these steps, you will be able to create your chart on the first try and without major complications. Now, it’s time to make it look nice.
Customize Your Chart to the Millimeter
One of the great advantages of Adobe Illustrator is that it allows us to customize our designs to the smallest detail, and graphics are no exception. Likewise, we will start with something simpler, such as editing colors.
Select your chart with the Selection tool (A).
Go to Object and then select Ungroup. This will allow you to edit the individual parts that make up the chart. Be careful because once you do this, you will no longer be able to edit its data. Accept the pop-up text and select Yes to proceed.
Once you have ungrouped the chart, you can alter its colors (and shapes too) as you wish. Select them and change them to your liking.
You can modify the size of the chart and adjust it to the space you need. To do this, you simply have to do the following:
Select the graphic with the Selection tool (A).
Now, follow the path and go to Object > Transform > Scale. You can also double-click on the Scale tool.
In the contextual box that appears, enter the size you want your graphic to be.
By default, you will see that the chart legends appear on the right, but you can also change this:
As before, select the chart with the Selection tool (A).
Follow the path Object > Graph > Type.
Here, click on Add Legend Across Top and press OK to finish.
Do you want to give your table a distinctive touch and add shadows? Try doing this:
Re-select the chart with the Selection tool (A).
Again, follow the path Object > Graph > Type.
In the Graph Type box, click on Add Drop Shadow and select OK to finish.
If you have thought about mixing various styles of representation in a single graphic, you can make it a reality in Illustrator. To combine any type of graphic with another, follow these steps:
Choose the Group Selection tool. It is located under the Direct Selection icon (key A) when you right-click.
Now, select which data from the chart you want to change to a different style. Double-click to select both the chart and its corresponding legend.
Follow the path Object > Graph > Type and choose which style you want to change to. Configure it to your liking so that it looks exactly as you want.




.webp)