Make a Facebook app in 30 minutes with Dapper

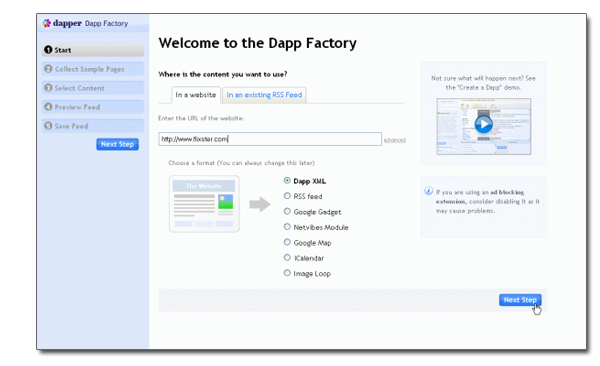
There is a school of thought which says that if you want to create a Facebook app you need years of coding experience. Not so. Because, although the really fancy dynamic apps do require a lot of PHP knowledge, it is possible to make your own Facebook apps without any scripting whatsoever. In fact, you can put together a simple, yet functional app in around half an hour, thanks to Dapper’s Facebook AppMaker. Dapper is a data mapping application that lets you extract and reuse content from a web site in another format. It creates feeds which can be exported to XML, RSS, Google Maps, widgets and more. You can then transform these feeds into Facebook applications with the AppMaker. Here’s how it’s done:

1. Start by signing up for a Dapper account on the site’s home page, then click on the ‘Create a new Dapp’ link. Here we need to choose the content we want to include in our Facebook app. You’ll need to enter the URL of the site you want to draw content from (in this case Flixster) and hit ‘Next step’.

Step one

2. A preview of the site will appear in the main window. From here you need to choose a variable (e.g. search field, radio button, drop-down menu selection, etc.). In this case it’s the search field. Enter a search and click ‘Add to basket’. This directs Dapper to the content that it needs to load when a search is produced. Enter a couple more search terms and add the search results pages to the basket. Once you’re done, click ‘Next step’. Continue reading “Make a Facebook app in 30 minutes with Dapper”

Check your PC with online anti-virus

Following the trend of online applications, there is a growing number of online anti-virus apps that can analyze and detect viruses on your system without requiring you to have an anti-virus tool installed on the computer. Of course, this is no replacement for the traditional desktop security software. First, these online anti-virus tools don’t prevent viruses from entering your system, but only work when the system has already been infected. Second, they usually don’t provide you with a cure for the infection, but only with the diagnosis.

Online anti-virus apps can be divided into two main groups: those which analyze a single file with multiple different anti-virus engines, and those which analyze a bunch of files with one single anti-virus tool.

  Multiple Analysis

Online antivirusVirusTotal – analyzes your file with 37 different anti-virus tools. You have the option to send the file via SSL for higher security. The service is  usually not very overloaded, which makes it quite fast.

Online antivirus ViruScan – similar to the previous one, but with 20 different anti-virus tools. ViruScan is fast and efficient, but features a quite unattractive interface.

Online antivirusNoVirusThanks – another similar online anti-virus tool with 23 different analysis engines. You can also search for specific files using the MD5 Hash.

Online antivirusVirus.org – online analysis tool with 22 engines. The only drawback is that the file size is limited to 5 MB, so if you want to scan a larger file you’ll have to look elsewhere.

Online antivirusVirScan – The largest online multiple anti-virus service, featuring 39 different engines – though a bit slow as well. File size is also limited, but to 10 MB this time.

Online antivirusVirusChief – a slightly more modest online anti-virus with 10 different engines. Oddly enough, the list lacks many important engines such as NOD32, Kaspersky or Virusscan.

Online antivirusFilterbit – Filterbit allows you to upload files up to 20 MB in size. The drawback is that it only features 8 anti-virus engines, but at least it does the job quite fast.

  Single anti-virus analysis

Rather than analyzing just a single file, these online anti-virus tools scan the whole system and inform you of the presence of any viruses on your computer. The ones marked with an asterisk can actually remove the viruses from your system; the rest are just diagnosis tools.

Via: OnSoftware Spain

uTorrent for Mac full review

I’ve been using uTorrent on Windows for years now and so the arrival of uTorrent on the Mac is something that many users, myself included, have long been waiting for. For some reason at the moment, the uTorrent Mac page still says uTorrent for mac is “coming soon” but believe me, the beta version is very much here.

The reason I’ve relied on uTorrent for so long is that it’s lightweight, extremely easy to use, very fast, requires no configuration and generally just makes downloading torrents a piece of cake. Fortunately, the Mac version does not disappoint with the added addition of course that it has a much better looking Mac OS style interface. The main difference you’ll notice is that uTorrent for Mac is slightly stripped down compared to the Windows version.

utorrent-interface-2.png

Down the left hand side of uTorrent you have all the same menus that you have in Windows that allow you to select exactly what you see in the uTorrent window. You can choose to view only those downloads that have completed, those that are currently downloading, those that are active and finally those that are inactive.

uTorrent Transfer Menu

Of course, you can also choose to view all of these at the same time too. However, along the top of the interface, some of the controls that you find in Windows have been removed such as the button for RSS downloads, the create your own torrent wizard button and a preferences button. Preferences can, however, be accessed via the menu bar.

Everything else is the same as you get in the Windows version including a detailed stats windows giving you details of your download which you can toggle on and off via the “info” symbol on the top right of the interface. The stats menu is split into General, Files and Peer. The General tab gives you a holistic overview of how the file is downloading: Continue reading “uTorrent for Mac full review”

Making Email more useful

Email is essential for most of us today, but like the phone and snail mail before, it comes with its own set of drawbacks. Luckily, developers never sit still, and there are a number of interesting and free email solutions around.

If you’re unlucky enough to use Outlook, I can sympathize. It’s search is awful, it looks cluttered and losing important messages is easy if you’re not careful. A great way to vastly improve Outlook so it’s almost enjoyable, is to install xobni. With no effort from you, you’ll have a fantastic, intuitive and helpful search, instantly find your contacts in LinkedIn or Facebook and get fun statistics (I know that sounds unlikely, just try it out!).

One way we fill up our inboxes with rubbish is by giving out our email address to sign up for stuff like activation codes, posting occasional comments in forums etc. For this we get unwanted newsletters, updates and ads sent to us. A great way to beat this is to use a service like Melt Mail. This gives you a temporary email address, which will melt after 3, 6, 12 or 24 hours, during which time any messages to the address will be forwarded to your ‘real’ address. I used to use an old Hotmail address for this purpose (Hotmail’s not much use for anything else), but temporary addresses feel like a safer solution.

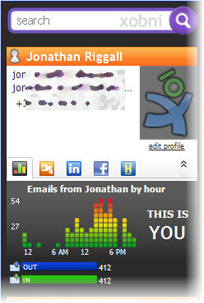
Another trend with apps, online and off is aggregating your web-life in one place. Two cool examples of this recently are the Firefox add-on Yoono, and web app Zenbe. Yoono brings your Yahoo and Gmail together in a sidebar, and also syncs with Facebook, Twitter and other social sites. If you constantly have your web-life opened in Firefox tabs, this can be a real space saver, and the pop up notices are cool too. ZenBe does a similar thing, but online. You can set up multiple POP emails to be forwarded into it, and read everything there. With a calendar and Facebook and Twitter integration, this is another neat way to streamline your internet use. I should add that ZenBe seem a bit overwhelmed with registrations at the moment, and took a few days to get back to me, but I do think it was worth the wait.

Create your own animated movies

Animation movies require many different skills – drawing, designing, coding – and also a deep knowledge of 3D software tools. But don’t let these high requirements change your mind: if you’re really interested in creating your own animation movies, you may as well start with Xtranormal.

This website features a basic online editor with which you can create very simple animated movies in a really easy way. First, select the background and actors for your great production. Then, all you have to do is drag and drop movie elements (expressions, animations, sounds and more) onto the script. Dialog lines, which the actors can “read” in several languages, are also inserted right away on the script. Whenever you want to see the result so far, simply click on the “Action” button.

Create animation movies with Xtranormal

Xtranormal is chiefly aimed at people with little or no experience in graphic design and animation – among which I count myself. This is why it includes basically everything you need to get you started, from the background landscape to camera angles. More advanced users will find it too limited, especially since Xtranormal doesn’t let you upload any kind of content to use in your movies.

The good thing about Xtranormal is that you don’t need to sign up in order to use it. You can start creating your movie right away. But if you want to save your work for later or publish your finished movie, you’ll need to create a user account. Don’t worry, it only takes a couple of minutes and is completely free.

5 ways to shrink long URLs

URL Link ImageThere’s nothing that looks more unsightly on a website than long URLs. This is especially true when it comes to commenting on blogs where you want to leave a link but the comment box can’t handle them properly. However, it seems that keeping URLs trim still isn’t something that’s caught-on, even among the big boys.

As Rob Trent points out, check out this old link that Microsoft posted on their website:

http://www.microsoft.com/events/EventDetails.aspx?CMTYSvcSource=MSCOMMedia&Params=%7eCMTYDataSvcParams%5e%7earg+Name%3d%22ID%22+Value%3d%221032301951%22%2f%5e%7earg+Name%3d%22ProviderID%22+Value%3d%22A6B43178-497C-4225-BA42-DF595171F04C%22%2f%5e%7earg+Name%3d%22lang%22+Value%3d%22en%22%2f%5e%7earg+Name%3d%22cr%22+Value%3d%22US%22%2f%5e%7esParams%5e%7e%2fsParams%5e%7e%2fCMTYDataSvcParams%5e

To avoid making the same mistake, try any one of the these 5 tools to shorten URLs into something more manageable:

Available either as an extension for Firefox or a dashboard widget for Mac OS

One of the most widely used URL shrinkers on the net, TinyURL is an online tool that asks you to enter the URL you need to shrink and gives you the result instantly.

A simple app that sits on your desktop and can be recalled at any moment to shrink a link. Normally it goes for $14 but you can get it for free right now. It’s a bit long winded to install and it won’t even let you cut and paste links with your mouse but it does allow you to track links. 

Another online tool but also allows you to enter a password while shrinking that allows you to track how many people click on your link.

An online tool that arguably offers the smallest URLs possible. You can also track and view other stats about your URLs but you have to be a member.

Capture short audio clips for free on your Mac

Audio Hijack Pro LogoA while back I needed to save a sound byte from a DVD for a video project I was working on in iMovie. I thought this would be pretty simple but soon found out that it wasn’t. Thinking that QuickTime would surely feature a decent audio recording function, I was frustrated to discover that you had to pay and upgrade to the Pro version for sound recording. In fact, every other package I looked at for recording sound required some kind of payment. Either that, or it would only work with certain sound sources.

Then I discovered Audio Hijack Pro and while it’s not free, it does allow you to record up to 10 minutes for free from any sound source. In addition, it looks great, feels and works like a professional sound recording app but doesn’t require a degree in sound engineering to work out how to use it.

All the major applications that you might need to record are listed neatly down the right-hand side of the Audio Hijack Pro including RealPlayer, DVD Player and Skype.

Audio Hijack Pro Main Interface

If your application isn’t listed, you can easily add it using the application selector. Continue reading “Capture short audio clips for free on your Mac”

Top 3 essential desktop search tools

Search logoThe more data we download and store, the more information you have to organise and store it all in a way that makes it easy to find what you’re looking for when you need it. In addition to my hard drive, I now have 2 external drives connected to my Mac and remembering where everything I need is in becoming increasingly difficult. Fortunately, there are now several desktop search tools out there that allow you to search everything connected to your computer from the comfort of your desktop. Here’s 3 of the best:

Google Desktop

It’s no surprise that the king of search engines built the best desktop search tool. Google Desktop search works with a convenient floating search box than can be summoned at any time by double pressing Ctrl (or Cmd on Macs). Google Desktop then displays the results in your web browser with hyper links to folders and files. The one concern is that the contents of your hard drive(s) could be compromised via your internet connection after being indexed by Google.

Spotlight

Who could live without Spotlight on the Mac? I know I certainly couldn’t and I can only wonder what Mac users did before 2005 when it was introduced to OS X 10.4. Spotlight searches at lightening speed and organises results into easy to read categories such as images, folders, music etc. Windows users don’t know what they’re missing out on.

Windows Search 4

For a Microsoft product, Windows Search 4 is remarkably well designed and executed. It’s the closest you’ll get to Spotlight on Windows although it only comes bundled with Vista – XP users have to download and install it manually. It also has a little known natural language search tool, where you can search using natural search terms such as “where is the most recent version of the Softonic newsletter?”

Fashion your Firefox with tailored extension packs

Fashion your FirefoxThough I currently have only two Firefox extensions installed (Download Statusbar and Tab Mix Plus), I could say I’m a bit of an extension junkie. I love finding new extensions and trying them out. Sometimes I’ve been asked for advice regarding the best extensions for Firefox, but the truth is that these recommendations depend a lot on each user’s personal habits when browsing the web.

Bearing in mind these diverse user profiles, the Mozilla guys have created a special area on their website – Fashion your Firefox – where you can select specific extension collections according to your most frequent activities when using Firefox. So if, for example, you like reading blogs and keeping track of certain websites, you’re advised to install Foxmarks, Delicious Bookmarks, Thumbstrips and Fast Dial. But if you’re more interested in viewing and sharing videos online, then the best extensions for you are Cooliris, Fotofox and Fast Video Download.

The best about Fashion your Firefox is that you can select extensions according to the way you use the Internet and what you like to do when you’re browsing the web. Also, the installation process is really handy: simply click on the profile that suits you best (Social butterfly, Shutterbug, Digital pack rat, Shophaholic and so on) and check the extensions you want to install. They’ll all be added to your Firefox simultaneously. Oh, and you can also mix extension from different profiles, of course

How to: add a water reflection effect to your photos

Water is usually an attractive element in pictures, creating beautiful effects and reflections. But if the water area in your photos doesn’t look that great, don’t worry: you still have an ace up your sleeve. Simply launch Photoshop and follow this tutorial to create a nice water reflection effect on any image you have – as long as there’s already water on it.

1. Open your photo and duplicate the background layer. This is always the first step in all Photoshop works as it enables you to work on the picture without ruining the original.

Add a water reflection effect to your photos

2. Use the Marquee tool (M) to select the area outside water and press Ctrl+J to duplicate it on a new layer.

Add a water reflection effect to your photos

3. Use the Move tool (V) to drag this area to the bottom of the picture, just where the water reflection should appear. Continue reading “How to: add a water reflection effect to your photos”