Creating beautiful graphics within Adobe Premiere Pro may seem like a titanic task from the outside, especially if you don’t have enough experience. However, it’s not as difficult as you think; especially if you already know how to handle design programs like Adobe Photoshop.
Adobe has a great advantage over other design programs: its ecosystem. This allows us to easily switch between programs and, as in this case, create professional graphics.

Photoshop and Premiere Pro, an ideal couple
Indeed, they are made for each other. Photoshop is not just for photo retouching or poster design: its tools can help us create visual elements that we can then take to Premiere Pro.
However, having a good command of Photoshop is key, at least to bring your ideas to life just as you have them in mind. At Softonic, we have several tutorials in case you need to know how to perform certain editing tasks, so feel free to check them out if you’re interested.
Preparing Graphics in Photoshop
First of all, we need to make sure that we prepare our designs correctly in Photoshop. To do this, you have to keep in mind some key points such as:
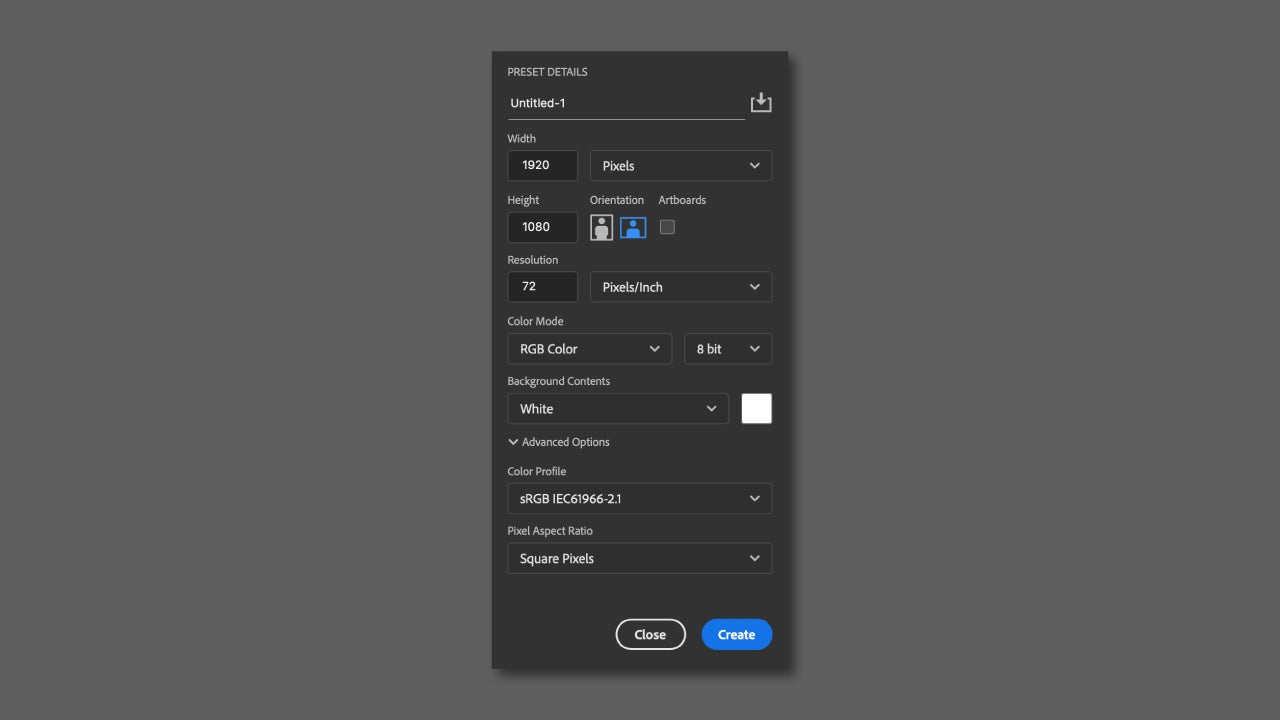
- Create your canvas with the right dimensions: In Premiere Pro, you work with very specific resolutions, such as Full HD or 4K. If we work with a canvas that does not have those dimensions, our design will not fit correctly. For example, if the video you are creating is Full HD, make the canvas size 1920 x 1080 pixels and 72 ppi resolution.
- Organize the layers well in Photoshop: Each layer you want to animate should be separated and clearly named to avoid confusion. While it’s not mandatory, it will make things much easier for you. In fact, think of each layer as if it were a piece that you can later move in Premiere.
- Do not flatten the file: Save the project in .PSD format to be able to edit it again at any time and keep the layers.
Import and Animate Graphics in Premiere Pro
Once you have your .PSD file ready, open your project in Premiere Pro and go to File > Import… Now, select the file and when the options box appears, choose Import As > Individual Layers. This way, Premiere will keep all the layers as separate clips. Here you can choose which layers to keep from the document to import into Premiere. Click OK and you will have finished.
Now it’s time to give “life” to our motion graphics:
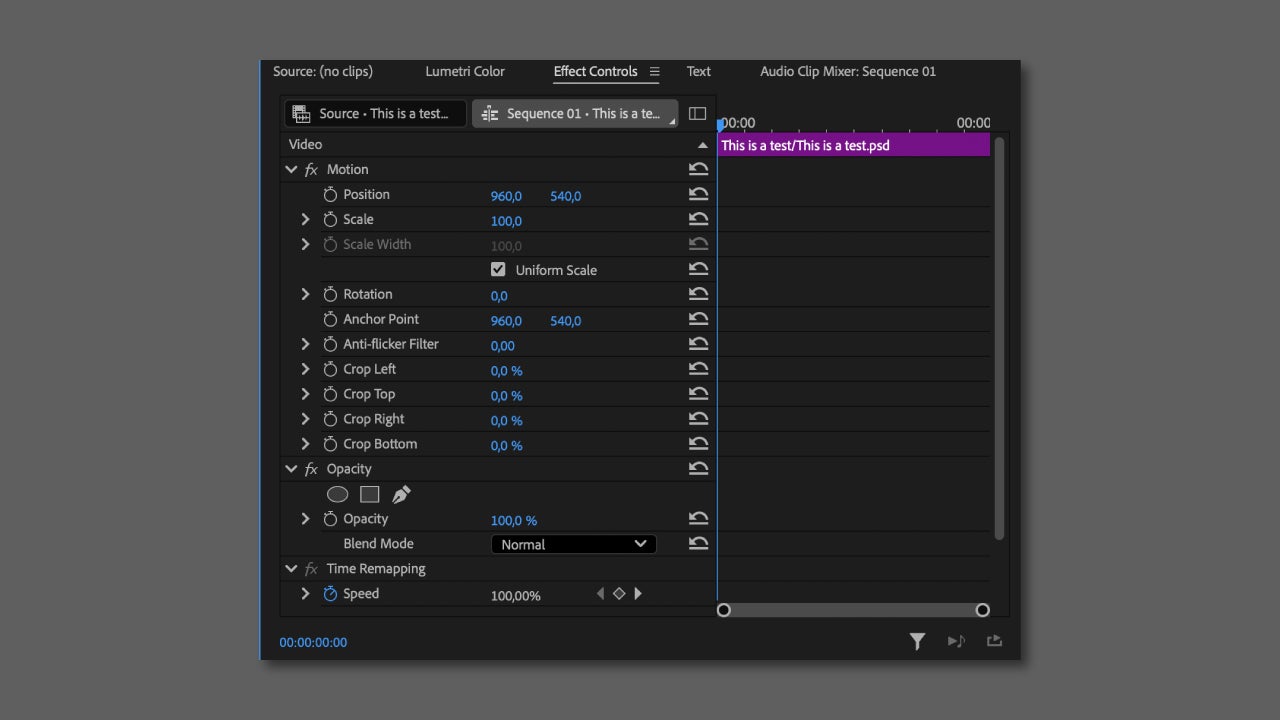
- From the Effects Control panel, you can animate and change the position, scale, rotation, or opacity of the graphics.
- Activate the timer next to the property you want to animate and move the time head to define the action.
- You can modify the transition speed of the keyframes from Effects Control. If you wish, combine your animated layers with others from the Effects panel to achieve more eye-catching transitions or effects.
After giving it movement, it’s now time to fine-tune and sync with the music or the sound effects of your video (if you decide to add them).
Export your video
When you finish editing your graphics, it will be time to export the project to video. Do a final check to see that everything is ready and start the export:
- Premiere will export what is in the workspace (what occupies the gray bar). Keep this in mind if you want to export the entire video or just a piece.
- With the sequence already selected, go to File > Export > Media. You can also use the keyboard shortcut Ctrl + M on Windows or cmd + M on MacOS.
- Now it’s time to choose the format. You will see that you have many options to choose from, but the most versatile codec is H.264. This is ideal for videos that will be viewed on YouTube or social media.
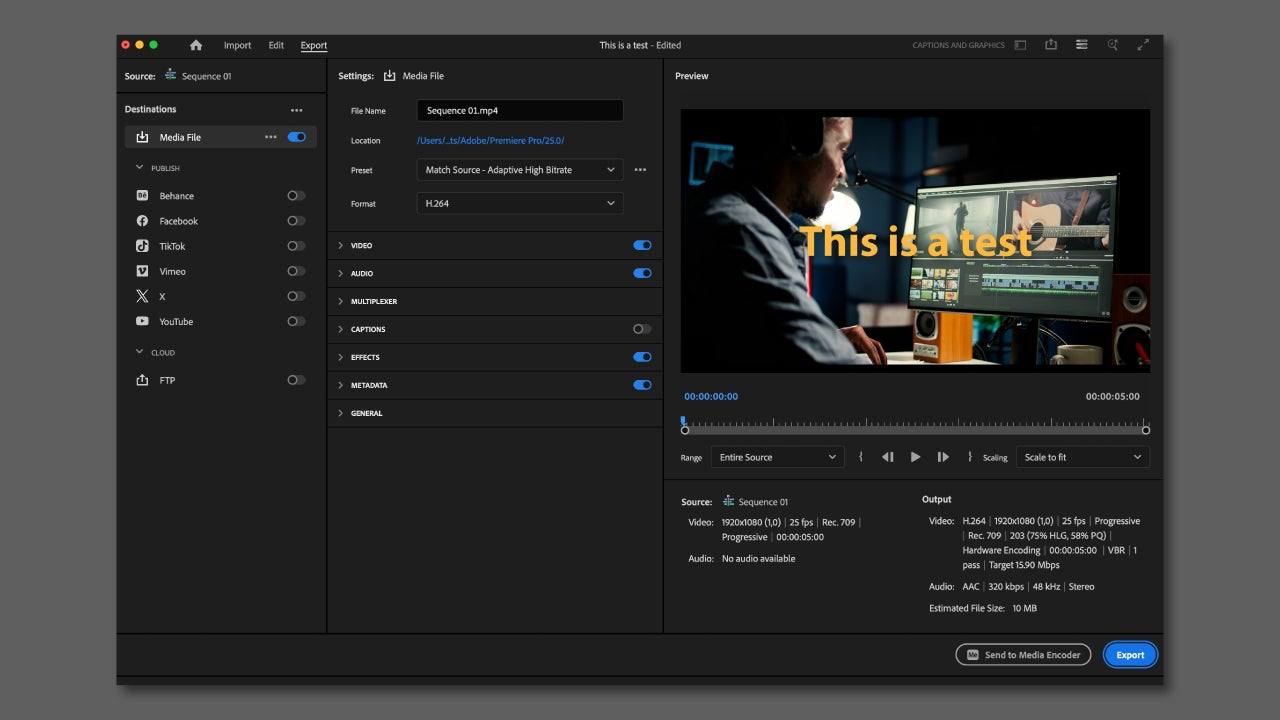
- From the preset list, you will find optimized options according to the platform where they will be viewed. Select one of these options if you want to ensure that the resolution and compression fit well.
- Choose what to name the video and where it will be saved on your PC. Very important: do not forget to check the boxes for Video and Audio so that everything is saved correctly.
- To export your video, you have two options, choosing between exporting from Premiere Pro or from Adobe Media Encoder. The main difference is that one allows you to edit while exporting the video in the background (Adobe Media Encoder) and the other option does not (Premiere Pro).
If you want to export your video from Premiere, simply choose Export. Otherwise, click on Send to Media Encoder. Once the process is complete, check that your video has been exported correctly, and if not, make the necessary adjustments and repeat the process.
