So you’ve created and debugged your first program in Code::Blocks. But something’s still not working right. What do you do next? Let’s go over some common problems that many programmers run into when getting started with Code::Blocks. We will also review frequently used troubleshooting suggestions and tips.
Common issues with Code::Blocks
I’m unable to build my project
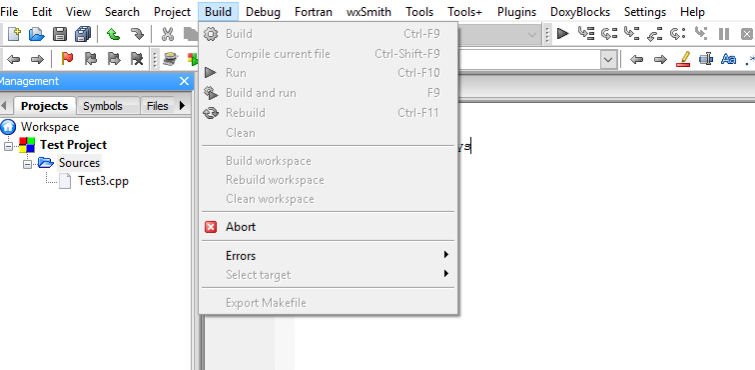
Problem: All of the Build-related options are grayed out.
Solution: Code::Blocks checks the file extension for individual files before allowing them to be compiled. Save your file with the correct file extension (*.c or *.cpp). More often it is useful to create a project so that Code::Blocks can manage the entire build.
I’m unable to compile my project
Problem: Syntax. Syntax errors, incorrect errors in formatting of code, and accidental typographical errors will not allow the program to run correctly. You may see errors that do not allow you to build or compile.
Solution: Methodically check the syntax of the programming language that you are using. You can do this by reading your code. You can step through your code line by line, or you may choose to set break points and watches to isolate segments of your code. If needed, consult documentation for the specific programming language that you are using. Sometimes the smallest error can disable an entire program.
Multiple undefined reference errors
Problem: Every time I build, Code::Blocks reports multiple undefined reference errors. Example: undefined reference to `WSACleanup@8 undefined reference to `WSACleanup@0 Solution: Check to see if the required library is not linked with your project. Go to Project->Build options…->Linker settings (tab) and add the required library or libraries.
If the error includes a line number, it is likely that this is a problem with your code. Track down your function declarations and implementations. Ensure they all match up, are spelled correctly, and have the correct scope resolution.
A Code::Blocks option I expect to be able to find is missing
Problem: The option I was looking for is nowhere to be found in Code::Blocks.
Solution: Many features of Code::Blocks are implemented by means of plugins. Open Plugins->Manage plugins… and ensure that the one you are trying to use is not disabled. If the plugin you are looking for is not in the list, it’s possible that you removed or disabled it on installation. To acquire the plugin, reinstall Code::Blocks (double checking that the desired plugin is included).
These are some of the most common errors that you may run into when using Code::Blocks. To learn about other errors or problems, consider checking http://stackoverflow.com or https://en.wikipedia.org/wiki/Code::Blocks. In addition, when using any software program, app or utility, it’s always a good idea to familiarize yourself with the documentation on the developer’s website. Further documentation is available at http://www.codeblocks.org/.
You are now well on your way to building and managing complex programs and applications using the complete and extendable Code::Blocks IDE.
So, you’ve successfully created your first program in Code::Blocks – that is, you have written your source code, made any changes needed, and compiled and built your code. Maybe you got lucky and your program came out just right on the first try. But more likely you’ll need to make edits and debug your code in order to come out with a finished product that works properly.
So let’s learn how to debug in Code::Blocks, which is a popular IDE that many developers use to create code with C/C++ and other languages.
How to debug your program
Debugging your program in Code::Blocks might seem daunting at first, but after we review the process it will become second nature. The process of debugging involves tracing the program operation step by step. You also use the debugging process to place breakpoints where you wish the program to pause. A debugger can pause your program and you can watch the values of the variables that you have defined. This will help you to isolate errors or mistakes in the code. First, let’s talk about using breakpoints.
Using breakpoints
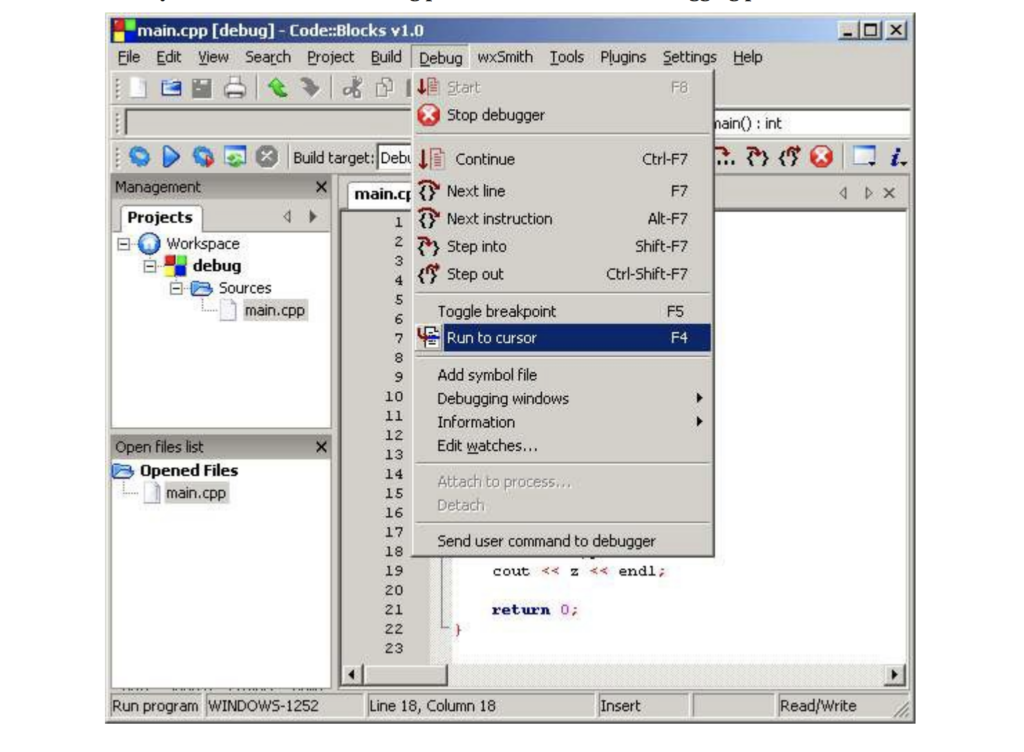
Set a place in the code to have the program pause. To do this, pull down the Debug and click Run to cursor. The cursor should be over the first line of code where you plan to start the tracing process.
Move the cursor over the line where you want your program to stop. This is called a breakpoint. Now you can tell the debugger to run the program up to the cursor’s position, or line number. This allows you to see the point where your program malfunctions.
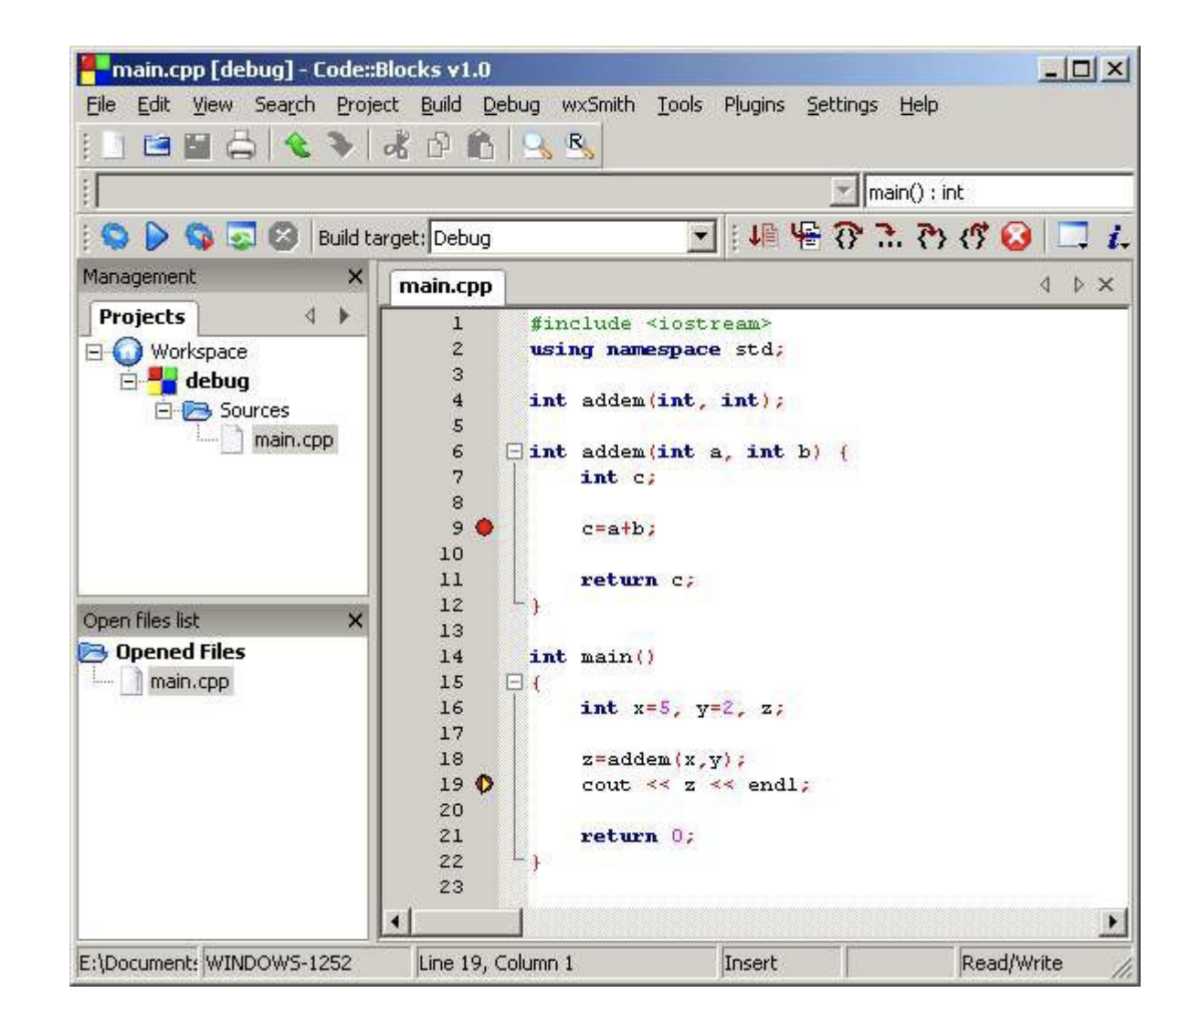
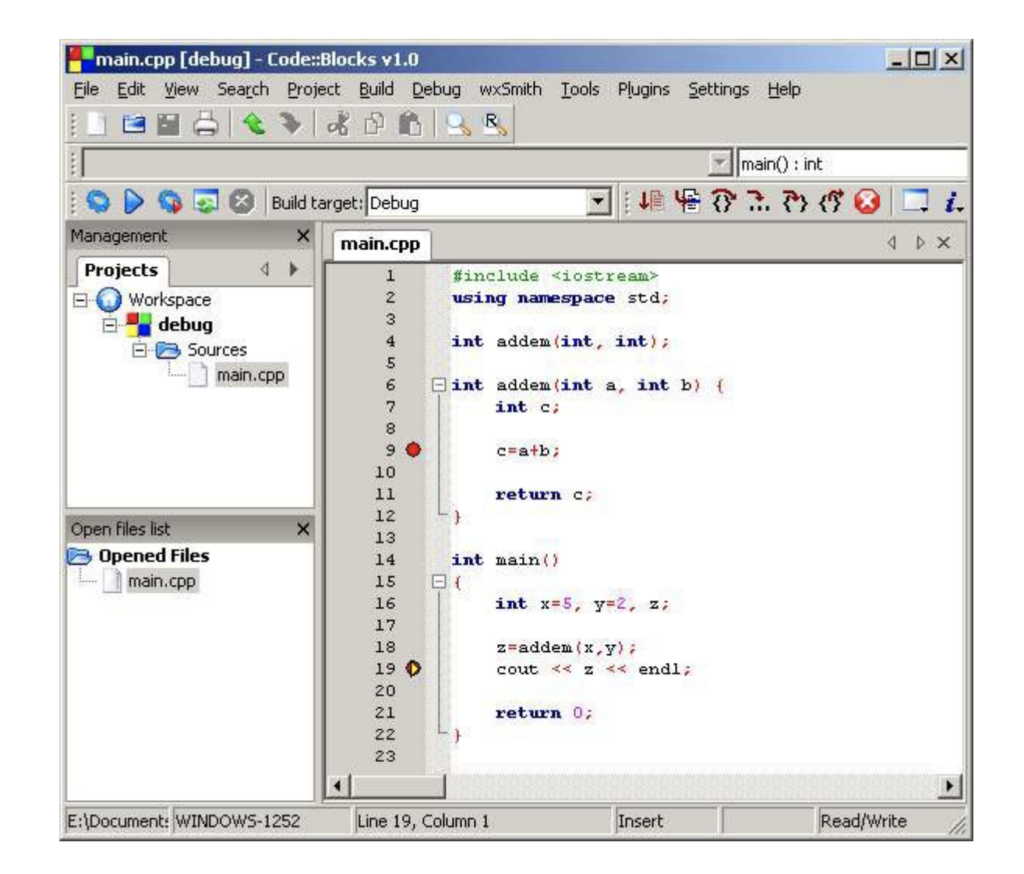
When the debugger detects a breakpoint, the program pauses and the debugger allows you to inspect your code. The breakpoint remains until you remove it. It can be toggled on and off by pressing F5. (Prior to running the program in debug mode, breakpoints will be marked with a red circle. )
Problematic areas of code can now be isolated between breakpoints for easier identification.
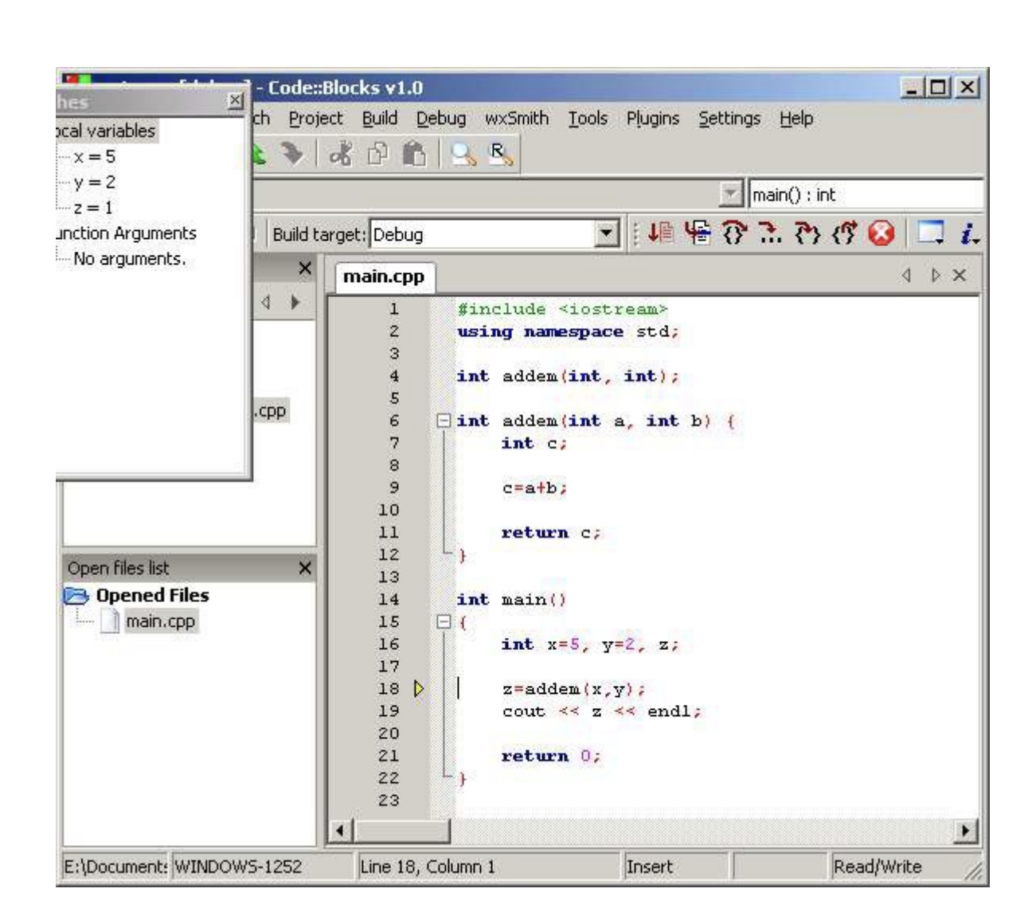
Using watches to monitor code variables
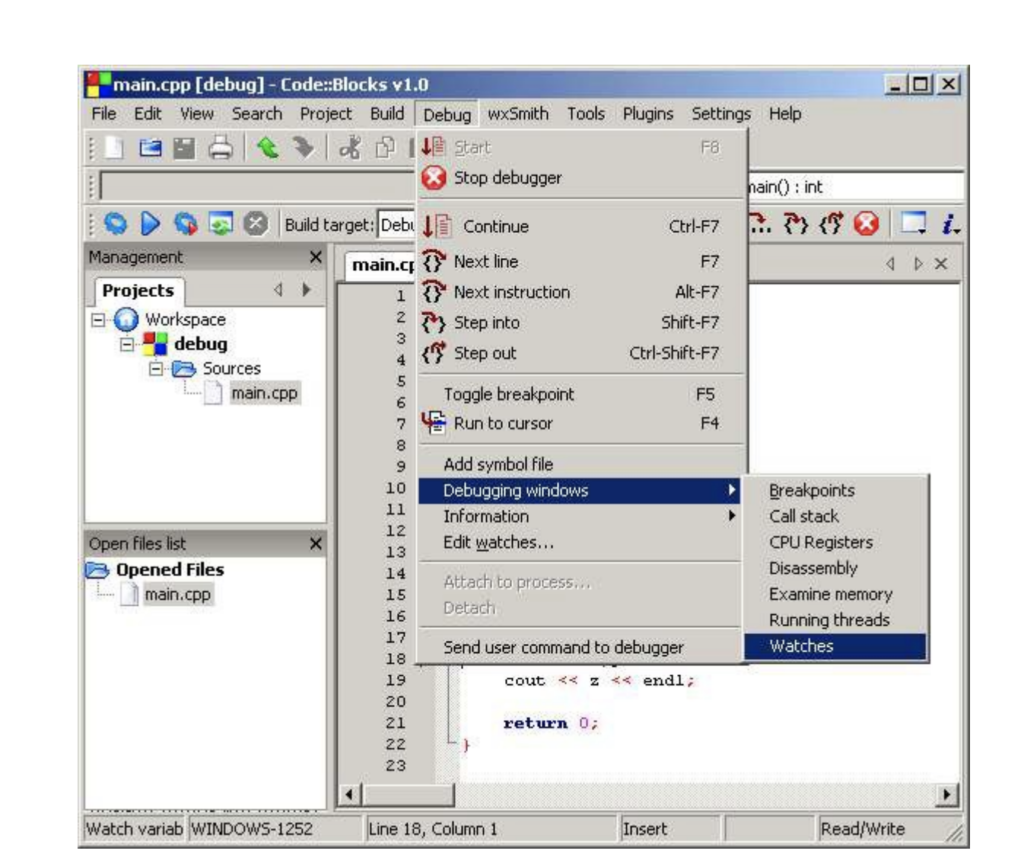
To monitor specific variables during the execution of the program, you should open the Watches window. This will highlight the variables in your code.
Do this by going to the Debug pull-down menu. Click Debugging Windows and then Watches. The Watches menu shows a list of the variables in your code. If nothing is next to the listed variable, there is currently nothing assigned to it in the program.
Debug tips
Yellow markers are displayed on the left side of the screen beside the location of breakpoints in the code when the running program has paused. This lets you see the exact location of the breakpoint.
To advance to next line of code, select Next line from the Debug menu. You can also use the F7 key as a keyboard shortcut to accomplish the same task. This allows you to walk through your code line by line in search of errors. This reduces troubleshooting time greatly.
When you are finished debugging, click Continue, and your program will run to the end. If your program is stuck and will not advance, you have the option to choose Stop debugging from the Debug menu.
When you run the debug process, the yellow triangle will show you where the breakpoint has stopped the program from running. The red circle will show the various locations that the breakpoints have been placed throughout the code.
Now that you understand the basics of debugging in Code::Blocks, you are on your way to completion of a successful program. When you have completed the debugging process Code::Blocks will ask you if you want to save your workspace. If so, click yes; it is now safe to exit the program.
If you’re new to Code::Blocks IDE and you’ve already downloaded and installed the program, it’s a good time to create your first program. We’ll go over the steps to create a specific starter program using Code::Blocks and programming in C++. This is a great way to get familiar with the layout and workings of the software.
Add files to your project
Follow these steps to add files:
Go to the Project menu and select Add files. This will bring in the files associated with your program.
Add any additional .cpp or header files to your project at this step.
Name your files. Now you will see your main .cpp file (if programming in C++) as well as any other .cpp files that you have added to your project. Press Select All to have this file saved as both debug & release targets. Press OK when done.
Edit your files
To begin to edit a file from your project, double-click the file name from sources, and it will appear in the window with line numbers.
Write your code in the main.cpp file (or alternate .cpp file that you have chosen.)
When testing your code, make sure that Debug is selected as the target to use. This is needed to have a debug version available once you compile your code.
Syntax
In C++ there is no special syntax for streaming data input or output. Instead, these are combined as a library of functions. Iostream provides basic input and output services for C++ programs; it must be included for your program to function properly. This is why we must include the #include< Iostream> line in our program.
Formatting the C++ code
We also must include the #include <cstdlib> to the program in C++ .
Be sure the statements you wish to print in the console are between “” quotation marks. For example:
cout << “Hello there!….or should I say NAMASTE “<<endl;
Be sure to use correct beginning and ending statements with each line of code. For basic C++ syntax please see this link.
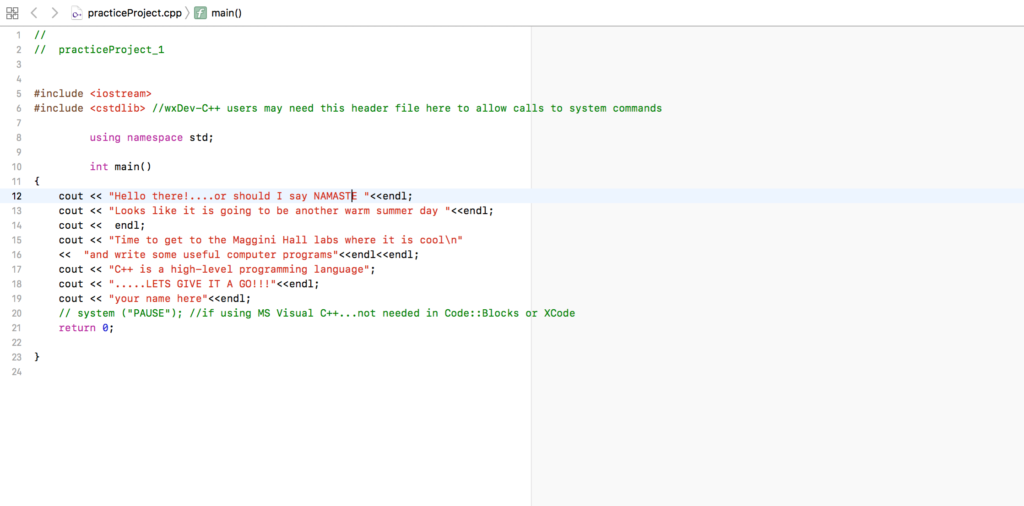
Input the following code into your project (see the image above for comparison):
#include <iostream> #include <cstdlib> //wxDev-C++ users may need this header file here to allow calls to system commands
using namespace std;
int main() { cout << “Hello there!….or should I say NAMASTE “<<endl; cout << “Looks like it is going to be another warm summer day “<<endl; cout << endl; cout << “Time to get to the Maggini Hall labs where it is cool\n” << “and write some useful computer programs”<<endl<<endl; cout << “C++ is a high-level programming language”; cout << “…..LETS GIVE IT A GO!!!”<<endl; cout << “your name here”<<endl; // system (“PAUSE”); //if using MS Visual C++…not needed in Code::Blocks or XCode return 0;
}
Then save your work.
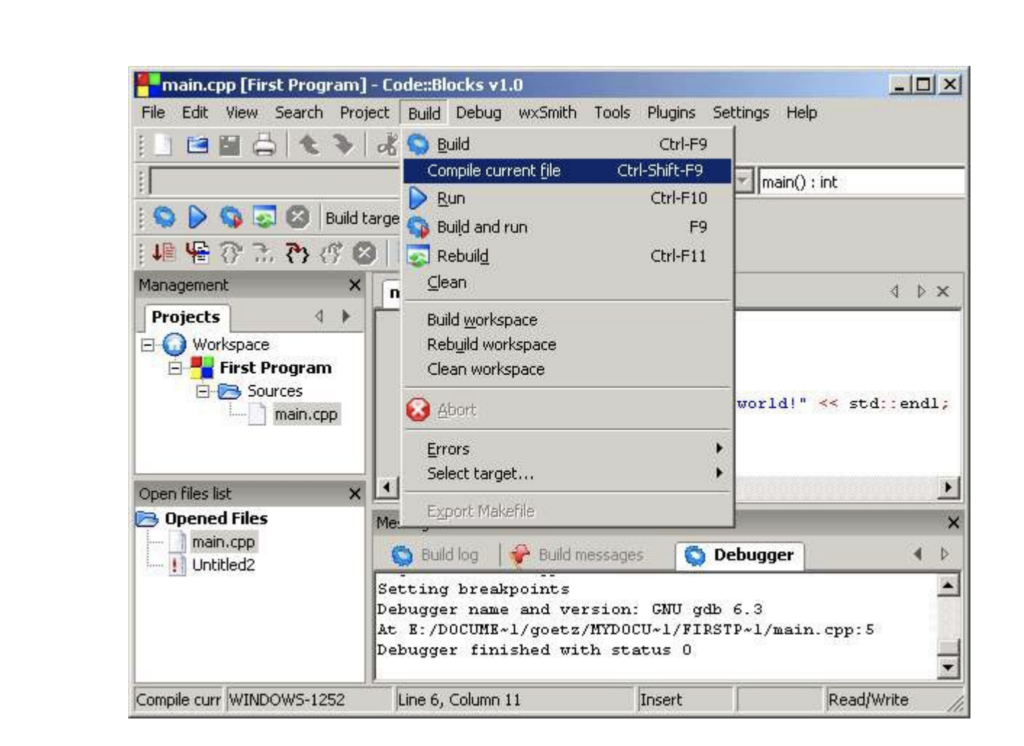
Compiling
After you complete the writing and editing of your program, you must compile the file. To do this, first go to the Build menu and select Compile Current File (or Ctrl+Shift+F9).
Next, test your project. From the Build pull-down menu, click Build and Run. This step will build an executable file for you. A project build takes the compiled versions of your source files and combines them into one single program. Your program output will now be displayed. You will see all of the text you wrote in between the quotes displayed as program output.
If an error is displayed, check the syntax of your code and check for missing pieces, or unintentional errors.
Although this is a very simple program, it is the foundation for beginning to write more in-depth programs in Code::Blocks. As your programs increase in length and depth, the same basic steps apply. Happy programming!
Code::Blocks is an open-source IDE (Integrated Development Environment). It helps you to work on software and programs you are developing, including coding, debugging, testing, and much more. It supports many compilers, such as GNU GCC (MinGW and Cygwin) and MS Visual C++. It is also free to download.
If this is your first time with this development tool, you’re in the right place! We’ll reveal what is Code::Blocks and how to use it.
What is Code::Blocks?
Simply put, Code::Blocks is a free cross-platform integrated development environment for C/C++ and Fortran. Code::Blocks is built around a plugin framework, which means you can extend its core functionality with various plugins. Essentially, Code::Blocks is perfect for building onto because with easy integration with user-made plugins; you don’t need to edit any of the source code to add the functionality you need.
Although the software is open-source, so if you need to edit the code, you can. While Code::Block inherently supports the functionality of multiple compilers and debuggers, it isn’t in itself any of these systems.
You can think ofCode::Blocks as a house. The house itself is an empty shell, but it has rooms that certain functions and systems can use. Not all Code::Blocks installation files contain compilers. Instead, Code::Blocks can use the functionality of whatever compilers you have installed, whether that’s GCC, Clang or Visual C++, or any other compiler that tickles your fancy. While you let the house metaphor simmer, let’s take a look at some of the features Code::Blocks is known for.
Code Editor
This integrated development environment (IDE) features code folding and syntax highlighting, driven by a Scintilla editing component. It also features a class browser, hex editor, C++ code completion, among various other utilities. The code editor organizes any files you have open into easily accessible tabs and supports personalized syntax highlighting colors, font, and font size selection.
Compilers
Code::Blocks features support for multiple compilers. Among the most widely used supported compilers are GCC, Digital Mars, LLVM Clang, MinGW, Microsoft Visual C++, Watcom, LCC, Borland C++, and the Intel C++ compiler. Code::Blocks was written in C++ but features decent support for other coding languages such as Fortran and D. The installation file also includes a plugin with support for further programming languages.
Debugger
The Debugger shipped with the Code::Blocks installation file has full breakpoint support. A Breakpoint refers to an intentional pause or stopping point written into a program. Breakpoints are put in place for debugging purposes to gather more information about a program during its execution and are sometimes simply called pauses.
Code::Blocks streamlines the debugging process by giving you access to the argument display, call stack, thread switching, custom memory dump, CPU registers, local function symbol, disassembly, and GNU Debugger Interface.
Easy User Migration
Code::Blocks is an increasingly popular integrated development environment. It, therefore, has features specifically designed for users migrating from other IDE’s. Including Dev-C++, Microsoft Visual C++ project import for MSVC 7 and 10, and Dev-C++ Devpak support.
Code::Blocks Tutorial: How to Use it
With any software, before you learn to use it, you need to install it. While most installs are as simple as clicking a download button, accepting a bunch of conditions, and voila, Code::Blocks might require a little thought.
To condense a long process, if you have a compiler already set up on your system, you simply click the download button, and you’re home free. This version doesn’t come with a built-in compiler, so you’ll just choose the compiler you have installed when it asks you to during use.
If you don’t have a compiler pre-installed, you’ll need a different installation file. To access this, click the link underneath the Code::Blocks download button, and you’ll get to the official website. Now click ‘Download the binary release,’ which is the easiest way to get the utility installed, now onto the bit that requires thought or at least some reading. You’ll see a list of download links if you scroll down to ‘Microsoft Windows.’ The one you want that includes a compiler is called ‘codeblocks-20.03mingw-setup.exe’. Here you can choose to either download from FossHUB or Sourceforge.net.
The minds behind Code::Blocks think of everything. On the list of downloads is an executable file (.exe) for people who don’t have administrative rights on their PCs, and another exe that includes all the Code::Blocks plugins. They really try to make things as easy as possible, not just within their IDE but also with installation. Here’s an easy guide for troubleshooting Code::Blocks if it misbehaves.
Run the installer. It’s a standard installer for Windows; just press Next after reading each screen. If using another operating system, choose the appropriate option on the downloads page referenced above.
If you’re planning on installing a compiler after you’ve installed Code::Blocks, read the information provided in the installer. Also, see this link for help setting up your compiler.
If you downloaded the installer that doesn’t come with MinGW, you may have to configure the compiler manually (usually Code::Blocks auto-detects the compiler).
Starting your first project
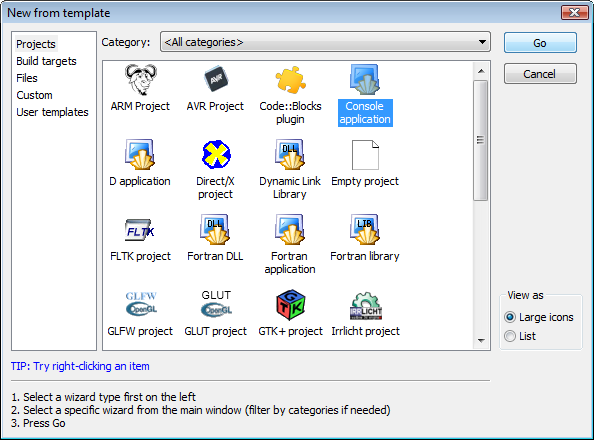
Step 1. Launch the Project Wizard
Select File->New->Project… to start a new project. You can select from many types of templates to help get your project started. For your first project, select Console application, as this is the most common for general purposes. Click Go.
Step 2. Select the destination for your project.
Choose your programming language, (for example C++) when prompted for a language. Then, on the next screen, give the project a title and select a destination folder. Code::Blocks will generate the remaining entries from these two.
Step 3. Choose your compiler.
This is often the default compiler that you use on your machine. The default builds will be debug & release. If another option is needed, select it here.
Step 4. Finish
After selecting Finish, you’re on your way to your first project!
How to Use Code::Blocks for C++
Once you’ve installed Code::Blocks on your PC, all that’s left to do is run it. As soon as you start Code::Blocks up, you’ll see a list of compilers. The utility will detect which one you have and automatically select it. It will ask you if you want to make the compiler the default viewer for C++ files, which you should.
Next, click on File> New >Project, and you’ll see a new window. Select ‘Console application’ and click ‘go.’ You’ll need to click ‘Next’ in succession until the language selection dialog box opens. Choose the programming language you use, and then you’ll be prompted to choose a place to save your project.
Rather place the project in its own folder because it is likely to create several files. Give your project a name and click ‘Next.’ Now, you will set up your compiler. You don’t need to change any settings you see here, so just click ‘finish’ and open the main.cpp file on the left of the screen.
By now, you should have your main.cpp file, which you can modify if you wish. Currently, it just says ‘Hello World!’, run it as is. Hit F9, which compiles and then runs the program. You now have a working sample program. The main.cpp code can simply be edited and then compiled and run again using F9.
How to Use Code::Blocks in Google Docs
Code::Blocks is available as a plugin for Google Docs. Simply go to the Google Workspace Marketplace, type in Code::Blocks and click install. Read through and accept all the permissions if they’re agreeable. Otherwise, you won’t be able to use its full functionality.
Once you’ve completed the install, Code::Blocks is easy to use. Your first step is to create a new document in Google Docs. Next, head to ‘Add-ons’ and choose Code::Blocks from the drop-down menu. Code::Blocks will open up a new panel on the right side; from here, you’ll have access to all the utility’s functionalities.
Next, you need to write or paste code into the body of the document. Once you have your code in place, select it, and you’ll be able to choose a language from the language drop-down menu or a theme from the theme drop-down menu. Click preview to view your code, and as soon as your code looks exactly how you want it, click Format. Your code should now be formatted perfectly, and you can move on to the next piece of code.
Code to your heart’s content
Now that you know how Code::Blocks works, you can get started on your first project. It may seem complicated, but you should get the hang of it soon. Feel free to show us anything you’re currently working on!


 Step 4. Finish