We’ve already written about virtual machines on this blog a couple of times, explaining how easy they’re to use and how handy they come in when testing new operating systems or new software. One of our favorite virtual machine solutions, VirtualBox, has recently been updated to version 3.0.6 which, among other new features, includes now an enhanced way to deal with system snapshots and share them across different computers.
What is a snapshot? It’s similar to the Restoration Point functionality in Windows. VirtualBox snapshots save your current virtual machine as is, with all the software you’ve installed so far, as well as files and personal configuration options. You can create as many snapshots as you need for each virtual machine, and revert the system to any of them at any point. So i, for example, you saved a snapshot just after installing the OS, you can go back to it anytime and have a clean, newly installed system in two minutes and without having to go through the pain of reinstallation.
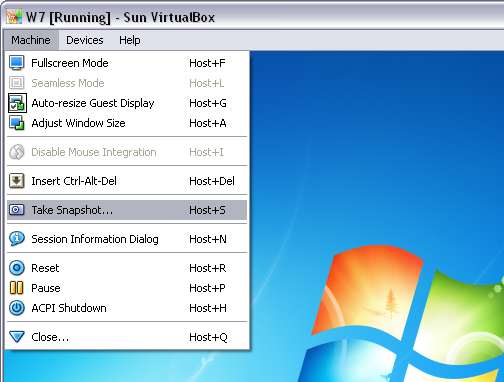
To create a snapshot in VirtualBox, all you have to do is click on the Machine menu in your virtual machine and select Take Snapshot. You’ll be asked to enter a name and a description for the snapshot, so that you can distinguish between different snapshots more easily. Then click on OK and you’re done!
To revert your current machine to a previous snapshot, open VirtualBox, select your virtual machine and click on the Snapshots tab. Right click on the Current State icon and select Revert to Current Snapshot, which will bring the virtual machine back to the latest snapshot you took. If you want to revert the system to an earlier state (for example, the first snapshot you took) you can do so by discarding all other snapshots, so that the first one you took goes immediately before the Current State icon. Continue reading “How to: Create and manage snapshots in VirtualBox”
 VirtualBox is an excellent free solution if you need to run Windows on your Mac. However, one common problem is that over time, you run out of disk space. If you receive the “Low Disk Space” warning in Windows, your only option is to either delete files and applications or resize the amount of hard drive space you allow Windows to use on your Mac.