The 10 rarest and most coveted Roblox hats

Roblox players everywhere would tip their heads off to you if you collected all 10 of these hats!

Roblox

Hats – yes, hats, the things you wear on your head – are one of the most widely traded commodities on the Roblox platform.

What makes hats so unique and popular is that only the Roblox staff can make, publish, and sell them; they control the amount that are sold, and this has resulted in some incredibly rare releases over the years.

There are thousands of different hats available in the catalog, but only a handful of them are considered uncommon or rare, and only a handful of those make our list of most coveted Roblox hats.

Owners of rare hats that are no longer or never were on general sale are able to sell them to the wider community for a price of their choosing, which means that many of the rarer hats sell for millions of Robux. Yes, millions, with our number one pick reaching close to R$1 billion!

The 10 rarest and most coveted Roblox hats

1. The Eerie Pumpkin Head

Roblox This hat was a prize all the way back in Halloween 2007 for The Spooky Building Contest. There were 16 of these hats handed out originally but, over time, accounts with them have either been deleted or have gone inactive, meaning that The Eerie Pumpkin Head is by far one of the hardest hats to find, period. At this moment in time, there is only one left, and its owner is currently selling it for R$999,999,999,999,999 (or 999 trillion 999 billion 999 million 999 thousand and 999 Robux). There is no single user on the Roblox platform who could afford that, so we think its owner – Linkmon99 – might just be showing off.
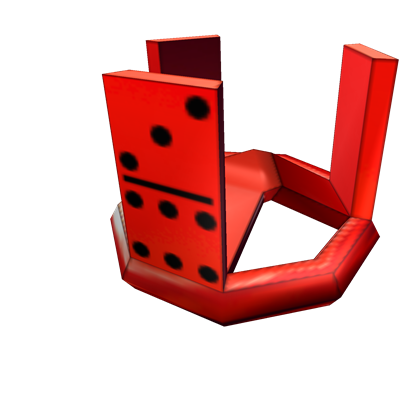
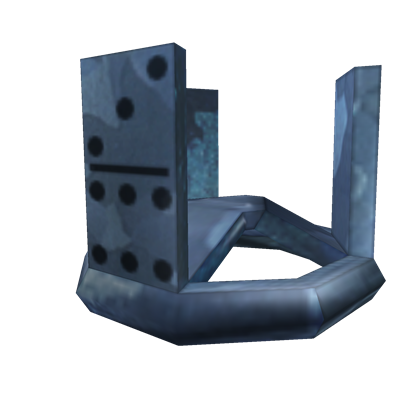
2. Domino Crown

Roblox Domino Crown is a legendary Roblox hat that only has a small handful of known owners. It was originally awarded to 13 people as part of the Domino Rally Building Contest in 2007.
There are currently only four people selling the hat on the Roblox exchange, and all of them have it listed for over R$50 million. Its average selling price is R$1,453,877, which reflects just how rarely it sells and how much it has increased in value over time.

3. The Kleus Aphthiton

RobloxReleased as part of the Grand Melee competition, the Kleus Aphthiton was awarded to only the top four competitors and is almost never traded.
In fact, only one person – Linkmon99 again – is selling it on the exchange for the eye-watering price of R$9,999,999.

4. Dominus Empyreus

RobloxDominus Empyreus is part of the Dominus series of hats and was released in January 2010. Originally on general sale for R$13,337, only 26 of them were sold, and today it is the most expensive hat in the Dominus series.   Many people consider this to be the most expensive hat on Roblox that is realistically obtainable (who’s got $50+ million Robux to spare?) and is currently retailing at R$15 million. Its average price is $2,207,992, which reflects just how rarely it is traded and has inflated in value over time.

5. Dominus Frigidus

RobloxDominis Frigidus, which translates to “Lord of the Cold,” is the third hat released as part of the Dominus series. It was designed by Roblox user Sethycakes who, as part of his Make-A-Wish Foundation wish, visited the Roblox headquarters, where he was awarded R$1 million – the first Roblox player to have this many Robux – and got to design the Dominus Frigidus. Like the Dominus Empyreus, only 26 were sold for R$39,000 before it went off sale. There are currently 18 of the original 26 left, three of which are for sale starting at R$10 million.

6. Red Domino

RobloxThe Red Domino was given out as the Glowing Gold Gift of Superuser to all the Roblox administrators and moderators for free, in addition to going on sale for R$20,000. When opened, it revealed the Red Domino –  which, at the time, was the second Domino Crown to be made. The hat went limited in August 2013 (meaning it could be sold on the exchange) and is currently selling for R$500,000.

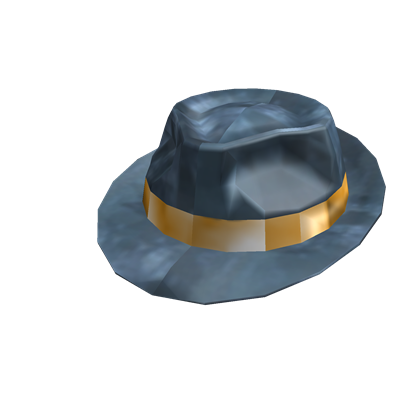
7. Sparkle Time Fedora

RobloxCreated in December 2007, Sparkle Time Fedora was given away in the Glittering Gold Gift of Fame, which was given to players who had 1,337+ profile views. It could also be purchased for R$500, which was a lot at the time. The Glittering Gold Gift of Fame was sold only 88 times, but it is not known how many of them were given away to players who had the required number of profile views. At present, it is only thought around 400 are left and it sells for an average of R$192,666.

8. Bluesteel Domino Crown

RobloxYet another re-texture of the classic Domino Crown, the Bluesteel Domino Crown was retrieved from recipients of the Epic Builder Present awarded free to the platform’s top 100 places between December 7 and December 13, 2011, and could briefly be purchased for R$25,000. It is not known how many are left, but it is currently selling for R$211,000, so anywhere in the region of 500-1,000 would be a logical estimate.

9. Bluesteel Fedora

RobloxReleased during Black Friday 2012 for R$10,000, Bluesteel Fedora was sold as a LimitedU item. Only 150 of them were sold; you had to be relatively quick and be willing to part with R$10,000 to get one. Currently, you can get your own Bluesteel Fedora for R$190,000… the initial investment of R$10,000 was clearly worth it!

10. White Sparkle Time Fedora

RobloxA re-texture of the classic golden Sparkle Time Fedora, the white version was released in September 2017 for only two hours during the Labor Day sale. and sold 306 times for $100,000. Released only recently, it will take some time for some of them to fall out of circulation and see a significant increase in value. At present, it is being re-sold for an average price close to R$150,000.

The 2019 beginner’s guide to Minecraft

Minecraft is fast approaching ten years of being one of the world’s most popular games, with hundreds of millions of active players across all platforms. It has revolutionized the industry and has turned some of its most talented players into multi-millionaires. It dominates YouTube, is on the shelves of every toy store, and it even has its own Lego range.

Some people play Minecraft because it offers a lot of creative freedom; Minecraft has been used by architects and in schools as an educational tool. For others, it’s the adventure; such a vast world can be explored endlessly and provides hours of entertainment.

If you’re late to the party and have only just bought the game, you might not know where to start. The game drops you into a very vast world, and it can be a very confusing game to get started with. Each world is randomly generated from a string of numbers (known as a seed), so no two worlds are the same. Fortunately, once you’re armed with a few basics and a pickaxe, you’ll learn the ropes in now time. So let’s dive into the basics.

The 2019 beginner’s guide to Minecraft

Crafting

Crafting is central to the game, and is used to make all kinds of different objects from the materials you have. Each item in the game – such as a sword – has its own individual crafting recipe. For example, to make a stone sword, you would craft it like this:

Placing a stick below two pieces of cobblestone would make a stone sword. Swap out the cobblestone for wood, iron, gold or diamond to create different variations, diamond being the strongest and most durable.

Before you start crafting anything, however, you will need to build a crafting table, which is made from four pieces of wood. This is a very simple process and can be done as soon as you step foot into your first world.

How to build a crafting table

  1. Locate a tree and then punch out some wood by holding down left-click.
  2. Press the e key to open your inventory and select the wood, placing it into the four boxes next to your avatar. Four oak wood planks will appear.
  3. Click the oak wood planks and drag them to your inventory. The original piece of wood will disappear because you have turned it into planks.
  4. Then, fill the four boxes where you placed your original piece of wood with the four wood planks. A crafting table will appear.
  5. Drag the crafting table to your hotbar (the single line of boxes) and then exit your inventory. The crafting table will appear in your hotbar and you can select it by scrolling. When it’s selected (i.e. it is in your hand), place it on the floor by right-clicking.

You now have a crafting table, which is a 9×9 area that allows you to craft anything in the game; just right-click the crafting table to use it.

It is important to know how to utilize the crafting feature so you’re ahead of the game when it comes to surviving your first night in Minecraft, because you won’t have long until it’s dark and monsters spawn. Speaking of which…

The first night

Your first night in the game is the hardest because you start with nothing. When you spawn for the first time, the in-game time is noon. You only have a short amount of time (ten minutes) to get a basic shelter together in order to survive. If you don’t build a basic shelter, you’ll spend your first night repeatedly getting mauled by mobs – not fun!

To survive your first night, you’ll need to grab yourself some wood to build a basic shelter and create some wooden tools, then hunt down some coal to make a couple of torches. Mobs (monsters) spawn in the dark; you really don’t want to create a shelter and then have a monster spawn inside it!

What exactly are “mobs”?

“Mobs” is the term used to describe Minecraft’s animals and monsters. Mobs can either be passive (such as sheep or pigs) or aggressive, and there are many different adversaries in the game that have the potential to harm you or destroy your creations.

Over the years, mobs have been a huge focal point for the Minecraft
development team, and the number of mobs has virtually doubled. However, the mobs you should pay special attention to while you’re still finding your feet are the aggressive ones that can spawn in the Overworld.

Zombies are quite easy to fight; you just need to keep hitting them.
Zombies will come after you if you get within a certain radius of them,
and they can beat down doors. They are very slow and aren’t a huge
threat, but a group of them can be deadly.

Spiders only attack you at night. These pesky monsters have the ability
to climb walls, jump and move fairly quickly, though, like Zombies, they
are quite easy to kill… most of the time.

Skeleton Archers are a serious threat even for experienced players. This very irritating monster carries a bow and arrow and has the
ability to shoot you with it. As a result, these monsters can do damage
to you from a considerable distance, and they are very accurate.

Creepers are perhaps the most widely known and most destructive of mobs
in the game, especially when you are just starting out. Creepers explode
when you get within a certain radius of them and can decimate small
bases. It takes them a couple of seconds to explode, but they will chase
after you, so just stay well away!

Endermen are the final mobs you need to worry about in the early stages
of your Minecraft life. These tall, dark, and slender mobs may look
pretty scary… because they are. Endermen are passive… until you look at
them… and then you’re going to die, probably, because they have the ability
to teleport away from and then back to you, attacking from a different
angle. Just keep as far away from them as possible; you don’t stand a
chance as a new player!

Mining

As you have probably guessed by the name “Minecraft,” mining is pretty
much the most important aspect of the game. When you’ve survived your
first night, have a basic set of tools, and know which nasty monsters
to look out for, you’re set to begin delving underground and exploring
the world beneath you.

The world extends down below the grass by around 100-130 blocks; it
is here where you will find all the best resources, treasures, and loot.
You’ll find iron, diamonds, and gold, with which you can create more durable tools; and redstone, which is Minecraft’s answer to electricity and can be used to make circuits.

Naturally occurring iron ore can be mined with a stone pickaxe and smelted into iron bars.

It is best to start mining below your shelter, because then you are safe
from monsters and you don’t need to run through the wilderness to get
home and risk being attacked by a monster. Don’t dig straight down,
though, or you may fall into lava or a chasm.

The best way to mine is to dig in a stairway pattern; that way you avoid
falling into deadly pits and have a clear pathway to get back home. No
matter what method you use to mine, though, always make sure you have a plentiful supply of torches and food; it is dark underground, which makes it hard to see and is the perfect environment in which monsters can spawn and ruin your day!

It is easy to get lost in mining, and people often spend many hours doing
it… it is quite therapeutic, and Minecraft’s ambient music only adds to
this. Remain vigilant at all times, because monsters do spawn
underground in pre-existing caves and dungeons… in fact, it can be just
as dangerous below ground as it is above ground.

Now that you have the basics of Minecraft down, take your gaming to the next level with our guides to how to install Minecraft mods and how to change skins in Minecraft.


How to speed up your home Wi-Fi network in 5 steps

Having Wi-Fi at home was a luxury a few short years ago. In our lives today, it’s not merely an excellent commodity to brag with; it’s an essential part of our lives that we need for work and play. 

Wi-Fi is arguably one of the most important and useful technologies you can have in your home. But, it can also be incredibly frustrating when it slows to a crawl just as you’re finishing a work project or trying to send a file. Let’s not even talk about the frustration when your Netflix has to reload frequently while you’re trying to binge-watch your favorite series. It can drive even the calmest of people to contemplate throwing their router out the window. 

Before you do that, though, read on because it’s possible to boost your Wi-Fi connection and speed up your home network! With modern tools and techs such as CCleaner, ExpressVPN, and Clean my Mac X, your family life and your windows can all stay intact.

How to boost your wi-fi

Step 1 – Find the right place for your router

If you want the best Wi-Fi signal, you should place your router out in the open, if possible, in the center of your home without walls or furniture obstructing it. Although a router isn’t the prettiest of things, you should avoid hiding it behind objects and furniture that could hinder the signal.

Your router’s placement is often dictated by where your internet connection enters your home. Still, by purchasing a longer ethernet cable and some clips to hold the line in place, you can place it in a more prominent part of your home. Keep in mind that using the ethernet cable does secure a more robust connection, no matter how unsightly it is. To maximize the router placement benefits, arrange the antenna perpendicularly, with one pointing vertically and the other horizontally.

Step 2 – Check your internet speed

Depending on where you’re located, your internet speed can fluctuate a great deal from what you’re paying for. The great news is that your ISP has many tricks up their sleeve that can increase your internet speed if they know that it’s underperforming. If you’re struggling to get a stable and uninterrupted connection, you can quickly check the connection speed with Network Speed Test tools. It’s free and safe to download and quickly shows you how fast your internet is downloading and uploading.

  • Download a Speed Test app or open a free one.
  • Open up the app and click ‘Begin.’
  • Compare your upload and download speeds against your ISP agreement.
  • If it varies significantly, log a call to your provider for assistance.

Step 3 – Change your Wi-Fi channel

With your router’s initial set up, it detects the least crowded channel and uses it, making it the router’s default channel. But, as the area around your home becomes more crowded, the channel can begin to fill up, which can slow you down.

Tools such as NirSoft can analyze the Wi-Fi spectrum and give you details about your home network, including channel utilization, which can help you decide whether to change to a less populated one.

Your internet service provider should have a step-by-step guide on how you can change to a different Wi-Fi channel, as the process can vary. Let’s look at a typical procedure:

  • Open your web browser and type in your router’s IP address in the search bar.
  • Press’ Enter.’
  • Type in your username and password.
  • Select ‘Wireless Settings.’
  • Click on the drop-down menu for ‘Channels’ and select another Wi-Fi channel.
  • Save your changes.

Step 4 – Update your router’s firmware

Problems with your Wi-Fi network can be as simple as your router needs an update. Manufacturers are continually tweaking software to make slight improvements to router performance, and you could be a few (or, probably a lot of) updates behind.

Updating your router’s firmware can vary significantly in difficulty depending upon your device’s manufacturer. Still, most modern routers have an update function built into the router’s administrator panel, so it is just a case of pressing a button and waiting. Here are a few simple steps to update your router:

  • Connect your PC to the Wi-Fi network in question.
  • Type the IP address of the router into your search bar.
  • Navigate to the ‘Update’ or ‘Firmware’ section.
  • Select the manufacturer of your specific router.
  • Select to download the ‘Firmware Update’ file.
  • Move the file to your desktop. Open the ZIP file and extract the firmware files.
  • Click on ‘Browse’ in the ‘Update’ section.
  • Click on the extracted update file.
  • Follow the prompts to start the upgrade process.
  • Please don’t interrupt the update; it can take a few minutes.
  • When the firmware update is complete, you can reboot your router.

Step 5 – Lock down your Wi-Fi network

It would help if you always had a password on your Wi-Fi network, as unsecured networks can cause all sorts of problems, are vulnerable to attacks and can put your data at risk. In addition to this, neighbors piggybacking on your network can significantly slow it down for obvious reasons.

In addition to this, you can hide your Wi-Fi network from prying eyes via cloaking. If outsiders cannot see your network, it cannot be accessed – simple! Consider a Wi-Fi Protector to cloak your network from unauthorized opportunists.

Some of the most useful plugins for Minecraft server owners

Minecraft multiplayer would not be the success that it is without its range of amazing plugins, which modify certain aspects of the game. There are thousands of plugins available for free on the internet, which are very useful and, in some cases, necessary to run your server effectively.

There are plugins for almost everything you could possibly think of. Want to build things quicker? There’s a plugin for that. Want to create a player ranking system? There’s a plugin for that. Want to monetize your server? There’s a plugin for that, too. It can be hard to decide which plugins to include, so here is a list of ones you must (or really should) have, if you want to build a successful server.

Minecraft Download Minecraft
7

Some of the most useful plugins for Minecraft server owners

1) WorldEdit

WorldEdit by sk89q is possibly the most popular plugin there is, with over 17 million downloads and almost all servers using it to some degree. WorldEdit is a powerful, yet simple-to-use tool which enables you to edit large amounts of blocks with relative ease. There are over 100 functions that can be used to modify the world around you, and you can edit thousands of blocks at a time. Cutting, copying, pasting, rotating, removing, and adding large numbers of blocks using the //wand tool are just some of the things you can do with this plugin.

2) WorldGuard

WorldGuard – again by sk89q – is a plugin which protects your Minecraft server’s world. Through the creation of regions, you are able to define an area where you can control who can do what. For example, you could build a spawn area where new players will start when they join your server for the first time. And you could and set the spawn region’s rules so that nobody can place and destroy blocks and monsters cannot spawn there. WorldGuard has some great features and is a must for any public server.

3) CoreProtect

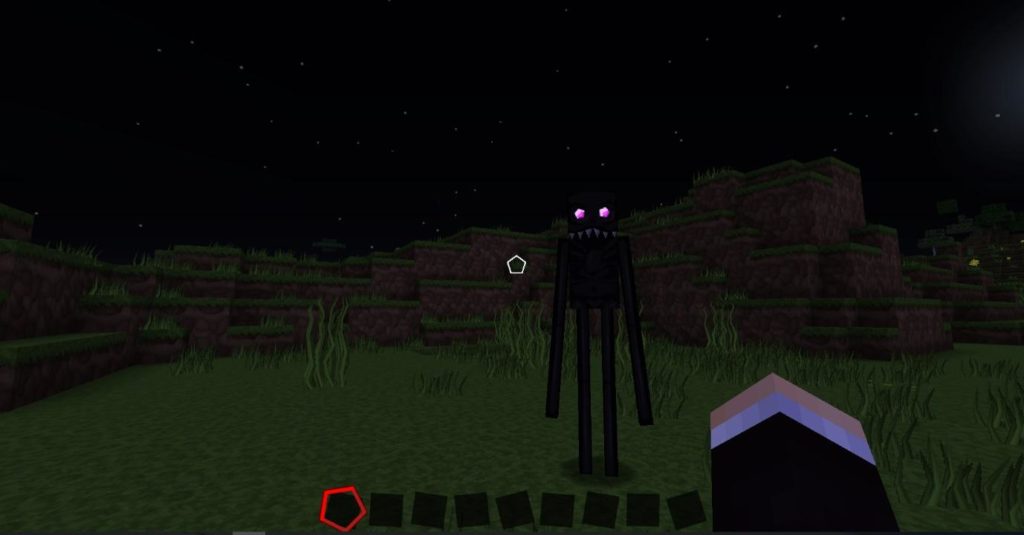
Some players just want to crash your party and mess things up. CoreProtect was created by Intelli to stop them. CoreProtect is a data logging anti-griefing tool, which can be used to restore and roll back damage caused by malicious players.

The plugin logs all instances of blocks being placed and broken, or damage being caused by other means (fire, explosion, liquid and lava flow, etc) and can be used to quickly and seamlessly restore creations to their prior state. Using MySQL storage, it can do all of this without draining your server’s resources, which is great!

4) LaggRemover

LaggRemover by drew6017 is a utility plugin which keeps servers running more smoothly by unloading empty chunks of the map and removing unnecessary entities (like monsters that are not near players, or blocks that haven’t been collected from the ground).

This is by no means a game-changing plugin, but it is very useful to have if your server has quite a few players; the more players you have, the more entities and chunks there are to slow your server down.

5) Vault

Vault is not a plugin in the sense that it adds new features to the game, but it is a plugin that manages how other plugins interact with each other. If you’ve got a lot of plugins running on your server, you are going to need Vault – or something similar – to do this, and many plugins directly rely on Vault to even work at all.

Vault enables other plugins to hook onto it and manages their
interactions and manages other server systems such as the chat or economy.

6) EssentialsX

EssentialsX by drtshock is quite aptly named because it is a plugin packed with lots of useful server commands and functions for miscellaneous server functionality. That includes moderator tools (banning and kicking players), spawning tools, player kits, teleporting tools, warps, mob spawning, colored signs and more. No matter what type of server you run, you will need this!

7) WorldBorder

WorldBorder is another utility-type plugin which limits the size of your world by placing an invisible and impassable border around it. Its size depends on the radius you set, and this is a very useful plugin for smaller servers that only have a few players. Given that the Minecraft world is unlimited, you do not want a 30-player server to be spread out across a 100,000 x 100,000 map!

8) NoCheatPlusNoCheatPlus

NoCheatPlus  is – you guessed it – an anti-cheat plugin, which can detect hacked clients for things such as flying, speed hacking and a variety of other cheats.

Manually detecting and figuring out whether a player is cheating can be difficult. This plugin removes a lot of the legwork involved in keeping hackers out of your server by preventing you from using their cheating tools and warning you of suspicious behaviors.


A guide to The Nether and The End in Minecraft

Although you may have dominated the Overworld, there are two perilous
dimensions that pose an even greater challenge, greater rewards, and
beasts more ferocious than anything you can find in the grassy plains of
Minecraft’s passive Overworld.

Survival in these treacherous realms will be difficult; you’ll need to
be on top of your game and successfully navigate the alien terrains if
you want to make it back to the Overworld. But first, you need to get
there – here’s how!

A guide to The Nether and The End in Minecraft

Getting to The Nether

Infiltrating The Nether is no easy process; it is not something you can do as soon as you start playing the game. It takes time to gather the resources necessary in order to build the portal itself. Plus, you should make sure you are up to the challenges that will await you. Before you try to visit The Nether, make sure to build up an arsenal of weapons and protective gear, because it is a very dangerous place!

Building a Nether Portal may sound simple, but it requires access to resources that can be difficult to locate. A Nether Portal is made of Obsidian, a nice looking solid block with a purple hue that you can mine only with a Diamond Pickaxe. Obsidian can be found far underground in caves and chasms, often where water has met lava, and you need 18 of these blocks to build yourself a Nether Portal.

Once you have gathered your 18 Obsidian blocks, build a  5×4 portal that
looks like this:

There you have it! A Nether Portal.

But it’s not quite done yet, and you might be wondering why nothing happens when you enter it. To use the portal, you’ll need to activate it by equipping a Flint and Steel then right-clicking on the portal. The middle portion should turn purple, which indicates that it is ready to be used to zip you to The Nether.

Be careful, though; don’t go until you are up for the fight that awaits! When you enter The Nether for the first time, make note of where your portal is and don’t lose it – it is your only way back, aside from respawning, and it is easy to get lost in this hellish dimension.

Upon arrival, you will be greeted by an unforgiving world filled with lava pools, fiery dark terrain and lots of scary mobs. You can find many treasures in The Nether, such as Nether Fortresses, but there are plenty of adversaries too. Zombie Pigmen and Ghasts are two of the commonly found monsters here, and they are not pleasant.

Ghasts are the huge, white, ghostly looking mobs that can fly and will shoot fireballs at you whenever they have a direct line of fire. Your only line of defense against these monsters is a good bow and arrow, so make sure you come prepared!

On the other hand, Zombie Pigmen will not bother you unless you attack them first; they are passive until disturbed. If you do attack one, though, get ready to run; Zombie Pigmen attack in numbers and will all gang up on you if you dare pick a fight! Their golden swords are very deadly, and you can quickly become overpowered by them.

Finding The End

Locating and exploring The End is something that should be on every Minecraft player’s bucket list; it is the ultimate fitting end an awesome game. The End is home to the Enderdragon, a large mythical beast that is viewed as Minecraft’s “boss level” enemy.

Getting to The End is not easy; in fact, it is significantly harder than building a Nether Portal. First, you cannot build an Ender Portal; you must locate a Stronghold. This is very resource intensive. Then, when you have found a Stronghold that contains an Ender Portal, you must navigate your way around the fortress – a maze of rooms and confusing corridors – to locate the portal, all while fighting off any mobs that come your way.

Although this is no easy feat, The End is an amazing realm, and if you are up for what can be a very long and tiring adventure, then you should go for it!

Locating a Stronghold

The Eye of Ender is used to locate a Stronghold. When thrown in the air, it travels upwards and then horizontally in the direction of the nearest Stronghold. Then, it will either drop to the floor (80% chance) or break (20% chance). You also need Eyes of Ender to activate the End Portal (12 in total), so make plenty of them before you start your adventure!

To make an Eye of Ender, you need Ender Pearls and Blaze Powder. You can get the pearls by killing Endermen, and the powder from locating and killing Blaze monsters in the end.

Keep throwing your Eye of Ender until it no longer travels horizontally, and instead travels downwards toward the ground. When it does this, you have located a Stronghold, which will be far under the ground on which you stand – you will need to dig far, far down in order to enter the Stronghold and begin exploring.

Strongholds can be made up of many rooms that may or may not be connected. If you keep finding dead ends, just keep going and digging around the surrounding area to locate more rooms. It can take a while to find the End Portal room, but you will know it when you’re there – look out for stone brick like this:

This is what a Stronghold looks like and, as we have already mentioned, it is a fortress of twists and turns, rooms which lead to nowhere and are full of surprises. It can take a while to find an End Portal, so be patient and begin exploring – there is a lot for you to find here.

An End Portal is a 3×3 square with its corners missing, made of a white block with a green border. It always sits atop some stairs with some lava underneath it, and it looks like this:

An inactivated End Portal: note the empty black holes in the blocks.


Like a Nether Portal, the End Portal is not active when you find it. To activate it, equip your Eyes of Ender and right-click each individual white block; this will place an Ender Eye in them and when they are all filled the portal will activate. Jump on in if you’re ready to be transported to The End and face the Enderdragon!

When you reach The End, you will be greeted by a big creamy-colored land mass, on top of which sit lots of towers made of Obsidian. Guarded by Endermen, these towers are what gives the Enderdragon its power and, in order to defeat the Enderdragon, you must first destroy the beacons that sit atop of these towers.

These Endermen will not bother you… so long as you don’t look at them directly!


The Endermen are harmless when passive; just don’t look at them – as I am sure you are already aware – and you won’t be harmed. A bow and arrow is the weapon of choice for both taking out the crystals and the Enderdragon itself.

It is possible to take down the Enderdragon without destroying the beacons, but you will need a very strong bow, because the Enderdragon can regenerate health from active beacons. Eventually, this mythical beast will succumb to your attack and dazzle you with a spectacular light show.

Make sure you collect all the experience points that this monolithic adversary drops! Just below where the dragon falls, his egg will spawn atop a podium – be sure that you pick it up and display it proudly back in the Overworld!

But wait, what’s this? Another portal? Yes, that’s right! A new portal will spawn where the Enderdragon died and, upon entering, you will see the game’s ending credits and be returned safely to the Overworld… much better than having to fight your way back through the Stronghold and walk home!

How to start your very own Minecraft server

Running your own little Minecraft server can be a very rewarding experience. Over time, you may build up your very own community of loyal players, which has the potential to grow in popularity if you play your cards right and run your server well.

Although it sounds complicated, running your own server isn’t as hard as you’d imagine. You do not need much prior technical knowledge to get going. Just keep in mind, you should know the Minecraft game itself very well if you are going to attempt this!

Running your own server gives you complete creative control, and there are hundreds of modifications out there which extend the multiplayer experience beyond simple, vanilla Minecraft survival; this is what has made Minecraft multiplayer servers so popular among gamers.

Minecraft Download Minecraft
7

How to start your very own Minecraft server

1. Decide on a server theme and then choose a hosting provider

The first step is to decide on a server theme, and there are plenty to choose from: factionsprison, classic survival, and towny, among others. Each gameplay theme brings completely a completely different dynamic to the game, but you probably already have one in mind.

When you’ve settled on a theme, you need to choose a hosting provider. You can set up a server on your computer, but this is not feasible if you want to have a public server online 24/7. In addition, hosting a server on your computer requires a fair amount of technical knowledge, and it is much easier to go with a hosting provider, where setting up a server is as easy as clicking a few buttons. There are plenty of Minecraft hosting providers out there, but let’s use Nitrous Networks – a UK-based company – as an example.


You are free to use any provider, but Nitrous Networks has good ratings and their prices are reasonable.

2. Setting up your server

When you have paid for your server and it has all processed, navigate to your server’s control panel. It will look like this (most hosting providers follow a general layout):

Press Start, and your server console (where all the timestamped messages are) will fire up, preparing your spawn area. This will take around 10 to 20 seconds – you can see it is ready when no new messages appear.

To join your server, navigate to your Minecraft game client and direct connect to your server’s IP address.

That’s it – it really is that simple! Although, your new server will be very plain… it is what is referred to as ‘vanilla Minecraft’, that meaning it is the basic Minecraft game. Although it is possible to run a ‘vanilla’ server, they are not as popular as servers like factions, a player-vs-player game mode.

3. Installing Bukkit or Spigot

We recommend installing a Minecraft developer API mod such as Bukkit or Spigot – the two most popular Minecraft server modifications which provide
additional functionality and control to Minecraft servers – allowing you to ‘plug in’ additional Minecraft server modifications (called ‘plugins’, such as Factions or Towny) into your server.

Don’t be intimidated by the jargon, installing these are very simple. In your server’s control panel, navigate to ‘Modpacks’ and choose either Bukkit or Spigot, then press Install. That’s it.

At this stage, it does not make much difference which you choose, but Spigot has additional functionality and is further optimized to support larger servers that pull in hundreds of players.

You do not need to worry too much about what Bukkit or Spigot are; they
do very little on their own and are developer tools which expose an API
which can be used by developers to add functionality to Minecraft
servers. This additional functionality is implemented through plugins
(and there are thousands), which can be downloaded freely and added
to your server.

4. Making yourself an ‘op’

An ‘op’, short for operator, is an administrator on a Minecraft server. These people have access to additional commands and abilities (for example, such as being able to kick or ban players using /kick or /ban, spawn items using /give, or fly using /fly.)

As a server owner, you will want to make yourself an operator because this is the top-level administrative level you can have on a server. It is recommended that you give operator privileges only to yourself and trusted people because some of the commands can wreak havoc on your server and cause irreparable damage.

To make yourself an op for the first time, navigate to your server control panel and type ‘op [name]’ in the input box, replacing [name] with your Minecraft name.

In future, you can type ‘/op [name]’ within your actual server to make additional people operators. But, for first-time use, it must be done on the console.

5. Installing plugins

Plugins bring your server alive, and there are thousands of them. To get an idea of what plugins are and what they are capable of, we recommend installing some and playing around with them.

With the majority of reputable Minecraft server providers, installing plugins can be done through the control panel. Navigate to ‘Plugins’ and begin reading about some of the different ones available. We are going to install a plugin which displays a message to players who join your server. In the ‘Plugins’ search bar, type ‘welcome message’ and install the very first one.

Press View then Install and wait a few minutes. Then, restart your server by navigating to ‘Manage’ and pressing Restart. Your plugin will now be installed. Before the plugin will work, you will need to configure it. This is very easy, and most plugins have a user-friendly file called ‘config.yml’ which allows you to modify its settings.

To access a plugin’s configuration, navigate to the ‘plugins’ folder under the ‘File Manager’ tab, open the plugin’s unique folder (which is usually the name of the plugin) and then click ‘Edit’ next to ‘config.yml’ and follow the instructions provided by the plugin’s developer. It is very easy, and requires no special knowledge.

6. What next?

There are many possibilities with running a Minecraft server, and the best course of action is to just go with the flow, play around with some plugins and figure everything out as you go – you can only learn to run a server by running one, even if it’s just you who plays it to figure things out!

Some of Minecraft’s bigger servers and server networks pull in thousands of unique players per month, and if you create a community which appeals to the general Minecraft community, you could find yourself building a name for yourself very quickly.

Related articles:

8 cool things you didn’t know you could do in Minecraft

8 amazing Minecraft creations that will blow your mind

The 2018 beginner’s guide to Minecraft

5 great kid-friendly Minecraft YouTube channels


5 great kid-friendly Minecraft YouTube channels

If you have a child or young relative who is obsessed with Minecraft, they probably spend just as much time sitting in front of YouTube watching Minecraft videos as they do playing the game itself.

Minecraft-related YouTube channels pull in millions of views per day, and they are a huge part of YouTube’s video library; there are hundreds of Minecraft YouTube channels with millions of subscribers apiece. These videos have a very wide range – beginners’ guides, fictional scripted series, and music video parodies, to name a few.

Finding an appropriate Minecraft channel for your kids can be tedious. It takes time to sort through all the many different YouTube content creators and find the right ones. So we’ve done it for you!

5 great kid-friendly Minecraft YouTube channels

Mr. Stampy Cat (stampylonghead)

All of Stampy’s content is very elementary and clean; expletives are never used in his videos!


Operating under the guise of a British cartoon cat, Mr. Stampy Cat hosts many a lively video on his channel. Mr. Stampy Cat’s Minecraft videos are generally let’s plays and game tutorials, and he has plenty of videos covering other games, too. His How To Minecraft series is excellent for a younger audience who are new to the Minecraft world.

TheAtlanticCraft

Cody and Joe of TheAtlanticCraft are unique in that not only are their videos kid-friendly, they are technically advanced and enable the younger audience to learn the more advanced aspects of the game. Cody and Joe work well together and have a great rapport, but it must be noted that the language on this channel can sometimes venture towards the PG-side. They also produce Minecraft-related music videos, such as Let It Glow; I am certain you do not need to be told what it is a parody of!

CaptainSparklez

CaptainSparklez (Jordan Maron) has one of the largest followings on YouTube, with over 10 million subscribers and 3 billion views. Jordan captivates his audience with his entertaining comedy and warm personality, he is widely known for his Minecraft parody videos – of which he made some of the earliest ones – and his adventure series which takes Minecraft to another dimension, giving his audience something different from the typical Minecraft video series.

PopularMMOs

Pat – PopularMMOs – has one of the most popular Minecraft YouTube channels at present; with over 13 million subscribers he far outstrips monolithic channels such as CaptainSparklez or stampylonghead.

This channel has great variety and is just as known for its MMO-style battles as it is for its standard Minecraft videos. Pat plays regularly with his fiancée Jen, and together they draw in a huge audience. Make sure to check out the channel’s coverage of Minecraft game modifications, which draws in a large proportion of their viewers.

Be warned, however, that strong language is used on this channel.

DanTDM (TheDiamondMinecart)

DanTDM is hosted by Dan Middleton from England, and has rapidly grown in popularity due to its creative videos. Dan’s high-quality videos cover all genres – let’s plays, game art, music videos and Minecraft mod reviews – which has made it one of the most highly subscribed channels on YouTube.

Dan’s videos are mostly clean, but his videos are aimed at more knowledgeable Minecraft players – not beginners – so it is perhaps not suited to children who are just starting out.

Related:

2018 beginner’s guide to Minecraft

8 cool things you didn’t know you could do on Minecraft

How to install Minecraft mods

8 amazing Minecraft creations that will blow your mind

Minecraft is a bastion of creative ingenuity. Its player demographic is huge – children, adults, students, architects – and there are people from all walks of life with varying levels of skill and creativity who play this game across a number of gaming platforms. Anything you can think of, you can create.

8 amazing Minecraft creations that will blow your mind

1. Minas Tirith

Six million blocks and 20 hours later, this re-creation of Minas Tirith from Lord of the Rings was born. This project is absolutely enormous, and we cannot help but be wowed by the enormous attention to detail the creator put into it, all on his own.

2. Planet Earth

Even our very own Earth exists in Minecraft, albeit at a 1:1,500 scale. Time, passion, a lot of love and fiddly corners were put into this project which, although not as detailed as Minas Tirith, is impressive in its own right… it’s  Earth, after all, and you can explore it in Minecraft!

3. King’s Landing

It was only a matter of time before Game of Thrones met Minecraft – one of the world’s most popular TV shows and one of the world’s most popular games were destined to cross paths at some point.

The project itself is astonishing, created over an eye-watering amount of hours by a team – yes, team – of builders who had to submit an application to join the project… it’s very serious stuff!

4. The Eiffel Tower

Although this design is more simplistic than some of the examples we have already seen, this is an example of the painstaking lengths some Minecraft architects go to, to create some of the world’s most iconic landmarks. It is no easy feat to create curved structures in Minecraft, and the fact that someone has gone ahead and built the Eiffel Tower – a windy, angular nightmare – is brilliant. This build even includes the real towers viewpoints and other intricate details… bonus points!

5. Flame Atronach

Image courtesy of Block_Fortress

Fans of Skyrim will instantly recognise this incredibly detailed re-creation of Flame Atronach. This is not just pixel art, this is a full 3D model of the fantasy character. We can only imagine just how long it took to place all those blocks to create such an amazing level of detail.

6. A 16-bit Computer

Using Minecraft’s answer to circuits, logic, and electricity – redstone – this player created an animated, sound-enhanced and color-coded fully functional 16-bit computer. The sounds, animation, and colors help you visualize the computer in action, and get an idea of just what is going on… sort of.

7. The Shire

This blocky re-creation of George R. R. Martin’s The Shire may not be technically correct (hobbits live in holes, not houses) but this creation is still a beautiful attempt at re-creating Bilbo and Frodo’s home. It is part of a wider ambition to re-create, you guessed it, Middle-Earth, and they seem to be doing rather well!

8. Razul

Razul is an adventure map inspired by Skyrim, and if you’re a huge fan of Bethesda’s monolithic game, you will absolutely be able to make the connection due to the Nordic architecture style and fantasy theme. Like many of the creations featured here, it was built single-handedly.


The 5 best Pokémon-themed games on Roblox

Pokémon has earned its place as a modern-day classic. Available across a variety of devices, Pokémon games have a strong and passionate fanbase with a diverse worldwide community.

Pokémon games are played primarily on Nintendo systems and smartphones (remember Pokémon Go!?), but they were never designed for PC or traditional consoles like Xbox or PlayStation.

This is where Roblox comes in.

Thanks to the ingenuity of the Roblox platform, you can finally immerse yourself in the world of Pokémon on your PC, laptop, or game console by playing one of the many available Pokémon-themed games.

If you type “Pokémon” in the Roblox search bar, you’ll get a slew of results. Although none of these games is the same as playing the real Pokémon, they come pretty close, and some of these games do an incredible job mimicking it. Here are the ones that came out on top during our testing.

The 5 best Pokémon-themed games on Roblox

1. Pokémon Brick Bronze by Pokémon Brick Bronze Version

This is the very best Pokémon-themed game available on Roblox right now. When playing Pokémon Brick Bronze, you may think you’re playing the real thing. This super-addictive game has a ginormous world to explore and has combat mechanics virtually identical to the real handheld Pokémon game you know and love.

You can also earn badges as you play and become more experienced. Those achievements can be displayed on your profile.

With over 430 million players at the time of writing, this is one of the best and most popular Roblox games, period. The game is always being updated with new gyms and has thousands of people playing it at any given time, so you are sure to find a suitable server.

2. Pokémon Galaxy by Titanium Studios

Pokémon Galaxy has all the Nintendo game’s much-loved features, including the PokeDex, a leveling system, and all the familiar faces from the handheld game.

Pokémon Galaxy has a wide range of different starter Pokémon and has an immersive, well-designed environment that you can explore “sandbox style” with your Pokémon.

This is one of the platform’s newer Pokémon games – released in 2016 – and has quickly become a serious contender in the Roblox Pokémon game market. There are always plenty of servers available, and the game is regularly updated with new feature-rich content that improves the overall gameplay experience.

3. Pokémon Legends by BeasTakip

Although it’s not quite as good as Pokémon Brick Bronze, Pokémon Legends is one of the oldest Pokémon-themed games on Roblox.

The game features a vast and rich environment for you to explore and has a large amount of Pokémon-themed content and types of Pokémon on display. Players can enjoy a roleplay mode, treasure spawns, and regular events hosted by the game’s creator, BeasTakip. All the bells and whistles help keep regular gamers entertained.

There are typically up to 300 people playing during peak times, so you’ll be able to find a server easily and you’ll get to play with a wide variety of people.

4. Pokémon Universe by Raphael7

If you want to play as a Pokémon instead of a trainer, then look no further than Raphael’s Roblox interpretation of the handheld classic. Pokémon Universe, which allows you to play as either a trainer or Pokémon, isn’t as immersive and well designed as some of the other games, but the game has plenty of unique features and original ideas that give it an entirely different depth and feel.

With 20 players to a server and 100 people playing at a time, you will always have plenty of other people to play with. Plus, it is constantly updated with bug fixes and new features.

5. Pokémon Battle Brawlers by BuildingDude000

This list wouldn’t be complete without including Roblox’s oldest Pokémon-themed game, Pokémon Battle Brawlers. Published way back in 2009, this game wasn’t an instant hit like some of the others we listed, but it is an interesting look back in time.

Although it’s not regularly updated with new features, this game is something of a time capsule and gives you some insight into what Roblox was almost ten years ago.

Pokémon Battle Brawlers really has that classic Pokémon feel to it, similar to the classic GameBoy Pokémon games. There is a lot of immersive adventure to be had in this game, which was created with a high attention to detail.

People still play this game, too. Although there are not as many players as the other games we have featured here, you will still usually be able to find a server with players online.

Lots of other Pokémon-themed games and content are available on the Roblox platform, too, but we think these five are the most solid examples, and as close to the real thing as possible. What do you think? Let us know in the comments.

Related:

5 best Roblox games of all time

11 best Roblox games based on your favorite characters

Roblox beginner’s guide

5 most popular Roblox games of all time

Since the Roblox platform’s launch in 2006, millions of players have published their own games on the platform, each varying in quality, popularity, and theme. The best of the player-created games on the Roblox platform are some of the most ingenious and creative games you can find anywhere on the internet.

The problem is, choosing a Roblox game to try out can be challenging since there are so many of them. That’s where we come in. Whether you are new to the Roblox platform or are a veteran player just looking for something new to play, we have curated a list of the most popular Roblox games of all time.

These games are all unique, well-made, and have lots of people playing on them, even years after they were released or last updated. In fact, many of the developers of these games have gone on to become fully fledged Roblox staff, working as developers at their California headquarters.

The 5 most popular Roblox games of all time

1. MeepCity by alexnewtron

Released in February 2016, MeepCity is a wildly popular social hangout and role-playing game. With over 1 billion visits and 100,000 players online, MeepCity is the most visited game of all time.

MeepCity was influenced by games such as Disney’s Toontown Online and Club Penguin; its play style is similar to these games, and there are a number of hangouts and features in the game that are comparable.

With minigames, an economy, jobs, a housing market, and even pets, MeepCity is possibly the closest you can get to having a double life in Roblox.

MeepCity has made its creator – alexnewtron – very successful, and he now employs a full team of staff to manage, develop, and maintain the game.

2. Natural Disaster Survival by stickmasterluke

Released in March 2008, Natural Disaster Survival is a Roblox classic that has amassed almost 500 million visits. With thousands of people playing this around the clock, it is something you can jump into and begin playing immediately.

The game is simple but challenging. You have to survive over ten different natural disasters on various different maps that spawn atop a floating island. Disasters include flash floods, tornadoes, thunderstorms, wildfires, and meteor showers, allowing for plenty of different survival strategies and techniques for you to try out across the various maps.

stickmasterluke is constantly updating this game, too, so there are often new things to be discovered.

3. Roblox High School by Cindering

Released in April 2009, Roblox High School is a popular role-playing game that takes place in a small city featuring restaurants, stores, social hangouts, and the high school itself. It has a fully integrated economy where people can get jobs, earn money, and buy items such as pets and cars.

Lots of different events take place throughout the year to keep gameplay varied and interesting, such as the annual Holiday Event where gifts are scattered around the map, or the Ghost Hunt event where players are able to capture ghosts.

4. Lumber Tycoon 2 by Defaultio


Sequel to the classic 2008 Roblox game Lumber Tycoon, Lumber Tycoon 2 was launched in 2009 and had over 10,000 players on its first day. Something of a cult classic, Lumber Tycoon 2 has a large Roblox fan base with several dedicated groups, a fan-made guide website, and even its own dedicated Discord server.

Lumber Tycoon’s basic objective is to chop down trees, sell the wood, and use the money you earn from that to purchase more advanced items and equipment and make investments. The game has several different dimensions to it, which has made it a huge success over time, with several active servers and over 350 million visits.

There are lots of shops in-game where you can spend your money to buy new tools and upgrade your equipment. It is a very well-designed game which, due to its slow pace and relaxing ambient music, is a nice break from adventure and combat games that dominate the platform.

Although there are only 6 players to a server, this game is very individually oriented and there is not much of a multiplayer aspect to the game.

5. Apocalypse Rising by Gusmanak

Apocalypse Rising, one of the platform’s earliest open-world adventure survival games, is a Roblox classic. A sandbox-style open world zombie survival game created by Gusmanak and launched in 2008, it is still regularly updated and is as immersive and exciting today as when it was launched.

Based off DayZ standalone, the Roblox game shares plenty of similar aspects such as an economy, scavenging for food and resources, military outposts, and refugee camps. Even vehicles, once you have fixed them, are driveable.

The game has no primary objective, you can not “win” it, per se; you simply survive for as long as possible by exploring the map and gathering supplies. With so many different things to see, find and do, including the ability to form groups and alliances, you will find it very easy to become immersed in the game and forget you are playing it on Roblox.