Skip to content

Softonic English

Just another Softonic Sites site

How to add subtitles to any video in a matter of minutes (without needing advanced knowledge)

Subtitles in videos are quite important, especially if you want them to be more accessible to everyone. If you take a look around social media, you’ll see that it’s rare to find a video without them. They help us both to follow the thread of the video better and to understand it if it’s in another language. Nowadays, we have many editing programs to add subtitles, but Adobe Premiere Pro is one of the most complete and versatile that exists. Next, you will see how you can add subtitles in Premiere by yourself, in an easy way […]

Subtitles in videos are quite important, especially if you want them to be more accessible to everyone. If you take a look around social media, you’ll see that it’s rare to find a video without them. They help us both to follow the thread of the video better and to understand it if it’s in another language.

As of today, we have many editing programs to add subtitles, but Adobe Premiere Pro is one of the most comprehensive and versatile available. Below, you will see how you can add subtitles in Premiere by yourself, in an easy and quick way.

Adobe Premiere Pro
Adobe Premiere Pro DOWNLOAD

How to generate automatic subtitles for a video

There are several ways we can follow in Premiere Pro to easily add subtitles to our videos. The first one is at the very beginning of the process, when we are creating our project.

To start, we open Premiere and select New Project. Next, we write the name it will have, where the project will be located on the computer, and, if we want, choose a predefined template to save time. When you finish, click on Create.
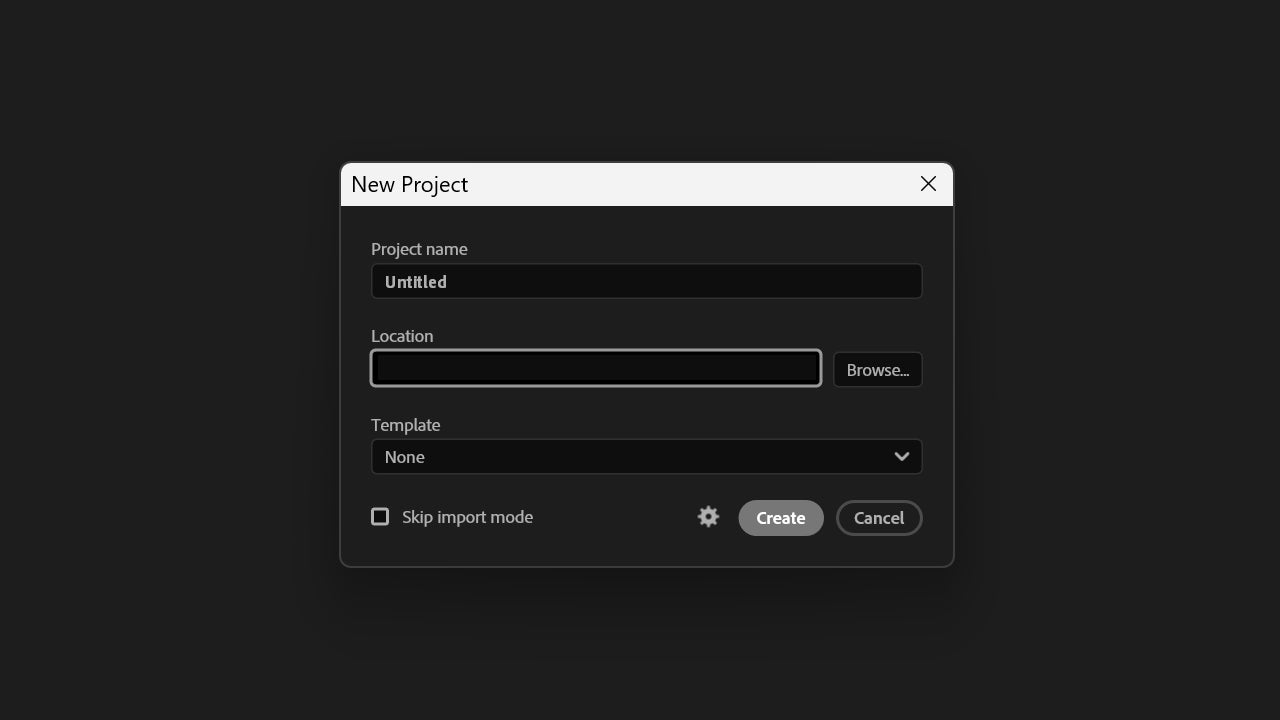
Now, you will choose which resources (whether videos, images, or sounds) will appear in your project. On the left, you will see a quick view of the folders on your computer so you can easily find your resources. Here, select the video you want to have subtitles and direct your view to the right panel. Then, check the Automatic transcription box.
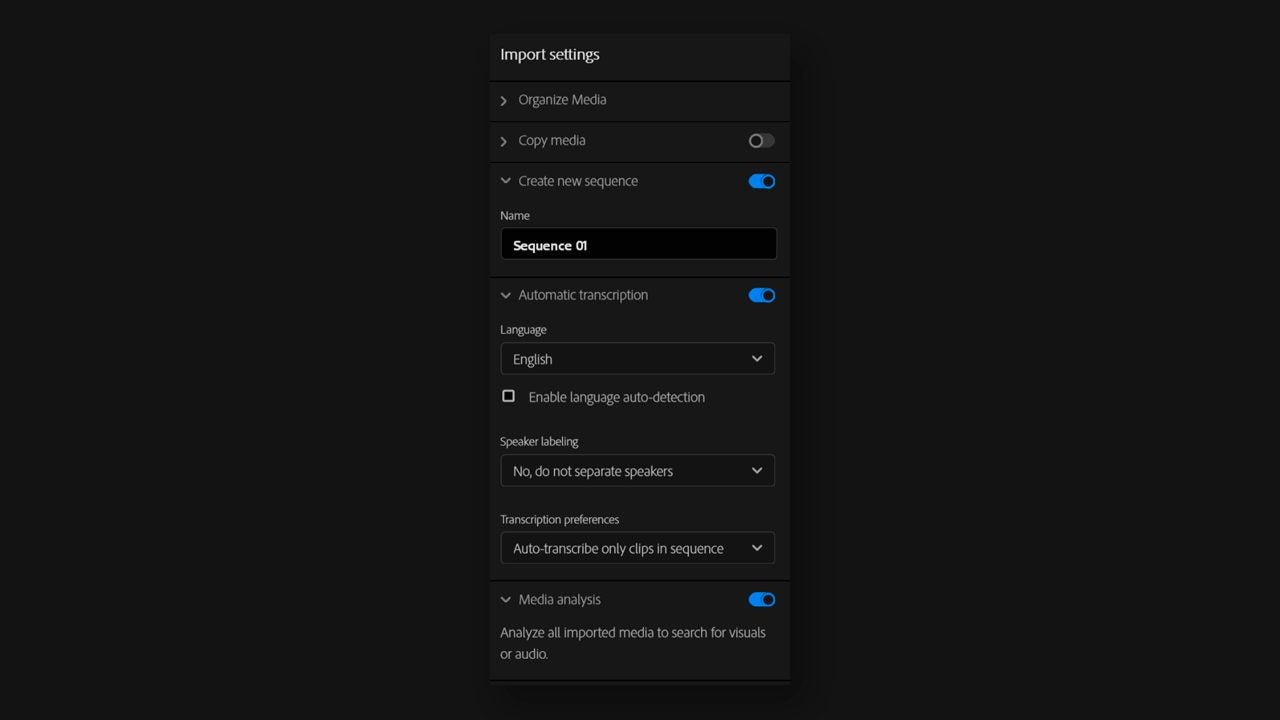
You can choose the video language in Language or check the box for Enable language auto-detection. The latter will cause Premiere to analyze the video to determine which language it is in. Further down, you will also find the option for Speaker labeling, which will make Premiere distinguish who the speakers are and classify them as such. In Transcription preferences, you can select whether the transcription settings apply to just a specific clip or to all the clips you are going to import.

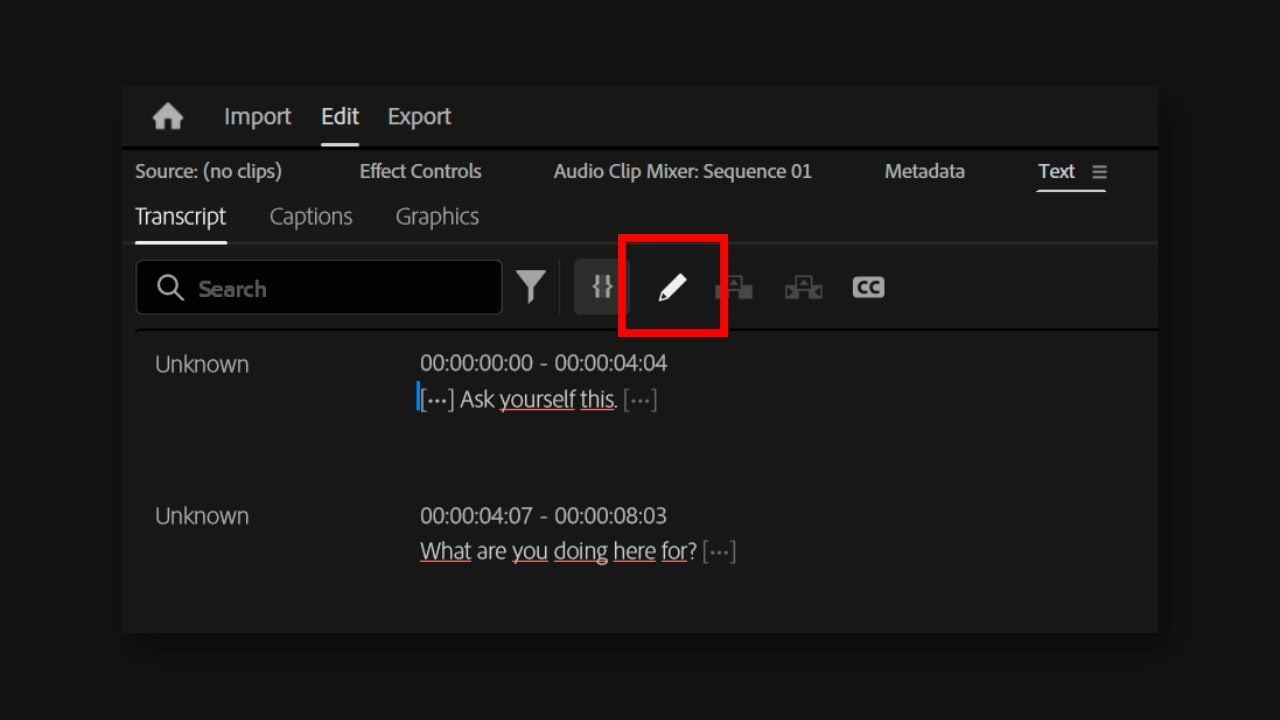
When you finish, select Import. Wait for Premiere to finish analyzing the clips and we can continue. Now, go to Window > Text and you will see a new panel with the transcribed audio appear. If you see any transcription errors, select the pencil symbol, so you can edit the texts.
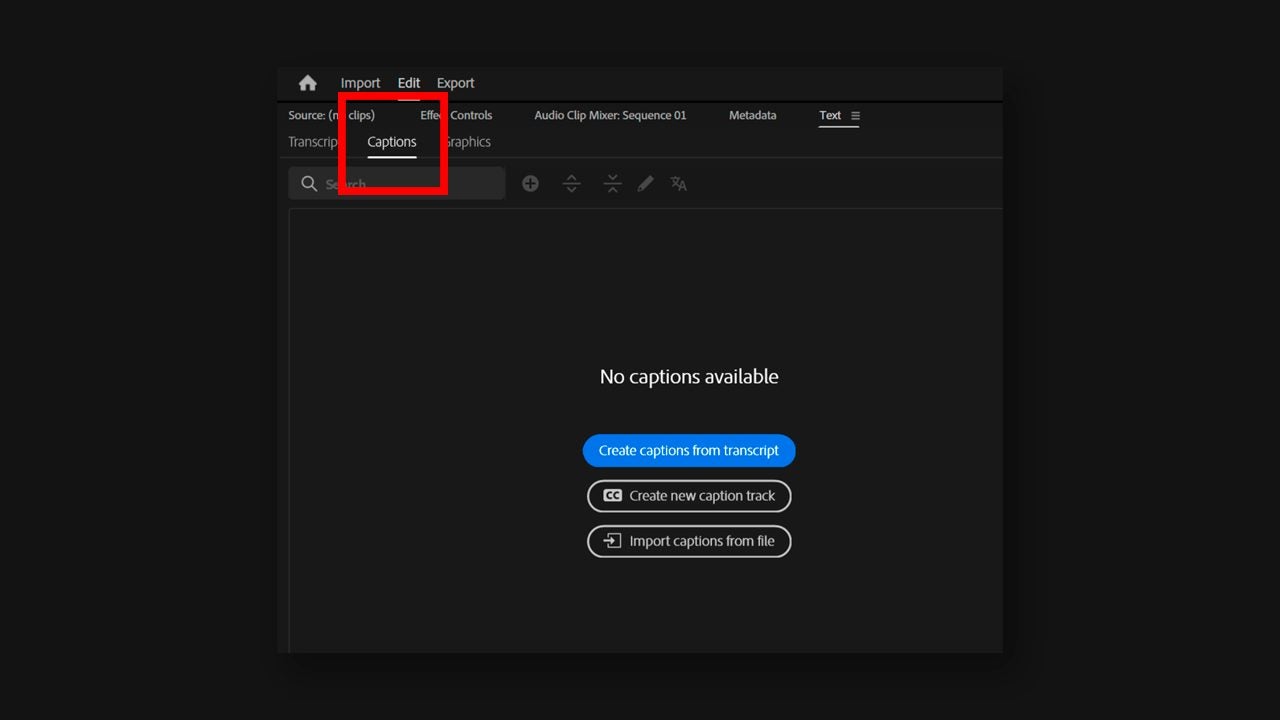
When you finish and see that the subtitles are correct, go to Captions and click on Create captions from transcript. Next, a series of options will appear where you can choose the format, the style of the subtitles, whether you want them to be one line or two, the duration… Don’t worry if it doesn’t turn out as you had thought, you can change it later. Finish by selecting Create captions.
After creating the subtitles, we can apply new visual styles to them. Go to the timeline, located further down, and start by selecting one of the subtitles. In the Properties panel, you can change the font, color, see if it is centered or not, and much more. Experiment as much as you want to achieve the result you are looking for.

When finished, we will need to apply the style created to the rest of the subtitles in the video. In the Track Style section, select Redefine Style, which is the first button located to the right of the styles.
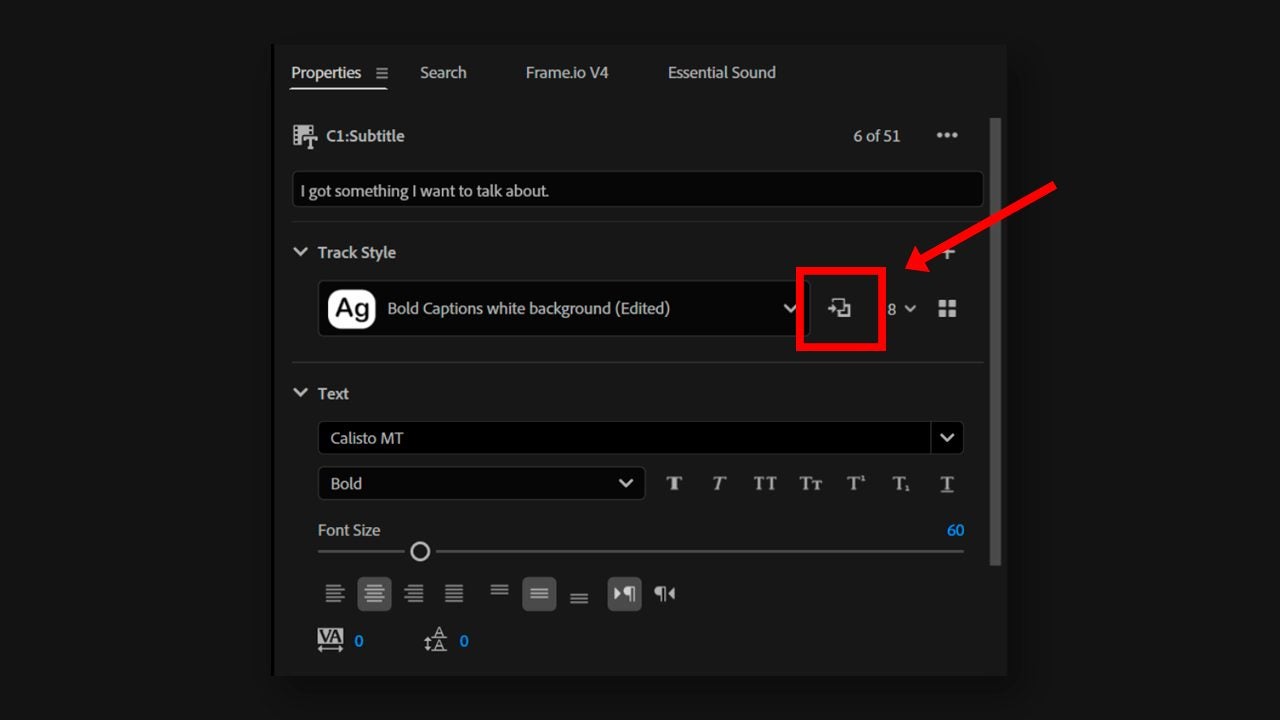
Now, click on All captions on track to apply the changes to all the subtitles of the clip at once. If you like the style you have created and want to save it for future projects, select the “+” icon located in the upper right corner of the Track Style menu and select Create style. Here you will see two options, Save to Project and Save to Local styles. The first will link it to the project and will create a folder within the Project panel. The second will save the style in a local folder on your computer so you can use it in other videos.

How to create translated subtitles from another language

As we mentioned at the beginning, having subtitles translated into other languages can greatly improve the reach of your videos (at least if you want to focus on social media).

If you have already done the above, return to the Captions panel and select the translation symbol, as we indicated in the image.
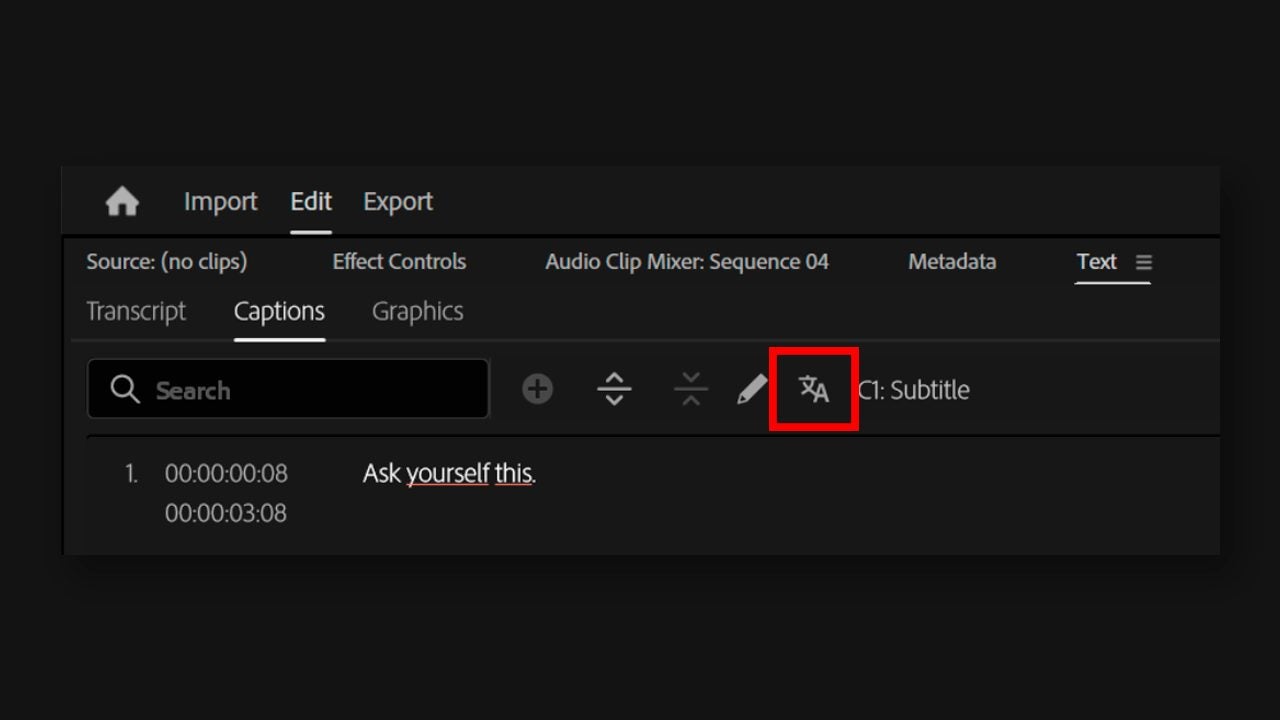
Next, choose the original language of the subtitles (although Premiere can detect it automatically) and select which other language it will be translated to. When you finish with the settings, select Translate.
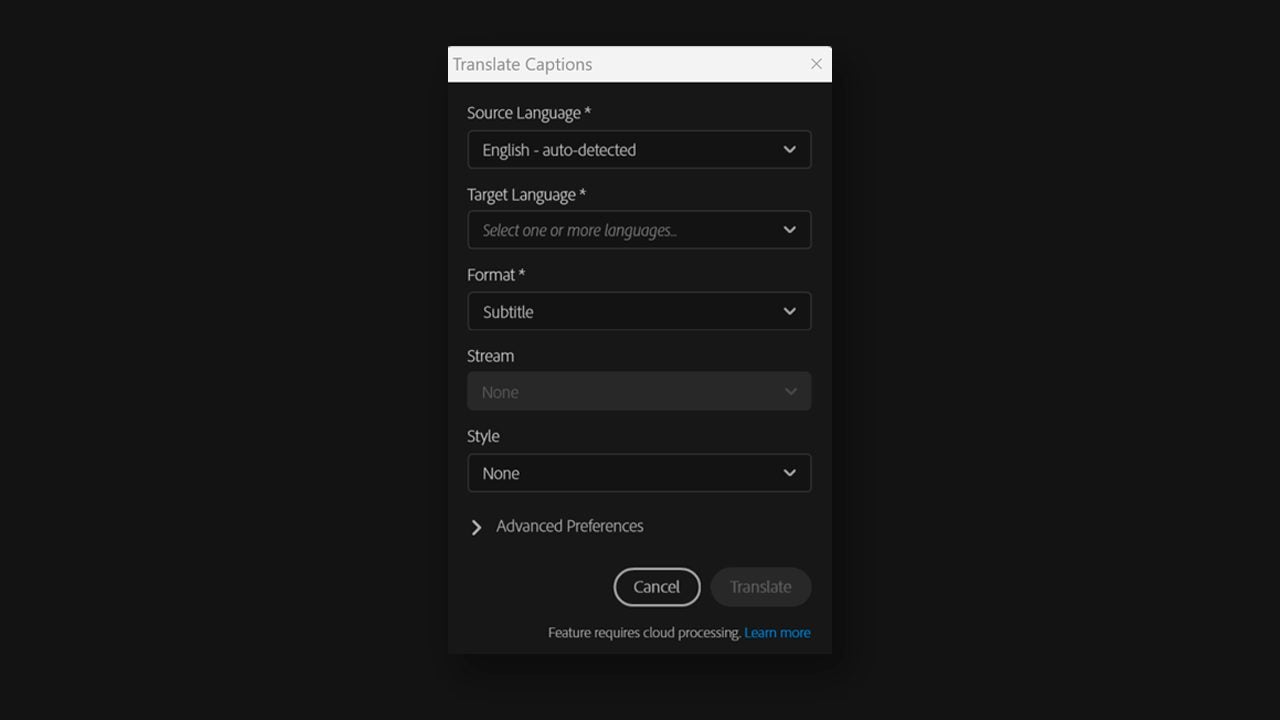
When Premiere finishes analyzing everything, you will see another additional bar above Subtitles on the timeline with the new subtitles already translated for the entire clip.

How to create subtitles manually

To manually add our subtitles, we simply need to go to Window > Text within our project and then go to the Captions tab. Here we need to select whether we want to create subtitles from scratch in Premiere or import texts that we have already written in a document. For the first option, we click on Create new caption track and for the second, Import captions from file.

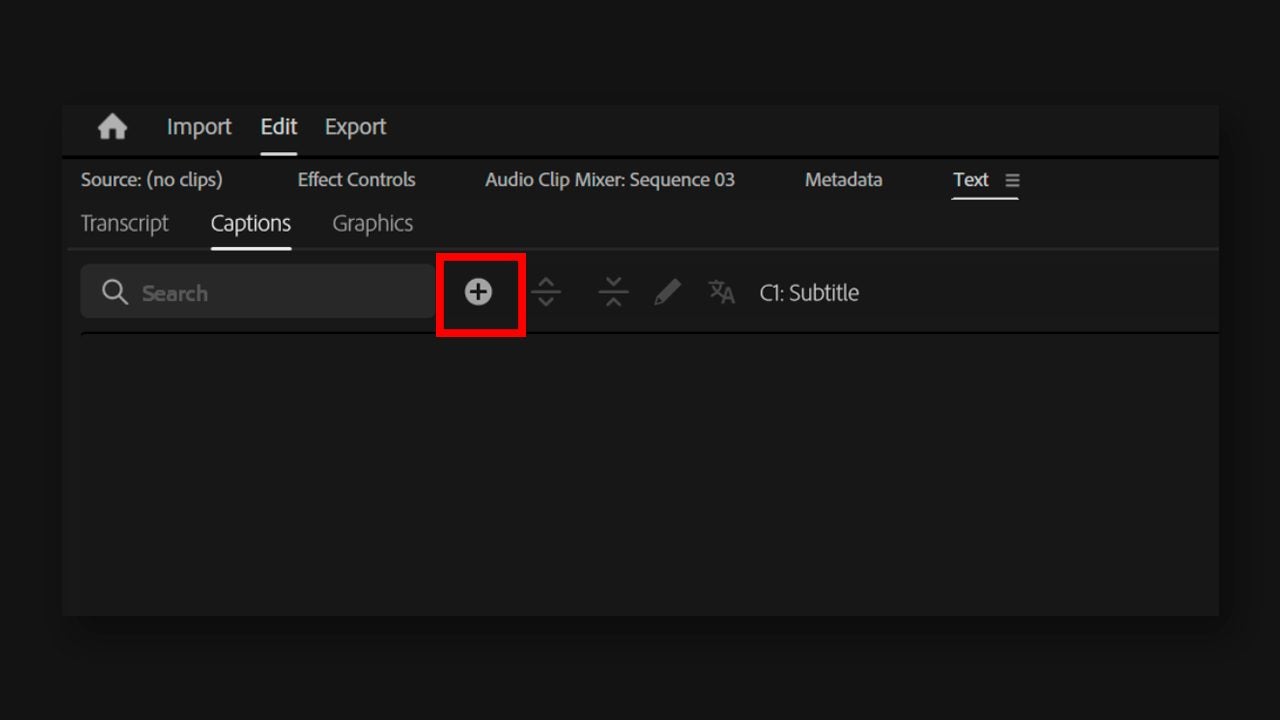
If you selected Create new caption track, go to the Text panel and click on the + button. This will create the first subtitle, which you will see named as New Caption. Double-click on New Caption or select the pencil icon to edit the subtitle text. In the timeline, you will see it on a separate layer called Subtitle.
If you decide to import the subtitles, you should know that you will not be able to use the most “common” text files. The compatible extensions are as follows:

Sidecar files

  • SCC (for television broadcasts)
  • MCC
  • XML
  • STL
  • SRT (ideal for YouTube, Facebook, and Vimeo)
  • DFXMP

XML Files

  • W3C TTML (DFXP)
  • SMPTE-TT
  • EBU-TT
Adobe Premiere Pro
Adobe Premiere Pro DOWNLOAD

Author: María López

{ "de-DE": "Künstler aus Berufung und Technikliebhaber. Seit ich denken kann, habe ich gerne an allen möglichen Gadgets herumgebastelt.", "en-US": "Artist by vocation and technology lover. I have liked to tinker with all kinds of gadgets for as long as I can remember.", "es-ES": "Artista de vocación y amante de la tecnología. Me ha gustado cacharrear con todo tipo de gadgets desde que tengo uso de razón.", "fr-FR": "Artiste de vocation et amateur de technologie. J'aime bricoler avec toutes sortes de gadgets depuis que j'ai l'usage de la raison.", "it-IT": "", "ja-JP": "", "nl-NL": "", "pl-PL": "", "pt-BR": "", "social": { "email": "", "facebook": "", "twitter": "", "linkedin": "" } } View all posts by María López

Author María LópezPosted on July 20, 2026July 20, 2026Categories News

Post navigation

Previous Previous post: I Play Rocky gets a November 2026 release: a Rocky making-of drama
Next Next post: House of the Dragon Season 3, Episode 5 explains Dorne’s strategy: how it beat the Targaryens’ biggest advantage

Recent Posts

  • Adam Driver: Kevin Feige now confirms Marvel has tried for years
  • Google Maps for Android Auto gets a live speedometer: beta users are seeing it now
  • Tesla filing reveals Houston robotaxi crash: remote operator was in control
  • Hackers Don’t Need Your Password: How Avast One Free Antivirus Helps Fight Infostealers
  • Google Maps adds a speedometer to Android Auto: showing up in beta

Archives

  • July 2026
  • June 2026
  • May 2026
  • April 2026
  • March 2026
  • February 2026
  • January 2026
  • December 2025
  • November 2025
  • October 2025
  • September 2025
  • August 2025
  • July 2025
  • June 2025
  • May 2025
  • April 2025
  • March 2025
  • February 2025
  • January 2025
  • December 2024
  • November 2024
  • October 2024
  • September 2024
  • August 2024
  • July 2024
  • June 2024
  • May 2024
  • April 2024
  • March 2024
  • February 2024
  • January 2024
  • December 2023
  • November 2023
  • October 2023
  • September 2023
  • August 2023
  • July 2023
  • June 2023
  • May 2023
  • April 2023
  • March 2023
  • February 2023
  • January 2023
  • December 2022
  • November 2022
  • October 2022
  • September 2022
  • August 2022
  • July 2022
  • June 2022
  • May 2022
  • April 2022
  • March 2022
  • February 2022
  • January 2022
  • December 2021
  • November 2021
  • October 2021
  • September 2021
  • August 2021
  • July 2021
  • June 2021
  • May 2021
  • April 2021
  • March 2021
  • February 2021
  • January 2021
  • December 2020
  • November 2020
  • October 2020
  • September 2020
  • August 2020
  • July 2020
  • June 2020
  • May 2020
  • April 2020
  • March 2020
  • February 2020
  • January 2020
  • December 2019
  • November 2019
  • October 2019
  • September 2019
  • August 2019
  • July 2019
  • June 2019
  • May 2019
  • April 2019
  • March 2019
  • February 2019
  • January 2019
  • December 2018
  • November 2018
  • October 2018
  • September 2018
  • August 2018
  • July 2018
  • June 2018
  • May 2018
  • April 2018
  • March 2018
  • February 2018
  • January 2018
  • December 2017
  • November 2017
  • October 2017
  • September 2017
  • August 2017
  • July 2017
  • June 2017
  • May 2017
  • April 2017
  • March 2017
  • February 2017
  • January 2017
  • December 2016
  • November 2016
  • October 2016
  • September 2016
  • August 2016
  • July 2016
  • June 2016
  • May 2016
  • April 2016
  • March 2016
  • February 2016
  • January 2016
  • December 2015
  • November 2015
  • October 2015
  • September 2015
  • August 2015
  • July 2015
  • June 2015
  • May 2015
  • April 2015
  • March 2015
  • February 2015
  • January 2015
  • December 2014
  • November 2014
  • October 2014
  • September 2014
  • August 2014
  • July 2014
  • June 2014
  • May 2014
  • April 2014
  • March 2014
  • February 2014
  • January 2014
  • December 2013
  • November 2013
  • October 2013
  • September 2013
  • August 2013
  • July 2013
  • June 2013
  • May 2013
  • April 2013
  • March 2013
  • February 2013
  • January 2013
  • December 2012
  • November 2012
  • October 2012
  • September 2012
  • August 2012
  • July 2012
  • June 2012
  • May 2012
  • April 2012
  • March 2012
  • February 2012
  • January 2012
  • December 2011
  • November 2011
  • October 2011
  • September 2011
  • August 2011
  • July 2011
  • June 2011
  • May 2011
  • April 2011
  • March 2011
  • February 2011
  • January 2011
  • December 2010
  • November 2010
  • October 2010
  • September 2010
  • August 2010
  • July 2010
  • June 2010
  • May 2010
  • April 2010
  • March 2010
  • February 2010
  • January 2010
  • December 2009
  • November 2009
  • October 2009
  • September 2009
  • August 2009
  • July 2009
  • June 2009
  • May 2009
  • April 2009
  • March 2009
  • February 2009
  • January 2009
  • December 2008
  • November 2008
  • October 2008
  • September 2008
  • August 2008
  • July 2008
  • June 2008
  • May 2008
  • April 2008
  • March 2008
  • February 2008
  • January 2008
  • December 2007
  • November 2007
  • October 2007
  • September 2007
  • August 2007
  • July 2007
  • June 2007
  • May 2007
  • April 2007
  • March 2007
  • February 2007
  • January 2007
  • December 2006
  • November 2006
  • September 2006
  • August 2006
  • June 2006
  • May 2006
  • July 2001
  • January 2001
  • November 2000
  • September 2000
  • August 2000
  • July 2000
  • April 2000
  • March 2000

Categories

  • Affiliate post
  • Expert Review
  • Gaming
  • Guides
  • How to
  • Legacy how To
  • News
  • Noticias
  • Software>Security
  • Sponsored
  • Trucos y Consejos
  • Uncategorized
  • Windows software

Meta

  • Log in
  • Entries feed
  • Comments feed
  • WordPress.org
Softonic English Proudly powered by WordPress