3 tips for getting the most out of Yahoo! Mail on iOS

These days, we spend a lot of time out and about. But with fast mobile internet and wifi hotspots, you can stay online no matter where you are. Whether it’s work or play, you can stay in touch through calls, texts, messaging apps, and of course, emails.

If you haven’t downloaded the Yahoo! Mail app for iOS, do it now. With a colorful, clean interface and a ton of interesting features, it could very well be the only email client you need.

Here are three tips to help you get the most out of the iOS Yahoo! Mail app.

1. Customize your swipes

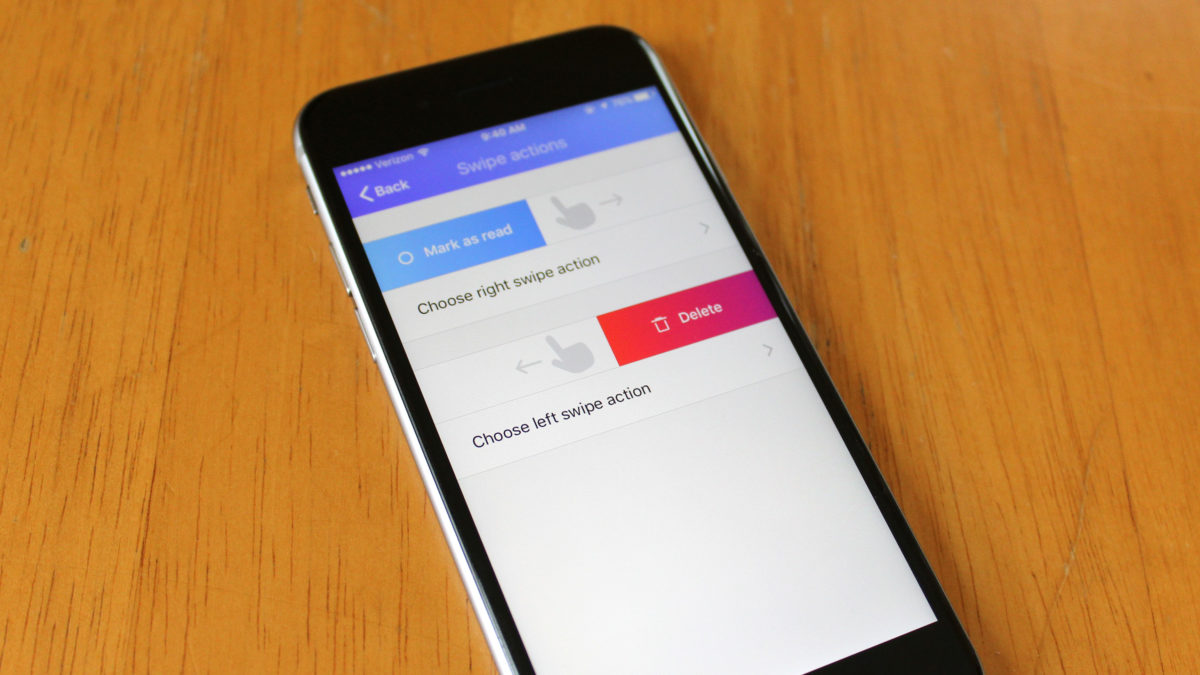
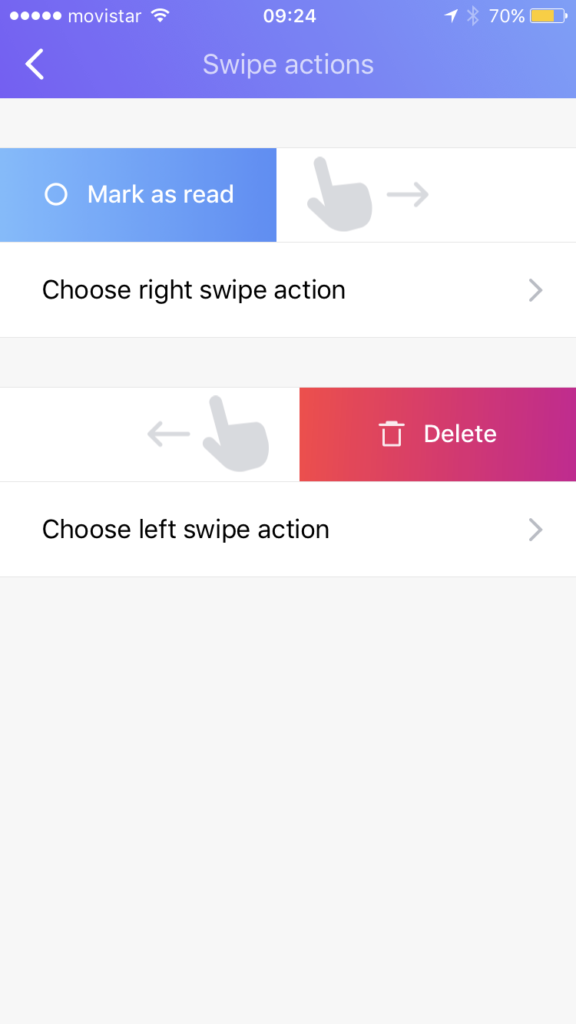
When you’re reading emails, you’ll want to organize them quickly – be it deleting, marking read, or flagging important. With the Yahoo! Mail app for iOS, you can swipe left to delete an email, or swipe right to mark it read. But you don’t have to stick with these actions. With Yahoo! Mail, you choose what you want your swipes to do.

To customize your swipes:

  1. Click the three horizontal lines in the top right.
  2. Select Settings.
  3. Select Swipe actions.
  4. Select Choose right swipe action.
  5. Decide what you want it to do.
  6. Repeat steps 5 and 6 for Choose left swipe action.
2. Manage all your email accounts from Yahoo! Mail

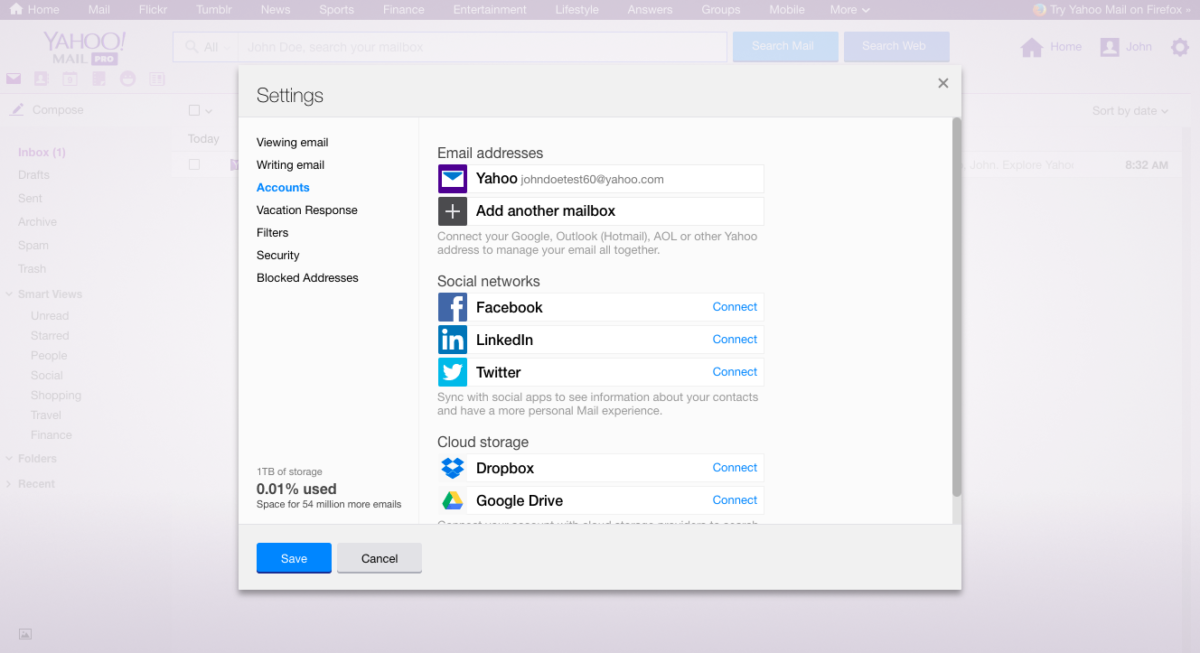
Yahoo! Mail can add and synchronize all your mail clients, including Outlook, AOL, and Gmail (as well as other Yahoo! Mail accounts). This saves you time switching between different apps.

You can read, reply, and send from the address you’ve added. Importantly, it synchronizes with your email clients, too, so you don’t have to manage them separately.

To manage all your email accounts through Yahoo! Mail’s app:

  1.  Click the 3 horizontal lines in the top right.
  2. Select Add another mailbox.
  3. Choose your mailbox.
  4. Enter your email address. You’ll then be taken to your other account.
  5. Give Yahoo! Mail access by authorizing when asked.
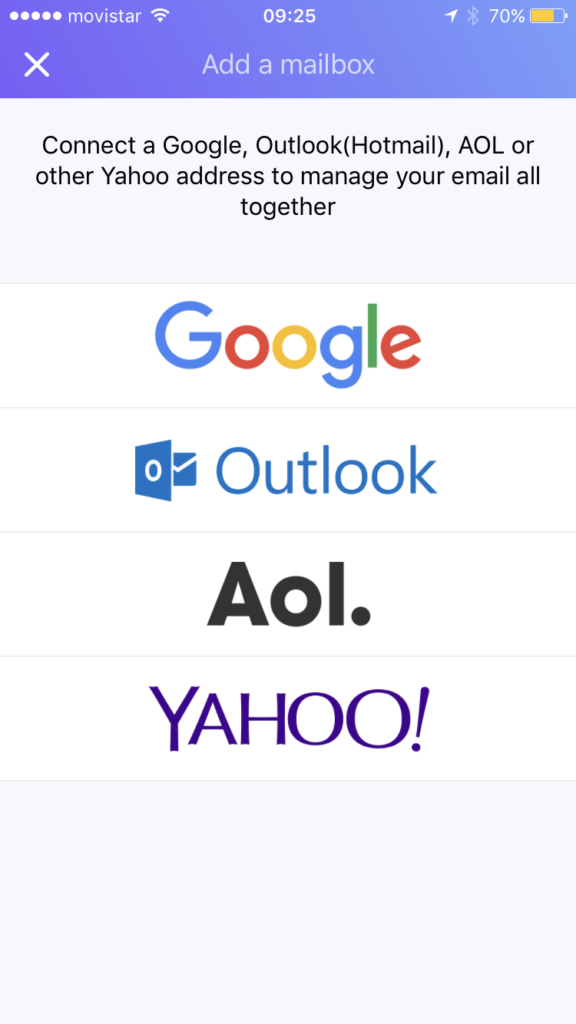
This will take you back to your Yahoo! Mail inbox. To select a different mailbox, such as Gmail or Outlook, swipe left on your inbox or click the menu icon at the top (the three horizontal lines). Then select which mailbox you want to view.

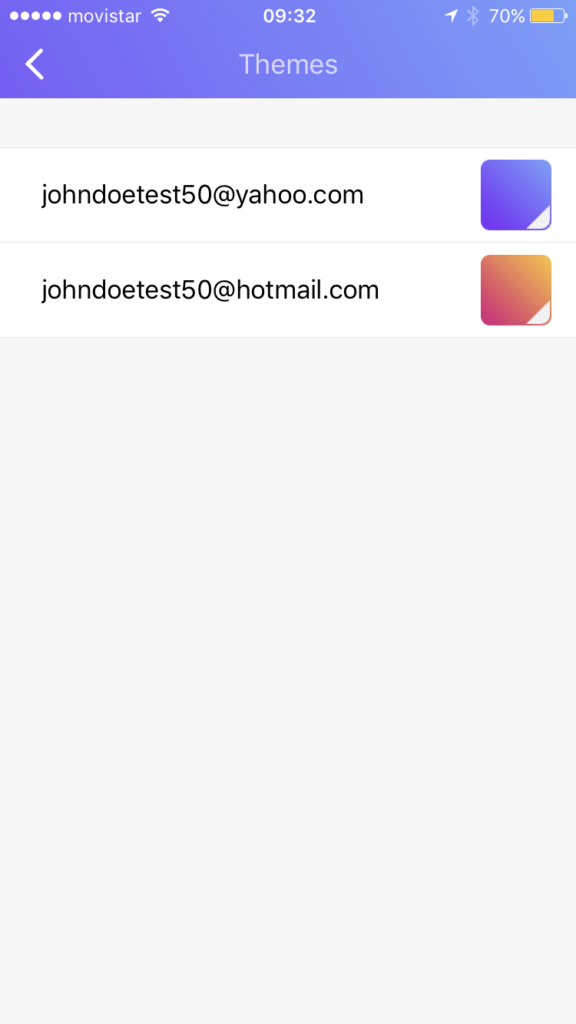
Special tip: You can change the color scheme (the “theme”) of each mailbox by going to Settings, then Themes, and choosing different colors for each. That’ll make it easier for you to recognize which mailbox you’re viewing.
3. Add cloud storage (and social media)

You’d be surprised how easy it is to use up your attachment limit – even on your mobile. As our smartphones take better photos and videos, the file sizes increase. So, you want to make sure you’ve got some cloud storage built in – especially if you want to make your friends jealous with your latest holiday snaps.

Here’s how to add Dropbox or Google Drive cloud storage:

  1. Select the menu icon from your Inbox (the three horizontal lines at the top left)
  2. Select Settings.
  3. Select Connect services.
  4. Toggle Dropbox or Google Drive on. You’ll be asked to authorize Yahoo! Mail to access Dropbox or Google Drive
  5. Once authorized, you’ll be taken back to the Connect services page and you’ll get a notification saying it was successful (as in the screenshot below).
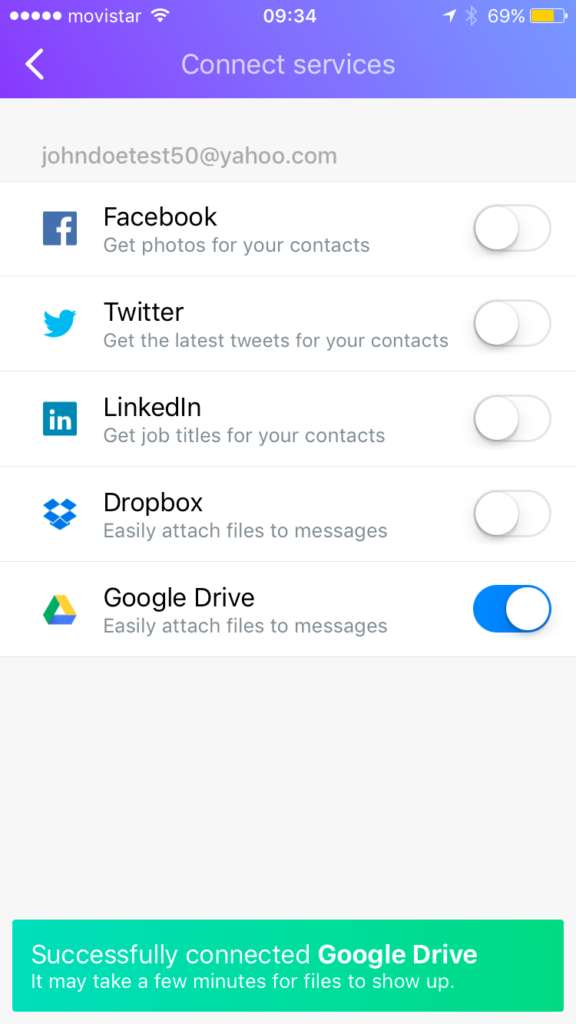
From the same menu, you can turn on other social media services, like Facebook and Twitter – integration is fairly limited, though. Facebook simply supplies pics for your contacts. Still, it’s handy to see who you’re emailing.

That concludes our three tips for getting the most of Yahoo! Mail’s iOS app. So get out there and enjoy keeping in touch with friends and family on the go.

More:
Download Yahoo! Mail

5 ways to customize Yahoo! Mail

Remember the days when your parents told you what to wear? Put a jacket on. Don’t wear those nice shoes out. Here, your grandma knitted this for you.

One of the great things about growing up is you get to choose your own clothes. To express yourself the way you want. And this applies to your Yahoo! Mail client, too. Why let Yahoo! decide what your email client looks like?

So here are five ways you can put some of your personality into Yahoo! Mail.

Download Yahoo! Mail

1. Change the theme

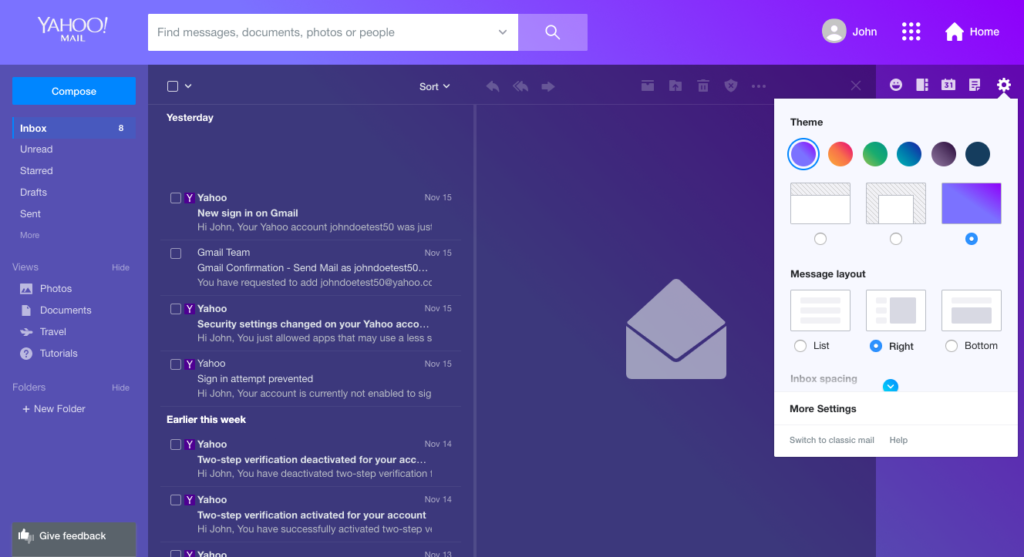
The latest version of Yahoo! Mail gives you a ton of personalization options. Simply click the gear on the top right and you can choose your own:

  • Color scheme
  • Message layout
  • Inbox spacing

And you can also choose whether to include tabs for multitasking.

Source: Yahoo
2. Change the font (and font size)

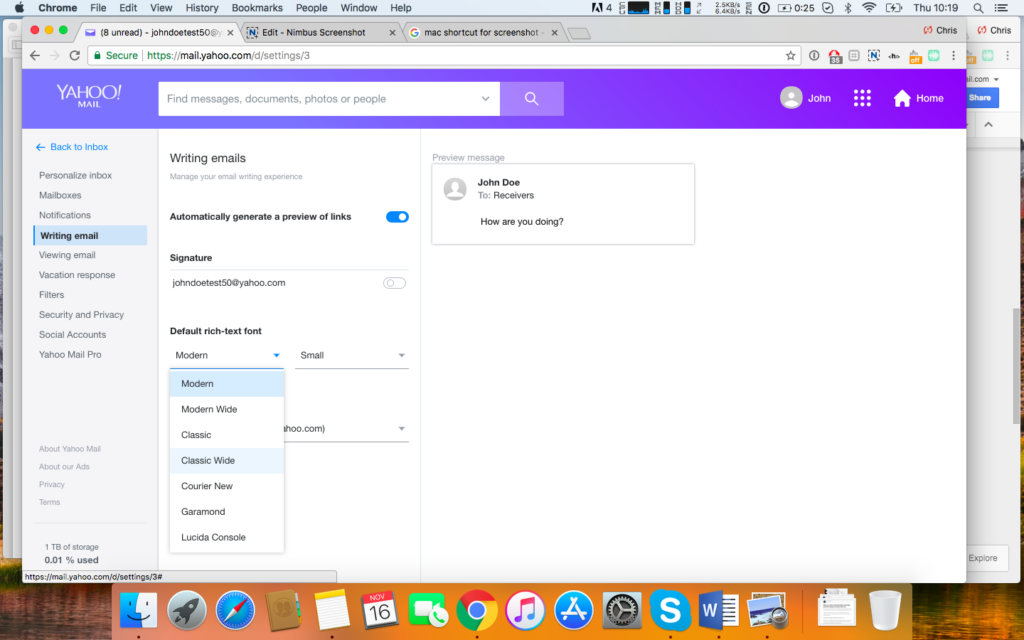
You can also select the default font and font size for your emails, which is useful if you have trouble reading smaller print.

To change the font and size:

  1. Click the gear icon on the top right.
  2. Select More settings.
  3. Select Writing email from the column on the right.
  4. Under Default rich text font, choose the font and text size you want (you can see how it will look in the preview box on the right).

Source: Yahoo

3. Add an email signature

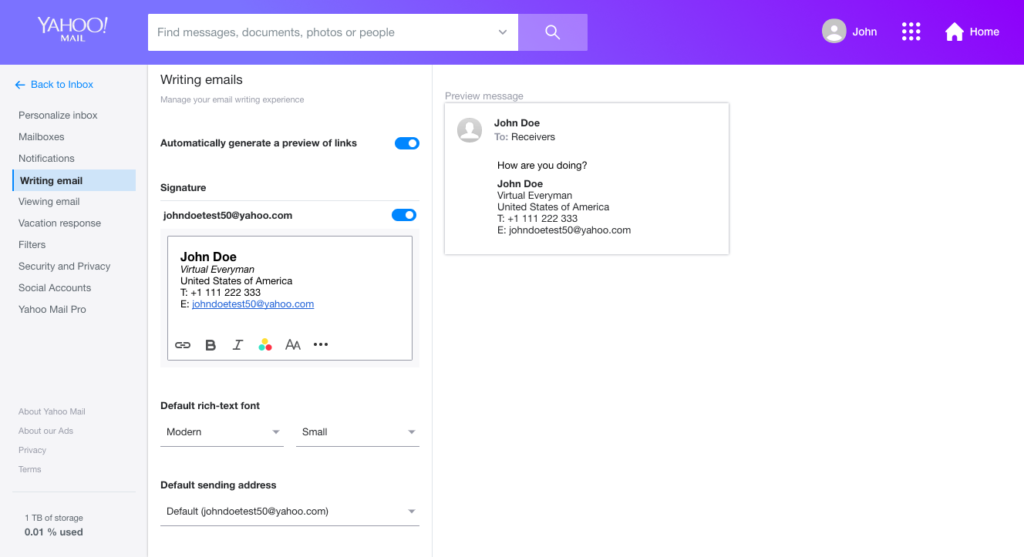
It can be tiring having to write the same sign-off multiple times, so why not create your own email signature? This is especially useful if you use Yahoo! Mail for business. It’s super easy to do; just follow the instructions below.

To create your own email signature:

  1. Go to the Writing emails section of Settings (as outlined in step 2).
  2. Toggle Signature to on.
  3. Write your signature, including any rich text features such as bold, size, etc.
  4. That’s it – your new signature is automatically saved. To turn it off, simply toggle the Signature switch off.

Source: Yahoo
4. Add stationery

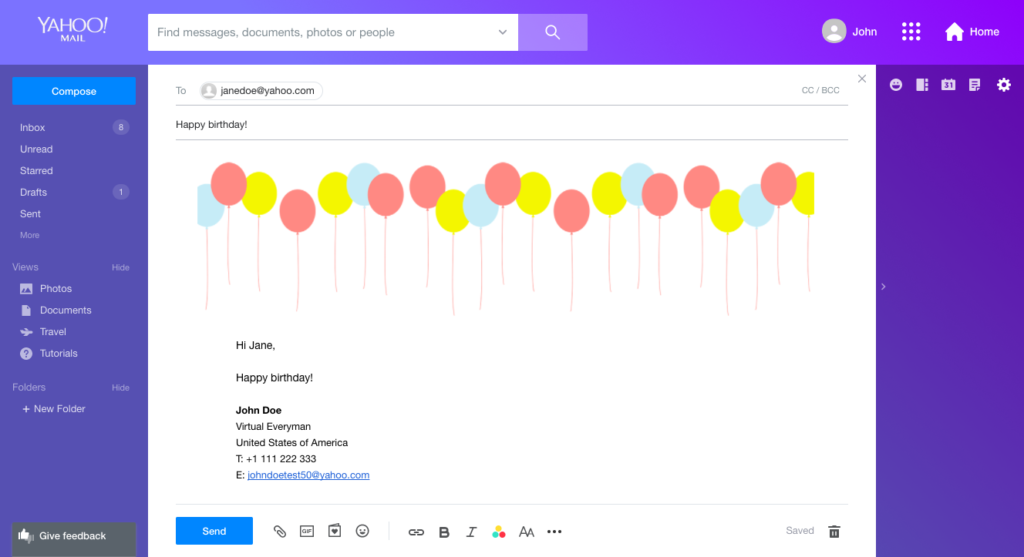
Stationery lets you add a bit of extra color and imagery to your emails for special occasions. Perhaps you want to congratulate someone or send them birthday wishes – even a Christmas card. Yahoo! Mail partnered with Paperless Post to give you over 50 designs, completely free, to wow your friends and family with.

To add some flair to your next email, follow these instructions:

  1. After clicking Compose, click the little card and heart icon next to the Send button.
  2. The stationery box will appear. Select what stationery you want to add.
  3. Close the stationery box.

And that’s it! It’s much nicer than going through a separate e-card website.

Source: Yahoo
5. Switch to Yahoo! Mail classic (or basic)

Not everyone thrives on choice, so if you prefer Yahoo! Mail’s old, functional layout to its shiny new one, you can always switch back.

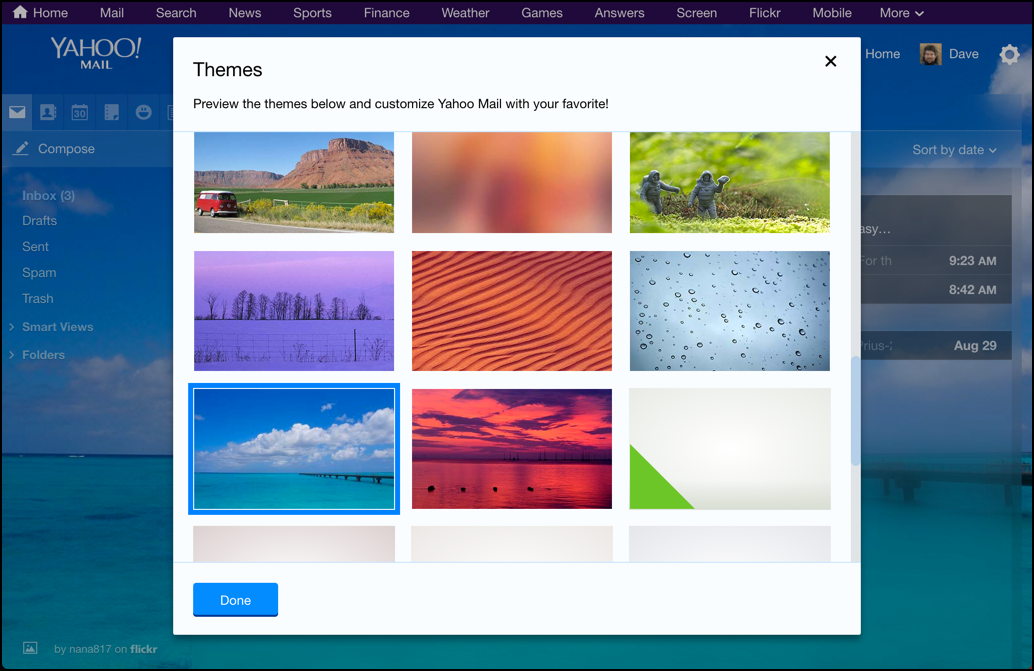
Classic gives you some customization, such as photo themes (which you might actually prefer to block colors), and it’s a good halfway point between the two looks.

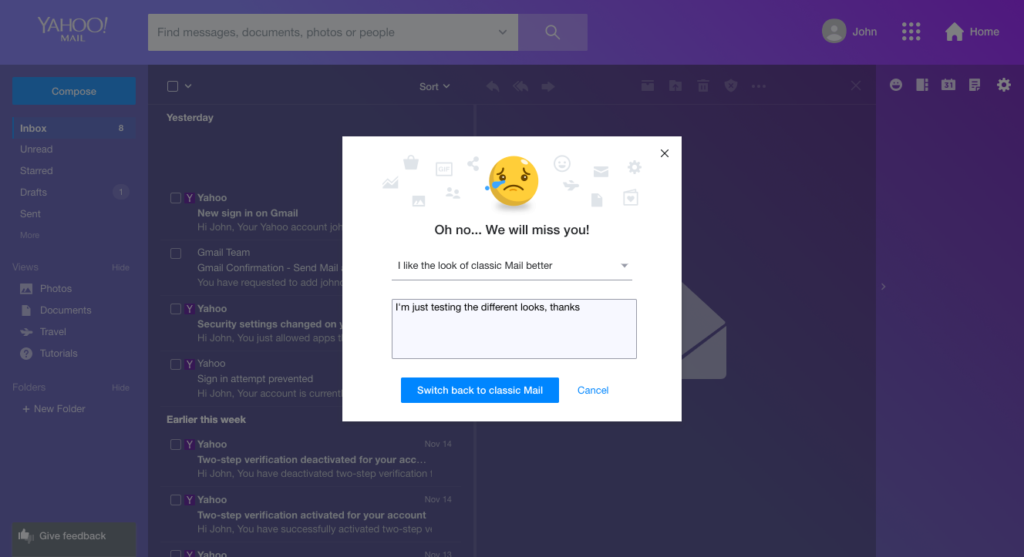
To switch to Yahoo! Mail Classic:

  1. Click the gear icon on the top right.
  2. Select Switch to classic mail (at the bottom in grey).
  3. You’ll then get a pop-up asking why you’re switching to the older look. You must fill this in to switch back.
  4. Enter the details and click Switch back to classic mail.

Source: Yahoo
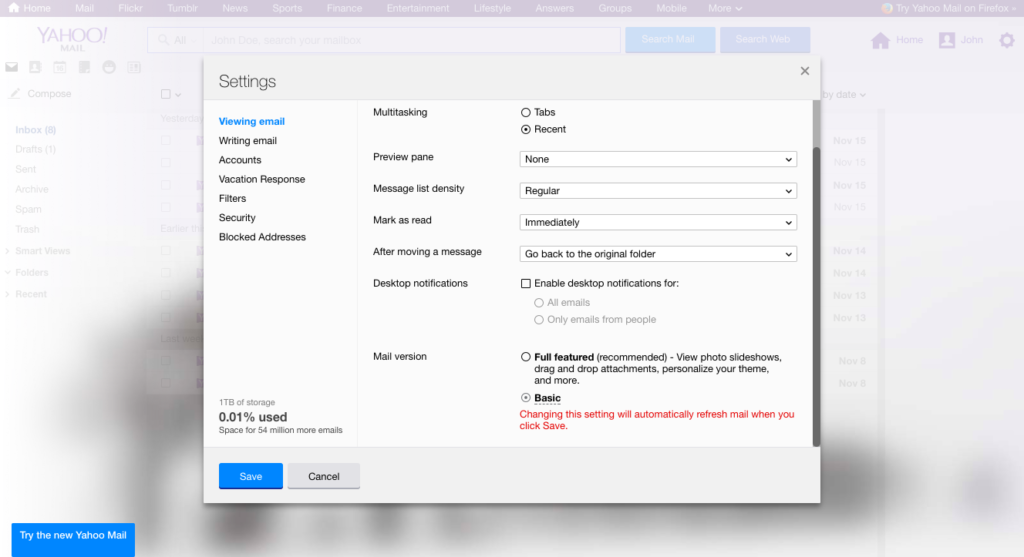
For the purists among you who want email without the frills, you can return to Yahoo! Mail Basic. You will lose themes, drag and drop attachments, and other features – so do consider carefully whether this is for you.

To switch to Yahoo! Mail basic:

  1. Click the gear icon, then Settings.
  2. At the bottom, you’ll see Mail version.
  3. Select Basic.
  4. Click Save.

Source: Yahoo
So there you have it: five different ways to get Yahoo! Mail the way you want it. Play around and see what works for you. And remember – there’s no shame in wearing grandma’s knitted sweaters!

5 reasons to switch from Yahoo! Mail to Gmail

When we’re lost, we check Google Maps. When we need facts, we “google” them. From smartphones to intelligent assistants, Google has become a household name. And there’s a reason Google touches on almost every part of our lives – it makes great things. So why are you still using Yahoo! Mail?

If the answer is, “because I’ve been using it for ages,” then perhaps it’s time to switch to something better. Gmail is probably the most powerful free email client around, with lots of advantages over Yahoo! Mail…

Here’s five of them.

Reason #1: Gmail is more secure

Yahoo! Mail’s infamous 2013 hack resulted in the theft of 3 billion user accounts – the largest hack ever. Yahoo! did apologize (eventually) and has since increased its security. But some would argue Yahoo! should’ve seen it coming.

Google, though not immune to hacking, is normally very quick to address weaknesses. It was the first of the two clients to introduce 2-step verification, for example. They’ve also consistently used the more secure bcrypt password hashing algorithm, which Yahoo! Mail only switched to after the 2013 hack.

While they both offer similar protective features (2-step verification, for example), Google’s reputation for innovation, speed, and patching vulnerabilities puts it miles ahead of Yahoo! Mail.

Reason #2: Gmail is faster

Google has an enormous international server network. The exact number is confidential, but according to this 2011 report based on energy usage, it’s around 900,000. That number will have increased considerably from 2011, so I’d guess it’s way above a million now.

All that bandwidth and power means your emails are sent lightning fast. It might not be a big advantage, but when you need your email to arrive quickly, Gmail wins hands down.

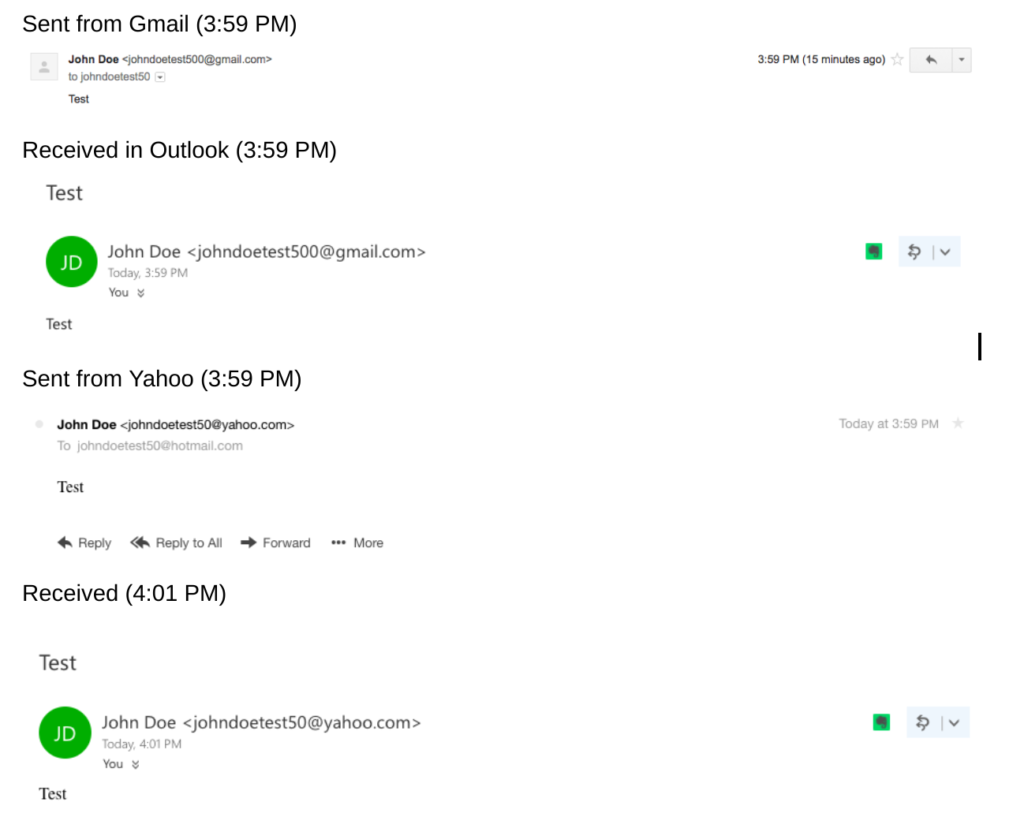
As a quick test, I sent an email from Gmail to Yahoo! Mail. It was received in my Yahoo Inbox the same minute it was sent: 3.41pm.

I then sent another test email from Yahoo! Mail to Gmail. This time, Gmail didn’t receive the email until five minutes had passed. I know Gmail has stronger spam algorithms, but it’s extremely unlikely that made up the difference. Regardless, I repeated the test with Outlook, and here are the results.

That’s better than the first test, but still two minutes slower. , ow this isn’t a scientific test – I’d need to send thousands of emails at different times to claim a truly accurate pattern – but it does demonstrate just how quick Gmail is.

Reason #3: Gmail has a powerful suite of productivity tools built in

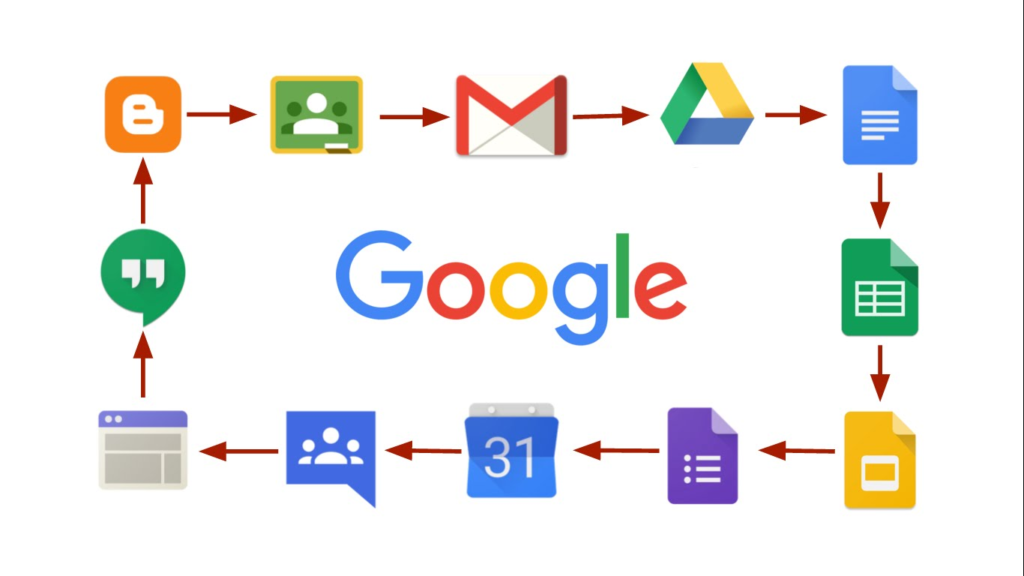
Gmail comes with a pre-installed package of cloud-based tools – many of which are the gold standard of modern office working. Think Calendar, Maps, Documents, Sheets, Drive, Hangouts, YouTube, and more. With everything at your fingertips, you don’t have to log in elsewhere to get the programs you need. You can write, do your accounts, organize your social life, plan your next bike ride, and store precious memories all from within the Gmail app.

Yahoo! Mail, on the other hand, gives you… news? (At least it supports Google Drive.)

Source: Google

Reason #4: Gmail has fewer and smaller ads

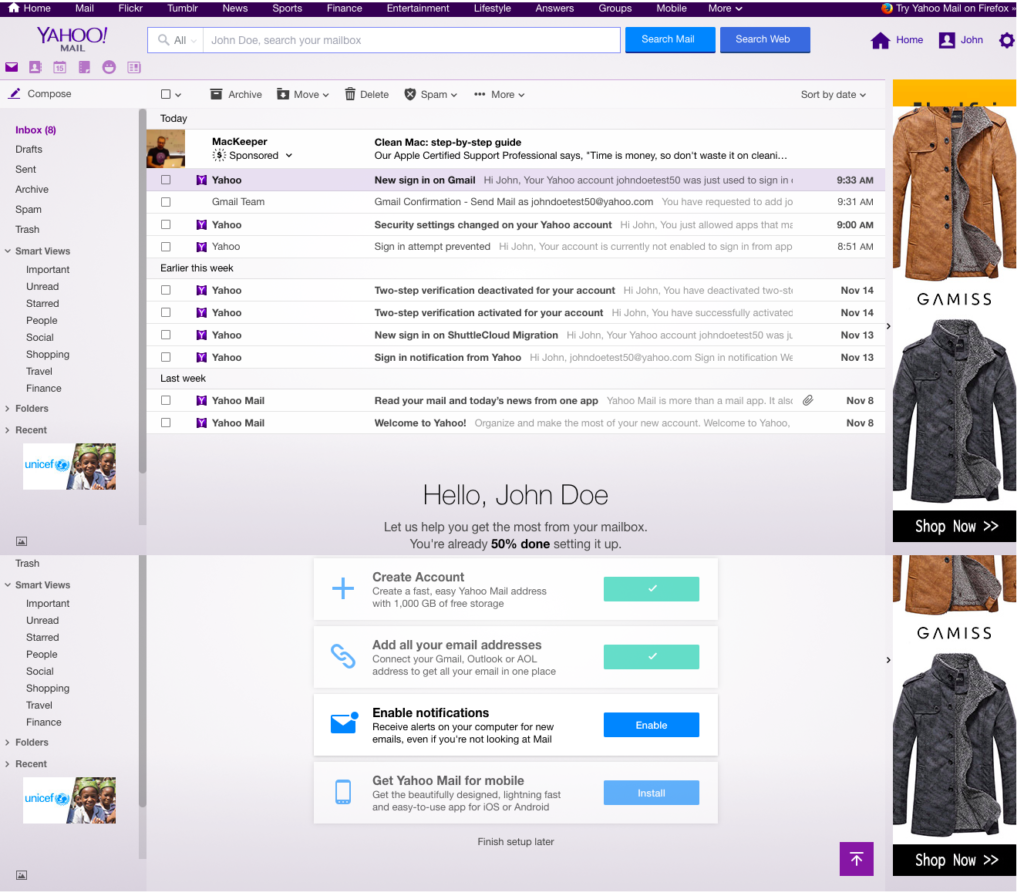
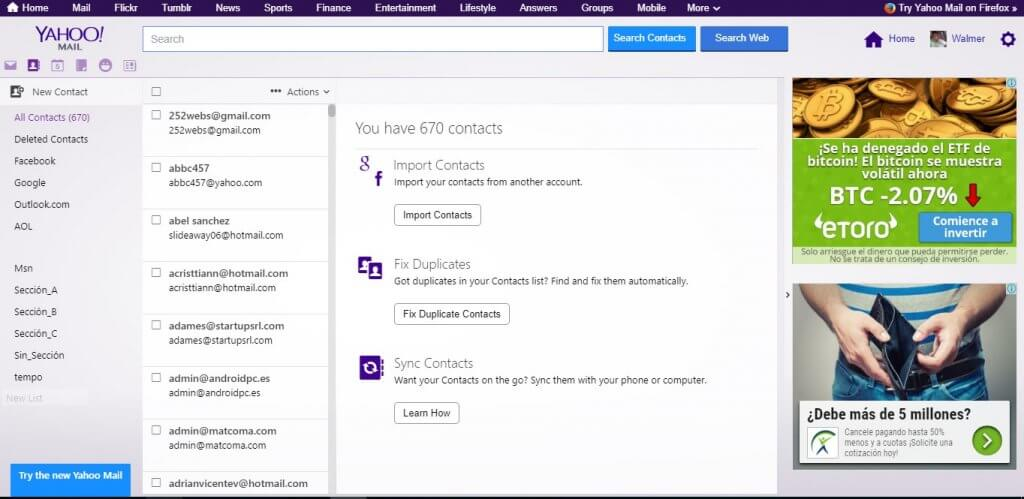
Just take a look at this messy screen.

Source: Yahoo
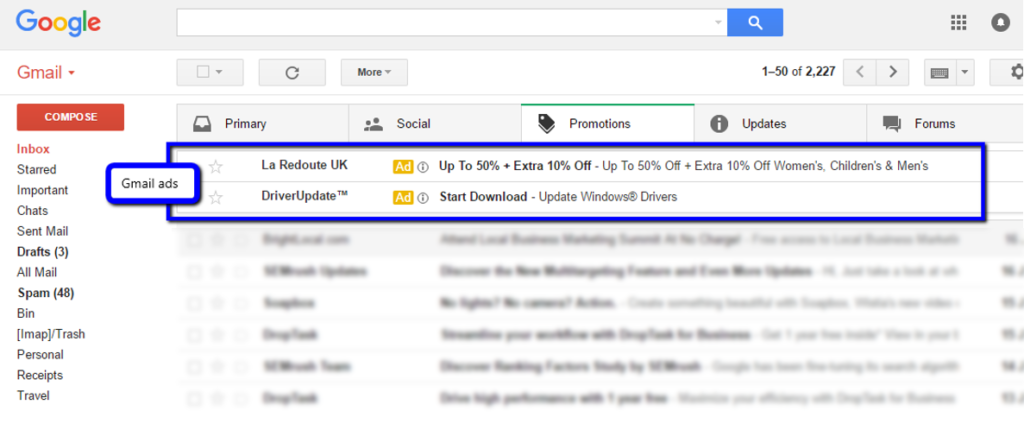
As you can see, Yahoo! Mail’s advertising is quite intrusive. Gmail’s, on the other hand, is fairly subtle. In fact, ads appear as emails under your “Promotions” tab, clearly labelled as such, and only appear in their full form if you click on them. Much nicer and less distracting.

Source: Gmail

Reason #5: Gmail has more powerful spam filters

Spam is arguably the most irritating aspect of the internet. No matter how many times you delete it, more keeps coming. All email clients filter spam to a degree, but Gmail’s is the strongest and most effective – catching 99.9% of it.

Gmail uses a combination of user feedback – understanding how you and others react to potential spam – and a machine learning algorithm to successfully delete what you don’t want. This type of neural network programming is gaining traction among other email clients, too, but as Google is one of the leaders in this field, its spam-catching powers are legendary.

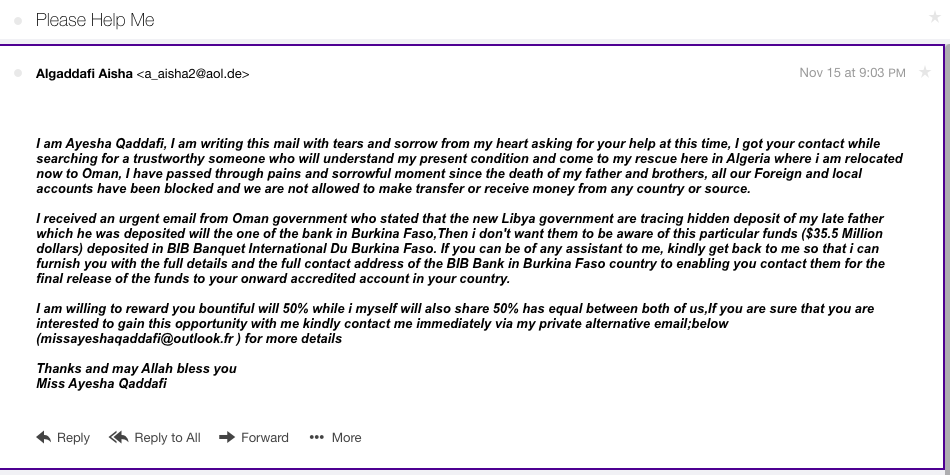
In fact, when creating the two test accounts for this article, I received six spam emails in Yahoo! Mail (thankfully they went straight to the Spam folder) – you can read one of them above. But I received nothing in Gmail. Not even in the spam folder.

Gmail isn’t for everybody. The switch from folders to labels might irritate some, and its storage space isn’t as generous as Yahoo! Mail’s. But if you’re sick of spam, want better security, in-built apps, and a cleaner interface – Gmail is the one for you.

Download Yahoo! Mail


How to read and send Yahoo! Mail emails in Gmail and Outlook

You don’t have to abandon Yahoo! Mail if you move to Outlook or Gmail. By tweaking a few account settings, you can read or even send mail from your old Yahoo! Mail address.

Traditionally, there are two ways this works.

POP3

POP3 stands for Post Office Protocol. It downloads emails from Yahoo! Mail’s server to your new email client without synchronizing. If you make changes, such as deleting an email, this only affects your new client and not your Yahoo! Mail account. Also, you can only access the emails in your Inbox (not other folders).

IMAP

IMAP stands for Internet Message Access Protocol. This newer method lets you access Yahoo! Mail and make changes that synchronize between the two clients. So if you delete your Yahoo! Mail email within Gmail, it will be reflected when you log into your Yahoo! Mail account.

Choosing one over the other depends on what you want to do. If you want to just view new emails then POP3 is fine. If you want full control, go for IMAP. IMAP also means you don’t need to organise your Yahoo! Mail account separately (deleting read mail etc.), as it synchronises with Yahoo! Mail’s servers.

In the past, you’d need to set up POP3 or IMAP manually, but both Outlook and Gmail can configure the IMAP/POP3 settings automatically for you.

First, let’s get your Yahoo! Mail set up on Microsoft’s popular Outlook client (the cloud-based Live and Hotmail accounts, not the desktop client).

Connect Yahoo! Mail to Outlook

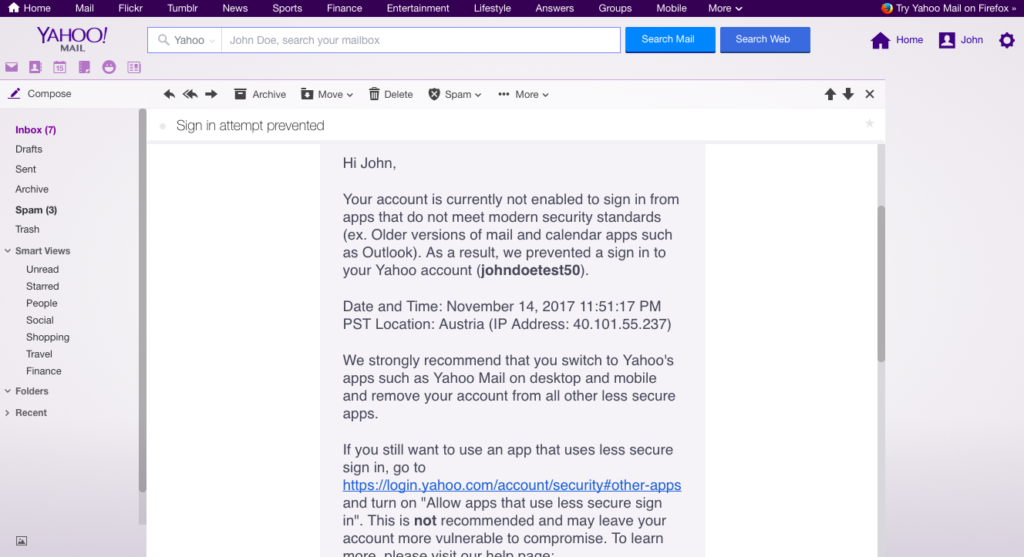
Please note: The first time I tried this, it didn’t work. I kept getting an error message in Outlook telling me they couldn’t connect to my Yahoo! Mail account. I checked Yahoo! Mail and I’d received this email:

So it seems Yahoo! Mail thinks Outlook isn’t all that safe. I’ll let you decide if that’s true or not, but to make it work, simply visit the Account Info page and enable “Allow apps that use less secure sign-in.”

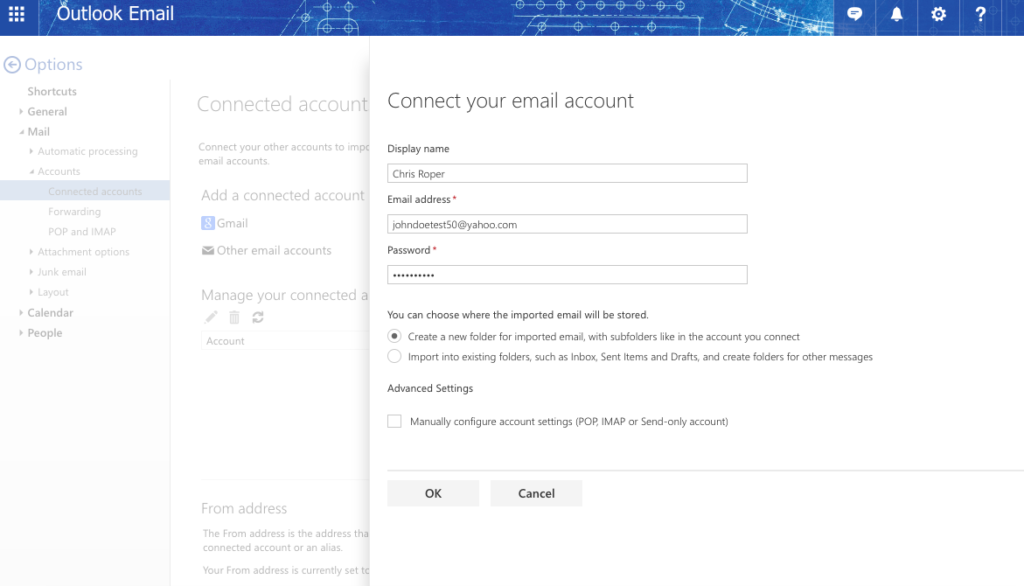
  1. In Outlook, click the gear on the top right and select Connected accounts.
  2. Select Other email accounts.
  3. Enter your Yahoo! Mail email address and password.
  4. Decide between copying your Yahoo! Mail folder system and using Outlook’s
  5. Outlook will configure IMAP by default. If you’d prefer POP3, select Manually configure account settings.
  6. Click OK.
  7. For IMAP, you’re done. You’ll get a notification saying, “Your account [account name] is now connected.” It might take some time for the changes to reflect in your Outlook mailbox.
  8. For POP3, you’ll need to enter some settings manually. Most of these are pre-filled, but you can find anything missing on Yahoo! Mail’s help page.

Now, with IMAP configured, your two accounts are synced. You’ll get Yahoo! Mail in Outlook, and can send mail from your Yahoo! Mail address (though you’ll need to show the “from” field to do this and select it from the drop-down box).

Connect Yahoo! Mail to Gmail

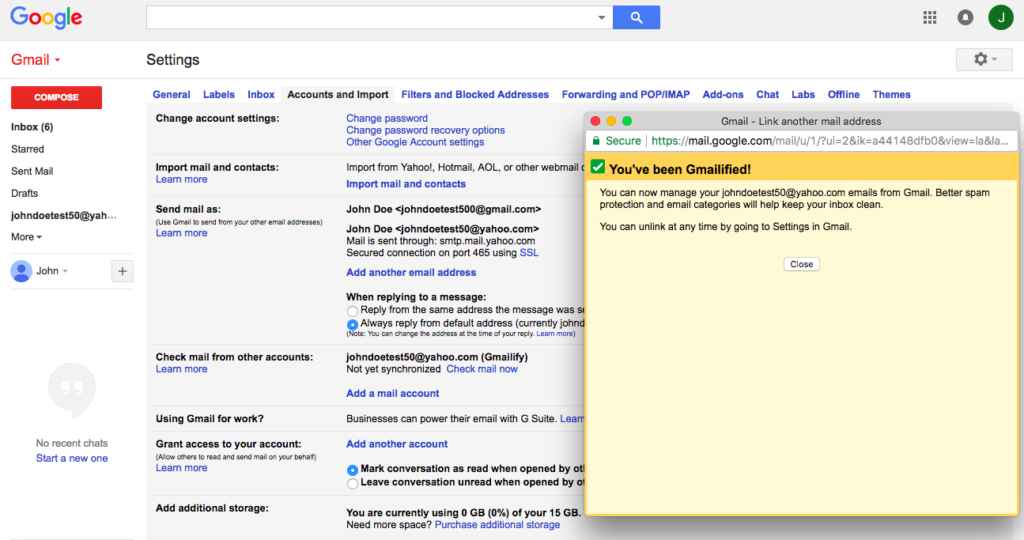
Gmail has a cool feature called Gmailify. This configures full IMAP control of your Yahoo! Mail, with a few extra benefits such as Gmail’s better spam filters. If you want to control your Yahoo! Mail account from Gmail, this is the way to go.

  1. Click the gear in the top right and select Settings.
  2. Select Add a mail account.
  3. You’ll get a pop-up asking you to enter your Yahoo! Mail email address. Once you’ve done this, click Enter.
  4. Ensure Link accounts with Gmailify is selected, then click Enter.
  5. You then get a message from Yahoo! asking you to give access to Gmail. Click Agree.
  6. That’s it – you should get the “You’ve been Gmailified” screen below.

If you’d prefer POP3 only, select the other option at step 4 and follow the instructions.

As usual, it might take some time to sync, but Gmailify gives you Yahoo! Mail control, with all the best features of Gmail.

Download Yahoo! Mail


3 tips for keeping your Yahoo! Mail account secure

Cybercrime is on the rise. From influencing elections to stealing cash, hackers pose a growing threat to our digital lives. Ignoring basic security precautions leaves you open to theft, extortion, or if you’re lucky, an endless barrage of spam.

But thankfully, there’s lots you can do to protect yourself – starting with your Yahoo! Mail account. Any email account is a treasure trove of personal information, and it’s essential you keep it as secure as possible. Yahoo! Mail, like any email client, can only do so much to protect your details. It’s down to you to do the rest.

With that in mind, here are three tips for keeping your Yahoo! Mail account secure.

Download Yahoo! Mail

1. Use Yahoo! Mail’s Account Key

Source: Yahoo
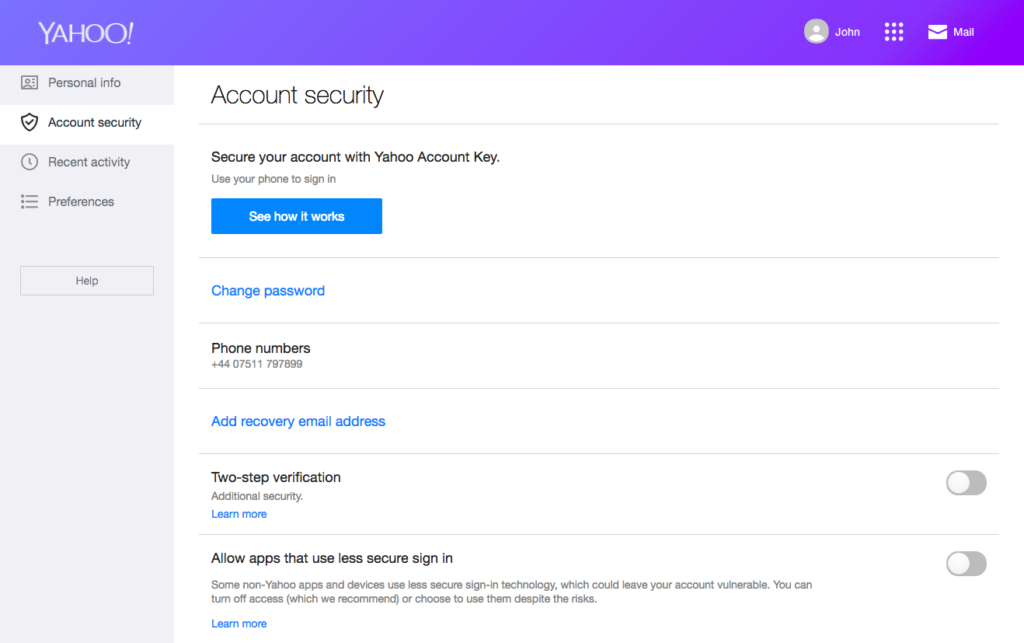
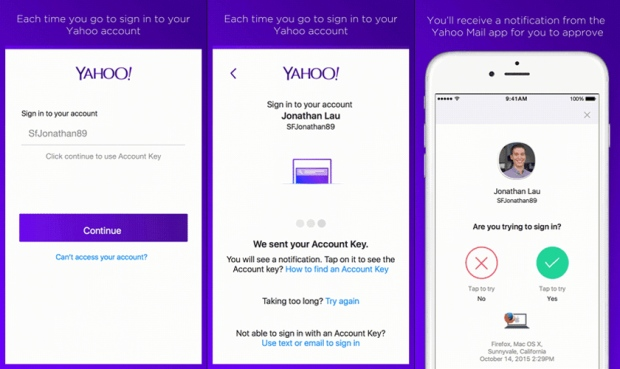
Passwords, by their very nature, are crackable, so why not get rid of them altogether? Yahoo! Mail’s Account Key is a relatively new feature that lets you log in without entering a password. Instead, Yahoo! sends a notification to your phone, which you approve for access.

It’s a cool feature, and as we’re never far from our smartphones these days, it’s just as convenient as a password – but much safer. You will need to download a Yahoo! app for it to work. The mail app is pretty decent, so I’d go with that. Then, follow these instructions:

  1. Click your name at the top right.
  2. Select Account info.
  3. Select Account security.
  4. Select See how it works under Secure your account with Yahoo Account Key.
  5. Select the device and app on which you want to be notified.
  6. Select Send me a notification.
  7. On your device, select the Approve icon.
  8. Select Always use Yahoo Account Key on your browser.
  9. Enter your mobile number.

2. Use a secure password

Source: XKCD

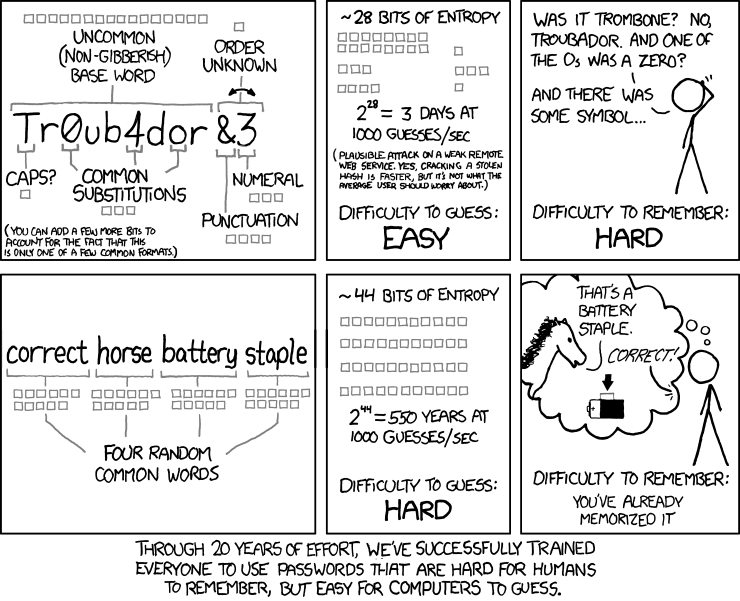
In 2003, Bill Burr, a former manager at The National Institute of Standards and Technology, wrote a guide to creating secure passwords. He asked that we use symbols, numbers, and other characters in our passwords – (0mPuT€R!, for example.

The problem is these passwords are difficult to remember but remarkably easy to hack. Humans aren’t particularly good at coming up with random passwords, making them easy to guess by running through common words and their spelling substitutions.

Bill has since apologized for his error. Now, the best passwords take four random words and put them together. Like hotel-sausage-armchair-viper. This is much more difficult to guess but far easier to remember as they’re recognizable words made up of standard letters. Flick through a dictionary, in any language, and select four random words to make your emails very difficult to hack.

3. Use 2-step verification

Source: Yahoo!

A password alone isn’t enough to protect you, so you should set up 2-step verification. This means that every time you log in from a new device, Yahoo! Mail will send a notification either by mobile phone or to another email address asking you to confirm it’s you.

This extra layer of protection is becoming increasingly common across all email clients. And while it’s not perfect, it’s much better than using a password alone. Be warned, though – you can’t use Yahoo Account Key and 2-step verification together. For ultra-protection (though you’ll need a good password), I recommend doing 2 step-verification.
Here’s how to set up 2-step verification through your desktop browser.

  1. Click your name at the top right.
  2. Select Account info.
  3. Select Account security.
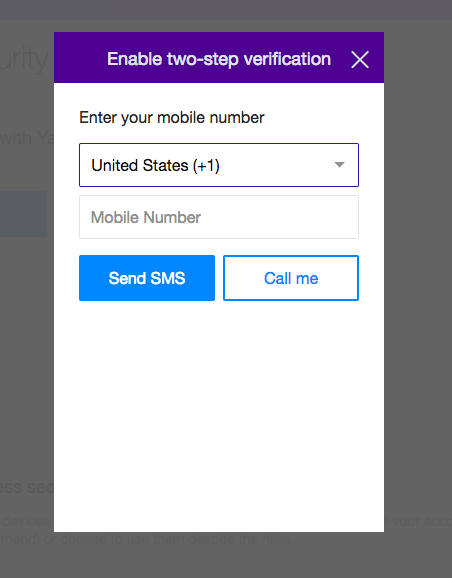
  4. Toggle Two-step verification to on.
  5. Enter your mobile number.
  6. Choose whether to receive an SMS or a phone call.
  7. You’ll then receive the “success” message.

That concludes the three tips. As always, never give your passwords, user IDs, or other sensitive information to anyone. If you suspect foul play, check recent sign-in activity on your Yahoo! Mail account.

Switching from Yahoo! Mail to Gmail? Here’s what you need to know

If you’ve decided to jump ship and try Gmail, you’ll want to take your stuff with you. Rather than copy all your emails and contacts manually, you can make Gmail and Yahoo! Mail do the hard work for you.

Below is a step-by-step guide to automatically transferring all your emails and contacts from Yahoo! Mail to Gmail. Before you begin, make sure you’ve already got a Gmail account set up. You won’t be able to move your stuff until you’ve got a live Gmail account.

The next thing to do is make sure all your Yahoo! Mail emails are in your inbox. Gmail can’t take emails out of your folders, so just move them all into your inbox before following the steps below.

How to switch from Yahoo! Mail to Gmail without losing your stuff

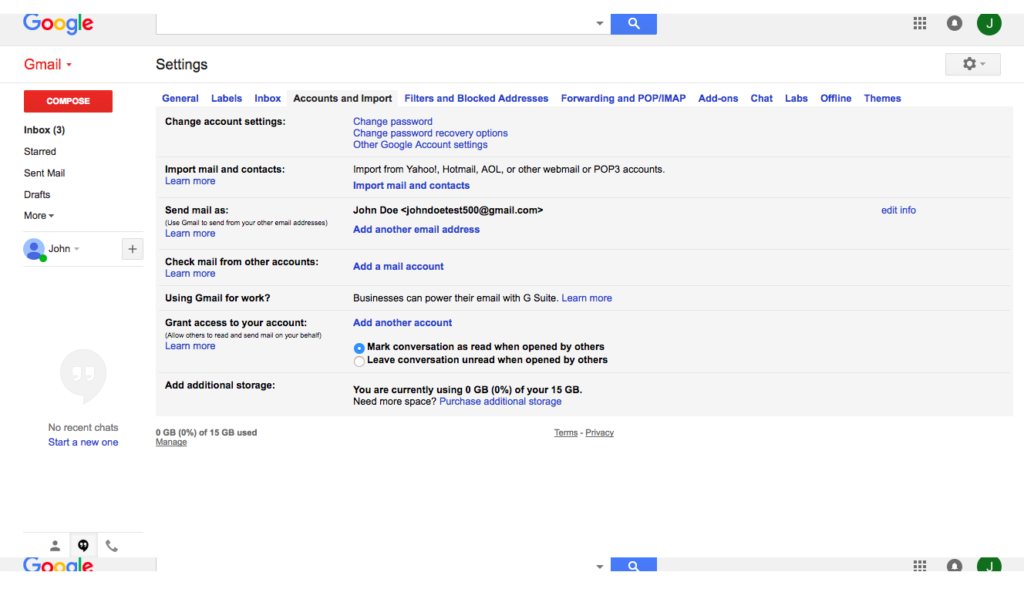
Step 1. In Gmail, click the little gear symbol at the top right and select Settings. You’ll be taken to the General settings tab, but you should then click Accounts and Import.

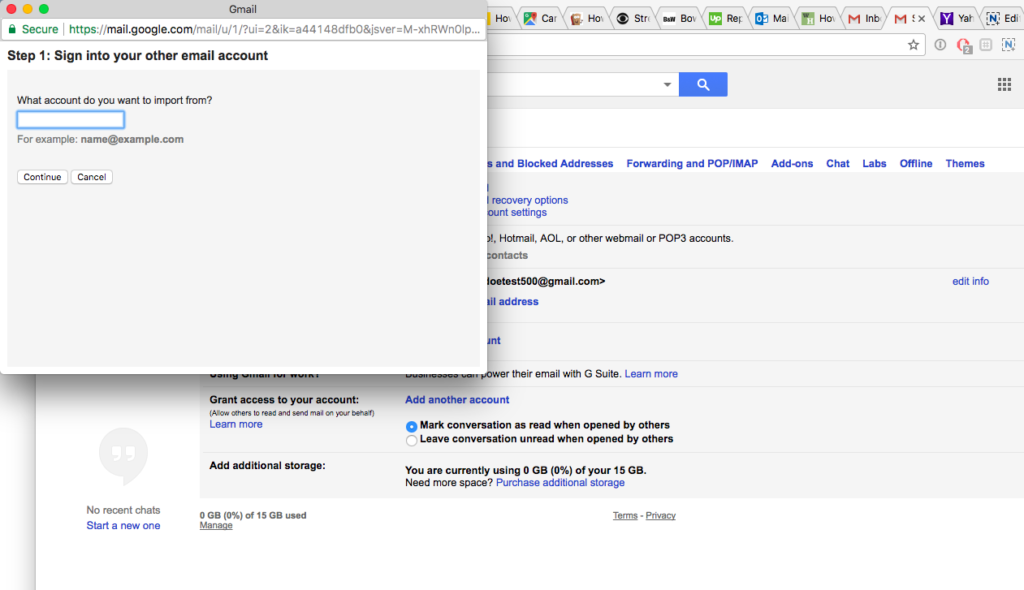
Step 2. Now click on Import mail and contacts. This generates a pop-up that will ask you for the email address of the account you want to import. In the example, I’m importing from a Yahoo! Mail test account called johndoetest50@yahoo.com – so that’s what I entered here.

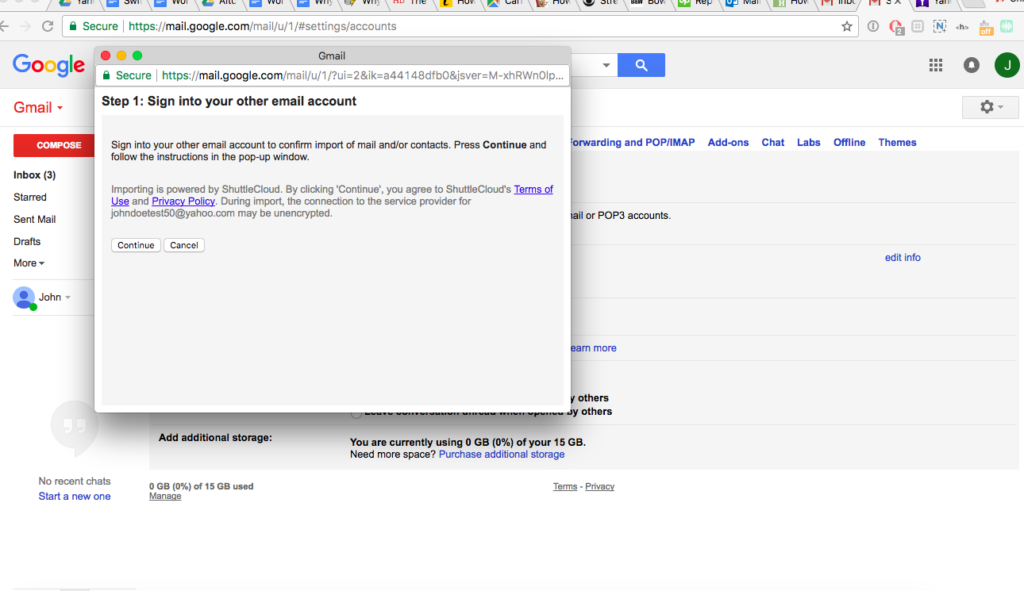
Step 3. Once you’ve entered your Yahoo! Mail email address, you’ll be asked to sign into your Yahoo! Mail account to confirm the transfer.

Gmail also warns that your emails might lose encryption during the transfer process, but this is unlikely since ShuttleCloud – the service handling the transfer – encrypts all your data (according to their website).

Once you’ve signed into Yahoo! Mail, click Continue.


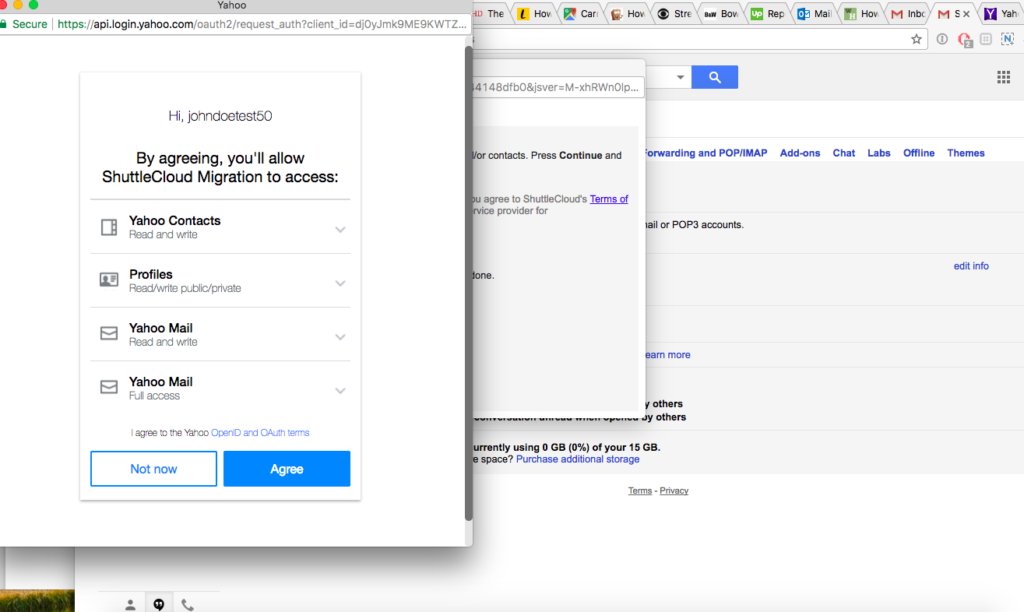
Step 4. Now you’ll get another pop-up asking you to give ShuttleCloud access to your Yahoo! Mail account. Click Agree.

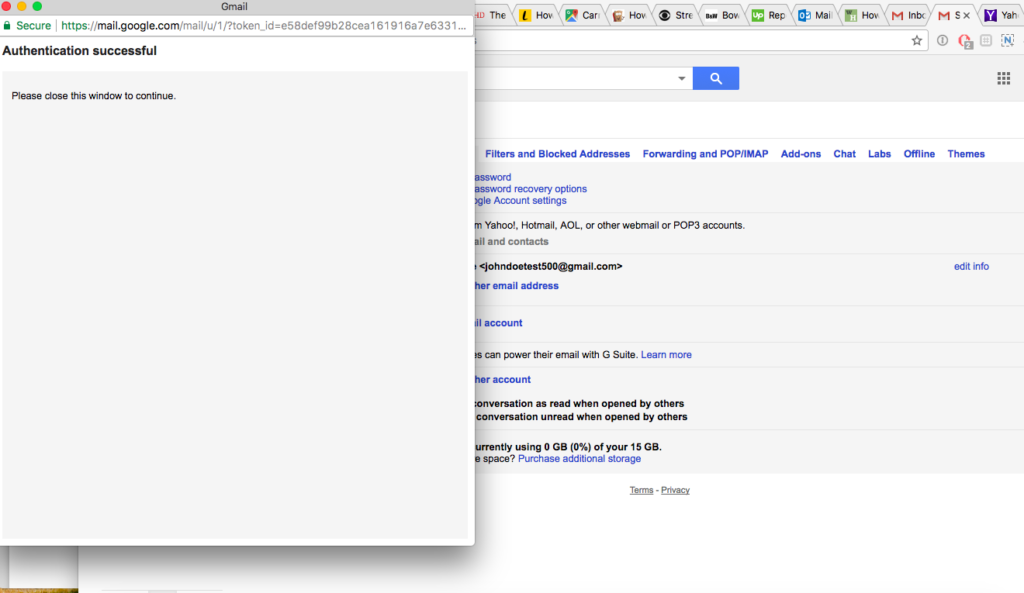
Step 5. If everything goes well, you’ll get an “Authentication successful” message, asking you to close the window. So go ahead and close it.

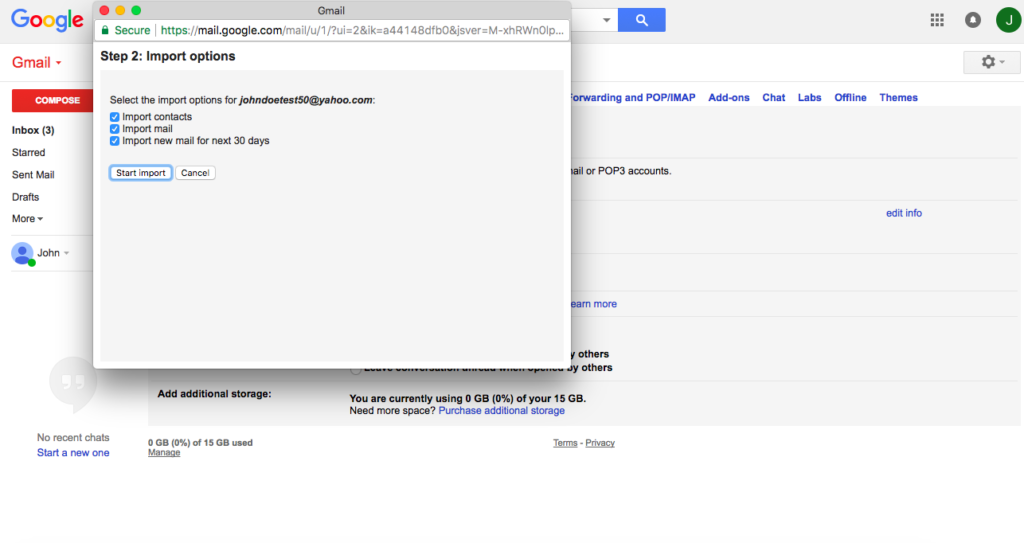
Step 6. You’ll return to the original pop-up where you must choose what to import. Gmail also suggests importing any new mail you get for 30 days. This is handy if you haven’t gotten around to giving everyone your new Gmail address.

Once you’ve chosen what you want to import, click Start Import.

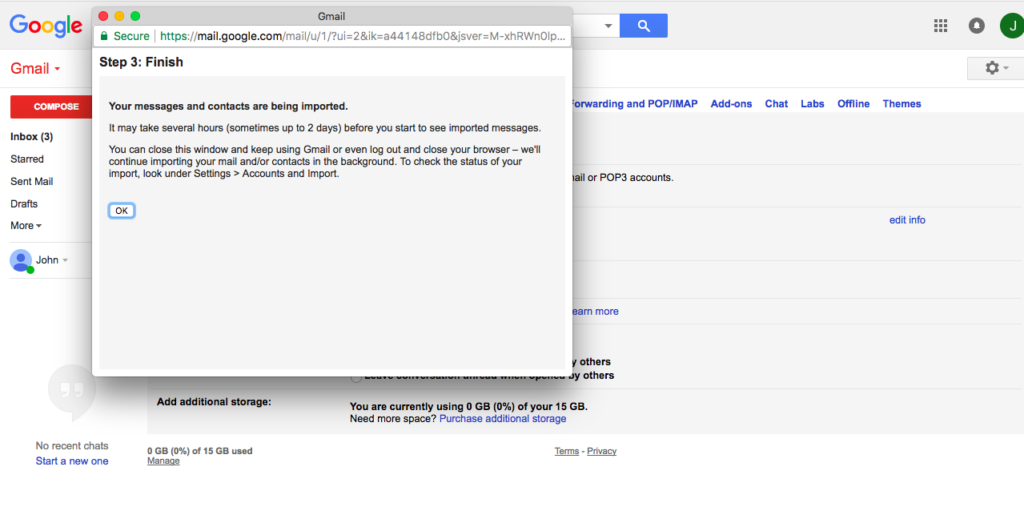
Step 7. You’ll see a message confirming that your emails and contacts are being imported, and how long it might take to complete. It could be hours or days, depending on how big your Yahoo! Mail inbox and address book are. The good news is you don’t need to be signed in. Gmail will continue to import your stuff even if you log out.

And that’s it. Once everything has been imported, you’ll see it in your Gmail inbox. All your emails will be automatically labeled with the email address they were imported from, which will make organizing your Gmail inbox that much easier.

Related:

3 tips to get the most out of Yahoo! Mail

Since 1997, Yahoo! Mail has provided fast, secure, and easy-to-use email services for millions of people around the world. Despite an onslaught of competitors, Yahoo! Mail holds its own with a rich suite of features, customization, and one of the largest storage allowances of any email client.

Download Yahoo! Mail

Whether you’re a lifelong fan or a recent convert, here are three tips for getting the most out of Yahoo! Mail.

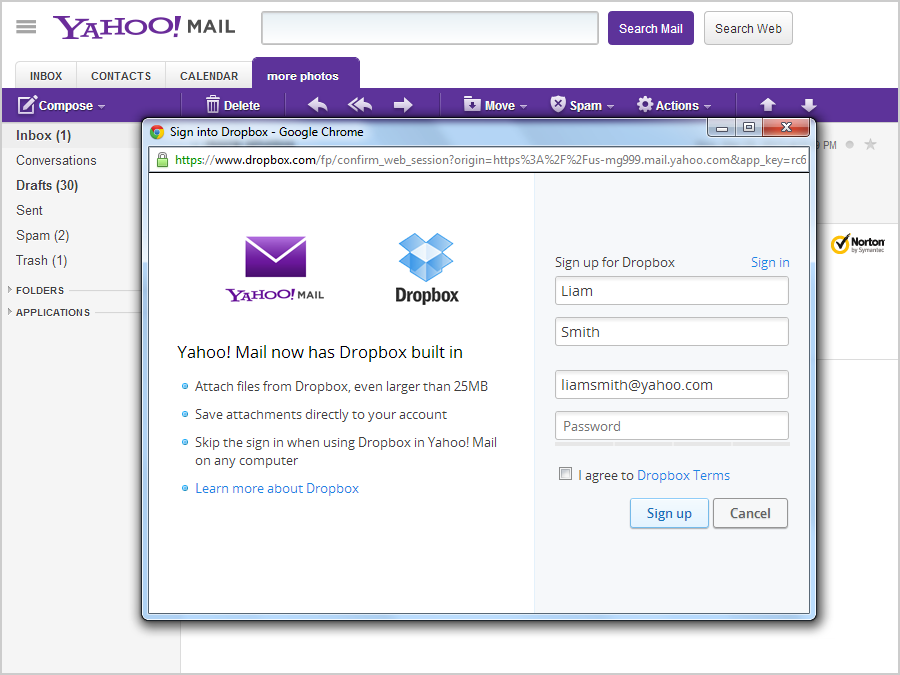
1. Avoid unwanted calls with Caller ID from Yahoo! Mail app

Most email clients have a smartphone app, but none is quite as user-friendly or useful as Yahoo’s. The Yahoo! Mail app for iOS and Android casts off most of the ads that pepper the desktop version and provides a host of cool benefits, including customizable swipes, themes, and a passwordless security key.

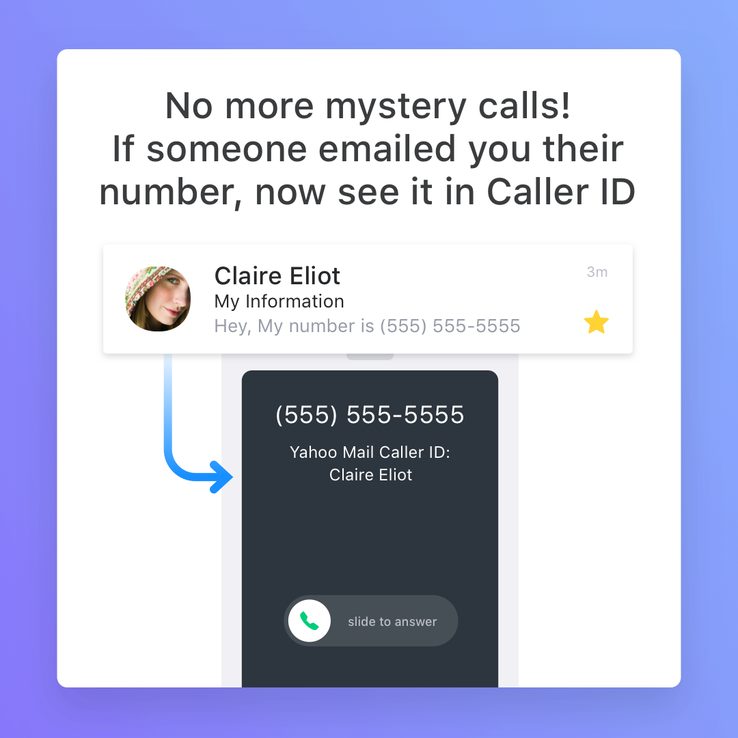
One of their most unique features is Caller ID.

Whenever you receive a call, the app will compare the incoming number with those listed in your emails, including those in email bodies and signatures. This is a great for screening unwanted calls, or if you’d prefer to keep a digital record of your conversation. You’ll also be able to see the number in your call records if you need to refer to it in future.

Source: Techcrunch

To turn on Caller ID on iOS, first install the Yahoo! Mail app. Then follow these instructions:

  1. Go to your phone’s settings.
  2. Select Phone.
  3. Select Call Blocking & Identification.
  4. Toggle the Yahoo! Mail app on.
  5. Save your settings.

2. Attach files larger than 25MB with Dropbox and Google Drive

In today’s data-driven age, we’re constantly sharing photos, videos, GIFs – even whole albums. Yahoo! Mail, like other email clients, has an attachment size limit of 25MB. But you can bypass this by using cloud storage instead.

Normally this means getting a link and then inserting into your email, but Yahoo! Mail has it all built in. So next time you want to surprise your friend with their drunken dancing from the evening before, just upload it to the cloud – and don’t forget to copy in your other friends, too!

Source: Digital Trends

It’s really easy to set up:

  1. Click Compose as normal.
  2. Click the little blue plus sign on the bottom right.
  3. Select either Google Drive or Dropbox.
  4. Log in to Google Drive or Dropbox as usual and you’re good to go.

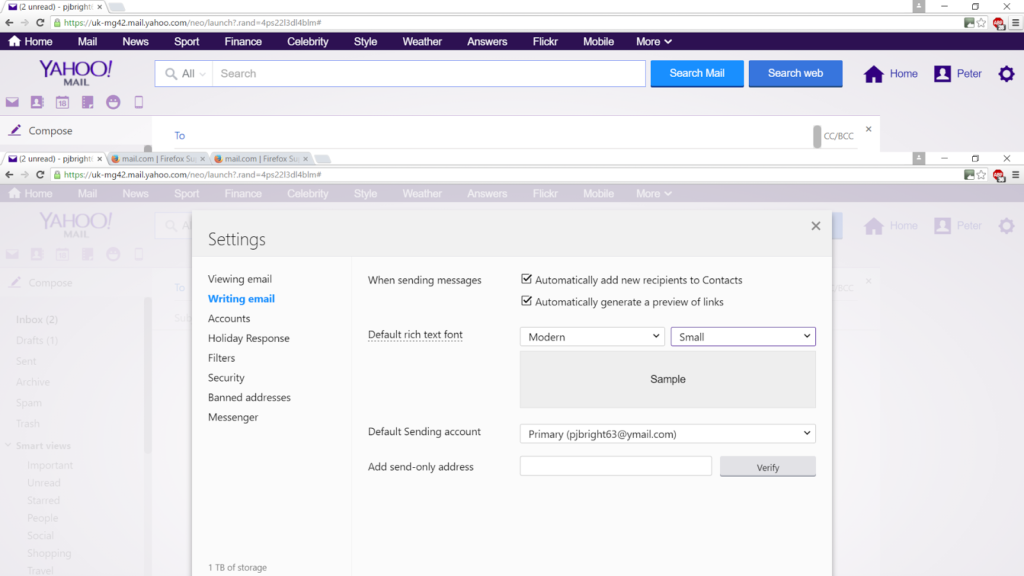
3. Add email contacts automatically

Trawling through old emails to find that special contact isn’t fun. Of course, you could add them to your contacts manually as you go, but who’s got the time to do that? Wouldn’t you rather fire them off quickly and get on with your next communique?

Whether you’re keeping in touch with family or organizing your friend’s 21st birthday, do it faster with automatic email contacts. Yahoo! Mail adds your email recipients, senders, and your senders’ recipients to your address book without you needing to lift a finger.

Source: Mozilla

To set it up, follow these steps:

  1. Click the small gear at the top right. This takes you to the Help menu.
  2. Click Settings.
  3. Click the Writing email tab.
  4. Click Automatically add new recipients to contacts.

And that’s it – Yahoo! Mail will add all email recipients to your address book automatically, giving you more time to dazzle friends with your tales.


How to delete your Yahoo! Mail account in 3 steps

Yahoo has been through a lot lately. And what with every single Yahoo account having been hacked, it could be time to delete your Yahoo! Mail account. This will minimize your risk of exposure and the chances of your data ending up in the wrong hands.
Our email accounts are a bit like relationships – some last, some don’t, but we’ll always remember the good times.

So if you’ve moved on, don’t leave your email client hanging on for a possible reunion. Whether you’ve switched providers, have been inundated with spam, want to safeguard against vulnerability, or simply want to try something new, you deserve a clean break.

Before you start

Before you begin, think about how deleting your Yahoo! Mail account might affect you. If you’re paying for any services, such as Yahoo! Mail Pro, you’ll immediately lose access.

The same goes for other Yahoo! Mail services such as Flickr and Tumblr. Once you’ve terminated your account, you lose access to it all – including all your photos and documents stored on Yahoo! Mail’s servers.

And make sure you tell friends and family members your Yahoo! Mail address won’t work. Especially anyone who might not email you regularly – like a business associate, client, or that old flame you’ve been hoping to hear from. Have a peek at your address book and past emails to ensure you don’t lose anyone important.

Have you signed up to any external services with your Yahoo! Mail address? Netflix, Facebook, Twitter etc? Cancelling your account might interrupt these services, too. Your email address will become available again after you cancel, and that could be a nuisance if it’s still attached to a service you use.

All done? Okay. Now you’re ready to cancel your Yahoo! Mail account.

How to cancel your Yahoo! Mail account

Step 1.

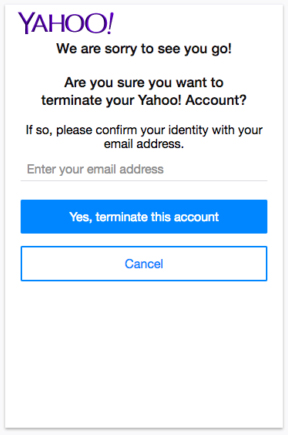
Sign into whichever account you’d like to delete, and visit Yahoo! Mail’s account termination page.

You’ll then get a warning note about what terminating your account entails. But if you don’t use Yahoo! Mail for anything other than emailing, there’s not much to worry about here.

Once you’ve read the text, click Continue.

Step 2.

You’ll now be asked to confirm your identity. In the example below, you just need your email address.

Enter your email address (or whichever form of identification it asks for) and click, Yes, terminate this account.

Step 3.

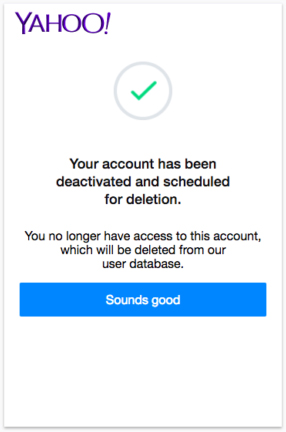
You should get the screen below. If not, something went wrong and you’ll need to start over again.


And that’s it. You can reactivate the account simply by logging in within 40 days of termination, but I’m guessing that if you’ve got this far, you won’t want to.

Related:

Yahoo! Mail vs. Gmail: Is there really a contest?

As the older of the two, Yahoo! Mail is a bit like Gmail’s quirky older brother. It’s been around longer, has gone through several style changes, and had had its fair share of embarrassing moments (including a pretty big hack in 2013).

Gmail is younger and fresher, but with a slightly geekier style. Techies love Gmail’s fluid, streamlined interface, its assortment of features, and Google applications built in.

But does that make Gmail better?

Not necessarily. Familiarity, a recently revamped interface, integrated cloud support, and a huge storage allowance make Yahoo! Mail a surprisingly nimble client. And as we all know, experience is a big advantage, and Yahoo! Mail has this in spades.

Assuming most of us want a secure, easy-to-use, and feature-rich email client, let’s see what each has to offer across these three areas.

1. Security

We don’t want to rehash bad times, but Yahoo! Mail suffered a real doozy back in 2013. A hacker stole the personal information of 3 billion users – every registered Yahoo! account – in the largest data breach ever. Yahoo was a little shady about the exact number at the time but has since ‘fessed up with the truth.

And what has it done since? Well, at the time of the hack, they were using weak MD5 hashed encryption for passwords. They’ve since upgraded to the far more secure Bcrypt algorithm.

Yahoo! also encourages 2-factor authentication, where you use a password and a second form of identification – such as a mobile – to gain entry to your account. All your incoming mail is scanned for viruses, too.

Source: Yahoo

Gmail does all of the above, so they’re fairly evenly matched. In fact, Gmail suffered its own security hiccup when Orin Hafif, a security researcher, discovered a bug in Gmail’s “delegate access” feature that exposed Gmail’s email addresses to theft. This didn’t include passwords, but it would’ve attracted massive phishing scams – something Gmail is regularly fighting.

2. Features

Both Gmail and Yahoo! Mail are formidable email clients. They’re both free, come with Instant Messaging, and support cloud storage. But they each have elements that outshine the other. For example, Yahoo! Mail gives you 1TB (1,000 GB) of email storage. That’s more than enough for even the most prolific emailers. Gmail only gives 15GB.

Source: Google

On the other hand, Gmail includes powerful productivity applications such as Google Documents, Google Sheets, Google Calendar, and Google Drive. Yahoo! Mail lets you attach files from Google Drive without leaving the app, but it doesn’t integrate the other applications. With Gmail, you get a full suite of tools easily accessible from your Gmail navigation bar, which is convenient for people who like to have everything in one place.

But another point goes to Yahoo! Mail for social media integration. It supports Facebook and Twitter – letting you post directly from the app – while Gmail only lets you access the less popular Google+ (it also supports YouTube natively, but I’ll let you decide whether to count that as social media).

3. Ease of use

Again, the two are fairly evenly matched when it comes to ease of use. But if you’re used to one or the other, you’re bound to find a few things frustrating.

First, Yahoo! Mail bombards you with ads. While they claim to have reduced them, they’re still quite invasive – taking up most of the right of the screen, and a banner on top.

Source: Yahoo

Gmail’s ads are more discreet, sticking to banners only. This is a much nicer user experience, but there’s a bigger issue that some of you won’t like. To personalize ads, Gmail’s algorithms read your emails. Although Google has said they’ll stop targeting ads in this way, they have no intention to stop reading your emails. So if you don’t want Google’s algorithms knowing your intimate details, perhaps Gmail isn’t for you. Having said that, Yahoo! Mail has reserved the right to do the same.

Another controversial difference between the two is in the way they organize your inbox. Gmail uses labels, while Yahoo! Mail uses folders. For some reason, people tend to prefer folders. Despite Gmail’s labels offering greater functionality, like assigning multiple labels to each email, Yahoo! Mail’s folders seem the more intuitive, and therefore easiest to use.

But Gmail wins on its spam filters thanks to the powerful, data crunching algorithms that drive Google’s search and analytical tools. These keep those Nigerian lotteries at bay, saving you the trouble of deleting them.

And speaking of power, Google’s vast server network does mean your emails get where they need to a little faster. Whether this is important or not depends on you. For most people, Yahoo! Mail is plenty fast enough.

As you can see, both Yahoo! Mail and Gmail have their pluses and minuses. Which you prefer depends mainly on you. Yahoo! Mail might seem like the fun but dorky older brother, it’s been around for ages and has acquired a loyal following who love its folders and generous storage.

But if you’re into tech, love to tinker, and want powerful tools at your fingertips, Gmail is the cool-but-slightly-aloof newer kid on the block you should make friends with.

Either way, you’ve made a great choice.

Download Yahoo! Mail

3 easy ways to organize your Yahoo! Mail account

Despite the meteoric rise of social media, email is as popular as ever. And as with all online activities, it’s important to spend your time wisely. After all, a messy inbox isn’t just frustrating to use; it could actually increase your stress levels.

So here are three ways to organize your Yahoo! Mail account. They’re easy to learn, quick to set up, and will help prevent headaches next time you check your mail.

Download Yahoo! Mail

Add all your email clients to Yahoo! Mail

These days, most of us have more than one email client. Often there’s a reason – separating work and play, for example. But it means having our attention spread over more applications, interfaces, and functions (not good for our overworked brains). It’s better to combine them all in one convenient place.

Here’s how.

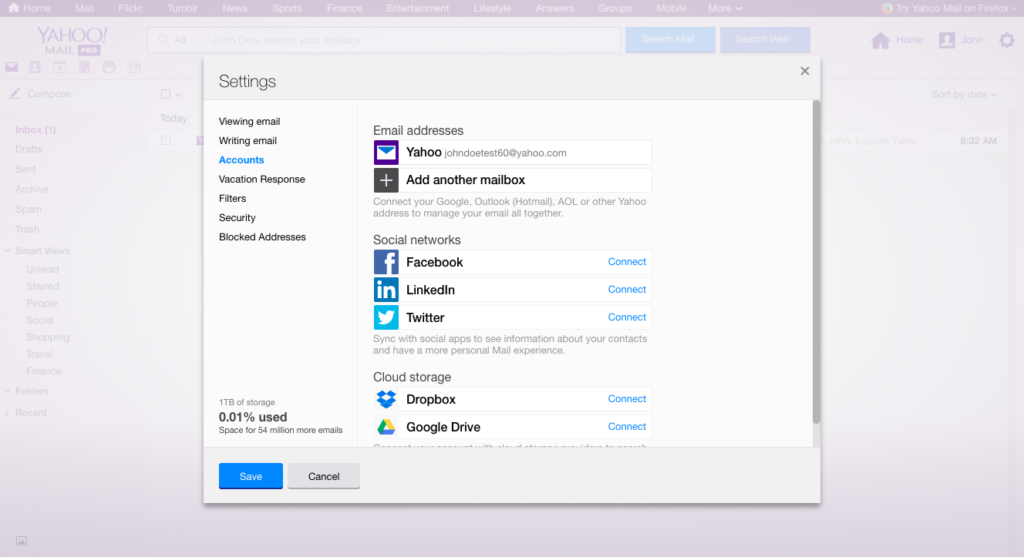
  1. Under Settings (the little gear symbol at the top right), select Accounts.
  2. Click Add another mailbox.
  3. Select the client you want to add.
  4. Enter the email address.
  5. Log in to your other client and adjust the settings to give Yahoo! Mail access.

Source: Yahoo

Create folders to organize your emails by topics or themes

Remember back in the eighties a typical office would have shelves of box files and folders? This is a digital version of that concept (and it takes up far less space). Folders give you single-click access to topics you’re interested in.

A common system might include folders for work, social, and family. But there’s no right or wrong way. Just choose the system that makes most sense to you. Once you’ve decided, create your own folders by following these steps:

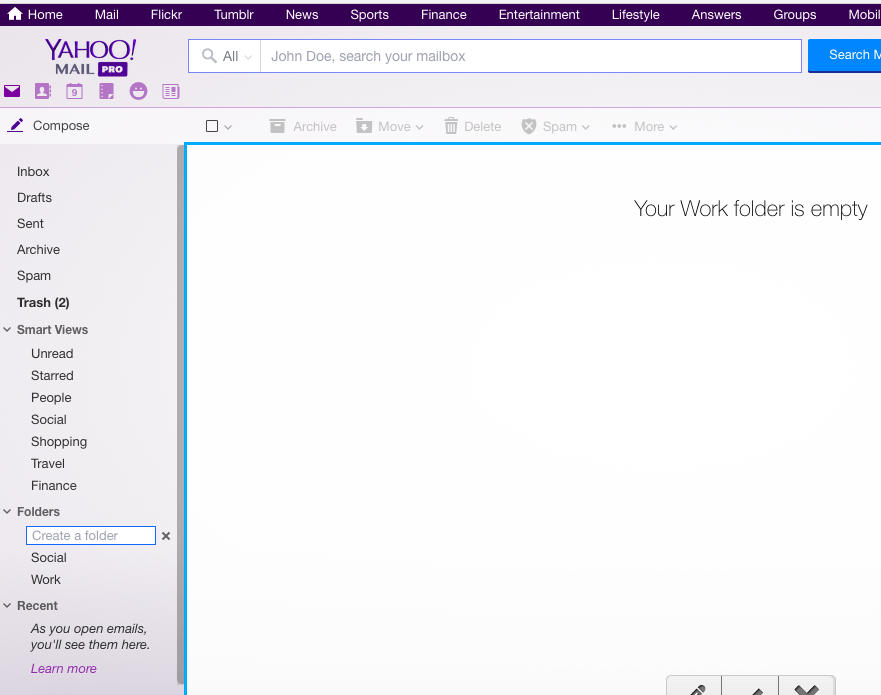
  1. Move your cursor to the Folders section on the email menu column on the left-hand side.
  2. You’ll see a little folder symbol appear alongside it. Click it.
  3. Enter the folder name and hit Enter.
  4. To add emails to your folder, simply drag and drop them from your inbox. Or, select the email and use the Move button on the horizontal selection bar on top and choose the folder you want to move it to.

Use filters to automatically sort your email into folders

It can get a little irritating having to constantly move new emails into folders, but thankfully Yahoo! Mail has a solution: filters.

Filters let you set rules that automatically folder incoming mail. All you need to do is give Yahoo! Mail the criteria to filter by, such as:

  • From
  • To/CC
  • Subject
  • Body

By asking Yahoo! Mail to filter your emails using keywords in any of the fields above, you save time doing it yourself. Just follow these instructions:

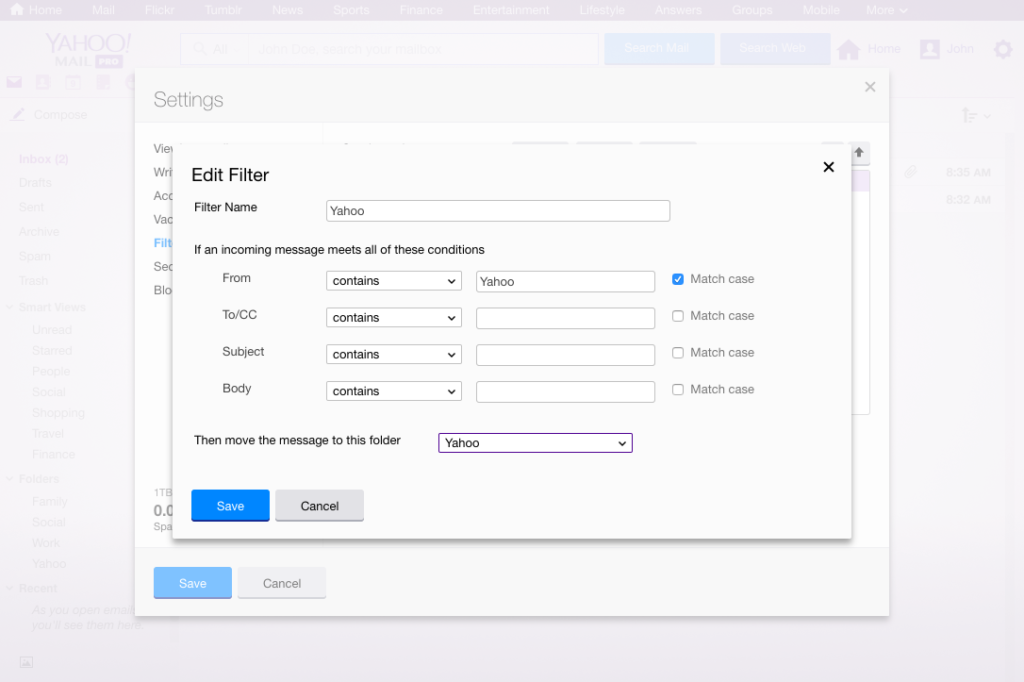
  1. Under Settings, click Filters.
  2. Click Add.
  3. Give your filter a name. In the screenshot below, I wanted to all new emails from Yahoo to go into my Yahoo folder. So I called this filter “Yahoo.”
  4. Select what you want to filter on. In my example, I simply filtered the “From” field using the word “Yahoo.” You can also set the filter to be case sensitive.
  5. Select which folder you want new mail matching your filter to be sent to – this is a drop-down box next to Then move the message to this folder.
  6. Click Save.
  7. Click Save again when you’re back in the Settings menu.

Now, in the example below, all new emails from Yahoo will automatically go into my Yahoo folder.

Yahoo! Mail will display in bold text any folder with unread mail and give the number of unread emails in brackets. That’ll make sure you don’t miss out on anything sent straight to a folder.

And don’t forget – if you can’t find what you’re looking for, simply use the Search Mail box at the top of the page.