How to Install the Friday Night Funkin’ Vs Whitty Mod in 3 Easy Steps

Friday Night Funkin’ is a fun rhythm-based game, available on Windows and Mac, which centers around a guy who wants to kiss his girlfriend before the end of the night. Her father won’t allow it until the main character proves his worth by rapping his way through a host of competitors and ultimately facing the father and beating him too; a classic love story if there ever was one.

The Vs Whitty mod for this game adds a new challenger to the game, rebinds the default keys from WASD to DFJK for more comfortable gameplay, and adds a new input system pulled from other rhythm-based games. Overall, this mod is definitely worth checking out and, in today’s article, we’ll show you how to install the Friday Night Funkin’ Vs Whitty mod safely.

How to Install the Friday Night Funkin’ Vs Whitty Mod

Let’s jump right into the guide and get you set up!

Step 1: Download the mod

You can download the mod on our website.

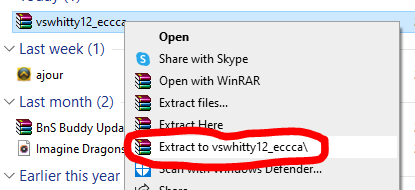
Step 2: Extract the files

Right-click on the downloaded file and extract it (you will need an unzipping tool, like WinRaR, for this step.)

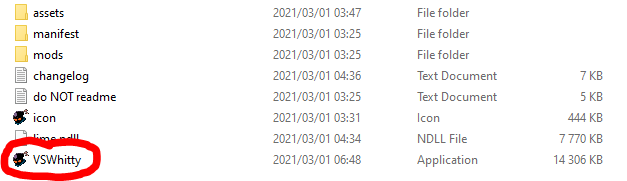
Step 3: Move the files

Open the extracted folder, copy the .exe file of the game and paste it into your game’s installation folder, which will replace the file in the game folder.

Now Go And Drop Those Beats!

You can now start your game, and it should work perfectly with the mod. It’s a common misconception that mods are bad for games. Many games have enormously benefited from their modding communities, Skyrim probably being the most notable one. 

So, while caution should be taken when downloading and installing mods, they also offer the opportunity to get more out of the games we love. Friday Night Funkin’ is a highly entertaining time-waster game that offers genuine fun and some pretty good music to boot. 

And the Whitty mod piles onto that by giving you more gameplay and streamlining the mechanics so that you can rise to the top of the ranks and finally kiss that girl.

How to Restore Tabs on Google Chrome in 2 Easy Steps

Google Chrome is probably the most popular browser out there at the moment, with the majority of people choosing it as their go-to browser on Windows, Mac, Android, and iOS. Chrome offers so much in the way of stability, and you can customize so many things to ensure that your online experience is perfect. 

One of Chrome’s most popular features is its ability to quickly restore previously opened tabs, even after closing the entire browser. We’ve all felt the panic of closing the wrong tab that took you forever to find or of accidentally closing the browser while you have five tabs open that you still needed.

So today, we’ll be showing you how to restore your tabs on Google Chrome after closing the browser and after closing the tab while keeping it open.

How to restore tabs on Google Chrome after closing

The first method we’ll look at is restoring tabs after you’ve closed Chrome.

Method 1 – Step 1

You’ll need to reopen Chrome and right-click on the top bar next to the New Tab.

Method 1 – Step 2

Scroll down on the menu that pops up and select Reopen closed window.

This will restore all of the tabs that you had open before you closed Chrome. This will also work after a computer restart.

Method 2 – Step 1

The second method, while very much the same as the previous one, differs ever so slightly. You’ll use this when restoring one tab that you closed.

This one is straightforward; right-click on the bar next to your open tabs and select Reopen closed tab. This will restore your previously closed tab.

It’s a piece of cake!

Chrome is known for being extremely easy to use, and this is perfectly illustrated in this guide. The ease with which you can rectify these small mistakes showcases why Chrome is sitting very comfortably at the top of the browser list.

Their processes and features are so much fun to play around with and so easy to use that most people find themselves inevitably drawn to the veritable browser dessert that is Google Chrome. And, unlike most things in life, this cake is never a lie.

4 tips: How Make Rust Load Faster

Are you ready for some first-person survival, construction, and action in Rust but waiting ages for the game to load? Rather frustrating, we know, especially if there’s a newbie out to attack you, and you have a masterplan to sidetrack him. 

Don’t worry; we’ll give you some tips to get that game loading faster while your game plan is still fresh. Hopefully, you can get to your team quickly and divert the sneaky attackers.

Why is Rust so slow to load?

Rust is an exciting game where you get to put all your skills to the test to survive with only two tires, a stone, and a torch. You form part of up to 300 players in a game, and it’s truly survival of the fittest out there on the island. Due to the servers’ load with so many players logging in, loading times can take forever. 

You can download Rust for Mac and Windows, free of charge if you haven’t joined into this action yet. There’s no time to waste, so let’s get your game going, shall we?

How to speed up Rust Free?

Tip 1: Don’t press alt+tab

The Rust client doesn’t like it when you browse while waiting for it to load, and using the alt+tab will prolong your game starting time.

Tip 2: Update your drivers regularly

The Rust developers keep on improving and adding new graphics to the game. Make sure you stay up to date with your graphics drivers to prevent lagging.

Tip 3: Check your Steam updates

Although the Steam updates are automated, something could have stalled it, in which case you need to do a manual update. You can do a manual check-up by clicking on the ‘Check for Steam updates’ button on the top left corner of your Steam page. Follow the easy prompts if you need to catch up.

Tip 4: Skip the asset load

One of the most extensive files to load is the assets. You can skip this step to improve loading time drastically. You’ll see two large Xs while the software is loading. If you press the red X while loading, the server will drop you back a step and push you into the game as if you’ve completed the action. 

Just keep in mind that if you choose this step, it can cause graphical errors that’ll take up time to fix later on. It should be a last resort to get into the game faster. Let’s call it an emergency when all else fails.

Hunting for scraps at the speed of light

Now that you know how to make Rust load faster, you’re back in the game. Make sure you have enough stone and cloth to continue crafting those significant items. You can also look at our guide for how to build in Rust.

How to Remove Google Chrome Extensions in 3 Easy Steps

Google Chrome has risen through the browser hordes to become one of the most popular web browsers on the market due to its versatility, stability, and well-designed interface. One of Chrome’s best features is its add-on management. Chrome is widely used on Windows, Mac, Android, and IOS in place of the default browsers because it just works better in so many ways.

The Google Chrome store offers a virtual cornucopia of extensions for every whim and situation. Still, sometimes you’ll install an extension and, later on, find out that there’s a better one or that the one you’re using was the incorrect one.

How to remove Google Chrome extensions

What is an extension?

Extensions are mini-programs built into Chrome that exist to make your life better while browsing or working online. One of the most popular types of extension is an ad blocker which, well, blocks ads. Everyone hates to be interrupted on Youtube with two or three ads at a time or when you load into a news website and are greeted by hundreds of ads and pop-ups. These ad blockers remove intrusive ads and clear away that clutter.

There are also extensions for well-known websites (such as Grammarly), popular apps (such as Zoom), and even extensions that allow you to play games online (such as Farmville.)

Now let’s dive right into how you uninstall them.

Step 1: Access Extensions

The first thing to do is select the three dots in the top right-hand side of the screen, then scroll down to More Tools and select Extensions.

Step 2: Find the appropriate extension

Find the extension that you want to remove and select Remove.

Step 3: Remove the extension

Select Remove again from the window that pops up, and you’re done!

There’s nothing wrong with vanilla

While extensions can be beneficial in so many ways, they also tend to consume memory on your computer and clash with certain web pages and web-based apps. Luckily, removing them is a piece of cake, and it’s incredibly easy to default back down to the vanilla program. And, as we all know, there’s nothing wrong with a little vanilla.