3 alternatives to Time Machine for backing up your Mac

Time Machine is an awesome tool for backing up Mac. Even so, here are 3 other options to have in mind, depending on your needs.

Periodically backing up your hard drive is something everyone should do. These days, there are so many tools that make the job easy, you’ve really got no excuse.

By default, OS X offers Time Machine, which creates incremental backups on a periodic basis, and if you ever need to use it (HD failure, kernel panic), it lets you to back up your Mac.

But Time Machine, by its nature, has very few personalization options. Often times, that’s not a problem, but there are times when you’re going to want more control.

Bearing that in mind, here are 3 great alternatives to Time Machine that will let you clone and restore your Mac’s HD: SuperDuper!, Carbon Copy Cloner and Paragon Drive Copy.

SuperDuper!: make your life easier

I remember using SuperDuper! for the first time about 7 or 8 years ago. At the time, Time Machine wasn’t around, and I was looking for a good backup program. I read about SuperDuper. It was billed as “idiot-proof”, in the sense that anyone could use it, and it was easy to see what you were doing before you started, thus avoiding potential disasters.

After I tried the demo, I immediately whipped out my credit card and bought the full version. I also sent an enthusiastic email to the developer, complementing him on a great program. And I still use Super Duper! today.

SuperDuper!’s beauty lies in its transparency. Everything is based on three simple drop-down menus. In the first one, you pick which disc you want to copy; in the second, you choose where you want to copy to; in the last, you choose what parts to copy (or restore).

Depending on what you’ve picked, you’ll see a simple explanation of your particular combination in the middle of the interface.
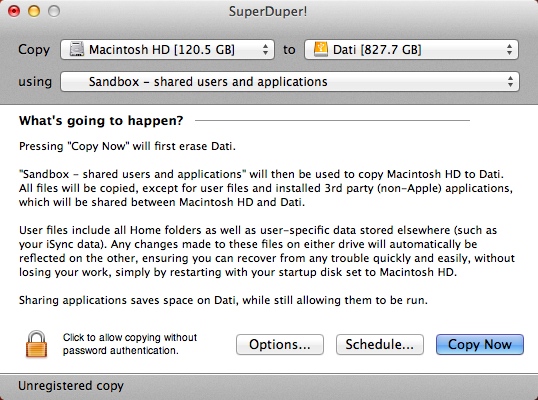
SuperDuper!

From Preferences, you can refine the operation by enabling some important options. The most interesting is probably Smart Update. If you’ve already done a full copy of a disc on another disc, this tool allows you to integrate it– basically, it’ll copy the files that weren’t there in previous backups, and will replace the ones that have changed without touching the ones that have stayed the same.

This means that you’ll always have a backup, and save a lot of time, because after the first backup, subsequent ones are much faster. The system, known as incremental backup, is similar to that used by Time Machine. You can also schedule automatic backups periodically.

In Settings, you can choose what your Mac should do once the backup has been made. Among your options, you can reboot using the newly made backup as a bootable disc, turn the computer off, or put the computer to sleep and eject the disk where you made the backup.
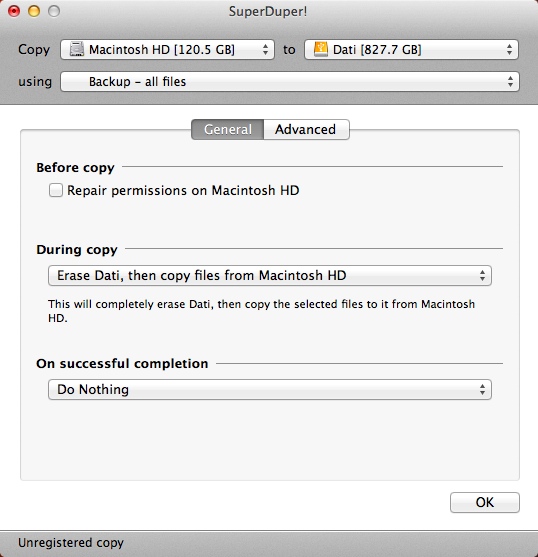
SuperDuper! - Options

As if all this wasn’t enough, SuperDuper! offers a full trial version with no time limits. Even better, it has very few restrictions compared to the full version. Incremental backup, unfortunately, is among these limitations: you’ll only get it with the full version. Fortunately, the full version is priced very reasonably. It’s a great backup program, and has years of conscientious development behind it.

The latest version is compatible with OS X 10.6, but you’ll find versions for operating systems as old as Mac OS X 10.2 Jaguar on the developer’s website.

CarbonCopyCloner: the all-powerful

Also known as CCC, this is the old-school backup program for Mac. CCC has always staked everything on the strength of its bootable backup. The scenario that was (and still is) painted by developers is this: you’re working on an important project, you’re about ready to finish, and suddenly, your Mac stops working. The HD pings worryingly, and everything disappears.

CCC

With a classic backup, you’ll spend an entire day buying and installing a new disk, reinstalling the OS and programs, and finally, restoring the data. With CCC though, just boot the Mac from the backup and you’re immediately operational. When you want, you can restore the backup to your new hard drive and magically, everything will be as it was before the disaster. This apocalyptic picture is no longer as effective as it once was, because bootable backups are no longer the exclusive domain of CarbonCopyCloner, but the program still does a great job.

Compared to SuperDuper! and Paragon Drive Copy (which we’ll talk about later), it’s slightly more complicated to use. On the other hand, you’ve got almost total control over customization, including what to include in the backup, what to exclude, and how to process the data.
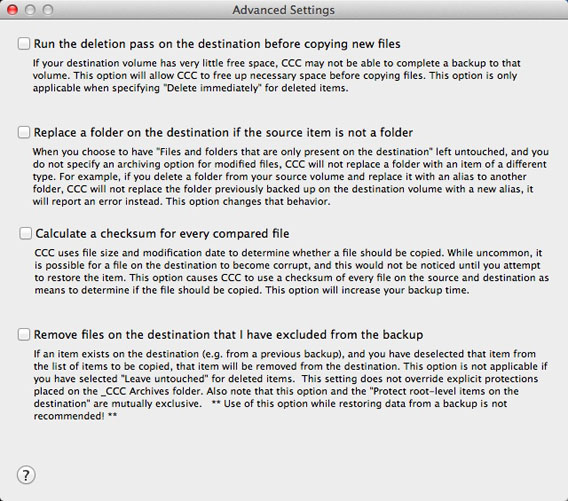
CCC - Advanced settings

Some of CCC’s many settings

An experienced user with non-standard requirements will probably need to make several tweaks to the process, but that doesn’t mean that it’s insufficient for the average user. By choosing the source drive and the destination– and leaving the parameters to their default values– you’ll get a complete and bootable backup of your Mac’s HD.

If you want to venture into custom and advanced parameters, you’ll find a mine of options that give you total control over every operation.
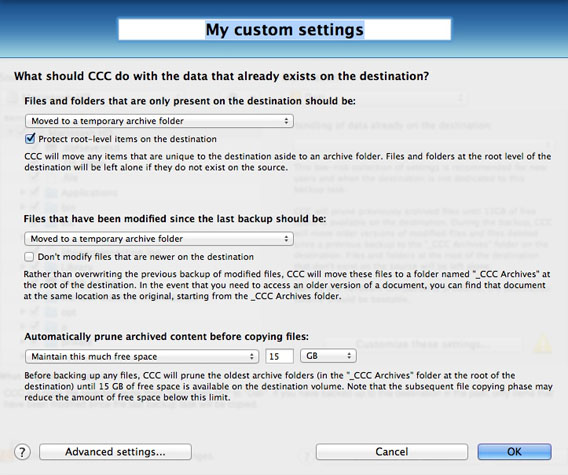
CCC - Custom settings

Many of CCC’s parameters are customizable

CarbonCopyCloner also offers incremental backups, plus the ability to save the backup to a disk image. You’ll be notified by email whenever a new backup copy is made, which you can save to another Mac on the same local network, or a remote network using an internet connection.

Another very useful function: you can keep your Mac awake and set CCC to perform a backup at a specific time (say, at night), and then put the computer to sleep.

CarbonCopyCloner is an excellent alternative to Time Machine, especially for those who are more familiar with the technology and have specific needs, but also for those who want one of the most comprehensive tool in the product category.

The latest release (3.5.4 at the time of writing) is compatible with OS X from 10.6 to 10.9, but on the author’s website, you ‘ll also find the 3.4.7 version, compatible with Mac OS X 10.4 and 10.5.

Paragon Drive Copy: the future belongs to the young

This product is new and, at the time of writing, is in open beta, meaning anyone can test it for free. The interface of Paragon Drive Copy for Mac OS X Beta, at least in this beta, is pure OS X style, simple and familiar to any Mac user, and using the app will come easily to pretty much anyone.
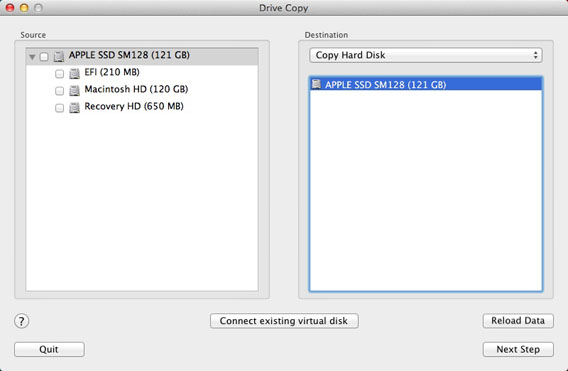
Paragon - Interface

This tool differs from competitors because, in addition to the traditional method of copying a disc to another HD, it allows you to clone the hard disc of your Mac into virtual containers, more specifically, in the pVHD format: VMDK, VHD and VDI.

What are these containers? Basically, they are files that contain the virtual hard drive (disc image), used by programs like VMware or VirtualBox. In practice, Paragon Drive Copy is able to copy your hard disc in formats that can be read from virtual machines.

You can use these containers as simple backup and restore them to a HD, or you can start them as virtual machines and use them as if they were physical computers.

Another feature of Paragon Drive Copy that we like: use simple drag and drop to establish the size of the disc you’re copying to a hard drive another location. This lets you create a backup of the exact dimensions of the copied disc, without wasting extra space on the destination disc.
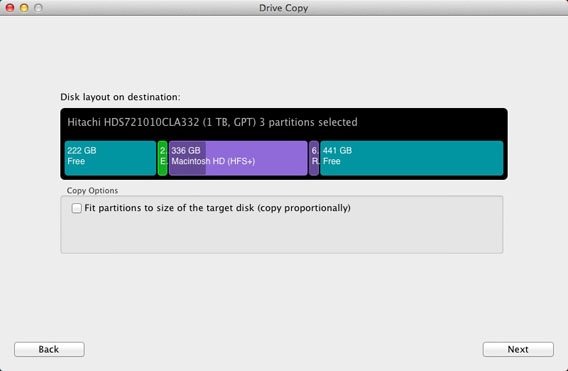
Paragon - Drive size

Paragon Drive Copy supports OS X 10.7 Lion, Mountain Lion and 10.9 10.8 Mavericks.

No more excuses

Summing up, you have lots of good options for backing up your Mac. The three lsited above are all of great quality and reliable.

Want clarity and transparency? There’s SuperDuper! Would you like completeness and speed? Then choose CarbonCopyCloner. Would you like simplicity and innovation? Paragon Drive Copy is the one for you.

The main point is, make regular backups of your HD. Even if you decide to stick with Time Machine, make sure to set it properly the first time, and you’ll be able to sleep soundly.
RELATED ARTICLES

OS X 10.9 Mavericks: improve your battery life

Does the battery on your Macbook run down too quickly? Here are some tricks to make it last that little bit longer. When Mavericks stepped into the spotlight during WWDC 2013, we saw an operating system capable of managing energy a little bit differently. The new low consumption universe presented by Apple was based on a suite of technologies called Advanced Technologies, which included tools to optimize the use of the CPU (Timer Coalescing), multitasking (App Nap) and Safari and, consequently, improve the battery performance of Macbooks. Here’s what you need to know to help your laptop battery last a bit longer.

Activity Monitor, your new best friend

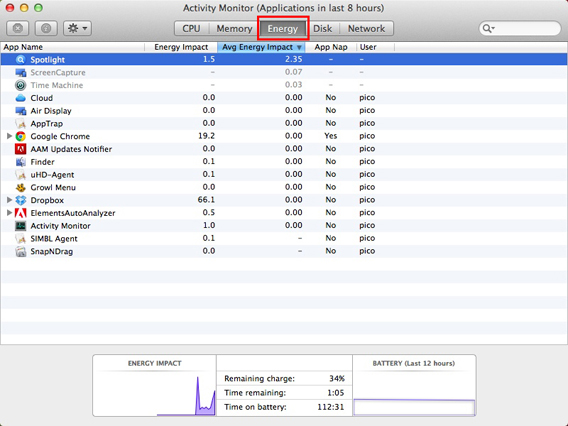
In Mavericks, the app to control resource usage on your Mac (Applications> Utilities> Activity Monitor) has a very useful, and practical tab: Energy.

Energy panel 01

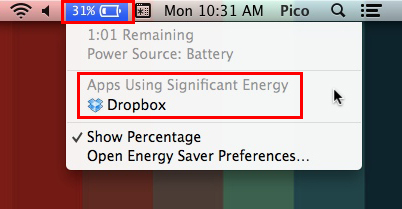
This gives you a very clear idea of which programs are using the most battery. If you need your battery to last as long as possible, for example, because you’re traveling and won’t be able to recharge your Mac, this tab will let you find and close all applications that might reduce your computer’s battery performance: just select them and, with the first option on the top left, force them to shut down. To check which programs are consuming the most battery at a glance, you can also just click the battery icon in the menu bar, and see what the Apps Using Significant Energy report says.

Apps using significant energy

Dual video card? Choose automatic switching

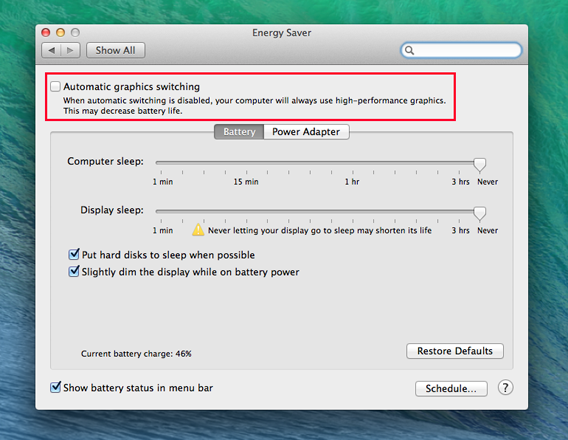
Some Mac models are equipped with a dual video card. One is less powerful and consumes less energy, and the other is very powerful and demanding in terms of battery consumption. In OS X 10.9 Mavericks you can choose which to use, or, you can switch on the automatic switch between the two. In this case, the operating system will decide which video card to assign to each application, so as to best balance needs in terms of performance and energy saving. If you want to save your battery, check the box for Automatic graphics switching. If it’s not a priority, leave this option unchecked.

Mac graphic card auto switchIf you don’t tick the automatic switch box, as in this case, your Mac will always use the highest performing video card (i.e. the one that consumes more)

App Nap: you manage it

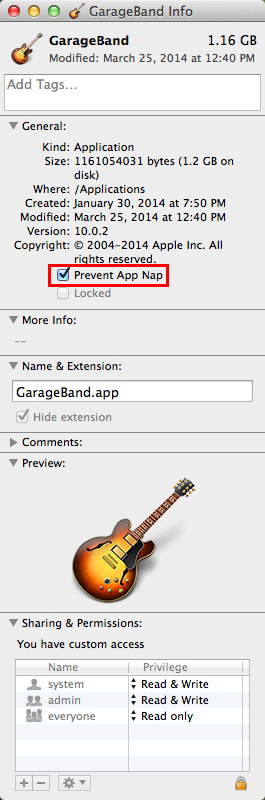
Mavericks has implemented technology that allows significant energy savings while minimizing the resource allocation for Mac applications not in use. It’s called App Nap. When the window of a program is completely hidden and you’re not doing a particular task (for example, playing music), App Nap will reduce consumption to a minimum, slowing it down. When that window becomes visible again, the necessary resources are reassigned. The process is quick and accurate, and doesn’t cause any delays. It also saves you a lot of battery life. If you’d prefer not to “suspend” some apps in terms of resources, maybe because you always want to work at full capacity (perhaps for sequencer music, or video editing programs if you’re working on large projects), select them, press the Command + I (info), and in the General tab, tick the box Prevent App Nap.

Block App Nap

Safari…always popular

safari The browser is probably the one of the apps that we use the most. It’s usually constantly open. So it’s easy to see how the way it handles resources can make a difference to the battery life of a laptop. Safari 7 was equipped with everything you could wish for – excellent performance flanked by energy saving. As has been happening in Chrome for some time, each tab is a separate process, but in resource allocation the tab in the foreground is favored most of the time, and just the bare essentials are assigned to the others.
Apple’s browser now includes a tool called Safari Power Saver, which prevents plugins loading automatically. Its surveillance weapons are Flash and Silverlight. How many times has a video (usually an ad) started straight away when you open a web page? With Safari, it’ll be blocked by default. If you decide you do want to start it, just click on it. With these two measures, you’ll definitely notice an increase in battery life on your Mac. Moral of the story: changing Chrome or Firefox to Safari could prolong the battery life on your Mac.

If you don’t need it, turn it off

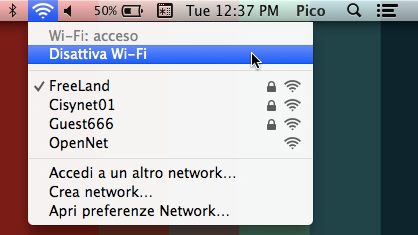
We often forget that we’ve left something active. Everything you leave enabled, however, will consume valuable energy. A classic example is the Bluetooth connection, which isn’t always needed. Of course, if you want to be findable on AirDrop, then you’ll need to keep it active, but otherwise just turn it on and off as and when you need it. Occasionally, you might also leave your wi-fi connection on. If you don’t need the internet, or if you’re in a place where there’s no connection, turn it off. Your battery will be grateful.

Deactivate wi-fi

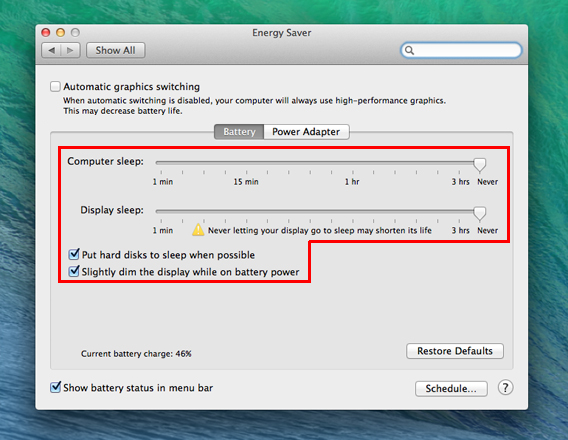
Another good idea is to adjust the brightness of the screen according to your actual needs (no need to always have it at maximum), and also set up your Mac so the screen and the hard drive are put to sleep automatically (go to System Preferences> saving energy).

Schermo e hd in pausa quando possibile

These are a few changes you can make to save energy

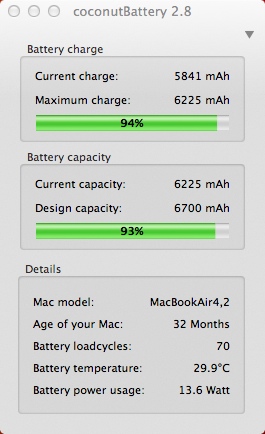
To preserve battery power as much as possible, move the Computer Sleep and Display Sleep as far to the left as possible, thus shortening the time between you stop using the Mac screen and when it goes to sleep. Also check the boxes for putting the hard disks to sleep and dimming the display while on battery power. If you want to check the status of your battery, you can use Coconut Battery, which will show you the total capacity in milliamps, the number of charge cycles performed, the temperature of the battery and other information so you can keep a check on your battery’s health.

CoconutBattery

Pamper your battery

With Mavericks, Apple has done great job with intelligent use of the battery. Considering how small laptops are now, this is essential, because the physical size of the batteries are clearly decreasing, and to obtain reasonable battery life you need to make the most efficient use of them as possible. If you use the technology and add a little ingenuity, your life as an on-the-go Mac user will be better and, more importantly, easier. As an added benefit, there’s the fact that saving energy is eco-friendly. That can’t hurt either.

RELATED ARTICLES

Syncing Mac and Android is easier than you think

You don’t need to have an iOS device to sync with Mac OS X 10.9 Mavericks. It may be hard to believe, but Android and Apple can work together. Let’s see how to make them communicate.

Ok, it’s true – it’s simple to sync an iOS device to your Mac. We’re thinking of iCloud (which, remember, is also available for PC).

But I want to talk about Android. This doesn’t mean I don’t love Apple! Synchronizing OS X Mavericks and Android is a piece of cake. All it takes is a couple of tools and a few minutes to prepare everything.

Synchronize photos, videos and music

doubleTwist (for Mac & Android) is the most efficient tool for syncing music, photos, and videos between Apple computers and Android devices.

There are two options: sync via AirSync (the computer and the phone must be connected to the same Wi-Fi network, and the Android device must install AirSync ) or via USB cable.

For syncing through USB to work, you need to enable USB mass storage MSC mode on your phone. This means that (at least at the time of writing) phones that only support USB MTP mode can only sync wirelessly.

Phones that support USB MSC mode are the Samsung Galaxy S2 (excluding the Sprint version), Google Nexus S, HTC One X with Android 4.0 (except for the Sprint version), and the Motorola Razr and Razr MAXX .

Recent devices (like Samsung Galaxy S4 and Nexus 5) only support MTP mode, as well as tablets with Android 3.0 (Honeycomb) and devices without an SD card that run on Android 4.0 (Ice Cream Sandwich).

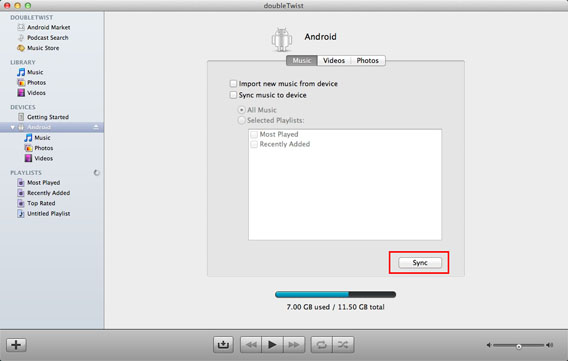
doubleTwist is very similar to iTunes. Connect your phone and select it in the left column under Devices. In the three available tabs (Music, Videos, and Photos) choose the type of synchronization you want to perform, and then press the Sync button.

doubleTwist Mac Sync

This may also be one-way (phone to Mac or Mac to phone). This is pretty handy, as it’s unlikely that you’ll want to upload the entire photo library on your computer to your cell phone. It’s more likely that you’ll want to free up Android storage by offloading some photos and videos.

The Mac doubleTwist library requires iTunes and iPhoto to be in sync, so unfortunately you can’t add custom folders.

Synchronize your contacts

This is done using your Google account.

Open the Phone app, choose the Contacts tab, tap the three dots in the lower right corner to access the options and select Accounts.

Contacts - menu Accounts

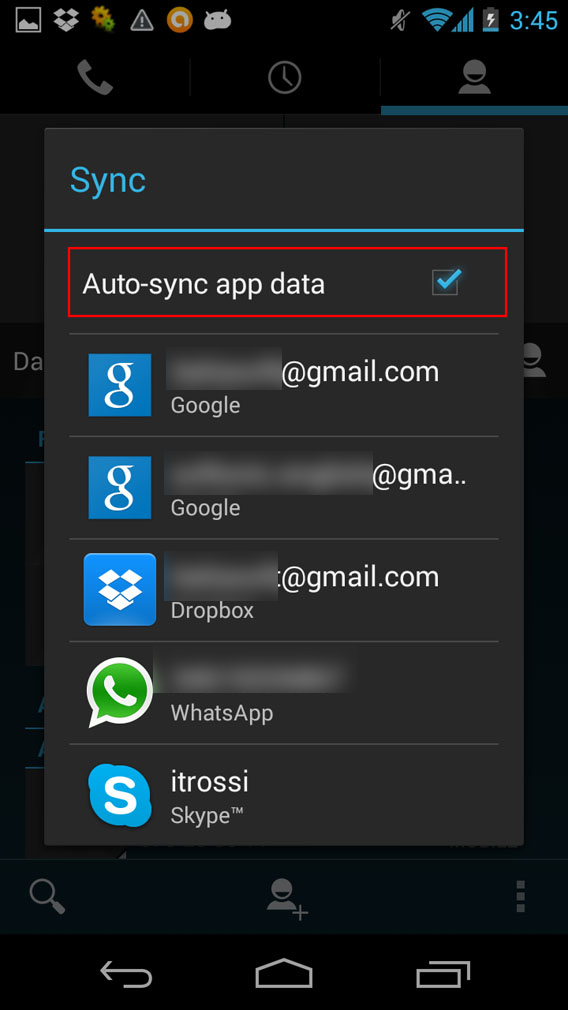
Check ​​Auto-sync app data. By now, the details of the accounts listed will be synced online.

Contacts autosync app data

To set up your Mac. Open the address book, go to Preferences > Accounts and click on the “+” button at the bottom left.

Select Google, click Continue, and fill in your name, email, and password.

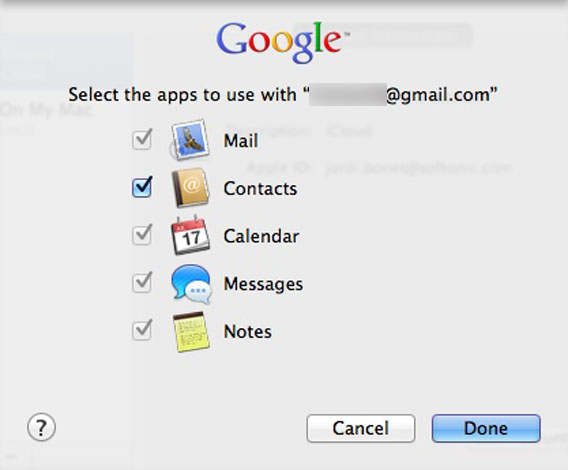
In the next step select Contacts and then click on Done.

Google Contacts on Mac

When you’re connected to the internet your contacts on Mac and Android will automatically sync.

Synchronize your calendar

For this task, you also use your Google Account.

Open the Google Calendar app on your Android (or download it on your device if it’s not available by default, for example if it’s an HTC phone).

In the menu with the three dots select Settings, and then tap Add Account, choose Google > Existing, and follow the steps.

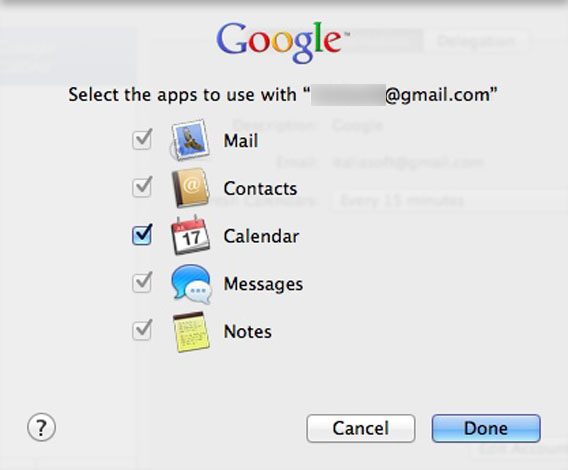
And now to your Mac. To synchronize your iCal calendars with your Google calendars follow the same steps to sync your contacts: Open iCal, go to Preferences > Accounts, click on the “+” button, choose Google, enter your login details, and select Calendars.

Google Calendar on Mac

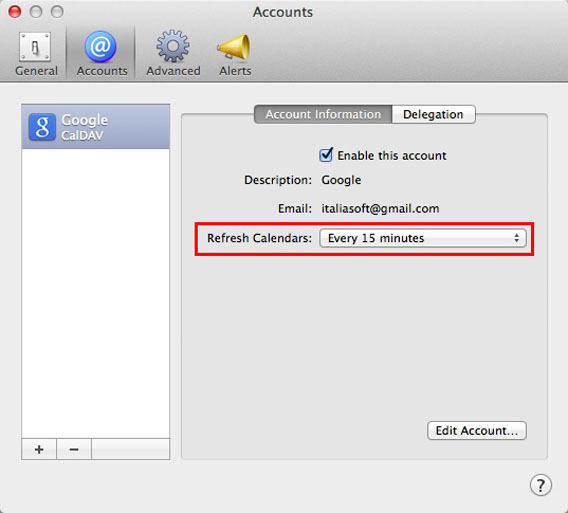
In the drop-down menu in the Account Information tab you can set the refresh intervals for calendars.

Calendar refresh

Now your Mac and Android calendars will always be perfectly synchronized.

Synchronize other files

There are various options to keep your documents up to date on Mac and Android. The easiest and most effective way is to use a service like Dropbox.

Download the app for Mac and Android, and create an account or, if you already have one, sign in with your credentials.

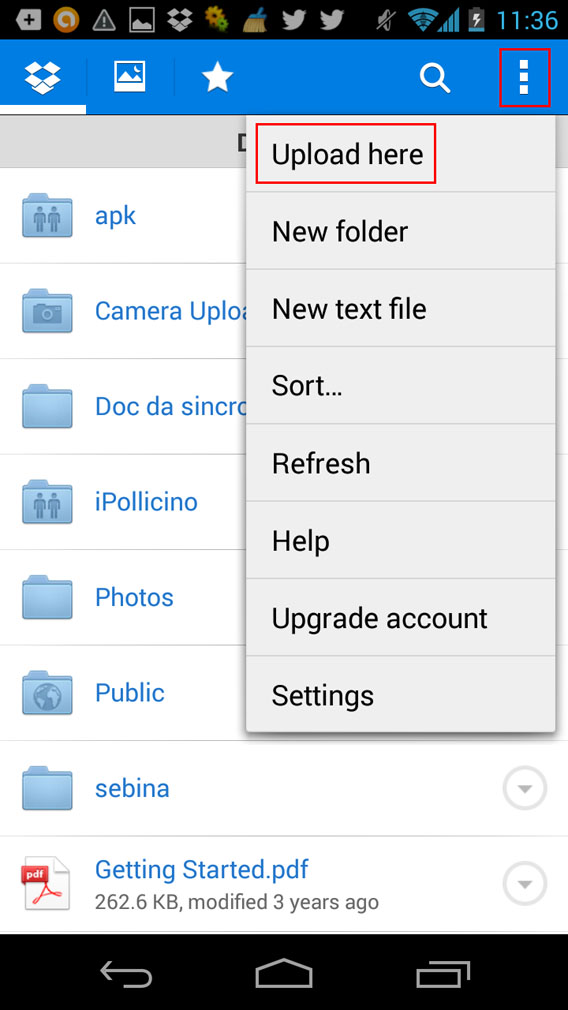
All of your Dropbox folders and documents will be accessible. To add new files to Android, just go to the folder where you want to upload, then click on the menu with three dots, and tap Upload here.

Upload here Dropbox Android

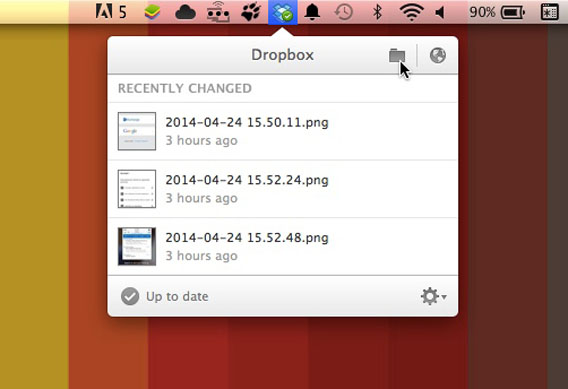
Dropbox is available through the Menu bar on OS X, and manage it exactly as if it were a normal folder.

Dropbox on Mac

All the files that you upload to your device will synchronize when added to Dropbox, and will always be available on other devices.

Synchronize bookmarks

Having all your browser bookmarks is essential for those (isn’t that all of us?!) who use the internet on a daily basis.

An easy solution is to use the Chrome browser, which is available for Mac and Android.

Log in to both with your Google account. To do this on Android you have to tap the Sign In button.

Chrome Android sign in

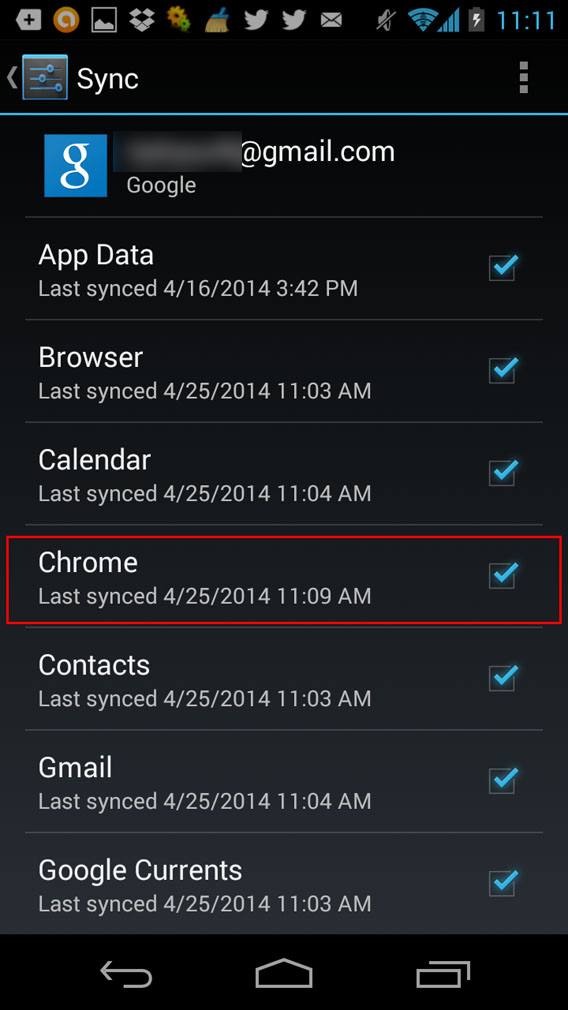
Enter Settings, then Accounts, choose Google, and then verify that Chrome is selected.

Chrome Android sync

On the Mac, access Sign in to Chrome.

Chrome Mac sign in

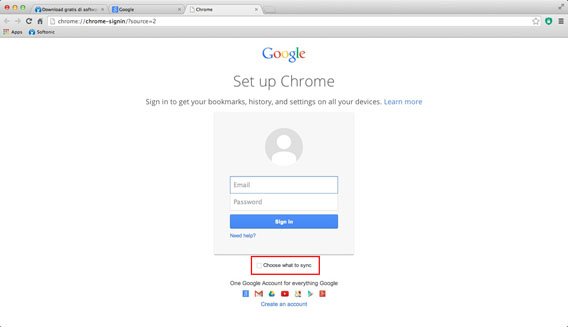
Enter your Google account information and, if you like, check the Choose what to sync box. If you do this, on the next screen you can decide what to sync by checking the relevant boxes.

Chrome Mac choose what to sync

Easy, huh?

As you can see, synchronizing your digital life doesn’t mean you need to be 100% Apple. If you love your Mac, but also love Android, then you’ve got all the necessary tools to get them to communicate.

This tutorial has been designed specifically for those using a Mac running OS X 10.9 Mavericks.

RELATED ARTICLES

Goodbye Windows XP, hello Mac!

After 12 years of honorable service, Windows XP is retired. This means that many users will have to choose another operating system. Maybe it’s the perfect time to get a Mac. I’ll explain why.

It’s a reality: on April 8, 2014, Windows XP closed its doors. At the moment official Microsoft support ended, the historic operating system was already installed on 17% of PCs in the world – in Asia peaking at 25%. A very respectable percentage, I’m sure you’ll agree.

And so, for its millions of users this brings a dilemma: what to do?

Those who decide to migrate to Microsoft’s latest OS (Windows 7 or Windows 8) will have PCmover Express at their disposal. But is this really the best option?

Maybe not. Perhaps this is actually the perfect time to get a Mac. Here’s why.

Friendly interface

The desktops of Macs and PCs have always been slightly different.

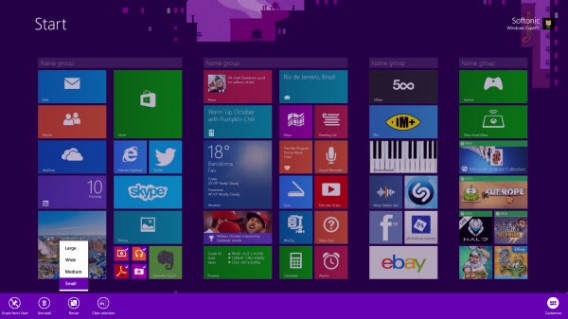
Windows 8 changed things completely and introduced the Modern UI interface, a concept borrowed from Windows Phone, but not one that all Windows users have enjoyed (at least until now).

Windows-8.1

The Modern Windows Desktop 8.1 is very different from the classic Windows

The upgrade hasn’t exactly been immediate because the design of the new user interface is very different from the legacy Windows UI. The result: doing what you’ve always done has become rather complicated. In other words, the learning curve is high and not particularly intuitive.

Finder from OS X has a function that’s similar to Windows Explorer, and the whole organization of the user interface is based on similar philosophies, so it’s easy to feel at home.

Mac OS Finder

Finder window in OS X

So what now? Well, it could be the perfect time to switch to a Mac. OS X (rather paradoxically) offers a more familiar environment to those coming from XP (or even Vista and 7) with respect to what’s in Windows 8.

Familiarizing yourself with the differences requires a few minutes: once your aquainted and know the main features it’ll be easy, and you won’t feel homesick for either XP nor Windows.

And if you think that you’ll miss the Start button if you switch to Mac be happy with the face that the Start button doesn’t exist in Windows 8!

A removal of software, however, is inevitable

From the point of view of the programs, even upgrading from Windows XP to Windows 8 is a radical change. In the new OS you won’t find many of the programs that you used on a daily basis.

There is Internet Explorer 10, but the Modern version doesn’t offer the same user experience that you were used to before. When it comes to the rest, you won’t find Paint, Messenger, Windows Movie Maker, Minefield, Outlook, Solitaire, or Pinball. On OS X you’ll have gained Mail, the Calendar app, and Messaging.

Given the magnitude of the change, therefore, a Mac might be a palatable option. In this article you’ll find, for any Windows application that you used, the corresponding one for Mac, while in this article we show you how to do everything on a Mac that you did on Windows. And in less than thirty minutes you’ll be a fully fledged member of the Apple society!

Making you feel at home

Many of the important applications that you had on XP are also on Mac, such as Microsoft Office, Firefox, and Chrome. This does not mean that they’re missing from Windows 8: it’s just that now, the operating systems from Apple and Microsoft share a large number of programs for everyday use.

Chrome for MacChrome for Mac

But there is another aspect of the software issue to consider: when it comes to Modern versions for Windows 8, programs for OS X are very similar to those you used with Windows XP, even almost identical, with respect to those specifically for Win 8 .

Skype, VLC, and Chrome, for example, offer versions for the Modern UI, but they usually have fewer features than versions for legacy OS (VLC is a prime example), and, most importantly, the user experience is completely different.

In these cases, therefore, a move to OS X provides more familiarity than to Windows 8.

Microsoft is focusing more on the new interface, so that, until the last update of Windows 8.1, the PCs booted exclusively into the Modern UI, and didn’t allow you to boot into the traditional desktop.

Some changes, but they’re for the better

Of course Mavericks is not XP, and there are differences. But it’s very likely that these will be well-received! For example, you will finally be free from the shackles of antivirus, its updates, incompatibility, and delays.

Not that a Mac is inherently immune to attacks. But it certainly has very strong shoulders. Unix, the system on which both OS X and Linux are based, includes more than 40 years of development, with all that follows from decades of evolution in terms of strength, stability, and security.

And that’s not all. OS X is an operating system developed around specific hardware, and for that reason it’s a perfect fit. Windows, however, must be able to run on multiple (often very different) machines, and therefore can’t rely on the same degree of integration between hardware and software. Stability is frequently the first thing to suffer here.

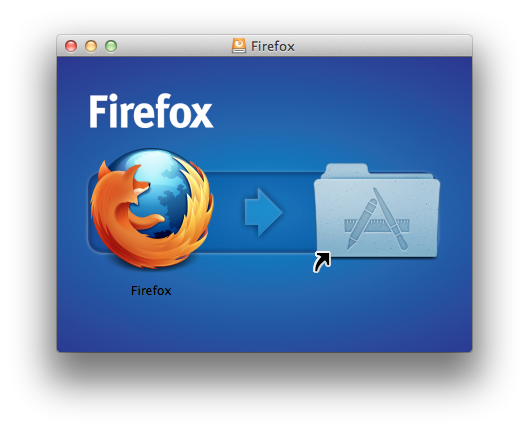
Another difference that you will notice immediately in the switch from PC to Mac is the simplification of processes. An example is the installation of programs, which in most cases, in OS X, is done with a simple drag and drop into the Applications folder .

Mac install drag and drop

Even when it comes to backing up, Macs offer a pleasant surprise: Time Machine. This is a tool that automatically performs periodic backups of your entire machine. This means that you never have to worry about losing anything, because everything will be safely stored on a disc – all done by the operating system, with no effort on your part.

And if you need to look for something on your Mac, that’s easy thanks to Spotlight. OS X’s internal search engine is accurate, powerful, and easy to use, and shows you previews of documents simply by passing the mouse over the name.

Mac Spotlight

Spotlight, the internal search engine of OS X, is a powerful tool

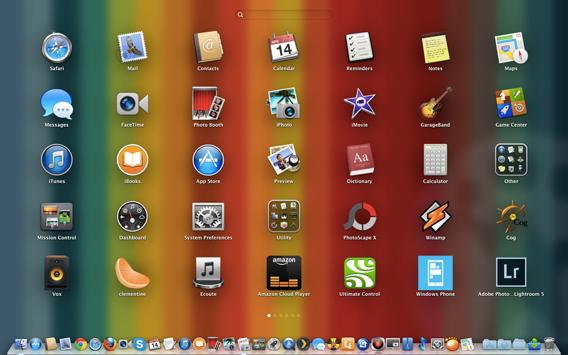
And if you’re looking for a program? With Launchpad it’s a matter of a single click, or, if you have a trackpad, a simple gesture. This is definitely a feature we’ve become attached to!

Launchpad

Looking for a program is a matter of a single click

Finally, mention should be made of the application stores. Both OS X and Windows 8 have one, but in terms of both quality and quantity, the Mac App Store is far superior to the Windows Store, not to mention better organized.

The Apple store has been around longer, and has very strict policies for the admission and exclusion of applications. This can sometimes drive developers a little crazy, but does ensure good standards of quality.

The Windows Store has suffered the consequences of a policy that has focused, especially in the beginning, on quantity over quality, and so has flooded the Windows Store with poor quality applications.

Are you ready to take the leap?

In short, if you’re thinking about a replacement for your Windows XP computer, the Mac might be your best choice, and one that could make the change of operating system less traumatic and more fulfilling.

If you’re also a member of the iPhone or iPad club, you can count on perfect and complete integration with iCloud to fully sync all your devices automatically, without installing anything.

This, of course, does not mean that Windows 8 is a bad operating system. Quite the reverse. But at the moment when a change of OS becomes almost unavoidable or (as in this case), make life easier and more pleasant, then it’s always a good option. And maybe, OS X is just the answer you’re looking for.

If you have any doubts about what the end of Windows XP support from Microsoft means for you, we’ve compiled the most frequently asked questions with all the answers in this article.

How to upgrade to Mac OS X 10.9.3 beta

Beta versions of OS X are normally only available to developers. This time, however, Apple has decided that anyone who has Mavericks can try out OS X 10.9.3.

In this tutorial we’ll explain how to install it (as well as how to go back if you don’t like it).

Make a backup of your Mac

OS X 10.9.3 is a beta, so it’s not fully stable. With this in mind, it’s best to have the option to go back to version 10.9.2.

Since downgrading isn’t possible, you’ll have to make a backup copy of your pre-upgrade computer so that you can reinstall it, if necessary.

If you use Time Machine, your computer will make backup copies automatically. To revert to a backup copy, restart your Mac while holding down Command + R (which starts OS X Utilities), choose Restore from Time Machine Backup, and follow the wizard.

Another good option is to use Carbon Copy Cloner, which lets you create backups of and easily restore your Mac.

Once you’ve sure hat you can retrace your steps, you’re ready to install the OS X 10.9.3 beta.

Download and install the update

1. Register with the Beta Seed Program

To download Mavericks 10.9.3, you have to register with the program that lets you test Apple OS beta versions.

Go to OS X Beta Seed Program, click on Join Now, and then on Get Started on the following page.

OS X Beta Seed Program

2. Login

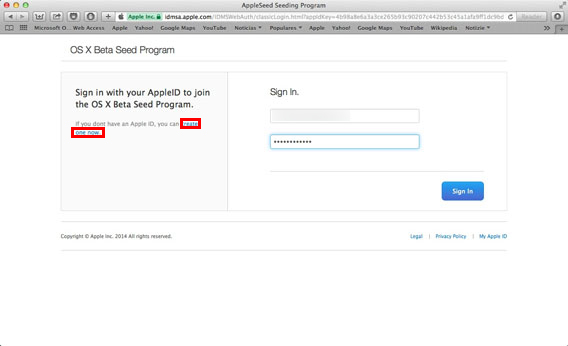
At this point, you need to enter your Apple ID and password. If you’ve got a Mac then you’ll almost definitely already have this account. Otherwise, click on create one now and follow the steps.

OS X Beta Seed Program login

You’ll need to register your Mac with the program by clicking on Enroll Your Mac.

3. Download the update package

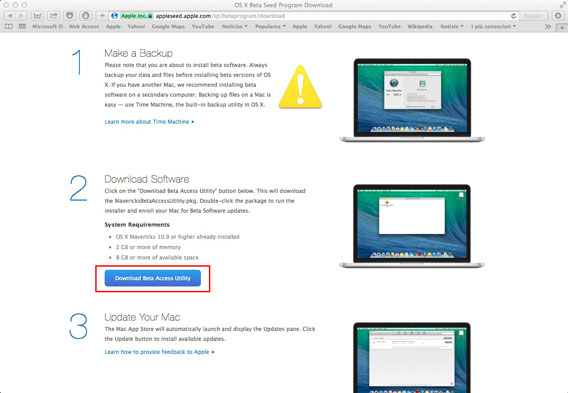
To download the Mavericks Beta Access Utility, which is necessary to update your Mac to version 10.9.3, click Download Beta Access Utility.

Download Beta Access Utility

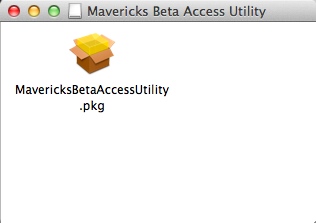
At this point, open the disk image you just downloaded and double-click on the PKG file, then follow the installation wizard.

Mavericks Beta Access Utility pkg

4. Update OS

The App Store will open automatically, and after checking for available updates, you’ll see under Software Update the update of the OS to version 10.9.3 beta (Pre-release version: OS X 10.9.3 Update Seed 13D45a) and iTunes (Pre-release: iTunes 11.1.6). Click on Update for both of them.

Mavericks Beta Access Utility update

You’ll also need to update iTunes because OS X 10.9.3 synchronizes contacts and calendars through iTunes.

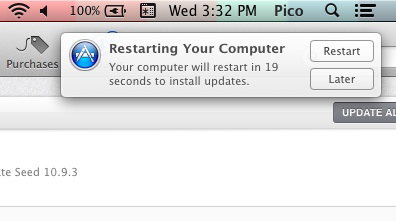
5. Restart your computer

To complete the process, you’ll need to authorize the restart of your Mac.

Restart Mac

And after a few more minutes, voila! You’ve got Mavericks 10.9.3 installed on your Mac.

Your feedback is important

In the Dock, you’ll also find a new app called Feedback Assistant. Open it, log in with your Apple ID credentials, and you report any problems you encounter during the beta test directly to Apple.

You don’t have to give feedback, but if you do, you’ll help the developers fix bugs in the beta.

If you haven’t yet upgraded to Mavericks because you’re not sure whether it’s right for you, read our review and find out the advantages and new features it can offer.

6 tips to make it easier to read on your iPhone

Do you have trouble reading things on your iPhone’? Here are 6 things you can do to make your phone more accessible.

Your iPhone is a nice device; it’s solid, efficient and reliable. But the text on the screen isn’t always easy to read. First of all because of its size: compared to other smartphones, the iPhone 5’s 4 inches seem small. Then there’s the iOS 7 design: although it’s beautiful and elegant, the default font is so thin it’s not always easy to read.

But don’t worry, there are 6 things you can do to improve the accessibility of your iPhone running iOS 7.

Activate Bold Text

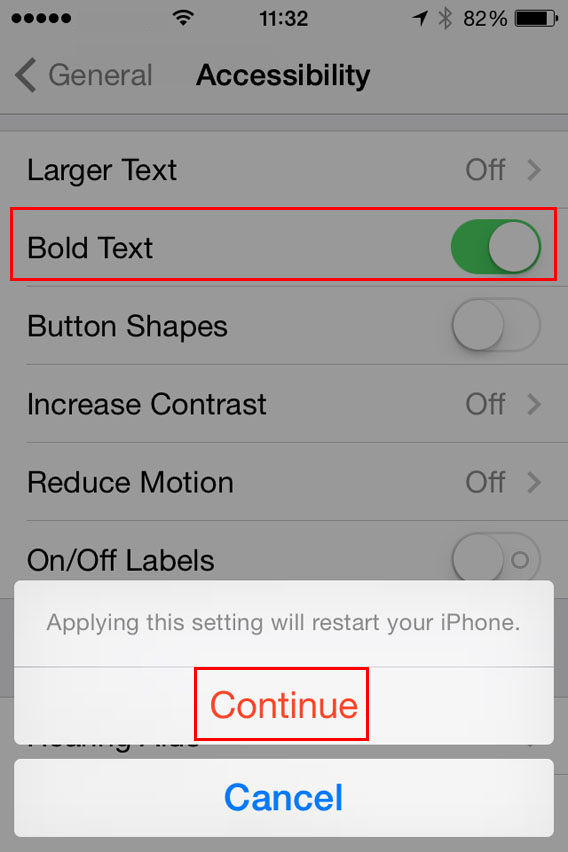
First of all, try to activate bold text as the default font. To do so, go to Settings > General > Accessibility and select Bold Text.

Bold the text

To apply this setting you’ll have to restart your iPhone.

Increase the text size

If you’re still having trouble reading the text, you can make the font size bigger. To do so, go to Settings > General > Accessibility and select Larger Text. You can choose the font size you want by dragging the slider along the horizontal bar.

Make text larger

Activate zoom

Zoom substantially magnifies all the content on the screen. You can activate it by going to Settings > General > Accessibility > Zoom. To zoom in, double-tap the screen with three fingers. If you want to move around the screen, move three fingers around the screen.

Only the area you double-tap on will zoom in.

Zoom

Increase contrast

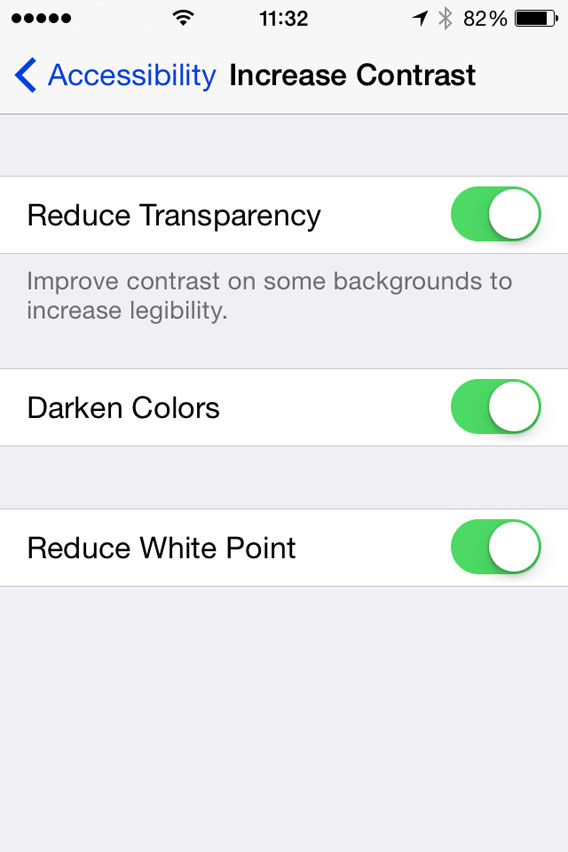
In Settings > General > Accessibility > Increase Contrast you have three options that might improve your reading experience.

The first is Reduce Transparency, to increase the contrast on the backgrounds. The second is Darken Colors. The third, Reduce White Point. Try all three, together or separately, until you are happy with the result.

Increase contrast

Invert Colors

The Invert Colors option creates a negative of what you see on the screen which, for some people and in some cases, can make the text easier to read. If the other solutions haven’t worked, you can try this. One thing is certain: if you invert the colors your iPhone will look very original!

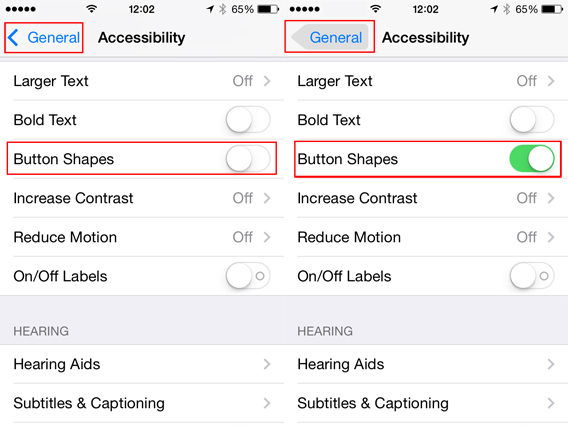
Activate Button Shapes

The minimalist design of iOS 7 can sometimes make it difficult to identify what part of the text you can see is a button. To overcome this problem, you can enable Button Shapes on Settings > General > Accessibility.

Button shapes

Optimize the screen? Easy!

Thanks to these accessibility tools that Apple has added to iOS 7, most people can the right formula to enjoy their iPhone without straining to see, and without sacrificing the benefits of Apple’s smartphone.

If you want to know more about iOS 7, check out our guide.

Lightroom for iPad: a darkroom in your backpack

Adobe Lightroom for iPad is used to touch up, synchronize, organize and share photos. It supports the RAW format, and it’s a perfect for both lovers of photography and for professionals.

It was designed by Adobe as a complement to Lightroom desktop for Mac and Windows, but it’s also great as a standalone product.

Let’s have a look in detail to see how this powerful and versatile accessory for photographers actually works.

How to Get Started

To use Lightroom, you have to have an Adobe ID, which you can create on this page.

If you want to use the sync features with Lightroom desktop, you must have the program installed on your Mac or PC, and have activated one of the Creative Cloud plans from Adobe.

Adobe offers a 30-day trial for both Lightroom desktop and Creative Cloud so that you can test the package. Once you start the trial, you will have access to all the tools.

Minimum System Requirements

The app is free and is compatible with iOS 7, and works in tandem with desktop Lightroom 5.4 and later versions.

To use Lightroom 5 Desktop, you must have a Mac running OS X 10.7 or later, or a Windows PC with Windows 7 SP 1, Windows 8, or Windows 8.1.

Synching is just the beginning

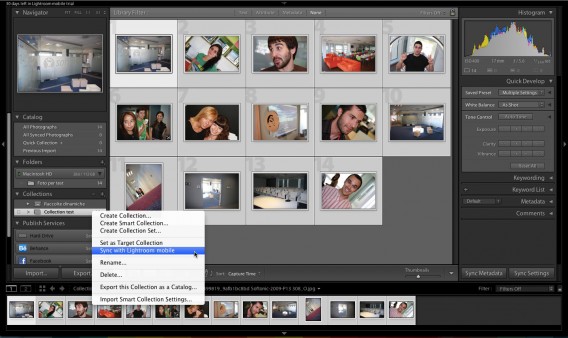
If you have the latest version of Lightroom desktop installed on your computer, all you have to do to sync photos is to enable the Sync option. To do this, select a collection (left column, Collections), click on the right mouse button, and select the option: Mobile Sync with Lightroom.

Adobe Lightroom for Mac

Lightroom 5.4 for Mac

You can also add photos by importing them from your iPad, or by taking them directly from your DSLR camera. To do this, you must have the appropriate adapter to connect it to the iPad (iPad Camera Kit).

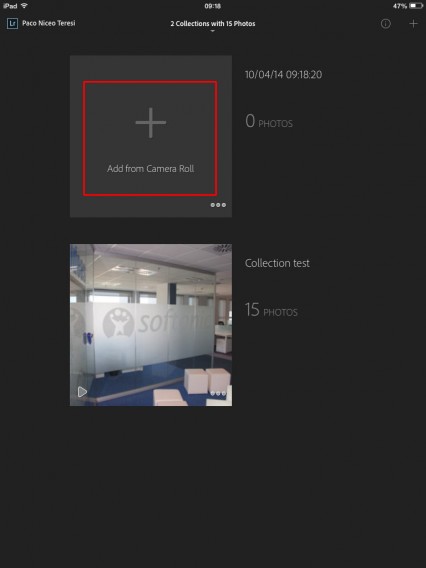
The procedure is simple: connect the camera to the tablet, import the photos you want, and then open Lightroom Mobile. Create a new collection using the “+” button in the upper right corner, and then tap Add from Camera Roll.

Add from camera roll button

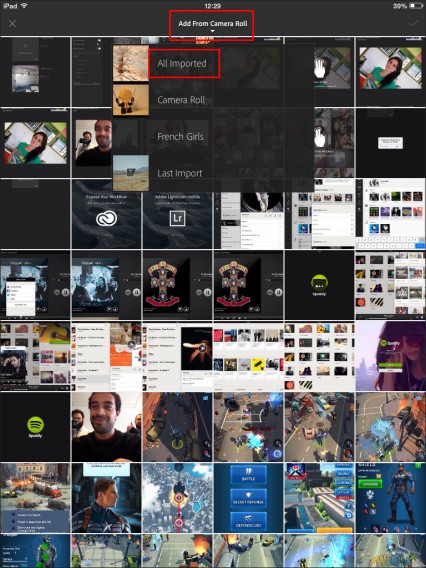
You will then see all the photos on the roll, but those that you’ve imported are not there: they are imported into an album on the Camera app. To find them, you have to touch the drop-down menu Add from Camera Roll at the top center, select All Imported or Last Import, and choose the photos you want to import into Lightroom.

Add from all imported

Hello RAW files

The big news for Lightroom mobile is support for RAW format files at editing level, an important turning point in the world of mobile device apps, and a small milestone for the world of photography. Adobe already announced this revolution almost a year ago, and now it has finally taken shape in Lightroom Mobile.

In practice, this is possible thanks to the app that makes a Smart Preview, which compresses the RAW file (or NEF file for Nikon users) into a compressed DNG, which can be easily managed on an iPad.

Lightroom Mobile tools

There are lots of image editing tools, and the controls are well adapted to the touchscreen of the iPad. The workflow is fluid and instinctive for any type of user.

From the toolbar at the bottom, you can access the 4 main tools.

The first is the Filmstrip (gallery), and it’s from here that you can select the photo you want to view or edit by selecting a thumbnail.

Instrument 1 - Thumbnails gallery

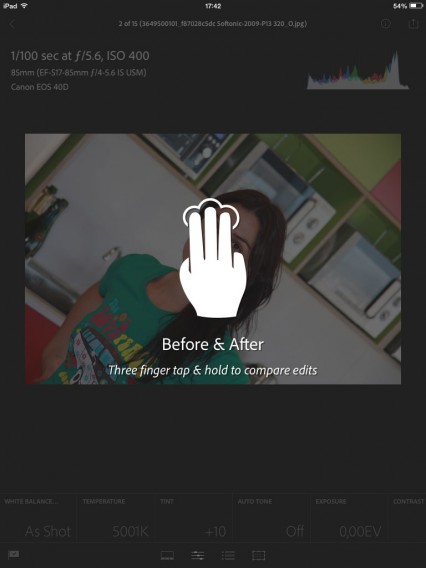
The second tool is Adjustments, and offers a rich set of tools for editing. When you edit, you can always compare the original image and the edited photo by placing three fingers on the screen, outside the perimeter of the picture.

3 fingers tap

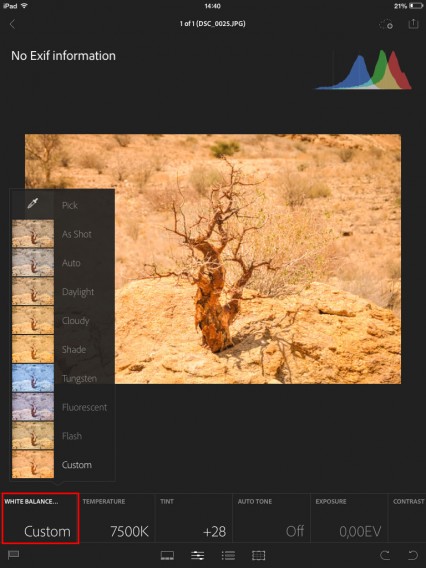
You can edit various things like setting the white balance of a shot by selecting the type of lighting there was (there are classic options including direct sunlight, shade, cloudy, and tungsten light), or by choosing the right color temperature.

Instrument 1 - Color temperature presets

When you use a tool that’s adjustable with a slider, a double tap returns it to its initial value.

The other tools available are Tint, Auto Tone, Exposure Value (EV), Contrast, Highlights, Shadows, Whites, Blacks, Clarity, Vibrance, and Saturation.

The resulting images are of a very high quality. There are very few tools as powerful for mobile devices, and perhaps none combine the abundance of options that you can adjust using Lightroom, with such a well designed interface that’s simple, instinctive, beautiful, and complete.

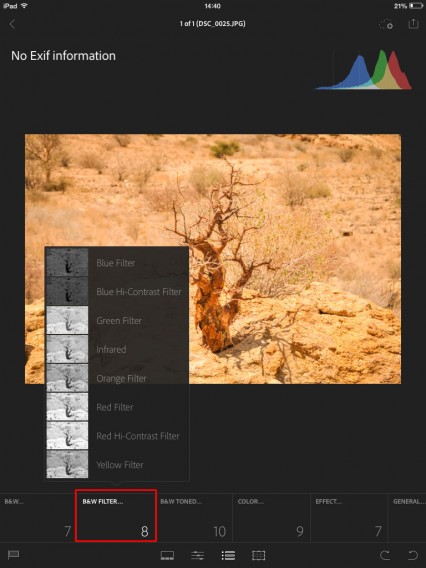
The third tool is Presets. This includes a number of preset profiles, like the ability to transform a photo shoot in black and white, or to filter out the colors or apply effects.

Instrument 3 - B&W filters

They are effective tools because you can achieve changes that would require a lot of work with a photo editing program. The intensity of the effects is well calibrated, and the results are always compelling and usable.

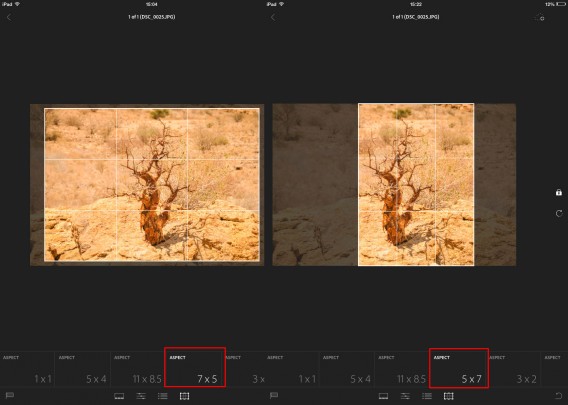
The fourth tool, Crop, lets you crop photos with different proportions (e.g. 16 x9, 4 x 3, 11 x 8.5). To reverse the axis and move from a horizontal view to a vertical view, or vice versa, it just takes a tap of the Aspect button.

Instruments 4 - Cropping vertical and horizontal

No matter which editing menu you’re using, tapping on the photo gets rid of all the tools and all the information from the screen, leaving only the image.

Being able to see the photos without distractions is the best way to evaluate it, and at that point, the tool is a welcome addition. In this mode, you can also use a three finger tap to compare the original and edited photos.

Edit, organize, share

Lightroom mobile is the perfect tool for photo enthusiasts who are serious and professional about their photography, for more than one reason.

The first, which impressed me the most, is the careful selection of editing tools that Adobe has made available.  Whether you’re a professional, or just taking photos for pleasure, you’ll immediately notice that the app delivers exactly what you need (practically nothing is missing, but it’s also not excessive) to edit the photo and perfect a really good shot, or just correct an error to make an image even nicer.

It’s also immediately evident that the quality of the algorithms is high, it has excellent usability, and the workflow is quick and pleasant; there’s probably no other product on the market (at least for free), that offers this much.

The editing is as easy as it should be, and the synchronization options with Lightroom desktop are great because it means that you can always have essential retouching and editing tools with you. Similarly, with Lightroom for desktop, you can edit in much more depth, if necessary.

Finally, the options that let you sync and share photos are designed to meet the needs of real photographers at all levels, but are especially useful for professionals.

Adobe Lightroom for iPad

In short, Lightroom mobile is a product that has been missing in the photographic landscape, and not only is it here, but it also works well.

Personally, as an amateur photographer, I’ve already started using it a lot because it makes things possible that I’ve wanted for a long time: it lets me not only have my digital SLR with me, but also a handy tool to upload my shots, process them, and post them or share them instantly.

But it’s not just Lightroom that helps photos come alive. If you want to embrace the world of social photography, read our Complete Guide to Instagram.

How the SteelSeries controller makes the iPad almost as good as Playstation

With the first iPad controller approved by Apple, gaming takes a quantum leap. Will the iPad take the place of Playstation and the Xbox? For now, maybe not, but it’s certainly on the right track, especially now that Apple officially supports, for the first time, a wireless controller for iOS 7: The SteelSeries Stratus Wireless Gaming Controller.

This joypad solves the only real problem I had with video games for iOS devices: the difficulty of using virtual controls, especially in traditional games, such as FPS, sports games, racing car games, flight simulators and RPGs.

Bridging this gap that they faced against traditional consoles, and considering the quality of the connection to the TV via HDMI cable, the Apple tablet has therefore officially become an ultraportable video game console.

There aren’t yet a huge number of compatible titles, but you can bet that we’ll soon be inundated. The world of gaming, in fact, is a juicy slice of the market, and now that the “infrastructure” to make the iPad a console is in place, we can expect a beautiful revolution.

To begin with, here are 5 games that already support the SteelSeries controller, and will change your approach to videogames on a tablet.

Temple RunTemple Run – Running takes a lot of energy, but gives a lot of satisfaction too. And when it comes to Temple Run, with a physical controller the energy you need to use is halved and satisfaction is doubled. The aim of the game is speeding through a world that looks like a movie, collecting treasures and power-ups and avoiding obstacles.

A game that leaves you breathless, especially when viewed in HD on your TV at home.

AirAttackAirAttack HD – You’re in trouble. Enemy planes are everywhere. But with your biplane you show them who’s boss! The setting of AirAttack HD is full of details, not to mention stellar gameplay. Using the physical controller, it really seems like you’re in a games room.

There are as many as 64 different types of enemies (and some are quite big!), as well as 10 missions, special weapons, two game modes and a soundtrack from an American blockbuster.

PhoenixPhoenix HD – A Modern Arcade Shmup – 60 frames per second of pure action, pyrotechnics, explosions, and blinding enemies are always going to be different. A vertical scrolling arcade on the screen of the iPad is a rare visual experience – one that’s all-encompassing.

The meeting of a concept from the 80s with the technology of the third millennium really does leave you speechless. A game that can entertain you for hours, becomes simply indispensable with a physical controller. Works on in-app purchases.

Retro RacingRetro Racing – Do you like car racing? Then you’ll love Retro Racing! Oh, you don’t like car racing? You’ll still love it! That’s because it’s a game that’s won in seconds. It keeps you busy for quite a while, so you won’t get bored.

The graphics are Commodore 64-style and are combined with high-definition in a match that wins over the casual gamer as much as the astute player. If you like a challenge then this is the game for you.

Rush CityRush City – An alien in New York. Green. Runs on the roofs of skyscrapers. Hunted. A rocky platform game, without compromise and without a moment’s respite. All of that, on your home TV, becomes almost a movie. And with the joypad you relive the golden era of 90s gaming platforms. Can you escape the helicopter? Let’s see!



The SteelSeries controller is a great new way to experience iPad gaming, but we all know the iPad isn’t just for games.

If you want even more things you can do with your iPad, check out these 5 excellent apps.

What can you do with a free Spotify account on an iPhone?

At last, iPhone users of Spotify with free accounts can use the Shuffle mode. And with a little trick that we discovered you might also be able to circumvent the restriction imposed on free accounts, and listen to the song you want!

First of all, those who didn’t have a premium account only had access to radios. Now the entire database can be searched and browsed by artists, albums and playlists in shuffle mode.

So let’s see in detail what you can and can’t do if you have an iOS device and a free Spotify account. We’ll also have a look at how to get around the limitations that prevent free users from listening to any song they want.

iPad and iPhone: the apps are different

Spotify has decided to equip the tablets like desktop computers instead of smartphones. For this reason the iPad app (as well as the app for the Android tablet) doesn’t simply offer the Shuffle function, like the one for the iPhone, but also allows you to search and listen to individual songs, just like you can on the desktop version.

Of course, the limitations for free accounts remain: advertising, average audio quality, and the inability to listen to songs offline.

The major limitations of the free account

If you don’t have a Spotify Premium account then you’ll be subject to some restrictions:

  • Regardless of the device you’re using, users with free accounts will not be able to listen to music at the highest quality available, but just at average quality
  • It’s not possible to listen to songs offline
  • You can’t add songs to the play queue

What can you do on the iPhone with the free account

Listen to random songs from an album, artist or playlist – this is precisely what the Shuffle function does, and is the main new feature of the update of the app for iPhone released by Spotify.

Spotify

You can find music via the search function, or avail of Spotify’s suggestions. The limitations: you’ll be presented with advertising every four or five songs, and you can only use the skip function (to skip to the next song) up to 6 times per hour.

Out of skips

We also noticed that, in order to listen to the playlist, there must be a minimum number of tracks. It could be a plan devised by Spotify to prevent free users creating a playlist with a song and then listening to it, a trick which would get around the impossibility, for free users, of listening to specific songs.

But there is a trick for being able to listen to the song you want: in creative mode use the Starred playlist. This list collects all the songs that you like, but doesn’t have a minimum number of tracks to start playing songs randomly.

So keep the list empty, then every time you want to listen to a specific song just mark it as a favorite, open the Starred playlist (which will contain only that song) and play it from there.

Adding songs or an album to an existing playlist or a new one – this is a really handy feature because it allows you to create playlists, add songs that you like (using the search function) and then listen to them in shuffle mode, all directly from the iPhone.

Spotify

Share the song or album with your contacts on Spotify – Sharing via Facebook, Twitter, Email, or SMS is possible and you can also copy the http link of the track to where you want it.

Sharing with contacts on Spotify, however, doesn’t always go as expected. Ever since I started using the Spotify app, this tool has malfunctioned. For example, in the iOS app my contact list has always been empty, and so I’ve never been able to share songs if I’m not on the client for Mac or PC. But you might have better luck than me!

Create a radio station from a song or an album – Spotify radio selects songs with similar characteristics from the entire database. The most important criterion (which the tool is based on) is the musical genre. In this case all you have is the skip function, which is limited to 6 clicks per hour. It’s important to note, however, that the number of skips on the radio and on Shuffle listening is not 6 + 6, but 6 for everything.

Things you can only do with a Premium account

  • Listen to a track (unless you use the trick we just explained above)
  • Listen to music offline
  • Take advantage of high-quality audio
  • Add a song to the play queue

Spotify

Spotify for iPhone with a free account: pass or fail?

It’s an improvement, for sure. Making the entire Spotify catalog available for free on smartphones, with the only limitation being you have to listen in shuffle mode, is definitely a good move, given that it makes Spotify more competitive than Google Play Music (although the service of the Big G remains more palatable, from certain points of view).

Kernel Panic on Mac? Don’t panic!

Although Kernel Panic doesn’t sound very reassuring if you know what it is and how to handle it, there’s a good chance your Mac will emerge unharmed.

Kernel Panic (KP) is the equivalent of the Windows Blue Screen of Death for Unix-based operating systems, such as OS X and Linux.

Technically, Kernel Panic is a kind of emergency procedure that the operating system enables when it comes across a system error from which it cannot safely recover. Specifically, the OS will shut down automatically, and to use the computer again you’ll have to restart it manually.

Kernel Panic is very rare, and isn’t necessarily a symptom of a major problem. It can also be caused, for example, by a malfunction of a defective data package.

So, our first tip: if you only get one KP and, after the reboot, it doesn’t happen again (or at least it doesn’t happen again for a long time) and everything seems to work normally, then you can relax and ignore what happened.

If the Kernel Panic starts to become more frequent (for example, a couple every month), you should identify the problem and fix it.

In this article, we’ll tackle the problem from a software point of view, but remember that sometimes the KP could have been caused by hardware.

What can cause Kernel Panic?

Mac triste

The most common cause is a hardware failure  – either the Mac itself, or an external device or application. Some of these problems are only temporary and will disappear after a reboot, as we have already mentioned. Others are more complicated, and will stop you using your computer.

Badly-written drivers or plugins could cause a KP or even the random presence of specific conditions. In these cases, the Mac should work properly again after the reboot.

There are other, more complex problems that need to be identified and fixed. Let’s start with the ones that are easier to spot.

How to recognize Kernel Panic

The easiest symptom to recognize is the classic screen with the start button image in the background, and the multilingual message that tells you: “You need to restart your computer.

The classic Kernel Panic message

Sometimes, however, you don’t get this default message, and your Mac could spontaneously restart, turn off, or stop responding to commands, forcing you to shut down the computer forcibly.

In these cases, to be certain that it was a Kernel Panic, just go to /Library/Logs/DiagnosticReports (in Mavericks). There, if the problem was really a KP, you’ll find a log with the details of the incident .

Sometimes, however, this file could be missing, even if it was a Kernel Panic. In this case (even though it’s hard to tell), the problem is probably in your Mac’s hardware, such as a faulty RAM or hard drive.

We’ll see later how to deal with the problem if that’s the case.

When applications fail

Sometimes a badly-written program could be behind a Kernel Panic.

OS X 10.8 onwards, after a reboot your Mac will automatically give you the choice to open the programs that you were using just before the KP.

Reopen applications

The best thing to do is to say yes, clicking on Open. If one of the applications is the cause of the Kernel Panic, it will occur again. If the computer crashes again, now you know you shouldn’t open those applications in the second reboot.

Instead, reopen the applications one by one until you find the one that’s behind the KP. Uninstall it and the problem should be resolved.

Keep your system updated

By keeping your OS, programs and firmware up-to-date , you’ll decrease the likelihood of conflict and therefore of a Kernel Panic.

  • Open Software Updates in the Apple > Update menu and update all programs (operating system, firmware and software downloaded the Mac App Store).

Update the software on your Mac

  • Check that the versions of the programs you downloaded from the store are the most recent. You can, for example, check the Mac section on Softonic, or use the built-in function in the applications, if they have one.

Sometimes it’s a startup issue

To check if startup items are responsible for the Kernel Panic, follow these steps:

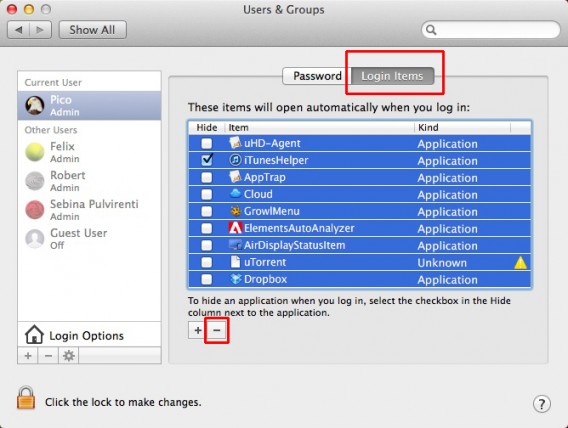
  • Disable all the login items (System Preferences> Users and Groups, then select your user, go to the Login Items tab, select all the items and click on the ‘minus’ sign)

Disable the login items

  • Restart your Mac in Safe Boot Mode (hold down the Shift key during startup).
  • Now you need to disable all login items for all accounts and groups, using the same method described above.
  • Some applications install items that start automatically with the operating system, before you even log in. You must also disable those. To do this, go to Library/StartupItems.

Startup Items

There you’ll find folders with the names of applications. Select them all and drag them into any other folder (you’ll need the administrator password). When the Kernel Panic problem is solved you can put them back into the same folder.

  • Now you can restart your Mac. If there’s no Kernel Panic this time, then one of the login or startup items was responsible for it. Put the items back into the folder one by one, restarting the computer each time, until you find the cause.

Find the drivers that your Mac doesn’t like

If you recently installed drivers, for example for a new printer, and as soon as you tried to use it you got a Kernel Panic, it could be the printer’s fault: incorrect drivers can make your OS crash.

Check carefully that you have the latest drivers for that specific device (and not a similar model), and that they are compatible with your OS X version. If you don’t know what version you are using, go to the Apple menu in the upper left corner and click on About This Mac.

Your Mac's info

Kernel Panic can also be caused by the hardware itself, which for some reason your Mac doesn’t like. If you’re sure that the installed drivers are the right ones, and every time you turn on the device your system crashes, the only solution is to stop using it.

Get your hard disk in shape

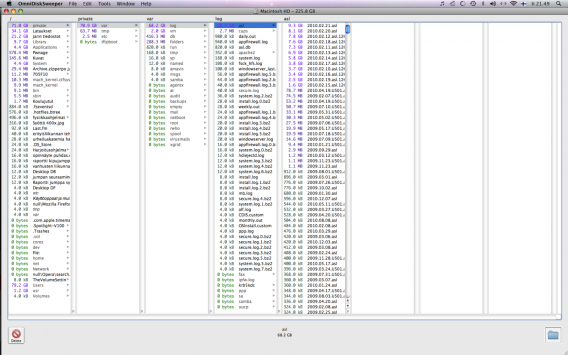
The hard disk must have free space and be in good condition. To do this, get rid of things you don’t need or use. We all have files that are no longer useful or applications we never use. You can use OmniDiskSweeper, which creates an index of all the contents on your Mac and sorts them according to their size.

OmniDiskSweeper

This will help you find files that are heavy but useless, and could free up space equal to about 5 times the amount of RAM installed, giving your computer a little room to breathe.

Something else you can do is a little hard disk maintenance. To do so, start the Mac from the OS installation disk (insert the DVD into the drive and restart your Mac while holding the C key) or the recovery partition for OS Lion (restart while holding down Command and R).

Now run Disk Utility Applications > Utilities > Disk Utility, select the HD in the left column and just click on Repair Disk.

Repair disk

Nothing works? Reinstall OS X

If you’ve tried everything and nothing seems to work, try reinstalling the operating system. If you have OS X 10.9 Mavericks, this is the procedure according to Apple:

  • Make sure your power adapter is plugged in
  • Restart your Mac holding down the Command and R keys
  • Choose a network from the Wi-Fi menu or connect an Ethernet cable
  • Select Disk Utility, then click Continue
  • Select your startup disk on the left, then click the Erase tab
  • Choose Mac OS Extended the Format menu, enter a name, then click Erase
  • After the disk is erased, choose Disk Utility > Quit Disk Utility
  • Select Reinstall OS X, click Continue, then follow the onscreen instructions

Relinquish control, and just bring it back to the store

Now that we have explored even the most unpleasant of the possible consequences of a Kernel Panic, the initial message is worth repeating: this is a very rare problem, and can be fixed in almost every case.

OS X is a Unix-based operating system, an OS backed by 45 years of development (the first release was in 1969!), that is why it has a very solid architecture and these problems are rare.

And if you’re a thorough Mac user, and use Time Machine as a backup, even in the worst case scenario you’ll be able to recover most of your digital data.

One last piece of advice: Kernel Panic can also be caused by internal hardware components (such as RAM or HD). If you believe that’s the case because, for example, the problem started after replacing the original hard drive or after adding memory to your computer, we recommend you take it to an Apple Store.

If you’re new to the Mac world, check out our Moving to Mac Guide.