The best photo and video app of 2014

For photography lovers and video fanatics, 2014 has seen lots of innovation, making it a natural category for our Best apps of 2014 series. As always, social networks have come to rely even more on photos, and with the introduction of new video techniques like time lapse, there’s been no shortage of new apps that cater to the latest photo and video trends.

After a heated debate, our Softonic editors were able to decide on the best photo and video app of 2014, Hyperlapse, and its 4 runners-up.

Default player


brightcove.createExperiences();

Hyperlapse

hyperlapse-iconThis latest release from Instagram was an insta-success, and not just because of its ties to the already successful social network. Its biggest strength lies in innovation; the app combines both video stabilization and this year’s trend of time-lapse videos, the result of recent developments in mobile technology. Hyperlapse proves to be the perfect example of putting these two things to good use on mobile phones.

Not only that, the app’s simple and streamlined interface makes using it really easy, letting anyone with an iPhone turn their shaky videos into a beautiful Hyperlapse.

Download Hyperlapse for iOS

Facetune

Facetune-iconIn the year of the ‘selfie’, Facetune has some major selling points. Notability, its high quality tools, usually relegated for professionals, makes it the perfect choice for quick and effective photo editing for even the most basic users. Perfect skin, teeth, and hair are all within reach thanks to Facetune.

It gives a much more instinctive approach to photo editing, especially on touch devices, and it takes all of the best photo-editing features of other apps to make it one of the most complete photo editing tools for mobile.

Download Facetune for AndroidiPhone | iPad | Windows Phone

Adobe Lightroom

LightroomWhen Apple announced that it’d cease development of pro photo-editing app Aperture in favor of OS X Yosemite’s new Photos apps, Adobe Lightroom became the natural replacement. Having released a version for iPad this year, Lightroom has emerged as the most complete multi-platform service for professionally managing and editing photos.

Aside from a bunch of really professional tools, Adobe Lightroom shines when it comes to multi-platform integration. The iPad, PC, and Mac versions integrate seamlessly so that you can organize and edit your pictures on any platform. The PC and Mac versions prove its high quality and effectiveness, while the iPad version is like a completely different app, and not in a bad way– not only has it been adapted, but it’s been completely redesigned for tablet, opening up a world of possibilities for touch screen photo editing.

Download Lightroom for iPhone | iPadMacWindows

Emulsio

Emulsio-iconThis video stabilization app deserved to be included in Macworld/iWorld’s Best of Show at this year’s expo, standing out for its ease of use, price (free), and for keeping up with trends. Like Hyperlapse, it offers video stabilization to give a steady hand to your shaky videos, and it’s all done behind the scenes, making the app super user-friendly.

Download Emulsio for iOS

FotoSwipe

PhotoSwipeFotoSwipe is an app for sharing photos between cell phones in real time. You might be asking yourself what the big deal is; people share photos this way all the time. But it’s not what it does– it’s how it does it. To send photos, you simply put two phones next to each other, and slide the image all the way across to the other screen. Just like that, you can exchange photos between iOS and Android with a simple swipe, a novel function which solidifies this app firmly on our list.

Download FotoSwipe for AndroidiOS

A golden year for photographers and digital filmmakers

As of late, there’s been an obvious increase in quality and affordability when it comes to photo and video apps for mobile and PC. 2014 in particular has seen a lot of growth, especially when it comes to new technologies that allow for big improvements in photo and video quality.

In 2015, we except much of the same, with a greater focus on photo storage, sharing, and security.

Check out the rest of our Best apps of 2014 series.

How to send disappearing messages in iOS 8

iOS 8 may not be a revolutionary upgrade but it polishes the changes introduced in iOS 7. Even Apple can’t ignore the popularity of features of other apps, adding them as native features in its operating system. In this case, Apple has included self-destructing messages into Messages, just like Snapchat.

Apple offers free calls through Facetime and now you can also send audio and video messages with expiration times. This feature will give some people a sense of security because photos will be deleted after a period of time.

You should be aware that this function only works if both people are using iOS 8. If you are talking with someone on an older version of iOS, these features won’t work.

Two minutes to expiration

To send self-destructing photos or videos, hold the camera icon in Messages. A new option for taking a picture or recording video will pop-up.

iOS 8 Messages

You can choose to take a picture or use the record button for video.

When recording video, you can just tap the record button to start recording and tap it again to stop or hold it down and remove your finger when you’ve finished recording. After you’ve finished recording, you can preview the video, send it, or delete it.

iOS 8 Messages photos

Send a picture with the camera icon: If you press the camera icon, the device will take a picture immediately.

If you prefer to send a voice message, tap the microphone icon that’s to the right of the text box. Recording will begin automatically and after you’re finished, you can choose to send or delete it.

iOS 8 Messages audio message

To customize the settings for audio and video messages, go to Settings > Messages. You have two options: set the audio or video to expire after two minutes or keep it forever.

Expire time

Sending photos

Instead of taking a quick snapshot, if you hold the camera icon you can choose a photo or video from your library.

iOS 8 Messages photo library

While you can’t set photos to self-destruct, you can set a timer for Messages to delete chats. There are three options: 30 days, 1 year, or Forever.
iOS 8 Messages

Only works in iOS 8

These improvements for Messages are only available in iOS 8. If you use an older version of iOS or chat with someone using a different mobile OS, then the options in Messages won’t work.

Related Stories

What’s changed in iOS 8?

7 questions Siri can (and can’t) answer in iOS 8

The best keyboards for iOS 8

Originally published in Italian for Softonic IT.

What’s changed in iOS 8?

Aside from its new features, and beyond Apple’s insane promotion, I wanted to see what the update to iOS 8 actually brings to the daily use of those who own an Apple smartphone or tablet.

I’ve spent the past two months trying out the beta version of iOS 8, always with the same question in mind: what does it really change in your daily digital life? Now that iOS 8 has been released en masse , I tested out the many new features to see which ones are actually useful, and which you could probably do without.

Messaging: Say goodbye to WhatsApp, Viber, Skype, and Snapchat

The iOS messaging app is, according to Apple, the most widely used of all native iOS apps. Until now, however, it only covered some of a user’s communication needs.

For group chats, people can turn to WhatsApp; for ephemeral photo sharing, Snapchat; and to make free phone calls, Skype or Viber is usually the go-to.

In what looks like a smart move from Apple, iOS 8 seems to satisfy all of these needs without leaving Messages.

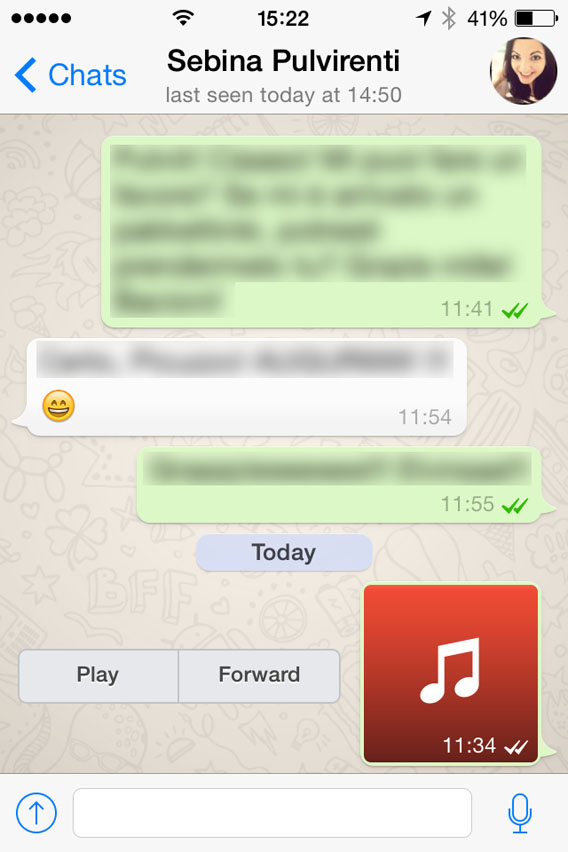
Now, you can use it to send text messages, create group chats, record voice and video messages, send the famous self destructing messages, access free audio and video calls via FaceTime, and post or share your location.

Messages - vocal messages and video messagesVoice and video messages in iOS 8 Messages

For fellow Apple users, everything you need will be in one app, meaning you won’t need any other app to chat with, unless of course your messaging partner doesn’t have an iOS device. Undeniably, having one app instead of four is much more comfortable. Just think about much it easier it could be to find a conversation if it’s all in one place.

Among other things, all the attachments that are exchanged during a chat are saved together in the same chat. Just tap Details, in the top right, and look in the Attachments section. This is an especially useful tool in group chats.

Messages - Attachments

Even more, for those who decide to buy the new iPhone 6 Plus, they’ll get two columns in landscape mode, with contacts on the left and messages on the right. It’s not an essential feature, but it’s quite handy.

iCloud Drive: Apple’s cloud finally makes sense

icloud_drive_iconFrom the user point of view, the best feature of the new iCloud Drive is the clarity of its structure and the simplicity and ease of use of its interface.

The service is now organized as a real virtual hard drive, with a navigable structure divided into folders, similar to that of other services in the same category, like Dropbox.

This new and improved drive is kind of a big deal. Previously, iCloud control was basically out of the user’s hands; there was a space somewhere in the cloud that worked almost completely automatically to backup and save files online, but there was no way to access the backup unless you were resetting your device. This means that it wasn’t even possible to simply drag and drop a file into iCloud (or take one out). This made using the service confusing and sometimes problematic.

iCloud Drive

The integration of iCloud with OS X adds transparency to your storage, and it seems likely that iCloud Drive could become the cloud storage of choice for Apple users.

Handoff: The heart of Continuity

continuity_iconContinuity is what Apple calls the deep integration of its operating systems: iOS, OS X, and now, the OS for the Apple Watch, which we’ll see on the market at the beginning of 2015.

What does this mean in a nutshell? Basically, when you have more than one Apple device in the same room or in the same house, they’ll constantly be “listening” to each other. Whatever you start on one device (like creating a document or reading an article online), you’ll be able to continue on another, exactly where you left off. The best part is, it’ll all happen automatically.

Another cool feature with Handoff is the ability to answer phone calls or send and receive messages directly from your Mac, without even touching your iPhone. If you’re lazy or if you’re focused on what you’re working on, it’ll be super convenient.

Siri listens to you

siri-iconThe biggest change in Apple’s virtual assistant Siri is hands-free, voice activation. If (and only if) your iPhone is connected to a power source, you can yell “Hey Siri” from across the room to activate Apple’s digital assistant, who’ll eagerly await your response.

The fact that voice activation only works when your phone is charging is perfect for certain situations, like in a car for example, where you’ll want to be able to access GPS, answer phone calls, and change the track, hands-free. On the other hand, it’d be nice to be able to call out to Siri when your phone isn’t plugged in and charging.

Custom keyboards and good suggestions

The new keyboard in iOS 8 offers a system identical to that of SwiftKey Notes: smart suggestions that help you write faster, but aren’t invasive. If you want to use them, do it. Otherwise, you can text as usual without interference.

Keyboard suggestions

Not only that, external developers can now create alternative keyboards that you can install and use instead of the default.

The default keyboard of the iPhone 6 Plus also gives you extra keys that speed up typing, including cut, copy, and paste.

In short, good suggestions that actually adapt to your writing style (and to the person you’re writing to), new buttons, and customization means that Apple scores points here.

Widgets and extensions: power and customization

Some apps developed for iOS 8 will include an extension. In practice, they’re tools to open an app inside another app (app inception?), letting you pick the tools you want from inside the app “host.” For example, you’ll be able to edit the images in the Camera app with tools from VSCOcam, because it’ll provide an extension that allows you to do so, although it won’t be available immediately with the VSCOcam for iOS 8 update.

There will also be extensions for Safari, which means that you’ll be able to customize your browser just as you would with the add-ons for Chrome or Firefox that you use on desktop computers.

As a user, this tool will significantly change the way you use your iPhone or iPad; these mobile devices are quickly approaching the full functionality of desktop computers, without losing the “lightness” and convenience of touch screen devices. It’s more power, but with the same level of comfort.

The widgets, on the other hand, are extensions that can be added to the Notification Center, which now lets you personalize them, subsequently making them much more useful.  Up until now, in fact, barely anyone used it. I myself usually opened it by mistake and immediately closed it with annoyance. Now, the story may change: it might just be worth giving this revamped service another chance.

In sum, widgets and extensions mean more power and customization, and that’s never a bad thing.

Add a widgetAdding a new widget is simple

Health Kit

The Health Kit is a kind of control center for all apps related to fitness, sports, weight control, and general health.

The apps connected to the Health Kit will collect the data, including calories burned, physical activity, nutrition, and sleep patterns (among others), and present them in the form of graphs, which show the performance of each variable by day, week, or month.

Health - Screenshots

The new iPhone 6 and iPhone 6 Plus will be equipped with a co-processor dedicated to movement called M8. Aside from movement, M8 will also measures altitude changes, making it super effective when gathering information, especially when coupled with the Apple Watch.

Is the app useful? It depends. If you’re using these kinds of apps daily, or if you have health problems which you need to consistently monitor, then most likely, the Health Kit will be very useful.

There is, however, also a bit of mania about this huge centralized structure that has the potential to control all your health information. If, however, you make the app work for you, instead of becoming a slave to it, and if data isn’t accessible to any third-parties, then it can be a good tool.

Quick answers with Interactive notifications

Some apps show you notifications at the top of the screen, something you’ve probably become accustomed to swiping away. A typical example: the Messages app. In iOS 8, however, you can respond directly to these notifications (for example, responding to a text message) directly from the notification itself, making it ‘interactive’.

It’s a feature I’ve already come to love, especially because it also works from the lock screen. To reply to a message, just drag it to the left and tap Reply.

Interactive notification - answer

The notifications are both interactive and accessible from the lock screen

The convenience of this tool lies in the fact that to respond to a message or an email, you don’t have to leave the app you’re using, or even unlock your phone if it’s on lock screen. It’s a little thing that you’ll immediately wonder how you lived without.

Photo app, Camera app and iCloud Photo Library

Undeniably, the smartphone has now replaced the camera as the default gadget for taking photos.

In the case of the iPhone in particular, this isn’t surprising: the optics are good, the third-party app are endless, and the OS is robust (and all this in just over 100 grams). What’s new then, in the new Photos app in iOS 8?

A lot of things. For one, the editing options are really useful, not unrealistic like many overly complicated photo apps.

Camera - Straighten pic

The tool to straighten crooked shots in the Camera app

Thanks to iCloud, all photos and videos are organized by events like shooting location. They’re then automatically stored in your iCloud account, which has a powerful search engine to help you find any shots quickly.

Another great feature is the option to shoot time lapse or slo-mo videos, which reaches up to 240 FPS in the two new models of the iPhone 6.

Overall, the life of a digital photographer like myself will be a little richer and far more orderly in iOS 8.

Multitasking

Multitasking is especially interesting for those who have an iPad. It lets you open and use two apps at the same time, each on half the screen. For iPhone users, I’m not totally sure that a screen that small is suitable enough to accommodate two apps at the same time, unless of course we’re talking about the new iPhone 6 Plus.

Split screen multitasking

Of course, this will depend largely on the two apps that are being used. For now, I haven’t found a convincing pair, but I’m sure it works well for some. In the meantime, I’ll keep looking.

In general, it’s better to have one more than one less function, so we’ll see how it develops.

In the family, but what family are we talking about?

This new Family Sharing feature lets you create a sort of ‘family’ Apple account to share between members, including apps, music and books, calendars, and photos taken with each member’s iOS device.

Family SharingSetting up Family Sharing

Parents also have the ability to accept or decline, in real time, iTunes store purchases made ​​by their children, as well as locate them at any time on a map.

This service, however, does raise a few questions. Think of a teenage daughter sharing (or wanting to share) her photos, taste in music, or social calendar with her father? Sounds pretty unlikely.

To be honest, I don’t find this feature particularly useful, but other people might.

Your favorite contacts are a double-tap away

In iOS 8, you can create a list of people you call or text most often, turning these contacts into favorites.

To view this list, just double click on the home button of the iPhone the iPad, and you’ll see them at the top of the screen.

Add a contact to favorites

Along with favorites, you’ll also be able to see recently called contacts. With this feature more conveniently located, you’ll almost never have to open your phone book.

iOS step by step

Finally, the new mobile OS also offers a nice bonus app: Tips. Every week, you’ll find tips and tricks to help you learn how to use all the new features of iOS 8. The tips are actually done quite well, so they should come in handy.

Tips

In short: install

Does iOS 8 pass or fail the test? For me, it’s a definite pass. With this iOS update, Apple’s succeeded in the same small feat that it accomplished during its transition from Lion to Mountain Lion, which quickly turned a great OS into an even greater one.

I’d recommend any user who has an iPhone, iPad, or iPod touch compatible with the new iOS 8 to install the system. Among all the new features, there are only a few minor flaws which I think are easily outshined by the great new features.

Related Articles:

The best keyboards for iOS 8

iCloud gets more secure with two-factor authentication

What you need to know about syncing photos in iCloud

Follow me on Google+

Alternatives to Adobe Photoshop Mix

Adobe has added new mobile apps to its own creative ecosystem, which now offers Sketch, Line, Voice, Lightroom Mobile, Ideas, Kuler, and Photoshop Mix. Some of these apps integrate with the Adobe Creative Cloud desktop programs (PC and Mac) to create and edit projects, but others also work as an independent tool.

Lightroom Mobile is one of the most interesting photo editing apps for mobile devices because of its quality and features, and lets you do a lot even if you are not subscribed to Adobe Creative Cloud.

The suite’s weakest link seems to be Photoshop Mix. The possibility to edit individual layers of PSD files is interesting, but it doesn’t include many features: the most interesting are only available for premium users (Creative Cloud subscribers) and are, overall, not very useful.

Luckily, for each feature it provides, there are alternatives.

layrs: editing masks and transparencies

layrs

layrs is a free app that is incredibly good for the quantity and quality of its features, as well as the fluidity that the intelligent interface provides. You can add as many layers as you want (the developer doesn’t specify a limit, and when I tried it, I was easily able to add eight), and apply effects and filters to each of them independently.

There are filters, tools to correct brightness and color, and much more, all easy to use even on the small screen of an iPhone.

layrs

The mask selection tool, which lets you isolate parts of the picture, works pretty well, although it can still be improved. In fact, it takes patience to select the item with precision if it has an irregular shape or if the colors of the object are too similar to the background.

Compared with Photoshop Mix, layrs lets you add many layers to each project (only two on Adobe’s app), and has a lot more features.

TouchRetouch: Delete imperfections and unwanted content

TouchRetouchIn the classic Photoshop for desktop, the Healing Brush tool is used to remove blemishes from photos including graffiti, skin imperfections, or anything else you don’t want in your picture.

TouchRetouch does the same thing, simply and effectively. Just choose one of the selection tools, highlight the section to be retouched, and then tap the Go! button. Like magic, the app will analyze the surrounding area and the imperfection will disappear.

TouchRetouch

Photoshop Mix has the similar Content-aware fill tool. It does the same thing, but the editing process is slightly different: the image is uploaded to the cloud, processed, and then sent back to your iPad in four different versions, letting you choose the option that convinces you the most. In addition, this tool is only for premium users.

In short, it takes longer than TouchRetouch, and it’s not free.

Straighten: Correct angle and perspective:

StraightenLike above, the feature that lets you straighten photos in Photoshop Mix uploads the image to the Creative Cloud, edits four versions, and then automatically sends them back automatically to the device for your selection.

Straighten

Straighten is an excellent free alternative. In addition to manually straightening the images with the help of guides, it lets you crop the image and choose an aspect ratio. All the picture’s metadata is kept after editing, including the time and place it was taken, and information on the camera used.

Image Straightener

Image Straightener Image Straightener, on the other hand, only lets you fix the image’s rotation, but with a useful indicator that shows the degree of the correction applied.

This means you have complete control over a function that, thanks to the grid, becomes extremely accurate. It’s not that Photoshop Mix does a bad job, but it’s automatic, as the tool tries to guess which is the correct angle of the shot.

Image Straightener

It normally gets it right, but doing it manually, for free and without having to wait is something completely different.

Snapseed: Improve the sharpness (and much more)

snapseedSnapseed combines a huge amount of excellent photo editing tools in one single free app.

Just like layrs, the app offers an intelligent interface and makes the most of the touch screen. With it, you can carry out selective editing of specific sections of the picture. It also supports very large files (on the third-generation iPad and iPhone 5, it can work with 20.25 megapixel shots).

Snapseed

The tools to improve the sharpness of the pictures are only one of the many features that Snapseed hides.

Adobe is Adobe, but…

The fact that there are good alternatives to Photoshop Mix tools doesn’t mean that Adobe’s app isn’t good.

It’s actually a decent addition to the Creative Suite, and considered with Adobe’s system of creative tools (both desktop and mobile), it can be interesting.

People who love taking pictures with their iPhone, however, don’t need all the tools that Adobe Creative Suite offers, especially with so many free or cheap alternatives.

If you’re interested in mobile photography, read our complete Instagram guide.

How to create and install presets in Adobe Lightroom 5

Adobe Lightroom 5 (for MaciPad and PC) is an excellent professional image-editing program that helps you turn every shot into the perfect picture. Among the many tools it offers, there’s a useful collection of presets (or templates) that allow you, with a single click, to apply a whole set of changes to a photo.

By default, there are quite a few to choose from. You’ll find them in the Presets menu, in the column at the left hand side of the Lightroom interface. In addition to using those which have been pre-installed, however, you can also create your own, or upload new ones by downloading them for free online.

Below, I’ll take you through how to create them, save them, and install new ones on your Mac. For this tutorial, I used a Mac with OS X 10.9 Mavericks, but the steps are almost identical on a Windows PC.

How to create and save a preset in Adobe Lightroom 5

1. Retouch a photo

Open a photo and make all the adjustments you want, altering any parameter you want among the many available in the program.

The tools that let you make adjustments are in the column on the right of the interface.

2. Create a new preset

When you’re satisfied with the result, you’re ready to save all the changes that you’ve made ​​as a preset.

In the Presets menu on the left hand side of the interface, click on the “+“.

The lowest key

3. Decide which parameters to include

A dialog box appears, from which you can give a name to the new template , as well as determine which of the fixes that you applied to the photo you want to include or exclude by adding or removing checkmarks.

Save new presets window

4. Save the new template

Click on the Create button. The preset will be saved, and you can apply it with a single click to any other photo. You’ll find it on the menu to the left – Presets> Default User.

New presets available in the left column of the interface

Unfortunately, at least for the moment, presets created on the desktop versions do not synchronize on Lightroom for iPad , but I’m expecting this feature to eventually be added to the already rich set of options in the Adobe virtual darkroom.

How to download and install presets from other users

There are many websites where you can find Lightroom templates shared by other users; you can even find some interesting ones on the Adobe blog itself, and loading these presets to use them in your Lightroom is easy.

The presets are usually compressed in ZIP format. Download the ones you want, and unzip them. You’ll see a file with the extension .lrtemplate: right-click on it, and copy it.

Then, open the Lightroom preferences by going to Apple Menu> Preferences, and in the Presets tab, click on Show Lightroom Presets folder.

Button displays the preset folder

Go to Develop Presets> User Presets and paste the files you copied there.

Paste Develop preset in the Presets folder 2

When you re-open Lightroom, in Preset> User Presets you’ll find your new template ready for use.

Apply the new preset downloaded

A final tip

If you’re venturing into the world of photo editing for the first time, you can find ready-made presets in Lightroom; these are also a great place to start to learn how to orient yourself among the many tools that the program offers.

Just open a photo, apply a preset, and study what parameters have been modified to get yourself the effect you want– it’s a really useful exercise that I highly recommend.

If you want to check out Adobe Lightroom for iPad, check out our review of the program.

How to install WhatsApp on your iPad or iPod touch

Contrary to popular belief, it’s possible to install WhatsApp on an iPad or an iPod touch without resorting to a jailbreak.

With a little trick and a simple app,  I’ll explain how you can install WhatsApp on your iPad or iPod, even without a SIM. The procedure takes no more than ten minutes, is simple, and works great.

What you need

In addition to your iPad or iPod touch, you’ll also need:

  • a Mac or PC with iTunes
  • iFunBox, a file manager for Mac or PC that’s used to manage the files on iOS devices
  • an iPhone (used only for a few minutes, you can even borrow your friend’s if you don’t have your own)
  • SIM (this will also serve just as a one-off and only for a few minutes)

The last item must be inserted in the iPhone to install and authorize WhatsApp on your mobile phone. Subsequently, this authorization will be “transferred” to the iPad, as I’ll explain in the next steps.

Since, however, the same phone number can’t be used for WhatsApp simultaneously on two devices, the idea is to use a SIM which isn’t already tied to a WhatsApp account.

1. Download the app on your computer

Open iTunes on your Mac or PC and go to the iTunes Store. Find WhatsApp  for iPhone– there isn’t a specific one for iPad– using the search field, and click on Free to download it.

Find WA in the Store

By doing this, the installation file (.IPA) will be downloaded to Music> iTunes> iTunes Media> Mobile Applications (on both Mac and PC).

The IPA file

For your convenience, drag it to the Desktop.

2. Install WhatsApp on your iPad

Download iFunBox (it’s available for Mac and PC), open it and connect your iPad. Click on Install App.

iFunBox install app

Browse on your desktop, select the .IPA file, and install the app on your iPad. Disconnect it from your computer.

3. Authorize the app on an iPhone

Install a new version of WhatsApp on an iPhone, using a SIM card that isn’t already linked to a WhatsApp account. If the app is already on your smartphone, delete it and re-install it. Before deleting it, though, back up your chats to iCloud (open WhatsApp, go to Settings> Chat> Backup chat and tap Backup Now). That way, you can restore them when the app re-installs.

If, for example, you have an old SIM card you no longer use, but which can still receive a text (the code to authorize the app will be sent via text message), or maybe a SIM card belonging to a relative or friend who doesn’t use WhatsApp on that number, use that.

The SIM will only serve to activate the app. Then, it can continue to function as normal.

Open WhatsApp on your phone and proceed to register your number. Once you’ve entered the code, which you’ll get via SMS, you can close the app.

4. The iPhone to iPad Transfer authorization

Disconnect your iPad from your computer and connect your iPhone. In iFunBox, choose User Application, find WhatsApp, and double click. Get the Documents and Library folders and drag them to the desktop.

Docs folder and Lib iPhone

Disconnect the iPhone, connect your iPad, select User Applications> Whatsapp again, open it with a double click, and drag the two folders that you took on your iPhone and “parked” on the desktop.

Subsequently, the iPhone (which contains the authorization), is replaced by the iPad or iPod touch.

5. Open WhatsApp on your iPad and start chatting

If you’ve carefully followed the above steps, WhatsApp should be fully operational on your iPad.

List Chat

WhatsApp without limits

Having WhatsApp on an iPad or iPod touch is nice and convenient. You can surf, chat, or work on the same device, and it’s very easy to use.

In the case of the iPod, since you probably spend most of your time in places covered by WiFi networks, the Apple music player becomes a quasi-iPhone, even more so when WhatsApp will be able to accept voice calls.

If you want to transfer music files on WhatsApp on an iOS device, check out our tutorial on transferring MP3 files via WhatsApp.

iPhone: how to send an MP3 via WhatsApp

Want to send a music file with WhatsApp for iPhone? For Android users it’s easy to send a song via WhatsApp, because it’s the operating system itself that offers the option. For iPhone users, it’s another matter.

WhatsApp for iOS allows you to send pictures, videos, contacts and geographic location…but not music. Fortunately,  sending an MP3 via WhatsApp for iPhone is still possible. All you need is the help of a free app that offers an Open With option. There are a few of these, but iZip seems to be the most suitable for our purpose.

Here, I’ll take you through how to send an audio file with WhatsApp for iPhone.

How to send audio files using iZip

1. Install iZip on your iPhone. Open the program.

2. Select Music Library.

Select Music Library from the menu

3. Open a folder (e.g. Albums).

Select a folder in the Music Library

4. Tap Select in the top right of the screen and choose the song you want to send with WhatsApp. At this point, Select will be replaced by Done.

Select the song you want to zip

5. Tap the Zip button at the bottom center of the interface. The app will compress the file.

Select the song and then zip

6. This will open the folder Local Files. From there, you can select the ZIP file you just created.

Select the ZIP file you just created

7. You’ll be asked Would you like to extract all files? Tap OK .

Do you want to unzip the file

8. This automatically creates and opens a folder in Local Files with the decompressed song. Then select the file .

Select the file to be opened with

9. Now, tap Open In (at the bottom center of the screen) and, from the choices that appear, select Open in WhatsApp.

Select Open in WhatsApp

10. It will open WhatsApp automatically. Select the user you want to send the MP3 to, and when it asks you to Send to [contact name], click on Yes.

Confirmation sending files to contact

At this point, the file will load and send. When the recipient receives it, you can listen to it by tapping the Play icon next to the music file.

Listen to the file received

Beware of copyright

This method lets iPhone users exchange music via WhatsApp, even if the procedure is a bit more complicated than for Android users.Remember, however, that sharing music files protected by copyright laws is illegal, so only send audio or music that can be freely shared.

One last tip: if you want to share a new song with a friend, instead of sending the file, you can share it with them via Spotify. To do so, just find the song you like, tap the menu with the three dots next to it, and select WhatsApp.

Spotify - Share with Whatsapp

Then, select the contact, confirm you want to send it, and you’re done. Simple, fast, safe and totally legal.

If you’re looking for other tricks for using WhatsApp, look for them in the index of our comprehensive guide to WhatsApp.

Is your iPhone memory full? Find and delete the guilty apps

Run out of space on your iPhone or iPad? There’s an easy way to free some up – and you’ll be back up and running at top speed in no time.

The iTunes Store is full of great quality free apps, and it can be easy to fall into the trap of installing and testing new ones all the time.

Some of them you’ll use every day, but most of them you’ll forget about forever. And before you know it they’ve stacked up, occupying memory (and when we’re talking about games, that can be a lot).

Here’s how to find out which apps are eating up the most memory on your iPhone, iPad, or iPod touch, and how to get rid of them.

Search for and delete useless apps

1. Go to Settings> General> Usage. The first bit of information you’ll see is the amount of free memory and what’s already in use.

Space available and in use 02

Immediately below this, you’ll find the full list of apps and services that are taking up memory on your iOS 7 device – they’ll be ordered from the “biggest” to the smallest in terms of memory. If the memory is particularly full, it may take a minute before the list appears.

2. Select the app you wish to uninstall from the list. You’ll be shown in detail how much memory is occupied by the app and how much the documents and data related to the app itself occupy too.

Docs and date 03

3. To delete, tap Delete App and then confirm the deletion of the application and its data and documents.

Confirm delete app

Repeat this process until you’ve deleted all the programs that you don’t need any more…then listen as your iPhone breathes a sigh of relief!

Sometimes you don’t need to delete the app

In some cases, you won’t need to delete an app that seems to occupy a lot of memory, you’ll just need to delete the files or documents created with it.

In the example below, the app itself only takes up 6.0 MB, but the pictures with it take up 688 MB.

Panorama - documents storage space is huge

This means that, to free up space, you could simply delete the photos taken with Panorama (you can do so by opening the app), and save the application to re-use it in the future.

More memory and your iPhone’s back on form

If you want your iPhone or iPad to run as fast as it should, always make sure you’re not filling up the memory. As a rule of thumb, bear in mind that it’s a good idea to keep about 10% of the total memory free. For example, if you have an iPhone 16 GB, you should leave 1.5 GB unused.

And remember: often the most effective way to free memory is to transfer your photos to the cloud with an app like Dropbox.

Format a disk to use on both Mac and PC

Have you ever wanted a hard disk or a flash drive that you can use on both your Mac and your PC? With OS X, you can create one in less than a minute.

It’s not uncommon to need an external drive (hard drive or USB stick) that works on both Mac and Windows computers, especially if you need to constantly transfer files from one system to another.

Luckily, with OS X, you can create a disk that can be used by both operating systems in a snap. Here’s how.

1. Connect the disk and open Disk Utility

Connect the hard drive or USB drive to your Mac and then open the Disk Utility app, which is located in Applications> Utilities> Disk Utility. You can also open the app from Launchpad.

Open Disk Utility

2. Select a disk to format

Choose the disk that you want to format for both Mac and PC from the column on the left.

Select Disk

3. Choose the format

Open the Erase tab. From the Format drop-down menu, choose MS-DOS (FAT), better known as FAT32.

Choose Format

4. Choose a name for the disc

After you choose the format, you’ll see a box to enter the name of the disk. Choose any name with a maximum of 11 characters (don’t worry, it can be changed later).

Choose Name

5. Erase and format

Click on Erase and confirm the operation in the next pop-up window.

*Warning: this will delete all data on the disk. If there are documents on there that you want to keep, make a copy of the files on your Mac or on another external drive first.*

Erase

And you’re done! Now, the disk can be read and written using both Mac and Windows computers.

What problems could I have on an HD formatted in FAT32?

FAT32 is the only format that both OS X and Windows can read and write without the use of third-party apps.

There are, however, some things you should know about the FAT32 format:

  • It doesn’t support files larger than 4 GB.
  • It doesn’t let you set access permissions to files, so it’s potentially less secure than the NTFS format (the native OS X format).
  • It’s less efficient in terms of space management. In practice, for the same total size, you can put fewer files on a FAT32 formatted disk compared to a NTFS formatted disk.

That said, for a daily exchange of files (for example, if you work on a PC but you have a Mac at home), it’s a practical and effective solution.

Of course, there are other options for transferring files between hard drives; cloud-based solutions like Dropbox are convenient and don’t have compatibility issues, although are sometimes limited in space.

If you’re thinking of moving to Mac but are unsure about the process or concerned with these kinds of issues, check out our Moving to Mac Guide.

Foursquare and Swarm division points to new trend for standalone apps

Five years after it was founded, Foursquare, the social network based on geolocation, has split its main functions into two apps. An updated version of Foursquare remains, but the new addition, Swarm, brings the social aspect of Foursqaure to a standalone app.

As Facebook’s ramping up to offer more and more standalone apps for all of its various services, most notably Messenger, it looks like the newest trend is to separate apps based on one main function.

Swarm will serve as a way to keep in touch with friends so that you can share your location or let them know where you’re going, while Foursquare will remain an app to help you discover new places to eat, drink, or hang out.

So, why exactly did Foursquare founder Dennis Crowley decide to gamble on a successful product by splitting it into two? What’s the reasoning behind having two separate apps instead of one? I’ll take a closer look at the Foursquare division to get a better idea about the trend, asking why two apps are really better than one.

Foursquare and Swarm

Foursquare The new Foursquare, still available on Android and iOS, serves as more of a city guide, a way to discover new places around a city. In a way, taking out the functions that have been transferred to Swarm make it more of a competitor to Yelp, the “online urban guide”.

Foursquare, however, takes into account where you’ve been, what you’ve liked before, and what your friends have liked, providing reviews by friends and contacts; this means more personalized guidance, which can be much more relevant and reliable simply because it’s based on the opinions of people you trust, as opposed to Yelp, which gives reviews from random users.

SwarmSwarm, which launched for iOS and Android late last week, offers some additional privacy compared to similar functions that were removed from Foursquare. By default, Swarm doesn’t give your exact location to others. Rather, it gives your friends a rough idea of where you are, letting you choose whether or not you want to share your exact location.

Swarm also functions in a more immediate way, meaning that you can automatically provide your location to friends, without having to check in.

Of course, separating into two apps doesn’t mean that the services don’t work together; in fact, Foursquare and Swarm are meant to co-exist, forming a consistent and fluid mini-ecosystem that makes it easy to switch from one app to the other.

Why separate?

The decision to create two different apps, as explained on the official Foursquare blog and in an exclusive interview with The Verge, was made following observations of user behavior where, 19 times out of 20, users only used the app to either check-in or find new locations.

Only 5% of the Foursquare users opened the app to find a friend and find a restaurant,

says Noah Weiss, Vice President of the company. He adds:

We were thrown into a sort of mission impossible: to have a single function mobile app that actually held two different functions.

Jon Steinback, VP of Product Experience, says:

The use of mobile technology has expanded and evolved. When you open an app, you do it to perform a specific action, not to access something that’s more detailed and complicated.

As a result, ​​separating the two services and improving the individual function of each service was actually bringing them closer to providing apps that served the needs of the user.

Cutting out the clutter

The “simplification” of apps is becoming more of a trend. Increasingly, while apps may be integrated into an ecosystem of products, they’ll have a standalone and specific function.

The same thing’s been happening at Facebook and Google. Facebook’s already made Messenger a standalone app, with plans to discontinue the service in the Facebook mobile app completely, while Google Drive for Android recently lost the function to edit documents, which was transferred into two new apps: Docs for text documents, and Sheets for spreadsheets.

Location Foursquare BadgeIt’s almost as if users have less time to spend using an app, and if whatever they need to use it for takes longer than a few seconds, the app ends up in user oblivion. As a result, the “Swiss army knife” of apps, with many different integrated functions, has suddenly become obsolete, slow, and undesirable because they take time, something that users no longer have.

We can also take a look at the modular trend, which can be considered a response to the increasingly urgent demands for personalization.

Users create a network of apps on their smartphones based on their specific needs, made up of individual apps that perform useful functions and make their mobile digital world more streamlined and easier to use.

Foursquare TrophyWith our own app ecosystems, there’s no need for the excessive: if I need an app to edit text documents, but I don’t need one for spreadsheets, why would I choose a product that offers both? It’s cutting out the clutter and only getting what you need.

So, Foursquare adapts…

In short, the trend has changed. While all-in-one products used to be the most popular in the market, the new trend is towards fragmentation, which generates a greater, more conscious choice.

Space and time are becoming less and less available, and we’re less and less willing to sacrifice them for something we don’t really need. Technology, it seems, is adapting accordingly, and the Foursquare/Swarm division is the perfect example of this shift.

When apps like Foursquare, Facebook, and Google start separating their services, it’s probably a sign that this “trend” is quickly becoming the norm. Pretty soon, we’ll find out if users really do relish these separations.

Do you prefer standalone apps to all-in-one apps?

Follow Pico on Twitter @pfpic