Instagram guide: make the most of Instagram online

In this eighth episode of our Instagram special I’m going to show you how to make the best possible online profile on the social network from your PC. I’m also going to present two services from third parties which will really help you take full advantage of Instagram. The instagram.com site is a valuable addition to the app, because it allows you to manage your social activities much more easily than from your smartphone, letting you mold your image as a social photographer.

One of the features of the new generations of digital artist is that much of your work is done away from the desk. And so you’ll find that the best way to take care of yourself and your colorful tribe of Instagrammers is to do so from the web. So here’s what instagram.com allows you to do, perhaps with a little help from some extra services.

A better way to Instagram

The Instagram app is really intelligently organized, and it works pretty well. As well as taking photos and applying filters and tags, you can also manage your network of contacts. But the ideal place to view your friends’ shots, add comments and like, repost pictures and generally keep in touch with your Instagram network is online. The organization of the home page is almost identical to that of the app, but seeing the pictures in a reasonable size is obviously quite different. If your contacts publish images that are particularly beautiful and well executed, it’s nice to enjoy them at a suitable scale.

instagram.com home

The button with the three dots in the lower right corner of each shot is used to report a photo as inappropriate, or to look at it in its original size. We recommend that you use the latter option every time you want to see a shot properly. To add a like, you can double click on the photo (this doesn’t work with videos: instead, you have to use the button in the shape of a heart), and adding comments when you’re on a PC is much more practical than on a smartphone.

If you’ve decided to take your public relations on the photo social network seriously, then the computer is definitely the ideal way to do it. Even the page on your personal profile is beautiful and functional, with thumbnails of all your photos in reverse chronological order and a header made ​​up of 7 shots taken from your library in a random rotation.

An Instagram profile

Profile and privacy

Under Your Account, you can do several things. Edit Profile: you can enter or edit your name, the email linked to the account, username, phone number, and you can add to or edit your bio. You can also add the URL of your personal website. Change Password: you can change your Instagram password here. Manage Applications: this section is particularly interesting, because it lets you revoke permissions to any apps you’ve allowed to access your Instagram data.

Applications you've authorized

In episode number 2 of our series we discussed managing your privacy in detail. From here you can control another important aspect – Badges. These are used to get the code to insert a badge that directs people to your Instagram account from your website or blog. You can also create a personalized badge by downloading the camera icon.

Two excellent 3rd party services

The Webstagram feed

Webstagram: If instagram.com doesn’t quite satisfy you, you can also use Webstagram, a viewer that also allows a variety of operations, including viewing shots in three different formats (Thumb, Mid, and Large) and reposting of photos and comments via Facebook accounts. This service also provides you with an RSS feed, a good search engine for finding users and hashtags and a statistics section with commonly-used filters, the most popular hashtags and instagrammers with the most followers. These are just a few of the services offered by Webstagram. Among the others there’s one with which you can easily add your own Instagram image gallery to your blog or your website. It’s an excellent tool for professionals and enthusiasts who take their shots seriously, and who want to have total control of their profile.

Webstagram - Instagram gallery code

Statigram: If you’re obsessed with statistics, Statigram offers a set of tools which let you take the pulse of your success on the Instagram network, and to get a detailed picture of what you post.Statigram 1

It provides information on the filters and hashtags you use most, the popularity of your photos, the engagement they generate among your followers, the number of likes and comments you receive, the growth in the number of followers, the distribution over the month of what you posted, the density by day of week…and plenty more!Statigram 2 If you decided to use Instagram to promote yourself or your business, Statigram is a powerful tool that helps you understand if you’re on the right track, and a great ally to plan exactly what and how to post.

And now…get to work!

And so we’ve arrived at the final installment of our guide. If you followed our advice, you’ll now have a few tricks for taking interesting shots, you’ll know how to set the privacy of your profile, repost photos from other users, how to create and manage your videos, how Instagram Direct works, for attracting new followers and how to import photos from your computer on to the app.

In short, Instagram has no more secrets for you. You have all the tools you need to become a instagrammer with a solid identity. Whether you do it for business or pleasure, you can create a far-reaching social network, finding people with whom you share your passions and discover new ones in time. And above all, you can paint your world with whatever filter you want!

Thank you and good night…or should that be good light?!

"Under African skies" on Instagram

Can you really fall in love with an app?

Can you really fall in love with an app? It happens to the lead character in the hit movie Her. We think it’s a much more common problem than many people realize. Here’s how to figure out if it has happened to you too.

Love is an unpredictable emotion that has little regard for the rules. One day you’re calm and collected, going about your life, free from worry, and the next, you get up, go to work, and BANG! Cupid, the angel with a perfect shot and a messed up sense of humor picks YOU as his prey. Face it, you’re screwed!

But sometimes love can take forms you’d never expect. You know these days people are falling in love with apps? I’m not surprised. Yahoo Weather kind of reminds me of a mysterious foreign princess, while VSCO cam is undoubtedly the femme fatale of photo apps. Oh, so you think this kind of love could never happen to you? I wouldn’t be too sure. To find out, check with Softonic. Here are 6 signs you’ve fallen for an app. If you recognize 3 or more, then face it – it’s happened to you.

You can’t spend a minute without it

Trapping a magnificent app like Facebook between the narrow walls of a smartphone is torture once the lights go out. A whole night without it is pure suffering. At least it makes the morning bright. Sometimes, before I’ve had my first coffee, the dawn itself seems to rise from a 6-inch touchscreen.

1-Look-it-forever

If you’re in love, staying away is hard

It’s the last thing on your mind before you sleep, and the first thing you think of in the morning, but that’s not all. You want the app to be happy, so you’re always looking for a good internet connection, leaving it free to run and skip around the web. You’re out at a restaurant maybe, having pizza with friends, but the 3G coverage is shaky and it feels like you’re gasping for air. Why? Because you know it’s suffering, and it’s all your fault! You could have stayed home eating canned tuna, right next to that powerful wifi router it loves so much. But instead you came to the pizzeria and here you are, slipping out every 20 minutes to look for a decent signal to buy yourself some breathing space. If this has ever happened to you, then you could be in love. But to be sure, we’ll need more evidence.

You open the app just to catch a peek

When you’re in love with an app you don’t necessarily need an excuse to open it – any time is a good time! That happened to someone I know with Evernote, and that someone was me. Why? Because it’s sexy! Its colors, the interface, the animations: they’re beautiful and I’ll never tire of gazing at them.

2-In-Your-Heart

Where others see only, say, a screensaver, you see a miniature Technicolor world. And those animations, ah, those animations! So, if you’ve ever found yourself opening an app and scrolling through just for the fun of it, well, it might be love. But again, we’re going to need more evidence to be sure. Continue….

Talking to it makes you happy

Virtual assistants have become very popular in recent times, but they’ve already managed to break the hearts of millions. The one that really drives us crazy, though, is the original and best – Siri. She’s helpful, has a sense of humor and is really well-informed. That – and have you noticed that after each update, her voice becomes increasingly persuasive? That’s hard to resist!

3-Nice-Words

You could also fall in love with Talking Tom Cat, cuddling for hours without ever getting bored. And if you are in love, the whole world will know about it, since this little feline is a social network obsessive. It’s true, sometimes a love is so special that it’s hard to put into words, but needing someone else to spread the news isn’t the only symptom of love – and you can definitely do better than the most annoying cat in the world.

You buy it gifts

Sometimes true love must first requires diligent use of a credit card. And while it’s true that bunches of roses, bottles of Dom Perignon and 20 carat sparklers are often lost on an app, that doesn’t mean that you can’t spoil it a little. It happened to me with Paper for iPad. If you keep it constantly updated, download all the paid updates and never miss an in-app purchase, even though you know you’re never going to use all these extra tools, it might just be love.

4-Candy-Love

When I opened Paper by FiftyThree, I think my heart broke a little. It made me feel like a real artist, even if I’m not, making all my childhood dreams come true. A new world of graphic art opened before my eyes, and it was so beautiful! In 15 minutes flat, I had bought the entire set of pens, paper and colors that Paper offers as in-app purchases. While I was shelling out, I was happy, because I knew my beloved Paper was happy. But maybe that means it was just a fling, because we all know that love is free – or at least just accepts donations from users. Er, I mean lovers. Or, and here we’re skirting controversy, imagine actually paying for WinRAR at the end of those 40 days! There’s no record of anyone who has actually done this, but it would be pretty incontrovertible proof of unconditional love if you did.

You introduce it to everyone – or no one

And so said The Beatles: She’s just the girl for me, and I want all the world to see we’ve met (I’ve Just Seen A Face). When you’re in love, you want everyone to know.  If the object of your affection happens to be a chat app, for example, like WeChat or the luscious LINE, your friends can use it too, and the more of them that use it, the more you can use it (in a good way, obviously). If you suddenly find yourself passing on effusive recommendations to friends, family and total strangers about which chat app to use (“which one? That old one?! Noooooo! This one is clearly the best!”), then you might just be in love.

But this could also come right back at you. If you’re the jealous type, you’re going to want to keep your precious just for you. At least it would help you avoid the kind of trouble that bothered Flappy Bird, which, if it wasn’t so famous, mightn’t have attracted the troublesome attention of so many suitors.

5-Share-Good-Bad

You want to get to know it better

Well, we’ve finally come to the definitive test. If you want to meet the parents, then it’s certain – you’re in love. In other words, what if you develop boundless affections for the developer of the app (like happened with the happy squadrons following Rovio, creator of Angry Birds)? Next thing you know, you’re following them on Twitter, you’re friends with them on Facebook, you spend hours each day on their forum giving help and advice to anyone who asks. And suddenly, it’s official: you’ve got a crush on an app. Unfortunately, we can’t welcome you to the club – it seems that we’re just not as devoted as you!

6-Gratitude-To-Developers

So then, have you ever fallen in love with an app? Tell us which one, and why!

Instagram guide: Protecting and sharing your profile

In the second chapter of our complete guide to Instagram, we teach you everything there is to know about your privacy and profile sharing.

Privacy on social networks is always a touchy subject. To protect yourself, you have to be aware of how each social network functions. Who can see what you post? Does every other member of the network have access to your information? How can you block an unwelcome user?

In this installment of our guide, we’ll answer these and other questions to give you the tools you need to keep your privacy under control.

How to set up your personal profile

Whether you already have a profile, or you’re just about to open one, there are some things you’ll want to do to prevent any potentially unpleasant situations in the future.

First of all, the only thing you absolutely have to fill in is a username. The best option is to pick a username that has no reference at all to your real name. This will help you avoid being tagged in any images that might embarrass you or cause damage, like images uploaded by a contact, which will be visible in your photo stream, or images taken by someone who has stolen your phone.

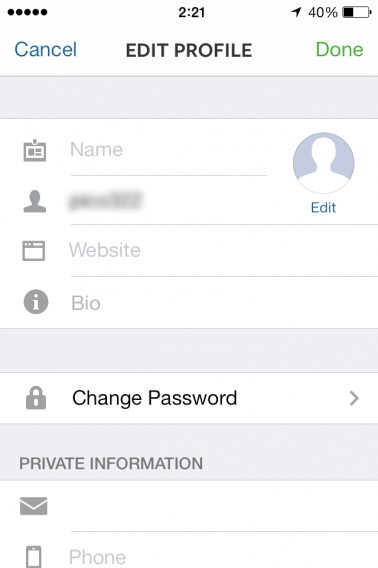
If you’ve already added other details about yourself, you can delete them easily. From the Profile tab, enter Edit your profile, remove the information that you want to delete (for example, a telephone number or your real name), and then tap Done.

Instagram - edit your profile carefully

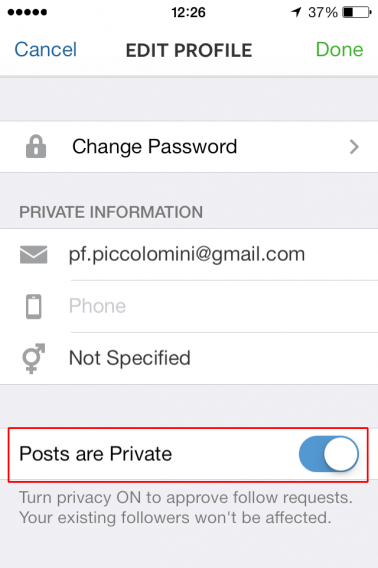
At the bottom of the profile editing page is a section with which you can determine if your posts are public, meaning that any Instagram user can find and access them, or private, which means that only contacts who are expressly authorized by you have access to your post (which are your images).

If you want a private profile, which is the recommended choice if you want to be in control of your privacy, you have to move the switch to ON, meaning to the right on iPhone, or tick the relevant box on Android.

Instagram - Making posts private

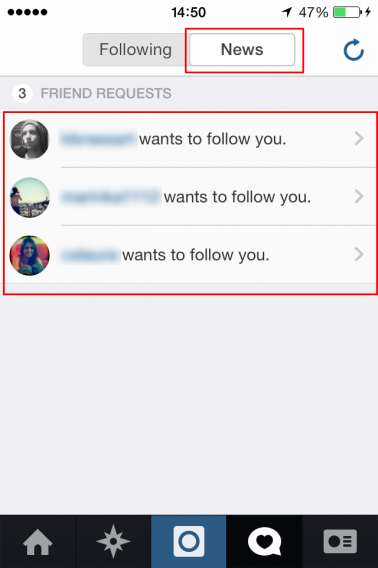
Once you’ve done this,  you’ll get a request when someone wants to follow you, which will appear in your news feed. You’ll have to authorize the request to give them access to your profile.  You can then decide, case by case, whether to approve the request, or ignore it.

Instagram - Accepting follow requests

One last tip: Use a strong password for your Instagram profile, to make life difficult if anyone tries to access your account. If you’re not sure how to choose a secure password, here’s some advice.

Blocking a user: how to do it and what it involves

If you set your profile as private, only people who you’ve expressly authorized have access to your posts. At any time, however, you can choose, for whatever reason, to revoke this authorization.

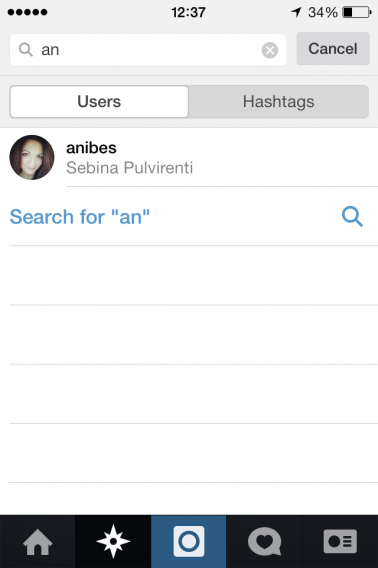
First, you have to go to their profile. To do this, go to the Explore menu and search for their username.

Instagram - blocking users (1)

Next, on iPhone, go to the menu with the arrow in the upper right corner, under the battery charge icon, or the menu with the three vertical dots on Android.

Instagram - blocking users (2)

From the menu that appears, choose Block User.

Instagram - blocking users (3)

If, in the future, you decide to unblock access for that contact, you can go back to the same menu and choose Unblock User.

When you block a user, they won’t receive any sort of notification, but they’ll no longer be able to see your photos and videos or access your account. Likes and comments that they left on your posts before being blocked will remain. If you want to remove them, you must do so manually.

How to delete a photo you’ve already published

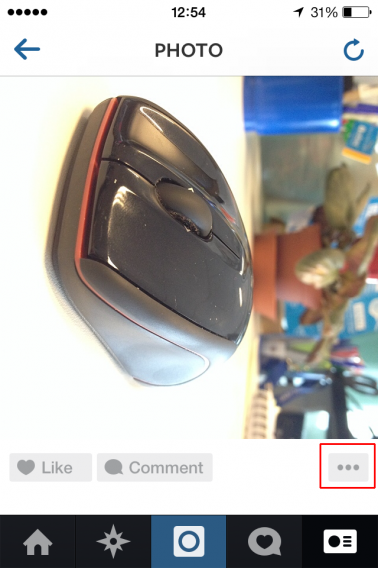
If you decide to delete a photo you’ve already published, go to your profile and select the photo you want to get rid of. When you open it, tap the menu with the three dots (which you’ll find at the top or bottom, depending on the smartphone you own).

Instagram - deleting photos (1)

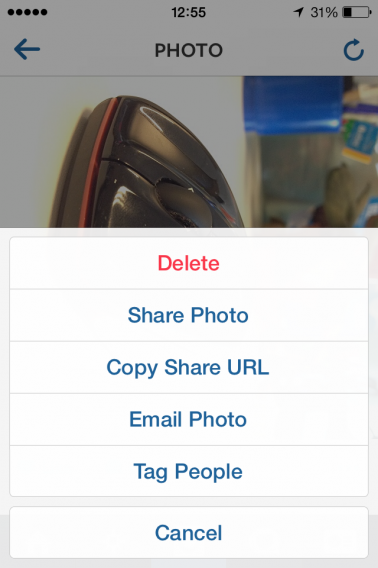
From the menu, select Delete.

Instagram - deleting photos (2)

Your Photo Map

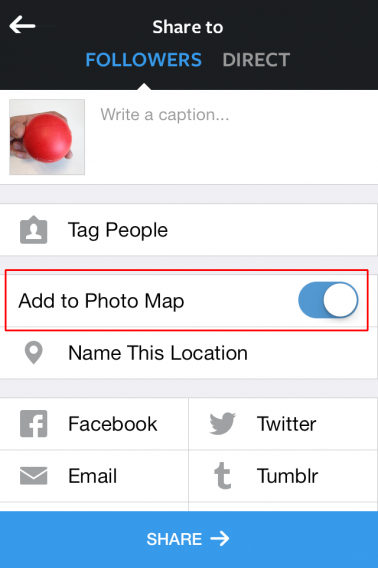
When you take a photo, you can decide whether or not you want to add it to your Photo Map. To do this, simply move the Add to Photo Map slider to the right, accessible on the same page where you choose sharing options after you’ve taken and edited a photo.

Instagram - enable add to Photo Map

This map is visible to everyone if you have a public profile, but only to your authorized contacts if you have a private profile.

It can be a nice feature, but it can also reveal too much about you or the people you care about, like where you or your friends live, or places you frequent. In short, this tool could unwittingly cause you a bit of trouble.

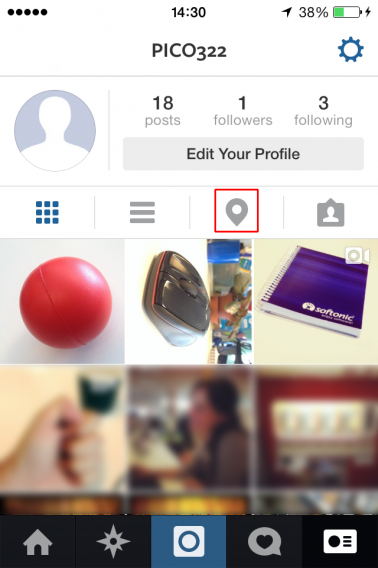
If you already have photos on the map that you’ve changed your mind about sharing, you can remove them easily. First, go into your profile, then tap the Photo Map icon.

Instagram - removing photos from Photo Map

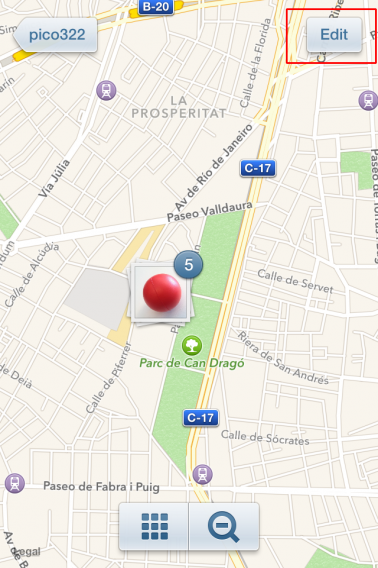
You’ll see a map with all the geotagged photos you’ve taken. Tap Edit in the top right hand of the screen.

Instagram - editing your Photo Map

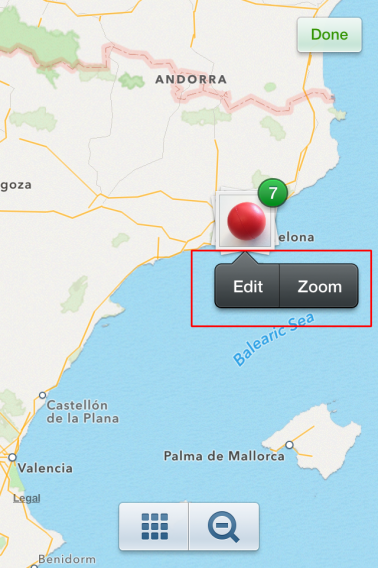
Select the photo you want to delete and click Edit, or zoom in if there are lots of photos in the same location, and choose the one you want to delete.

Instagram - editing your Photo Map (2)

If you select Edit, you’ll see a list of photos and can select which ones you want to stay on the map, noticeable with a green check mark.

Instagram - editing your Photo Map (3)

Tap Done. Instagram will ask you if you really want to remove the tags from the photos that don’t have the location selected. Tap Confirm, and these pictures will no longer appear on the map.

If you block a contact that had access to your map via another friend, they’ll no longer be able to see it from the time you blocked the friend.

How to set preferences for sharing on Facebook

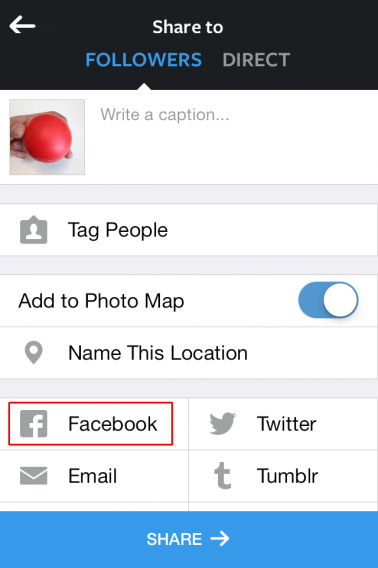
If you want to publish your Instagram photos to Facebook, it’s easy: just click the photo, add the finishing touches and, when you’re sharing it, tap the Facebook icon.

Instagram - Facebook sharing options

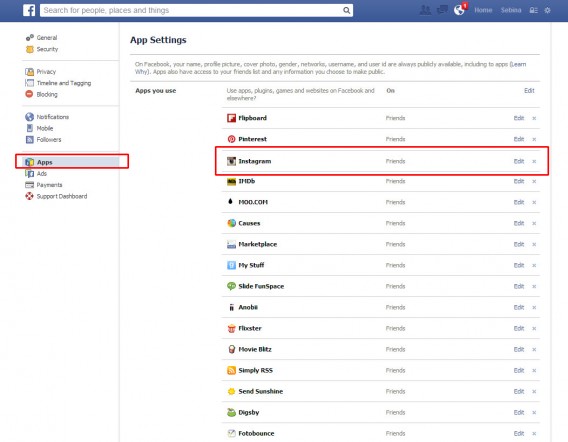
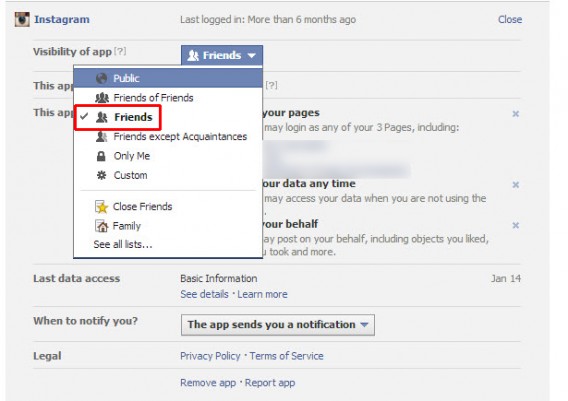
But how do you know who’ll be able to see that photo? To find out, go to the Settings menu of your Facebook account and then select the column on the right, Applications. If you’ve posted on Facebook at least once from Instagram, you’ll find Instagram on the app list.

Instagram - tweak settings from inside Facebook

Find it and click on it. It will expand the panel and from the Application Visibility drop down, you can choose who can see your Instagram posts on Facebook. The visibility options are: Public, Friends of Friends, Friends, Friends except Acquaintances, Only Me and Custom.

Instagram - change who sees your posts on Facebook

Choose the one that suits you, but our advice would be not to share beyond your friends.

Any other suggestions?

With current devices, you’ll have a good level of control over your privacy on Instagram, and you’re unlikely to have any nasty surprises. In addition, we advise you not to accept new followers too easily and, if you welcome ones you don’t know, keep them “under observation” for a while; then, if you feel that they’re not trustworthy, block them.

Also, remember that instead of sharing your photos with all of your followers, you can use the Direct option, which lets you individually choose contacts that you want to share an image with. In this case, remember that users you’re directly sharing with can see respective Likes on your post, even if they aren’t followers of each another.

Check out our complete guide to Instagram for everything you need to know about using the social network.

Instagram guide: Get that “10,000 likes” image

In this first episode of our guide to Instagram, I’m going to explain a few tricks from the professionals so that you can take beautiful pictures, and get lots of likes. Photography is an art form, and is thus free by definition. A single subject can be shot in virtually any way. There are, however, some useful tips things that will help you avoid common mistakes and let you take photos with shared aesthetics. In short, photographs that have appeal.

Here’s our advice on how to gain followers for your Instagram profile.

What’s the subject?

The most common mistake to make is not clearly show the main subject of the photo. Some photos don’t have one at all, while others have more than one. The result is an image that isn’t very interesting,  or one that’s difficult for the viewer to focus on.

So it’s important that we make it clear who the protagonist is in photos. This doesn’t mean that it has to be be a person, but it should be a single subject – it could also be a road, the converging lines of a building, a road sign, a herd of zebras, or a crowd in a plaza – it just has to be clearly identifiable. To ensure that the subject is clearly the star of a shot, there are various methods you can use. You could just take the photograph of them against a neutral background, which doesn’t contain any distracting elements.

Or you can fill the entire frame with the subject, as in a close-up shot, which means that there is no opportunity for other distracting elements to be in shot. Equally, you can work on the depth of field, to make sure that only the main character is in focus, and not the rest of the image. We will have a look later on at how to do this. So remember – one subject only. This way, you’re (almost) guaranteed a Like!

The rule of thirds

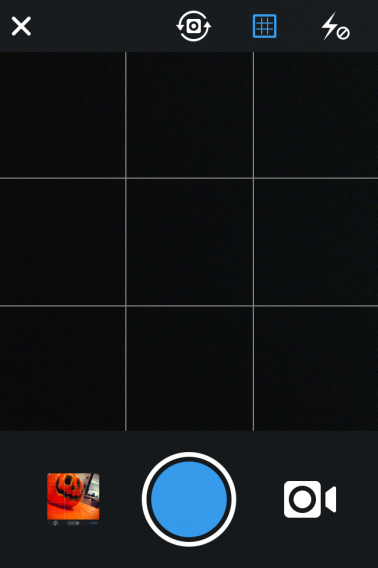
This is usually the first technique you learn on photography courses, and is fairly simple. You should ideally divide the frame into nine equal parts by drawing two horizontal and two vertical lines, like these

.Instagram grid view

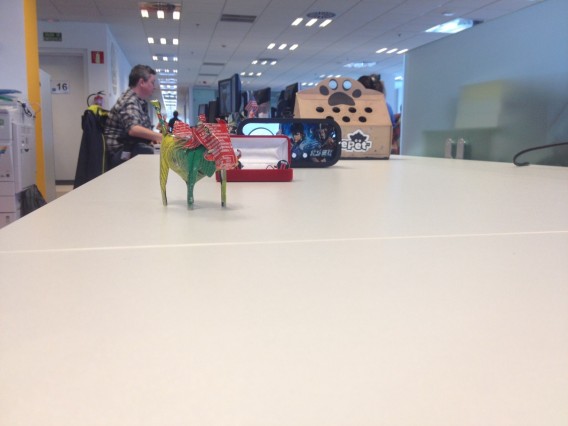
The intersection points of the lines are the places where the eye most focuses its attention. And it’s on these points that you should try to place the main subject of your photo. Here are a few examples using Pindar, my tin warthog, as a model. In this first photo, it’s located in the center of the image. It’s not wrong, but the shot is static and not very interesting.

Photo subject in center

In this second image, however, we placed Pindar a bit more to the left, on one of the intersection points we’ve just been talking about.

Photo subject off center

The composition is more interesting, and the space that has been left by virtue of the fact the viewer’s gaze has been directed to the subject, makes the picture much more dynamic. Whether your followers are aware of this or not, the rule still works.

And if you stick to the rules, your photos will improve in quality as well as getting more people to click on them. Of course, like all the rules that relate to photography, they can be broken and this will still result in excellent pictures, but for now, let’s play it safe!

Managing light

Some smartphones do not allow you to adjust the exposure manually, but you can choose the point in the frame that you want to use for calibration. When you focus on a subject, the smartphone might decide to adjust the exposure according to a point that is either too dark or too bright. If it’s too dark, the shaded areas will be properly exposed, but those in the light will be overexposed.

Light exposure

If it’s too bright, the zones in the light will be seen, but the dark areas will be almost black.

Light exposure
Because you want to see all areas in the photo, you have to use the light meter and show the camera an area that is neither too dark nor too bright. To do this, simply touch the part of the screen you have chosen, and the iPhone and Android will set the exposure.

If you’re not satisfied with the result, tap different points until you find the right one. Even so, always bear in mind the principle that we talked about previously: photography rules are made to be broken! A photo that has clearly overexposed or underexposed parts can be interesting, emotionally intense and creatively remarkable.

Photo of the sun

Sunset in Swakopmund, in Namibia

One last tip: The flash almost always produces a funeral effect on the photos. If you’re planning to take shots at night or indoors, using the flash, it’s unlikely to be particularly pretty. Alternatively, you can use it when you’re shooting during the day; for instance, it can be used to lightly correct the shadowed areas of a face when you do a portrait, as well as dampening the contrast between parts of a subject that are in both areas of light and shade.

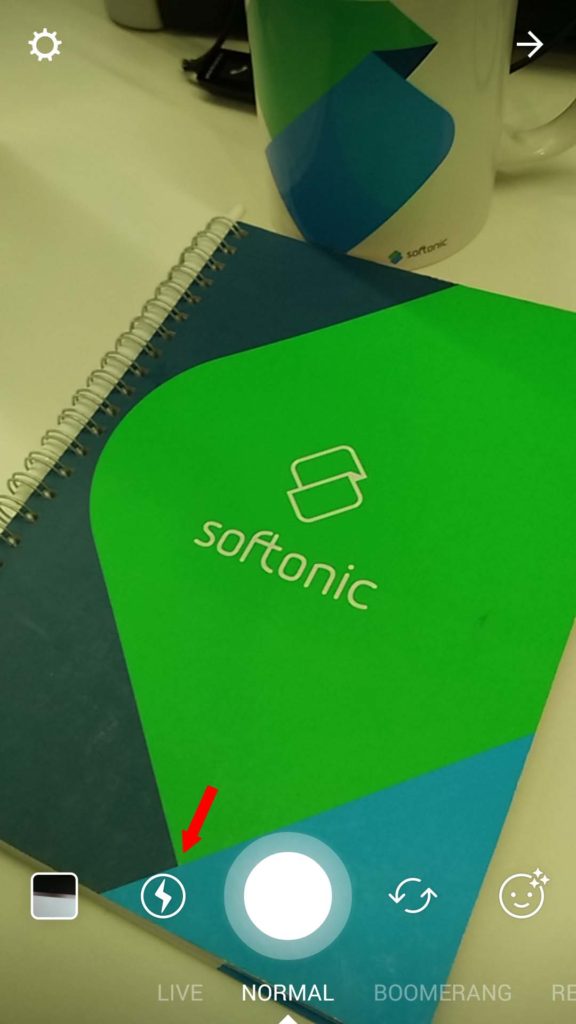
To enable and disable the flash in Instagram, tap the lightning icon next to shutter button when you’re in Normal mode.

instagram

Keep it straight, please

This is another rule that seems obvious, but isn’t. Most of the pictures where the subject isn’t facing the professional photographer, are crooked. The feeling that a picture isn’t straight, whether you’re particularly aware of it or not, is annoying, and it’s then hard to give someone a like for it.

Unstraightened photo

Crooked photo

Straightened photo

Straight photo

What to photograph and how

Point of view matters a lot in photography. The angle from which a subject is photographed often shows more of the chosen subject. Our advice is to showcase people and things from a point of view that differs from the norm.

One example is children (who always manage to look good in pictures). As adults, we are used to seeing them from above, so if you photograph them from that perspective, you’re only showing something that’s already been seen, and so it will be more difficult to get likes.

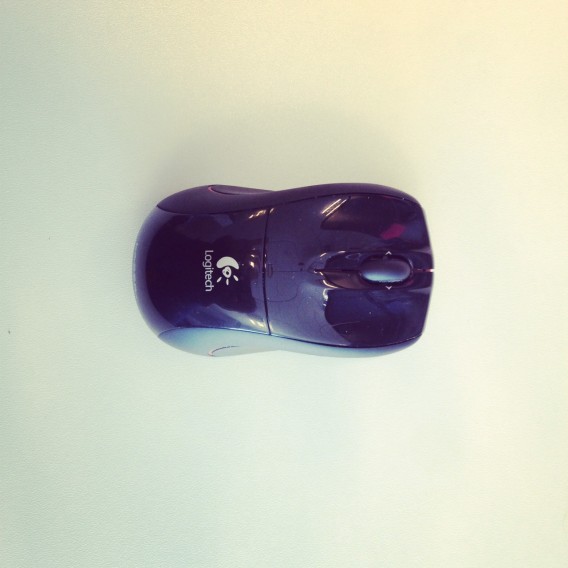
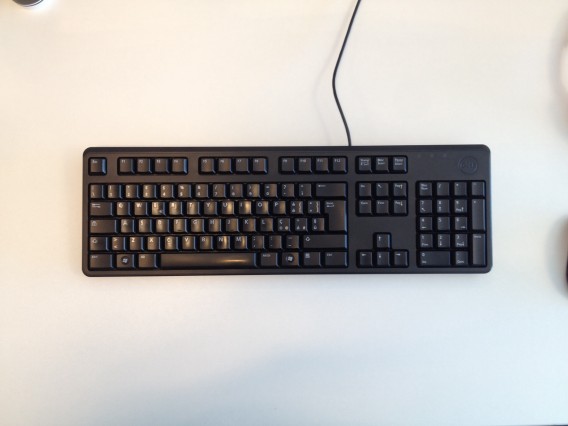
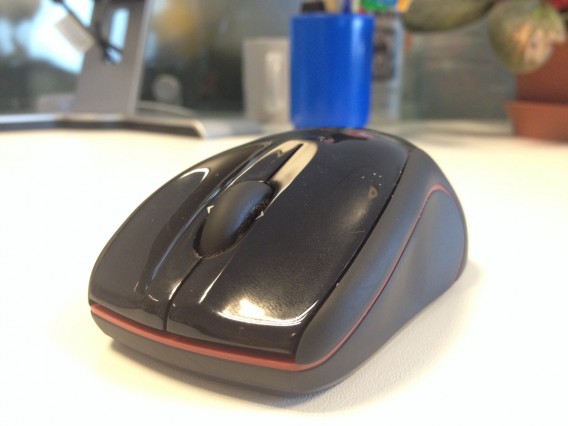
But if we photograph them from the ground, looking upwards, you get a whole different perspective, which will easily attract more attention and people will happily ‘like’ the photo. Another trivial example is the image of the keyboard and mouse, below. Seen from above, as we usually see them, the picture doesn’t say much.

Aerial photo of computer mouse

Aerial photo of computer keyboard

But when viewed from an angle that’s unusual, if not compelling, then it at least looks a little more interesting.

Angled photo of mouse

Angled photo of keyboard

Another interesting topic is the beauty of detail. Again, this is something unfamiliar to us, because we almost never pay attention to it, but that’s why it’s a great photographic subject. The details found in a mundane object can be very interesting indeed, and, with a bit of luck, will also tell a story.

Depth of field

A narrow depth of field is a valuable ally when it comes to giving more prominence to the subject that we’re photographing; in fact, if we can maintain the focus of the subject and blur the rest, then it prevents the person who is looking at the photo from getting distracted.

Background elements

Background elements are less distracting when out of focus

But what is depth of field? Put simply, “it’s the distance in front of and behind the focal subject that appears to be sharp” (Wikipedia). Professional and semi-professional cameras allow you to manually adjust nearly all of the parameters, including shutter speed and aperture, as well as framing several objects, as required.

It is these three elements that affect the depth of field. Lenses with large focal lengths (telephoto lenses, for example) tend to reduce it (but this also depends greatly on the use). Something that has a greater effect on the depth of field, is the aperture opening: the greater it is, the smaller the depth of field. But these parameters, in most smartphones at least, are set automatically.

So, what leeway do we have? If you also take into consideration the fact that the lens on a smartphone is a wide angle, and therefore has a very small focal length (and consequently a large depth of field), how can we try to decrease the area in focus when photographing objects or taking portraits?

Basically, there are two ways: the distance from the subject, along with blurring in post-production, which is something that you can do in Instagram. The closer we are to the person or thing that we are photographing, the smaller the depth of field, and the more of the subject will be in focus along with what is behind or in front of it, while if you increase the distance from the subject, things become progressively more blurred. In this way, you can get physically closer to the subject in order to blur the background and give the subject greater prominence.

Large depth of field

This large depth of field fails to highlight the subject

Small depth of field

Here, however, the depth of field is smaller, because we have gone in close to the subject

In a great light…

In this article, as we’ve said a couple of times, it wasn’t our intention to make photography into something governed by a series of rules and regulations. Our recommendations are only based on the experience of many photographers, who through experimenting have found that there are certain things that work better than others.

Now, it’s over to you to try things out and see if our recommendations have increased the number of likes you get for your photos!

In the next installment of this guide, we’ll explain how to manage the privacy settings on your Instagram account.

Instagram series

This Softonic guide is for people who want to be Instagram stars, using the app to make the most beautiful photos and videos you can, increasing your followers and making them happy in the process!

Instagram represents a tiny revolution in the world of the smartphone, transforming non-professional photography into a self-contained world bursting with possibilities. How? By mixing a social network with an evocative world of Polaroid-like vintage filters. That’s why we decided that to get the most from Instagram, we needed to give you tips and tricks that bridge the two worlds that make up Instagram: photography and social networks.

What will you learn?

Lots! From basic photo techniques and video editing to tricks to increase your followers and use Instagram Direct. And that won’t be all. If you’ve got an Android or iPhone, and an Instagram account, you’re going to see just how easy it is to go from taking your first steps as an Instagrammer to becoming a bona fide professional of the social network.

Who should read it?

Anyone who has Instagram installed and uses it from time to time, but who also wants to learn how to get more from it, both in terms of maximizing the quality of the photos you take, to building a solid identity in the world’s largest photographic community.

The series

The episodes planned for this series are below, and will be updated as they are published:

So grab your smartphone, and lets start taking some beautiful photos!

Clean up your YouTube interface with Adblock Plus

Following the fury that erupted when YouTube imposed its new comment system on users, Adblock Plus is poised to counterattack: the plugin now allows you to clean up Google’s YouTube interface.

Everyone’s heard the phrase ‘Google ecosystem’, and while the integration may not be ideal for some users, it does sum up well the whole range of products and services that Big G has aggregated and combined over the years.

Some of latest buzz was surrounding the YouTube comment system and the ability to comment on videos only when signed in with a Google+ profile, a flawless example of product integration. Google claims that the reason behind this move is to combat the trolling, offensive, violent and generally inappropriate comments that sometimes occur in an anonymous commenting system.

Many users have taken this news as an act of force on Google’s part. As a result, the developers behind Adblock Plus, a plugin for Chrome, Firefox and most recently Safari, have sprung into action, updating its add-on so that numerous ‘disturbing’ elements, including the now controversial comments field, can be removed from the YouTube interface.

Watch the video below to see how to install Adblock Plus, and check out results.

Default player


brightcove.createExperiences();

RELATED ARTICLES:

Turn your old Android phone into a new tool

Do you have an Android smartphone that you no longer use but don’t want to throw away? Believe it or not, there are plenty of useful things you can turn your Android phone into, without spending a dime.

If you’ve switched phones or upgraded to a new model, you might have a spare Android phone lying around collecting dust. It may not have a high resale value, but with the right apps, there are still plenty of uses for your Android smartphone.

Here are 5 things you can do with your old Android phone.

Turn your Android into a trackpad

Remote Trackpad

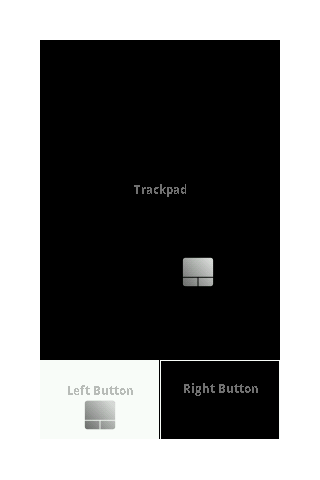
Remote Trackpad – Why buy a wireless trackpad when you’ve already got an Android phone? Remote Trackpad is a completely customizable app that lets you access your PC from a distance.

You can choose whether you want to click by tapping anywhere on the screen, or by using virtual buttons. There are multiple ways to right-click as well, including tapping the screen with two fingers. The level of energy consumption is quite high, but for a phone you’re not using regularly, it shouldn’t be a big issue.

To use the app, you have to install the Remote Trackpad Server on your PC. If necessary, unblock the firewall if its preventing a connection to your computer, and connect your computer and Android phone to the same Wi-Fi network.

remote trackpad scrn

Turn your Android into a joypad

Ultimate Gamepad

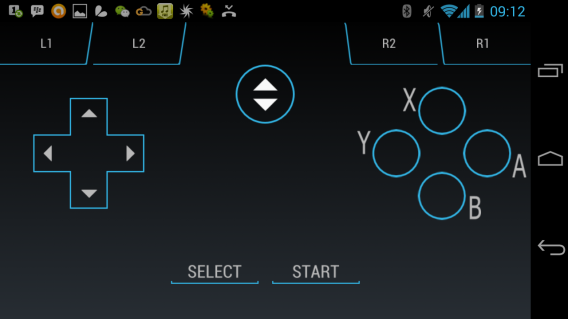
Ultimate Gamepad – If you’re into video games but don’t like to play using a keyboard and mouse, don’t bother buying an expensive joypad. Instead, install Ultimate Gamepad on your Android.

The app emulates a console joypad, with the arrows for movement, as well as the 4 main and 4 secondary buttons (L1, L2, R1 and R2 for PS3, or RT, RB, LT and LB for Xbox). You can use it with Windows, Mac and Linux computers.

To use Ultimate Gamepad, you have to install Ultimate Control Receiver on your computer, and then connect via Wi-Fi/LAN and Bluetooth.

Ultimate Gamepad

Turn your Android into a remote control

Remote Control Collection Remote Control Collection – Multimedia computer-based technologies are increasingly common, and having the ability to control them with a remote can really come in handy.

Remote Control Collection is an app that turns your Android into a remote control jack-of-all-trades. Do you want a multi-touch touchpad mouse, or a handy keyboard at your fingertips to type on your PC? How about a remote that controls the videos you’re watching or the songs that you’re listening to?

Remote Control Collection has all of these functions, and more. The interface isn’t only intuitive, but also nice to look at. Once you’ve installed the server on your PC, follow the step by step wizard to configure the app on your smartphone, and voilà, you’re ready to remotely control it.

To use Remote Control Collection, you must have the Remote Control Server and .NET Framework v 4.0.30319 installed on your PC.

Remote Control Collection

Turn your Android into a wireless webcam

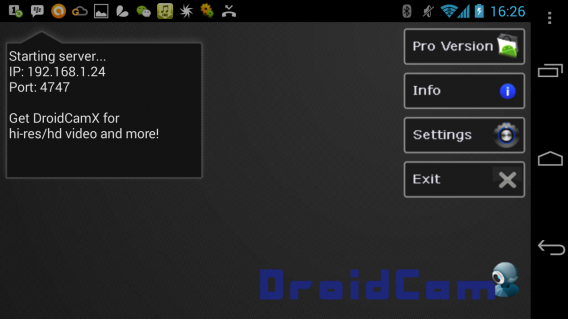
DroidCamDroidCam Wireless Webcam – With DroidCam Wireless Webcam, you can use your smartphone as a camera, but with the added convenience of being completely mobile.

To use the app, you must install the DroidCam Client on your PC. Since some of the features are still in trial mode, like audio drivers when using a 64-bit PC, the developer’s page has a list of solutions to some of the most common problems you may run into when using the app.

DroidCam

Turn your Android into a microphone for your PC

Wo MicWO Mic – A wireless microphone can be a huge convenience. It lets you talk without being tied down by a short cord, something which can make quite the difference.

WO Mic requires you to download a PC client to use it. It also supports Bluetooth connections, Wi-Fi and USB.

WO Mic

Before you decide to throw away or sell your old Android phone,  just remember that it’s called a ‘smartphone’ for a reason: as demonstrated above, there are a ton of other functions that you can use your smartphone for, maybe even saving yourself some money in the process.

Check out our Android: Everything you need to know guide for anything and everything Android.

5 alternatives to iPhoto

People who like iPhoto are few and far between: it’s heavy going, slow to use, and has a habit of ‘appropriating’ any photos that you use it with. It’s good to know, so, that there are some good alternatives out there!

The OS X operating system offers a rich default software package. In fact, it meets virtually every basic need the average computer user has, all without needing to install additional programs.

But, nestling amid an array of good programs such as Safari, Mail and GarageBand, you’ll also find Apple’s Achilles Heel – iPhoto.

That said, it’s not a complete disaster, it’s simply not up to the standard of its fellow apps. And it never really has been.

So, even if you do love iPhoto, here are 5 alternatives that might just be worth a look.

Aperture, a complete and professional package

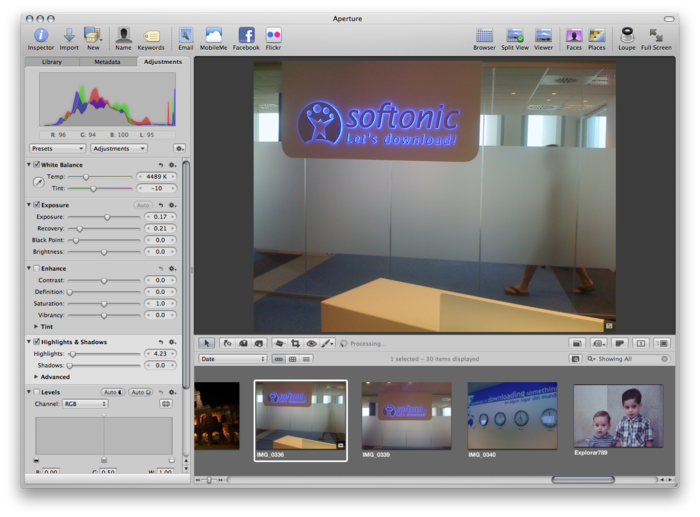
apertureAperture is iPhoto’s big sister. It’s not a simple program to use, but it is targeted at a professional audience. It has a lot to offer, both from the point of view of managing your library, as well as touching up images.

The non-destructive editing allows high level, accurate operations. If you come from an iPhoto background then importing the old library is easy. The two programs are able to communicate with each other perfectly – this means they’re both able to use a shared library.

Aperture

Aperture lets you create presentations, organize your photos using faces and places (like iPhoto) and it’s optimized for retina displays. It’s the right choice for those who are serious about working with their photos, but for everyone else, it’s might be overkill.

Lyn, a paragon of virtue

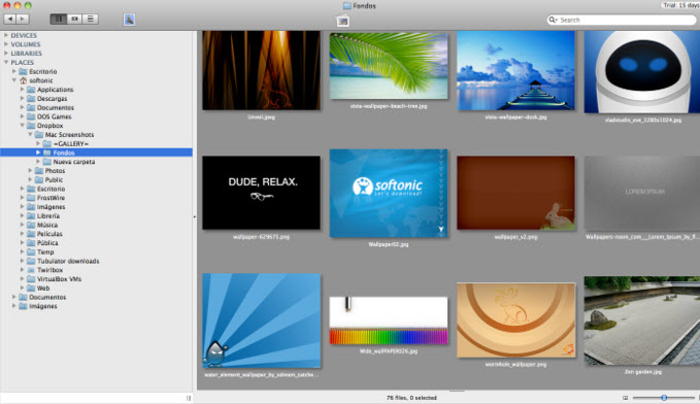
LynLyn is one of the various programs available for managing digital photos that’s better suited to the Mac platform.

It has everything you need: a user-configurable explorer, geotagging, metadata management (essential for professionals), a non-destructive editor, batch processing and excellent sharing options.

Not only that, but it’s also compatible with iPhoto, Aperture, and Lightroom libraries, so the transition from using one of these programs to using Lyn is trouble-free. The interface isn’t as esthetically appealing as that of Aperture, for example, but it’s clean and easily navigable.

Lyn

The program is lightweight but supports all popular formats, including JPEG, TIFF, JPEG 2000, PNG, TGA, RAW, HDR, OpenEXR, PPM and animated GIFs. The complete list of compatible formats can be found on the publisher’s website.

It’s perfect for anyone who wants to have their user photo library ordered like a professional (although it doesn’t of course provide such a rich collection of tools as Aperture does).

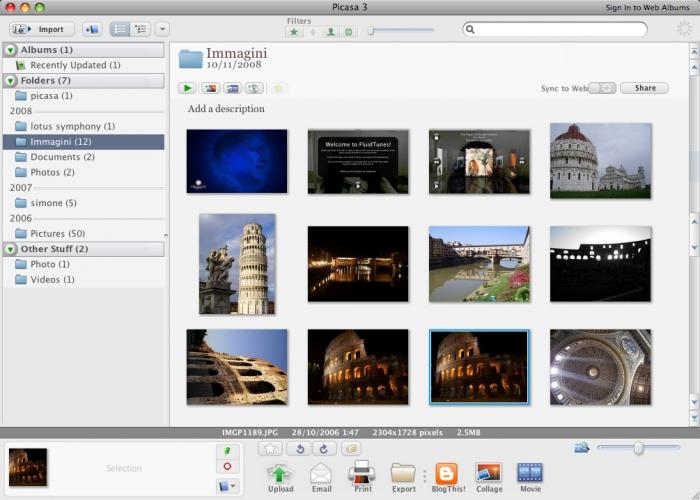
Picasa, a great free solution

picasaWhen it comes to managing images on your computer, then Picasa is unbeatable. Importing the images is a fully automated process: all you have to do is choose whether the application should search for photos in certain specific folders or on the whole of your Mac, and then sit back and wait.

The system puts the photos in chronological order, but once the scan has finished, you can create folders, use tags, categorize by collection and share your Picasa Web Albums. You can also create collaborative albums.

picasa

Picasa also offers some basic tools for touching up images as well as some other effects – the quality is ok, but nothing special. The interface is a bit confusing, but remains functional. It’s the right choice for those that don’t want to waste any time and who don’t need anything too elaborate. It supports the RAW format offered by many cameras.

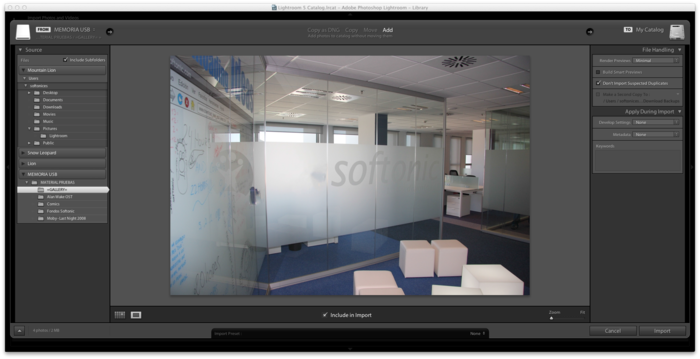
Lightroom – Photoshop’s deputy

adobe-photoshop-lightroomAdobe has managed to infuse the power of Photoshop into Lightroom, merging the simplicity and sense of logic that you’d expect from a high-level photo management application.

The editing tools are very advanced. Worthy of particular mention are Upright, which straightens skewed images with a single click, and the Advanced Touch-up Brush, which works in a similar way to the Clone stamp tool in Photoshop, correcting imperfections and mistakes, but in a far more automated way.

Adobe Photoshop Lightroom

Another very nice feature is the ability to turn color photos into black and white photos. The photo undergoes a process that’s more than simple desaturation, which would leave the shot flat and without character; instead, Lightroom lets you to add data via eight color channels. The result is an intense black and white photo that exudes vibrancy.

The application runs well, even when dealing with very large photo libraries, it supports geotagging and lets you create beautiful albums from templates. It’s a professional tool, but less complicated than Aperture. A little gem.

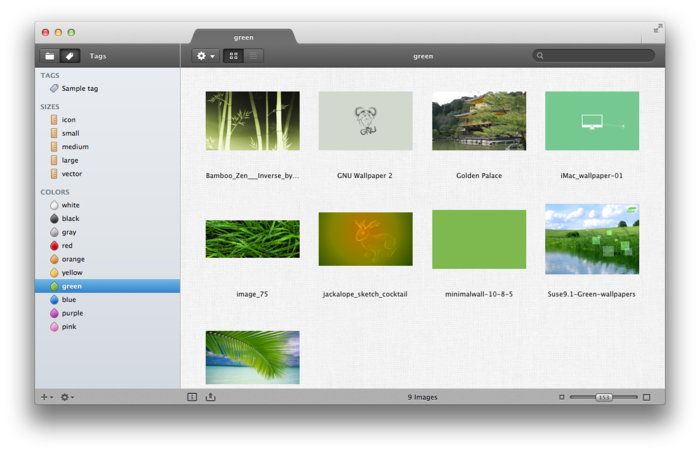
Pixa the bold

PixaThe Pixa interface is in true Mac style, and is well organized thanks to a predominantly automated workflow that allows you to add images to your library or share them in a few simple clicks.

The Auto-tagging feature saves the tedious job of tagging photos in order to find them easily, because it automatically adds attributes to the images. The Live folder, however, is a smart folder that lets you group your photos how you want to, but without moving them from their original locations on your Mac.

Pixa

Exporting using the conversion presets makes it very easy to share images. Pixa is a program that’s perhaps less rich than the previous ones we’ve discussed, but it has more original features. It’s one for the more daring among you!

What do you think of iPhoto? Can you suggest any other alternatives?

Mailbox: not your average iOS mail client

Mailbox is the only iPhone app that I remember having to join a waiting list for just so I could download it. Even those who just wanted a preview had to join the queue… and wait. Sooner or later, though, it did happen.

Now, finally, Mailbox is available to everyone. Why would you choose it over the official Gmail app?

Actually, there are a few reasons. The one that intrigued us was the underlying Mailbox promise that it would not only change the way you manage your mail on your mobile, but also the way you manage you life. In order to accomplish that, they’ve proposed a new way of reading and storing emails.

So let’s see what’s new this email client can add to our iPhone experience, as well as our lives.

Installation and set-up

After entering your email address and password for your Gmail account, Mailbox provides you with a short tutorial that goes through how the app works: archiving emails (Archive), snooze function (Later), and moving the message to a list (Lists).
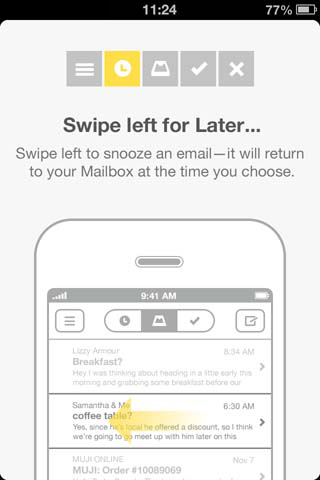
Mailbox

The section entitled Mailbox Tools will go through each.

In the next step you can choose what to do with your Inbox. If you want it to appear exactly as your Gmail inbox does now, then you need to choose “no” when you’re asked if you “need help getting to zero?”

If you choose this, then you’ll see all your unread messages in the Mailbox inbox – basically, everything will appear normal.
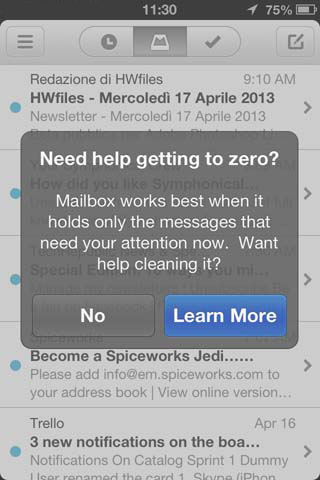
Need help to getting to zero

However, this isn’t the best way to make the most of Mailbox. The idea behind the app is to focus on streamlining productivity, and in fact, Mailbox does make it easy to harmonize the flow of mail that arrives on a daily basis… as long as you stick to the rules.

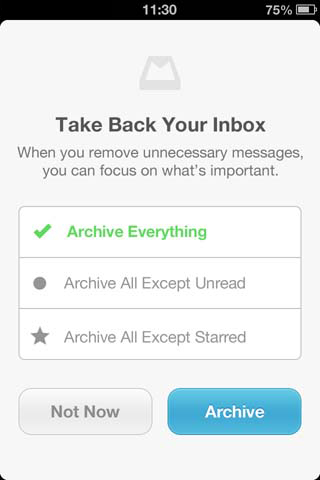
So, when the popup appears with the question need help getting to zero?, click on ‘Learn More’. Mailbox will then give you three options for archiving mail in your inbox.
Mailbox

1) The first option is Archive Everything. The Inbox is completely emptied, letting you separate off your pre-Mailbox emails so you can make a fresh start, after which everything will (hopefully) be easier. Of course, the messages don’t actually disappear. If you’re using the app, you’ll find them in the Archive mailbox, while in webmail you can access them from the panel All messages.

2) The second option is Archive All Except Unread, which moves all read messages into the Archive, but leaves the others in the Inbox. This seems to be the best option for those who are starting to use Mailbox, because it will soon begin to manage all unread mail using the new system introduced by the app.

3) With Archive All Except Starred, the only emails left in the Inbox are those marked with a star – in other words, any special emails.

Once you make your selection, you can finally begin to use Mailbox.

The interface

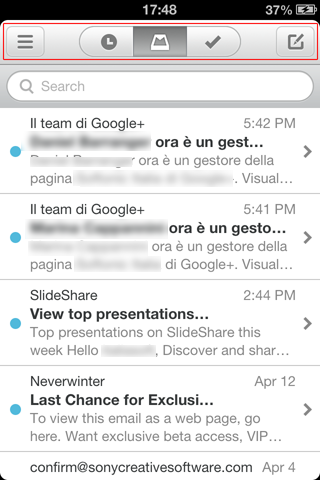
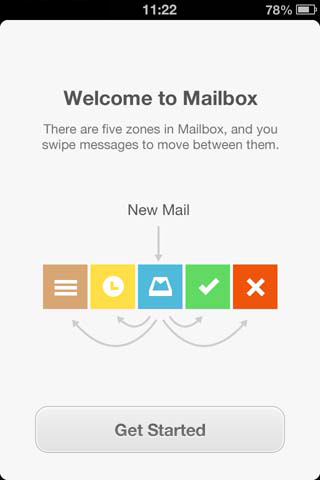
The graphics used for organizing mail are very logical. In the upper part of the interface you have 5 buttons, three of which are grouped together.
Mailbox

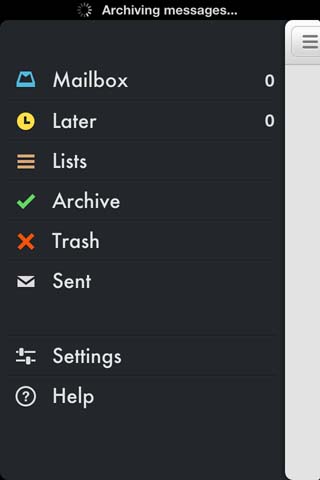
With the first button (which depicts three stacked horizontal lines) you can access all of the folders: Mailbox, Later, Lists (with the lists you’ve created, if you’ve already put messages here), Archive, Trash, Sent. All your emails are accessible from here.
Mailbox

Also accessible here from here is the Settings menu and Help. The latter is particularly important, because new users will inevitably wonder about many things, particularly the way in which Mailbox and Gmail webmail work together. You’ll find lots of answers here (often accompanied by explanatory diagrams and videos), a collection of hints and tips, as well as other useful services.

From the Settings menu, you can add new email accounts, edit those you’ve already added, choose the default account, attach a signature automatically to all sent emails, amend settings for Lists and Snoozes, set your syncing preferences, notifications, and the application badge.

With the next three buttons you can respectively access the Later box, the Mailbox and the Archive.

The last button creates a new email message.

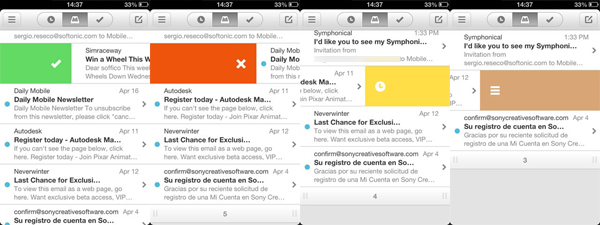
The app takes full advantage of the fact the iPhone has a touch screen and you can actually move mail into the different folders by using different gestures.
Mailbox

  • Short swipe to the right (a green bar appears): move to Archive,
  • Long swipe to the right (a red bar appears): moves to Trash
  • Short swipe to the left (a yellow bar appears): you’ll see the Later menu, which allows you to choose when to redisplay a notification for that message,
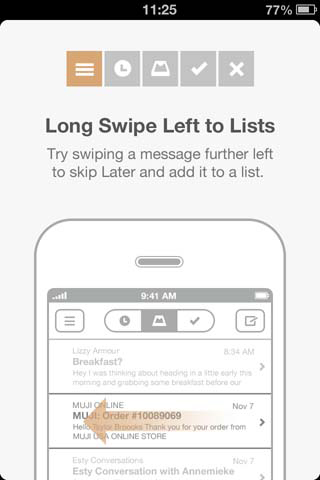
  • Long swipe to the left (a brown bar appears): opens the menu list, and you can then choose which list to move the message into.

It’s clear the effort that has been put into making the interface as logical as possible, and by and large they’ve succeeded. It’s just a shame that using it in landscape view is not an option, as I personally always use that when writing emails on the iPhone as I find it much more convenient than portrait view. But patience is a virtue, as they say!

Now let’s have a look in more detail at all the features the app offers.

Mailbox Tools

Later

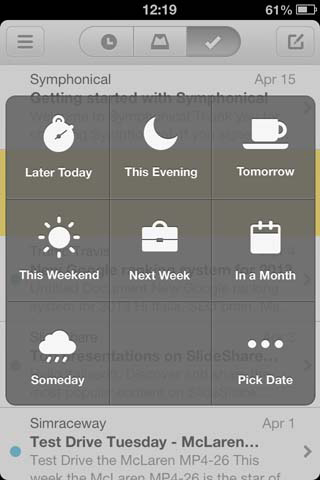
This feature is done very well, and it’s the heart of Mailbox. You can choose to temporarily store each message, and then get it to pop up again at another time.
Mailbox

You can postpone the notification for the email so that it appears at a later time that day (Later Today), in the evening (This Evening), the next day (Tomorrow), the following weekend (This Weekend), the following week (Next Week), in 30 days (in a month), or on an unspecified day (Someday, a kind of black hole into which you can send emails that you want to ignore, but don’t quite have the courage to brutally trash!). Finally, you can choose a specific date on which you’ll receive the notification again, by selecting the Pick Date option.

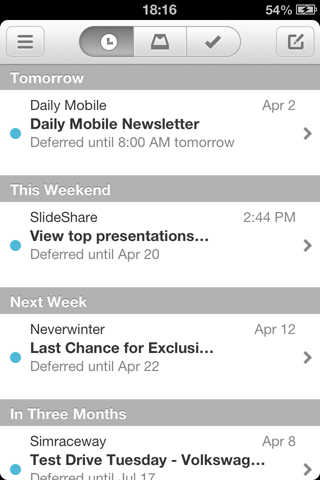
From the tab showing the clock icon at the top of the interface, you can control all postponed messages, ordered chronologically from the next message you’ll receive a notification for, to the one that’s been postponed for the longest.
Mailbox

Those who are inclined to procrastinate might start to abuse this tool a little, but if you can put it to good use, it will become an invaluable companion.

Lists

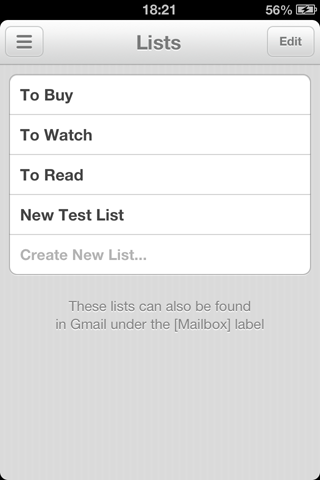
Lists are a type of category under which you can store messages, and they’re a tool that if used properly, will guarantee a tidy Inbox. By default, Mailbox offers three lists: To Buy, To Watch, and To Read. You can configure them as if they were folders.

To move an email to a list, just swipe left on the message preview with your finger, until the band becomes light brown. At this point you can do two things: choose to add the message to a list that you’ve already created, or create a new list.
Mailbox

You can create as many as you want. They will also be automatically found in Gmail webmail, under the Mailbox menu. If you delete it from there, they will be automatically recreated from the iPhone, as soon as you move any new messages there.

Badges

A special mention has to be made for the app badge, which doesn’t show the unread e-mail messages, but those that haven’t yet been stored anywhere (i.e. in the Lists folder or those messages that you’ll get a notification for later), and so they therefore remain in the main folder.

Ideally, in fact, you should only keep in the Inbox those emails that require your immediate attention. When the relevant task is complete, you can get rid of (sorry, archive) the message, or move it to a list.

In this way, even when the app isn’t open, you’ll always be able to see at a quick glance how many things you’ve got left to do.

Fabulous… but…

The Mailbox app has a lot going for it, but there are a few flaws

1. It’s not suitable for everyone

Power users of Gmail, for example, would find it difficult to make it work well. The email client, by its very nature, disrupts Gmail by creating folders and moving messages. This can be awkward for any advanced user, given that they have usually structured their own folders very carefully, setting them up to suit their specific needs.

Those who have always only used the basic functions of Gmail (and that’s the majority of users), will probably really appreciate this new app. In short, the reorganization carried out by Mailbox can be a positive experience for some people, and negative for others.

2. Stopping isn’t so simple

If at some point you no longer want to use Mailbox, you have to de-authorize it by following a specific procedure described on the help pages of the site. No other email client requires you to do anything like this, and even though the procedure makes sense given the nature of the app, it’s still a hassle.

Mailbox

3. A client… a limited client!

At least for the moment, Mailbox only works with Gmail, iCloud, and Yahoo! Mail. The good news is that you can manage multiple accounts, but then again the official Gmail app also offers this option (up to 5 accounts), so it’s not exactly a groundbreaking innovation.

4. The search function, or is it?

The Search function isn’t particularly convincing. In fact, it sometimes brings up irrelevant results from the search terms. From this point of view, the Gmail app works much better: searches are faster and there are also suggestions as you type in the terms.

5. Goodbye labels

If you set up a system of labels to sort your mail, it’s best you know that Mailbox won’t pay any attention to them – in fact, the client doesn’t support them. The rationale behind the app, however, offers a management system that’s an alternative to labels, so it’s not something that you’ll really miss. However, it’s not a great incentive to try the app if you’re someone who does use labels.

6. Gestures: love ’em or hate ’em?

The gesture that you use to manage your messages may confuse some users.
Mailbox

Apps for smartphones with touch screens are increasingly exploiting the potential of this new technology, but not all users are able to keep pace.

There is a sort of a second generation of apps (actually, more like a third generation as the second generation culminated in OS X Lion multi gestures), which go that little bit further than the pure instinct used at the advent of touch screen technology. This means you’ve got to put in a little more effort to learn them.

Mailbox is part of this generation. If you’re in, you’ll be able to take advantage of it, but if you don’t want to fit the mold, you’ll find yourself in difficulty.

But which is better? Mailbox or the official Gmail app?

Sooner or later, this question has to be addressed.

The Gmail official app is basically the image of webmail, but simplified and adapted to your smartphone screen. It also offers some interesting tools, such as automatic replies, or the option to send an individual attachment to each message, using simple but nice tools.

Looking at everything else, however, Gmail is a pretty anonymous app that adds nothing to the email service provided by Google. This can be an advantage for some, but a drawback for others.

Which app you prefer will come down to a matter of personal preference. Just don’t forget that Mailbox might well support mailboxes other than Gmail in the future.

What do you think?

If used properly, Mailbox is an excellent tool to alleviate the annoying feeling of being overwhelmed with things to do. “Used properly” means being scrupulous in taking advantage of the tools that the app offers.
Welcome to Mailbox

I think this is probably the crux of this client. And I must confess, that despite the defects, I liked Mailbox and I’ll start to use it because it’s an app with character. It doesn’t try to copy or do everything – it offers its own vision of things. If it works – great. If it doesn’t, we’ll just stay friends.

Download Mailbox

Making the switch from PC to Mac? Learn the basics of OS X in 30 minutes

So, you’ve made the leap to using a Mac after years of proudly using a PC? Or maybe you’re about to make the switch? Here are some things you’ll need to know about OS X to help you get started with your new computer.

If you’re used to Windows, its likely that you’ll need a small handbook to explain some of the basics of OS X so that you can enjoy the Apple experience without too many speed bumps along the way. For example, where can you find the tools you use every day? How do you uninstall a program, or create a screenshot?

Below is the first part in a practical guide that’ll help you learn everything you need to know to start enjoying your new Mac simply and easily.

What is the Finder?

Finder iconThis is usually the first question by new Mac users. And it’s a perfectly valid question.

The answer is simple: the Finder is the file manager for OS X. In the Windows world, its counterpart is Windows Explorer.

In other words, it’s a program that’s always running and it provides a graphical interface that lets you manage the files and disks on your computer, letting you visually access all the data there is including music, documents, and videos.

Here’s what a Finder window looks like in OS X 10.9 Mavericks.

OS X 10.9 Mavericks Finder

In a nutshell, use Finder to search for files, move them, order them, group them into folders, change their icons, catalog them using labels, or delete them. There are also many other uses for Finder. If you want to know more, here’s Apple’s official page that explains everything about Finder.

Where’s the Start menu?

Quite simply, there isn’t one. So, how do you search for or open a file or program, access a disk or change system preferences?

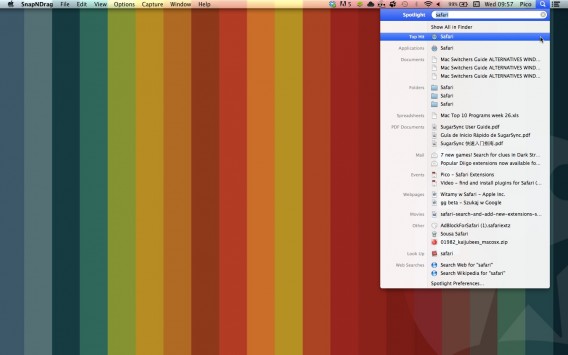
Searching with Spotlight is the quickest way to finding anything on your Mac. Click on the magnifying glass in the upper right hand corner on the top bar, which will open up the Spotlight search field. Type in what you’re looking for – the results are divided into the different types of files.

OS X 10.9 Mavericks Spotlight

To open an application you’ve been looking for, or that you’ve just installed, simply go to the Applications folder, look for it and double click on it. Almost all programs should be in here.

If you are using a Mac laptop, or you have a trackpad, it’s even easier: pinch the trackpad with your thumb, index, middle, and ring fingers, and you will see the Launchpad that has all of your programs in it. Just click on the one you want to open.

OS X 10.9 Mavericks Launchpad

If there are any files or folders that you use on a regular basis, you can put them in the dock to make things easier, which is the lower bar for quick access. If you don’t see it, hover in the lower part of the screen and it will appear.

OS X 10.9 Mavericks DockTo add shortcuts to files, folders or programs, just drag and drop it above. This is an alias, so if you decide to later delete it, it will only delete the link, not the file or program it’s pointing to.

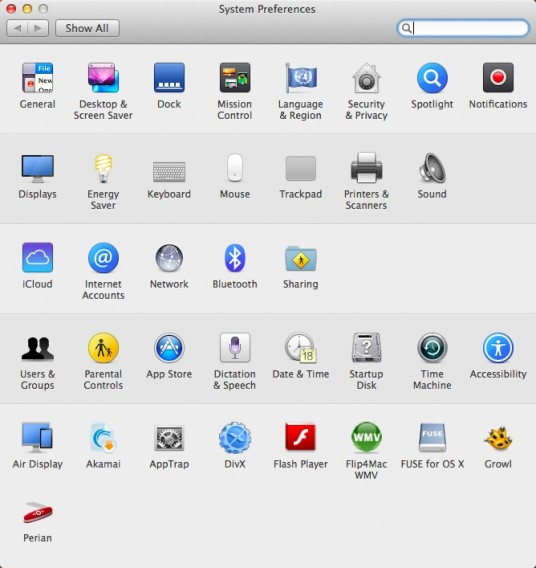
If you want to change the system preferences, go to the Apple menu and select System Preferences.

OS X 10.9 Mavericks System PreferencesYou’ll have access to the entire panel.
OS X 10.9 Mavericks System Preferences

How do I access the hard drive?

In OS X, internal and external drives, along with CDs and DVDs that you load onto the Mac, are easily visible on the desktop. If you don’t see the hard drive on your desktop, it’s likely that your Finder preferences are set so that the drives are hidden.

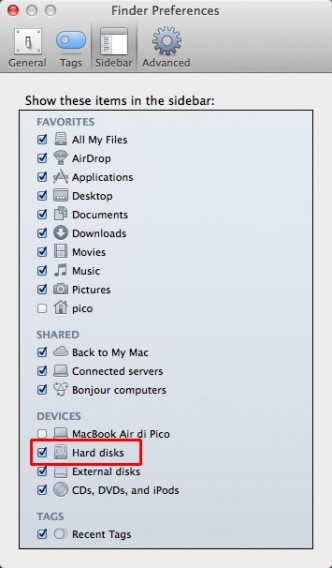
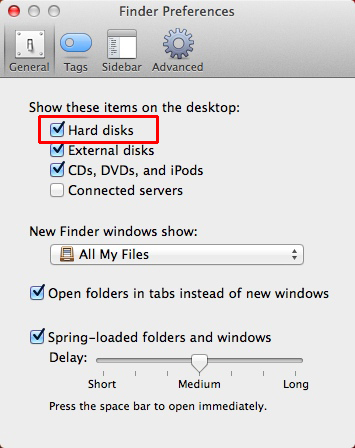
To make them visible, bring the Finder window to the foreground. For example, access the Finder window by choosing between open programs, hold down the Command (Cmd) key and press the Tab key (the one above the caps lock) until the Finder window is selected. After that, go to the Finder menu, select Preferences, and in the General tab, go to the menu item Show these items on the desktop, then make sure Hard disks is selected.

OS X 10.9 Mavericks Finder Preferences

If you then want to have access to the drives even more easily, select the Sidebar tab and then Hard disks. You’ll be able to have all the disks available at all times in the sidebar of any folder you open.

OS X 10.9 Mavericks Finder Preferences

At this point, you’ve learned the basics of mastering OS X.

In the next part of this series, we’ll cover even more topics to help you master your Mac:

  • How to force quit an application
  • The “mystery” of using right click on the mouse
  • How to change the desktop background
  • Accessories: which programs can you use to view and edit photos, create and edit text files, unzip files, record audio and video, and other common tasks?
  • How to take a screenshot
  • How to boot a CD/DVD or an external HD
  • How to format and partition a disk
  • How to install and uninstall programs
  • How to manage e-mails
  • How to burn disks

Is there anything else you’d like to know about using a Mac?