The Old Man makes an exciting appearance on Disney+

We’ve been waiting a few months for Jeff Bridges to appear in The Old Man on Disney+. With the original trailer released in July earlier this year, the exciting series is now available on the small screen. The first episode was available on September 28, 2022, and there are seven episodes in the first season.

Of course, you can only enjoy the action if you have a Disney+ account. Watch Jeff as Dan Chase, fighting to save his family from those who seek to kill him. Stay with us until the end of the article to learn about the latest discount available.

Disney+ Offer SUBSCRIBE TODAY

The Old Man defends those he loves on Disney+

After the initial announcement of The Old Man in July, we’ve been waiting in anticipation for the series to arrive on Disney+. It’s been 50 years since Jeff Bridges was last on Television, but he doesn’t feel it’s a downgrade. In an interview he did with RadioTimes a few weeks ago, the star says that TV is becoming as good as movies lately.

Jeff doesn’t disappoint in The Old Man, which finally appeared on Disney+ towards the end of last month. For now, there are three episodes available, and I suspect there will be a weekly release like the platform usually does. Let’s see what you can expect from this series.

The plot of The Old Man

Dan Chase was once a CIA operative who retired about thirty years ago. He’s living off the grid to protect himself and his family when suddenly someone breaks into his home. Killing the intruder, Chase wonders who’s after him as he rents an apartment on the run.

the old man disney plus

A complicated past

There’s a slight complication, though. The FBI wants Harold Harper to bring him in. He’s the Assistant Director of Counterintelligence for the FBI, but that’s not why they asked him to take on this assignment. It seems they have a past together, one that stretches back to the Soviet–Afghan War.

As the old man Chase continues to run for his life, Harper continues to call on him to turn in and speak to the FBI. In the meantime, Harper has a hitman hunting Chase, which causes chaos on the screen as the one outwits the other.

the old man disney plus

Hunting the hunter

The government isn’t playing clean. The more Chase escapes and kills operatives and agents, the more the FBI is eager to hunt him down. They even threaten to come after his daughter, as you can see in the trailer. If there’s one thing we’ve learned from Liam Neeson, it’s that you don’t even come after the family.

Chase issues a counter-threat. For every agent they send after him, they’ll receive a body bag. Everyone that goes after his daughter will be sent back in pieces. While the Old Man wants to just live in peace, he’s going to show the FBI what he’s made of on Disney+.

the old man disney plus

Prepare for exhilarating action on Disney+

As you can tell, there’s excitement and action in The Old Man series on Disney+. You can already enjoy the first three episodes, with four more to come over the next few weeks. I’m sure you’ll love the intrigue and stealthy killing every step of the way.

Remember, you can only enjoy The Old Man if you have a Disney+ membership. At the moment, you can subscribe for 12 months at the cost of 10 months, paid annually. Don’t miss out on this Disney+ offer!

Hocus Pocus 2 weaves new magic on Disney+

It’s almost the Halloween season, and many people are already preparing makeup and outfits for the week of trick or treating. Disney+ is making this year’s celebrations special with Hocus Pocus 2, a new movie featuring the original Sanderson sisters from 29 years ago. It’s bound to be a comedic yet creepy story that will have us cackling and cringing all the way.

Disney+ members will be able to watch the magical mayhem as part of their membership on September 30, 2022. It’s going to be fun to see what the newly summoned witches of old will catch up to. Keep reading to see how you can receive a discounted membership today!

Disney+ Offer SUBSCRIBE TODAY

A tale of old returns to Disney+

How many of you were around when the original Hocus Pocus movie aired in 1993? It’s hard for me to forget, as I had such a teenage crush on Sarah Jessica Parker. While that’s probably giving away my age, it was fun watching a horror comedy film where you didn’t know if you should be scared or laugh.

The tale told the story of the Sanderson sisters in Salem, Massachusetts, who were three witches. They had taken a girl by the name of Emily, and her brother Thackery sets off to save her. While he failed and the witches restored their youth, the townsfolk noticed the disappearance.

The main point you need to know for Hocus Pocus 2 is that one of the witches made a curse. Should a young virgin light the mystical Black Flame Candle on All Hallows’ Eve under a full moon, they’ll return to cause chaos and mayhem. They were resurrected in the first movie, but it looks like the Sanderson sisters are far from done.

hocus pocus 2 disney plus

Resurrected witches in Hocus Pocus 2

It seems as though the community forgot the lessons from the past. Someone has discovered the magical book and Black Flame Candle, initiation the resurrection spell. The 17th-century Sanderson sisters are back on Disney+, ready to avenge their previous deaths.

The plot follows two girls who are turning 16, which is the age believed by many to receive powers. With newly acquired items, namely the Black Flame Candle and a magical book, they cast a spell. Unfortunately, they get more than they bargained for. The witches have returned!

There’s a slight snag, though. The sisters return to a world that looks very different. There’s new technology around that they don’t understand, never mind all the faces they don’t recognize. It seems this world is set to embrace them instead of fear them… for now.

hocus pocus 2 disney plus

Host of familiar faces on Disney+

Returning to Hocus Pocus 2 on Disney+ are the original actors as the Sanderson sisters, namely, Bette Midler, Sarah Jessica Parker, and Kathy Najimy. They reprise their roles with the same wit and personalities, which is destined to give us a good laugh. 

Other faces you’ll see in the comedy horror sequel are also familiar. Sam Richardson you may recall from “The Tomorrow War”,  while there’s also Doug Jones from “The Shape of Water”. Teen Wolf fans will be happy to see Froy Gutierrez, and Hannah Waddingham from“Ted Lasso also makes an appearance. Other top names include Whitney Peak from “Gossip Girl”,  Lilia Buckingham from “Dirt”, Belissa Escobedo from “American Horror Stories”, and Tony Hale from “Veep”.

Become enchanted with Hocus Pocus 2

It’s been 29 years since we’ve seen the Sanderson sisters in action. Hocus Pocus 2 promises to deliver an exciting movie in preparation for Halloween, exclusive to Disney+. It’s going to be exciting to reunite with our favorite characters from the past and see what new evil they can come up with. I hope you have your blanket and popcorn ready. Just remember to turn out the lights and enjoy the show on September 30, 2022.

Remember, you can only enjoy the Disney+ experience if you have an active membership. Fortunately, you don’t need to pay the full amount if you subscribe. You’ll only pay for 10 months while watching the movies and shows for a full 12 months. Check Disney+ offer to see how you can benefit!

A galactic adventure awaits in Star Wars Andor on Disney+

Star Wars fans of the Rogue One movie will be excited to hear that the Andor television series is finally coming to Disney+. With the first three episodes appearing on September 21, 2022, more will release every week until we have all 12 parts available. It’s time to join Cassian Andor in a classic adventure in this prequel series.

Disney+ Offer SUBSCRIBE

To fully enjoy Andor when it releases, you’ll need to have a Disney+ subscription. The streaming service is available in several countries worldwide, which means you can enjoy Star Wars and other brands directly in your home. Let’s see what the new series has to offer.

The rebellion begins with Andor on Disney+

The story of Andor is set five years before the events in Rogue One. If you recall, it had to do with the Rebel Alliance taking on the Galactic Empire and winning its first victory. Do you know how it all started, though? 

With 12 episodes in the series, Andor shows the formation of the Rebel Alliance. There are many key players that set events into motion, with many people not willing to tolerate the Galactic Empire any longer. It paves the way for the future that holds Luke Skywalker and his comrades in war.

Star Wars Andor on Disney+

Once upon a thief

The main focus of the series is the titular action hero, Cassian Andor. He’s a modest thief at the start of the Disney+ show, trying to scrape enough together to continue surviving. It isn’t long before he’s pulled into the struggles of others, which is where the formation of the Rebel Alliance begins.

With the Galactic Empire holding the power in the known Star Wars universe, Andor and his new friends decide it’s time to stand up to the evil dominance. Will Andor join the Rebel Alliance to make a difference in the galaxy, or will he stand alone in the darkness?

Star Wars Andor on Disney+

Star-studded cast

As usual, Star Wars brings a stellar cast to the fore with Andor on Disney+. Diego Luna returns to his role as Cassion Andor who’s destined to become a hero in Rogue One. Genevieve O’Reilly stars as a senator known as Mon Mothman, some who’s secretly starting the Rebel Alliance. You may remember the actress playing the same part in Revenge of the Sith.

Other top actors include Stellan Skarsgård, Denise Gough, Adria Arjona, Fiona Shaw, and Kyle Soller. There were three directors and four writers for different Andor episodes, all bringing new twists and turns for the upcoming Disney+ series. It’s bound to be a massive success when it launches on September 21 across the world on the top streaming Star Wars network.

Don’t miss other Star Wars action

Those of you who already have a membership will recall the Obi-Wan Kenobi series that appeared on Disney+. We finally saw the epic battle between the former Jedi master and his apprentice. This time, Anakin Skywalker was in his formidable Darth Vader suit, and he was determined to make Obi-Wan pay.

There are also new shows and series. One of these included a behind-the-scenes look at how they made the Obi-Wan Kenobi episodes. There are interviews with the cast, and you’ll see how they did many of the special effects. Be sure to catch a glimpse of this while waiting for Andor to release. 

Star Wars Andor on Disney+

Enjoy the stellar Andor adventure on Disney+

We’re sure you don’t want to miss out on any of the action. The Andor Disney+ series unveils more about the Rebel Alliance than we knew before, showing how it all started with a thief as a leader. There will be gunfights, spaceships, planets, and so much more action! You’ll also see your favorite characters from Rogue One back in action.

Of course, you can only enjoy the spectacular show if you have a Disney+ membership. To make sure you have the ultimate experience at the best price, there’s a discount offer available for you. If you sign up for a full 12 months, you only pay for 10 months. So, what are you waiting for? Use the Force and grab the offer today!

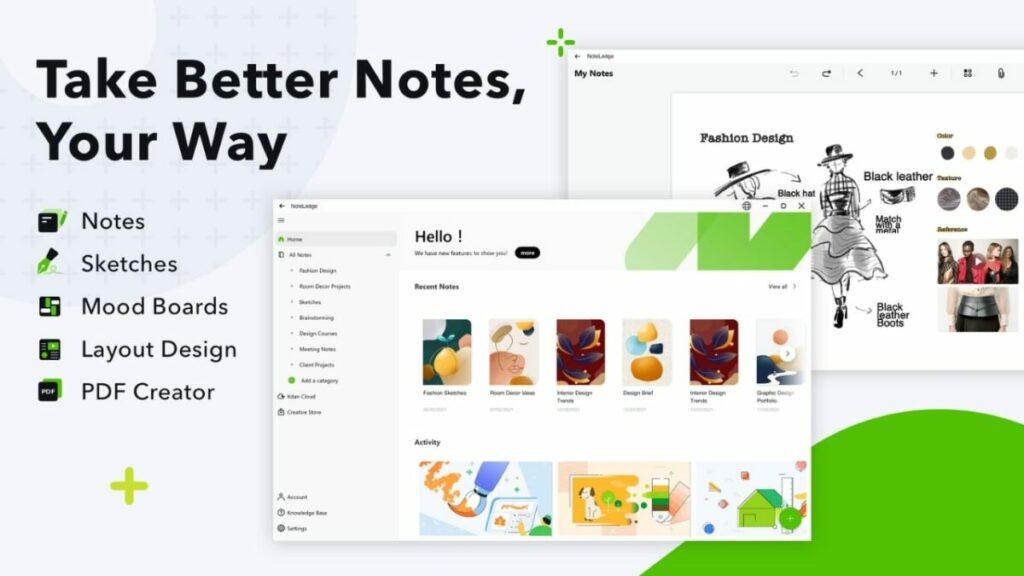
NoteLedge provides superior cross-platform note-taking

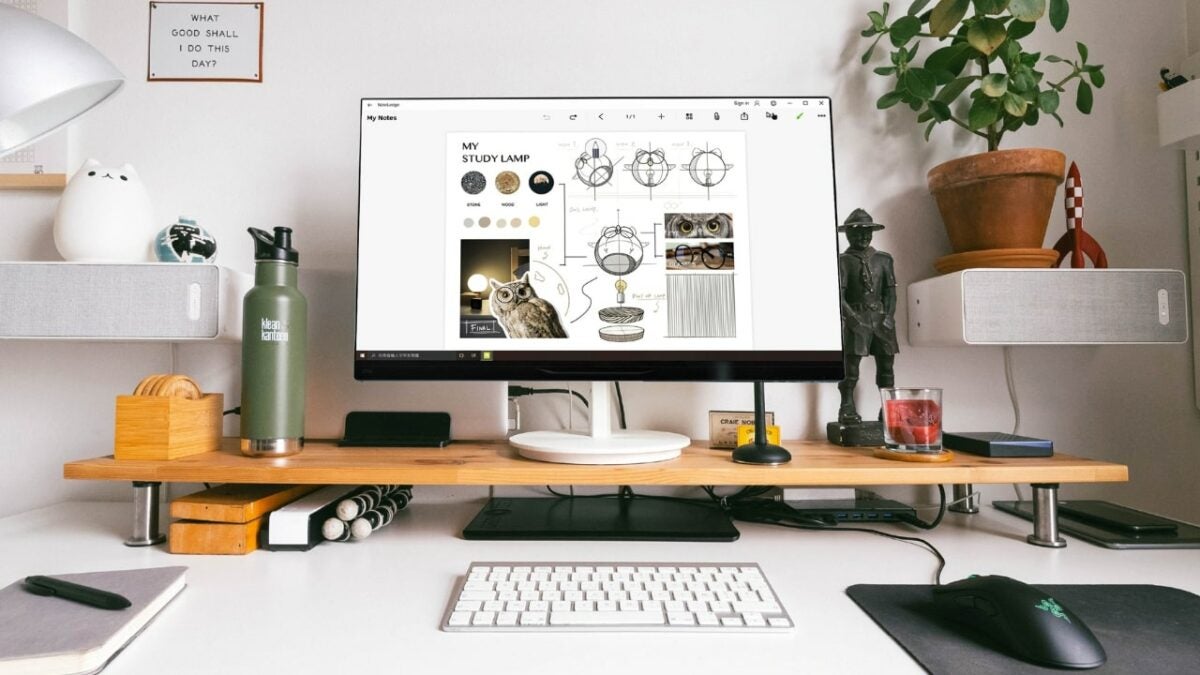
Those of us who have several roles in life, personal and professional, often make notes for different reasons. It happens when we need to remember what to buy at the store or recording stages in a project. I find it useful when I’m working on an intense novel with plot twists and I need to keep track. Thankfully, NoteLedge has excellent features to help in all situations.

NoteLedge Promo Check this offer

It’s not just about making notes. Apps like NoteLedge are incredibly useful at organizing your thoughts in a visual or audible way to plan better. While the program is also available on iOS, Android and Mac, I’m going to show you the exciting features available on Windows computers.

Organizing your ideas and thoughts on NoteLedge

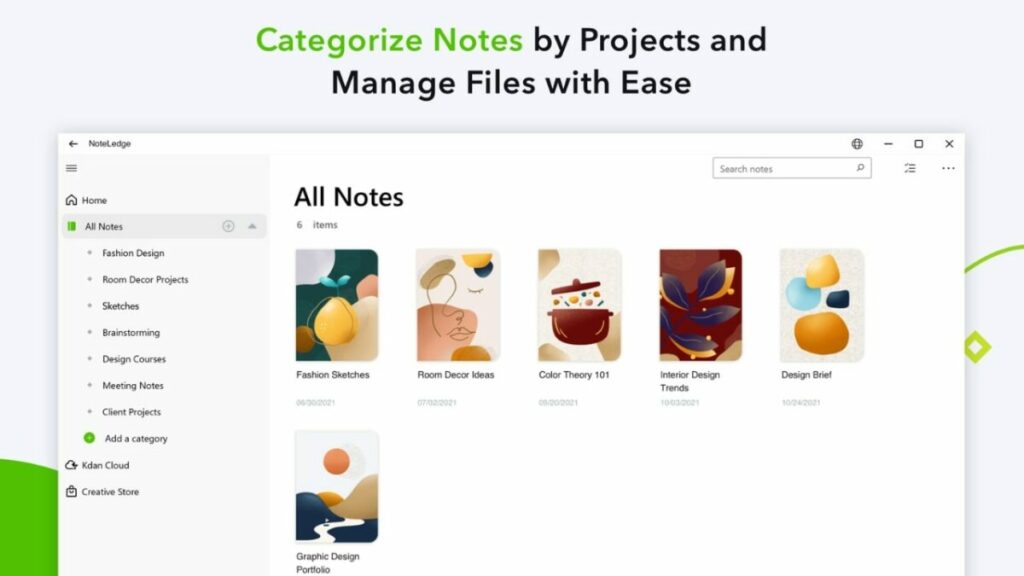
While working on my fantasy and horror novels, an essential element of maintaining consistency in the story is organizing my ideas. NoteLedge provides many ways to do so, whether via voice, text, images, sketching, or even using your hand with an external device. You can even sort your notes by category, which is helpful when you have loads of information captured.

If you’re a student or you’re using sources from the internet, it can be a pain to copy and paste or retype the information over to a document. NoteLedge makes your work more efficient and productive, with a drag-and-drop mechanism from the source web page. Also, it keeps track of where you got the information from, helping with your citations and references.

NoteLedge Softonic Home Page

Let your creative mind flow

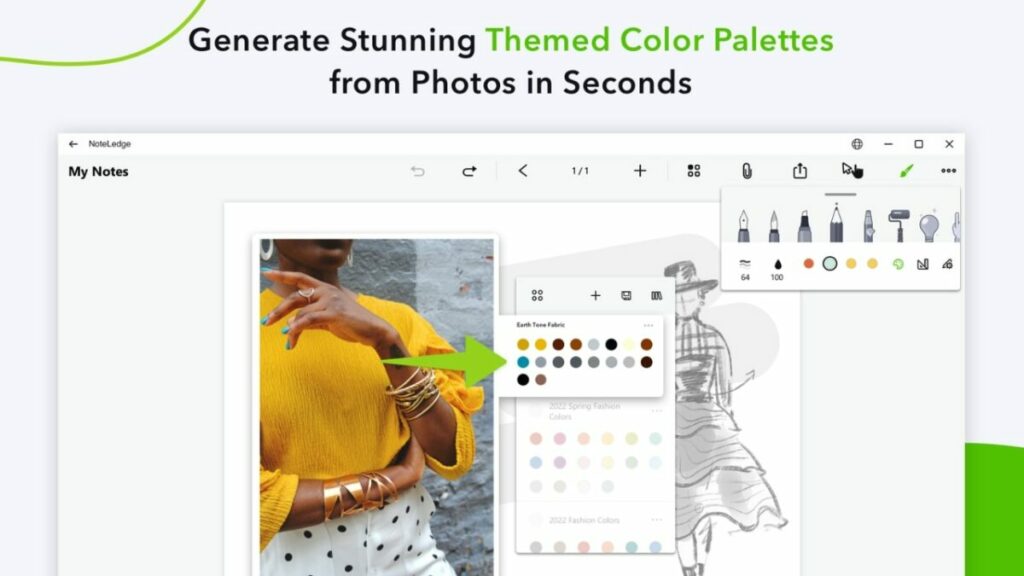
When you start a new note, you’ll have a variety of tools available. If you’re more of a visual person, there’s a library of brushes, preset patterns, rulers, and more to present your ideas in a new, vivid way. You’ll also find a palette of colors to work with, giving you more variety with your sketches and images.

If you see a color on an image that you like, it’s easy to import it into NoteLedge with the click of a button. The Windows version also lets you change the page layout and align objects. You can create mood boards, handouts, invitations, whiteboard discussions, and so much more. It’s also helpful when you’re working on a presentation and need to plan the slide layout.

NoteLedge Softonic Home Page

Sharing content and syncing to the cloud

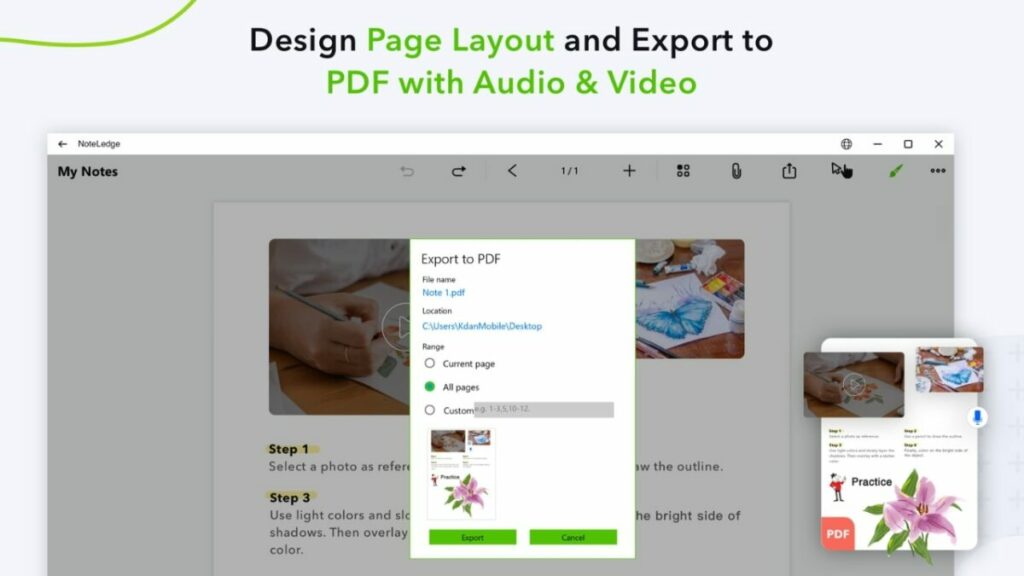
Creating ideas and sharing them with your team doesn’t work if you don’t have an app with that capability. NoteLedge has a built-in exporting tool that lets you quickly save your links, images, audio recordings, videos, and text in a PDF, and share them with your colleagues. When you click on the Share button, a window appears that asks how you would like to send it.

The first option is email. Once you provide the email address, NoteLedge will deliver the document with the content for you. You can also send it via another storage app, such as Dropbox, Microsoft Teams, and even Twitter. If you want to show someone next to you what you’ve worked on and you’re not near your Windows PC, you can show them on your phone or tablet if you’ve synced the data to the cloud.

NoteLedge Softonic Home Page

Is NoteLedge free?

You can download NoteLedge for free on Windows. Once you create an account and log in, you’ll be able to use some of the basic features for free. However, most of the powerful tools like custom brushes, color palette, and other advanced note-taking tools are in the NoteLedge Pro version, which is the one I recommend for professionals and freelance creative minds alike.

NoteLedge Pro Windows goes for about $4.99/month, $10.99/quarter, or $29.99/year, depending on how long you want to make a commitment. I suggest you try the free trial to see how much you can do. I have no doubt you’ll enjoy it enough to purchase the subscription. You’ll also receive 500 GB of storage space on the Kdan cloud.

If you want premium creative tools to create notes across Windows, iOS, Android, and Mac, you’ll need a Creative 365 subscription. You can opt for $9.99/month, $19.99/quarter, or $59.99/year. While NoteLedge Pro has enough content to get creative and record your notes, Creativity 365 allows you to work across different devices and enjoy additional content creation apps that come with the suite.

NoteLedge Softonic Home Page

Get NoteLedge at a discount!

If you’re a bit worried about the price, I have an offer for you that will lighten the burden. If you’re on Windows,  go to the NoteLedge website, and click on the Upgrade button. Place the coupon code NLSOFTONIC30 at checkout to receive 30% off the NoteLedge Pro or Creative 365 subscription cost. 

Now you can take your free trial to the next level with professional tools. With the cross-platform capabilities, you can work on a Windows computer, save, and then access your work from the cloud with your Android or iOS app. The power of creativity is in your hands no matter where you are!

This article was written by Shaun M Jooste.

Make a fun GIF in Canva

Most of you know precisely what a GIF is and has used it on social media messages and pages. Some of you might use it in your email correspondence, but whatever your choice of sharing them, we are here to help you create your own GIFs with Canva just like more than 85 million monthly active users in 190 countries are doing. 

Design for everyone FREE TRIAL

The bonus of a GIF is that they are compressed files that make them simpler to share than videos. If this is not a great reason to start creating personal GIFs, then we don’t know what is. So with further ado, here are your step-by-step guide to start creating GIFs in Canva today!

How to make a GIF in Canva

  1. What GIF do you want to make?

    How to make a GIF in Canva

    You can’t just sign into Canva and have a lift-off. Come on, now be realistic. We all know you need to work towards a goal. So think about where you want to use your GIF and message. Next, sign into your Canva account or get started by creating a free account.

  2. Choose a Canva template

    How to make a GIF in Canva

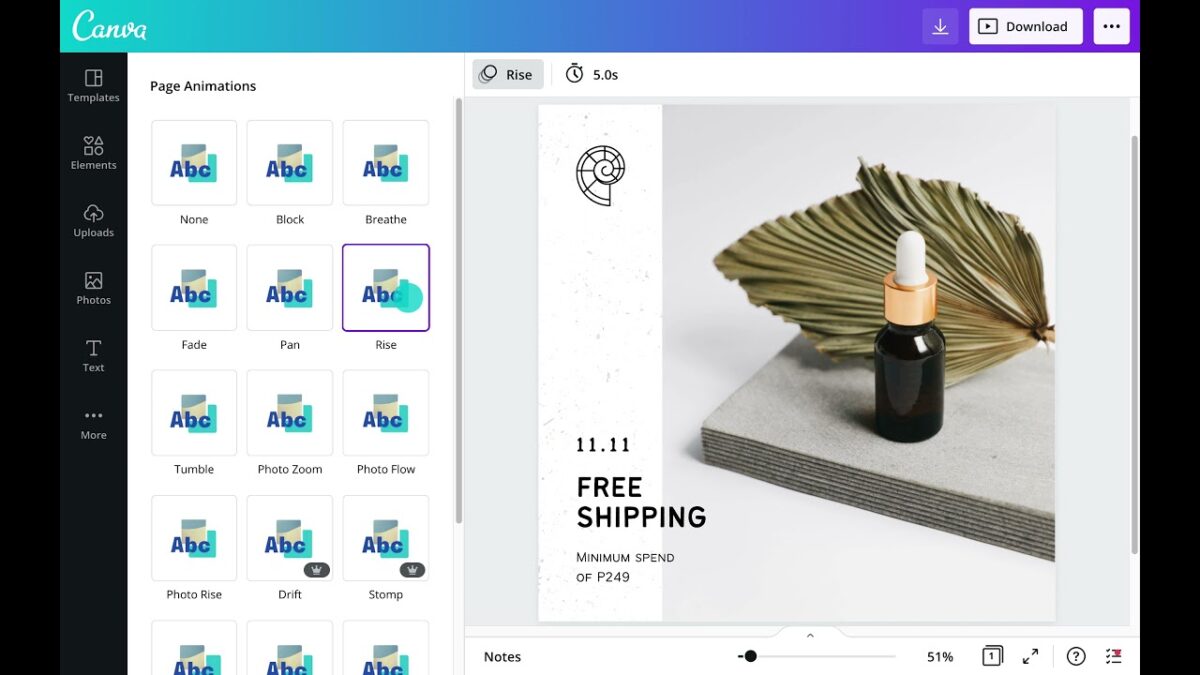
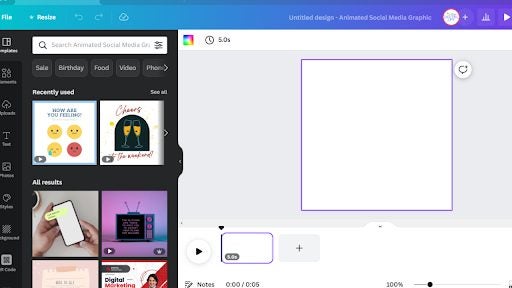
    Canva has an extensive template library on the left side on the interface. Start browsing the templates and decide which one is closest to your design goal. You can edit it to the design you want, but it is easier when you have a guide to give you a visual idea of what you will get. Once you have your template loaded, let’s get started.

  3. Design your GIF

    How to make a GIF in Canva

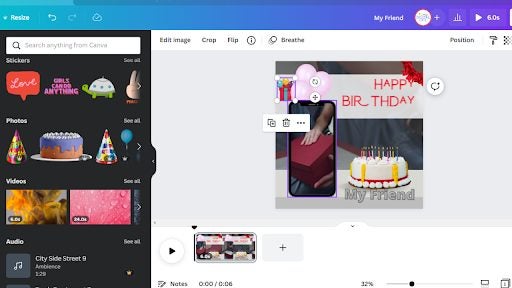
    Now the fun part begins. You can now click on the text box and choose a different font, change the font size, shape and color to your preference. You can also click on the different elements and images (located on the left side of the banner).

  4. Save your design

    How to make a GIF in Canva

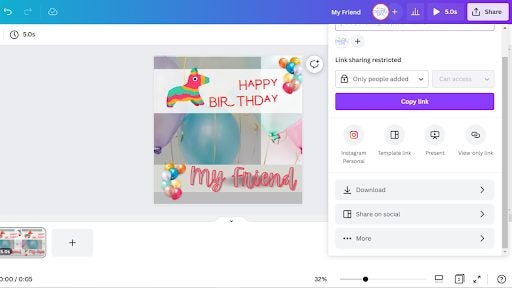
    Once you have played around with all the features that Canva offers and are happy with your end product, you can save and share your design. To do so, click on the share button on the top right corner, which will give you the following options: copy link, download, or share on social.

    If you copy the link, you will only be sharing your project link, which is not beneficial for your GIF sharing. But when you choose the download option, you can save it on your pc or phone (depending on which app you used for this design). If you choose to share on social media, you will be sharing it on your social media, but remember, you need to have a linked social media account.

  5. Share your design

    How to make a GIF in Canva

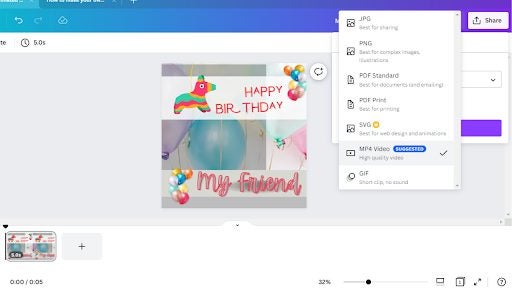
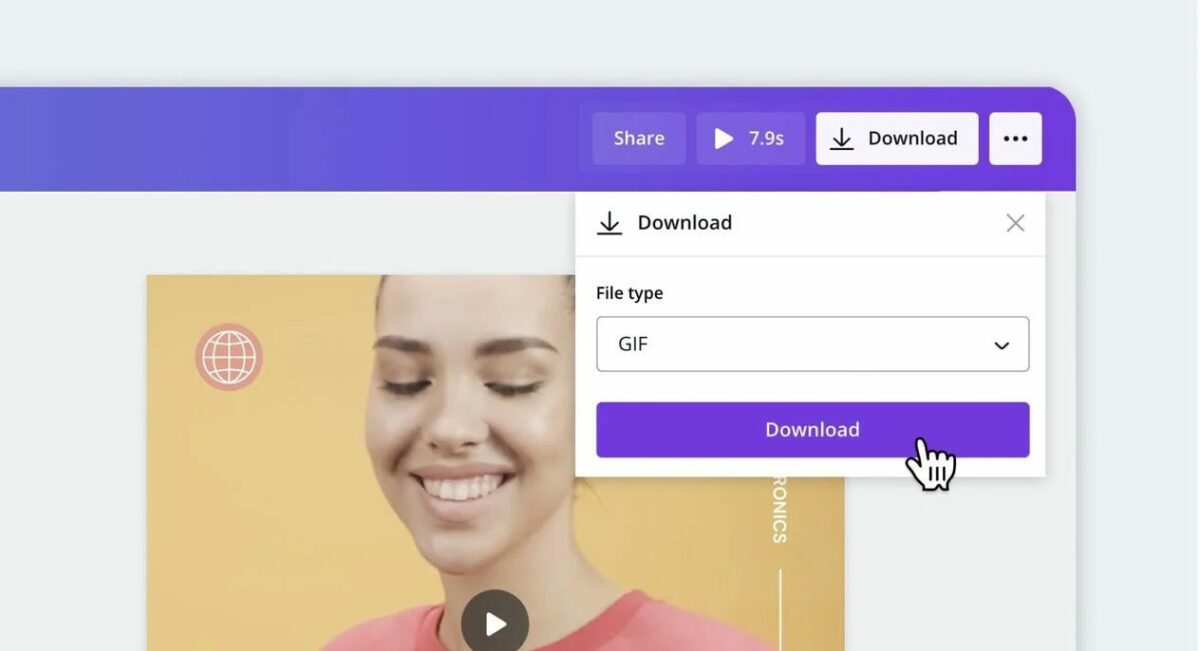
    When you click on the download button, you will have another list of options for saving your Canva GIF design for the best quality. It is recommended that you save your GIF in MP4 Video. Once you have made your choice, you can successfully save your file. The fun part is that you are ready to share your GIF once you have saved it! 

    Once your GIF is saved, you can share it via email or text messages and impress your friends and family with personalized GIFs. It is a beautiful tool to make a special occasion a little more unique and send fun holiday GIFs to show those close to you how much you care about them.

It is all in the GIF

Canva is a magnificent user-friendly design tool that you can use in all aspects of your life, promoting your business, creating brand awareness, or even creating personal invitations for special occasions. You can even make a business logo with Canva! 

A bonus is that you can have the Canva app on your computer or your smartphone. You can choose between a free or Pro account. The free account has limited design features but offers a great template library to choose from, and Pro is obviously limitless! We hope this guide will inspire you to create many more awesome Canva designs.

Design invitations from scratch with Canva

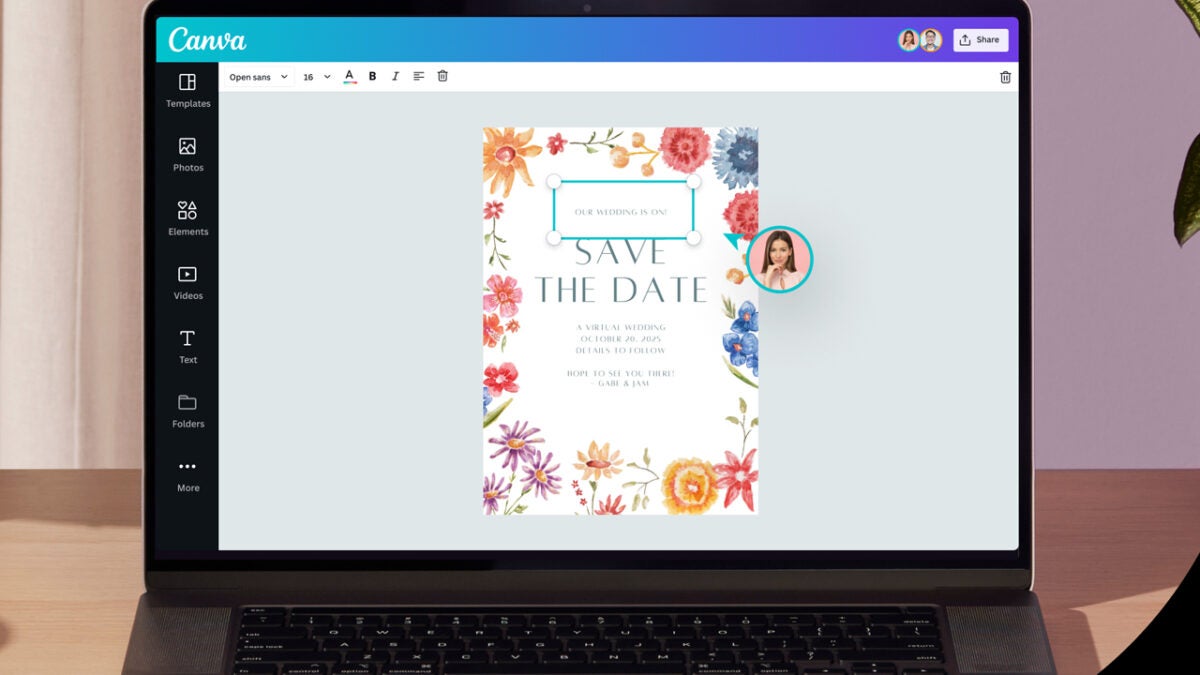
Planning your wedding can be exciting and terrifying all at once. But with that exciting event comes significant financial expenses in planning your big day! The good news is that you can create gorgeous Canva wedding invitations without being a professional graphic designer. It’s an intensely popular platform with over 85 million monthly active users in 190 countries.

Design for everyone FREE TRIAL

Your wedding invitation is the first glimpse of what your guests can expect on your special day, and you want your guests excited to attend the wedding! Without further ado, here are a few simple steps to create a Canva invitation from scratch.

Design invitations from scratch with Canva

  1. Create a Canva account

    Canva is a great tool for designing invitations from scratch

    If you don’t already have an account, you will need to create a Canva account. You can sign up for free or a paid Pro version, which will offer you more add-ons, but the free account still offers impressive features. You can also try Pro for free on the 30-day trial period, leaving you a month to get creative.

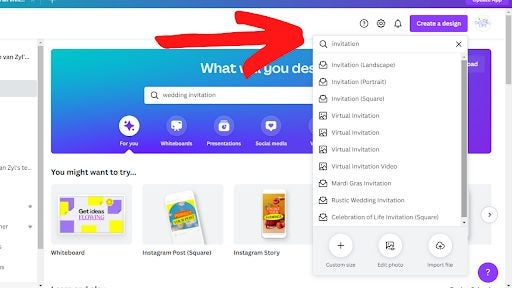
    Now you can start with your wedding invitation by selecting the ‘Create Design’ button, and if you don’t see the invitation on the drop-down menu, you can search ‘Invitation.’

  2. Create a design

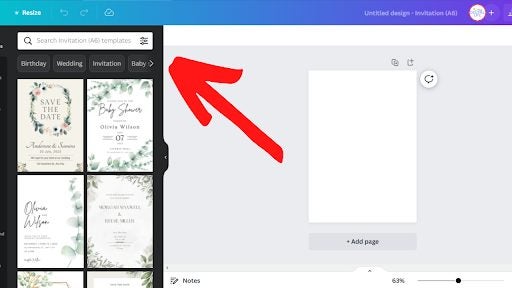
    You now have a clean canvas that you can start from scratch to design a Canva invitation that’s fitting for your wedding theme. What we love about this designing tool is the various template featured on the left side, and above the templates, you can choose what Canva invitation you would like to create.

  3. Personalize your invitation

    Canva is a great tool for designing invitations from scratch

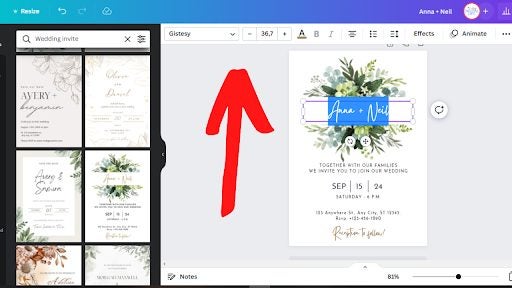
    Once you find a Canva wedding invitation template that you want to use, you can start with editing. You can click on each text box to make the necessary changes. If you want to change the font, text color and font size, you can make these changes at the top banner.

  4. Finishing up your design

    Canva is a great tool for designing invitations from scratch

    If you are happy with your design and want to finish the final print, you can do it in these three easy steps:

    • On the top right corner, click on the ‘Share’ button, which will open more options to follow.
    • Scroll down and click the ‘Download’ button, which will give you more options with a dropdown menu.
    • In the dropdown menu, you can opt for the JPG or PNG options if you will be sending the invitations via a social media app. Alternatively, you can choose PDF for print to give to your printing company of choice.
    • Once you have downloaded your design, you can save it and, if need be, send your PDF to the printers or load it on a USB and personally take it to the printers.

    Canva is an easy-to-use designing tool that makes creating invitations from scratch a breeze. They have an extensive template library, and you can get even more creative as you become more comfortable with the designing application. 

    The design tool offers over 22 900 invitation templates and can design anything from birthday invitations to graduation invitations. Canva features invitations for any occasion you can think of!

The solution to any invitation

It doesn’t matter what occasion you are planning — you will need to send invitations. But most of us (even if we aren’t on a tight budget) know that having a party or hosting an event can get expensive. The financial expectations from the venue to the decor and not even considering the catering could leave you overwhelmed. 

The last thing you want to stress is extra costs for invitations from hiring a graphic designer and the printing costs after that. That is why you can rest assured that with Canva, you will be able to save costs on your invitations.

If you are still unsure of how Canva works and how you can benefit from this designing tool, you may like to read: What is Canva and how it works. Remember, you can use a few invitational templates with the free version, but there are plenty more available with Canva Pro. It may be worth checking out the free trial to test its powerful capabilities.

Disney+ Day returns with new exciting shows on September 8

It’s that time of the year again! Disney+ Day makes its return to the small screen with its annual celebrations, launching a host of new shows on September 8, 2022. Those of you who are already members will see movies and series across iconic brands, namely, Marvel, Star Wars, The Simpsons, and more.

Special offer SUBSCRIBE NOW

Those of you who haven’t subscribed have one opportunity to enjoy these shows at a reduced cost for one month. You’ll get a taste of the fantastic assortment of series and movies available with a chance to renew your membership for the year ahead! Let’s take a look at the latest content appearing on Disney+ Day.

Obi-Wan Kenobi: A Jedi’s Return

Who of you has seen the latest Obi-Wan Kenobi series that recently appeared on Disney+? It was a heart-wrenching tale as we watched the Jedi master face his former apprentice again. The show revealed what happened ten years after Return of the Sith when Anakin Skywalker was ruling the stars as Darth Vader.

Obi-Wan Kenobi: A Jedi’s Return appears on Disney+ Day as a documentary of how the show was made. You’ll see how the former cast returned for the filming and the props that were used. There are also discussions about the new villains and heroes, plus some insight into the story.

Thor: Love and Thunder

Marvel fans have been waiting for this latest installment in the MCU to appear on television. Disney+ Day brings the beloved God of Thunder to your screen on a new journey, facing the villain Gorr the God Butcher. You may recognize the actor Christian Bale from his previous adventures as a Dark Knight.

This time, he enlists the help of some powerful allies. To his surprise, Jane Foster from Earth is able to wield Mjolnir, which transforms her into the Mighty Thor. Do they have what it takes to stop the God Butcher in his tracks?

The Making of Thor: Love and Thunder

Disney+ pulls back the curtains to show you how things were done in The Making of Thor: Love and Thunder. You’ll see lengthy interviews with the cast about their roles and how they felt about the story. As an extra treat, you’ll also see some raw footage from behind the scenes that will widen your eyes and make you laugh.

Disney+ Day returns

Welcome to the Club, a New Short from The Simpsons

We’ve seen some lovable shorts on I Am Groot where the small sentient being is still a baby, trying to prove himself to the Guardians of the Galaxy. The Simpsons show also has a new short movie coming on Disney+ Day called Welcome to the Club. Apparently, Lisa learns a lesson that sometimes being bad isn’t a bad thing. 

As a matter of fact, she sees how much fun it can be, leading to hilarious and risky consequences. It’s funny and teaches you a few lessons…kind of. It’s The Simpsons, after all. 

Disney+ Day returns

Mike

You’ve probably heard of the legendary boxer, Mike Tyson. However, you’ve never seen the story of his life on screen before. Disney+ presents a star-studded production where you watch Mike from his childhood, becoming a convict before he steps into the ring at a later age. 

The movie will pull at your heart as you see the trials and tribulations he went through to become the champion ever knows him as. It’s anything but an innocent life, but he fought his way to the top to prove himself.

Wedding Season

Here’s an exciting eight-part murder mystery series you won’t want to miss on Disney+ Day. Stefan enjoys attending weddings, and he meets Katie during one of them and falls for her. Sadly, she’s due to get married in two months, but that doesn’t stop the affair from happening.

During her wedding, someone poisons her husband and his family. With Katie and Stefan as prime suspects, they hit the road on the run while trying to prove their innocence. It’s a dark, twisted comedy that will have you laughing and wondering what will happen in the next episode.

Pistol

During the 70s, Steve Jones was homeless and looking for work when he decided he wanted to start a rock band. What had humble beginnings led to the formation of the Sex Pistols, but it wasn’t without heartache and risks. Pistol is a six-part series coming to Disney+, revealing all the band went through while becoming famous.

Tierra Incognita

Fans of the Stranger Things series will love this horror movie arriving on Disney+ Day. Eric can’t get over the disappearance of his parents in this Latin American film, so he heads back to his childhood town where it all happened. 

Locating the horror theme park where they vanished, he enters a whole different world filled with monsters. Can he, his sister, aunt, and friends survive the terrors that await them inside? 

Let’s celebrate Disney+ Day!

As you can see, Disney+ Day has loads in store for members on September 8, 2022. You won’t want to leave your television or computer screen with all the action and drama unfolding.

Remember, you can grab a month’s subscription at a reduced cost during Disney+ Day to enjoy all these shows. Make sure you don’t miss out on any of the action! You’ll only pay $1.99 instead of $7.99 (plus tax, where applicable) for the first month, which is a massive bargain. Go ahead and check out the deal!

This offer will be valid from September 8 to 19, 2022. Valid only for new and eligible Disney+ subscribers who are 18 years of age or older. After a 1-month promotional period, Disney+ automatically renews at a monthly retail price until cancellation. Offer valid until 11:59 p.m. 09/19/21 PST. Additional terms apply.

The latest features of Adobe Acrobat Pro

For a long time now, many people have only viewed Acrobat as a PDF reader or basic editor. As with the sands of time, things change, and so has this program. Adobe has released some new updates that took effect this month with incredible features. If you have the Adobe Acrobat Pro free trial, you’ll also be able to check them out.

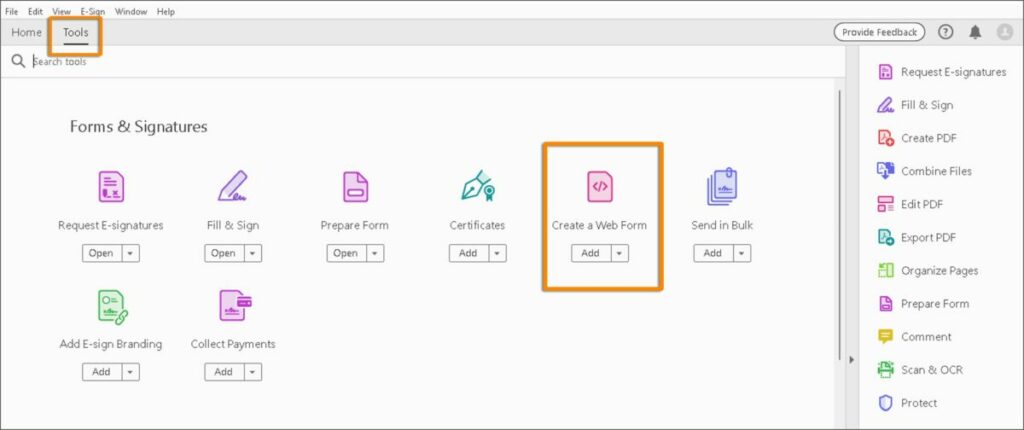
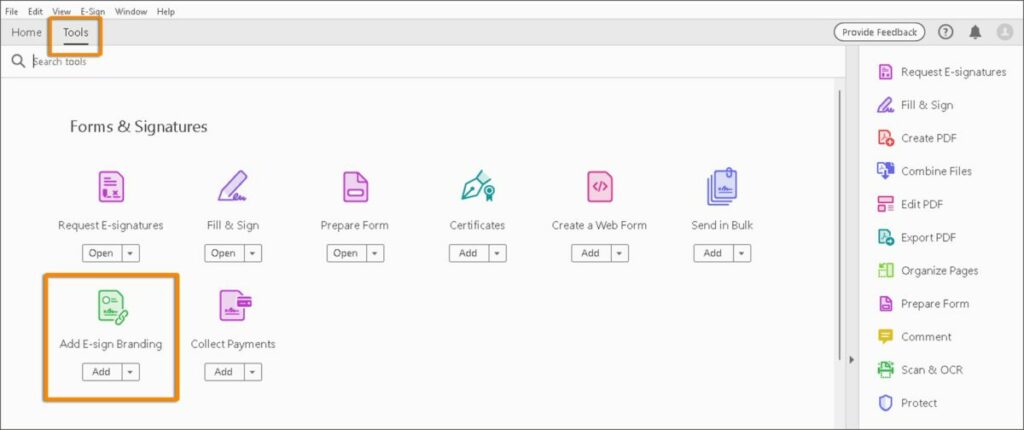
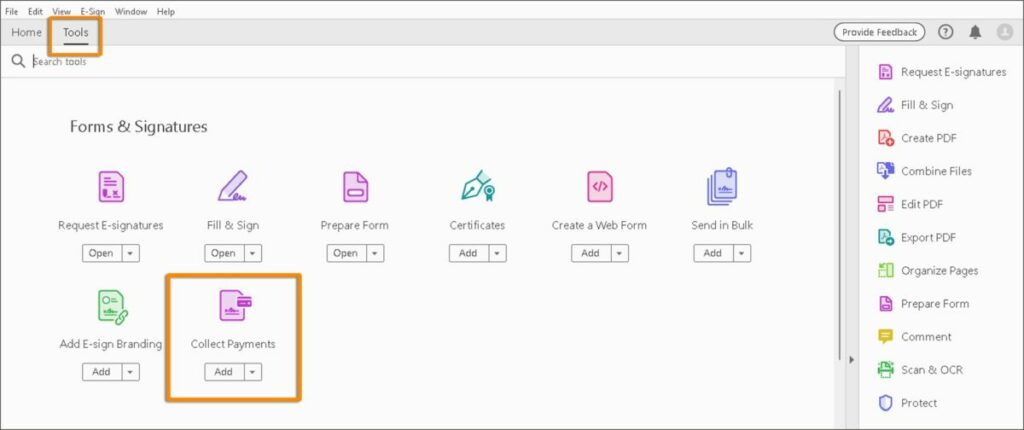
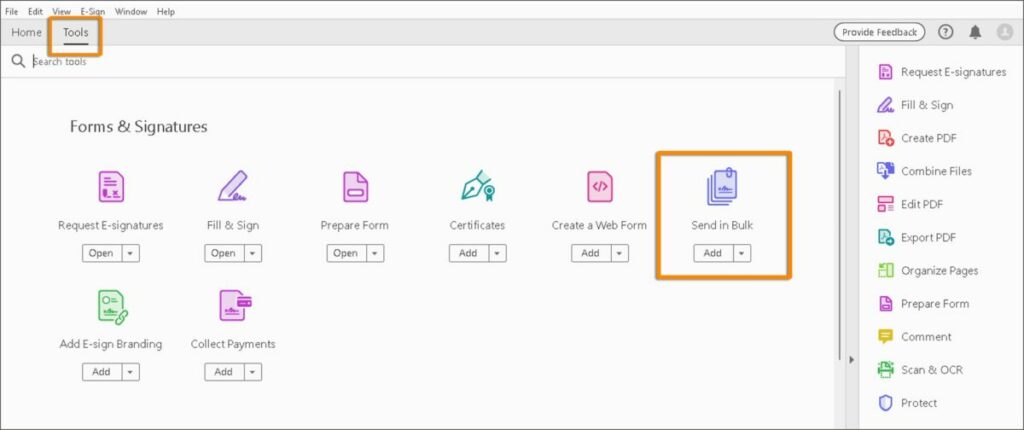
Adobe indicated on its blog that the new updates will affect the Adobe Acrobat Pro desktop app and the online cloud system. The new features are available for both, but you apply them in different ways. The latest tools include creating a web form, branding your account, collecting payments online, and requesting signatures in bulk.

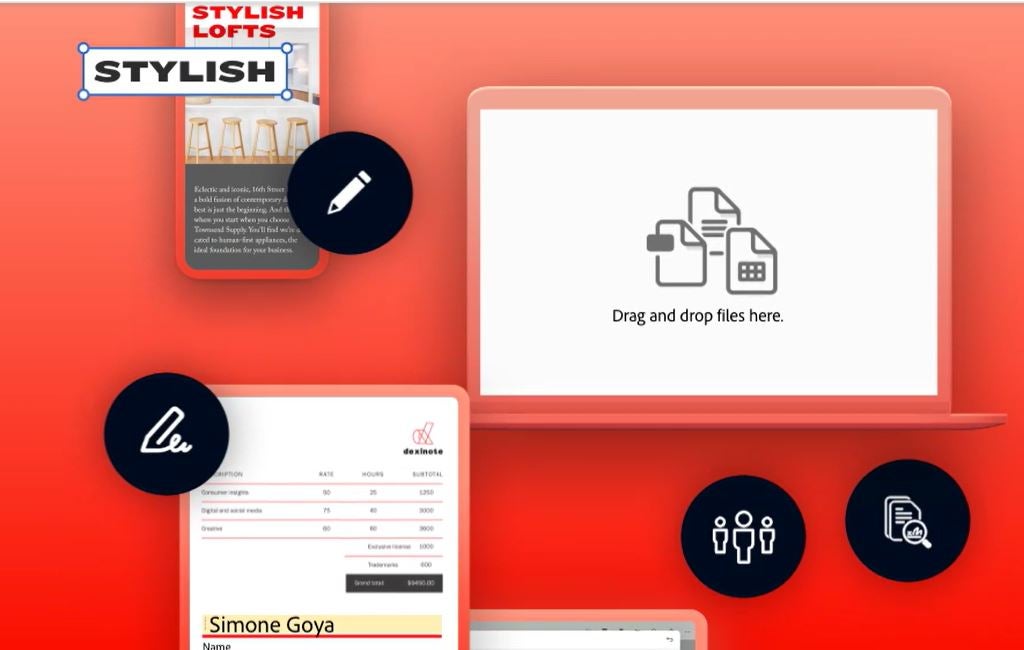
As you can see, Adobe Acrobat has moved away from simply opening a PDF document. The web form tool lets you quickly create a form that you can embed onto your site. While there are templates you can use, they’re easy to adjust with other details. From there, your visitors can complete and submit.

The latest features of Adobe Acrobat Pro

Many email and online signatures look bland with only variety in the font type and color. Adobe Acrobat Pro now lets you add your logo so you can brand your electronic signatures quickly and easily. Not only can you place them at the end of emails, but there’s a section on forms where you can also attach them.

The latest features of Adobe Acrobat Pro

You should already know about the ability to add spaces for signatures on forms as a previous Adobe Acrobat Pro update. Now, you can also ask for payments on your forms and documents. It’s almost like a call to action where it reminds the reader to make payment for your services.

The latest features of Adobe Acrobat Pro

Sticking with signatures, you can now request them in bulk from several recipients by sending them to various email addresses. While you only send one version, each recipient will receive a unique copy. It saves you time having to create a version for each person.

The latest features of Adobe Acrobat Pro

These new features are incredible, and it’s another way that Adobe strives to make your life and work easier. However, you won’t be able to see many of these tools with a standard Acrobat Pro DC download. 

Be sure to check out the Adobe Acrobat Pro free download to get a taste of what you can do.

FAQs about Adobe Acrobat Pro

Is there a free version of Adobe Pro?

At the moment, the only free version of Adobe Acrobat Pro is the free trial. You’ll have seven days to test all the new features of this PDF toolkit, giving you a taste of what you can accomplish. Once the trial period is over, you’ll pay for the subscription based on the option you selected before the trial.

Try Adobe Acrobat Pro for free FREE TRIAL

What is the difference between Acrobat Pro vs Standard?

While the standard version provides you with the standard tools, it excludes the more advanced features. For example, you can edit your PDF documents, create and sign forms, add passwords, and track responses. With Adobe Acrobat Pro, you can convert PDFs to different formats, redact confidential information, compare documents, and add branding to your signatures and forms.

Is it worth it to buy Adobe Acrobat Pro?

The best part of Adobe Acrobat Pro is that it’s designed to make the professional’s working life easier. The PDF toolkit is incredibly comprehensive and easy to use, giving you the power to deliver quality services and documents. Also, it has several security measures to ensure that only the intended recipients view confidential information.

Can Adobe Acrobat Pro help with productivity?

Have you ever had to work in different free programs for one task? Thankfully, Adobe Acrobat Pro helps improve productivity and efficiency by combining several functions in one app. You don’t have to stress about deadlines when you have this all-in-one solution.

Is Adobe Acrobat Pro a one-time purchase?

At the moment, you can purchase Adobe Acrobat Pro with monthly or annual subscriptions. There are pricing plans for individuals, businesses, and students, with the last option only available in select locations. The annual option lets you pay once-off for an entire year before the renewal kicks in.

Several solutions at your fingertips

I suspect this won’t be the last feature we see for Adobe Acrobat Pro. The company is set on ensuring you receive plenty of tools to work on your tools in one central location. Maybe it’s time we return to this familiar, trustworthy brand and see how it’s much more than a PDF editor today.

Increase your PDF productivity with Adobe Acrobat Pro

When you think of the Adobe Acrobat Pro brand, you’re probably thinking that it’s only for creating PDF documents. Sadly, so many working professionals don’t realize that it provides plenty of other benefits, making you more productive at home and in the office. Instead of using different apps, you’ll find an all-in-one solution with the latest features.

Adobe Acrobat Offers FREE TRIAL

Anything you need to do, Acrobat can do it. Reduce work stress and improve productivity with Adobe Acrobat Pro with some of the latest tools. Let’s take a look at how it’s no longer a static document viewer.

The benefits of Adobe Acrobat Pro

The most important benefit of Adobe Acrobat Pro is that you can use it as an all-in-one solution, reducing the need to open several applications for one task. That means you can edit a PDF and work with signature tools in one document instead of integrating it separately. The same applies to form fields.

It reminds me of a few years ago when I was compiling PDFs for a company overseas that wanted fields and spaces for signatures. Before I knew about the power of Adobe Acrobat Pro, I was making lines and field blocks in MS Word before converting it with a free PDF app and then adding images with another tool. Today, you can perform all your functions in Acrobat much faster with much less hassle.

The second advantage is that Adobe Acrobat Pro is incredibly versatile. There are plenty of tools that make your job easier to perform, completing your tasks in only a few clicks. You can edit any document without worrying about the format, convert your PDF to other formats, and integrate other apps for the functions you need. 

Finally, the Adobe Acrobat Pro system is very reliable. You can create and save a document to the Adobe Cloud where you won’t need to worry about it vanishing or anyone tampering with it. You can also set a password and lock the PDF, which is essential if you have a toddler around with fingers that explore.

How to increase productivity with your PDF

  1. Editing PDF documents and sending for signature

    Increase your PDF productivity with Adobe Acrobat Pro

    There are different ways you can prepare your PDF for signatures with Adobe Acrobat Pro. Whether you need to send proposals, invoices, or legal documents, one of the easiest methods is simply clicking on the signature tool. It saves you from having to use a different app for the purpose.

    Another way is to create a template in the library. You’ll add a template name, the template file you usually use for a specific task, and then add fields. Now, whenever you need to send that proposal to a new client, you’re only a few clicks away instead of spending an hour on it. Now, isn’t that more efficient?

  2. Sharing and commenting

    Increase your PDF productivity with Adobe Acrobat Pro

    Since I work from home with clients and colleagues in more than 10 countries, it can become quite tedious sending documents to them and waiting for replies on various apps and email platforms. A more efficient way of working is collaborating and discussing changes on the go. It cuts down on what might take as long as a week to only a day or two. 

    Fortunately, Adobe Acrobat Pro lets you share documents and comment on them all on the same platform. You choose which files you want to share, and your team or clients will receive them instantly. From there, you can have discussions on the document and share new ideas. It’s way more productive to work this way in the modern age.

  3. Protecting your confidential information

    Increase your PDF productivity with Adobe Acrobat Pro

    One aspect of work I truly dislike is admin. I work with several documents on a daily basis, being a journalist, content creator, project manager, account manager, editor, game writer, and novelist. With so many roles, you can imagine how hard it is to track my documents and make sure no one gains access to a file they shouldn’t.

    Instead of relying on other apps and tools to secure my files, it’s easier to simply open the password settings for the document in Adobe Acrobat Pro. You can also set permissions for different people to also view or edit the files, making sure that only the right people lay their eyes on them. As the owner of these PDFs, no one else can make changes to the password.

Create your own professional email signature design in Canva

Professionals overlook the importance of email signatures, yet they provide essential information. Most business communication and interactions are via email; your email signature is your digital business card that shares your information and even social media links. You can also make it look unique with Canva.

Canva DOWNLOAD

Keep your email signature informative, professional, and simple when you consider creating your own. Ultimately it is all about the information, but that doesn’t mean it has to be plain and boring. We are here to guide you in creating the best email signatures using Canva’s easy-to-use designs.

How do email signatures on Canva work?

You can sign up with Canva using your Google account, Facebook login, or email. Once you have created a free account, you can choose what you will use it for. With plenty of virtual email signature templates, you can pick a design and make the necessary changes to personalize it to your needs.

Choose your email signature template

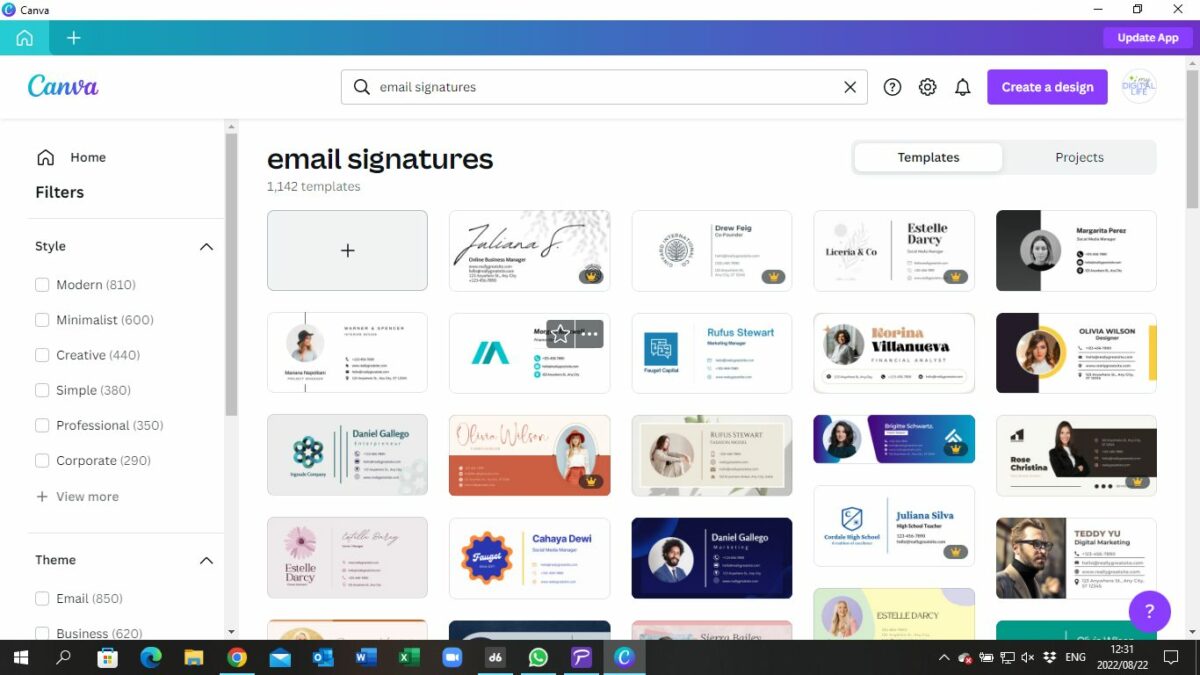
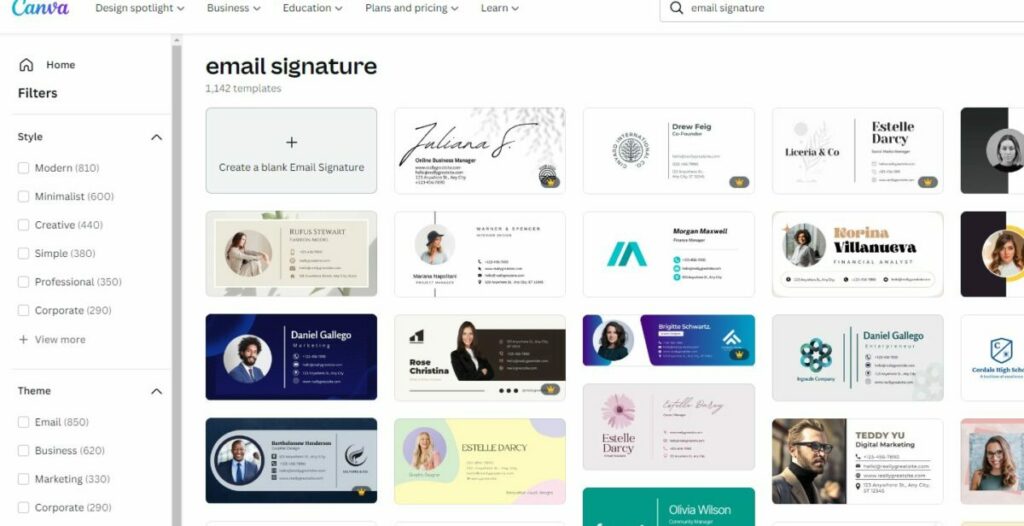
To make the email signature, you can search for email signatures that will offer you all the templates. You can choose the style you want for your signature on the left, and the main templates you can customize on the right. Clicking on your choice will show you a toolbar with editing options, reacting as you make things minimal and straightforward.

What information to include?

A fundamental mistake people tend to make with email signatures is including too much information. Don’t use your signature as a mini-autobiography; include the necessary information and stick to your brand’s style guide. Here are a few essential details you should have on your email signature:

  • Your name and surname
  • Job title | Designation
  • Professional photo
  • Business name
  • Website and email account
  • Clickable social media icons

Although this is vital information to include, it will be dependent if it applies to you or your business needs!

How to create a custom design email signature in Canva

  1. A new design

    Create your own professional email signature design in Canva

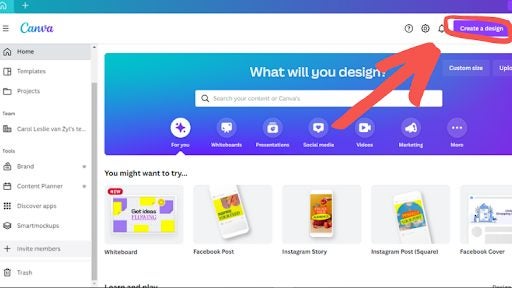
    Create a new design on Canva’s homepage using the Create a Design button.

  2. Custom size

    Create your own professional email signature design in Canva

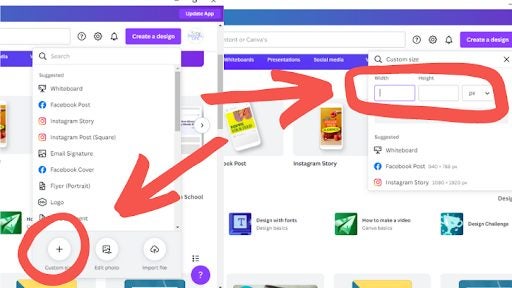
    Select Custom Dimension and use this measurement: 500 x 200 px. Professional signatures range from 70-200 px in height to 300-600 px in width.

  3. Setting the frame

    Create your own professional email signature design in Canva

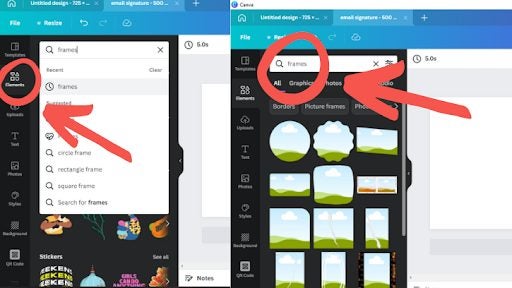
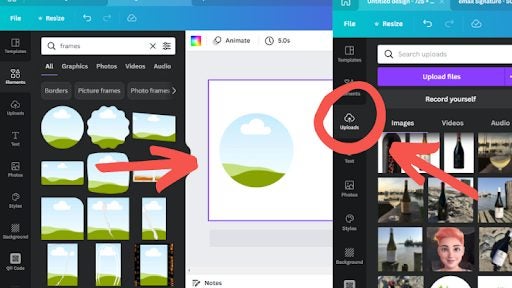
    Once on the editor page, head to Elements and click the Frames category. If you can’t find it, use the search option. Select the frame you would like to use. Typically round frames are used to give a sophisticated look.

  4. Adding photos

    Create your own professional email signature design in Canva

    You can add your frame to your design and resize and position it to where you want it on your signature template. You can then add your photo by using the Upload tab. Once you have uploaded your photo, click on it and drag it towards the frame.

  5. Adding details and links

    Create your own professional email signature design in Canva

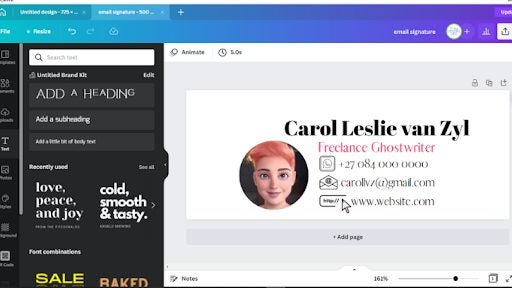
    Add text boxes by tapping the Text tab on the side panel menu. Use the heading box for your name and the subheading for your designation, business name, and contact details. Edit the text boxes by typing your name, business, and contact details.

    Once completed, save the email signature as a PNG file. Make your signature more professional by clicking on the Transparent Background box.

How to set up your Canva email signature in Gmail

It is as simple as 1…2…3 

  • Go to your Gmail settings. Find it in the top right corner.
  • Go to the Signature section and choose the “Create New” signature option.
  • Upload your signature file.
  • Press Enter, and you are all good to go!

How to set up your Canva email signature in Outlook

Again this is pretty straightforward. Just follow these simple steps:

  • Open Outlook and select Settings.
  • Open the email and scroll to the bottom to find the signature button.
  • Click Signature and upload your signature.
  • Press Save.
Canva email sig

What is the difference between Canva Free and Canva Pro?

Elements & Photos

Free: Limited free creative design elements and photos. But you can upload your photos or purchase more.

Pro: There are a lot of free stock elements and photos. 

Templates

Free: has over 8,000 templates.

Pro: has over 20,000 templates.

Fonts

Free: There are Fonts to use, but you can’t upload your own.

Pro: You get a lot of fonts and can upload your own.

Folders

Free: You get three folders for your designs and no folders for uploaded photos. 

Pro: Unlimited folders for your designs and folders for photos.  You can mix your designs and photos in one folder with recent updates.

Resizing

Free: No resize options exist, but you can copy and paste between two different sizes. 

Pro: There is the handy Custom Resize Function and Magic Resize function.

Transparent Backgrounds

You can save PNGs with a transparent background with a Canva Pro subscription only.

Time To Get Creative with Canva!

Email signatures are essential to your professional identity and provide valuable links and information to your email recipients. So, get creative and have fun with Canva’s accessible design elements, and if you are still a little uncertain, you might be interested in reading this feature on how to create professional designs with Canva.