VideoLAN, the creator of the free video player and editing utility, VLC media player, has hit two Indian ministries with legal notices in response to the country’s recent ban on its software. The company asserts that the ban was illegal and is in contravention of prior decisions made by the Supreme Court of India.
As VideoLAN asserted in a recent press release: ‘This was done without any prior notice, or affording VideoLAN an opportunity of hearing, which is contrary to the 2009 Blocking Rules and the law laid down by the Supreme Court in Shreya Singhal v Union of India.’ VideoLAN is not on its own, however. India’s Internet Freedom Foundation (IFF) has joined forces with VideoLAN to try and get to the root of the block and appeal the ban.
India’s Department of Telecommunications, the entity that instated the ban in the first place, has remained silent on the matter. In June 2022, the Internet Freedom Foundation submitted an application for the Right to Information. The application was issued to the DoT, which then pushed it through to the Ministry of Electronics and Information Technology (MeitY). Despite being the best equipped to level a meaningful response in the matter, MeitY issued the standard ‘No information is available’ retort.
Even though India has yet to respond to VideoLAN’s correspondences, some people suspect that the reason behind the ban may have to do with Cicada. Cicada is a Chinese hacking group with links to the State. Cicada is mentioned in a Symantec report that details the group’s use of VideoLAN IP, particularly the VLC media player, as a means of delivering remote control malware to unsuspecting devices across Asia, Europe, and North America. The report describes evidence of an ‘advanced persistent threat group’ that targets legal, religious, governmental, and civilian organizations in these territories.
Even though VideoLAN’s recent actions don’t guarantee that the company will take legal action, there is every chance that the situation could end up there in any case. Should India not be forthcoming with its cooperation in this matter, VideoLAN has warned that it ‘will be entitled and compelled to initiate legal proceedings against you for failing to protect our rights.’
VLC media player is an incredible utility and the solution to those weird visuals you used to get on Windows Media Player when trying to play ‘unsupported content.’ If you’ve always wondered how to run multiple instances in VLC media player, we’ve got you covered.
Developed in France and launched in 2001, VLC Media Player is registered internationally by the VideoLAN non-profit organization. It’s open-source software that’s completely free. There are no ads and no tracking of users or spyware.
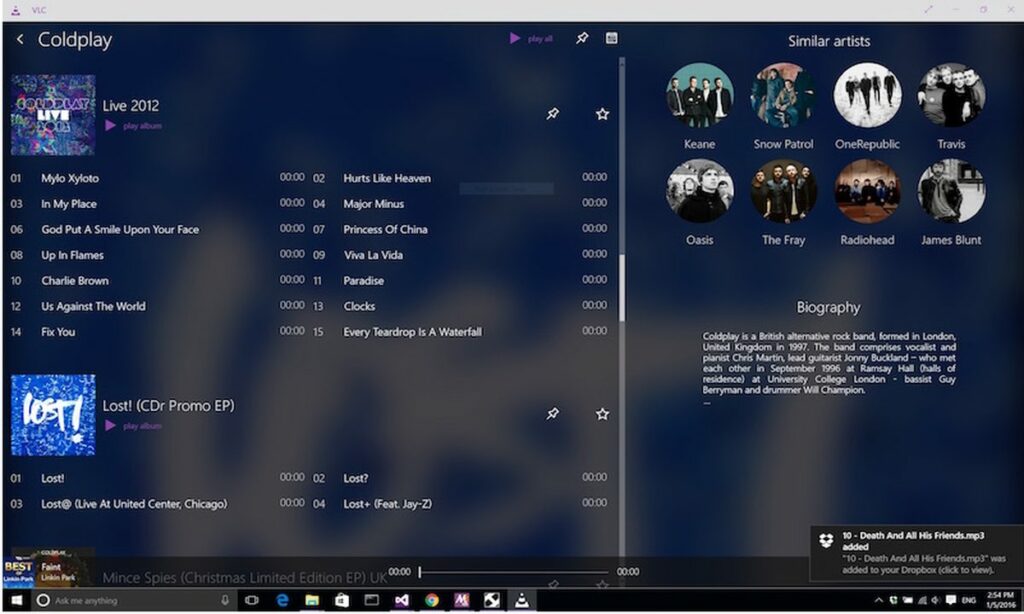
VLC stands out in a crowded field because it plays anything and everything, from files and discs to webcams, streams, and devices. It recognizes a vast number of video codecs, but even better, it reads many obscure or outdated formats and even allows you to convert them into files like MP4s that are in everyday use. VLC also allows you to play multiple videos or other media files simultaneously, one of its best features.
Enabling multiple instances in VLC Media Player
VLC Media Player allows multiple instances to be played simultaneously by default. You can even play different types of files at the same time, like a video file and an audio file or two audio files. You can multitask by cutting video files or converting audio formats in one instance of VLC while playing something different on another. If this feature is not enabled, here’s how to do it
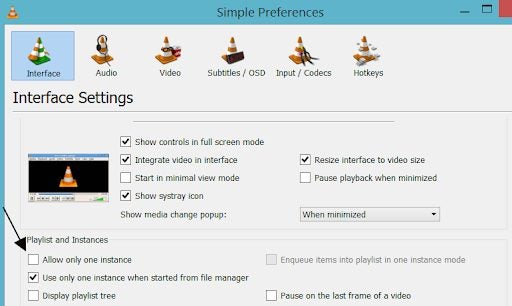
In Windows
Go to Tools > Preferences (CTRL + P).
Find the heading that says Playlist and Instances. Ensure that the Allow only one instance checkbox is not selected.
If you’re going to open multiple files and you want each new one to open in a new VLC window, do this: Go to Tools > Preferences (CTRL + P). Under Playlists and Instances, uncheck Use only one instance when started from the file manager.
Every media file you open after this from wherever you keep it or want to download it, will open in a completely new VLC Media Player window.
On a Mac or iPhone
Download VLC Player on your Mac or iPhone. The VLC.app MUST be saved in Applications. Download and unzip it. You will end up with a file called VLC-MULTIPLE-VIDEO.app on your screen that you can use as a second video player. You can also keep it in your Applications folder.
To play a second video, right-click it, then -> Open With -> Other, and choose the VLC-MULTIPLE-VIDEO.app. The video will open in a new VLC Application. Your device will prompt you to open the file because it will treat the app as a new application not yet opened.
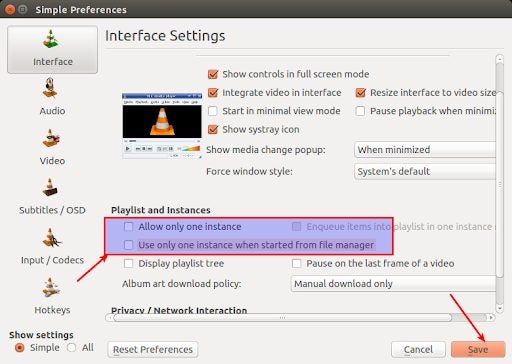
In Linux Ubuntu
Download the VLC Media player if you don’t have it installed and open it. From the Tools option in the Menu bar, choose Preferences. Go to the Interface tab. Uncheck Allow only one example. Also disable Use only one instance when starting from File Manager. Save. You will now be able to open two interfaces for VLC and watch two videos or other media at the same time.
Another way is to open Terminal, type VLC, and Enter. This way, you’ll use only one instance at the start. This is ideal if you only occasionally want to open more than one file at a time. You’ll still need to uncheck Allow only one instance in Preferences before running a second video.
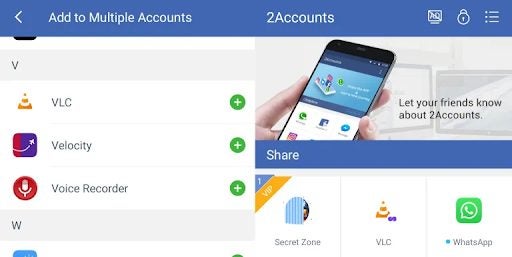
On Android phones
Install the 2Account Android app from the Google Play Store and open it. To add apps, you need to be able to run two elements at the same time, tap on Add more apps. Go to Other Application and select VLC. Tap Add. On the following screen, click Enable. Give the permissions requested. Now access VLC in 2Accounts. VLC will welcome you as if you have installed it for the first time.
Now load the VLC app on your home screen. You can split the screen and watch both videos simultaneously.
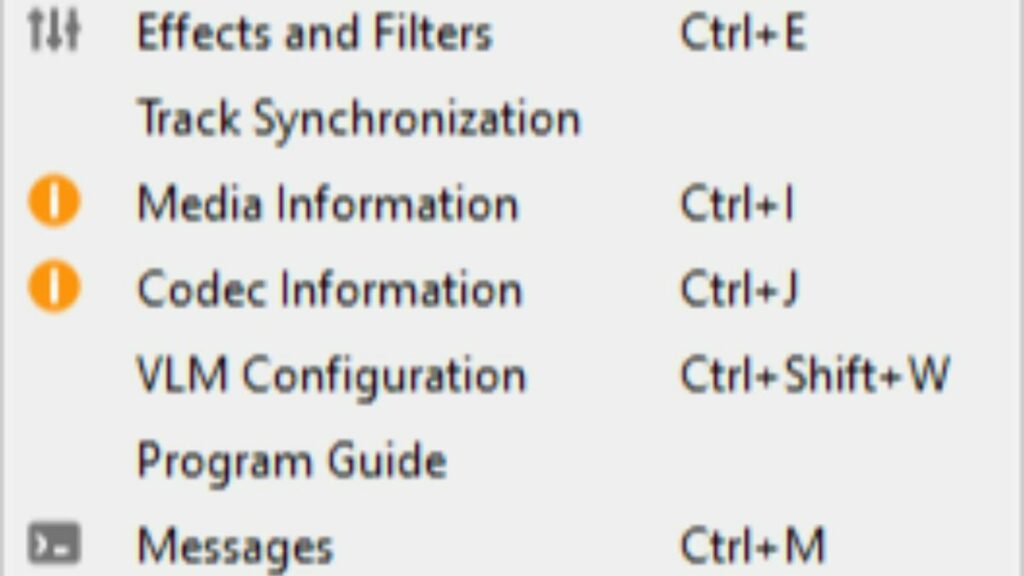
What is enqueue and dequeue in VLC?
VLC has the option of specifying where you want to place an element in a shared stream, playlist, or file. To enqueue an element means to play it last. You can add it as a Settings preference to ensure that all new elements will be added at the end. Removing an element from the front of the list is to dequeue it.
Why VLC tops the pops
VLC is not one of the most popular media players out there for nothing. It’s versatile, can read just about anything in any format, and can convert files in obscure formats to more modern and transportable ones. Among its best features is that you can watch more than one file or video at the same time very easily on a Windows PC, Mac, or your phone.
You can have multiple instances of VLC Media Player open at the same time, each streaming a different video. It takes multitasking to a whole new level, and what’s more, it’s completely free!
Media playback solutions are a dime-a-dozen these days. Most modern operating systems come with a serviceable video player pre-installed. Back when VLC Media Playerwas first introduced in 2001, there was a much stronger demand for ways to natively play audio and video files on-demand for free.
Despite the abundant nature of basic media playback software, VLC boasts several additional features that are worth taking a glance at. Whether your default app fails to play a file, or you are looking for editing functionality, VLC Media Player likely provides a specific feature that will help. After over 20 years of updates, this open-source app can recognize and play an impressive list of uncommon audio and video formats. With that in mind, let us take a closer look to determine if VLC Media Player is worth the download.
A free playback solution for obscure audio and video formats
Media playback solutions are a dime-a-dozen these days. Most modern operating systems come with a serviceable video player pre-installed. Back when VLC Media Player was first introduced in 2001, there was a much stronger demand for ways to natively play audio and video files on-demand for free.
Despite the abundant nature of basic media playback software, VLC boasts several additional features that are worth taking a glance at. Whether your default app fails to play a file, or you are looking for editing functionality, VLC Media Player likely provides a specific feature that will help. After over 20 years of updates, this open-source app can recognize and play an impressive list of uncommon audio and video formats. With that in mind, let us take a closer look to determine if VLC Media Player is worth the download.
A straightforward ‘play-everything’ media player
Launched by French developers in 1996, VLC has always touted a simple and clean interface. That no-nonsense, play anything reputation is well deserved. VLC gives easy access to all your device’s files without any additional bloat such as advertisements or premium subscription offers. The secret behind this ease of use is the vast array of video and audio codecs supported by VLC. This permits playback of nearly any file format under the sun without the use of conversion software. Once a file is running, the app offers unprecedented control over playback. You can change subtitle languages, synchronize audio, and apply a variety of filters to the content.
Options at your disposal, hover your mouse over the tools tab at the top of the screen.
Users also have access to simple video editing features such as cropping scenes and rotating images. You can learn more about these features here. When it comes to streaming, a wide range of content networks are available. You can even start video playback before the file is finished downloading. The instant playback feature works on P2P connections provided you set your torrent software up for sequential downloading.
Can you convert videos into different file formats using VLC Media Player?
VLC Media Player not only recognizes an enormous collection of video codecs, but you can even convert your files with obscure formats into a more universal extension. For instance, you can convert the rare H.264 video format into an MP4 file container. This feature is perfect for when you need to make your files more portable. Your MP4 video can then be comfortably played on most devices. Even if your goal is not to change the format outright, the conversion process can be used to reduce file size. Content creators who keep a library of past work will appreciate the ability to condense each file with ease.
This is the interface for converting your files into another format.
Is VLC media player safe?
With the number of frauds and malware going around the internet these days, it is wise to investigate foreign applications before installing them. Fortunately, the files for VLC Media Player are completely clear of any threats. Just be sure you download VLC Media Player from a trusted portal or directly from the publisher’s site. However, VLC does not scan the video and audio files you run through it for potential viruses. As with the program itself, be sure to acquire your audio and video files from a reputable source.
There are no viruses to see here, just your library of content.
Is VLC better than Windows Media Player?
If you have a Windows operating system, then you may be wondering if VLC is a substantial upgrade over Microsoft’s built-in playback application. Windows Media Player is a convenient choice for quickly watching short clips in popular file formats. The ability to rip data directly from discs is also an appreciated feature. For some basic users, the convenience of Windows Media Player will outshine VLC.
With that in mind, VLC’s advanced features are a huge step-up from what Microsoft provides out of the box. You are bound to run into a few file formats that Windows Media Player does not recognize. With VLC, it is extremely rare when a file will not play as intended. Once you have VLC installed, you never have to worry about compatibility again.
A simple overview of the GUI and layout that comes standard on Windows.
Is VLC media player customizable?
While customization options are not as robust as Windows Media Player, VideoLAN has provided numerous options for changing both visual appearance and runtime performance. On the cosmetic side, you have numerous skins to choose from that alter the visual theme. If none of the presets suit your fancy, you can create your own theme using the VLC skin editor.
When it comes to performance, VLC offers the ability to download extensions. Much like your web browser, VLC extensions are capable of adding any functionality an independent developer envisions. In the case of media playback, audio and visual filters are especially popular in the community.
One example of a custom VLC Media Player experience.
Does VLC media player support subtitles?
When watching anime or other foreign content, you need a reliable way to add subtitles to each viewing. The good news is VLC makes it simple to add subtitles in the language of your choice. If you already have a subtitle file, it should activate immediately. In some rare cases, you may need to right-click the video and manually select your subtitle file from the drop-down menu.
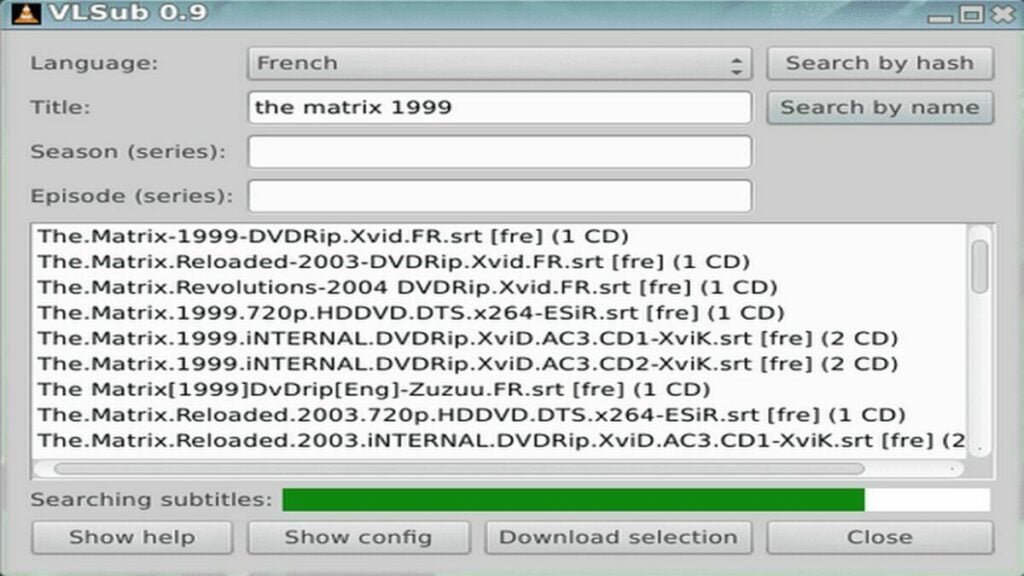
For shows that did not come with a subtitle file, you can use the handy extension, VLSub. This extension is available for free directly from the VLC add-ons store. Just type the name of your movie and desired language. VLSub will search the internet for the most relevant subtitle files and let you download them quickly. Once installed, VLSub allows you to complete the language setup without leaving the VLC Media Player app itself.
This extension makes adding subtitles a breeze.
The final verdict on VLC media player
Overall, VLC provides a smooth and reliable media playback service that can play virtually any media file. The ease of use, wide range of acceptable formats, subtitle support, and the suite of video editing coupled with conversion features make VLC media player a worthy addition to any of your devices. It was originally designed as a video player, so it’s not as well suited for music playback. However, there is an impressive degree of value for a free application with no other monetization schemes beyond the main website’s donate button. The fact that users have supported VLC for over 20 years is a clear indication of the media player’s efficacy. To find out how simple this app really is, download VLC for freetoday.
VLC Media Player runs on everything, including relatively closed ecosystems like macOS
PROS
Massive assortment of media codecs
Allows for playback while a video is still downloading
A suite of video editing features built in
CONS
Files must be selected in their directory folders to initiate playback
Interface is better suited for video rather than audio
Compared to other players, it lacks customization options
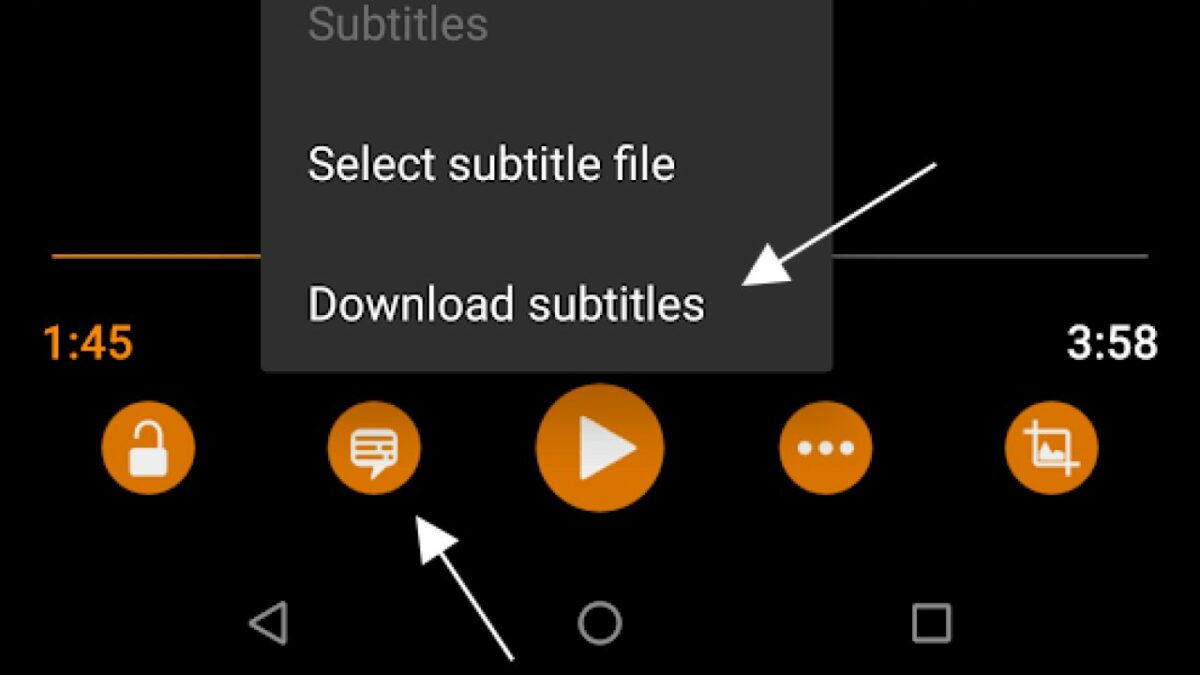
You can watch videos and movies from different sources using the VLC Media Player, which is available on different platforms, including Microsoft Windows, macOS, Android, iOS, and Linux. If you’re watching overseas movies or foreign language films, you’ll probably want to download subtitles.
They’ll help you better understand what’s happening in the movie or TV series. Here’s how you can add subtitles to a movie or video on VLC Media Player.
Method 1: Add subtitles to your movies or videos manually
Adding appropriate subtitles to your movies or videos can enhance your experience of watching them and sometimes also make them easier to understand. There are different ways to add subtitles in the VLC Media Player and to get them to play along with your video or movie.
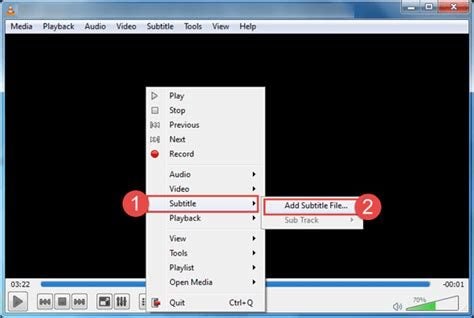
Step 1
Open the file for the video or movie you want to watch in VLC. Select Subtitle from the top menu. Select Sub Track, and you will see a listing of the available subtitles. Select the appropriate file in the language you want your subtitles to play in. VLC should then display subtitles while you’re watching your video or movie.
Step 2
If you don’t see the subtitle file, select Addsubtitle file from the Subtitle menu and manually select your downloaded file. VLC should then be able to pick it up and play it.
Step 3
If you can’t download subtitles, try resetting your settings to default. Make sure the subtitle file and the movie or video file you want to watch have the same name (leave the extension off). Then just drop the subtitle onto the VLC playing file. Play the movie with the VLC Media Player, and it should automatically show the subtitles.
Step 4
You can permanently add subtitles to a VLC file. When you open a video file, the VLC Media Player will automatically recognize the presence of a related subtitle file and open it at the same time. You can do this on VLC for iOS, iPhone, and Android.
Method 2: Download subtitles automatically
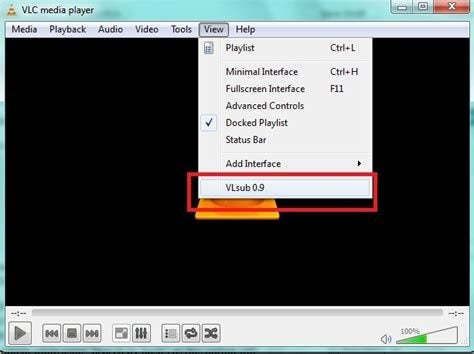
Another way to get subtitles onto the movies you watch through the VLC media player is to download them automatically from opensubtitles.org using an extension called VLSub. It’s a very easy and useful trick to learn. Here’s how you do it:
Step 1
Go to https://addons.videolan.org/p/1154045/. Then click on Files. After that,right-click vlsub.lua. Then choose the Save link to download VLSub into whatever system you are using.
Step 2
Go to your Downloads folder and find the vlsub.lua file. Move it into the Extensions folder in the VLC root directory.
Step 3
In the VLC media player, click Media > Open file to import a movie or video that you want to watch. Or you can just drag the movie or video file to the VLC Media Player. You can also press the shortcut key Ctrl + O. then click VLsub under View. VLC will open a dialog box. In the dialog box, choose the subtitle language that you want. Input the movie title/series episode/ season you want to watch in the dialog box. Then click Search to fetch appropriate subtitles from OpenSubtitles.org.
Step 4
The subtitle file will download to the default location of the video or movie and automatically play with your video or movie. What could be easier?
Change the size of your subtitles
Go to Tools → Preferences (set your Show Settings to All) and Video → Subtitles/OSD → Text renderer and Adjust. Setting the Font Size In pixels overrides the Relative Font Size selection. Press the Save button in VLC Setup to save your selected subtitle size and restart the VLC Media Player.
You can edit a subtitle file
Download Subtitles Edit and run on your computer. Add your subtitles file by dragging and dropping it or adding it through the File tab. Then click on Edit it. You can now change the font style or color of your subtitles. Save your Subtitles file.
Enjoy subtitles on your foreign movies
VLC Media Player is a versatile platform for watching movies and videos on many different devices and operating systems. Being able to add subtitles is just one of the advantages of using VLC to enhance your experience of watching your favorite content.
VLC Media Player is one of the most powerful and capable media player tools available for Windows. This utility is usually the utility of choice when it comes to formats of video playback files that Windows Media Player simply doesn’t support. In fact, many users end up making VLC Media PLayer their default media player.
While VLC Media Player usually delivers outstanding quality playback of various video and audio formats, the tool is not completely exempt from error. In the article below, we’ll highlight the three most prevalent issues that you may encounter while using VLC Media Player. We’ll also show you how to fix them and prevent them from happening again in the future.
The 3 most prevalent VLC Media Player Issues
It would be pointless to give you a guide on how to fix the various issues we’ve found with VLC Media Player without first giving you an overview of what those issues are. We won’t spend long on this section, though.
All three of these issues may present themselves while you’re trying to play a media file, which makes them even more frustrating. The three issues are:
VLC Media Player causing media files to lag, skip, or stutter.
Media files in VLC Media Player becoming scrambled.
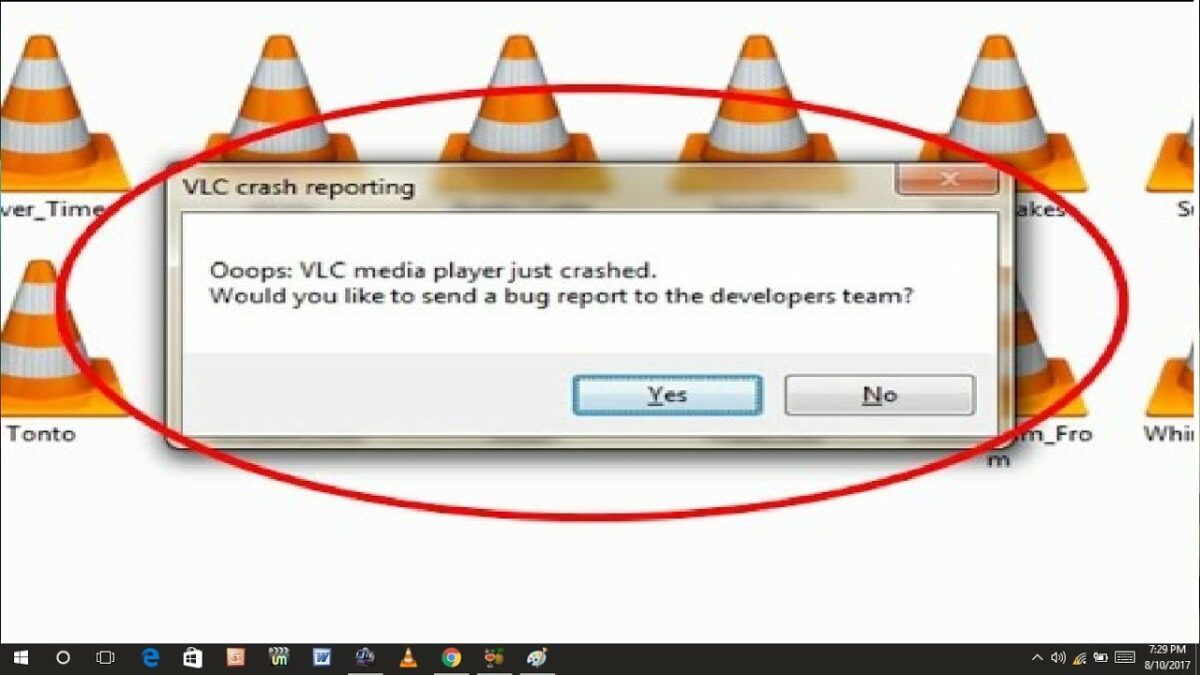
VLC Media Player crashing during playback or simply not starting at all.
Below, we’ll take a look at how to fix these issues and ensure that they never plague your VLC Media Player playback experience again. We’ve got multiple solutions for each failure, so if one doesn’t work, just go ahead and try the others. You should find at least one solution that works for whichever instance of failure you’re experiencing.
How to fix these 3 VLC Media Player problems
Stuttering, Lagging and Skipping
– First solution: Look for the File Caching option in Settings under Input/Codecs. Change the value from 300 to 1000 and save.
– Second solution: Open the VLC media player, press CTRL + P to show Settings. Select All. Go to Input/Codecs. Disable hardware-accelerated decoding.
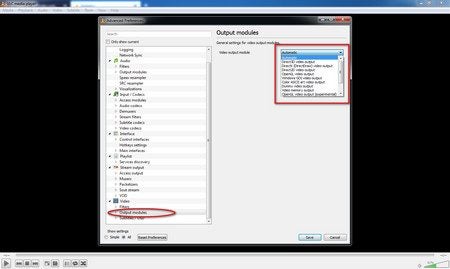
– Third solution: Open the VLC player, press CTRL + P to show Settings. Go to the Video Output module and try the options until you find one you like.
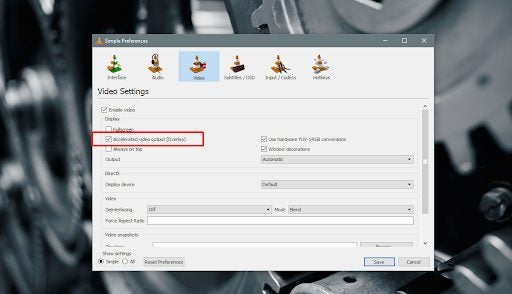
If Video Playback is Scrambled
– First solution: Open the VLC media player and press CTRL + P to open Preferences. Select Video. Under Display turn off Accelerated video output and save.
– Second solution: Open the VLC player, press CTRL + P to show Settings. Select Input/Codecs. Find Advanced and Network Caching. Increase the caching value.
– Third solution: Instead of playing the video from a network drive or DVD, copy it onto your desktop. This often works if nothing else will.
The VLC Player Crashes
– First solution: Exit the VLC. Double click This PC/My Computer. Click View and Check for Hidden files. Open C:\User\User_Name\AppData\Roaming\VLC. Right-click VLCC and rename it.
– Solution 2: In File Explorer in Windows 10, find the right 64-bit or 32-bit Program File, click on exe, select Properties and run it in Compatibility Mode.
– Solution 3: Try Disabling Pre-loading MKV Files. If that fails, reinstall the VLC player. Uninstall it in Apps and Features, reboot your computer and reinstall the VLC setup from the official website.
Keep Your VLC Player Operating Smoothly
VLC Media Player has become somewhat of a staple for people who need a tool that can play various media formats. Even though the tool works well most of the time, it has been known to present users with issues every now and again.
Despite this, VLC Media Player has been around for quite a while and is still one of the most reliable such programs for Windows. You can even record with VLC Media Player these days.
If you run into any issues, try the solutions we’ve outlined above, and you should be good to go again. If you’re looking for other guides for VLC Media Player usage, try our guide on how to edit videos within VLC Media Player.
VLC Media Player’s attraction is that it is a free and open-source media player that you can use to take screenshots. You might want to share a specific screen with someone, especially if you’re collaborating.
If you are playing a vid and want to take a snapshot of a particular frame, it is straightforward to do in VLC Media Player. Read on to see how it’s possible with just two keys and one tap of the keyboard.
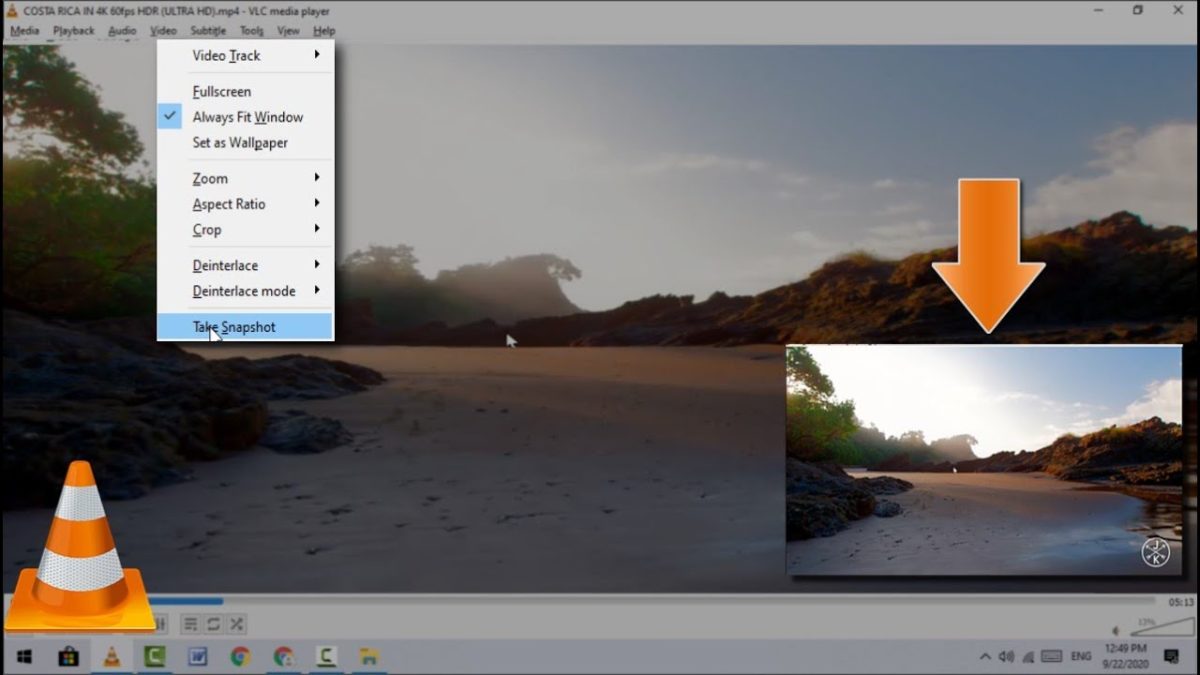
Start your video playing
First of all, you need something to capture. You can begin playing your video up to the required position.
Take your Screenshot
When you get to the frame you want to keep, press Shift+S, and voila, the image on the screen is saved.
Tip:If you open VLC Player and start taking screenshots, they will default to being saved in your Pictures folder. It is better to create a new folder within your Pictures folder and then go to Tools/Preferences/Video and set the download folder to the new folder you have made.
All your screenshots will then be in one folder and will not get muddled up with other pictures.
Capture that screen!
Now you know how easy it is to take a screenshot from your favorite vid is a two-key, one-tap process. It’s fabulous for new wallpapers or funny memes, so let your creative drive go wild!
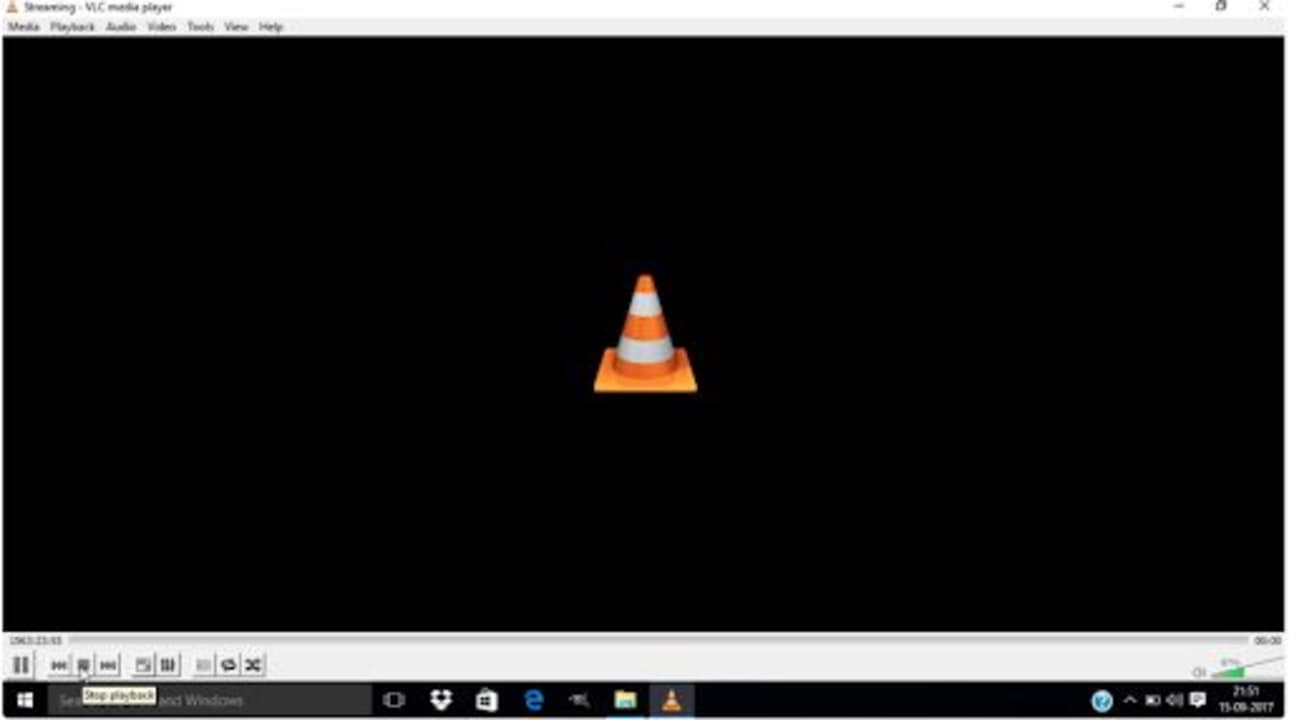
VLC Media Player has the ability to loop videos on various platforms. By looping videos, you can set multiple videos to play one after another in a continuous loop. Or you can just put a single video to play in a loop.
Although this is not a new feature, but rather one that has been around for a while, it is still a very useful function to have. Let’s look at how you can set your video to loop on VLC Media Player in Windows and Mac.
Create a Simple Loop
– Run VLCMedia Player on your Windows or Mac computer.
– Open the video you want to loop. If you want to loop multiple videos, you have to add all the videos to the playlist.
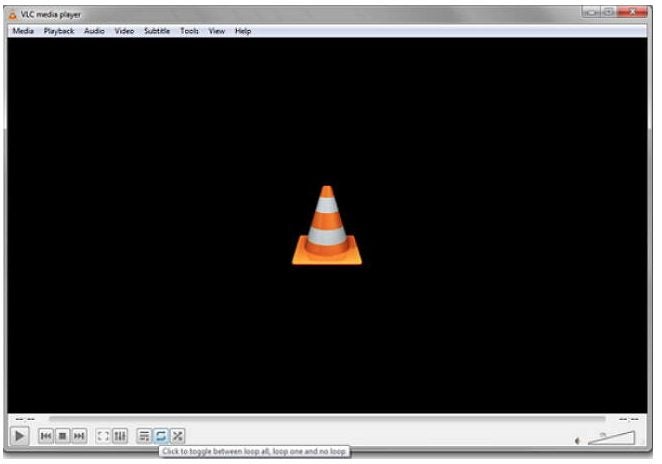
– With your videos ready, you can now press the ‘Loop’ button at the bottom of the screen. The ‘Loop’ button is represented by the two arrows completing a loop.
Tap the icon until you have the right setting between no loop, loop one or loop all. Your video or videos will continue to run in this loop until you stop the loop
Loop a Specific Section in a Video
– Run VLC Media Player on your Windows or Mac computer and open the video.
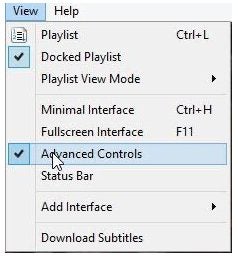
– Click on ‘View.’
– Click on ‘Advanced Controls.
– Move the video to the starting point of the loop and click on the loop icon.
Now move the video to the endpoint and click the loop button again. Now when you press play, it will only loop the selected section.
Loop Videos Easily With VLC Media Player
Sometimes, people loop videos just for a good laugh or to repeat sections to make the video stand out more. While not available on all video editors, we’re glad that VLC Video Player has this option.
Not only is VLC Media Player able to play most video and audio formats, but it also has video editing features that make it a beneficial program. With the built-in video editing tools, you can cut a video and delete parts you don’t want and many other features.
Let’s look at how you can use the basic editing tools in VLC to edit a video.
Activate Advanced Controls
Run the media player on your chosen device and start your video.To start video editing, you will need to activate the advanced controls.
– Click ‘View’ from the menu bar.
In the drop-down menu, choose ‘Advanced Controls.’ You will see a new toolbar at the bottom of the window, including a red recording button.
Cut and Crop the Video
You can now cut or trim the video any way you want.
– Drag the sliding bar to the start point of the section you want to keep.
– Now press the ‘Record’ and ‘Play’ buttons to start recording the section you want to keep.
– Press the ‘Record’ button once again to stop the recording at your chosen point.
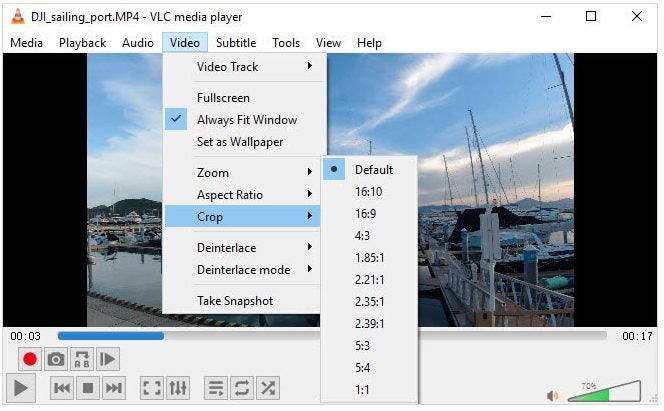
Feel free to also crop if you need to:
– Click ‘Video’ in the top menu bar.
Now click on ‘Crop,’ and choose the aspect ratio you want to crop in the drop-down list.
Rotate Video
– Navigate to ‘Adjustments and Effects.’
– Click on ‘Transform.’
Choose how you want to rotate your video.
Start Editing Videos Simply With VLC
VLC has many hidden bonus features that add further value to the program. Video editing is one of these bonus features. As you can see from the steps above, learning how to use the video editing tools in VLC is easy.
VLC is a top-rated media player that enables you to watch videos, listen to music, and even make recordings on your Windows and Mac computers.
It’s important to know how to update VLC to the latest version to keep it working correctly. There are two main methods, updating VLC on Windows and updating it on Mac. Let’s look at both options below.
Updating on Windows
Below is how to update your media player on Windows computers.
– Launch VLC on your Windows computer.
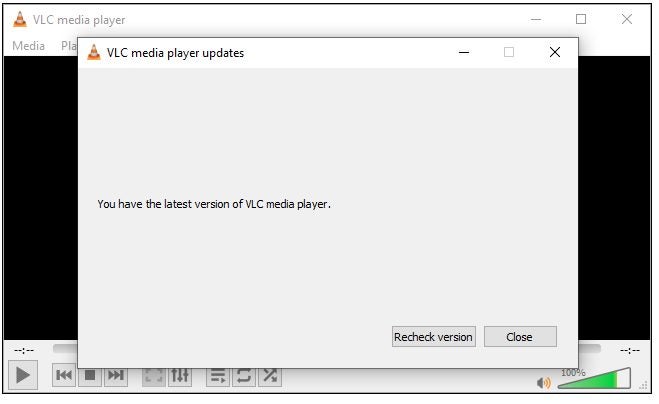
– Click on ‘‘Help’’ in the top menu bar. – Click ‘‘Check for Updates’’ in the drop-down list that appears. – If there is an update, the program will offer the option to download it. Click ‘‘Yes’’ to start the process. – Once the update has been downloaded, you will receive an option to install it. Click on ‘Install’, to start the installation. – Run through the installer and click on ‘Finish’ once it has been completed.
Now you’ll see a notification stating that your media player is up to date.
Updating on Mac
Below are the steps to update your VLCplayer on Mac computers
– Launch VLC on your Mac computer.
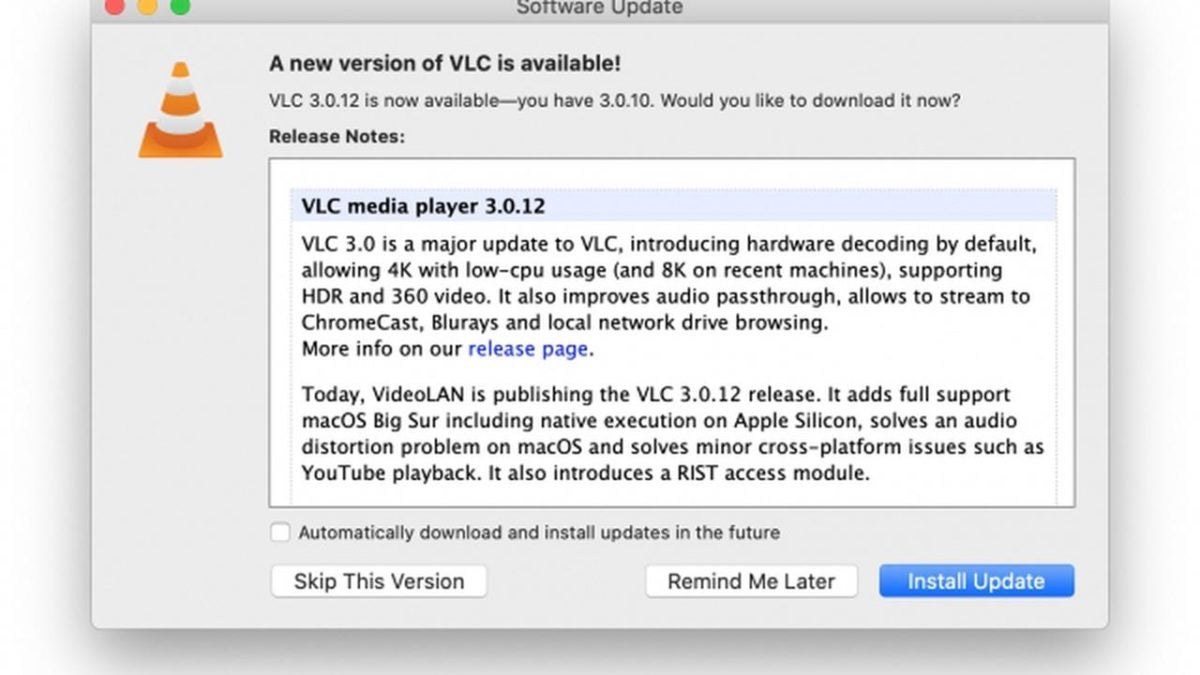
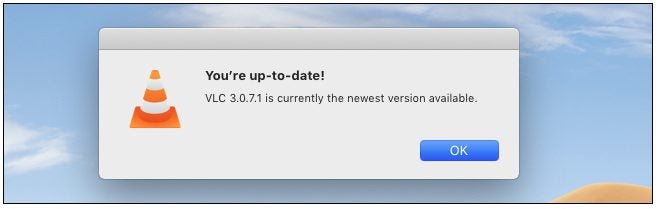
– Click on VLC in the top menu bar. – Now click on ‘‘Check for Update’’ in the drop-down list. – If there is an update available, VLC will let you know and provide an option to update it. Click on ‘‘Install Update.’’ – Once it is done with the download, click on ‘‘Install and Relaunch.’’ – If you were to click ‘‘Check for Update’’ again, you will see a notification that your player is up to date.
Keep Your Programs Update
As you can see, it is straightforward to keep your program updated, and keeping your player updated is essential to keep it working correctly. Why not check your VLC media player now to see if you have any updates waiting to be installed?
VLC Media Player is a great program to play movies, videos, and music on Windows and Mac devices. But, did you know that you can also use this media player to make recordings?
This function is not one of the best-known features because it’s not available on the home screen as it’s an advanced setting and a very useful feature if you want to record from a DVD or stream, or even record your desktop.
Open VLC
Launch VLC by clicking the app icon.
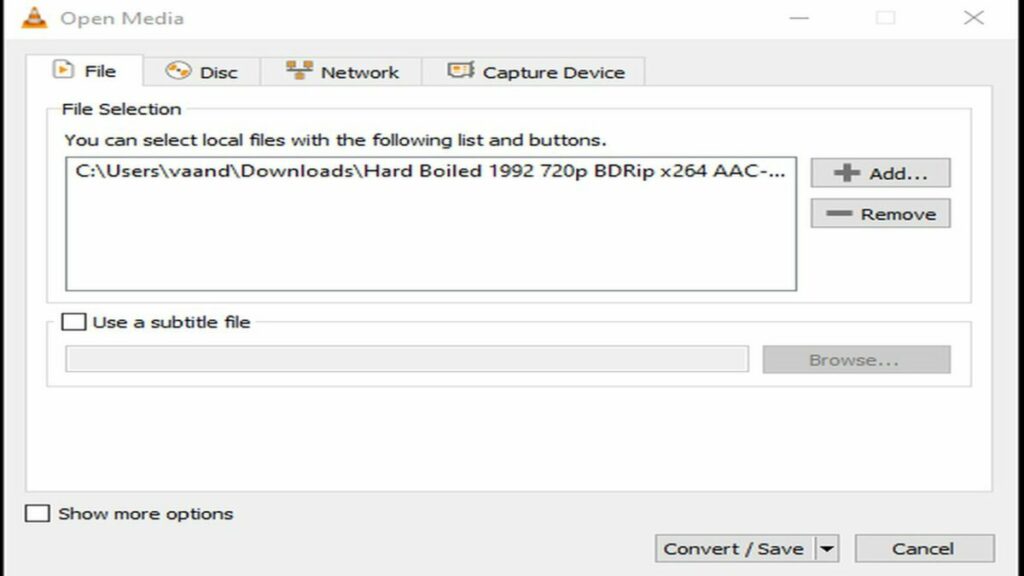
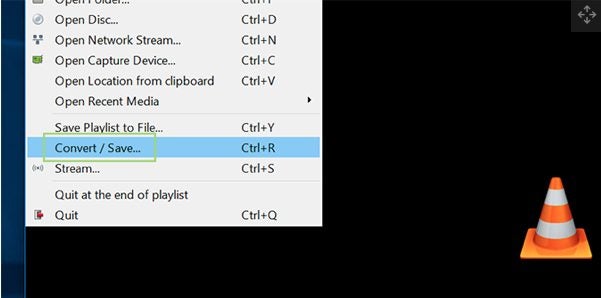
Go to ‘Media’ and Then ‘Convert/Save’
Navigate to the ‘Media’ tab in the top right corner of the media player. In the drop-down list, click ‘Convert/Save.’
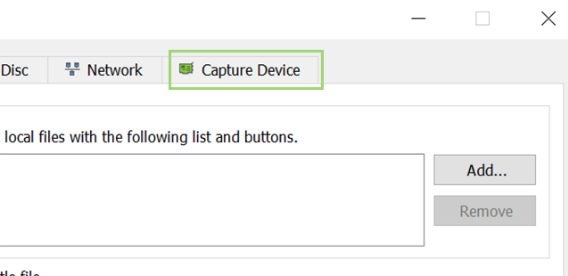
Click on the ‘Capture Device’ Tab
In the new window, choose the tab on your right titled ‘Capture Device.’
Set Capture Mode
The first line lets you set the capture mode. By clicking this option, a drop-down list will appear with the available options. DirectShow taps into your webcam and allows you to record with the webcam. The TV-Digital option lets you record from a TV tuner card. Finally, the Desktop option enables you to record what’s happening on your desktop screen, such as streaming videos and DVDs.
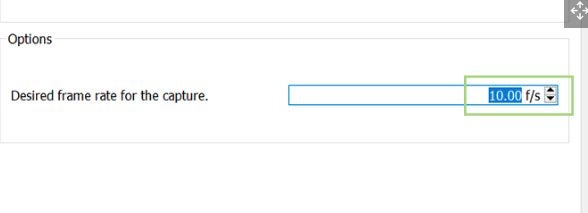
Set Your Frame Rate
Set your desired frame rate; we recommend using about 10f/s (frames per second), as this will be enough for most recordings.
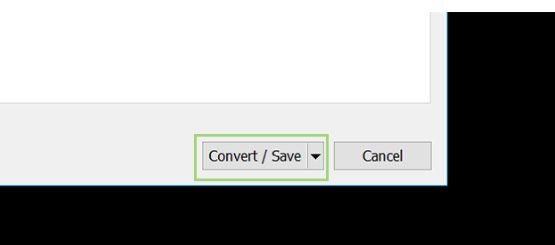
Click ‘Convert/Save’
Click ‘Convert/Save’ at the bottom of the screen.
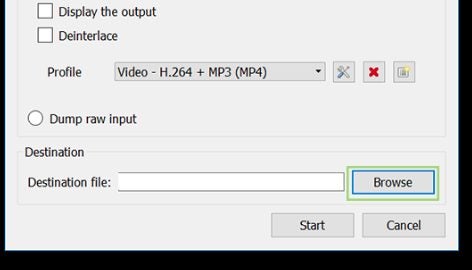
Choose the File Name and Destination for Your Saved Recording
Next, type in the file name and destination folder you would like to save the recording to once completed.
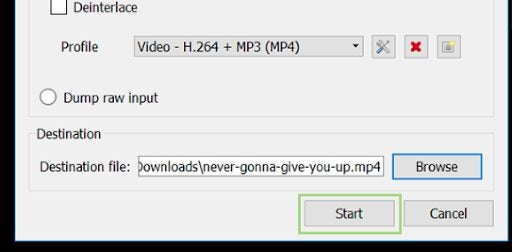
Click on ‘Start’
Click on ‘Start’ to start with your recording.
Click on ‘Stop’ When Finished
Click ‘Stop’ once you have finished your recording.
Watch, Listen, and Record
Not only can you watch videos and listen to music with VLC media player, but you can also make recordings. Why not try taking a recording now?