How to make custom brushes in Paint Tool SAI

Paint Tool SAI is an excellent platform for creating sketches and other art projects on your Windows PC. The numerous default options provided are enough for anyone to get started. However, you may decide that a custom brush is needed to serve a specific purpose later in a project. In these unforeseen circumstances, you can turn to the custom brush menu in Paint Tool SAI.

PaintTool SAI DOWNLOAD

With a little tinkering, you can create brushes capable of solving any design problems you come across.

  1. Navigating your free trial

    The free trial ends with this message in a dialog box

    Although Paint Tool SAI requires longtime users to pay for a license, new users can enjoy all the features of this software completely free for the first 31 days it is installed on your PC. The best part is that this offer is automatically in effect as soon as you open your first instance of SAI. Note the trial days remaining text at the top right of the screen. Once this number reaches 0, you will need to pay for a license to keep using the installation. You could keep installing fresh files to restart your trial, but you would lose each of your custom brushes each time you reinstall the program. If you create many digital drawings, it is worth keeping the full version permanently installed.

  2. Drafting a new brush

    This section is where you can select new brushes

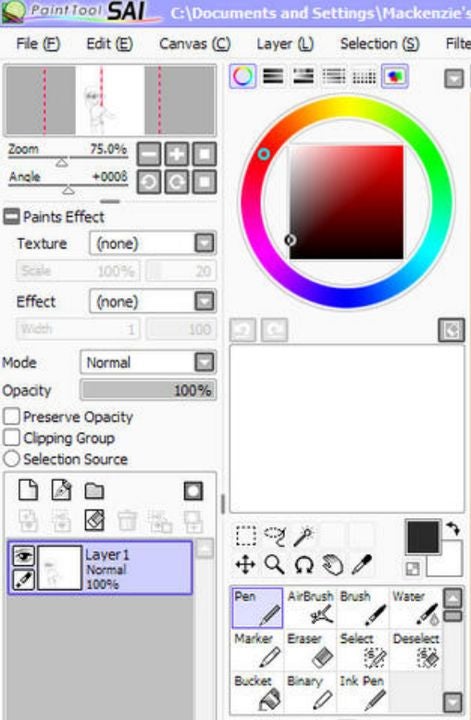
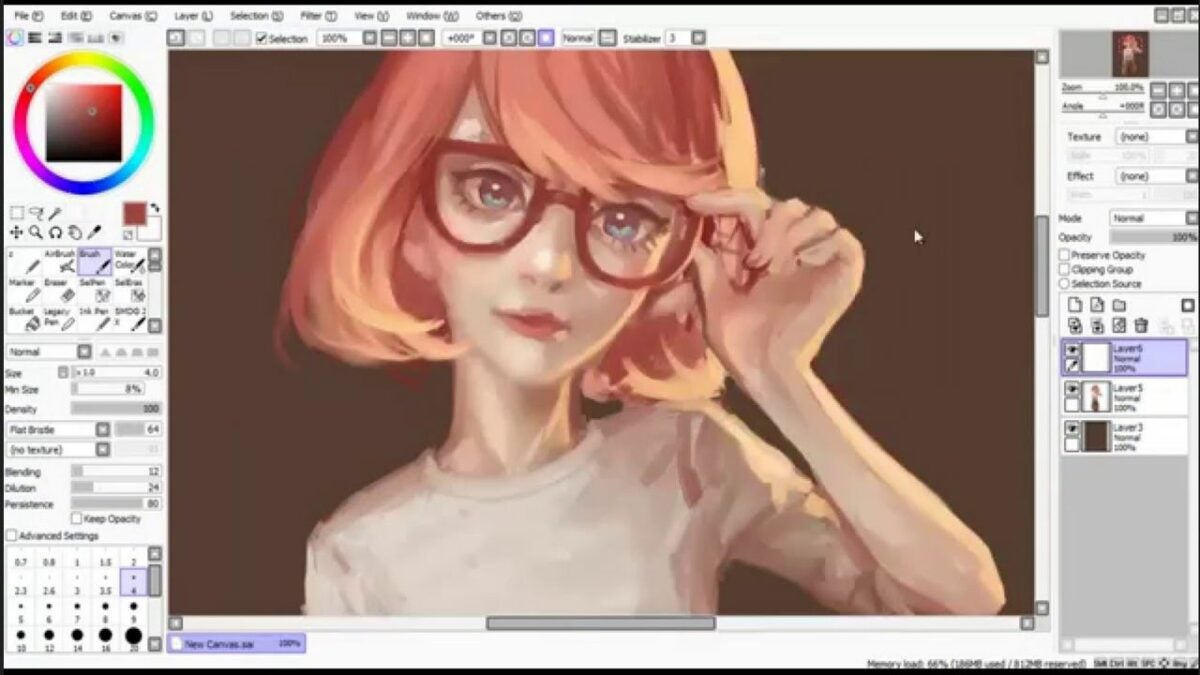
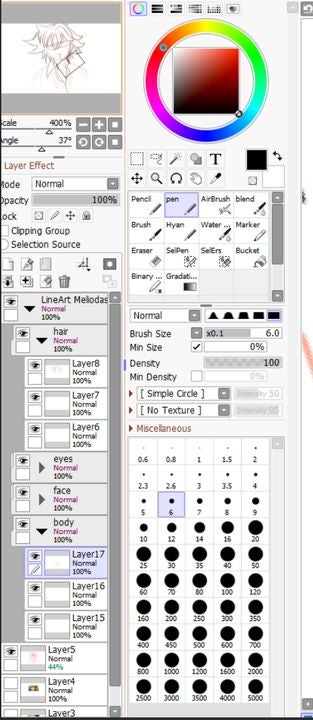
    Once you have Paint Tool SAI in an open window, check the tools section on the left side of your screen. Here, you will see blank white squares listed next to the default brush options. Right-click on an empty square to bring up the custom brush menu. Choose between a pencil, eraser, marker, watercolor brush, regular brush, or an air brush by left-clicking on your selection.

  3. Enter brush information

    Examples of different custom brush settings for each utensil category

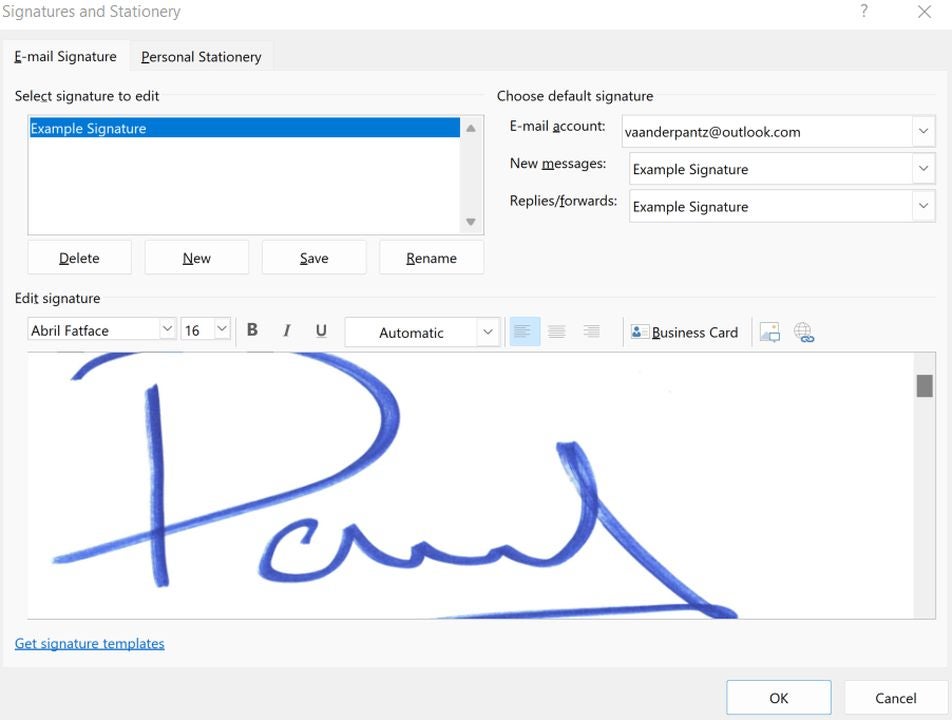
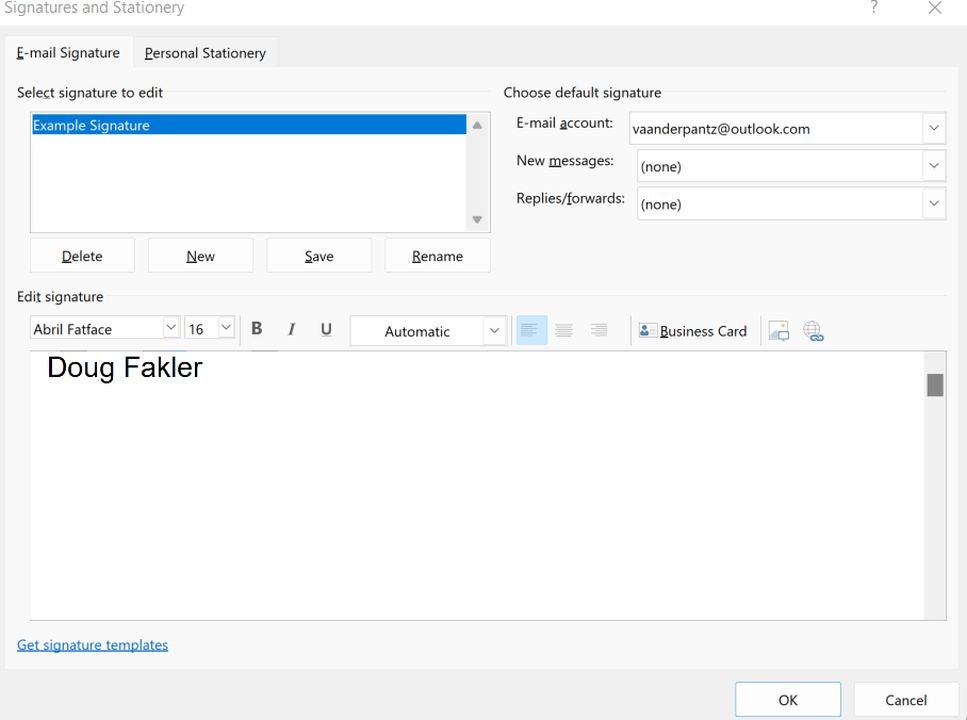
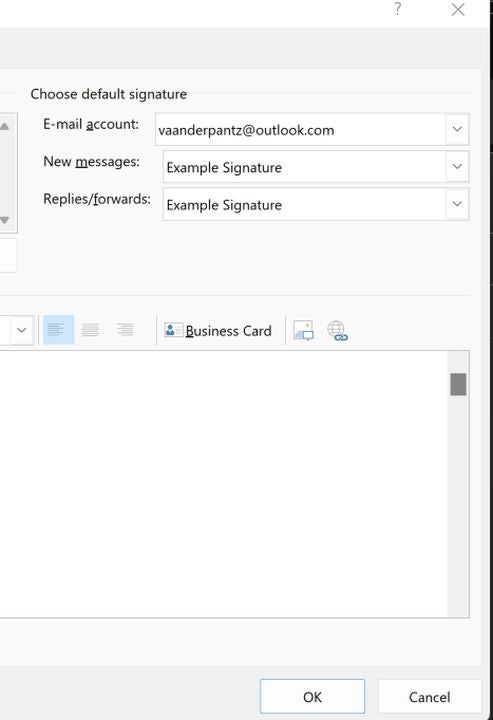
    Your new brush will appear in the previously empty white square you clicked in the previous step. Click your new brush twice to open a window that allows you to add custom details. There is a custom naming field that allows you to label each brush for quick access. In addition to a title, you can also write a concise description of the brush that jogs your memory later. This is perfect when you know you will be away from the PC for an extended period. Write a description that, when paired with the brush, will ensure you remember what you were last working on.

  4. Making quick edits and adjustments

    Make swift adjustments to each brush with these settings

    As you create a collection of custom brushes, you will want to be able to keep track of them efficiently. Creating keyboard shortcuts for each brush is the ideal way to have each one at your fingertips. This same technique can also be used to quickly adjust the degree to which SAI stabilizes your utensil when drawing. Double-click on the brush you wish to edit in the tools section. In the options menu, scroll down and click on add shortcut. Press an unused key that you would like to use to quickly summon the brush. Right underneath this setting, you will find the pressure stabilization settings. Move the sliders as you see fit to compensate for your specific hand gestures when drawing.

  5. Access advanced customization settings

    Advanced settings are found at the bottom of this box

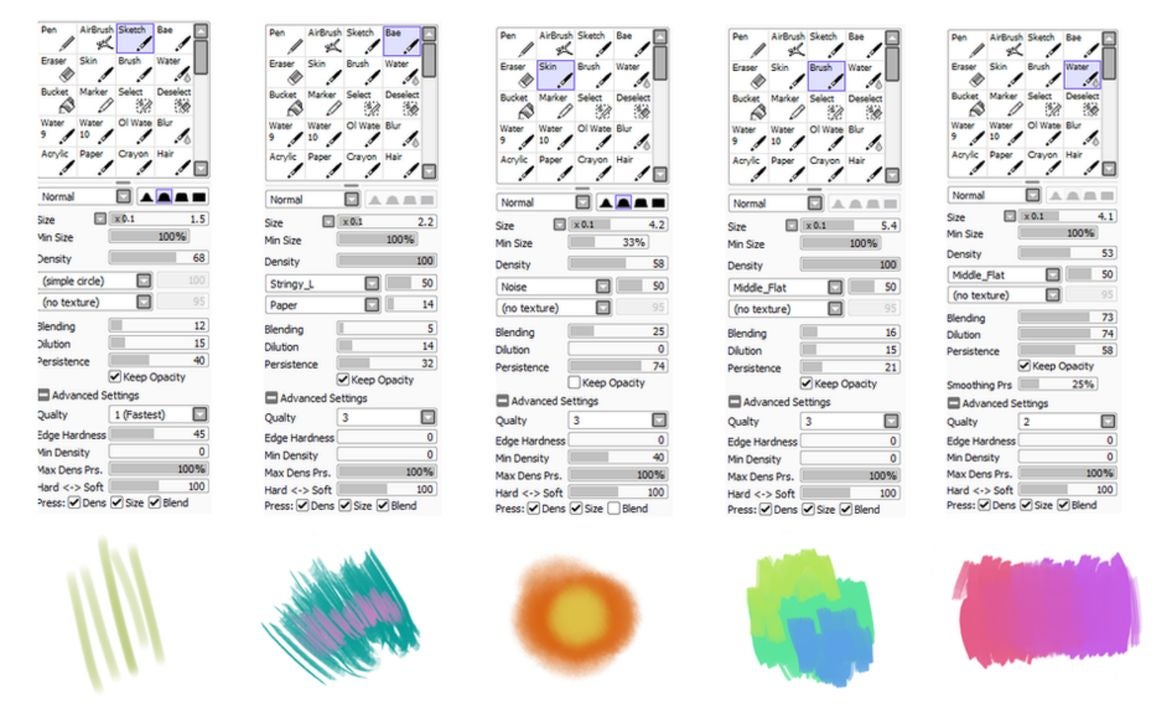
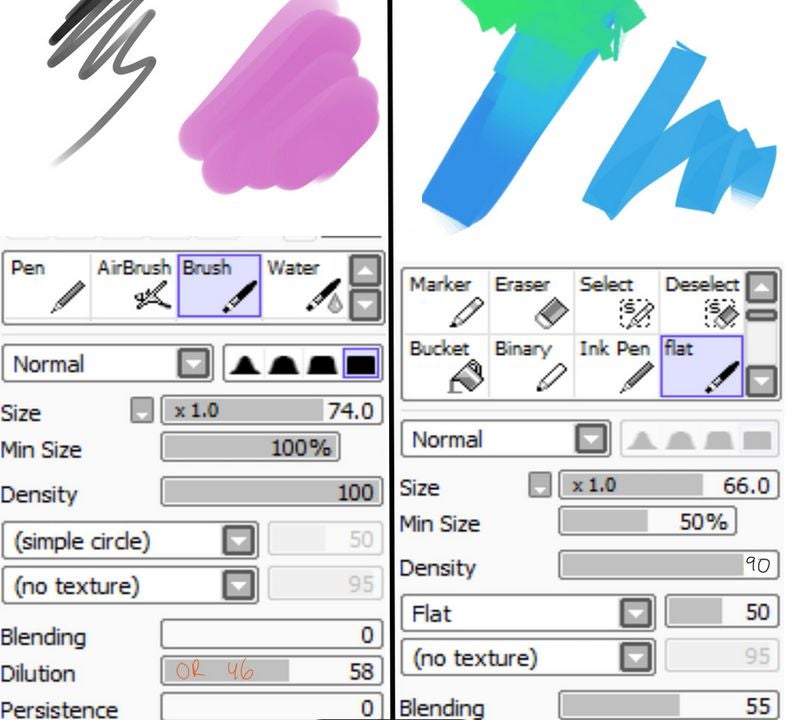
    When the above methods fail to produce the specific results you desire, there is one more menu to try. With your brush selected, look at where you choose line size to the left of the canvas. Directly above this box is the advanced settings tab. Click on it to access the final list of options. This is where you can change crucial details of your brush such as density and texture. There are also options for adjusting the shape, softness, and hardness of the lines you create. After making your selections, click anywhere away from the settings tab to return your view to the main canvas.

Always be designing

Creating a custom brush with Paint SAI gives you the power to let your imagination run wild when it comes to graphic design on your computer. And, it’s easy to use. Keep the power of the paintbrush going when you’re on your mobile device with by downloading Procreate APK for Android.

The 5 best apps for recording calls on Android phones

It is reasonable to assume that Android devices would make it simple to record calls out of the box. However, this basic option is not available in the standard operating system. With each update, users must look for external apps that remain compatible with the latest firmware. The good news is that there are many third-party solutions that you can download to get the job done on any version of Android.

There are some seriously impressive free services for recording calls on Android, and the option to upgrade to premium apps is also available. As with any market, each call recorder app has its own strengths and weaknesses to consider. The following breakdown will assist you in choosing an app that fits your needs.

Automatic Call Recorder

As the name implies, Automatic Call Recorder by Appliqato captures each of your conversations without you having to do anything extra. You can also determine which calls are recorded by enabling individual names on your contacts list. After you make a recording, you can effortlessly upload them to a cloud storage platform like Google Drive and Dropbox for later use. There is no limit to how many recordings you can make, except for your device’s available memory.

Automatic Call Recorder APK Download
Easily view and manage your list of recordings from this screen

Google Voice

If you are in a supported region, Google Voice is an excellent free solution for recording phone calls. Before each conversation, you have the option to record it with the press of a button. The real standout here is the app’s ease of use. Much like everything else Google does, the process is streamlined enough that non-tech-savvy people can work through it. Another nice feature is the ability to forward calls from your standard phone number directly to your Google Voice line.

Google Voice APK Download
Customize which calls get recorded with Google Voice

Cube Call Recorder ACR

One of the most popular apps in this space is Cube Call Recorder ACR. The app is no doubt this popular thanks to the reliable service and security features built-in. Support for VoIP services such as Slack, WhatsApp, and Facebook Messenger is also appreciated. For sensitive phone calls, you can hide the recordings from the file list on your device.

Cube Call Recorder ACR APK Download
Cube ACR makes managing your recorded files a breeze.

Automatic Call Recorder Hide App Pro callBOX

SMS Robot delivers one of the most fully featured call recorder apps available on Android. Not only can you record each call in HD quality, but you can even remove sounds and traces of other apps while recording. When you need crisp audio quality with no distracting noise, callBOX will provide the clarity you need. Each call is automatically recorded and stored as an mp3 file. The advantage of the mp3 format is that you can easily transfer the file to any other device or software.

Automatic Call Recorder Hide App Pro callBOX APK Download
Back up your recordings to cloud storage with just one tap of a button.

RMC – Android Call Recorder

Record My Call is another simple option for capturing the most important conversations had on your phone. You can set up automatic recording for both incoming and outgoing phone calls. Better yet, there is a manual record feature that allows you to instantly start capturing audio mid-call with the press of a button. After you complete a recording, you have several options for which file format you would like to export as. You can even backup your files on the cloud storage platform of your choice.

RMC: Android Call Recorder APK Download
RMC allows you to record voicemail messages in addition to regular calls.

Protecting yourself from spam calls

One of the most common reasons for recording phone calls is to have some evidence in case you get scammed. The abundance of telemarketers and robo-callers puts you at risk whenever you use your phone. However, you can mitigate most spam calls with the help of the Truecaller app for Android. This handy software automatically blocks the onslaught of spam calls that could potentially result in your data or money being stolen. Having fewer dishonest phone calls to record will make your life much easier.

The 5 Best VPNs for securing your online messages

Gathering data from your online activities is a highly profitable venture for many businesses. Some corporations and tech companies will exploit your information as much as possible should you leave your devices unprotected from probing attempts. Luckily, you can use a virtual private network to keep your online footprint to a minimum.

BEST VPNs of 2022 DOWNLOAD NOW!

In addition to hiding your online activities, a VPN will also allow you to securely message your contacts without fear of prying eyes. The best VPNs provide multiple layers of protection. You can hide your IP address, search anonymously, and encrypt sensitive messages before sending them. Once you encrypt a chat message, it’s nearly impossible for third parties to intercept it. The following virtual private networks will give you everything you need to shield yourself from data thieves.

Nord VPN

Nord VPN may be the most effective application for securing your online presence. You’ll enjoy multiple levels of protection without sacrificing your internet speed. Nord can maintain fast speeds thanks to the vast array of servers it owns around the globe. Being a massive brand gives Nord VPN a serious advantage in the online security sector.

NordVPN DOWNLOAD

While browsing, you can anonymize all your activity by activating the VPN. If Nord’s connection ever falters, you can quickly close your internet session with a kill switch. This prevents your open tabs from taking your data during a temporary lapse in service. Fortunately, Nord’s connection status remains steadfast a vast majority of the time. The kill switch is just a nice insurance policy on top of the excellent performance. You can also specify the location of the fake IP address you generate to access Geo locked content on video streaming services such as Netflix. And of course, Nord’s message encryption ensures your confidential chats stay that way.

Nord VPN makes it easy to assign a new location to your IP address.

Express VPN

Express VPN has taken the world by storm with its extensive marketing campaigns and simple-to-use service. If you’re a beginner in this space, Express VPN is a suitable place to start. The app itself walks you through setup, and there are extensive tutorials on sites like YouTube to help you set up the advanced options that interest you.

Express VPN DOWNLOAD

Messaging with Express VPN is made especially secure with the help of Trusted Server technology. It’s effective because all of the company’s servers operate on RAM memory. Unlike traditional hard drives, RAM memory is deleted each time a device is rebooted. This means that any trace of your sensitive chats is automatically deleted every few hours. Combine that with the standard IP spoofing and anonymity features found in most VPNs, and Express offers a complete package.

Set your Express VPN options on this screen.

Surfshark

If you’re looking for a value option, Surfshark is the VPN for you. The low monthly rate is among the best on the market, and you can even get your money back within 30 days. But don’t be fooled by the low price — Surfshark still brings a lot to the table. You can take advantage of multi-hop, which bounces your IP across multiple locations instead of just one. Anyone spying on you would have a lot of trouble tracking a multi-hop connection.

Surfshark VPN DOWNLOAD

Surfshark facilitates unlimited connections from a single account. This allows you to secure your privacy on each of your devices. Your chat messages will be fully encrypted yet easy to open on any device with Surfshark installed.

Save your favorite IP locations for quick access in Surfshark.

Proton VPN

The Proton suite of online applications is widely regarded as an optimal way to secure your data online. Proton VPN continues this trend by offering one of the most intuitive interfaces out there. It’s worth addressing the quality of Proton considering it is completely free. Although that may sound suspicious at first, Proton VPN does an excellent job of keeping your data and messages secure.

Proton VPN DOWNLOAD

Proton VPN is great for encrypting messages and reducing the number of trackers you collect while browsing. However, there are few advanced features to speak of. If you wish to have all the bells and whistles, you may prefer a premium VPN instead.

Create custom profiles in Proton VPN for frequently used online services.

VyprVPN

When your internet connection speed is just as important as your data security, try out VyprVPN. It works just like any of the other apps on this list, yet the primary focus of development is improving browser speeds and maintaining reliable connections. Your activity will be filtered through multiple servers around the world, though each one is equipped to hastily process your traffic.

VyprVPN DOWNLOAD

Encrypting your chats is just as easy and you have access to 24/7 customer support throughout your subscription period. The end result is a reliable service that runs in the background without much fuss.

Vypr is simple and lightweight to improve browsing speeds.

Going the extra mile to hide your tracks

While a VPN is an excellent way to start taking back your online privacy, there is so much more you can do to secure your data. For instance, you can download the Tor Browser to achieve 100% anonymous internet activity. This specialized browser was designed from the bottom up with data security in mind. In addition to hiding your basic internet activity and chat logs, you can also use Tor to access the dark web. Dark web sites are so hidden that you can only access them with this specialized browsing software.

How to make a GIF in Photoshop in 7 steps

A GIF is a short looping animation or video clip that usually lasts just a fraction of a second. They’re made from a brief sequence of compressed images that keep the file small and easy to share. Like emojis on steroids, GIFs can steal your viewers’ hearts with a powerful emotional or creative punch in a tiny package.

Adobe Photoshop DOWNLOAD

Photoshop comes with an array of animation and image stacking tools that make creating GIFs simple and quick. You can start turning your ideas into animated GIFs today with our Adobe Photoshop download. This step-by-step tutorial will show you how to make a GIF in Photoshop.

  1. Keep your GIF small with the right file settings

    Create a new document in Photoshop.

    – Open Photoshop, and press Ctrl + n to open the Create a new document panel. There are a lot of preset details here, but you only need to focus on the size, resolution, and color settings.

    – If you let the size of your still image or drawing dictate your GIF’s file size, your clip will probably be bigger than you need. Somewhere around 600 to 800 square pixels is usually big enough for most GIFs.

    – To keep your GIF small yet clear, use a resolution somewhere around 150 to 300 pixels per inch.

    – You’re not going to print your GIF, so set the Color Mode to RGB color.

    – When you’re ready, click on the blue Create button at the bottom right.


  2. Import your prepared frames

    Load Files into Stack.

    – The first frame of your animated GIF will be the first visible layer in your stack. All the consecutive layers under it will simulate the movement.

    – If you want to work with still images or video that you’ve prepared beforehand, you’ll need to import them into your new Photoshop document. If you’ll be drawing your GIF from scratch, skip to the next section.

    – To load a collection of still images into your new document, click on the File menu at the top left and then Scripts > Load Files into Stack.

    – In the popup window, click on Browse, and then, find the images you want to use in your GIF.

    – You can hold down the Shift key while you click to select multiple files. Select all the images you need, and click Open and then OK.

    – The images you selected will be imported into sequential layers in a separate document. You can resize or tweak them so that they fit into the canvas size and resolution you chose for your GIF document. Once you’re satisfied, you can select them all in the Layers panel on the right and then drag them over to your GIF document.


  3. Convert a video file

    Video Frames to Layers.

    – To convert a video file into an animated GIF, click on File > Import > Video Frames to Layers.

    – Make sure you only import short video clips, as Photoshop may have trouble importing long videos. The Import Video to Layers window gives you options to import the whole video, a Selected Range Only from your video file, or even just the frames at a set interval, like every other frame or every 10th frame.

    – Click OK to start importing your video clip.


  4. Create your animated GIF from scratch

    Duplicate Layer in Photshop.

    If you want to draw the animation yourself frame by frame, import or draw an image to use as your first frame. When you like what you see, duplicate that layer by right-clicking on it in the Layers panel and selecting Duplicate Layer.

    – Select the duplicate layer you just created, and draw the changes you need for your next frame. Repeat as needed.


  5. Convert your layers into GIF frames

    Make Frames from Layers.

    Now that you have your imported or drawn images stacked neatly into consecutive layers, turn them into frames. Click on Window from the top menu and then Timeline to open the Timeline panel at the bottom of your screen.

    – Click on the dropdown arrow in the middle of the Timeline panel, and select Create Frame Animation.

    – Click on the Options icon at the top right of the Timeline panel. It looks like three parallel horizontal lines. From the dropdown menu that appears, select Make Frames from Layers. This will put each of your layers into a separate frame in your timeline.


  6. Set your GIF’s timing

    Frame delay in Photoshop.

    Under each frame in your timeline, you’ll see a decimal number expressing how many fractions of a second it should appear. You can change a frame’s timing by clicking the dropdown arrow next to the decimal number. You can also select multiple frames to change the timing of all of them at once.

    If you want smooth, lifelike animation, use a lot of frames with short delays. Most creators use a frame delay of around 0.07 to 0.09 seconds.

    At the bottom left of the Timeline panel, you can see the frame loop setting is set to Forever. This is good for most GIFs, but you can change it to loop once or a specified number of times by clicking the dropdown arrow.

  7. Preview, save, and export your GIF

    Save for Web to export your GIF.

    The sideways triangle at the bottom of the Timeline panel is the play button that lets you preview your animated GIF. Once everything looks good, press Ctrl + s to save your Photoshop document in case you need to make changes later.

    – To export the final version of your GIF, click on File > Export > Save for Web (Legacy).

    – Just like in the Create a new document window, there are a lot of details you can ignore in the Export window.

    – From the Preset dropdown menu on the top right, select GIF 128 Dithered.

    – From the Colors dropdown menu below that, select 128 or 256 colors, depending on how small you need your file. You can see how big the exported file will be at the bottom left of the preview window.

    – Click the Save button at the bottom of the screen to export your animated GIF.


Share your animated GIF with the world

Watch the GIF you just made by dragging the file into any web browser, or share the file with your friends on social media or your favorite messaging app. If you’d like to see a few of the other awesome things you can do in Photoshop, take a look at our in-depth review of the latest Adobe Photoshop updates.

How to create your own signature in Microsoft Outlook

Microsoft Outlook is a massively popular service for sending emails in a business setting. Companies of all sizes can take advantage of the advanced communication features available in the software. Of course, professionalism is paramount when sending messages to your boss or colleagues.

Microsoft Outlook Download

An effortless way to display a professional tone is to add your personal signature to important emails you send to other people in the office. The process is incredibly easy and is achieved in just a few steps. Afterward, your custom signature will automatically appear in the emails you send. If you do not want to sign each message, you can also leave your mark on a case-by-case basis.

  1. Logging in to Outlook

    Log in to Outlook with your Microsoft Account.

    Successfully logging in will result in Outlook’s home screen appearing. You will need to draft an email before adding your signature to it. To create a new message, click on the “New Email” button to open a new window for your message. The new window works just like any other email application. Select your recipient, title the message, and say your piece in the body field.

  2. Drafting your email

    Create a new message before adding your signature.

    Successfully logging in will result in Outlook’s home screen appearing. You will need to draft an email before adding your signature to it. To create a new message, click on the “New Email” button to open a new window for your message. The new window works just like any other email application. Select your recipient, title the message, and say your piece in the body field.

  3. Adding a signature to your message

    Ensure you are on the messages tab so that the signatures button will appear.

    Upon drafting your email, there is simply the matter of signing it before the sendoff. To do this, you will need to ensure the messages tab is selected at the top of the screen. On the far right of the message toolbar is the signatures button. Click the pen and paper icon to open the signature options screen. If there is no data on this panel, click on signatures to make your first one.

    In the new window that appears, locate the box labeled “select signature to edit.” Since this is your first signature, the box should be empty. Click the new button to sign your name. Type whatever you desire into the field though leaning toward professionalism is recommended.

  4. Editing signatures and advanced functionality

    Edit signatures and add images on this screen.

    Outlook allows you to add way more to your signature than only plain text. You can add images, a business card, a logo, or even your personal handwriting. Click on edit signature and select the name you created in the previous step. This screen allows you to adjust font size, color, and all the word processor bells and whistles you have come to expect in modern software. Copying robust text from another program can help you with formatting bullet points and other complex strings.

    This same screen allows you to add logo images or business cards to your signature. Click on insert and select images to choose a picture from your device. Or click the business cards button to add a scan of your physical documents.

  5. Selecting signature frequency

    Determine how often your signature is added to emails.

    With a signature selected, you can set how often it applies to the emails you send. To the right of the edit signatures box are the email settings. Ensure your desired account is listed in the top box. Then, select what happens with new emails and replies/forwarded messages. The (none) option will keep the signature off by default. Otherwise, click on your desired signature template for both new messages and replies.

Another option for emails

If you prefer not to create a Microsoft account or pay for the subscription service, there are free alternatives for sending your emails. For instance, Mozilla Thunderbird has taken the world by storm thanks to its ease of use and low barrier to entry. To learn more, read our guide on how to set up end-to-end encryption for Thunderbird emails accounts.

How to use the best functions of Waze

Waze has quickly become one of the most prevalent GPS navigation apps on the scene. If you are wondering why Android users choose to download Waze over the default Google Maps, it is because of the range of additional features provided by the free software.

Waze Download

By utilizing user feedback, Waze updates your driving route in real-time to take into account new traffic jams, accidents, and anything else that could delay your commute. Although you may not wish to give up the familiar layout of Google Maps, this rundown of Waze’s best functions will show why downloading the app is a better idea than you may think.

  1. Adjust your audio mid-travels with the podcast control panel

    Use the podcast controls to listen while navigation safely

    When driving long distances, playing your own music or podcasts is an effective way of staying sane. While most GPS apps force you to minimize your map to open another audio program, Waze has podcast functionality built directly into the map interface. To access this feature, simply tap the pink button with a music note to see a list of compatible streaming services. Tap your desired app and an interface will be shown. Use your favorite streaming service as normal with the simple control integration.

  2. Quickly find the cheapest gas

    Find the best gas price in your area

    Considering the high price of gas these days, each cent counts tremendously. Waze helps you find the cheapest gas station near you each time you need to fill up your tank. Tap the search bar and click on the gas stations button. Alternatively, you can type the word gas station if you prefer. Both methods bring up a list of gas stations in the area. The information includes the address, the distance from your current location, and the going rate of fuel at the pump. Tap on your desired gas station to get directions and head over to the best deal.

  3. Pick your own routes

    Lock in a specific route with this menu

    Waze provides the innovative feature of adjusting your route on the fly in response to new user data and traffic reports. As handy as this feature can be in most instances, the influx of data can sometimes lead to odd navigational decisions. You can force Waze to stick to a particular, established route at any time. To do this, access the settings menu via the button on the top right of the app. Tap the routes tab to be given a list of reliable travel options. Tap on any route to lock it in and prevent the algorithm from making changes to your directions mid-journey.

  4. Get speeding alerts

    The Speedometer settings menu in Waze.

    When driving somewhere new for the first time, it can be easy to keep your eyes glued to the map instead of on the road. You may not be paying attention to road signs or your speedometer during these moments of intense focus. Waze allows you to set up automatic speeding alerts to notify you when you are over the limit in any given zone. Use the My Waze button to open a new menu. From this menu, open the settings menu (gear icon in upper-left corner) and select Speedometer to set the parameters for your alerts. Doing so is a great way to help avoid speeding tickets or accidents.

  5. Try effortless carpooling

    Carpooling is quick and easy with the app integration

    Carpooling offers many advantages for drivers, passengers, and the environment alike. You can split the cost of a commute or bypass the traffic via express highway lanes. Waze lets you set up carpooling sessions right from the app. Doing so is as simple as clicking the carpool button on the bottom right of the screen. Drivers can pick up some extra passengers on the fly, and people looking for rides can put in requests for transport from this convenient menu.

A phone’s GPS is a powerful tool

While you may think of your phone’s GPS as only good for navigation, there are actually many clever uses for the satellite technology used in modern devices. For instance, the GPSTracker app allows you to find any phone from your PC or another mobile device. This is ideal for keeping track of your children, locating missing people, or finding your own device should you drop it somewhere.

The top 5 uses for Nitro PDF Tool

Nitro PDF has everything you need to edit, manage, and customize your document files. In addition to the core functionality that makes Nitro PDF worth a download, there are many extra features that are not readily apparent until you dive deep into the interface.

Nitro PDF Reader DOWNLOAD

However, these extra features are what truly make Nitro PDF shine above the sea of other similar applications. Let’s take a look at some of the finest features that the document managing program has to offer.

Workspace customization

Most modern apps have a set interface that you must familiarize yourself with. Any shortcomings in the design that clash with your workflow just have to be lived with. What makes Nitro PDF stand out is the ability to customize your workspace. You can place the tools you use most in convenient spots that allow you to access them with fewer clicks. You can also hide the myriad other tools and widgets that you never need. With a bit of customization, the user interface is guaranteed to facilitate your specific purpose. The cumulative time saved by clearing the extraneous icons adds up tremendously over the course of a year.

Change the Nitro workspace to include only your favorite features.

Automatically and efficiently sign PDF documents

Many formal documents require your signature to be finalized. The introduction of all digital files has made this step trickier than in the days of paper. The good news is that Nitro allows you to automatically add your signature to the appropriate fields within a digital contract or document. Even in a web browser, you enjoy the rapid e-signing functionality typically reserved for mobile devices. After a few seconds, your signature is fully represented on the digital page without any flaws.

Quickly sign digital documents with saved signature profiles in Nitro.

Combine and convert different file types

When reviewing multiple bodies of large work, condensing it all into a single, searchable document is a game changer. Nitro allows you to merge multiple files, even of different extensions and styles. You can convert any file into the extension type that you intend for the finalized document. Once all pictures and documents are converted to the new format, you can merge them all into a massive file. From there, the Ctrl + F search functionality allows you to stay organized throughout thousands of pages worth of text. This functionality can save you dozens of hours when implemented properly.

Combine multiple Nitro files into one for easy reading or searching.

The suite of security options

If you need to oversee sensitive or confidential documents, Nitro PDF also has you covered. You can encrypt sensitive data before sending it to someone else or storing it in the cloud. Furthermore, you’ll be able to track when any activity is detected around the document. See who has access to each file, when they decide to open it, and a comprehensive log of all the changes made. The log updates in real-time to alert you to any nefarious or unwarranted actions. Overall, Nitro PDF is the ideal way to keep a tab on documents after they leave your personal machine.

Set security features like passwords and document tracking.

Integrate and utilize external applications

Nitro allows you to save even more time by quickly accessing and editing documents from other platforms. Your files from services such as Google Docs or Dropbox can be managed with the same efficiency as documents stored natively on your device. Sign your documents, convert them into new file extensions, or make simple edits without actually exporting your file from the other platform. Nitro streamlines the connection between all the apps where you store documents.

Search for and modify documents from a variety of other platforms.

More great options for PDF files

Nitro PDF is a great app, but you may decide it’s not compatible with your computer setup. If that’s the case, you can always use Adobe Reader DC instead. The PDF Editor for Chrome is another great option if you want a simple and free option. Read our guide to improving documents with PDF Editor for Chrome to learn more.

How to use the crop feature and move layers with Alight Motion

Alight Motion is a robust resource for motion graphic designers. This free Android app allows you to craft custom images or make professional edits to individual layers within your animation projects on the go.

Alight Motion Download

The user interface is, overall, easy to use but can be a bit overwhelming at first. Simple features like cropping a video or moving individual layers are straightforward enough once you know where to look within the UI.

  1. Cropping images and videos in Alight Motion

    Choose the shape of your cropping window here

    When you wish to only use a portion of the screen when editing images or video, you can crop out the unwanted space. With a project open in Alight, click on the button with a plus icon on the bottom right of the app. Within the menu of new options that appear, there is a list of shapes you can choose from. Tap on any shape to select the perimeter for your cropping. A square or rectangle is the easiest to work with though you may use other shapes like stars or triangles for fanciful edits.

    With your desired shape selected, drag a perimeter around the area of the image or video that you would like to keep using your finger. Everything outside of the green shape you created will be removed from the display when you hit the crop button. After making any final adjustments to the boundary, select which layers you wish to apply to the crop. Your project layers are listed on the left of the app screen. Tap on each layer to include it within the crop. Once everything is finalized, tap the button labeled crop that appears above the project viewer. You should now see only the area that you designated when dragging the mouse.

  2. Creating a project with multiple layers in Alight Motion

    Your layers are stacked on the left side of the screen

    If you do not already have a project with multiple layers, you can make one in just a few minutes. Open a blank project in Alight Motion. You can do this by tapping the plus button and selecting “create new project”. Next, tap on the plus icon again to see many additional options, including a bunch of shapes to choose from. Tapping a shape will add it to your project and create a unique layer for it. Create two more shapes so that you have three total layers for the next section.

  3. Moving layers up and down

    The blue highlight indicates when you can move each layer

    The ability to position each layer allows you to reconcile every part of an image while animating it. To move a layer, go back to the timeline of your project by closing the plus button menu. The timeline is the main screen that shows each layer and displays where it appears within the video clip. To select a layer for moving, place your finger near the far right of the layer in question. Tap and hold the button with three dots that appears when your finger is in the correct spot. Drag your finger to select each of the layers you would like to move. Using the example from the previous step, select all three layers by dragging your finger.

    With each layer highlighted in blue, simply tap on the layer you wish to move, and drag it up or down until it is in the desired slot. The top layer will be the first visible element on the foreground surface, and the bottom layer will be the deepest background component.

Doing more with mobile video editing

Alight Motion is great for graphic designers who work with simple animations and short video clips. However, your longer video projects will require the full editing treatment. Luckily, there are several effective video editing solutions for Android devices. One of the best mobile applications for augmenting your clips is Video Star. By combining apps like Alight Motion and Video Star, you can make professional quality clips anywhere in the world.

How to record your screen with Windows 11

Windows 11 offers a solid lineup of fresh features and added functionality over previous iterations of the operating system. The reworked software also rearranges the familiar interface that Windows 10 users have grown accustomed to.

Windows 11 Download

If you are wondering how to find and use the screen recorder within the updated Windows 11 framework, then read on to see where all the screen capturing options have moved to.

  1. Opening Xbox Game Bar

    Use the Xbox icon to access the Game Bar

    Even if you are not a gamer, there is plenty of reason to take advantage of some of the Xbox features that come standard with Windows 11 operating systems. Namely, the ability to capture your screen is tucked away amongst the suite of options on the Xbox Game Bar.

    There are three ways to open the Xbox Game Bar and reach the screen recorder. If your taskbar has an icon with the Xbox logo, clicking on it will bring up the game bar. If the Xbox icon is not on your taskbar, you can find it in the start menu. To access the start menu, click the Windows icon with four panels on your taskbar. Finally, the keyboard shortcut, “Windows + G” will instantly open the Game Bar interface from any spot on your computer.

  2. Using Game Bar’s screen recorder to take screenshots

    Use the camera icon on this bar to start the screen capture software

    With Xbox Game Bar open, look for the camera icon pictured above. Clicking the camera icon will open a new menu labeled capture. Here is where you can record your screen with both images and video. Before recording a video, be sure to enable or disable your mic with the rightmost button. If your audio is muted, the mic icon will have a horizontal line drawn through it.

    To record a screenshot, simply click the button with the camera icon. This allows you to determine the area of your screen that will be captured by dragging your mouse until the perimeter of the capture window is positioned to your liking. Click the camera icon again to take your screenshot. The image is automatically saved, so you can view it later by clicking the “view all captures” button at the bottom of the capture window.

  3. Using Game Bar’s screen recorder to capture video

    Use the circle icon to record video

    Recording video involves a similar process to producing a screenshot. From the main capture menu on Xbox Game Bar, click the recording icon that looks like a tiny white circle. Your entire screen is recorded when making videos. After performing your desired tasks to create the video, you can stop the recording by clicking the icon with a tiny white square that replaced the circle icon you selected previously. To view your video files, click on the “view all captures” button at the bottom of the window.

  4. Alternate method: use PowerPoint

    Use this button to record video with PowerPoint

    There is another method for recording your screen that does not require external downloads. The caveat is that you will need an active Microsoft Office subscription to take full advantage of PowerPoint. If you already subscribe to Microsoft office, then using the PowerPoint interface may prove preferable to you, especially if you plan on recording footage of a presentation anyway.

    Open PowerPoint from the Windows Start Menu and navigate to the “insert” tab. You will see a screen recording option on the top-right of the screen, as pictured above. Clicking it will bring up a capture menu. Clicking the red circle will start a recording, but there are several options to consider first. You can specify which area of the screen is recorded by clicking the select area button and dragging the mouse until the red perimeter rectangle is aligned correctly. To determine if your mouse cursor will be captured, click on the “record pointer” button on the capture menu. As with Xbox Game Bar, you can also enable/disable audio with the microphone button.

    Upon hitting record, you have the option of stopping or pausing the video. You can stop with the square icon button as before, or you can pause using the button with two vertical lines.

Screen Recording Options Beyond Windows 11

While the free screen recording options for Windows 11 are all good, you may want to explore other options that work with Google Chrome. There are several free Chrome extensions that offer special features such as higher frame rates and the ability to switch audio sources. To learn, more check out our list of the 10 best free screen recorder extensions for Chrome.

How to Use Free Data Recovery to Restore Lost Files

While cloud storage is becoming more popular, computing hardware remains a common way to store important data and files. However, computers are also fickle beasts that can glitch out at any moment. These errors sometimes result in vital information being lost or corrupted.

Luckily, you can restore any corrupt or missing files that were previously on your system via the simple-to-use Data Recovery app. In addition to being a completely free resource, the app can recover lost data in a manner of minutes. The next time your PC or phone eats an important file, be sure to have the Data Recovery app handy.

Free Data Recovery Download
  1. Installing and initializing the app

    This installation wizard will set up the app on your PC

    First things first, you must ensure you acquire the correct application for your computer. As there are many data recovery solutions clogging search engine results, the best bet is to click on Free Data Recovery download page. Upon clicking the green download button, a .zip folder will begin downloading on your system. To open a .zip file, you will need software designed to work with the file extension. If you do not already have such software, then 7-Zip is an excellent choice.

    Upon unzipping the Data Recovery folder, click on the application file to start the installation wizard. Follow the simple steps to place the program on your device. If you wish to have a start menu shortcut or quick menu icon, be sure to check those boxes during installation. After the install, click the Launch Free Data Recovery box to have the software open immediately.

  2. Select “data recovery” or “lost partition recovery”

    Choose how you wish to recover files upon startup

    The first screen asks you to pick between Lost Partition and Data Recovery. The option you need depends on the nature of the information you wish to restore. Data Recovery is perfect for information from existing drives and folders. For instance, you can recover files from your C drive or downloads folder. Lost Partition Recovery is for entire drives and folders that have since been deleted. For example, you can recover information from a previously plugged in USB flash drive via the traces of the files that still linger on your hardware. Click the option that most closely aligns with your file recovery goal.

  3. Using the data recovery feature

    This screen lets you restore data from existing areas on your device

    The Data Recovery screen lists all the visible drives and partitions on your system. Click the one you wish to scan and click next to begin the search for missing files. It is a good idea to click the deep scan box at the bottom of the screen before proceeding with the data recovery check. Although a deep scan takes longer, it ensures the maximum amount of data is restored.

  4. Using the lost partition feature

    Use Lost partition recovery to restore files from locations no longer attached to your device

    The Lost Partition screen allows you to select a drive to scan for lost file partitions. As with the Data Recovery screen, be sure to check the deep scan box at the bottom of the window to perform a complete search. After clicking on the drive you wish to scan, click next to begin the search. The search process can take up to an hour, depending on the size of files on your drive and the data transfer speed you are working with. Once the scan is complete, you can manage any file that is found as you would any other file on your device.

Backing up your data

The ability to restore lost files is incredible, but never losing them in the first place is even better. Managing your data with a cloud storage solution is a fantastic way to access your information on any device. Should one piece of hardware act up, you can continue right where you left off on another machine by redownloading the files from the cloud. A solid recommendation for cloud storage is Dropbox, a free application that gives all users 2GB worth of room to play around with. If you like the service, you can subscribe to acquire vast amounts of storage.