How to avoid getting random invites on PlayStation Network

Imagine that you’re playing an online game of Call of Duty or FIFA on your PlayStation 4. The map or game (respectively) is very heated, but suddenly several notifications on the upper right corner of the screen pop up. Yes, those random messages or invites usually jump out at the player and, thus, concentration is lost. Now, did you know that you can disable them so they don’t bother you ever again?

This option is pretty hidden within the different PlayStation Network menus, so we’re going to guide you step-by-step and explain each option, so you don’t have any trouble getting rid of them.

In depth

The first thing to do is to turn on the console, log into your user profile and head to the upper bar to the right of everything. “Am I going to turn it off again?” No, relax, the key button is just to the left of the off button, i.e. Settings. Let’s go in.

There are many tabs and you won’t have a clue what some of them are for, right? It’s happened to us all at some point, so the important thing now is to click on Notifications, which is the one we want.

Within this category, you’ll see five new ones: Pop-up notifications, Disable pop-ups while playing video, Pop-up color, Display message in notification, and Notifications when friends go online. Our advice is to disable the second option forever, i.e. while playing video. There’s nothing more annoying than a notification while you’re watching a movie. Once you’ve done this, go to Pop-up notifications and press X.

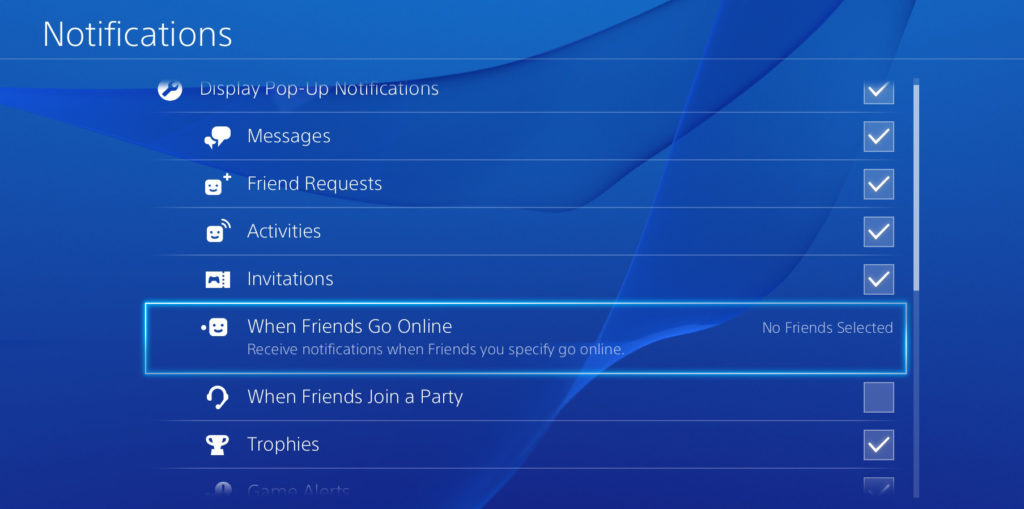
Here are the most important ones within this vast world of notifications: Messages, Friend requests, Activities, Invitations, When friends go online, When friends join a party, Trophies, Game alerts, Downloads, Uploads, Communities, Requests to watch gameplay, Events, Teams, Current song, Blocked scenes for video recording, When taking screenshots, Live from PlayStation and When you have a new follower.

The names don’t leave much room for error, so here you can decide which you prefer to get rid of. For example, if you have a lot of added friends, maybe you’re interested in unchecking the option When friends go online, while if you play a lot of FIFA, the option for disabling Messages is advisable (for all those insults that’ll come your way after finishing the game, from our experience.)

There are other tabs that truly have little use, such as DownloadsUploads and even Events. However, and as we’ve been saying throughout this article, the final decision is always in your hands (or, at your fingertips, to be more exact).

You should remember that these instructions won’t get you a safer PlayStation Network account, but simply will prevent you from getting too many notifications while you’re playing or using your PlayStation 4. After all, the goal is that our console doesn’t look like a cell phone with a lot of notifications on screen every few seconds.

How to identify fonts in any photo

“I love the font in this photo, but I don’t know what it’s called.” As you step into the exciting world of design and creative work, this question has definitely popped up in your head. And that’s completely normal: we all want to know as many font styles as possible, since they could be useful for future work and create a better end product.

If this question continues to puzzle you, don’t worry: we’re here to help. We’ve brought you the three best webpages or apps to find out the type of font used in a text, image or video.

What Font Is

It may seem a bit uninspiring to just look it up, but it’s the best suggestion if you’ve got little time to write and/or design. What Font Is is a website that accomplishes the mission of this post, i.e. finding out the type of font we don’t know at the moment. The best part? It’s free and works well. Very well, in fact.

All you have to do is upload an image with text from your PC (or paste a link to the website in question) and the website will take care of the rest. Of course, we’ll give you a few tips to narrow the search.

Also, and this is important, it has a browser extension for Chrome and Firefox that lets us send over the font we want to look up. In other words, we’ll save time going to the website, since it will send the font directly through the browser extension.

My Fonts

This one is almost identical to What Font Is, so we also recommend it for its high success rate: My Fonts. The mechanism is the same: we take a photo and upload it to the website. Once there, it gives us some results with the font in question used in the text.

We’ll point out that if the system doesn’t find the font we’re using, it will offer a series of alternatives that try to get at the result we want (ideal if it’s needed urgently).

Matcherator

This is the last, but not least on the list: Matcherator. Unlike its two rivals above, this website has the benefit of being regularly updated, which makes it easier to search for fonts more accurately.

Currently, for example, it has an advanced mode, an image editor and can detect less common font types within standard templates on the internet.

Also, its system is similar to the previous two: you upload an image to the platform and it comes back with the font to download. Moreover, it lets you detect typeface on websites with a higher success rate than the other two rivals (especially in this area).

Now you’ve got this complete guide for detecting fonts, so you won’t be in a rush when looking for the design that’s just right.

How to make a YouTube video

At some point, you must have wondered how to create (or edit) any of the Youtube videos you watch often. The answer is that numerous editing programs come into the equation, which require months of experience to learn to use. However, here’s the important part: Youtube also has its own production tools for doing all the most accessible tasks and within minutes.

The most famous video streaming platform in the world has very basic options for editing that clip of your friend’s birthday or your last vacation without making you feel like shooting yourself in the foot. We’ll go into how they work.

Step by step

The first thing you must do when creating a Youtube video is upload the respective clip. To do this, type Youtube in the URL and click on the arrow that appears just right of the search bar (as long as we’re logged into Youtube, of course).

The next screen isn’t too mysterious: we can drag or select the file we want to upload to the platform. However, if it’s a video that you want to edit, our advice is that you change the default settings and add the clip as “Private” or “Unlisted.”

Once we’ve selected the video to upload, Youtube will send us to a new screen like the one you can see below. Here we’ve got several options, though they’re easy to understand: the title of our video; the description of it; tags that must be separated by commas (not phrases but keywords, e.g. birthday, Christmas, New Year’s); and the possibility of adding it to a playlist (if we’re going to upload many videos on the same subject, e.g. “Summer 2017″).

Once the video is uploaded, click below on the “Video manager” tab and it will take us to where we have all the clips we own. Click on “Edit” to use one of Youtube’s strong points.

As soon as we enter, we’ll have the possibility of editing the video in front of us. The default field is “Information and configuration,” but we have to click on “Enhancements.” We can modify light, contrast, saturation, color temperature, put the video in slow motion, time lapse and most importantly: cut out the parts we don’t want.

On the other hand, we have the “Audio” tab. As its name suggests, it gives us the chance to add a song from Youtube’s extensive music bank. Best of all? The available songs are copyright-free, i.e. they don’t have ownership rights and you can use them freely (it’s not the same to add a song by Justin Bieber, who has his own monetization system within the platform, as one of the songs that are there for this purpose).

To wrap up, go to the “End screen and annotations,” where you can add all the text you want on the video, as well as annotations with links to other videos or webpages.

Our little guide to create videos on Youtube ends here. Try it out and leave your creations in the comments!

How to recognize a fake photo

Have you ever wondered if a photo is fake? The answer is definitely yes, since hoaxes and fakes nowadays are spreading faster than ever with the internet. Something happens, the snapshot in question is posted and… voila! It turns out that the photo isn’t authentic: either it’s been altered or it’s clearly an old shot being passed off as a current one.

That said, we’re going to teach you one thing: how to recognize if a photo is fake or not. Are you up to it? Here are three key tips for taking on the challenge.

4 Tricks to fix your bad photos

Google Images, our saviour

Believe it or not, Google Images is the best tool we’ve got to recognize if a photo is fake or not. How? Well, by using their tools to know the photo’s publication date.

For example, imagine there’s a forest fire and the (regrettably) classic photo comes out of a burnt landscape. Who says that photo wasn’t from a previous fire? To find out, we only have to download the photo and upload it to Google Images. When the search engine returns results, we can click on “Tools” and “Date.” Done. If the search results all belong to the period when the fire occured, the photo is an original. Now, if there are results from a year ago, when the fire happened a few days ago, you already know it’s a fake…

Metadata

All photos come with metadata. Always, we repeat. As soon as we take a picture with our digital or cell phone camera, information is associated with the snapshot for later analysis: the type of camera, technical info, date, time and a long list of other features.

To access an image’s metadata, you only have to right click on it and go to “Properties” and then “Details.” The problem? Well, social networks like Facebook,  Instagram and Twitter delete all metadata when the snapshot reaches their servers.

Luckily, that’s not always the case for all services, for example WhatsApp or mainstream media. For them, metadata is still available to look up. Knowing this can help you recognize if a photo is fake or not.

Increase the resolution

Our last tip may seem trivial, since the human eye comes into play (instead of technology), but it’s necessary: look closely at the pixels of a photo by increasing its resolution.

If you open a snapshot using Photoshop and Paint and see that some pixels aren’t the same as the rest, you may be looking at a modified photo. After all, if anything says “fake,” it’s a heavily modified pixel density.

We hope this little guide has helped you and you can browse a little easier, knowing you won’t get tricked by fake photos.

4 tricks to fix your bad photos using Photoshop