Skip to content

Softonic English

Just another Softonic Sites site

How to use Adobe Photoshop AI

Recently, we discussed the latest AI-based features Adobe has integrated into Illustrator. However, Illustrator isn’t the only company program to benefit from this technology; our beloved Adobe Photoshop also introduces quite interesting new functionalities.

Adobe Photoshop
Adobe Photoshop DOWNLOAD

The popular editing program is joining the AI bandwagon. Within it, we find new AI-driven tools designed to facilitate and enhance content creation. Can you imagine being able to create highly realistic images by simply writing a few words?

No need to dream any longer: here’s how you can do that and much more in your Photoshop projects.

Adobe Firefly Image 3, the AI Model Making it Possible

The generative “magic” of Adobe Photoshop is made possible by the new Adobe Firefly Image 3 model. Compared to its previous versions, Firefly Image 3 enables the creation of much more detailed and realistic images than before.

Additionally, it allows for greater control over the generations thanks to the newly added Structure Reference and Style Reference options. This saves many attempts along the way and makes it easier to recreate what we have in mind.

Photoshop isn’t the only Adobe program with this technology: Lightroom, Adobe Express, Illustrator, and InDesign also allow us to use image generation.

How Generative Fill Works

Adobe Firefly Image 3 takes generative fill to the next level. With a simple description or prompt, we can insert people, animals, or objects into our images. To do this, just follow these steps:

  • Click on the rectangular selection tool located in the toolbar. You can also use the lasso or another selection tool.
  • With the tool ready, select the area of the image where you want to insert the object to be generated.
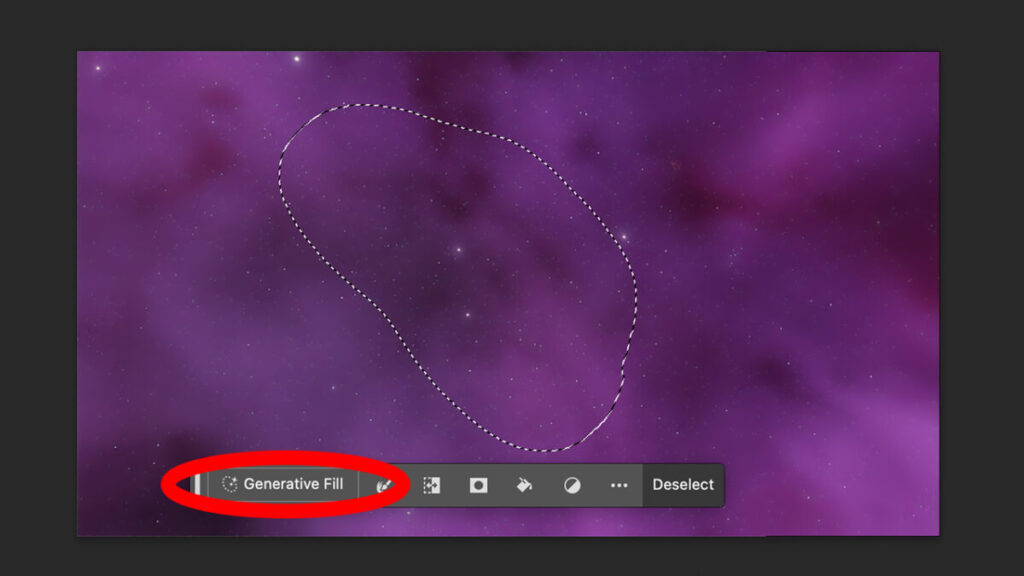
  • A small contextual bar will appear. Here, select the Generative Fill option.
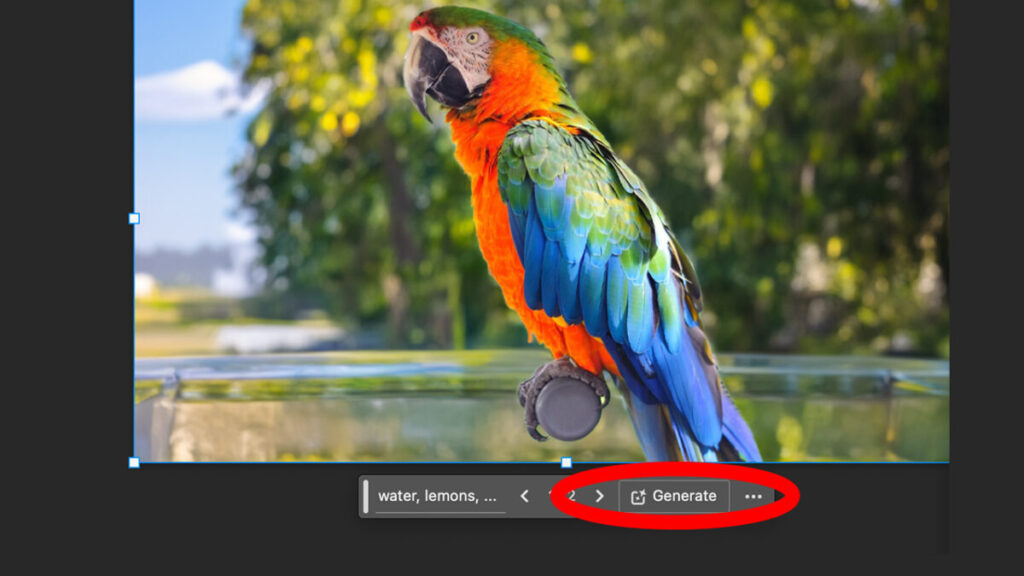
  • Briefly describe the image you want to generate. A flying fish, a colorful dog, an alien… be creative, don’t hold back. Then, select Generate.
  • You will see several options generated based on your description in the Properties panel. Choose the one you like the most, and you’re done.
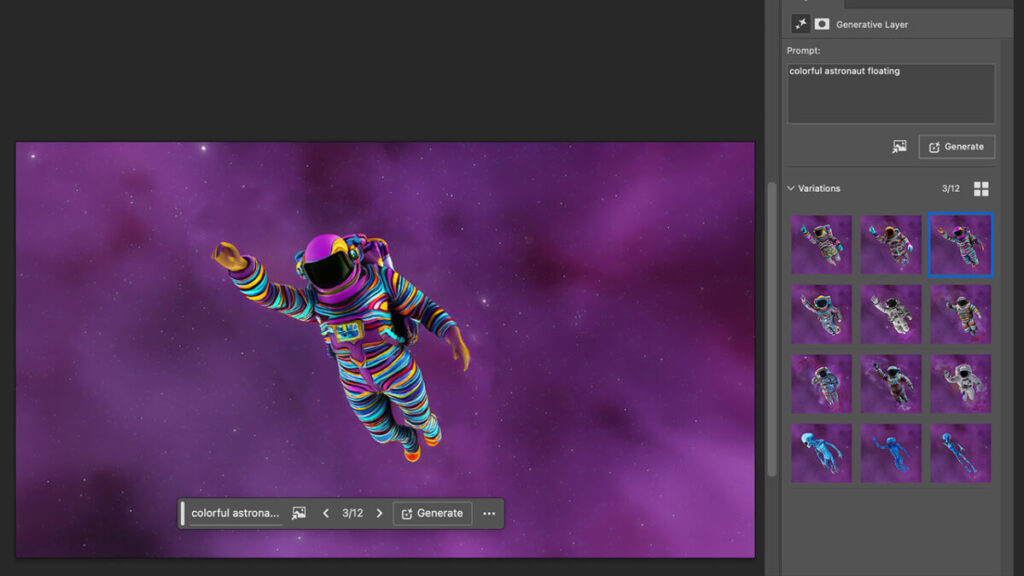
If you’re interested in a specific result and want to see similar options, Photoshop makes it easy. Just hover your mouse over the desired result and click on the three dots that appear. Then select Generate Similar, and Photoshop will show you new similar generations.

Adobe Photoshop
Adobe Photoshop DOWNLOAD

Instantly Generate Backgrounds with the Power of AI

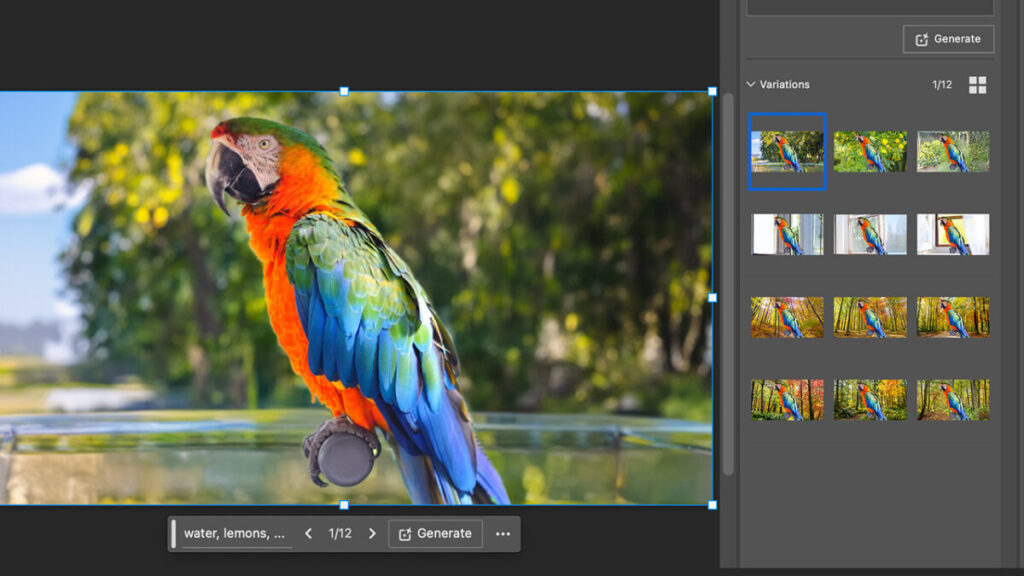
Creating a background that matches the colors, lights, and tone of your reference image is a challenge that few creatives can successfully achieve. With the help of generative technology, Photoshop allows us to generate backgrounds that meet our requirements in a few minutes. Here’s how we can do it:

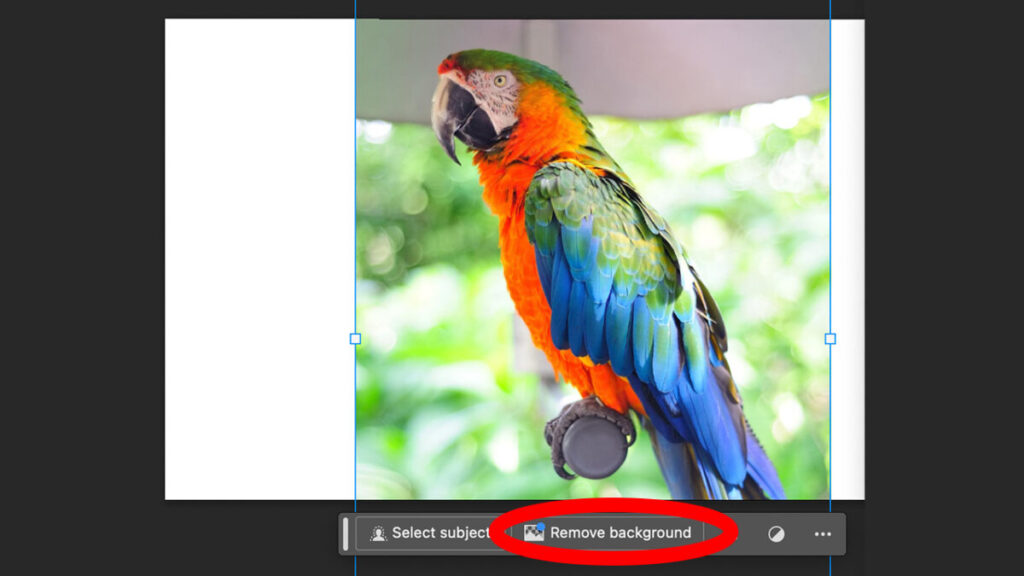
  • First, place your image and click on Remove Background, an option you’ll find in the small contextual bar that appears under the canvas.
  • When entering your description, remember that it’s always better to get straight to the point: focus on making simple, straightforward requests.
  • Once you’re ready, click on Generate.
  • As before, you will see some variations based on your description in the Properties panel. Now, you just have to choose the one you like the most.
Don’t get frustrated if some of these options don’t appear in your version of Photoshop. To access all these features without problems and before anyone else, you should use Photoshop (beta).

Use Reference Images to Generate Similar Ones

We’ve already seen how to create images and backgrounds from scratch. Now, we’ll learn how to generate similar objects based on a specific element. Adobe Photoshop allows us to produce variations of the same item without needing to provide an additional description. Here’s how you can do it:

  • Before starting, you’ll need to have your reference image ready. Have it located on your computer as we’ll need it later.
  • Click on the selection tool. As before, any will work, be it the rectangular frame, the lasso, or any other.
  • Next, select the place in the image where you want to insert the future generation we’re going to create.
  • When the small contextual menu appears under the selection, click on Generative Fill.
  • Select the Reference Image icon. This appears just to the right of the box where you have to enter the prompts.
  • Click on Choose Image and upload the image you want to use as a reference. Once it has loaded correctly, a blue check icon will appear.
  • There’s no need to write anything here, just click on Generate. To finish, choose your favorite result in the Properties panel.

Highlight the Details of Your Images

AI-generated images don’t have to look distorted and blurry. Now, Photoshop gives you the option to improve the quality and detail of your creations whenever you need it.

  • Once we have our generated image, go to the Properties menu.
  • Select one of the variations and then click on Enhance Detail. This is the icon you’ll see on the top left of the image.
  • Zoom in and enjoy the results..
Adobe Photoshop
Adobe Photoshop DOWNLOAD

More AI-Powered Tools in Photoshop

The truth is that artificial intelligence serves more than just generating content from scratch. Its capabilities allow us to enhance even more the tools we’ve been using in Photoshop for years and improve their functionality. One of them is the Remove Tool, which lets us replace areas we don’t like in an image by simply brushing over them. Neural Filters have also improved, both in their functionality and in the time it takes to apply them to an image. Take advantage of their capabilities in your projects and save unnecessary work time.

Author: María López

{ "de-DE": "Künstler aus Berufung und Technikliebhaber. Seit ich denken kann, habe ich gerne an allen möglichen Gadgets herumgebastelt.", "en-US": "Artist by vocation and technology lover. I have liked to tinker with all kinds of gadgets for as long as I can remember.", "es-ES": "Artista de vocación y amante de la tecnología. Me ha gustado cacharrear con todo tipo de gadgets desde que tengo uso de razón.", "fr-FR": "Artiste de vocation et amateur de technologie. J'aime bricoler avec toutes sortes de gadgets depuis que j'ai l'usage de la raison.", "it-IT": "", "ja-JP": "", "nl-NL": "", "pl-PL": "", "pt-BR": "", "social": { "email": "", "facebook": "", "twitter": "", "linkedin": "" } } View all posts by María López

Author María LópezPosted on June 8, 2024July 1, 2025Categories News

Post navigation

Previous Previous post: Cyberpunk 2077 is more alive than ever: get ready to hear the streets of Night City like never before
Next Next post: The Acolyte takes the lead on Disney Plus

Recent Posts

  • Apple updates AirPods with custom EQ: you can finally tune the sound
  • Microsoft unveils $10 billion Middle East push through 2030
  • Konami announces its plans for Castlevania’s 40th anniversary
  • Bungie announces the future of Marathon, which promises to radically change the game
  • One of the highest-grossing horror films of the year arrives on streaming services

Archives

  • September 2026
  • August 2026
  • July 2026
  • June 2026
  • May 2026
  • April 2026
  • March 2026
  • February 2026
  • January 2026
  • December 2025
  • November 2025
  • October 2025
  • September 2025
  • August 2025
  • July 2025
  • June 2025
  • May 2025
  • April 2025
  • March 2025
  • February 2025
  • January 2025
  • December 2024
  • November 2024
  • October 2024
  • September 2024
  • August 2024
  • July 2024
  • June 2024
  • May 2024
  • April 2024
  • March 2024
  • February 2024
  • January 2024
  • December 2023
  • November 2023
  • October 2023
  • September 2023
  • August 2023
  • July 2023
  • June 2023
  • May 2023
  • April 2023
  • March 2023
  • February 2023
  • January 2023
  • December 2022
  • November 2022
  • October 2022
  • September 2022
  • August 2022
  • July 2022
  • June 2022
  • May 2022
  • April 2022
  • March 2022
  • February 2022
  • January 2022
  • December 2021
  • November 2021
  • October 2021
  • September 2021
  • August 2021
  • July 2021
  • June 2021
  • May 2021
  • April 2021
  • March 2021
  • February 2021
  • January 2021
  • December 2020
  • November 2020
  • October 2020
  • September 2020
  • August 2020
  • July 2020
  • June 2020
  • May 2020
  • April 2020
  • March 2020
  • February 2020
  • January 2020
  • December 2019
  • November 2019
  • October 2019
  • September 2019
  • August 2019
  • July 2019
  • June 2019
  • May 2019
  • April 2019
  • March 2019
  • February 2019
  • January 2019
  • December 2018
  • November 2018
  • October 2018
  • September 2018
  • August 2018
  • July 2018
  • June 2018
  • May 2018
  • April 2018
  • March 2018
  • February 2018
  • January 2018
  • December 2017
  • November 2017
  • October 2017
  • September 2017
  • August 2017
  • July 2017
  • June 2017
  • May 2017
  • April 2017
  • March 2017
  • February 2017
  • January 2017
  • December 2016
  • November 2016
  • October 2016
  • September 2016
  • August 2016
  • July 2016
  • June 2016
  • May 2016
  • April 2016
  • March 2016
  • February 2016
  • January 2016
  • December 2015
  • November 2015
  • October 2015
  • September 2015
  • August 2015
  • July 2015
  • June 2015
  • May 2015
  • April 2015
  • March 2015
  • February 2015
  • January 2015
  • December 2014
  • November 2014
  • October 2014
  • September 2014
  • August 2014
  • July 2014
  • June 2014
  • May 2014
  • April 2014
  • March 2014
  • February 2014
  • January 2014
  • December 2013
  • November 2013
  • October 2013
  • September 2013
  • August 2013
  • July 2013
  • June 2013
  • May 2013
  • April 2013
  • March 2013
  • February 2013
  • January 2013
  • December 2012
  • November 2012
  • October 2012
  • September 2012
  • August 2012
  • July 2012
  • June 2012
  • May 2012
  • April 2012
  • March 2012
  • February 2012
  • January 2012
  • December 2011
  • November 2011
  • October 2011
  • September 2011
  • August 2011
  • July 2011
  • June 2011
  • May 2011
  • April 2011
  • March 2011
  • February 2011
  • January 2011
  • December 2010
  • November 2010
  • October 2010
  • September 2010
  • August 2010
  • July 2010
  • June 2010
  • May 2010
  • April 2010
  • March 2010
  • February 2010
  • January 2010
  • December 2009
  • November 2009
  • October 2009
  • September 2009
  • August 2009
  • July 2009
  • June 2009
  • May 2009
  • April 2009
  • March 2009
  • February 2009
  • January 2009
  • December 2008
  • November 2008
  • October 2008
  • September 2008
  • August 2008
  • July 2008
  • June 2008
  • May 2008
  • April 2008
  • March 2008
  • February 2008
  • January 2008
  • December 2007
  • November 2007
  • October 2007
  • September 2007
  • August 2007
  • July 2007
  • June 2007
  • May 2007
  • April 2007
  • March 2007
  • February 2007
  • January 2007
  • December 2006
  • November 2006
  • September 2006
  • August 2006
  • June 2006
  • May 2006
  • July 2001
  • January 2001
  • November 2000
  • September 2000
  • August 2000
  • July 2000
  • April 2000
  • March 2000

Categories

  • Affiliate post
  • Expert Review
  • Gaming
  • Guides
  • How to
  • Legacy how To
  • News
  • Noticias
  • Software>Security
  • Sponsored
  • Trucos y Consejos
  • Uncategorized
  • Windows software

Meta

  • Log in
  • Entries feed
  • Comments feed
  • WordPress.org
Softonic English Proudly powered by WordPress