Boost Your PDF Productivity: Install Adobe Acrobat Extension on Chrome

Adobe Acrobat remains a go-to solution for PDF management due to its robust features and user-friendly interface. With recent updates, the Adobe Acrobat extension for Google Chrome has become even more powerful, enhancing how users interact with PDFs directly in their browser. Here’s a comprehensive guide to installing and leveraging this extension’s full potential.

Adobe Photoshop Plans GET YOURS NOW

Seamless PDF Management with Adobe Acrobat Extension

Adobe’s Acrobat extension for Chrome allows you to manage PDFs directly in your browser, integrating features like viewing, editing, signing, and sharing documents. This extension streamlines workflows, making it easier to handle PDFs without switching between different applications.

Step-by-Step Installation Guide

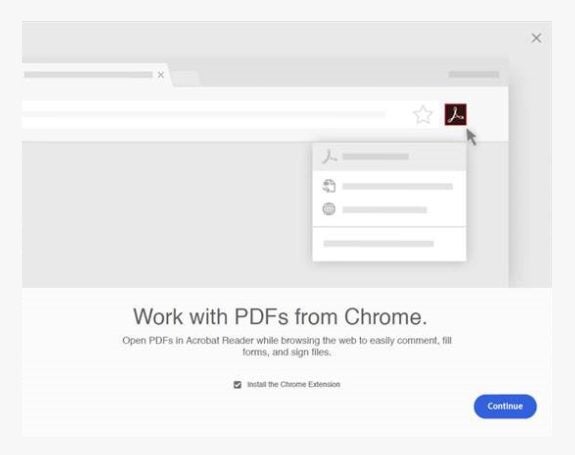
Step 1: Install the Extension

  1. Open Google Chrome and go to the Chrome Web Store.
  2. Search for ‘Adobe Acrobat’ and press Enter.
  3. Find the Adobe Acrobat extension and click ‘Add to Chrome.’
  4. Confirm the installation by clicking ‘Add extension’ in the pop-up window.
Step 2: Enable the Extension

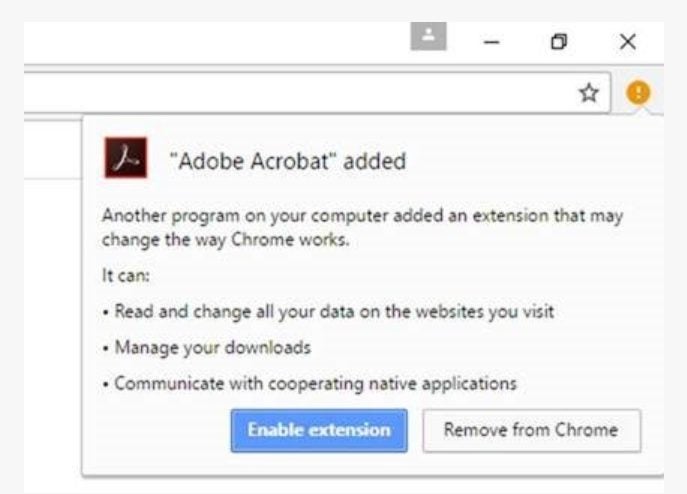
  1. Restart Google Chrome if it was already open after installation.
  2. A notification will appear asking if you want to enable the extension. Click ‘Enable Extension.’
  3. The extension is now active and ready to use.
Step 3: Utilize the Extension

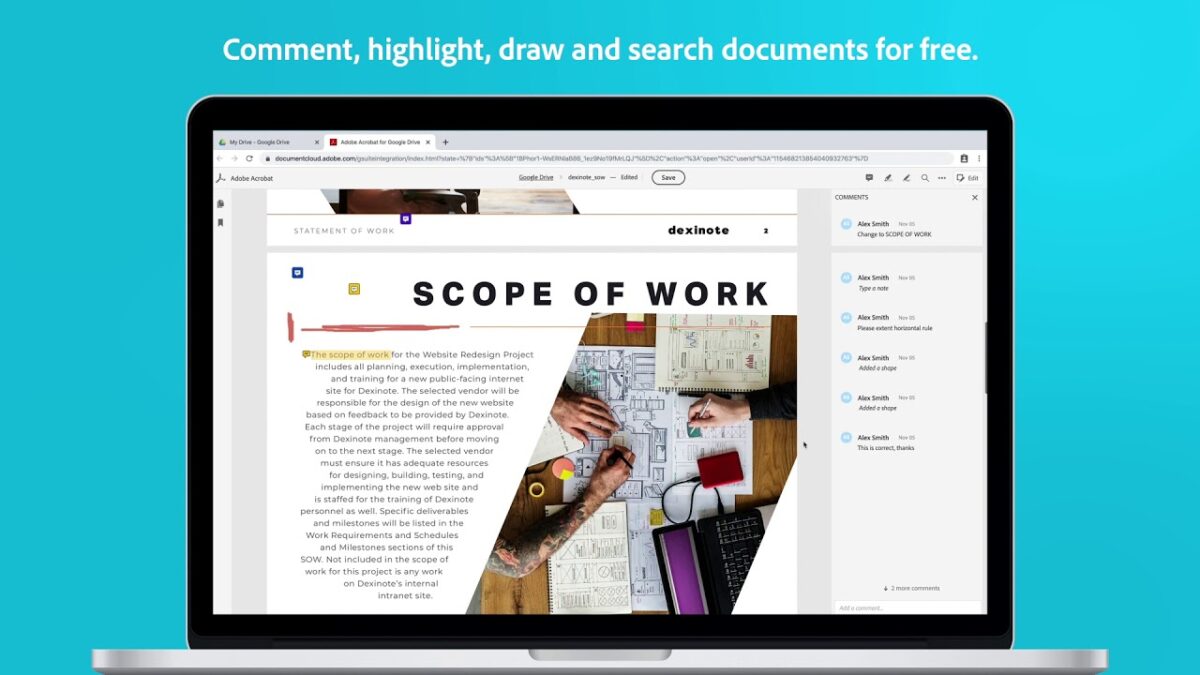
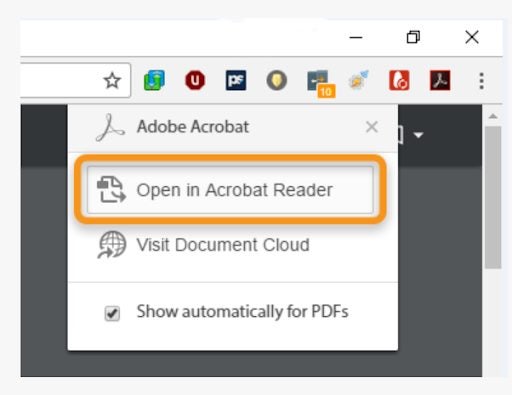
  1. Open a PDF file in Chrome, and the Adobe Acrobat extension will offer its features, including in-browser PDF editing. You can add comments, fill forms, and sign documents directly without downloading them first​.
  2. Choose to view the PDF in Chrome or open it with Adobe Acrobat for more advanced functions. With cloud integration, you can access and store documents, making transitions between devices seamless.
  3. Adjust your Chrome settings or Adobe Acrobat preferences to set it as the default PDF viewer if desired. The extension also allows for advanced conversion tools, enabling PDF conversions to formats like Microsoft Word, Excel, and JPEG directly from the browser.
Benefits of Using the Adobe Acrobat Extension

Using the Adobe Acrobat extension in Chrome not only simplifies managing PDF files but also boosts productivity by providing comprehensive tools within a single browser. Here are some additional benefits:

  • File Compression: Easily compress large PDF files to facilitate sharing and storage​​.
  • Enhanced Security: Protect sensitive documents by adding passwords and other security features​.
  • Accessibility Improvements: The extension is optimized for better accessibility, ensuring all users can interact with PDF content effectively​.

Enhance Your Creative Cloud Experience

To fully leverage the capabilities of Adobe Acrobat and other Adobe tools, consider exploring Adobe’s Creative Cloud services. With Creative Cloud, you gain access to a suite of powerful applications designed to streamline your workflow and enhance productivity. Whether you need advanced PDF editing, secure document storage, or comprehensive design tools, Creative Cloud has a solution for you.

Download and Explore Adobe Creative Cloud

  1. Adobe Acrobat Pro Subscription: Unlock premium features including advanced PDF editing, e-signatures, and secure document management.
  2. Adobe Cloud Services: Store, share, and access your documents from anywhere with Adobe’s cloud storage solutions.
Adobe Photoshop Plans GET YOURS NOW

Unlock the Full Potential of Your PDF Management

The Adobe Acrobat extension for Chrome significantly enhances your PDF management capabilities by integrating robust features directly into your browser. From in-browser editing and secure document handling to seamless cloud integration and advanced conversion tools, this extension streamlines your workflow and boosts productivity. Install the extension today and explore the full potential of Adobe’s tools through Creative Cloud to further enhance your document management and creative projects.
Steps for Extracting Single Pages from PDFs in Adobe Reader

Adobe Reader DC, a free tool, allows users to open, read, and print PDF documents on Windows and Mac. While basic functions such as document rotation are freely available, advanced features like extracting pages, merging documents, and password protection require Adobe Acrobat Pro, a premium version.

Adobe Photoshop Plans GET YOURS NOW

Why Extract Single Pages from PDFs?

Whether you’re a student needing a specific chapter from a textbook, a professional preparing a focused report, or someone archiving relevant sections of documents, knowing how to extract individual pages can be incredibly beneficial. Here’s an updated guide to help you navigate this process using Adobe Reader and other methods.

Steps to Save One Page from a PDF Using Adobe Reader

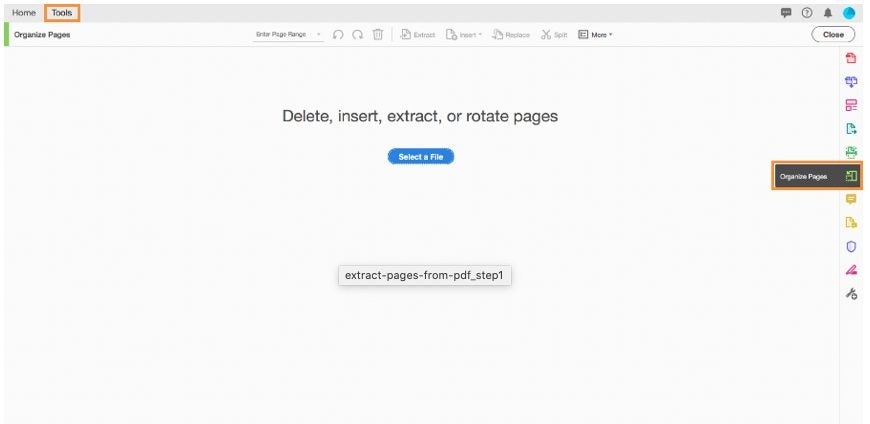
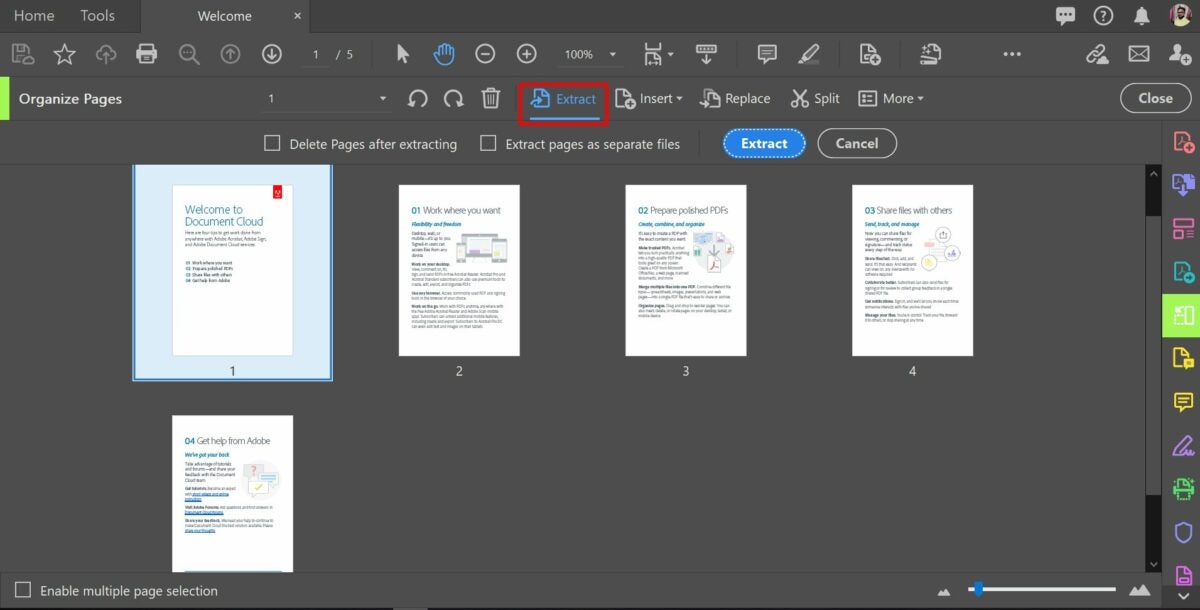
Step 1: Open the Organize Pages Tool

  1. Launch Adobe Reader on your computer.
  2. Access the ‘Organize Pages’ tool from the menu on the right side of the screen or by selecting the ‘Tools’ option from the top menu.

Step 2: Select the ‘Extract’ Option

  1. Open the PDF from which you want to extract pages.
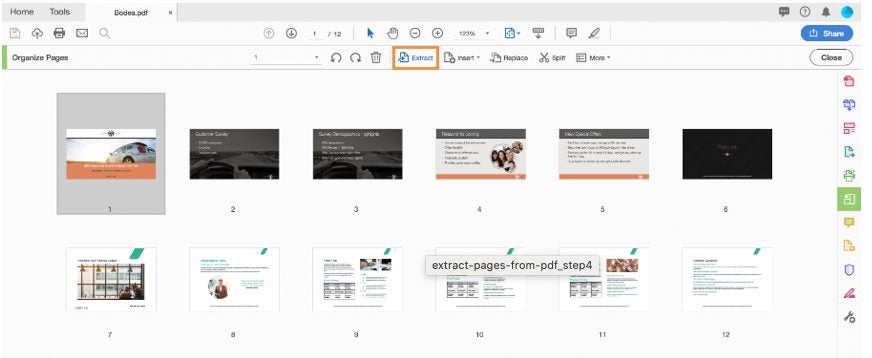
  2. The document will display in a thumbnail view of all its pages.
  3. Click on the ‘Extract’ option in the menu above the document.

Step 3: Choose the Pages to Be Extracted

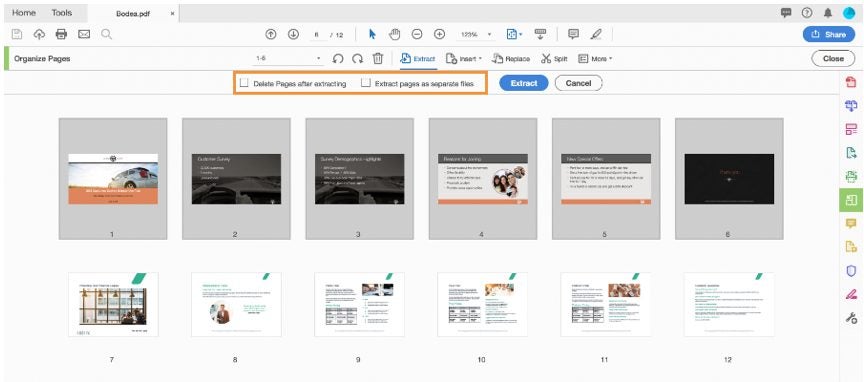
  1. Select the page or pages you wish to extract.
  2. For multiple pages, hold down the Ctrl (Windows) or Cmd (Mac) key while selecting.
  3. The selected pages will be highlighted.

Step 4: Extract the Pages

  1. Click the blue ‘Extract’ button located in the menu above the document.
  2. Choose the destination and format for the saved pages​.

Additional Methods to Save One Page from a PDF

Using Online Tools:

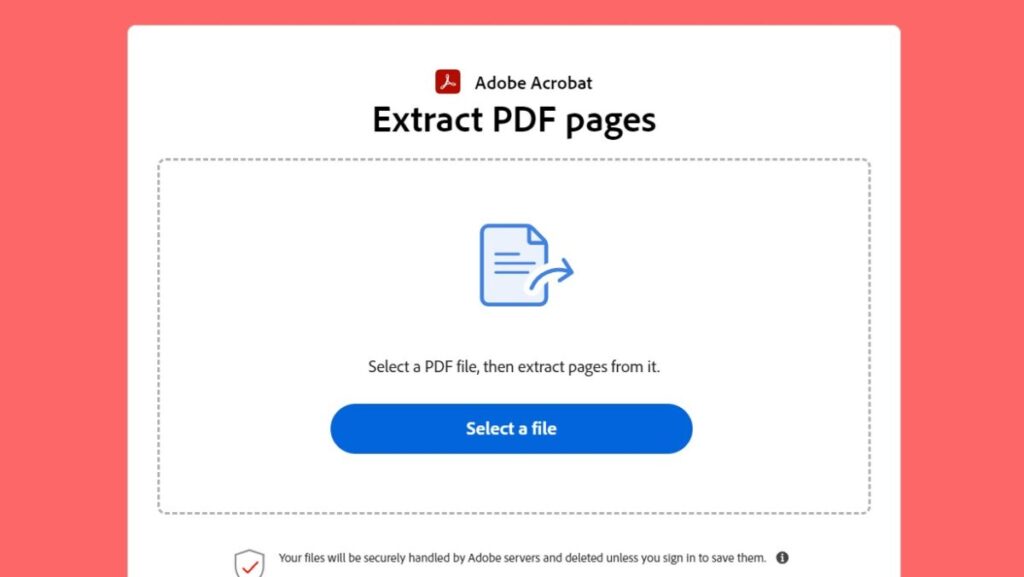
  1. Adobe Acrobat Online Services: Use the online PDF splitter tool from Adobe. Upload your file, select the pages you want to extract, and save the new PDF file​​.
  2. Smallpdf: Another simple online tool where you can upload your PDF, select the page to extract, and download the single-page PDF​.

Using Built-in PDF Viewers:

  1. macOS (Preview):
    • Open your PDF in Preview.
    • Navigate to File > Print.
    • Select the page number you want to save separately.
    • Change from PDF to Save as PDF and select the save location.
  2. Windows (Microsoft Edge):
    • Open your PDF in Edge.
    • Navigate to File > Print and select “Microsoft Print to PDF.”
    • Select the page range and save the file​​.

Maximizing Adobe Reader’s Features

Adobe Reader DC offers a range of functionalities to simplify PDF management tasks. For more advanced needs, Adobe Acrobat Pro provides capabilities such as:

  • Page Extraction: Easily extract and save specific pages.
  • Document Merging: Combine multiple PDFs into one.
  • Password Protection: Secure your PDFs with encryption.

Upgrade Your PDF Management With Acrobat

Discover the full potential of Adobe Acrobat by upgrading from Adobe Reader to Adobe Acrobat Pro. Unlock advanced features that make managing your documents easier and more efficient.

Adobe Photoshop Plans GET YOURS NOW

Master Your PDFs with Ease

With Adobe Reader DC, extracting single pages from a PDF is straightforward, enhancing productivity and flexibility. The tools and methods outlined above, from using the built-in Organize Pages feature to leveraging online tools like Adobe Acrobat Online Services, provide versatile solutions for any user need. Whether you’re working on a desktop or on the go, these techniques ensure you can quickly and efficiently manage your PDF documents.

Exploring advanced features in Adobe Acrobat Pro can further streamline your workflow, offering enhanced capabilities like document merging and password protection. By adopting these practices, you can make the most of Adobe Reader’s offerings, ensuring your document handling is both efficient and effective. Unlock the full potential of your PDF management by upgrading to Adobe Acrobat Pro, and experience the seamless integration of powerful tools designed to simplify your tasks.

How to Compress a PDF File Using Adobe Acrobat in 5 Easy Steps

While PDFs are naturally smaller than their .docx counterparts, they can sometimes become a bit too large to send in an email or store on your PC.

Luckily, Adobe Acrobat offers an easy way to compress your PDFs further and allow you to get them down to a manageable size, and we’ll show you how in this guide.

How to Compress a PDF File Using Adobe Acrobat

You will need either the Acrobat or Pro versions of Adobe. Now, let’s get started!

  1. Open Tools

    How to Compress a PDF File Using Adobe Acrobat in 5 Easy Steps

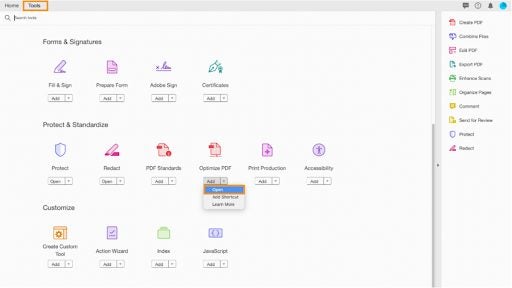
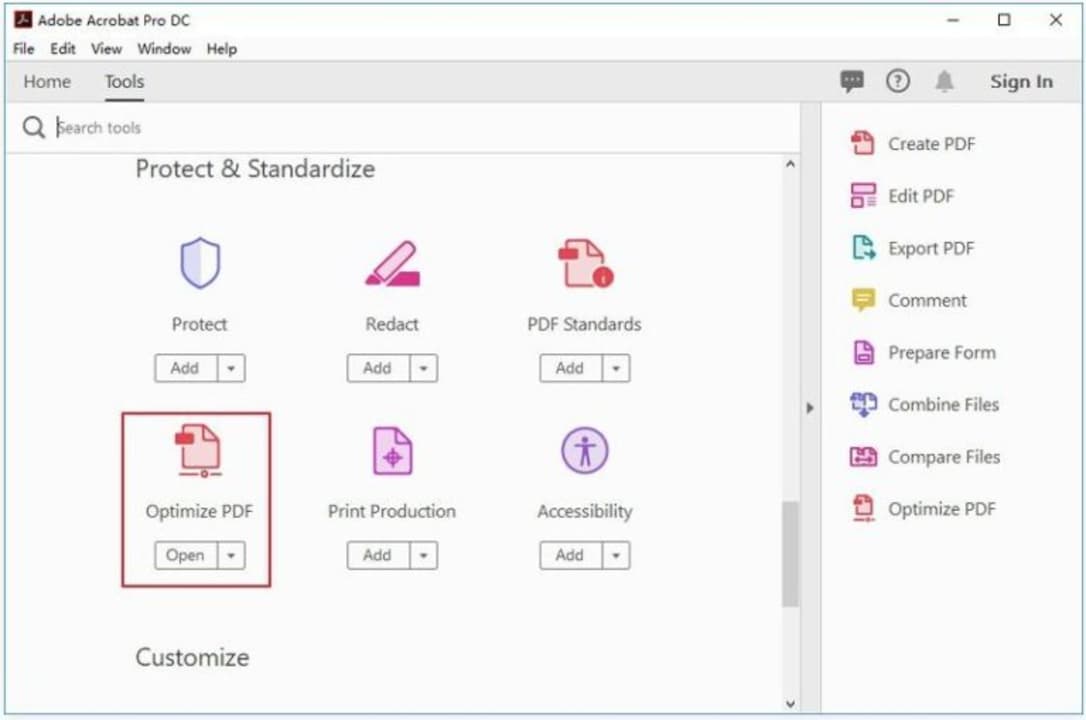
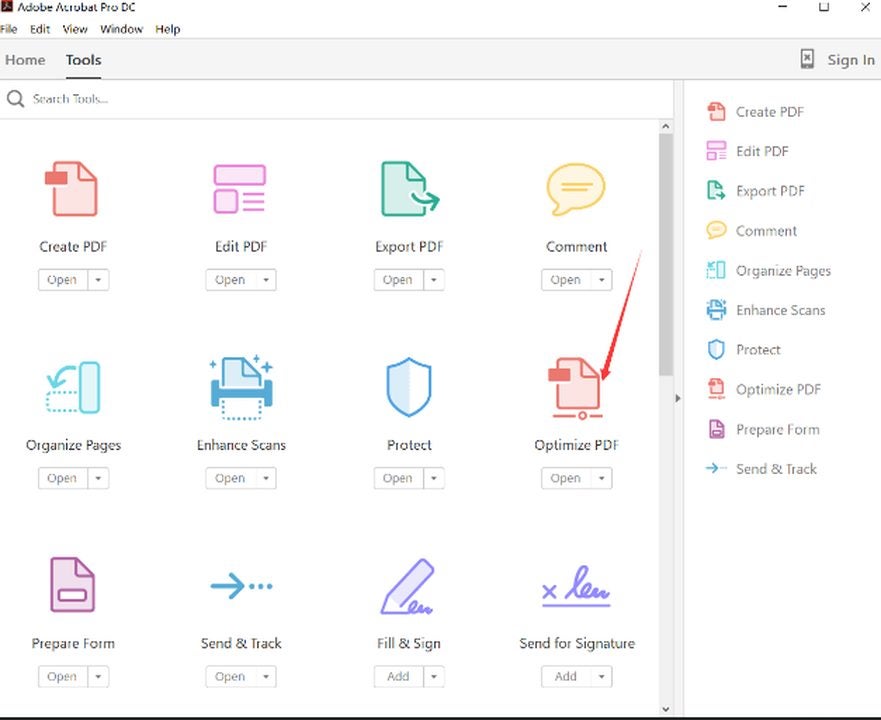
    Open up your Adobe Acrobat and select Tools from the menu at the top of the screen. Then select the dropdown arrow under Optimize PDF and choose Open.

  2. Access file

    How to Compress a PDF File Using Adobe Acrobat in 5 Easy Steps

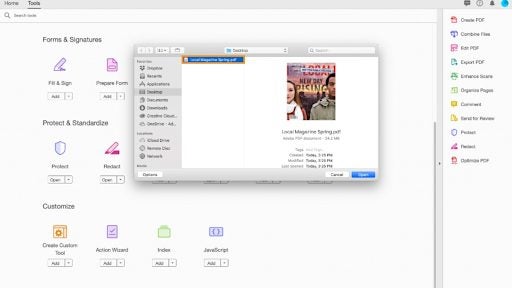
    In the box that pops up, select the PDF that you want to compress and click Open.

  3. Reduce size

    How to Compress a PDF File Using Adobe Acrobat in 5 Easy Steps

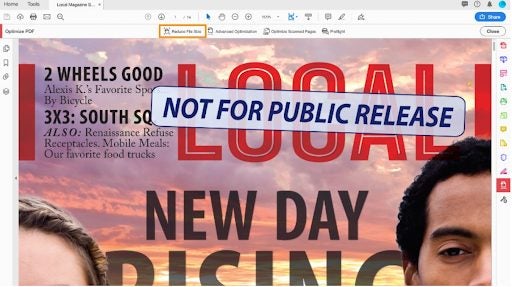
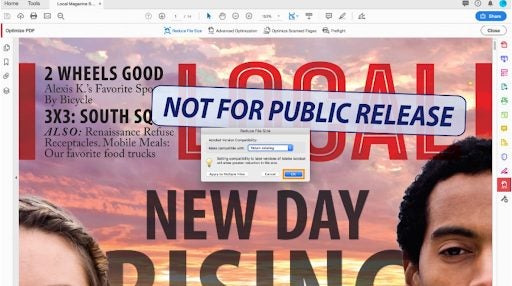
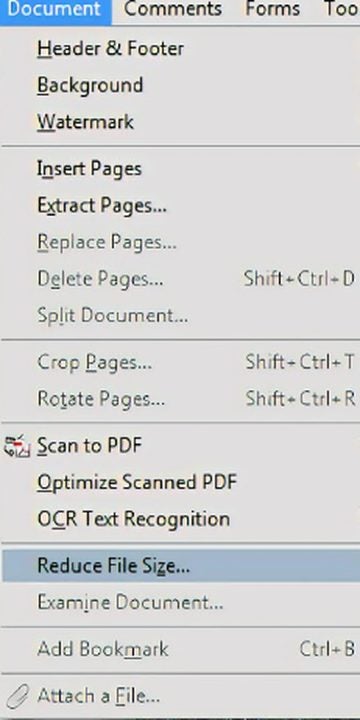
    This will open up the PDF with a few new options. Select Reduce File Size from the menu at the top of the screen.

  4. Set the compatibility settings

    How to Compress a PDF File Using Adobe Acrobat in 5 Easy Steps

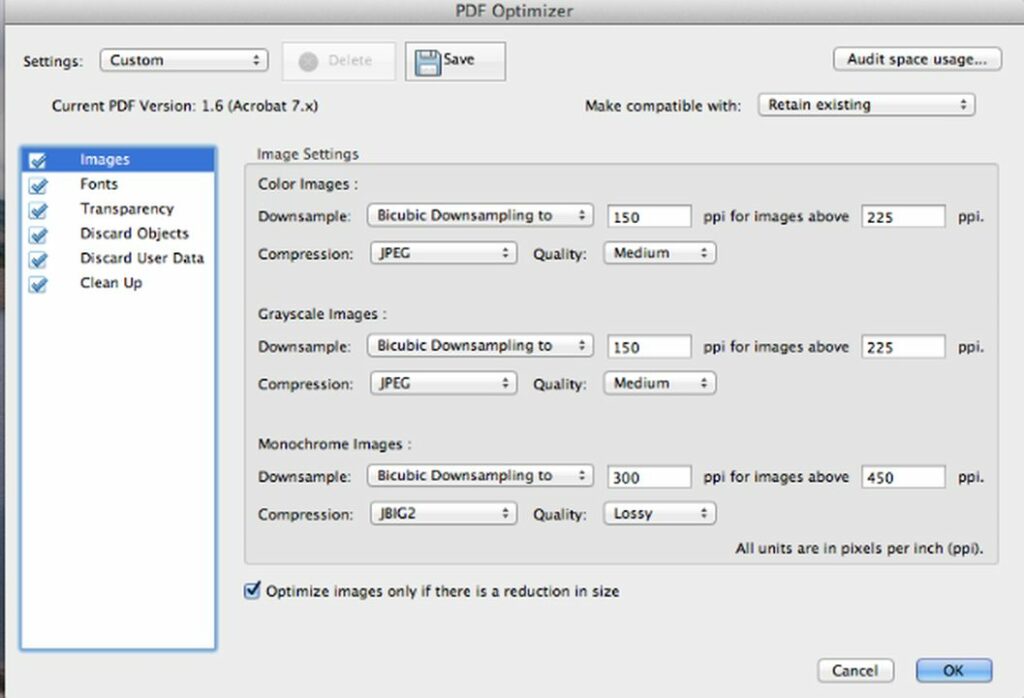
    Set your compatibility settings in the popup window; we recommend that you leave it on Retain Existing, though.

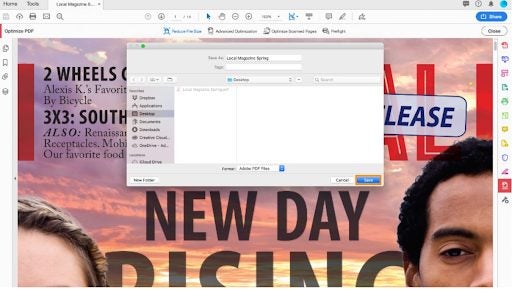
  5. Save your file

    How to Compress a PDF File Using Adobe Acrobat in 5 Easy Steps

    Lastly, save your newly optimized file with a new name to avoid overwriting the older version, or simply overwrite the older version with the new one; the choice is yours!

Honey, I Shrunk the PDFs!

Adobe offers one of the most uncomplicated and most straightforward methods for file compression when it comes to PDFs, and they even provide an online tool for those of us who work with the free version. It’s no wonder that Adobe has managed to retain the crown for PDF file readers for so long when they offer so many ways to work comfortably and efficiently with a notoriously tricky format.

Effortlessly Resize and Optimize PDFs with Adobe Acrobat Pro

Adobe Acrobat Pro is a powerhouse for managing PDF files on both Mac and Windows. Despite its vast feature set, resizing and optimizing your PDFs is straightforward. This guide walks you through the process, helping you keep your documents easy to share and store.

Adobe Photoshop Plans GET YOURS NOW

Streamlining Your PDFs with Adobe Acrobat Pro

Large PDFs can be a hassle, slowing down transfers and taking up too much space. Adobe Acrobat Pro makes resizing your PDFs a breeze, ensuring they remain efficient and easy to handle.

Getting Started with Adobe Acrobat Pro

First things first, you need Adobe Acrobat Pro. This functionality isn’t available in Adobe Reader. If you’re only tackling a few PDFs, take advantage of Adobe’s 7-day free trial. For ongoing needs, a subscription is the way to go. Once you’ve installed and activated Adobe Acrobat Pro, you’re ready to roll.

Step 1: Select Your File

  1. Open Adobe Acrobat Pro: Launch the application.
  2. Optimize PDF Tool: Head to the Tools pane and select “Optimize PDF.”
  3. Choose Your File: Use the file selector to find and open your PDF.
Click on optimize PDF to begin the process.

Step 2: Resize Your PDF

  1. Access Resizing Options:
    • Quick Method: Click “Reduce File Size” on the toolbar.
    • Alternative Method: Go to “File” > “Save As Other” > “Reduced Size PDF.”
  2. Advanced Optimization:
  • Images: Compress and adjust image resolution. Downsampling refers to reducing the number of pixels in images, making them smaller in size while trying to maintain quality.
  • Fonts: Optimize embedded fonts. This means reducing the size of fonts embedded in the PDF, which can help decrease the overall file size.
  • Discard Objects: Remove unnecessary elements. This includes:
    • JavaScript: Scripts embedded in the PDF that might not be needed.
    • Embedded Page Thumbnails: Small previews of pages that are often not necessary and can be removed to save space.
    • Form Fields: Interactive elements that can be flattened into static elements to reduce size.
  1. Fine-Tune Settings: Ensure “Optimize images only if there is a reduction in size” is checked to preserve image quality.
Reduce file size from this drop-down menu.

Unlock the Full Power of Adobe Acrobat Pro

Beyond resizing, Adobe Acrobat Pro offers a suite of tools to enhance your PDF management:

  • Password Protection: Secure your documents by navigating to “File” > “Properties” > “Security” and setting a password.
  • Editing and Annotating: Easily edit text, add comments, and mark up your PDFs.
  • Exporting PDFs: Convert PDFs to formats like Word, Excel, or PowerPoint for flexible usage.
Use this screen to adjust what you want compressed.

Experience the Benefits of Adobe Acrobat Pro

Discover the full potential of Adobe Acrobat Pro today. Whether you need to resize PDFs, secure sensitive documents, or convert files to different formats, Adobe Acrobat Pro has you covered.

Adobe Photoshop Plans GET YOURS NOW

Start your free trial now and experience seamless PDF management:

With Adobe Acrobat Pro, managing your PDF files has never been easier. Take control of your documents today and unlock the full suite of powerful features at your fingertips.

How to Markup a PDF in Adobe Reader in 4 Easy Steps

While almost everyone uses Adobe Reader to view PDFs, it’s a common misconception that you can only edit those PDFs if you buy Adobe Pro. There’s actually quite a lot that you can do with a PDF in Reader, such as fill in a form with your details or add your digital signature or add comments and notes to the document. While you won’t be able to convert the PDF back to Word unless you own Adobe Pro, you can still edit and add your own personal touch to the document while it’s still in PDF format. But how do you do this? 

How to Markup a PDF in Adobe Reader.

If you don’t already have the program installed, you can download Adobe Reader for the Windows version or this link if you’re working on a Mac. When you have everything up and running, you can proceed with the guide.

Step 1: Open the document

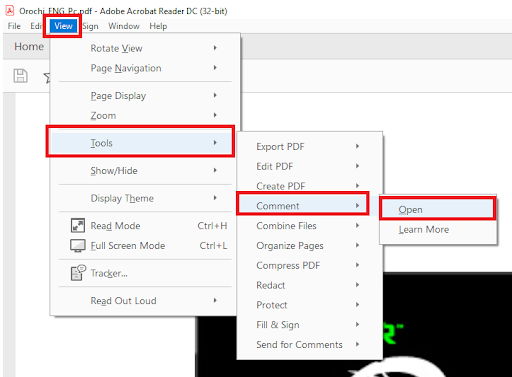
Open up the PDF that you want to edit and select View from the top menu. Then select Tools → Comment → Open. This displays the Comment bar on the left-hand side of the screen and gives you access to the markup tools at the top of the screen.

Step 2: Mark the file

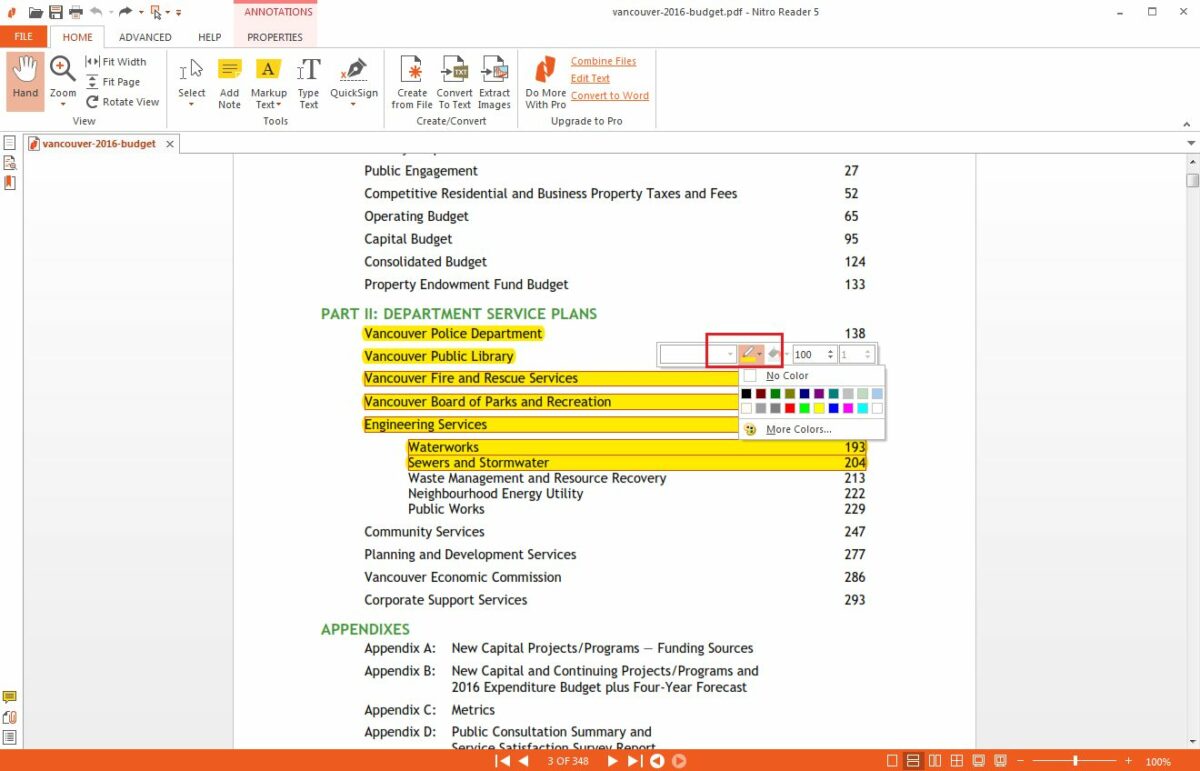
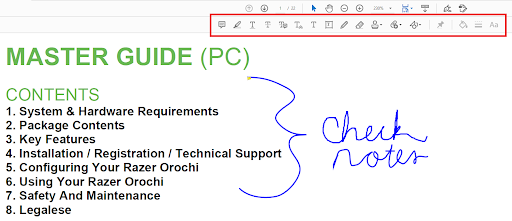
Now use the toolbar just above your document to edit, draw and mark your document.

Mark the file

Step 3: Add comments

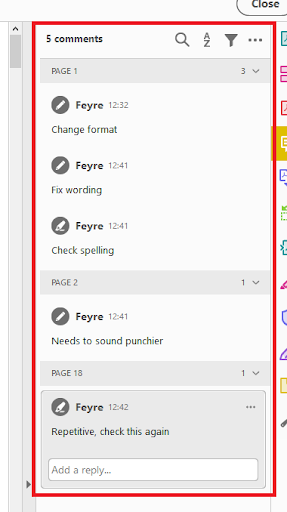
Any changes and markups that you make will add a comment to the comment box on the screen’s right-hand side. Here you can add additional comments, and someone else can reply to the comments to allow for easy communication.

Step 4: Save the file

Once you’ve made all of the desired changes, save your PDF. Now you can send it to others and allow them to make changes as well, or you can keep the edited version for yourself, depending on your needs.

The Perfect Tweaking Tools

Many people don’t know that the free version of Adobe Reader has so many editing tools, though, which allows for so much customization and effortless collaboration with others. Overall, Adobe has so many features that define it as the best PDF reader around, whether you’re working on PC, iPhone or Android.

How to Make Adobe Reader the Default PDF Program on Mac in 4 Easy Steps

Why is it that both Microsoft and Apple refuse to acknowledge Adobe’s dominance in the PDF reader pool, whether on Windows PC, Android device, or iPhone? Both of these companies insist on installing their own PDF readers and making them the default program so that even after you’ve gone through the whole rigmarole of installing Adobe Reader, your PDFs still insist on opening with one of the other programs. Microsoft has made it relatively easy to change your default programs with pop-ups and simple settings, but many people find themselves confused with Apple. 

How to Make Adobe Reader the Default PDF Program on Mac

You will need to have Adobe installed on your Mac before you begin this process. When that installation is complete, then please continue with the guide.

Adobe Reader for Mac Download
9

Step 1: Select a PDF file

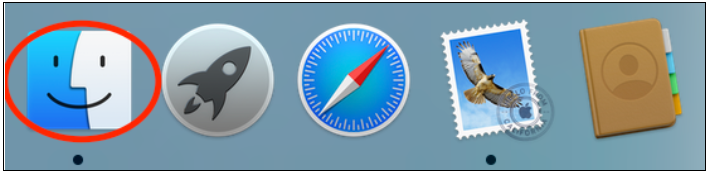
Startup your Finder and navigate to any PDF file.

Step 2: Click on ‘Get Info’

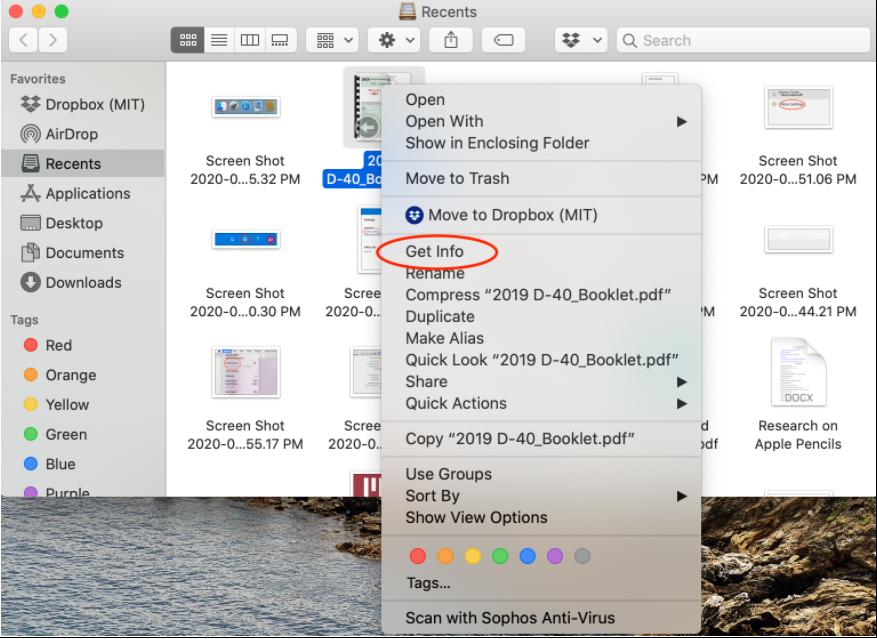
Ctrl+Click, or right-click if you’re using an external mouse, on the PDF and select Get Info from the menu.

Step 3: Open with Adobe Reader

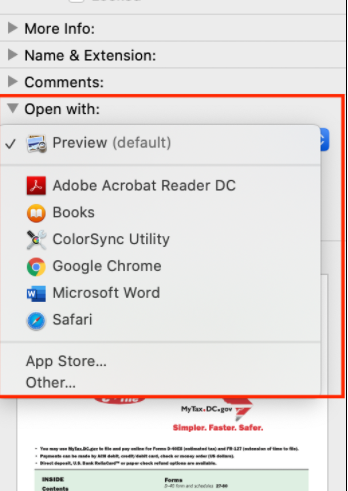
Click on the dropdown arrow in the Open With section of the menu that opens and select Adobe Reader from the list.

Step 4: Change the default PDF program

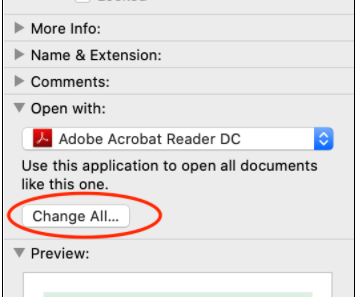
Finally, click on the Change All button just underneath the dropdown menu and select Continue from the box that pops up.

Making “Comfortable” Your Default Setting

Small things like this can be extremely frustrating; we all want our files to open in the correct programs automatically, and they often don’t. The beauty of this process is that it works for other programs as well; do you want to make sure that your videos open in VLC automatically or that your images open in Photoshop every time? Then this is the way you do that. Before you know it, you’ll have everything working with the correct programs, and you’ll be able to work comfortably and peacefully without manually opening everything in your preferred programs.

How to Password Protect a PDF in Adobe Reader in 3 Easy Steps

Adobe Reader DC is free to download and use, although some functions are only available on the Pro version. Currently, Adobe Reader is available on Windows, Mac, Android devices, and iPhone.

The Acrobat software also provides you with tools to secure and protect your PDF documents. This means you can keep confidential information such as tax and medical information, payslips, and more secure. One of the simplest ways to do this is by activating password protect on your PDF. This way, only people with the password would be able to access the document.

Be aware that if you do not have Adobe Reader Pro, a paid-for version with all the functions available, you will have to use the online Adobe site to password protect your PDF.

How to Password Protect a PDF in Adobe Reader DC Pro

Step 1: Open Adobe Reader DC Pro and Your PDF

Open Adobe Reader Pro on your chosen device and open the PDF file you want to secure.

Step 2: Click on ‘Protect’ in the Sidebar

Click on the ‘Protect’ option in the right sidebar.

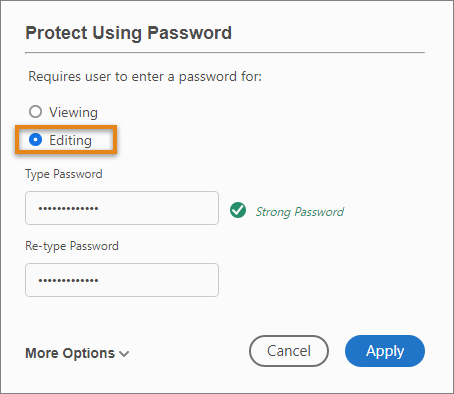
Step 3: Click on ‘Protect Using Password’

At the top of the screen, click on ‘Protect using Password’. Choose whether you want to lock the document so people cannot open it without the password or if you want to block edits. Then put in your chosen password and click on ‘Apply’ to finish.

How to Password Protect a PDF in Adobe Reader Online

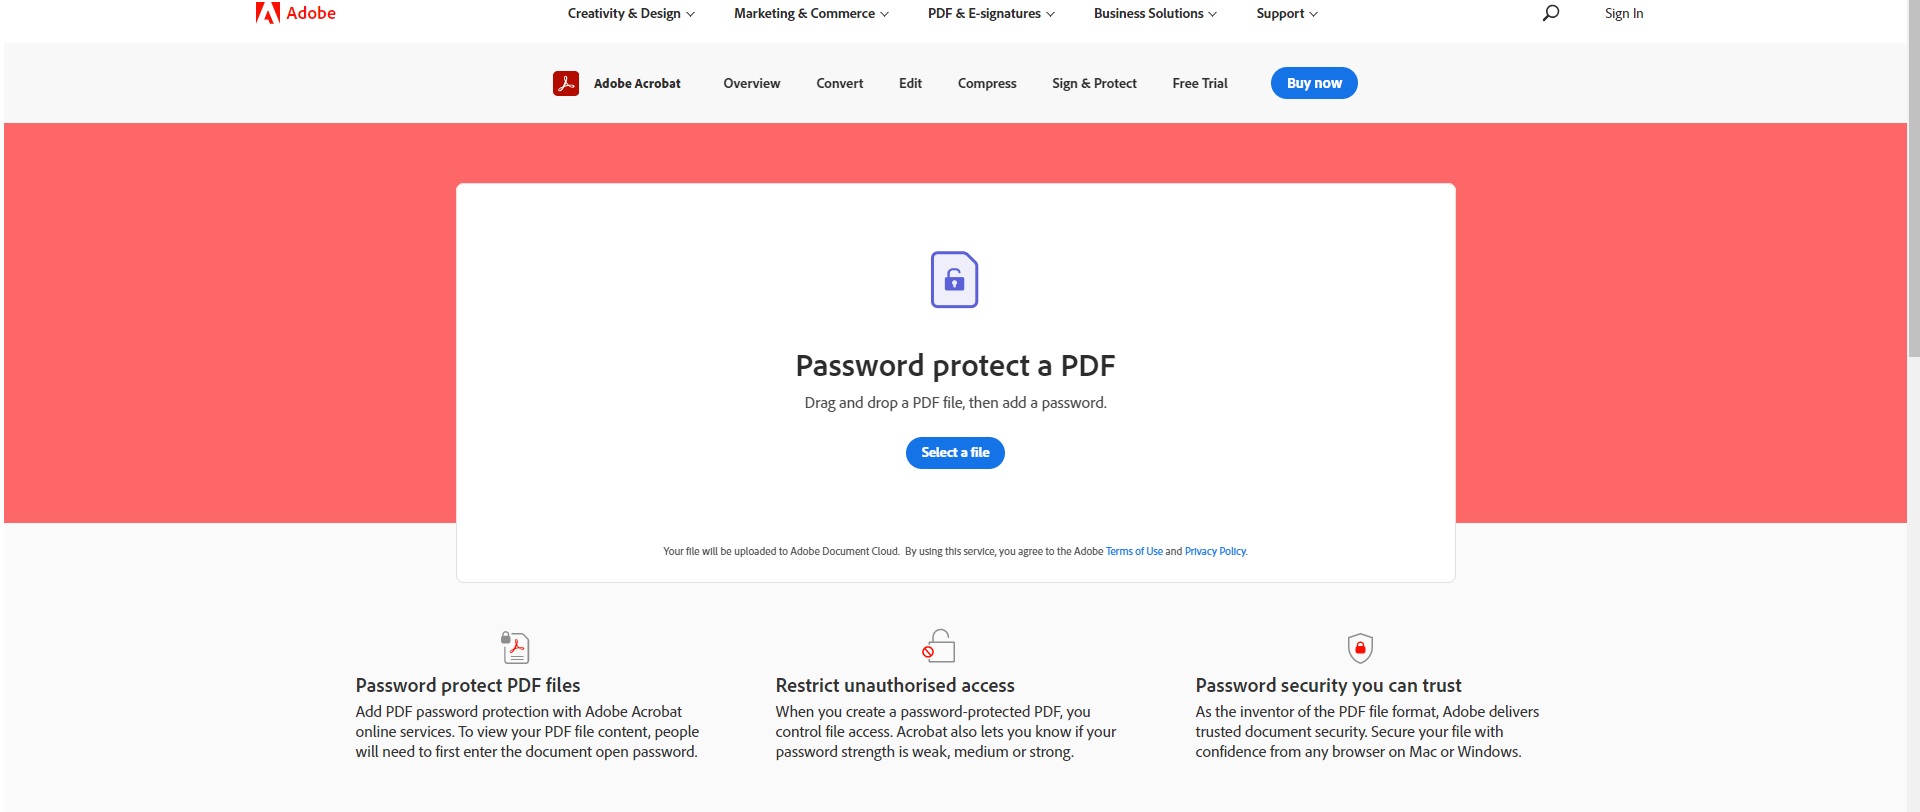
Step 1: Go to Adobe’s Site

Go to the Adobe site to use the free online services that include password protection.

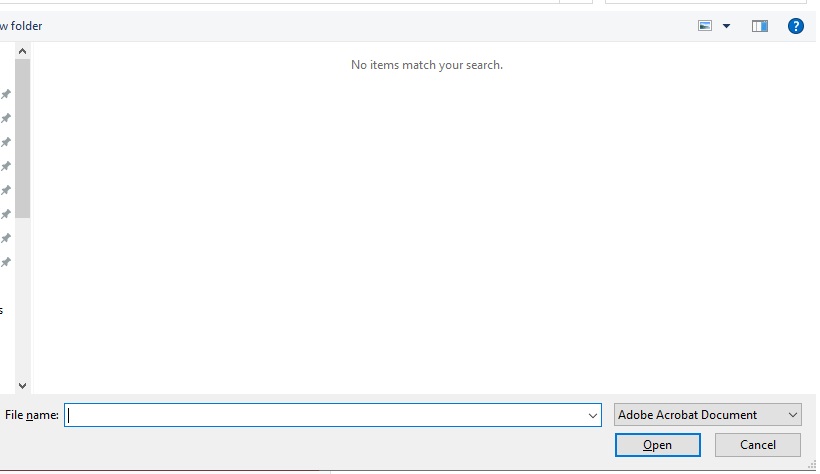
Step 2: Choose File

Choose the file that you want to password-protect.

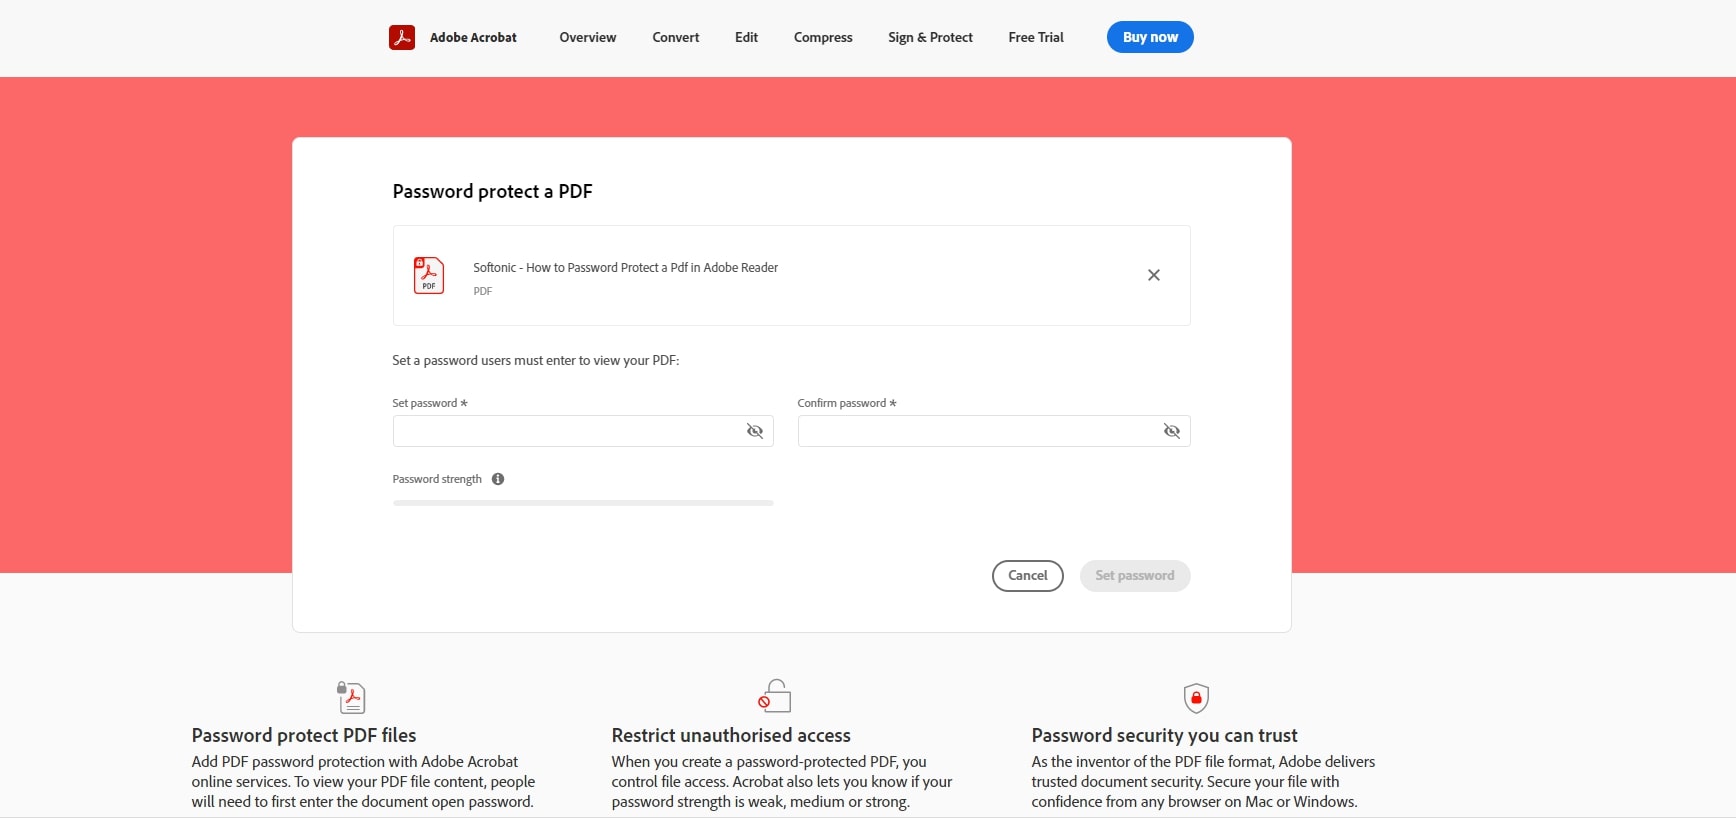
Step 3: Set Password

Enter and confirm your chosen password and set it.

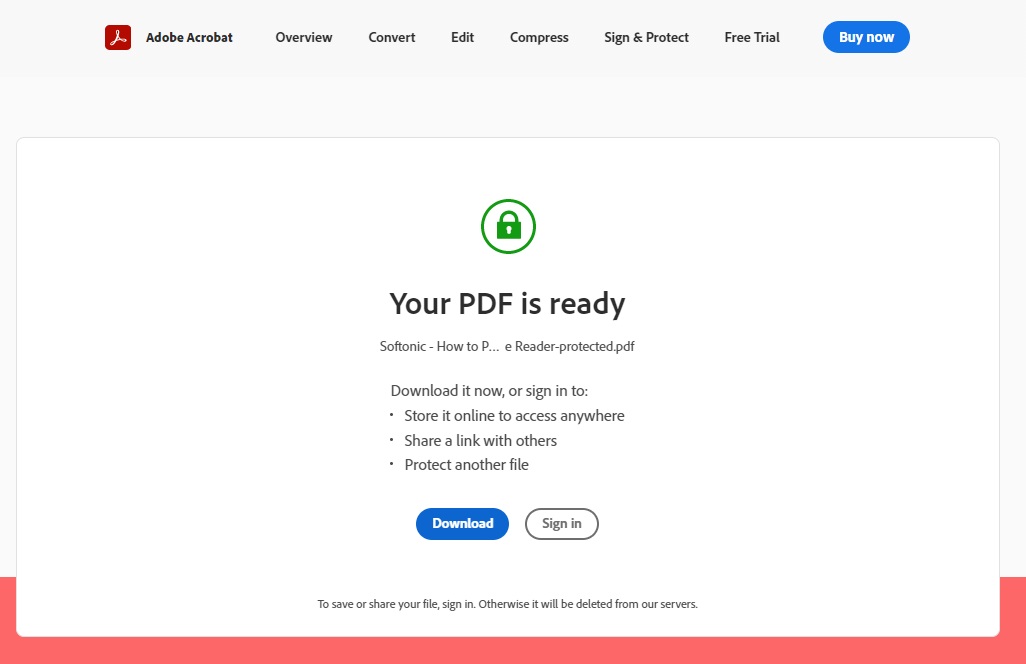
Step 4: Download Password-Protected PDF

Now download your password-protected PDF.

Add More Security to Your Confidential Documents

As you can see, the process to protect your PDF with a password is easy to set up, and there’s a way of doing it for free. Use this option to keep your confidential documents safe and secure.

How to Update Adobe Reader in 5 Fast Steps

Adobe’s Acrobat Reader forms part of the range of software and web-based products brought out by Adobe to view, sign, manipulate and manage PDF (Portable Document Format) files. The program is available on a laptop, both Windows and Mac, Android devices, and iPhones

However, as with most software, Acrobat Reader requires regular updates to remain secure and in good working order. Currently, Acrobat Reader DC is the latest version available.

There are two main ways that you can update your Reader. Let’s look at the steps you need to take to ensure your Reader is up to date. These steps are similar on Windows, Macintosh, Android, and iPhone.

How to Update Adobe Reader Automatically

You can automatically update Acrobat Reader straight from the program.

Step 1: Launch Acrobat Reader

Begin by launching the program on your device.

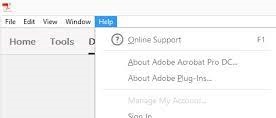
Step 2: Click on ‘Help’

Click on Help in the top menu of your screen.

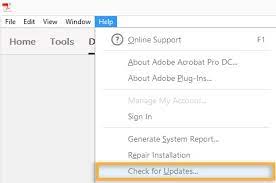
Step 3: Choose ‘Check for Updates’

Click on ‘Check for Updates’ in the list that opens.

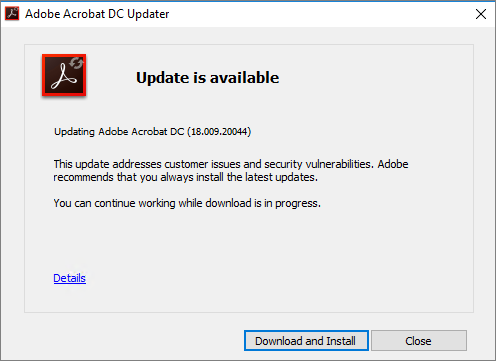
Step 4: Follow Instructions in the Updater Window

The Updater window will start to run and will look for any updates. Follow the instructions to install the updates. You’ll know that your Reader is up to date if no updates can be found.

How to Update Adobe Reader from the Web

You can also update your version of Acrobat Reader online.

Step 1: Launch Acrobat Reader and Click on ‘Help’

Run the program and click on ‘Help in the top menu of your screen.

Step 2: Click on ‘About Adobe Reader’

This will display a window with the details and version of your Acrobat Reader. Make a note of your version.

Step 3: Go to the Adobe Reader Downloads Page

Go to the Adobe Reader Downloads page on the Adobe Acrobat Website. The download page will automatically detect your operating system and adobe reader version.

Step 4: Install Any Updates

If there is a newer version listed, you can download and install it by clicking on the file and following the installer instructions.

Continue Viewing, Manipulating, and Enjoying PDF’s

With the latest version of Acrobat Reader installed on your pc or device, you will be able to continue reading, editing, manipulating pdf documents.

How to Type in Adobe Reader in 7 Simple Steps

Adobe Reader remains at the forefront when it comes to managing pdf (portable document format) files on Windows, Android, iPhone, and Mac. When it comes to a pdf document, the base content such as the text and images cannot be altered. Adobe Reader is equipped with tools to help you to add text and signatures, highlight text, and much more. It didn’t take us long to work out how to type in Adobe Reader, which we’ll share with you today.

How to Type in Adobe Reader

Below we share the steps on how to use Adobe Acrobat to add text to your document.

Step 1: Open Adobe Reader

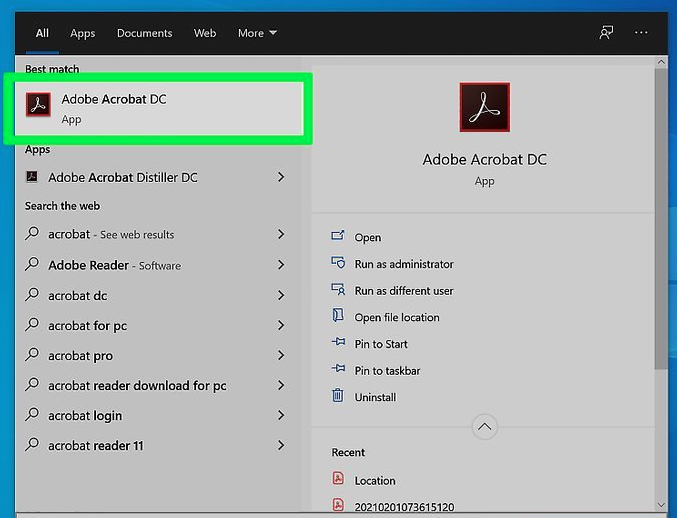
Open your version of Adobe Acrobat or Adobe Reader DC on your computer.

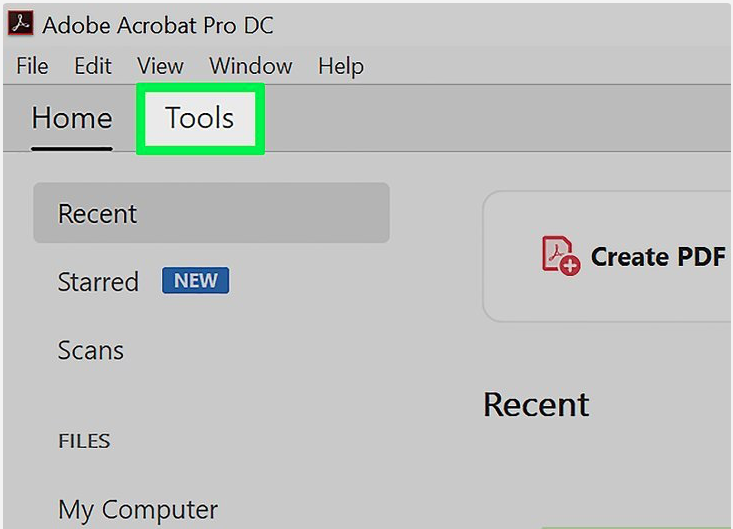
Step 2: Click on Tools

Click on the ‘Tools’ tab at the top of the window.

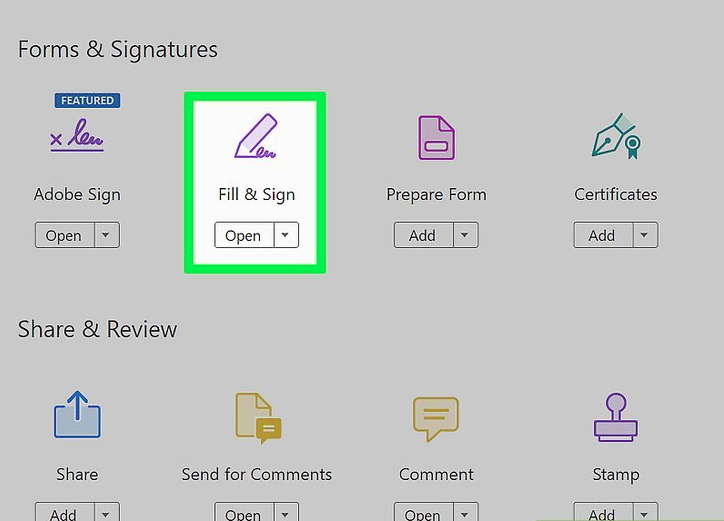
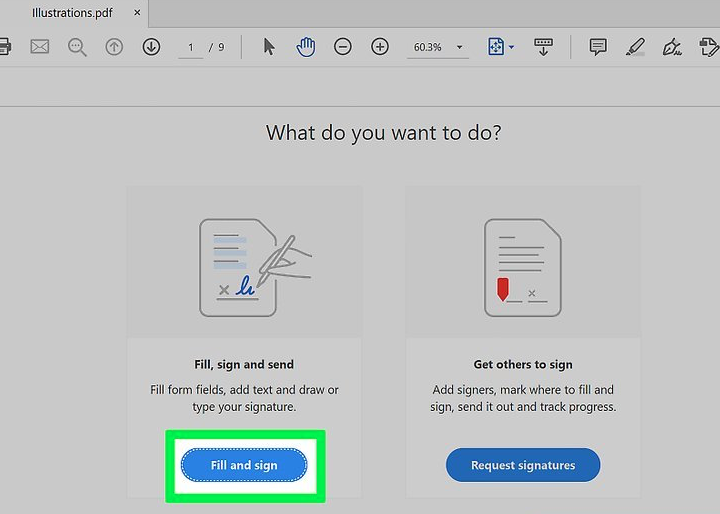
Step 3: Click ‘Fill and Sign’

Click on ‘Fill and Sign’. A pencil icon represents it.

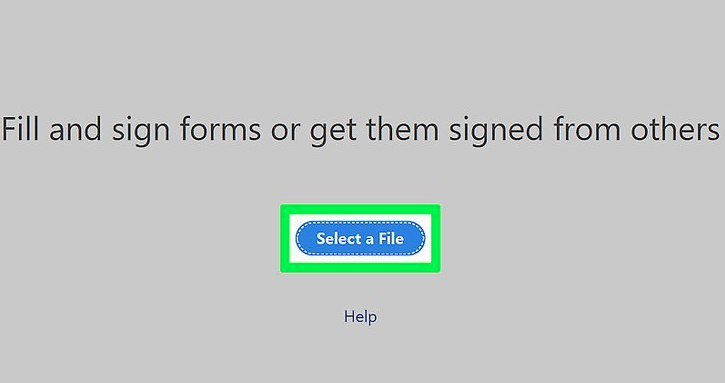
Step 4: Select Your Pdf

Select the pdf that you want to add text to.

Step 5: Confirm Your Selection

Confirm that you want to fill and sign this document.

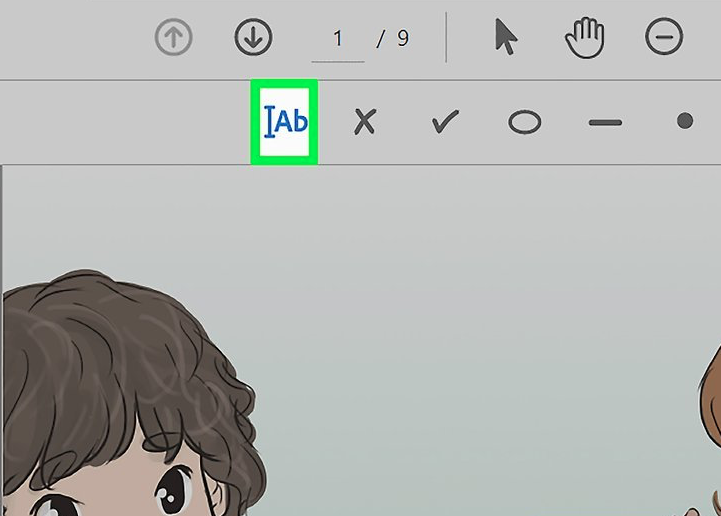
Step 6: Click the AB Icon

Click on the blue AB icon in the toolbar just above the pdf.

Step 7: Click the Area Where You Want to Type

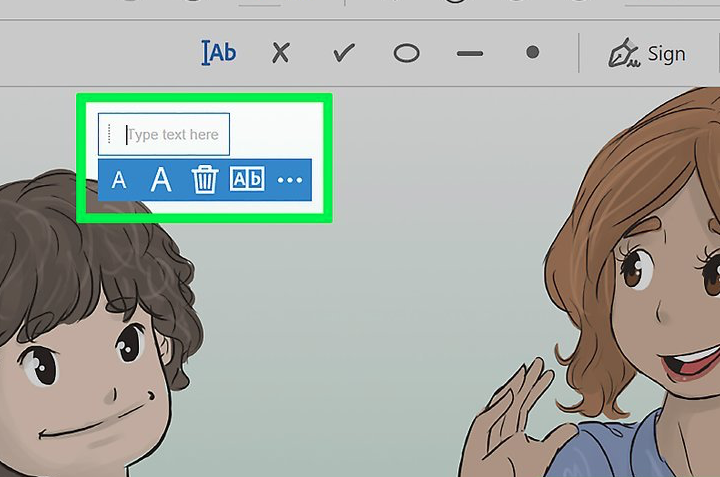
Click on the area in the document where you want to type, a text box will appear. You can adjust the text’s size by clicking on the smaller or larger A in the toolbar underneath your textbox.

Type to your heart’s content!

Now you can easily add text, get signatures, or complete forms that are in pdf format.

How To Merge PDF Files With Adobe Reader

When the world went online, software developers had a field day to stay ahead of the pack. Today we’re bombarded with options, including from which web browser we use to how we save files and send them around on the internet.

Although having so many choices is fantastic, it does present its own set of problems. Just because you love the program you’re working on doesn’t mean the next person does too. Compatibility across various working platforms has quickly become the modern-day dilemma when working remotely and sharing files.

Fortunately, creating PDF files from any type of content has dealed with this issue to a large extent. You can now save your images and text files in PDF format. As long as the recipient has a PDF reader installed, the communications are streamlined and resolved.

What is a PDF document?

You can divide PDFs into three categories depending on the original creation of them. How you create the PDF file will also determine whether others can gain editing rights after sharing it. ‘True’ PDFs the originals you create digitally in Word or Excel, and the originator then saves it into PDF format. It’s the original, so to speak. 

‘Locked’ PDFs are scanned or snapshot images and others can’t edit them. Regardless of the type of PDF file you have saved on your PC, it would help if you could merge all the information in one application, such as Adobe Reader. There are excellent free PDF Readers available to download free and safely.

Step 1: Download Adobe PDF Reader

If you don’t have an Adobe PDF Reader app yet, you can download it for iPhone, Android, Mac, and Windows. It’s free and safe to download for all devices.

Step 2: Open the Adobe app

When you’ve installed the new Adobe app, open it on your device.

Step 3: Combine the files

From here, it’s quick to complete. Click on ‘Tools’ > ‘Combine Files’ > ‘Combine Files.’

You have to select the command ‘Combine Files’ twice to kickstart the merging process. Adobe will now combine all your documents into one single file, making it effortless for you to access your work.

However, if this app won’t work for you, there are plenty of other excellent, free PDF Readers available to download safely.