What is Anydesk and how to use it

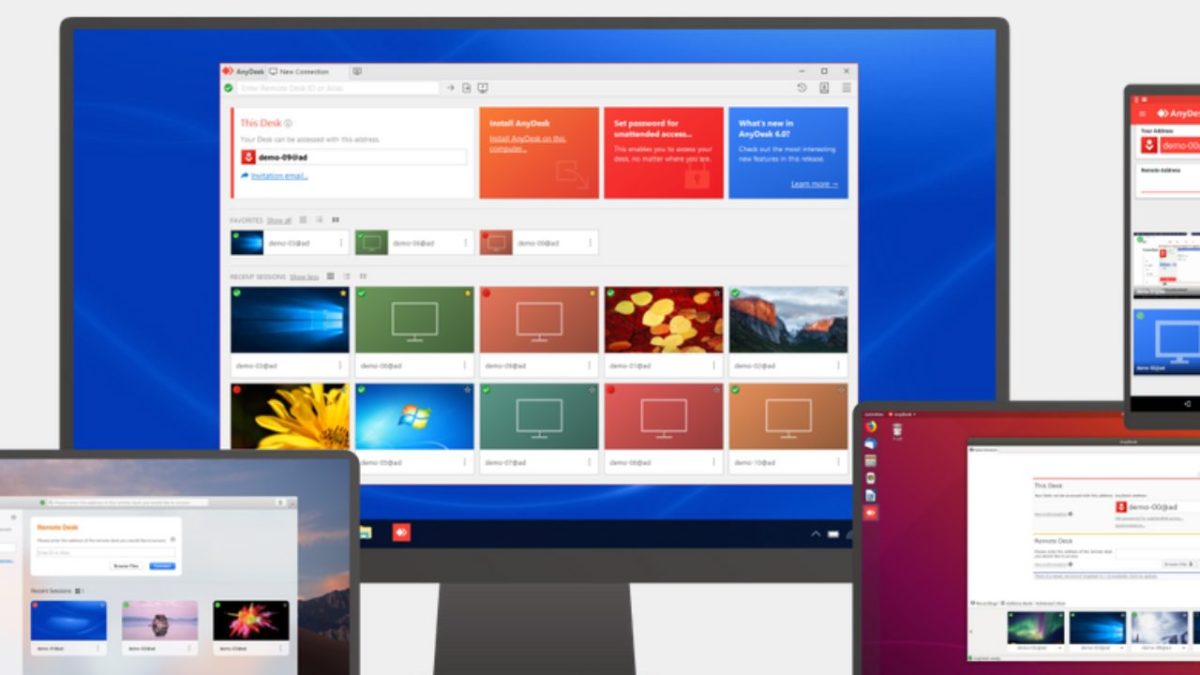
Anydesk is a popular software application that allows multiple users to have remote access to a computer system, its files, and documents. Or it can allow two devices to be connected for file-sharing or for IT staff to iron out bugs in a remote computer, for instance. It’s ideal for long-distance collaboration in the current scenario in which more and more companies have employees working remotely. The German software is used worldwide and has been downloaded more than 500 million times, according to the developers.

Anydesk is distributed by Anydesk Software GmbH. It’s free for personal use. Businesses are charged a monthly fee. Before you download it for yourself or your company, let’s take a detailed look at what Anydesk is and how to use it.

What is Anydesk and what is it used for?

Anydesk allows you to access your office computer when you’re out of the office. You can easily access data from your office computer, manage your files and transfer them or print them from a remote computer or mobile device. You can even turn your office screen black by enabling privacy mode in the security settings if you don’t want other people in your office to look at what you’re working on from a remote location.

How does Anydesk work?

The developers of Anydesk say its secure connection, which is encrypted and has a proprietary codec, ensuring trouble-free transmission. It allows connections between different kinds of devices, no matter which platform they’re operating on. The software also allows private users to access their home computers if they’re somewhere else. Business IT personnel can also use it to access staff members’ devices to solve problems if they’re out of the office.

How to use Anydesk?

Before you can use Anydesk, you need to download and install it. Here are the steps to follow.

Step 1: Download the Anydesk app

Choosing your preferred device format lets you start this journey by downloading the Anydesk app for free from a trusted provider. You can follow the easy links provided on top for quick installation.

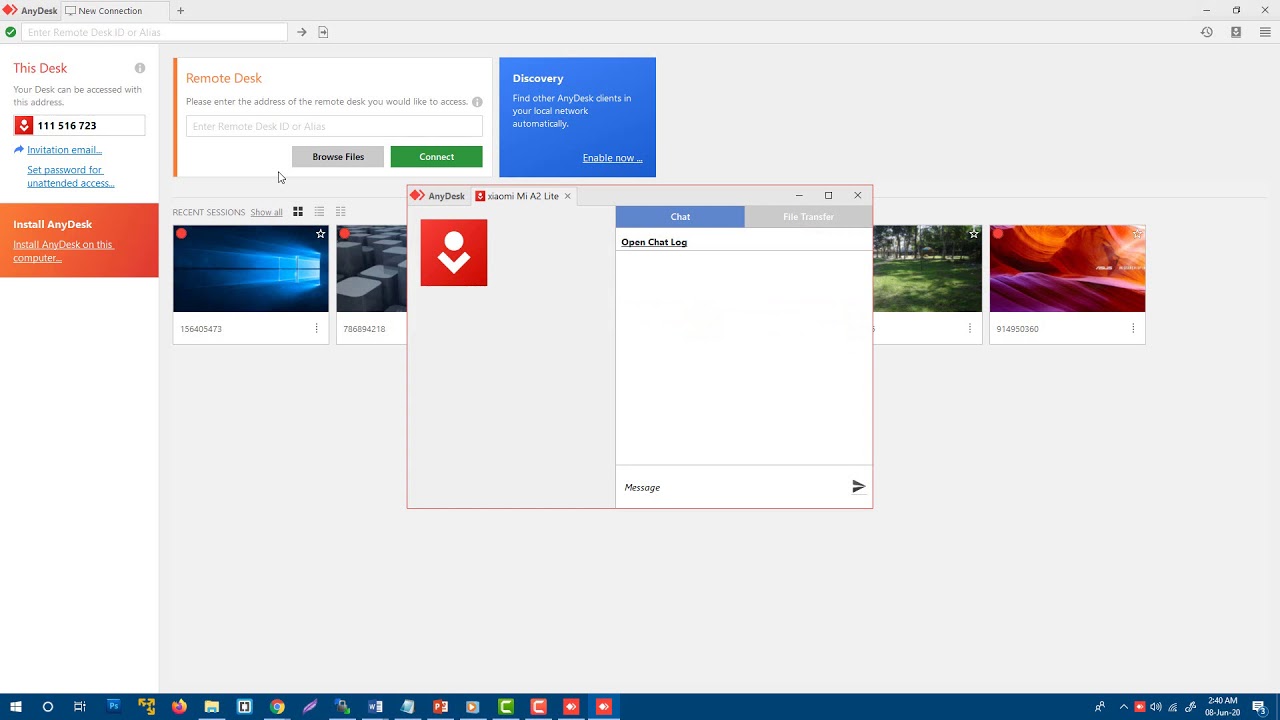
Step 2: Fire up your new Anydesk app

You can now launch the Anydesk app by clicking on the file. It’ll start running instantly. Under the heading ‘Remote Desk,’ you can type in the name of the remote device you want to access.

Step 3: Green is for GO

Once you’ve linked your devices, you press the green ‘Connect’ button, and you’re ready to go. This app is truly as simple as that. 

How to give control to Anydesk

In your Anydesk setting, you can find the Access Control List under the security tab.

If you want to give more access to your remote device, you have to unlock the security tab. You can press the + button to add more entries.

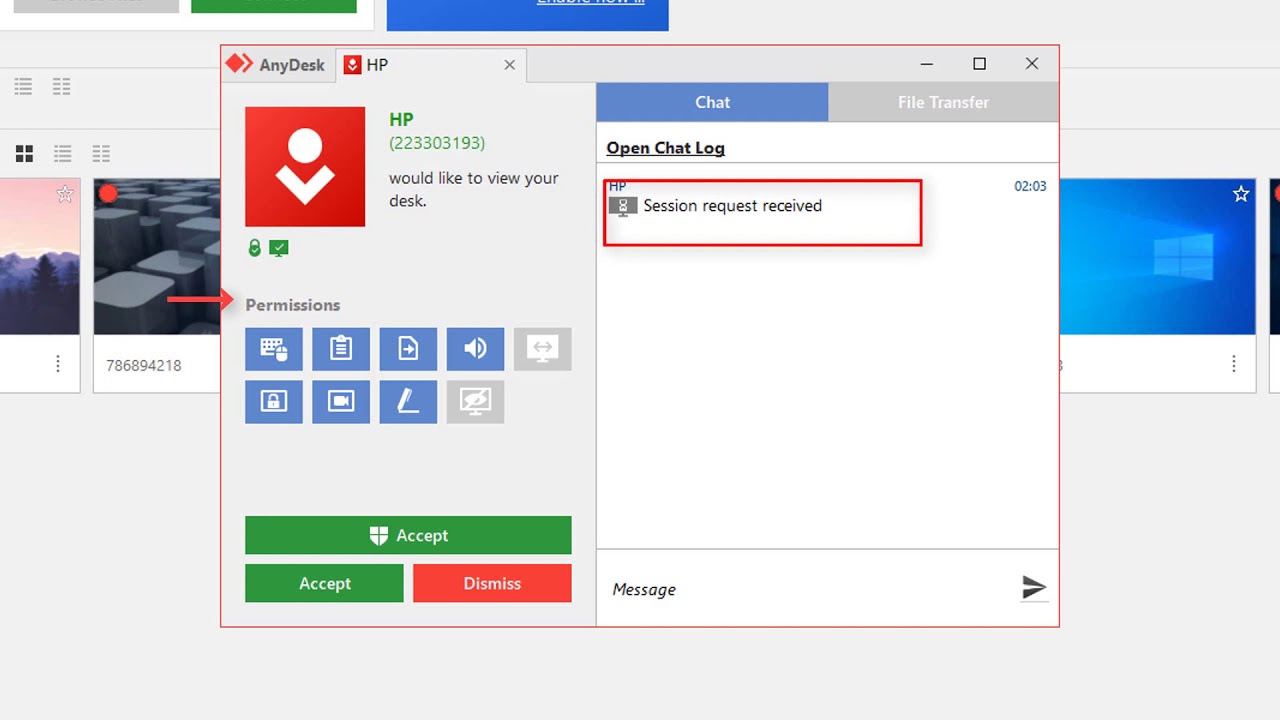
How to share files on Anydesk

You can copy one or more files to your clipboard on either the remote or local device.

When the pending file transfer request appears on the other device, you click on the ‘File Transfer’ button in the ‘Accept’ window.

A suitable safety protocol to follow when you’ve completed your file transfers is to disable Anydesk when not in use, especially if you’re accessing your remote device via a public WiFi connection.

How to use Anydesk on mobile

Using Anydesk you can access your personal computer from your mobile phone or tablet if you’re away from home. You will have to download Anydesk on your PC. Also, download the Anydesk app on your phone. Open it and enter the address or ID of the device. Tap the red arrow to use it.

You press the red button again to end the session. To communicate between the PC and the mobile device, you’ll have to have them connected to the same network. You’ll be prompted to select a name for your connection. If your PC is on, you can now access and use it from your mobile device.

More Anydesk guides

For more information on Anydesk, visit the following links:

Sharing connections

Anydesk provides an excellent opportunity to access your PC remotely and grab those important files you need. Don’t let all the functions intimidate you, as it’s easy to use.

How to Change the Language on Netflix in 5 Fast Steps

Bom dia, gutten morgen, goeie more! Wrong language on Netflix? No problem.

Netflix caters to a global audience and is available for Android, iPhone, Mac, and Windows. As you travel through various regions, you might encounter your Netflix account in a language you don’t understand.

Even when you’re not traveling, you might find a foreign movie you’d like to watch and need to change the subtitles. Whatever your reasons are for wanting to change the language on Netflix, you can do so effortlessly.

How to change your Netflix profile language?

Here’s a quick look at how to change your profile’s language.

Step 1: Log into your Netflix account

On a computer or mobile browser, sign in to Netflix.com.

Step 2: Click on ‘Manage Profiles’

Please navigate to the user for which you want to change the language and select it.

Step 3: Choose your preferred language

If it displays your chosen language already, change it to English, sign out, and follow steps 1 and 2 again.

Step 4: Save your preferred language

Sign out of your device and sign back in. Your preferred language should now be saved as the primary profile language.

How to change the subtitle language?

Netflix always displays up to 7 languages that are relevant to your region. If none of these are what you need, you can change it and select your preferred language for the subtitles. 

Step 1: Sign in to your Netflix account

You can sign in to your Netflix account from a PC or mobile device.

Step 2: Click on ‘Manage Profiles’

Next, select manage profiles to see the list that’s available.

Step 3: Choose your preferred profile 

Choose the profile you want to make changes in.

Step 4: Choose your preferred subtitle language

Now, you can change to the desired language.

Step 5: Play the movie or show again with the new subtitles

If you want to change it permanently, it’s advisable to change the settings using a movie or show with a teen or adult age restriction during the setup.

How to change the audio language?

If you want to change the audio language, you can do so following these easy steps.

Step 1: Sign in to Netflix

You can sign in to your Netflix account from a PC or mobile device.

Step 2: Click on ‘Manage Profiles’

Once again, open the list of profiles.

Step 3: Choose your preferred profile

Head to your profile to enter.

Step 4: Choose your preferred audio language

You can now select the appropriate audio language.

Step 5: Play your movie or show again in your preferred language

If you want to permanently change the audio language, use a movie or a show with a teen or older maturity rating while changing the settings.

How to Copy Something in PaintTool SAI in 4 Quick Steps

If you’re a budding artist, professional graphic designer, or a mom looking for creative ways to keep your kids busy, take a look at what Paintool SAI offers. It’s a superb app with user-friendly tools for free-hand and automated works of art on a digital platform. You can make use of the 30-day free trial version before purchasing the app from your preferred provider.

How to copy a layer in Paint Tool SAI?

Step 1: Create a folder

Group all the layers you want to copy into a folder.

Step 2: Select the folder

Once you’ve moved all the layers to the folder, close it and click on the folder to select it.

Step 3: Select the ‘Layer’ button in your top toolbar

Now head to the toolbar and click on ‘Layer.’

Step 4: Click on the ‘Copy’ button to finish the task.

To finish the task, select ‘Copy.’

How to copy and paste a picture on Paint Tool SAI?

Step 1: Choose the image you want to copy

Navigate to ‘File’ and click on ‘Open.’ Open the image you want to copy in Paintool SAI. 

Step 2: Crop or copy the image

Once the image is open, you can select to crop or copy it. Click on ‘Copy.’

Step 3: Move the image

You can now go to the page where you want the image copied to and ‘Paste’ it.

What else can I use? 

There are interactive and beneficial online communities where you can chat with other users and experts in forums to get answers and help. Deviant Art offers a precise approach with many pro tips and advice to read through. 

Although PaintTool SAI is a very user-friendly app, you can also endeavor into other software products to expand on your arty capabilities. Why not explore and see what programs such as Google Web Designer, LEGO Digital Designer, or Diagram Designer offers you?

How to Remove Continue Watching from Netflix in 4 Steps

Netflix makes it easy to watch your favorite series without missing a beat. Gone are the days where you had to wait an entire week to find out if the Carringtons dropped more adversaries at the bottom of their lake. Now you can watch seasons of your favorite show by simply downloading Netflix for iPhone, Mac, Android, and Windows.

Netflix automatically keeps track of your viewing activity and you can continue watching where you left off effortlessly the next day. If you don’t want to continue watching a show, or just want it off your list to make space for something you enjoy more, you can remove the title altogether.

How to Remove Continue Watching from Netflix

Follow these easy steps to remove ‘Continue Watching’ from Netflix.

Step 1: Enter Netflix from your browser

You can’t access all account functions on the mobile app. It’s more effective to open your Netlfix from your browser.

Step 2: Open your profile

On the menu, you’ll see all the user profiles for the account. Hover over your picture until the drop-down menu appears.

Step 3: Access your account information

If you’ve pressed the down arrow and can see your account information you can click on ‘Viewing Activity’ > ‘View.’ You’ll see a list with your recent viewing history. Navigate down to the title you want to remove from the ‘Continue Watching’ list.

Step 4: Remove ‘Continue Watching’ from your Netflix account

Each title has an option to ‘Hide from Viewing’ button on the R side of the screen. Click on the button if you want to permanently remove the title from your ‘Continue Watching’ menu.

A few things to keep in mind

It can take up to 24 hours before the title is not visible on your list anymore. Once Netflix removes it, you won’t be able to see it on your account tab any longer. It’s the perfect solution to remove some of the embarrassing shows you watched.

Also, keep in mind that children won’t have access to this solution, so you don’t have to worry that your kids are secretly watching and removing titles without your consent.

How To Delete Netflix History in 5 Steps

Have you ever wished you could erase a part of your history and never look back? Fortunately, our Netflix entertainment history doesn’t have to follow us around forever. We all love Netflix and have downloaded it for Windows, Mac, iPhone, or Android.  

Maybe you and your husband were binge-watching horror movies while the kids were in bed last night? Now you need to delete it so they don’t accidentally press re-play again? It’s super easy and quick to do. 

How to Delete your Netflix History

Here’s how to delete your Netflix history in a few easy steps.

Step 1: Open Netflix

You can access your Netflix account from the browser on any device you have handy. It doesn’t have to be on the specific device you used to watch the show or movie.

Step 2: Find your profile

Navigate to your sign-on screen and hover over your profile picture or avatar.

Step 3: Open your account

Open the drop-down menu by right-clicking on your profile. Click on the ‘Account’ button.

Step 4: Open your viewing history

Click on the ‘Viewing Activity’ tab on the ‘My Account’ page under ‘My Profile.’

Step 5: Delete the movie/show

Navigate to the movie or show you want to delete and click on the ‘Stop’ icon next to the title. This action will permanently delete the title from your viewing history. 

More tricks for a better Netflix experience

You can control many aspects of Netflix by following a few tips. If you want to streamline what Netflix recommends to you, make a habit of rating each show you’ve watched. It’s an automatic request you’ll see on your screen after the end of each episode or movie.

If you fall asleep on the couch often: remember to switch off the auto-play function. This way you won’t have to double back the episodes you slept through.

How To Update Google Play Store in 3 Steps

To stay up to date with all that’s new in the wonderful world of apps, you need to keep your Play Store ahead of the pack. By keeping Google Play Store updated, you’re assured of having the latest versions of the app going through all the bug fixes and improvements. Just like your Android apps, Google Play Store Android also needs essential fixes and features updated. It adds stability and visual changes to your digital store.

Update your Google Play Store

If you’re ready to learn how to update your Google Play Store, let’s jump right in.

Step 1: Open your app

  • Navigate to the Google Play app on your device
  • Click on Google Play to open it.
  • Click the slide-menu button in the app’s search bar.
  • Select ‘Settings.’

Step 2: Find your current version.

  • Scroll down and click on the ‘About’ tab. 
  • Your version is displayed here. Tap anywhere on it, and if it’s up to date, you’ll get a message saying ‘Google Play Store is up to date.’

Step 3: Update to the latest version

  • If you need an update, it will redirect to the download automatically.
  • Allow the update to complete without interruption.

You’ll mostly not even know that your Google Play Store app is updated, as it continually updates automatically in the background. If you’re like us and like to stay on top of our app’s performance, these steps will ensure you do.

What other apps can I use?

By far, Google Play is the most used digital store globally due to its app cost, distribution, and compatibility. That said, you can expand your reach and take a look at what other great app stores are offering too. The Amazon App Store is a close second for Android users and used to be the sole home of Amazon Prime and distribute games for Kindle Fire phones, tablets, and streaming boxes.

Manufacturers pre-load such devices with the Amazon App Store. If you enjoy thinking and operating outside the box, you might like what the Aurora Store offers. It’s a free alternative to Play Store for Android. 

How to Use Netflix Party

Guys, movie nights with friends just took a whole new direction. In this age of social distancing and invisible enemies, it does feel as if we have all become the lead actors in a sci-fi movie, doesn’t it? 

Fortunately, exciting new apps and tools launch each day to help us adapt to and love, spending more time on the couch. Why not invite your best friend for a Netflix Party (now called Teleparty)? It’s the coolest new tool and lets you chat to your invited peeps in a chatbox on the screen while watching the same shows. It’s free and safe to download, so there’s no reason not to. Without any further ado, here’s how to use Teleparty.

How to start a Netflix Party (Teleparty)?

Step 1: Install the Netflix Party (Teleparty)

  • Your first step is to install Teleparty by visiting netflixparty.com. You can navigate to the site by typing the URL directly into your browser.
  • When you’re on the page, you can opt to ‘Install Netflix Party’ or click on “Get Teleparty For Free.’
  • The page will redirect to the Chrome Web Store. You can now select the ‘Add to Chrome’ button to install the Teleparty extension.

Step 2: Open a Series or Movie on Netflix

  • You can now log into your Netflix account as per usual in a new tab. 
  • Choose any movie or series that you want to watch with your friends while hosting your Teleparty.

Step 3: Invite your guests and start your party

  • Once you’ve decided on your show of choice, you can press the red NP icon that’s situated next to the address bar to create your party.
  • Your party is about to start, with just a few more clicks.
  • Click on the ‘Start Party’ button and send the URL to all the friends and family members you want to invite.
  • Your guests will receive the URL invitation and click on the link to get in on the fun.

A part of your screen will now become a chatbox where you can have fun discussing the movie and enjoying a night of entertainment as if you’re all in the same room.

How to join a Netflix Party (Teleparty)

If you want to join someone else’s Teleparty, you’ll need to do the following:

Step 1: Accept the invitation

  • Click on the party URL to accept the invite
  • On the Netflix Website, you must press the NP icon next to the address bar to join in.

Step 2: Choose a remote master

Only one person can run the show and decide when to play, pause, forward, or call it a night. You have to select the remote master for your party before the party can start.

Millions of people have joined the fun of remote movie nights and are having a blast. It’s an excellent tool if your loved ones are far away. So, get your friends and family together for a new age of movie nights, and let the fun begin.

Let’s get this party started!

Now you can finally enjoy a movie night with your friends and family, no matter how far apart you are. Just remember to get the popcorn ready before you begin.

How To Delete A Google Classroom

Welcome back to one of our favorite new tools that have taken the education world by storm. We’ve shared many tips and tricks on how to master Google Classroom on iPhone, Android, and Windows. This superb tool that’s free and safe to download has helped thousands of teachers like you to keep in touch with their learners while keeping safe social distancing measures in place. However, what do you do when you’ve dismissed your class and scored the last assignments? 

Today we take a look at how you can keep your classroom schedule tidy by archiving and deleting it once it’s served its purpose. 

Step 1: Decide which action to take

Your co-teachers can archive a class initially, but only you can delete it entirely if you created it. While it’s archived, your students and co-teachers can still see it and access the data on it. Once you delete it, all information disappears permanently. If you know that you won’t need it again, you can proceed with step 2.

Step 2: Open the classroom

Go to classroom.google.com on your PC or laptop. Click the ‘Menu’ button at the top of your screen.

Step 3: Find it under archived classes

Note that you won’t find it here if you or a fellow teacher has not archived it specifically. Click on the ‘More’ button next to the specific classroom.

Step 4: Delete it permanently

Under the options, you can now click on ‘Delete.’ Google will permanently remove all data, assignments, and classroom communications. 

Can I undo it and retrieve my classroom?

Once you delete a classroom, you can not undo it. It’s always better to archive it until you’re 100% certain that you won’t need any of the data again. Bet, also keep in mind that too many active classrooms can limit a learner’s space for new projects, so don’t hoard up on all your old classrooms either.

What else can I use?

Although we consider Google Classroom one of the most comprehensive and user-friendly tools available currently, you can also make use of a few other social education tools to help you connect with your students. Take a look at the group video call capabilities of Zoom. It’s an excellent tool to use if you want to host huge online meetings.

How To Create A Google Classroom

Google Classroom has saved millions of curriculums from imploding in 2020. Whether you’re a teacher or a student, you’ve undoubtedly heard of the excellent benefits the app offers. It helps you stay in touch with your students in real-time while making it easy to create and distribute assignments. It’s also an excellent platform through which you can give marks and feedback to the student. The app is free and safe to download on iPhone, Android, and Windows.

Create a Google classroom in 5  easy steps

Step 1: Prepare your classroom

What is teaching other than creating order from chaos, right? Before you jump in and create your classroom, you should plan how you want to manage each one by dividing your students into the groups you wish to cluster together. 

You’ll need their email addresses for easy setup. Alternatively, you can send out a classroom code later. Your students will need it to enter their group and access all assignments, group meetings, and feedback.

Step 2: Download the app

You’ll need a Gmail account or the G Suite login information typically provided by your school’s IT department. You can also do it in your private capacity using your Google Account information. It’s as easy as downloading the free version from a trusted provider and installing it onto your PC or laptop.


Step 3: Sign in to Classroom

Now that you’ve got the app on your device, you can sign in at classroom.google.com. It’s best to create your classrooms on your primary device first until the setup is complete. To access it from your mobile app once the preliminary structure is complete is quick and easy.

Step 4: Pick your role

You’ll see two options on your screen. Your students will click the one when they want to join your class, but for now, you click on the picture that reads ‘I’m a teacher.’ You’re almost home free, just a few more clicks.

Step 5: Name your classroom

The next step is to create or join a classroom. It’ll redirect you to the Classroom Home Page, where you can click on the ‘+’ icon and then select the option to ‘Create Class.’ In the next tab, you can create a name that your students, and yourself, can identify with. Keep in mind that you can have numerous classrooms, so naming each one uniquely streamlines future searches. You can also add more information in this section to further simplify the categorization, such as:

  • You can enter ‘Section’ details to describe the class.
  • You can add the ‘Subject.’
  • You can indicate the ‘Room’ location for the class.

Finally: Create your classroom

If you’re happy with the classroom content, all that’s left to do is to click on ‘Create.’ Congratulations! Your first virtual classroom is all set up and ready for you to start inviting your eager learners to join.

How To Install Aptoide TV On Firestick

There’s an exciting new Smart TV app for lovers of all things Android, and if you haven’t downloaded it yet, you should consider taking a look at the excellent features it offers you. Aptoide TV is an app store that has excellent content for specifically large screen HD devices. 

It’s perfect for your home theater if you’re serious about high-quality entertainment. Its user experience is top-notch, and you can use it on your Windows and Android mobile devices too. You can use the remote for Firestick on your iPhone to access Aptoide TV.

Step 1: Get everything ready for installation

There are a few things you can’t go without when you want to install Aptoide TV, whichever device you’re using. Before you start, make sure that you’ve enabled the installation of apps from unknown sources under the device settings. You’ll also need a browser and a file manager. All Smart TV’s have it, but if you’re streaming via your laptop, you’ll run the installation directly on it and not your TV.

Step 2: Install a downloader app

You can install any downloader app from your favorite app store. You can use Google Play or Amazon App store for this step. You can proceed to launch the downloader. Then click ‘Allow’> ‘Okay.’

Step 3: Download Aptoide TV

Once you’re on the downloader app page, choose the browser within the L menu on your screen. Click on ‘Search’ and enter the tv.aptoide.com URL into the box. Then press ‘Go.’ You can now scroll down and select ‘Download Aptoid TV.’ You have to wait for the download to finish before closing the screen or using other apps on your device.

Step 4: Install and use Aptoide TV on your Firestick 

Once the file download is complete, you can click on ‘Install’> ‘Done.’ You’ll see a new pop-up window on your screen. Press the ‘Delete’ button here to free up storage space on your Firestick. You can press ‘Delete’ again to confirm your choice. 

You won’t immediately see the new app on your Firestick menu. Press and keep in the ‘Home Button’ on the remote until the shortcut icon appears. You can move the icon to the front of your apps on your screen for easy access by holding it down and opting to ‘Move to front.’

Start watching and streaming your favorite channels

You’ve successfully installed Aptoide TV on your Firestick. All you have to do now is tune into your favorite channels and enjoy the added features the app adds to your home theater experience. Consider downloading Firestarter and light fires from anywhere on your Fire TV.