Attach files to Gmail directly from Windows

gattach-logo.jpgI use Gmail so much now that in many ways, I prefer it to even using Outlook. However, integration with Windows is nowhere near as good as Microsoft Outlook for obvious reasons.

gAttach! bridges that gap somewhat by allowing you to attach files directly to Gmail or Google Apps Mail directly from Windows. In other words, just right-click on a file, select “Send To” and “Mail recipient” and the plugin will automatically open your Gmail client with the file already attached. It not only attaches files directly from Windows Explorer – it also opens up a whole new world of attachment possibilities from Microsoft Office, Adobe Acrobat, Windows Live Photo Gallery, Internet Explorer and Mozilla Firefox.

Send File dialogue

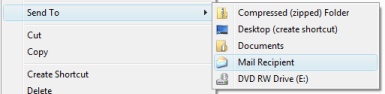
There’s not much to it than that but you’ll find it’s a much quicker and convenient alternative than always having to open your Gmail client when you want to attach and send a file. However, it’s worth noting that you may experience some glitches. If you are sending a file attachment whose filename is in a different alphabet to the one you use normally (e.g. your computer uses English but you’re sending a Spanish named attachment), it may not recognise or attach the file. If you’re logged into your Gmail, it won’t prompt you for your details but if you are not, then it does ask you for your username and password which you may or may not feel comfortable submitting.

You can download gAttach directly here.

Convert documents to PDF in SnagIt

Convert documents to PDF in SnagItIf we’ve already mentioned SnagIt quite a few times on this blog, it’s just because it’s one of the best capturing tools out there, and that’s coming from someone who takes about 120 screenshots a week!

However, SnagIt doesn’t only work as a screen capturing tool. In spite of having used it for years now, I recently discovered a new function in SnagIt I didn’t know about: the ability to use it as a virtual printer for any other app. This function comes in especially handy when you need to print a webpage exactly as it looks on your browser, or you’d like to convert DOC files to PDF to ensure other apps and systems will display them just like you designed them.

The PDF exporting tools in SnagIt are really easy to use. Launch SnagIt and then open the document, image or website you want to convert to PDF. The only requisite is that you open the file in a program that has printing capabilities. Go to the printing menu, open the ‘Printer’ drop-down menu and you’ll see ‘SnagIt’ among the available options. Select it and click on OK.

This will send your document to SnagIt no matter what it is: a webpage, a document or an image. Once it has been fully imported into SnagIt, you’ll be able to work on it just like any other image captured with SnagIt. When you’re done, click on ‘Save as’ and select ‘PDF’ as the target format. Your file will be saved as a PDF document.

MobileMe to replace .Mac on July 11

mobileme.jpgFor all you .Mac members, there’s only three days left until the service is shut down and Apple switches you to its brand new MobileMe service. Released at the same time as the new iPhone 3G, with which it will interact, MobileMe is surrounded by high expectations, as it will be a big step up from the aging .Mac services.

An Apple support page keeps a status posted to let .Mac members know of the switch. On Wednesday July 9 at 6 pm GMT, the .Mac service will be taken offline. The new MobileMe service will then have a six hour window to be introduced, which means .Mac members could spend a few hours without access to their account. The status window shows little colored buttons next to each .Mac service to keep you updated on their availability.

The switch seems to be highly worth it though. Although the yearly subscription fee is still a little high at $99, I feel that MobileMe offers much more incentives. Not only do you get 20 GB of individual storage, which should be plenty to hold all your emails and a significant amount of pictures, but you also get better integration with all Apple applications like iCal, Mail and the Address Book. You also still get direct access to your iDisk from your desktop.

The best improvement for me though is the easy synchronization of all your data, which should be best demonstrated with the iPhone 3G. Having all your contacts, notes and emails disseminated across all your computers and devices can really drive you crazy, and you simply don’t want to waste time harmonizing personal data on each device. If synchronization with MobileMe really proves to be as seamless as they say, I might just consider signing up.

Create disk images of your USB devices

usb-logo.jpgThere are plenty of disk imaging utilities out there for internal hard disks such as Norton Ghost and DriveImage XML. But there are relatively few that cater specifically for the needs and requirements of USB devices.

With USB drives constantly increasing in capacity and now capable of holding up to 1 Terabyte of data, it’s very wise to create images of them in case of hard disk failure. USB Image Tool is a smart free application that’s capable of generating images of your USB devices so you can restore the disk image anytime you need to.

USB Image Tool screenshot

The program automatically detects USB devices connected to your computer and scans them before asking you whether you’d like to create an image backup or restore a previously backed-up image. USB Image Tool can create images of any USB device whether it be memory sticks or MP3 players (which is useful for saving long playlists).

If you’ve got a lot of data stored on USB drives, USB Image Tool offers an easy to use and space-efficient way of protecting your information. Note that the tool requires the .NET Framework 2.0 installed in either XP or Vista. Also, the usbit32.dll included in the archive must be placed in the same directory as the EXE file for the program to work.

Top screen capture apps for Mac

GrabHere at Softonic, we take bucket loads of screenshots every day, as we’re constantly testing out and reviewing new programs and games. Now on a PC I simply stick to SnagIt, which is by far the best and most complete screen capture tool you’ll find. On Mac, there’s a much bigger selection of excellent programs that take high quality, crisp screen grabs of whatever it is you want to show.

When you start off taking screenshots on your Mac, you’ll probably go with Apple’s Grab tool, which is found in your Utilities. Grab is a no-fuss, hands on program, which allows you to capture full screen, a selection, a window or a timed screen. You can also select your pointer type and enable sound. Nothing too exciting, but it gets the job done, and luckily, it’s already installed on your Mac. So what are the alternatives? Here is our selection of the best screen capture tools for Mac:

  • Screenshot Plus Widget – My favorite. Available from the Dashboard, takes all sorts of captures and lets you format, display, export or save them.
  • Jing – One-click capture of anything on your screen. An intuitive new tool from Camtasia, creator of SnagIt.
  • Copernicus – Precise capture app which lets you bath preview your shots. Great if you take many screen captures regularly.
  • Red Snapper – A smart plugin for Safari that lets you capture full web pages straight from the browser.
  • SnapNDrag – A simple screen capture tool. Make your selection, set quality, format, size and snap away.
  • QuickSnap – Fast screenshots of your screen, a selection or a window. Gets the job done and looks nicer than Apple’s Grab tool.
  • Screenium – An advanced screen capture tool with presets for quality and size and a streamlined process.
  • grabUp – A smart Preference Pane item that lets you grab anything on your screen and share it online immediately.

PC users, check out Nick’s list of 10 screen capture tools for Windows.

Follow the Tour de France in Google Maps

The Tour de France, one of the most important cycling competitions in the world, started its 2008 edition last weekend ago in Brest, to the North-West of France. This was just the first stage of a 22-day race in which cyclists will cover more than 3,500 kilometers along the plains, valleys and hills of the country, supported by hundreds of fans, and closely followed by television cameras, news photographers and radio sports commentators.

But traditional media is not the only one to follow the Tour 2008. As explained on Google’s blog, you can also keep track of the Tour de France in Google Maps, making use of its Street View function.

Follow the Tour de France in Google Maps

The complete Tour de France 2008 route has been photographed and embedded into Google Maps so that we can experience the race as if we were standing right on the side of the road. Simply click on any of the locations included in the route and zoom in to see more detail.

I haven’t been able to see a single cyclist (I guess the pictures were taken before the Tour actually started) but on the upside I’ve been able to enjoy beautiful French landscapes and important monuments during my virtual trip.

How to watch the Olympics for free online

NBC Olympics logoSo the 2008 Olympic Games are little more than a month away now and whether or not you approve of the Chinese stance on Tibet and various other human rights issues, it looks like it’s going ahead.

If you don’t have access to a TV over the summer months or can only see it via pay-per-view channels, then you can watch it online for free courtesy of TVTonic. No, it’s nothing to do with Softonic but it’s a P2P TV app with access to hundreds of international channels worldwide. They’ve done a deal with US broadcaster NBC which allows you to download Olympic events for free. The catch is that they’re only available 12 hours after the events finish although because of the time difference between China and the rest of Europe and the US, that won’t actually be as annoying as it sounds.

TVTonic Channel Guide

Apart from the Olympics TVTonic has quite a few other interesting broadcasts you might like to check out. It’s obviously been designed with software fans in mind because it features a prominent section in it’s broadcasting schedule called “TechTonic” in which it highlights you can watch programs such as “Diggnation” and “The GigaOm Show”. Plus it has tons of channels devoted to video game reviews and interviews, music videos, movie trailers, breaking news. For instance, you can see what’s on offer Movie wise here and at the time of writing, 1st pick on the list is “Gonzo: The Life & Work of Hunter S. Thompson”. Plus you can subscribe to over 350 channels available in the guide or any RSS 2.0 feed with video enclosures.

You’ll need to download the TVTonic installer to get going but note that it only works with Windows Media Player and Internet Explorer… you can’t have everything!

Quick photo fixes with Picasa

Quick photo fixes with PicasaIf you want to quickly retouch your pictures or maybe fix some minor visual flaws, there’s no need to turn to complicated applications like Photoshop. Simply grab hold of Picasa and you’ll have access to a wide array of tools to fix light, color, perspective and other elements in your images to make them look just perfect.

To edit any photo in Picasa, double click on its thumbnail in the library to open up the editing tools. You’ll get a full screen preview of your photo with a tool panel to the left side featuring all the fixes and effects you can apply to your photo. Don’t be afraid to try them all, because you can see results in real time and also undo any changes.

The quickest way to apply an overall improvement to your photo in Picasa is using the I’m feeling lucky button. This function adjusts the image’s lightning and color, which generally results in a more visually appealing photo. But if you prefer to fix those two parameters separately, simply use the Auto Contrast or Auto Color buttons, with which you can work only on light or color without affecting the other one.

Quick photo fixes with Picasa

Also, if you click on the Tuning tab you’ll access a bunch of sliders to fine tune light and color in your image, perfect for the pickiest users. Again, these changes can be undone at any time. Continue reading “Quick photo fixes with Picasa”

Create your own jigsaw with BrainsBreaker

Jigsaw PieceI had quite a few jigsaws when I was younger. They were pretty boring affairs too be honest – usually pictures of ships, the English countryside or kittens. But I rarely completed them. Not because they were too difficult of course – because the dog would always end up eating half the pieces or I’d lose them down the back of the sofa.

Neither of these are a drawback with BrainsBreaker, which despite the name, is not some kind of mind-bending puzzle compendium. It’s actually a really fun to use jigsaw creator that allows you to create your own jigsaws with your own images. So if you’ve ever fancied smashing your bosses face to pieces and putting it together again, now’s your chance.

BrainsBreaker Screenshot

The program accepts any JPEG image and allows you to select various levels of difficulty before breaking it up into several pieces and spreading it across the playing area. All you have to do is simply drag and drop the pieces with your mouse. Don’t worry if the pieces don’t fit as they should do occasionally – sometimes you have to hover the pieces in exactly the right position and eventually they should magically click into place. In fact, the size of the image and number of pieces playable is only limited by the size of your screen this game is also a great excuse to buy that 32-inch screen you’ve wanted for ages and get the whole family involved. One of the minor drawbacks however is that it doesn’t allow multiple players to play together so you’ll have to share the mouse between you.

If you create an absolutely gigantic jigsaw, then you do have some advanced options which allow you to either move whole chunks together or start from the edges and move inwards. If you’re simply having too much trouble identifying the pieces, you can resize the image via a magnifier too to zoom in on what you’ve got left. Scoring is optional based on how many pieces you manage to fill although the real pleasure is in just seeing it come together.

A truly personal way to enjoy the classic jigsaw game and best of all, you’ll never have to worry about losing the pieces again!

How to remove author data from Office 2003

MS Office logoHave you ever noticed that when you create an Office document, it’s immediately branded with your name, the date and time it was created and other data that you don’t necessarily want the recipient to know? They can sometimes even contain comments and revision data that you’d rather keep confidential.

Normally, having such meta data attached to your documents is no big deal and indeed, sometimes extremely useful for other users to know. However, what happens if you publish that document on the internet? Do you really want others knowing your personal credentials and document history? If not, then did you know that Microsoft have a special Office 2003 plugin called Remove Hidden Data which allows you to select which data you want attached to your documents. If you’ve got anything higher than Office 2007, then you won’t need to worry about this function because it’s already built in but if you haven’t upgraded from 2003, this plugin is your only option.

Remove Hidden Data Dialogue

The plugin allows you to permanently remove hidden and collaboration data, such as change tracking and comments, from Word 2003/XP, Excel 2003/XP, and PowerPoint 2003/XP files. You can run the Remove Hidden Data add-in on individual files from within your Office XP or Office 2003 application. Or, you can run Remove Hidden Data on multiple files at once from the command line. In either case, to run the tool you must have the application installed in which the document was created.