Safer Video Downloading in Baidu Browser

Downloading these days can be dangerous, especially considering all of the malware and spyware available on the Internet. Thankfully, Baidu Browser keeps things safe by providing direct downloads through the browser itself.

How to Download Videos in Baidu Browser

On top of security, Baidu Browser makes it easy to download videos from the Internet straight through the browser itself. When you come across a source that you want to download from in Baidu Browser, you should receive a notification in the upper-right of the screen that prompts you to download the video content. If you choose to go ahead, simply click ok. Once your download is complete, you’ll receive a notification and you can quickly open your video.

How This Solves Problems

Downloading directly from the browser prevents problems in a couple of ways. First, it keeps you from having to download third-party software that is dedicated to downloading video. Also, some of these third-party programs can be a bit sketchy, but because you already trust Baidu Browser, you won’t have to worry about the potential for unwanted software being installed. Likewise, Baidu Browser’s downloading capability means that you can continue to surf the web while your video downloads in the background.

Downloading Safety Tips

Although Baidu Browser makes it easy and fast to download videos from the Internet, you need to be aware that some video content could be malicious. As a result, only download video from trusted sites that are known to be safe. It would be a good idea to scan any files that you download with an antivirus program. Also, you should never download illegal video content that is either owned by someone else or that is not in the public domain. Illegally downloading videos could get you into a lot of trouble and could lead to hefty fines.

Securing Your Downloaded Videos

Once you’ve safely downloaded video content through Baidu Browser, you can take things one step further and secure your files using password protection. In some operating systems, like Windows XP, you can do this by right-clicking on the file you want to protect and selecting the option to add a password. Unfortunately, this option isn’t available in all operating systems, but you could use a program like WinRAR to get around the problem. In WinRAR, all you have to do is create a new archive and add your downloaded files to it. When you do this, the program will provide you with the chance to add and confirm a password. Once added, only people who have the password will be able to access the files.

Scan your downloaded video files with Malwarebytes Anti-Malware for free!

3 Hidden Features in Office 2007

Office 2007 remains tremendously popular long after most of the software developed that year has succumbed to sleeker, more modern options available in the cloud and via mobile. It’s so rock solid, in fact, that many of its coolest features you still haven’t uncovered yet. Here are a few of the handiest hidden features in Office 2007:

Get More Text on One Page

Maybe you just don’t want to print out two pages or perhaps you need to save space in your backups. Whatever the reason, you can get more text on a single page to save space or print less. Begin by hitting Ctrl+A (which selects everything) and then click on the little arrow of the Home tab in the Font section. Select a smaller font size (keeping it at or above 6 pts for readability sake). Then shrink the margins by going to File, Page Layout, Margins, Custom Margins. Change all of the margins to .16. This is the smallest you can make the margins that will still print properly.

Print on Both Sides of a Sheet of Paper

Even if your printer doesn’t have the double-sided print feature, you can do this right in Word. You will probably have to collate it yourself, but it can save a lot of paper if you’ve got lots of long documents to print. Click on the Office icon and select Print. There should be an option called Manual Duplex — select that. Then click OK to save. Once the first side has printed, Office will prompt you to put that paper back into the input bin of your printer with the blank side up. Do this and click OK again to print the other side.

Give an Object Its Very Own Page

Would you like to feature an object (like a spreadsheet you created in Excel) on its very own page, orienting it in landscape mode instead of portrait, like the rest of the document? You can do this by putting the pointer where you would like to start the new page. Then choose Insert, then Page Break. Copy and paste the object into the document. Follow those steps again to create another page break after the object. When you are done, click Page Layout, Orientation, Landscape, and that will orient the object in landscape without changing the orientation of the rest of the document.

Eliminate Widow and Orphan Text

Does Word ever leave just a line or two of a paragraph on one page, and the bulk of the paragraph on the other page, making it look odd? Publishers call these widows and orphans. You can make Word stop doing this by going to the Home tab and selecting Paragraphs, and then clicking on the little arrow in that section. Check the box beside the option Keep With Next as well as the one called Keep Lines Together. If you always want a paragraph to begin a new page, also select Page Break Before.

These features might not be as well known as the others, but they sure are handy when you need them.

Don’t forget to download Office Home & Student 2016 for free!

3 Productivity Hacks for Office 2007

Want to get the most out of Office 2007? While the popular features are well known and widely loved, there are still a few secret hacks out there to make this baby really sing. Here are a few tips and tricks that even the seasoned pro probably doesn’t know:

1. Create Your Own Custom Keyboard Shortcuts

In Word 2007, you can assign keyboard shortcuts with the macros, styles, and other uniqueness you use most frequently. Click the Office button and then click the Word Options. Next, click the Customize tab and click on the button labeled Customize. This brings up another dialog box. Choose the item on the list that you wish to create a keyboard shortcut for. Select a category, then choose the command, style, font, macro, or other item that you’d like to assign a keyboard shortcut.

Now, enter in the new keyboard shortcut by clicking in the box labeled Press New Shortcut Key. If this particular shortcut is already assigned, Word will let you know so that you can pick another command. When you are finished, click on the Assign button. Now hit Close. Check to see that the shortcut is working.

2. Set a New Default Tables Format

Do you get tired of having to reset the same format over and over when you’re entering tables in Word? Well, you can change what Word uses as the default format. Determine what format you want all of your tables to be in. Then, go to Table and select Table AutoFormat. Next, choose the style of table and special formatting you need. Set this as default by clicking on the Default button. Now hit OK to save your changes. Once completed, when you create a new table, it will be in your preferred format.

3. View a Word Document in Two Separate Windows

When you’re working with a long document, editing, copying, and pasting can be a real pain. To avoid getting carpel tunnel syndrome scrolling up and down, you can open the same Word 2007 document in two separate windows.

Click on the View tab, and then find the button New Window. Instead of creating a new document, this opens up a secondary view of the same document you already have open. Whenever you make changes in one window, those changes are automatically made in both versions. Whenever you are done with the secondary window, just click either one to close. It doesn’t matter which one because the two are always identical.

To see more productivity software, don’t forget to check out Office Online!

Welcome to the Party: Adding Third-Party Effects in Windows Movie Maker

Windows Movie Maker already comes with a variety of cool special effects, but did you know that you can add even more? There are plenty of sites on the web that offer third-party special effects for Windows Movie Maker, and many of them are free. All you have to do is download them and add them.

Pro Windows Movie Maker Tips

Adding Third-Party Special Effects in Windows Movie Maker

To add new effects, find the ones you want online. Make sure you only download from trusted sources and don’t pass up effects simply because they’re free. Many free effects are just as good or even better than their paid equivalents. Once you’ve downloaded a new effect, open Windows Explorer by either manually navigating to it or by pressing the Windows button and typing “explorer” in the Run box.

Once you have Windows Explorer open, find your way to C:\Program Files\Movie Maker\Shared and open that folder. Once inside, create a new folder and give it a title that you’ll remember. Now, all you have to do is move your downloaded effects files to this folder. If you were running Windows Movie Maker while doing this, you will need to close the program and re-start it. When you do, you should see your new effects under View Video Effects. All you have to do now is simply run the added effect like you would any other.

The Benefits of Adding Third-Party Effects

While Windows Movie Maker already contains a lot of useful effects, there are many more out there that can add functionality to the program. Adding on new effects can help your movies to stand out from the crowd instead of just looking like everyone else’s creations. In addition, when you combine effects in Windows Movie Maker with third-party special effects, you can come up with new and innovative ways to tell your story or present information.

Avoid Using Too Many Effects

Although it’s easy to find and add new effects for Windows Movie Maker, you don’t want to use too many at once. Special effects can certainly spice up your movie, but too many can be a distraction and take away from your content. Try to follow the ‘less-is-more’ rule when deciding whether or not to add an effect. If the effect doesn’t truly add value to your movie, then it’s not worth adding.

For even more fun creating on your computer, check out Make Videos From Your Photos in No Time With RealTimes!

Burnout: How to Burn an ISO to Disc

ISO image files, also called disc images, are exact replicas of an entire optical disc (such as a CD, DVD, or Blu-Ray), stored in a single file. That file contains all of the data, as well as all of the formatting used on the original. You can then store this file on your computer system, transfer it to another computer or device using an external storage device like a USB drive, or even transfer the file online.

You can create another virtual disk as an exact replica of the original CD, DVD, or Blue-ray using the ISO file. For example, say your band records a CD of your new music. The CD, of course, contains breaks and other metadata in addition to the actual content – the songs. Using an ISO file, you can create more CDs to hand out or sell at your next gig. This is just one of many examples of burning discs from ISO files.

Burning ISO Files to Disc

The steps for burning discs in Windows are pretty straightforward.

1. Insert the disc you wish to copy from into the optical drive of your computer.

2. Click the Start button to open the Start Menu.

3. From there, choose Computer. This step will open Windows Explorer.

4. Here, locate the disc image file you wish to copy and double-click on it.

5. If you would like to make sure that the disc image burned properly, choose the “Verify Disc After Burning Option”. Definitely use this option if it is important that the copy is good, such as when you are making backup copies of critical software.

6. Then select Burn and the process will begin.

It’s worth noting that if a third-party software program for burning CDs or DVDs is already installed on your computer system, this program might open when you go to double-click the disc image file. In case this does happen to you, and you still wish to use the Windows Disc Image Burner instead, just right-click the disc image file, and then click on the option to Burn Disc image.

Using Third-Party Tools to Burn Discs or Save ISO Files

Also, you cannot create disc image files with the native program Windows Disc Image Burner. In order to do this, you will need to download and install a third-party software application designed for this purpose, such as Daemon Tools or Daemon Tools Lite.

ISO files can be used with a number of other utilities and tools, including system recovery tools, backup solutions, and as a separate operating system on your computer.

If you want to see how other programs can clone drives and handle ISO files, check out Virtual CloneDrive today!

3 Secrets You Didn’t Know Existed in Windows 7

Windows 7 is still widely popular, and here’s why:

1. Shortcut to Show Desktop

You might have stumbled across this one by accident, and if you did, it likely scared you silly. But when you realize it’s there (and what it’s there for), it is quite useful. With all of your usual programs up and running, look at the far right side of the task bar (across the bottom of your screen). You will notice a virtually undetectable vertical bar, almost the same color as the task bar. Hover the cursor over it and it’ll give you a sneak peek of your Windows desktop (until you move the cursor). If you click it, it will switch to the desktop. Just click it again to go back to your other programs.

2. Access Secret Windows Wallpapers & Themes

Most users pick from one of the standard Windows themes or wallpapers or use one of their own photos. Instead, you can choose from one of several international themes that are on your computer, but are hidden from view. Find C:\Windows\Globalization\MCT. If it isn’t there, hit Windows + R and search for “systemroot%/Globalization/MCT” in the box. That will bring up several folders: AU for Australia, CA for Canada, GB for Great Britain, ZA for South Africa, etc. Inside each of these files are folders called “Theme”. Open the Theme folder you want and double-click on the file inside that has a file extension of .theme. Now, when you go to your desktop and right-click an empty space, the “Personalize” folder will show the options you opened from the international folders.

3. Shut Down Windows 7 Faster

Somehow, it seems like the faster you need for Windows to shut down or boot up, the slower it goes. For instance, 4:59 on Friday night, or during those times when you’re installing new software packages – then it’s ridiculously slow. You can make Windows 7 close down faster by tweaking the settings in the Windows Registry. Be sure to backup your system first, because a mistake in Windows Registry can be a fatal one and you’ll want to be able to restore the system if necessary.

From the Start Menu, type “regedit” in the search bar and press Enter. This brings up the Registry Editor. Changes you make will show up in real time. Along the left panel, find “HKEY_LOCAL_MACHINE > SYSTEM > CurrentControlSet > Control”. That will bring up “WaitToKillServiceTimeout”. Right-click on “Modify”, because you want to change this value. This will bring up a box called “Edit String”. The values here are expressed in milliseconds, and the default setting will likely be about 12,000. Begin by making a reasonable change, such as to 10,000. If that doesn’t make much of a difference, tweak it down a little more at the time, but don’t go to zero (or terribly close to that), because this could affect the stability of your operating system.

If you like Windows 7, check out the free Windows 10 today!

Tech Geek: 2 Windows 7 Hacks

Mad props to the developers of Windows 7, as this particular operating system has survived three whole new versions of Windows and is still going strong. Released in 2009, Windows 7 remains incredibly popular, with another five years (at least) left to go with Microsoft Extended Support. While development has officially stopped on this product, it’s about as reliable, feature-packed, and useful as an OS is going to get.

Still, if you love your technology, chances are that you love learning about hacks that can make a really good product a really great one. So, you’ll be glad to know that after all these years, Windows 7 still has some surprises to share. Here are some hacks you probably never knew about:

First, A Word of Caution

First, a word to the wise. Most of these hacks involve poking around in Windows Registry, which is a dangerous place to be if you don’t truly know what you’re doing. Even if you do know what you’re doing, a slip of the finger or mental error here can mean certain doom. Back up your system before you start. Then, no matter how hideous an error you make, you can restore the system and there’s no (unfixable) harm done.

1. Keep Windows From Rebooting Your Computer by Force

It’s happened to you: you’ve been working away when Windows Update pops up, demanding to reboot your computer. This always happens when it is least convenient and most troublesome to stop and reboot. There are ways to stop this evil madness. You can open up the Windows Registry using the search box on the Start menu. Search for “regedit.exe”. From there, create a new 32-bit DWORD value, and call it “NoAutoRebootWithLoggedOnUsers”. Establish a value of “1” to keep it from automatically rebooting while you are logged into Windows. If you want to restore it as it was, just delete the value.

2. Cause the Task Bar Buttons to Bring Up the Last Active Window

When you’re working with numerous windows open, but are mostly using just one or two of the windows, you have to click the button on the task bar, select the one you’re working with, and then do this every time you need to switch back and forth. Windows 7’s Aero Peek feature gives you thumbnails of each Window, but if you want the ability to click the task bar to get the last open window to pop-up, there’s a hack for that.

Type “regedit.exe” into the Start search bar. Find the registry key: HKEY_CURRENT_USER\Software\Microsoft\Windows\CurrentVersion\Explorer\Advanced . Establish a new 32-bit DWORD value and call it “LastActiveClick”. Set the value to “1”. Now you must log out and log back in or kill Explorer.exe using the Task Manager. Now reopen it and your changes will be made.

Want to learn about alternatives to Microsoft’s Office? Check out Five Fantastic Free Alternatives to Microsoft Office!

3 WWE games to prepare for WrestleMania

WrestleMania is here, the highlight of WWE the calendar. If you are a wrestling fan, it is hard not to be excited – even if not every fight on the card fits your fantasy booking. Could this be Undertaker’s final year? Will Charlotte retain the Belt? Does Ambrose have a hope against Paul Hayman’s monster, Brook Lesner? And is Roman Reigns really going to take the Heavyweight Championship from Triple H? (I really hope not).

Anyway, while you wait for the next match on the WWE Network (iOS|Android), I have three WWE games to keep you occupied.

WWE 2K16 (Windows)

Of course, if you want to try act out the fights before they happen, you want WWE 2K16. Despite having been on consoles for over a decade, this is only the second year that WWE’s flagship game has made its way to PC. But as this year boasts the biggest roster of Superstars and Divas to date the timing seems pretty good.

WWE 2K16 - Seth Rollins and Kevin Owens

Plus, if you are picking between 2K15 and 2K16, the latest game certainly seems to have the edge. This is primarily due to the single player mode. Last year you could follow the stories of Degeneration X’s collapse or the rivalry between CM Punk and John Cena, both of which were fine but struggle to compare the this year’s offering which follows the iconic “Stone Cold” Steve Austin’s run during the Attitude Era.

It’s true that the combat engine now seems a little dated – with the canned animations of the wrestlers making everything feel a little stiff – but if you want to act out the fights of WrestleMania 32 before they happen then this is what you need.

WWE SuperCard (iOS|Android)

I had an almost unhealthy addiction to WWE’s collectible-card game, WWE SuperCard, when it was first released. I put in more than sixteen hours in a single weekend, and spent more money than I care to admit on cards. I am over that now… honest… just let me buy one more booster pack.

WWE SuperCard - is that Ryback vs Sgt Slaughter?

It’s a little embracing, because there is really very little to WWE SuperCard. Playing like a simplified Top Trumps, you take a hand of 5 to take into each fight. Cards feature a single Superstar or Diva on them, along with stats for Power, Speed, Toughness, and Charisma.

You then use these cards to fight online. Each contest lasts three rounds, and you have to beat your opponents numbers in whatever stat the round is based on. Only being able to use a card once across the three rounds, this leads to an interesting blend of strategy and luck as you try to predict what rules will be applied and what cards your opponent will play.

WWE Immortals (iOS|Android)

Immortals is perhaps the best WWE fighting experience in years. Based around the same basic premise as the Injustice: Gods Among Us mobile game (iOS|Android), this fantasy brawler replaces Superman and Batman with characters like a John Cena superhero and a stone warrior version of The Rock. By applying a stack of fantasy, sci-fi, and comic book tropes, WWE’s roster of Superstars and Diva’s Immortals makes for wonderfully ridiculous fun that works brilliant as an arcade style fighter.

WWE Immortals - Big Show vs Danial Bryant

Each three-on-three tag team match has you tap and swipe screen to unleash light and strong attacks. Once you charge up enough power, you get to unleash a special move that is in keeping with both the wrestler and their alter ego – cue Randy Orton’s Viper spitting acid before RKOing his opponent into the ground.

If you want a bit of action to pass the time between fights at this year’s WrestleMania, then WWE Immortals is perfect.

That’s it for this week, but do let me know your favorite wrestling games or your opinion on WrestleMania 32 in the comments… I need someone to talk to about it I am the only WWE fan in the office. See you next week!

Related Stories

Three alternatives to Nintendo’s Mario games on mobile

Batman vs. Superman: videogame showdown

The three best driving simulators

2016’s most anticipated games

Follow me on Twitter: @DoFuss

Twitter’s great new feature which leaves nobody out

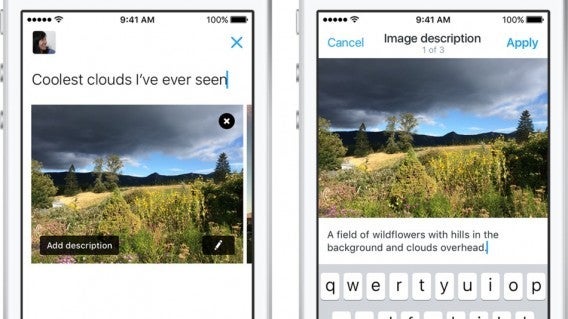
Twitter has recieved a new update which is going to come in very useful for some iOS and Android users, in particular those users who are blind or visually impaired.

This new feature allows users to add a descriptive text of up to 420 characters to go alongside any image that is tweeted. For example, if somebody has tweeted a picture of a landscape, the person tweeting that particular photo has the ability to add a description, so as not to leave anybody out.

It’s worth noting that these texts will not appear by default in the application, but must be activated in your Twitter settings. Once made, these descriptions may be read by various screen readers and Braille devices.

Undoubtedly, this addition is a breakthrough for the visually impaired, but it also (kind of) contradicts it if the one needing this feature has to change the settings themselves if they so wish this option. Surely it would be more considerate if it did come by default?

Source: Mashable

Forget all you heard before – Apple patents the future connector for iPad

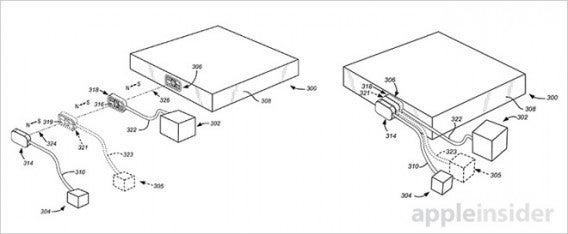
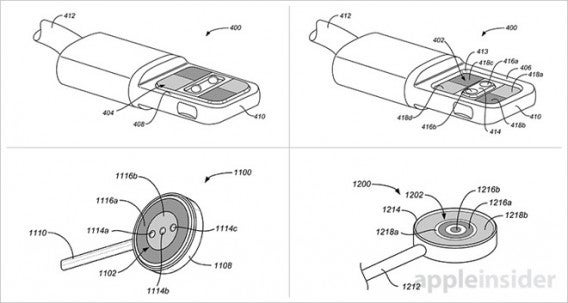
According to the guys at Apple Insider, it seems Apple has just registered a new patent for a new connector for the iPad. It indicates that it may be an evolution of the classic smart connector, which goes from being a single accessory, to a gadget in which you can connect multiple connectors at any one time – in other words, plenty of space for your iPhone, your partner’s iPhone, or whatever!

With this system (as you can see from the images provided), you can get a decent idea of how the multiple connectors could be joined (let’s also imagine for extras such as keyboard or cameras).

Apple Insider mentions that this charging technique consists of virtually unbreakable components, and great versatility. Let’s hope they’ll find a use for it on other devices, because it sure seems handy!

Source: Apple Insider