Cheap reflector based on soda can helps boost Wi-Fi signal

Are you having problems with your Wi-Fi signal? Do you have problems connecting to your network when you’re in certain parts of your house? If these problems sound like something that you have to deal with on a daily basis, don’t worry, you’re not alone. Wi-Fi problems are one of the biggest annoyances that affect the modern internet user.

That is why it is very good news that researchers at Dartmouth College have developed a cheap and effective way to both boost a Wi-Fi network’s signal and secure it all at the same time.

Our Softonic Solutions users are talking about the best USB Wi-Fi adapters for speeding up my laptop connectivity. Join the conversation now!

The system is built on the results of a simple experiment that saw a soda can being cut open and used to reflect the Wi-Fi signal from the router. The reflective surface of the can reflects and boosts the Wi-Fi signal. The researchers have used this principle to create an algorithm that can design custom schematics for a 3D printed reflector. Xia Zhou, an assistant professor of computer science at Dartmouth, said:

“With a simple investment of about $35 and specifying coverage requirements, a wireless reflector can be custom-built to outperform antennae that cost thousands of dollars.”

All users have to do is input the details of where the Wi-Fi network will be and where the user wants the signal to be strongest and weakest. The algorithm will then design a specific shape that, once 3D printed and covered in reflective foil, will boost the signal in the desired areas and block it from the areas it is not supposed to be. This way it can both boost the signal and help protect the network from outside interference if, for example, the router is placed next to a window. If done correctly, the results are impressive, as highlighted in the video below:

The researchers showed that their simple reflector could boost the signal by up to 22% to desired areas and lower it by up to 36% in places it wasn’t wanted.

Is this the cheap and effective solution to your wi-fi problems? Let us know in the comments below.

Follow me on Twitter: @PatrickDevaney_

Via: ZDnet

Play the classic space strategy game Starcraft II for free

The classic and extremely popular 2010 Blizzard game, Starcraft II, is now free-to-play. Starting November 14, players have access to the original single-player campaign (Wings of Liberty), all cooperative Commanders and, once unlocked, all competitive content and multiplayer options.

As a reward for all who bought the game up until October 31, 2017, Blizzard will be giving them access to the second part of the Starcraft II campaign, which focused on the Zerg, Heart of the Swarm. Players who bought the game will be able to take advantage of this offer until December 8, 2017.

Have you downloaded Winds of Liberty for free, or do you think you might? Let us know in the comments below.


Via: Battle.Net

Do you want to get the best deals and most interesting offers? Sign up to our special page to receive the best offers via Telegram, Twitter or through your browser!

3 tips for keeping your Yahoo! Mail account secure

Cybercrime is on the rise. From influencing elections to stealing cash, hackers pose a growing threat to our digital lives. Ignoring basic security precautions leaves you open to theft, extortion, or if you’re lucky, an endless barrage of spam.

But thankfully, there’s lots you can do to protect yourself – starting with your Yahoo! Mail account. Any email account is a treasure trove of personal information, and it’s essential you keep it as secure as possible. Yahoo! Mail, like any email client, can only do so much to protect your details. It’s down to you to do the rest.

With that in mind, here are three tips for keeping your Yahoo! Mail account secure.

Download Yahoo! Mail

1. Use Yahoo! Mail’s Account Key

Source: Yahoo

Passwords, by their very nature, are crackable, so why not get rid of them altogether? Yahoo! Mail’s Account Key is a relatively new feature that lets you log in without entering a password. Instead, Yahoo! sends a notification to your phone, which you approve for access.

It’s a cool feature, and as we’re never far from our smartphones these days, it’s just as convenient as a password – but much safer. You will need to download a Yahoo! app for it to work. The mail app is pretty decent, so I’d go with that. Then, follow these instructions:

  1. Click your name at the top right.
  2. Select Account info.
  3. Select Account security.
  4. Select See how it works under Secure your account with Yahoo Account Key.
  5. Select the device and app on which you want to be notified.
  6. Select Send me a notification.
  7. On your device, select the Approve icon.
  8. Select Always use Yahoo Account Key on your browser.
  9. Enter your mobile number.

2. Use a secure password

Source: XKCD

In 2003, Bill Burr, a former manager at The National Institute of Standards and Technology, wrote a guide to creating secure passwords. He asked that we use symbols, numbers, and other characters in our passwords – (0mPuT€R!, for example.

The problem is these passwords are difficult to remember but remarkably easy to hack. Humans aren’t particularly good at coming up with random passwords, making them easy to guess by running through common words and their spelling substitutions.

Bill has since apologized for his error. Now, the best passwords take four random words and put them together. Like hotel-sausage-armchair-viper. This is much more difficult to guess but far easier to remember as they’re recognizable words made up of standard letters. Flick through a dictionary, in any language, and select four random words to make your emails very difficult to hack.

3. Use 2-step verification

Source: Yahoo!

A password alone isn’t enough to protect you, so you should set up 2-step verification. This means that every time you log in from a new device, Yahoo! Mail will send a notification either by mobile phone or to another email address asking you to confirm it’s you.

This extra layer of protection is becoming increasingly common across all email clients. And while it’s not perfect, it’s much better than using a password alone. Be warned, though – you can’t use Yahoo Account Key and 2-step verification together. For ultra-protection (though you’ll need a good password), I recommend doing 2 step-verification.

Here’s how to set up 2-step verification through your desktop browser.

  1. Click your name at the top right.
  2. Select Account info.
  3. Select Account security.
  4. Toggle Two-step verification to on.
  5. Enter your mobile number.
  6. Choose whether to receive an SMS or a phone call.
  7. You’ll then receive the “success” message.

That concludes the three tips. As always, never give your passwords, user IDs, or other sensitive information to anyone. If you suspect foul play, check recent sign-in activity on your Yahoo! Mail account.

Your antivirus is in trouble: Update it immediately

Your antivirus is vulnerable. If you do not update it immediately, you may soon find yourselves at the mercy of a hacker.

A security technician named Florian Bogner has discovered a vulnerability in the most popular antivirus programs. Broadly speaking, the hacker can create a malicious file to be detected and quarantined by the antivirus. When quarantined, the vulnerability is safely hidden away.

The problem is that, although it’s hidden away, the malicious code will not lie dormant. In fact, quite the contrary: It will manipulate the scanning system and force itself out of the quarantine and into the heart of the machine’s operating system, where it can then take control of the operating system.

The worrying thing is that there are quite a few antivirus programs vulnerable to this hack: Trend Micro, Kaspersky Lab, Zone Alarm, Malwarebytes, Ikarus Security Software, and EMSISOFT.

Here’s the good news: the antivirus companies have already released an update that eliminates the vulnerability. What is left for you to do? Update your antivirus program immediately.

If you have an official version of these antivirus programs, you shouldn’t have any problem downloading the latest versions. Do it now!


Via: bogner.sh

Beware of this new virus that attacks your PC through Microsoft Word documents

A new cyberattack doing the rounds infects computers through Microsoft Office documents. Microsoft has already responded by releasing new security tips to stop from users from falling into the trap.

The group behind this new attack is called Fancy Bear. This isn’t any old group of cybercriminals; it is reported that they were behind the Democratic National Convention (DNC) hack during the 2016 US presidential election.

The technique behind this new Fancy Bear attack is to take advantage of the Dynamic Data Exchange, or DDE technology. This allows them to execute a code that is stored in another file.

The group sent a Word document called IsisAttackInNewYork.doc (“Isis Attacks New York”). The striking title led to a number of victims opening the document and finding links leading to malware-infested pages. At this point, however, the document wouldn’t be able to download the virus, instead displaying this message:

When the user opens the document, a message appears saying that the document contains internal links that can refer to files. The document then asks for permission to use the DDE technology to connect to the servers to update. In this case “update” means install a virus.

Microsoft advises that users be very careful before clicking Accept on these types of messages. If the origin of the document is unknown or if the document is suspicious in any way, they advise ignoring the DDE request.

This is the first time a group of hackers has used Microsoft Office to infect users’ computers. Does Microsoft need to update its Office automation tools to better detect this type of scam in the future?


Via: arstechnica

How to encrypt your hard drive and keep your folders and files safe

Security threats are everywhere online these days, so it is more important than ever to think about how you’re going to protect yourself. Our devices are treasure troves of files and data for thieves to try to get their hands on and, especially with laptops and mobiles, it is easier than ever for your devices to end up in the wrong hands.

Click Here to learn 3 things that’ll keep you safe on the internet

This is why many security experts say data encryption is a basic step that everybody should take. Encryption enhances protection by storing data in an unreadable coded form that can only be unscrambled using the relevant security key.

Chances are your computer won’t automatically encrypt your files, but there are a number of different encryption options available to you. These include encrypting your entire hard drive, encrypting certain files and folders, and even encrypting the Basic Input Output System (BIOS) so that nobody can access the operating system on your hard drive. Each method has its own pros and cons, so let’s have a look at them in a little more detail now.

Encryption: How to keep your files safe

1. Full hard drive encryption

Encrypting your entire hard drive is the most effective way to secure your data. This safeguards against human error and means that, for example, you won’t be able to accidentally forget to encrypt certain files. Other benefits include the fact that even swap space and temporary files (which potentially contain important and confidential data) will be encrypted, and there being nothing to worry about should you lose your device.

There is a downside to entire hard drive encryption, and that is a negative effect on your machine’s performance. When all files, including your operating system’s files, are encrypted, every time they’re used they must be encrypted and then decrypted. This takes times and can slow things  down. As modern processors become more advanced, this will become less of an issue, but it is definitely something that needs to be considered.

Programs to use
Microsoft Windows BitLocker and macOS FileVault are common encryption programs

Windows 10 or Mac OS X users can use BitLocker and FileVault, their operating system’s built-in whole disk encryption tools. The problem with BitLocker is that it requires Windows 10 Professional edition, which will cost $99 if the machine only has Home edition installed. If that is too much to pay, then an excellent option is VeraCrypt, which is an open-source full-disk encryption tool.

2. Encrypt certain files and folders

Another option is to encrypt only certain user files and not the operating system. This will have less of an effect on your system’s performance but it will require much more attention on your part and could lead to certain bits of important data being overlooked. There are a number of ways to do this:

  • Microsoft Office gives users the option to both encrypt and password protect files. The more recent the version of the Office program the higher the level of encryption available.
  • You can encrypt files and folders on Windows using the Encrypting File System. This is as easy as right-clicking on the folder or file in question, clicking Properties, and then clicking Advanced.

  • On a Mac, you can use Disk Utility to encrypt single files and folders easily.

3. Lock the BIOS with a password

Another option is to lock the hard drive using a password in the BIOS (basic input output system). The BIOS allows you to control your computer’s hardware with specific settings and even the loading of the operating system. If you set a password here, it’ll mean that the hard drive will remain locked, even if it is removed from the PC and placed in another one, unless the code is given. The added bonus about this form of encryption is that it doesn’t affect the performance of the machine that is running it, but the password will need to be entered every time it is switched on.

This is how to Update your Computer’s BIOS

So there you have three ways to encrypt your files and data. Do you have any other methods to add? Let us know in the comments below.

Via: how to geek, lifewire, infopackets, be encrypted and tom’s guide

Follow me on Twitter: @PatrickDevaney_

Switching from Yahoo! Mail to Gmail? Here’s what you need to know

If you’ve decided to jump ship and try Gmail, you’ll want to take your stuff with you. Rather than copy all your emails and contacts manually, you can make Gmail and Yahoo! Mail do the hard work for you.

Below is a step-by-step guide to automatically transferring all your emails and contacts from Yahoo! Mail to Gmail. Before you begin, make sure you’ve already got a Gmail account set up. You won’t be able to move your stuff until you’ve got a live Gmail account.

The next thing to do is make sure all your Yahoo! Mail emails are in your inbox. Gmail can’t take emails out of your folders, so just move them all into your inbox before following the steps below.

How to switch from Yahoo! Mail to Gmail without losing your stuff

Step 1. In Gmail, click the little gear symbol at the top right and select Settings. You’ll be taken to the General settings tab, but you should then click Accounts and Import.

Step 2. Now click on Import mail and contacts. This generates a pop-up that will ask you for the email address of the account you want to import. In the example, I’m importing from a Yahoo! Mail test account called johndoetest50@yahoo.com – so that’s what I entered here.

Step 3. Once you’ve entered your Yahoo! Mail email address, you’ll be asked to sign into your Yahoo! Mail account to confirm the transfer.

Gmail also warns that your emails might lose encryption during the transfer process, but this is unlikely since ShuttleCloud – the service handling the transfer – encrypts all your data (according to their website).

Once you’ve signed into Yahoo! Mail, click Continue.


Step 4. Now you’ll get another pop-up asking you to give ShuttleCloud access to your Yahoo! Mail account. Click Agree.

Step 5. If everything goes well, you’ll get an “Authentication successful” message, asking you to close the window. So go ahead and close it.

Step 6. You’ll return to the original pop-up where you must choose what to import. Gmail also suggests importing any new mail you get for 30 days. This is handy if you haven’t gotten around to giving everyone your new Gmail address.

Once you’ve chosen what you want to import, click Start Import.

Step 7. You’ll see a message confirming that your emails and contacts are being imported, and how long it might take to complete. It could be hours or days, depending on how big your Yahoo! Mail inbox and address book are. The good news is you don’t need to be signed in. Gmail will continue to import your stuff even if you log out.

And that’s it. Once everything has been imported, you’ll see it in your Gmail inbox. All your emails will be automatically labeled with the email address they were imported from, which will make organizing your Gmail inbox that much easier.

Related:

3 tips to get the most out of Yahoo! Mail

Since 1997, Yahoo! Mail has provided fast, secure, and easy-to-use email services for millions of people around the world. Despite an onslaught of competitors, Yahoo! Mail holds its own with a rich suite of features, customization, and one of the largest storage allowances of any email client.

Download Yahoo! Mail

Whether you’re a lifelong fan or a recent convert, here are three tips for getting the most out of Yahoo! Mail.

1. Avoid unwanted calls with Caller ID from Yahoo! Mail app

Most email clients have a smartphone app, but none is quite as user-friendly or useful as Yahoo’s. The Yahoo! Mail app for iOS and Android casts off most of the ads that pepper the desktop version and provides a host of cool benefits, including customizable swipes, themes, and a passwordless security key.

One of their most unique features is Caller ID.

Whenever you receive a call, the app will compare the incoming number with those listed in your emails, including those in email bodies and signatures. This is a great for screening unwanted calls, or if you’d prefer to keep a digital record of your conversation. You’ll also be able to see the number in your call records if you need to refer to it in future.

Source: Techcrunch

To turn on Caller ID on iOS, first install the Yahoo! Mail app. Then follow these instructions:

  1. Go to your phone’s settings.
  2. Select Phone.
  3. Select Call Blocking & Identification.
  4. Toggle the Yahoo! Mail app on.
  5. Save your settings.

2. Attach files larger than 25MB with Dropbox and Google Drive

In today’s data-driven age, we’re constantly sharing photos, videos, GIFs – even whole albums. Yahoo! Mail, like other email clients, has an attachment size limit of 25MB. But you can bypass this by using cloud storage instead.

Normally this means getting a link and then inserting into your email, but Yahoo! Mail has it all built in. So next time you want to surprise your friend with their drunken dancing from the evening before, just upload it to the cloud – and don’t forget to copy in your other friends, too!

Source: Digital Trends

It’s really easy to set up:

  1. Click Compose as normal.
  2. Click the little blue plus sign on the bottom right.
  3. Select either Google Drive or Dropbox.
  4. Log in to Google Drive or Dropbox as usual and you’re good to go.

3. Add email contacts automatically

Trawling through old emails to find that special contact isn’t fun. Of course, you could add them to your contacts manually as you go, but who’s got the time to do that? Wouldn’t you rather fire them off quickly and get on with your next communique?

Whether you’re keeping in touch with family or organizing your friend’s 21st birthday, do it faster with automatic email contacts. Yahoo! Mail adds your email recipients, senders, and your senders’ recipients to your address book without you needing to lift a finger.

Source: Mozilla

To set it up, follow these steps:

  1. Click the small gear at the top right. This takes you to the Help menu.
  2. Click Settings.
  3. Click the Writing email tab.
  4. Click Automatically add new recipients to contacts.

And that’s it – Yahoo! Mail will add all email recipients to your address book automatically, giving you more time to dazzle friends with your tales.


How to delete your Yahoo! Mail account in 3 steps

Yahoo has been through a lot lately. And what with every single Yahoo account having been hacked, it could be time to delete your Yahoo! Mail account. This will minimize your risk of exposure and the chances of your data ending up in the wrong hands.

Our email accounts are a bit like relationships – some last, some don’t, but we’ll always remember the good times.

So if you’ve moved on, don’t leave your email client hanging on for a possible reunion. Whether you’ve switched providers, have been inundated with spam, want to safeguard against vulnerability, or simply want to try something new, you deserve a clean break.

Before you start

Before you begin, think about how deleting your Yahoo! Mail account might affect you. If you’re paying for any services, such as Yahoo! Mail Pro, you’ll immediately lose access.

The same goes for other Yahoo! Mail services such as Flickr and Tumblr. Once you’ve terminated your account, you lose access to it all – including all your photos and documents stored on Yahoo! Mail’s servers.

And make sure you tell friends and family members your Yahoo! Mail address won’t work. Especially anyone who might not email you regularly – like a business associate, client, or that old flame you’ve been hoping to hear from. Have a peek at your address book and past emails to ensure you don’t lose anyone important.

Have you signed up to any external services with your Yahoo! Mail address? Netflix, Facebook, Twitter etc? Cancelling your account might interrupt these services, too. Your email address will become available again after you cancel, and that could be a nuisance if it’s still attached to a service you use.

All done? Okay. Now you’re ready to cancel your Yahoo! Mail account.

How to cancel your Yahoo! Mail account

Step 1.

Sign into whichever account you’d like to delete, and visit Yahoo! Mail’s account termination page.

You’ll then get a warning note about what terminating your account entails. But if you don’t use Yahoo! Mail for anything other than emailing, there’s not much to worry about here.

Once you’ve read the text, click Continue.

Step 2.

You’ll now be asked to confirm your identity. In the example below, you just need your email address.

Enter your email address (or whichever form of identification it asks for) and click, Yes, terminate this account.

Step 3.

You should get the screen below. If not, something went wrong and you’ll need to start over again.


And that’s it. You can reactivate the account simply by logging in within 40 days of termination, but I’m guessing that if you’ve got this far, you won’t want to.

Related:

Yahoo! Mail vs. Gmail: Is there really a contest?

As the older of the two, Yahoo! Mail is a bit like Gmail’s quirky older brother. It’s been around longer, has gone through several style changes, and had had its fair share of embarrassing moments (including a pretty big hack in 2013).

Gmail is younger and fresher, but with a slightly geekier style. Techies love Gmail’s fluid, streamlined interface, its assortment of features, and Google applications built in.

But does that make Gmail better?

Not necessarily. Familiarity, a recently revamped interface, integrated cloud support, and a huge storage allowance make Yahoo! Mail a surprisingly nimble client. And as we all know, experience is a big advantage, and Yahoo! Mail has this in spades.

Assuming most of us want a secure, easy-to-use, and feature-rich email client, let’s see what each has to offer across these three areas.

1. Security

We don’t want to rehash bad times, but Yahoo! Mail suffered a real doozy back in 2013. A hacker stole the personal information of 3 billion users – every registered Yahoo! account – in the largest data breach ever. Yahoo was a little shady about the exact number at the time but has since ‘fessed up with the truth.

And what has it done since? Well, at the time of the hack, they were using weak MD5 hashed encryption for passwords. They’ve since upgraded to the far more secure Bcrypt algorithm.

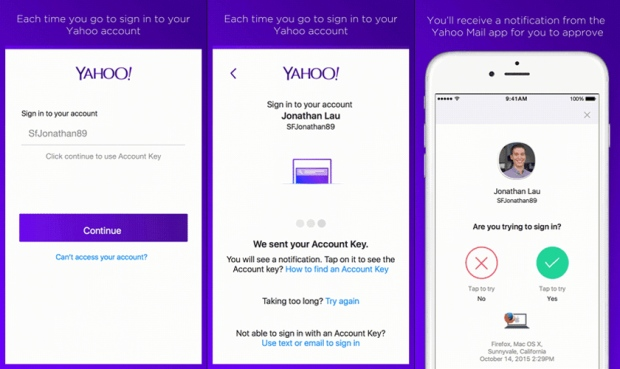
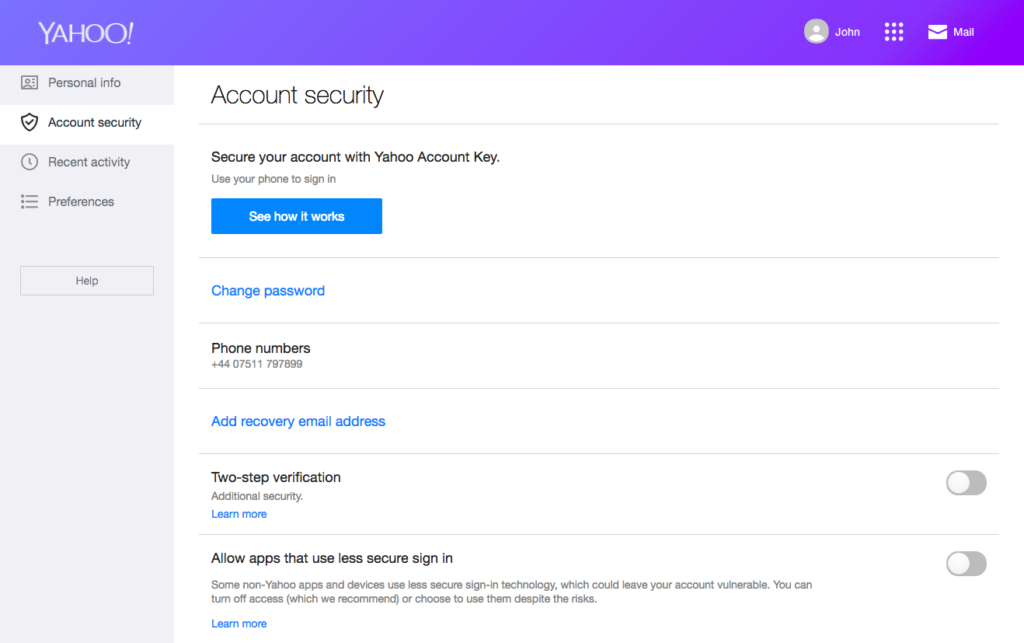
Yahoo! also encourages 2-factor authentication, where you use a password and a second form of identification – such as a mobile – to gain entry to your account. All your incoming mail is scanned for viruses, too.

Source: Yahoo

Gmail does all of the above, so they’re fairly evenly matched. In fact, Gmail suffered its own security hiccup when Orin Hafif, a security researcher, discovered a bug in Gmail’s “delegate access” feature that exposed Gmail’s email addresses to theft. This didn’t include passwords, but it would’ve attracted massive phishing scams – something Gmail is regularly fighting.

2. Features

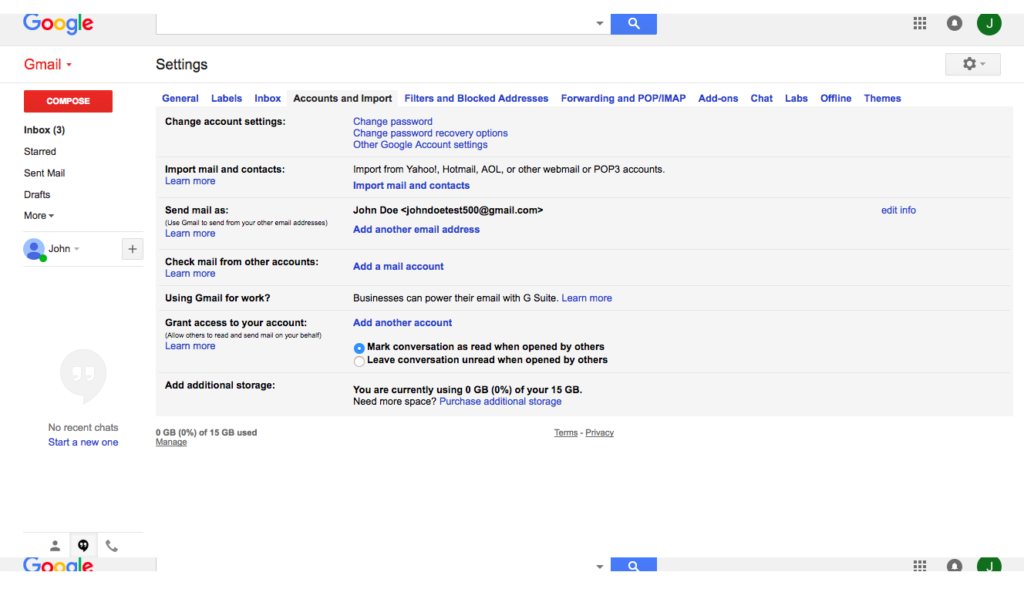
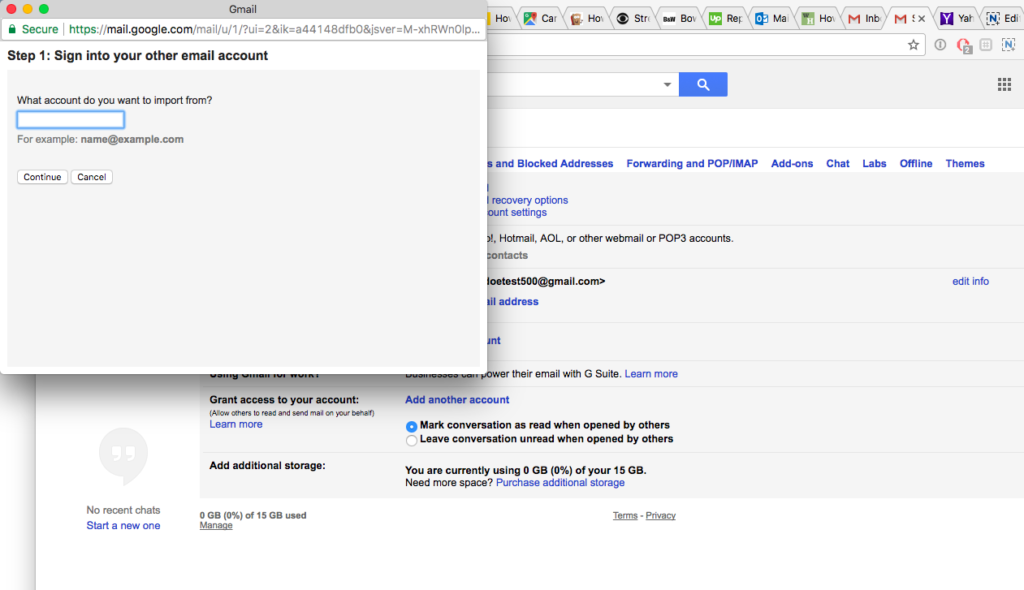
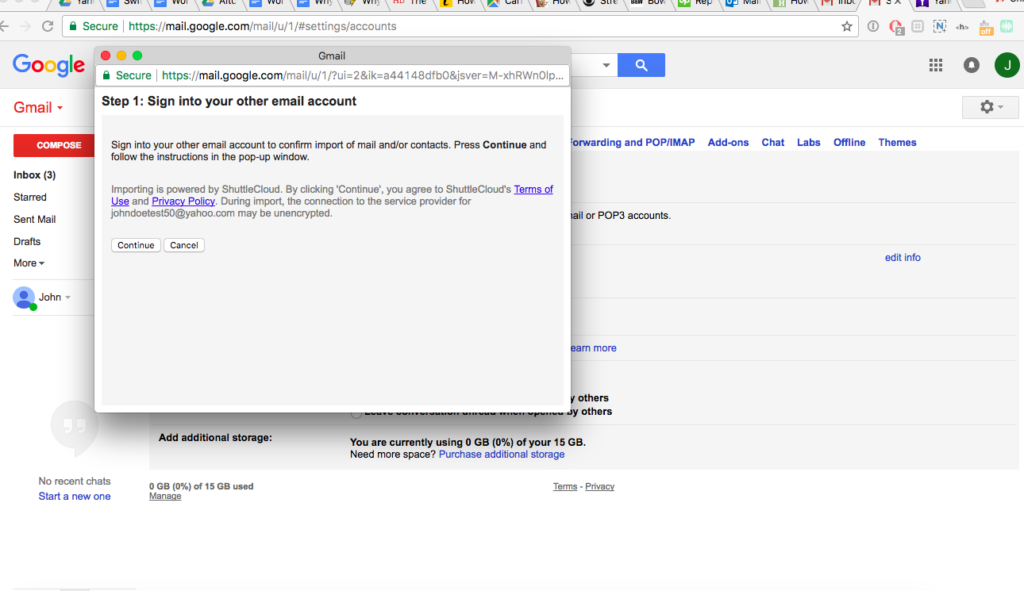
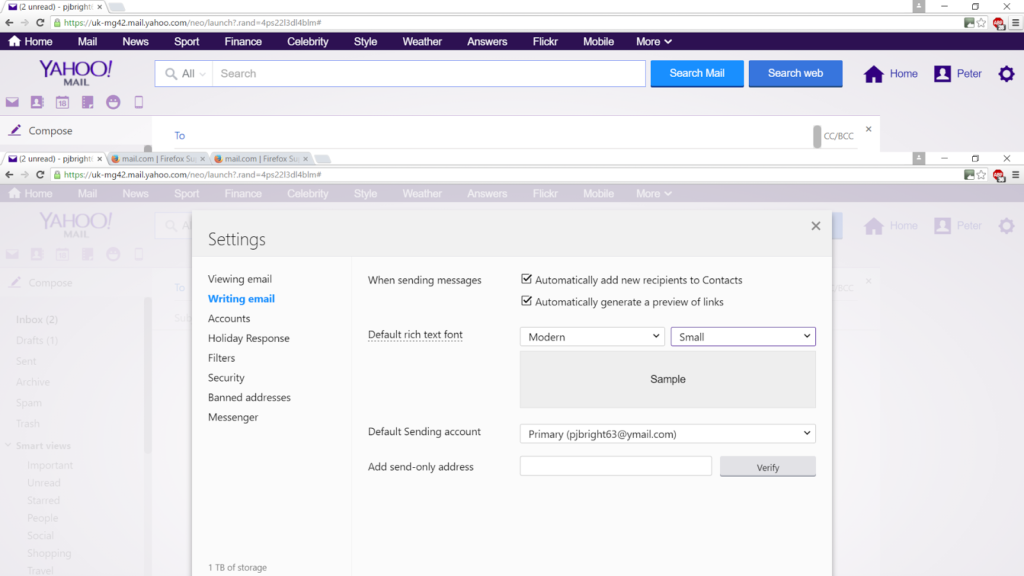
Both Gmail and Yahoo! Mail are formidable email clients. They’re both free, come with Instant Messaging, and support cloud storage. But they each have elements that outshine the other. For example, Yahoo! Mail gives you 1TB (1,000 GB) of email storage. That’s more than enough for even the most prolific emailers. Gmail only gives 15GB.

Source: Google

On the other hand, Gmail includes powerful productivity applications such as Google Documents, Google Sheets, Google Calendar, and Google Drive. Yahoo! Mail lets you attach files from Google Drive without leaving the app, but it doesn’t integrate the other applications. With Gmail, you get a full suite of tools easily accessible from your Gmail navigation bar, which is convenient for people who like to have everything in one place.

But another point goes to Yahoo! Mail for social media integration. It supports Facebook and Twitter – letting you post directly from the app – while Gmail only lets you access the less popular Google+ (it also supports YouTube natively, but I’ll let you decide whether to count that as social media).

3. Ease of use

Again, the two are fairly evenly matched when it comes to ease of use. But if you’re used to one or the other, you’re bound to find a few things frustrating.

First, Yahoo! Mail bombards you with ads. While they claim to have reduced them, they’re still quite invasive – taking up most of the right of the screen, and a banner on top.

Source: Yahoo

Gmail’s ads are more discreet, sticking to banners only. This is a much nicer user experience, but there’s a bigger issue that some of you won’t like. To personalize ads, Gmail’s algorithms read your emails. Although Google has said they’ll stop targeting ads in this way, they have no intention to stop reading your emails. So if you don’t want Google’s algorithms knowing your intimate details, perhaps Gmail isn’t for you. Having said that, Yahoo! Mail has reserved the right to do the same.

Another controversial difference between the two is in the way they organize your inbox. Gmail uses labels, while Yahoo! Mail uses folders. For some reason, people tend to prefer folders. Despite Gmail’s labels offering greater functionality, like assigning multiple labels to each email, Yahoo! Mail’s folders seem the more intuitive, and therefore easiest to use.

But Gmail wins on its spam filters thanks to the powerful, data crunching algorithms that drive Google’s search and analytical tools. These keep those Nigerian lotteries at bay, saving you the trouble of deleting them.

And speaking of power, Google’s vast server network does mean your emails get where they need to a little faster. Whether this is important or not depends on you. For most people, Yahoo! Mail is plenty fast enough.

As you can see, both Yahoo! Mail and Gmail have their pluses and minuses. Which you prefer depends mainly on you. Yahoo! Mail might seem like the fun but dorky older brother, it’s been around for ages and has acquired a loyal following who love its folders and generous storage.

But if you’re into tech, love to tinker, and want powerful tools at your fingertips, Gmail is the cool-but-slightly-aloof newer kid on the block you should make friends with.

Either way, you’ve made a great choice.

Download Yahoo! Mail