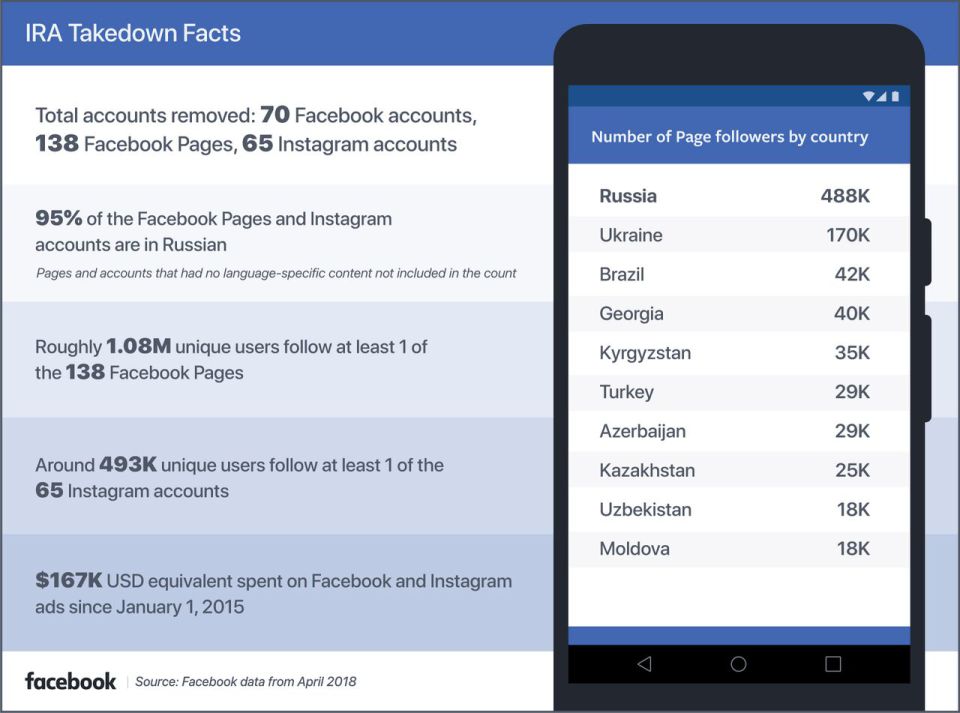
Facebook has taken further action to remove accounts and pages linked to the Russian-based Internet Research Agency (IRA). In total, Facebook has removed 138 Facebook pages, 70 Facebook, and 65 Instagram accounts. All ads relating to the removed pages, totaling over $167,000 in ad revenue, have also been deleted by the social network.
Although 95 percent of the pages run by the Internet Research Agency were in Russian, the organization gained notoriety during the 2016 Presidential election. At the time, the IRA was running fake pages designed to look like grassroots organizations in the U.S. were behind them. These pages would spread fake news and information designed to polarize political opinion in the run-up to the election.
Explaining why Facebook had taken action against the IRA Facebook’s Chief Security Officer, Alex Stamos said:
“The IRA has repeatedly used complex networks of inauthentic accounts to deceive and manipulate people who use Facebook, including before, during and after the 2016 US presidential elections. It’s why we don’t want them on Facebook.”
Stamos also went on to say that this latest batch of pages had only been removed because of their association with the Internet Research Agency rather than for the particular content they were displaying. Going even further, Stamos continued by saying that Facebook will keep removing accounts and pages linked to the IRA until all linked accounts had been deleted.
As well as punitive action by Facebook, the Internet Research Agency has also come under fire from other actors. The White House issued sanctions for election interference, and the U.S. Justice Department special counsel Robert Mueller issued an indictment against the organization for its efforts to “promote discord in the United States and undermine public confidence in democracy.”
Facebook also released some sample images of the types of pages that were being run by the IRA which can be seen here.
There are many streaming music channels out there, where you can choose the music you want, when and on what device. But today we’re going to concentrate on apps that mimic old-time radio – giving you a place where you can enjoy the tunes you already love and discover new jams on your wavelength.
Radio apps break down generally into two types. Either they mimic a conventional radio by simply providing a choice of radio stations to listen to, or they allow you to essentially build your own, personalized radio service based on your tastes.
Listening to the radio online – your options in apps
TuneIn Radio
TuneIn Radio gives you access to 100,000-plus stations worldwide. You can search for them by genre to find the sounds you’re looking for, both as live radio shows and recorded podcasts.
In addition to music, there are spoken-word and sports stations to choose from. The app provides plenty of information about the channels, including who is also following them to help you make your selection. You can even leave comments to guide others. The app will also make suggestions of other stations with similar content for you to explore.
Choose the simplicity of existing stations via TuneIn Radio and you’ll be offered a free subscription for a week or a month for the Premium package – but once that expires, you’ll be charged $9.99 a month. But you can cancel that at any time and still enjoy your free week.
Greatest hits
Discover new music from live stations and from around the world
Access recorded shows and podcasts, too
Previews of what’s playing on a station allow you to make informed choices
The premium account includes access to great extras, including audiobooks and NFL games
Access TuneIn from your computer as well as via the app
Gravest misses
You may experience variable quality as the app is dependent on the individual stations
It’s only a radio app with no bells and whistles you’d expect from other streaming media offerings
Fans of the app: want to listen to and music from around the planet. If you don’t mind being unable to skip between tracks and just want to listen to the radio, this is for you.
Like the vast majority of radio apps – but unlike TuneIn – Pandora allows you to build up a tailor-made, personalized listening experience, where you chose the songs, bands and genres you like. And Pandora is especially good at predicting which songs you’ll be into and which you won’t, thanks to its Music Genome Project, a clever piece of AI which analyzes 450 different musical characteristics to get a handle on whether a particular track gels with your taste.
It’s free – if you don’t mind listening to and/or viewing ads, and can cope with only being able to skip 24 tracks a day. The ad-free service is $4.99 a month and gives unlimited skips, better quality streaming and up to five hours per day of offline radio enjoyment .
Pandora does a lot of things right, which it is by far and away the most popular app of its kind in the U.S. Unfortunately for the rest of the world (and like several other radio apps) you can’t get it abroad.
Greatest hits
Quickly learns your musical preferences
No registration required
Shuffles stations to get a greater variety of music
Provides plenty of info, such as band biographies and discographies
Gravest misses
Currently only available in the U.S.
Those pesky ads
Fans of the app: want to listen to old favorites – and new music in tune with their current tastes.
Where Pandora’s musical intelligence is artificial, Slacker Radio’s is wholly human. Music experts and fans have created its wide range of virtual radio stations. Like Pandora, Slacker is supported by ads, limits your number of skips, and is only available in the U.S.
There are two paid offerings. Plus costs $4 a month, allows unlimited skips on stations and offline listening and is ad-free. Unlimited is 10 bucks a month and also allows you to play songs on demand, create custom playlists, and enjoy them offline.
Greatest hits
Great design which is intuitive and simple to use
Wonderful and unique selection of radio stations curated by fans and experts
Gravest misses
Lack of flexibility. You can’t delete songs you don’t want to hear from a station.
Fans of the app: will appreciate the human approach to introducing them to new music, and enjoying the old stuff.
It’s free, and although ad-supported, the ads are still images, so not nearly as annoying as video or audio. iHeartRadio has around 1,500 live radio stations with a ton of music – about 18 million songs by almost half a million different artists.
And on top of that, you can listen to talk radio and even tune in for seasonal stuff like Christmas music. It comes as an app – which can run on a variety of different devices – and as a website for greater flexibility of use.
Greatest hits
No video or audio commercials
Doesn’t require a user account
Flexible: can be used on several different devices and online
Here’s where we start to cross over from radio-only into general music streaming music apps. Apple Music offers both streaming music and Beats 1 Radio, its own online station, which features its very own programming. Of course, that’s only one station, so if you don’t like that selection, you’ll have to go elsewhere.
Greatest hits
Beats 1 radio features unique and interesting programming
Gravest misses
There’s only one free radio station that plays music
There’s no standalone app for radio-only
Fans of the app: will only want to listen to Beats 1 Radio, or already have an Apple Music subscription.
Those are our top picks for the best radio apps around. Naturally, you may disagree, and there are many other options available. Here’s a sampling of what else is available.
Napster unRadio
Another U.S.-only offering, Napster’s unRadio (previously known as Rhapsody) will cost you $4.99 per month for an ad-free experience. Use it to create your own stations or browse by genre, artist, and recommendations from Napster. There’s the possibility of a free 14-day trial, but no permanent free option available. You also get unlimited skips for your money.
SomaFM
SomaFM focuses on underground and alternative music and can be streamed from the website on your computer or Android device. There is an iOS app available for $7.99. It’s listener-supported, with 30 unique stations that are all different and interesting.
8Tracks
You can make or find playlists created by real people that match your mood, weather, or whatever you want on this site. It allows you to create your own playlists and listen to those the others have made. Thanks for the mix tape, stranger!
Local radio apps
In addition to the big names in radio apps, many, many stations now have their own apps or, at the very least, an online presence. A great example is the BBC, whose iPlayer app allows you to listen to listen to over half a dozen national stations plus many other regional and specialist channels, covering music, talk, and sports.
All the other streaming media
Why buy music when you can rent it? Many people have given up on the idea of owning physical media or even music files, choosing streaming instead. It gives you the flexibility of listening to plenty of new music and old favorites, either for free or for a small monthly fee.
As we’ve mentioned earlier, in addition to the niche radio-like apps, there’s a range of well-known media-streaming subscription services, such as Apple Music, Google Play Music, Spotify, SoundCloud, all of which offer some radio-type functionality. But that’s the subject of another article…
eBay is one of the most popular places to sell things online. Whether you’re getting ready for a cross-country move, earnestly clearing your house of clutter, or just trying to make money, it’s not your only option. Here are some other sites to try.
According to a 2016 survey about places to sell things online, this site was the one respondents would most likely recommend to friends. Bonanza doesn’t charge setup or listing fees, which makes it an appealing option if you’re worried about potentially spending more than you earn when selling through the Internet. You will have to pay a fee of 3.5 percent of the price of the item sold. That’s less than either Amazon or eBay.
The site also gives you a seller statistics dashboard. It shows details like how many people clicked on your items or the number of things sold in a given period. By using it, you could track trends that improve future results.
Established in 2008, this site boasts 4 million listings and more than 14,000 product categories. That means even if you’re trying to part with quirky items that are hard to categorize, there’s probably a way to sell them here. It’s always free to list things, and the sale fees for eBid are 3 percent or less.
Craigslist offers an extremely basic platform for selling items. Unlike eBay, it’s not a bidding site. You either set a price or let potential buyers know you’re open to negotiating. There’s also a section for items people are giving away.
The other sites covered so far have customer service departments you can rely on for clarification and help with the selling process. Craigslist isn’t like that, and depends on its users to make sure everyone follows the rules. There is a forum you can read for help, but no phone number associated with Craigslist to call.
People can report rule breakers by flagging their ads. As you can imagine, not everyone is honest when using this system. Many people who are following the terms of service get their content flagged anyway because competitors want to make those ads less visible. This dishonest practice is particularly problematic in the automotive and real estate sections of Craigslist.
Photo by Ivan Dorofeev on Unsplash
4. Item-Specific Sites
Perhaps you’re trying to sell a very particular kind of item you know has a niche market. In that case, your best bet is to focus on item-specific sites.
For example, Apfelbaum facilitates direct sales of collectors’ stamps after an appraisals process. SecondSpin is for selling CDs, DVDs and Blu-rays. There are also sections on that site for video games and vinyl.
Trying to get rid of clothes or handbags that are still in good condition? Look no further than thredUP. It could be an especially lucrative site if you have high-end, brand-name items. However, one little-known aspect of selling there is you must pay for a special bag thredUP sends you to use for shipping your clothes.
If you’re even a casual user of Facebook, you’ve probably seen users there attempting to sell everything from baby strollers to couches.
Wondering how you could do the same? It’s easy. First, use the search function to find a group to sell your items, preferably one in your area. Then, read the rules for using the group. Many stipulate there are certain things you cannot sell, such as animals.
If you’re satisfied with the standards, request to join the group. Once approved as a member, find the Sell Something link on the group page. You’ll then have to fill out a form that indicates what you’re selling and for how much.
After adding those details, click the Post button. Depending on how the group operates, you might see the content right away, but it’ll probably appear after a moderator reviews it.
One of the main perks of BriskSale is it doesn’t charge any seller’s fees. Also, every item you post gets automatically uploaded to the Google Shopping Network for better visibility.
If you have a hectic schedule and want to sell many things, but don’t have time to upload them all to the site, BriskSale representatives can do it for you as a bulk upload. You just have to send them a file of your inventory, and they’ll post it to the site within one to three days for no charge.
If you’re done with eBay or at least taking a break from the site, you can still sell things online. After trying one of these alternatives, you may never return to the famous bidding website.
In the early 1980s, if you wanted to play the latest video games, you’d have to travel to an arcade. Today, you carry the arcade in your pocket. Your phone is the hottest game platform on the planet. At Softonic, we don’t want you to be stuck playing alone. People from around the world could be your teammates or your foes.
5 incredible multiplayer games for iOS and Android
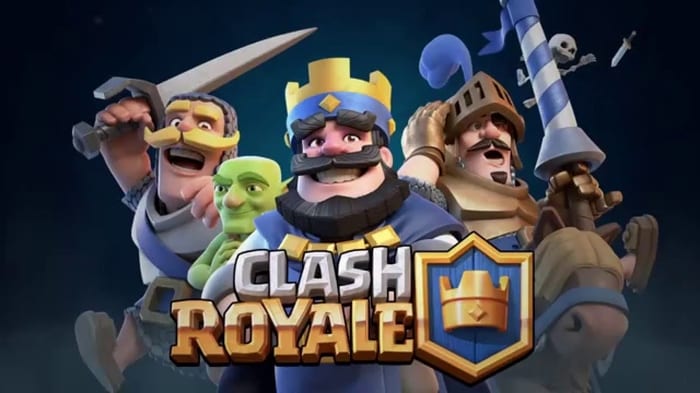
Clash Royale
This is by far one of the most played titles for cell phones. Clash Royale has had great success worldwide, with millions and millions of users (not to mention the YouTube channels dedicated specifically to it).
In Clash Royale, the goal is as easy: destroy your rival’s base. However, defending your own base is just as important. This balance of forces, between defense and offense, makes this massive multiplayer game a constant challenge.
It started slow enough, but with every new update and release, it’s gained an audience. Asphalt Xtreme is one of the best video games for people who have a need for speed.
Up to 12 rivals can compete at the same time, not to mention more than 100 unique vehicles. Try it out if you like this genre: we assure you, it won’t disappoint.
Unsurprisingly, FIFA also has its own video game for cell phones. And we have to say: it works well. This version is designed for smartphones, and it’s no larger than 100 MB, so don’t worry about taking up storage space.
Like the console version, this edition of FIFA Soccer is also constantly updated with new templates, classic player cards, and a new focus on the FIFA Ultimate Team. And yes, of course, it has a multiplayer mode so you can beat other people.
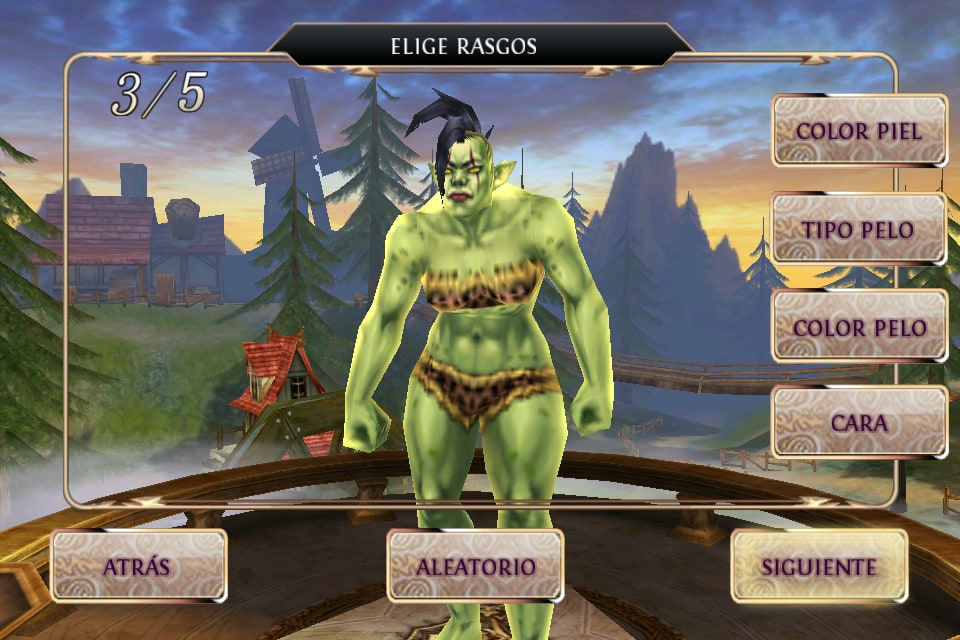
If you’re a fan of World of Warcraft or Guild Wars, with Order and Chaos Online you have a counterpart version for cell phones. This MMORPG combines the best of the genre in the palm of your hand: magic, orcs, elves, and lots of action.
Like any MMORPG, the key is to cooperate with other players to earn victories and achieve different missions.
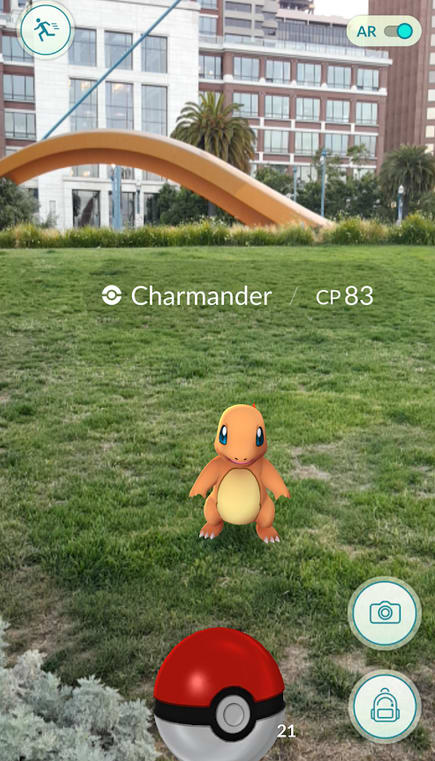
We’ll wrap up with the most one of the most groundbreaking games of all time. It’s a title that changed how we play on our smartphones thanks to its concept: Pokémon GO.
Catching critters has never been more fun than with this game, which brings the best of the saga to our daily lives. You may be saying, “But it isn’t multiplayer.” You’re right, it’s not… yet. That’s why we’ve added it to the list.
Niantic, the app developer studio, already mentioned that in 2018, online combat against other players will be released. So we just have to wait for it to come out. The sooner, the better.
Although you may have dominated the Overworld, there are two perilous
dimensions that pose an even greater challenge, greater rewards, and
beasts more ferocious than anything you can find in the grassy plains of Minecraft’s passive Overworld.
Survival in these treacherous realms will be difficult; you’ll need to
be on top of your game and successfully navigate the alien terrains if
you want to make it back to the Overworld. But first, you need to get
there – here’s how!
A guide to The Nether and The End in Minecraft
Getting to The Nether
Infiltrating The Nether is no easy process; it is not something you can do as soon as you start playing the game. It takes time to gather the resources necessary in order to build the portal itself. Plus, you should make sure you are up to the challenges that will await you. Before you try to visit The Nether, make sure to build up an arsenal of weapons and protective gear, because it is a very dangerous place!
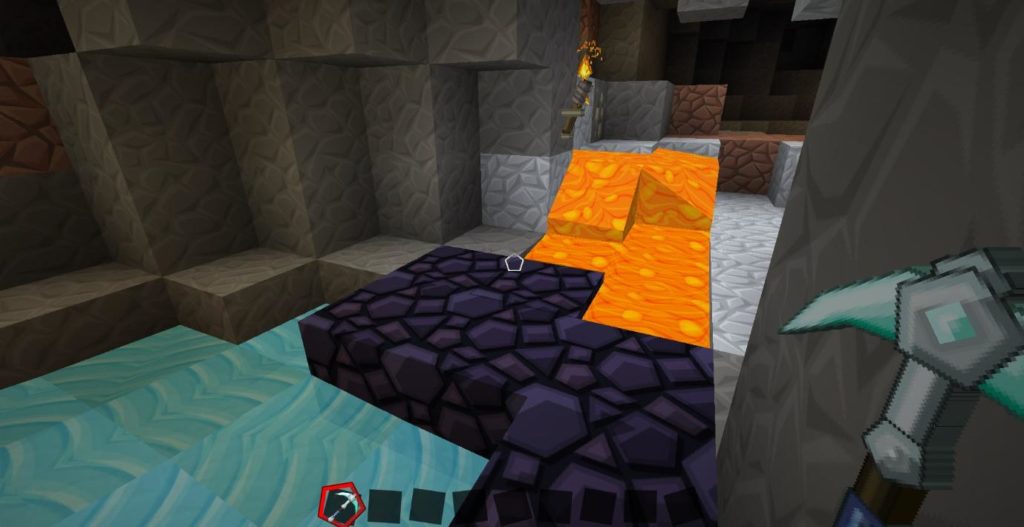
Building a Nether Portal may sound simple, but it requires access to resources that can be difficult to locate. A Nether Portal is made of Obsidian, a nice looking solid block with a purple hue that you can mine only with a Diamond Pickaxe. Obsidian can be found far underground in caves and chasms, often where water has met lava, and you need 18 of these blocks to build yourself a Nether Portal.
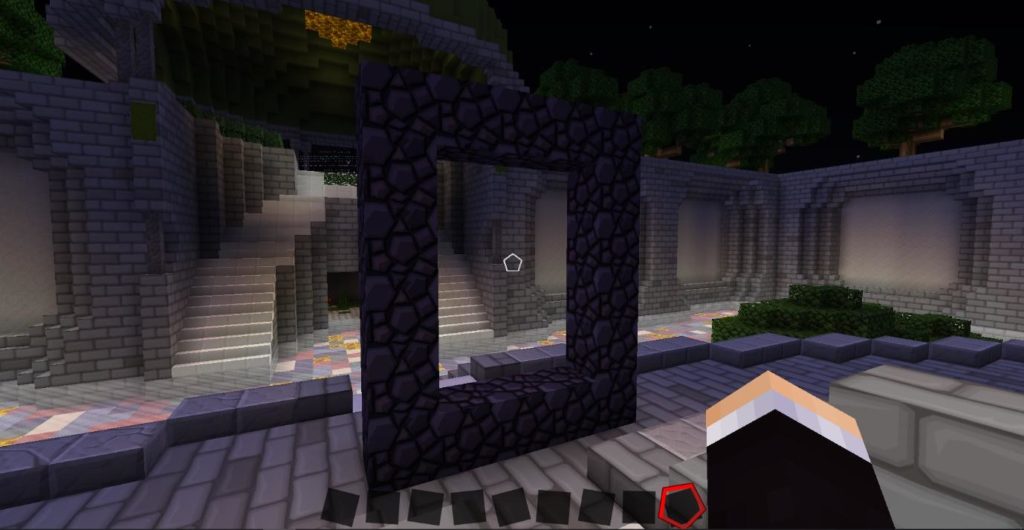
Once you have gathered your 18 Obsidian blocks, build a 5×4 portal that
looks like this:
There you have it! A Nether Portal.
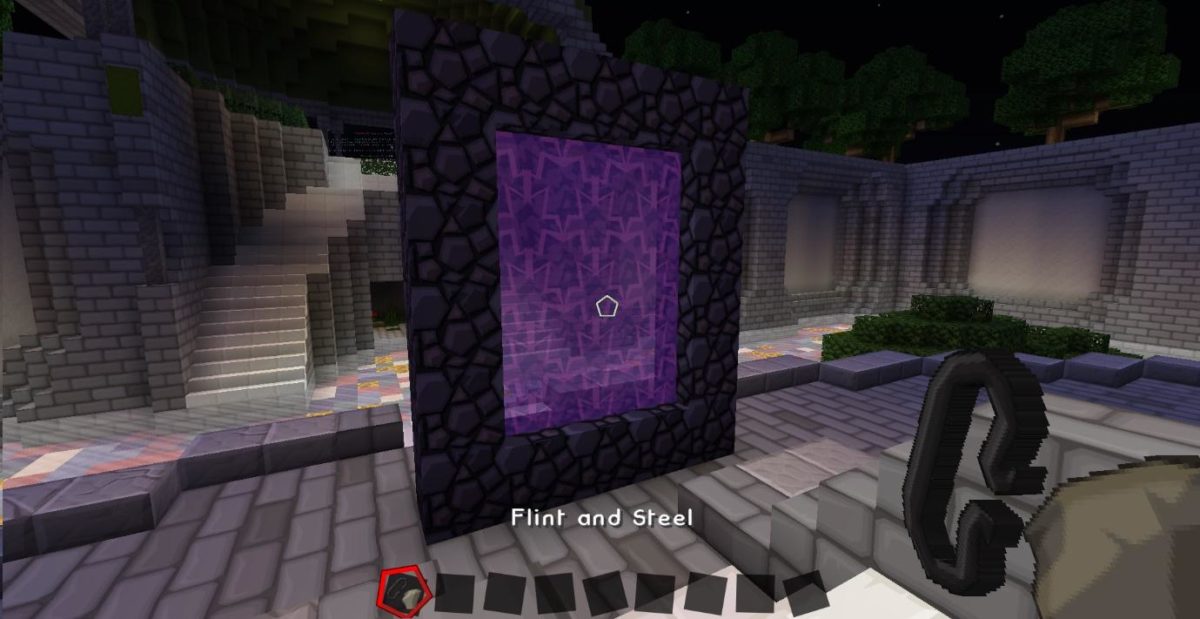
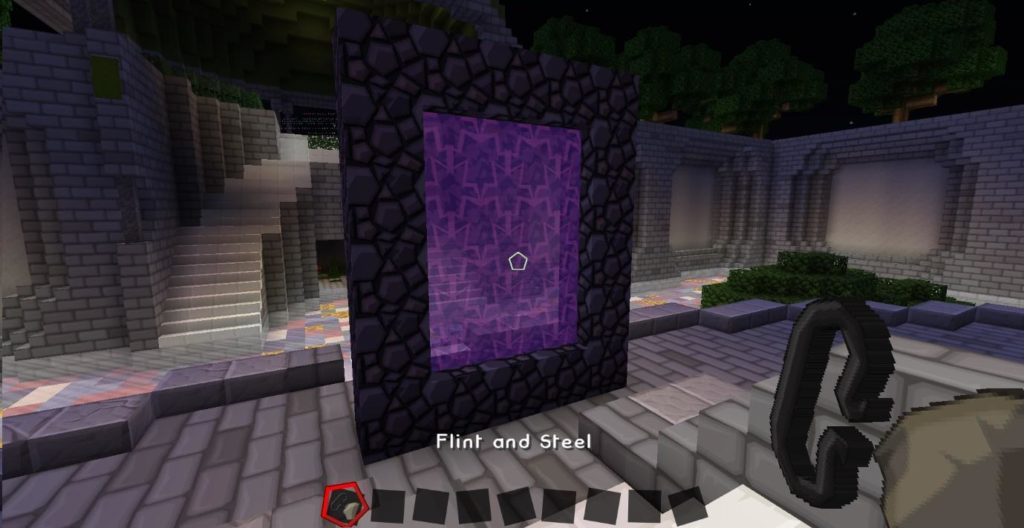
But it’s not quite done yet, and you might be wondering why nothing happens when you enter it. To use the portal, you’ll need to activate it by equipping a Flint and Steel then right-clicking on the portal. The middle portion should turn purple, which indicates that it is ready to be used to zip you to The Nether.
Be careful, though; don’t go until you are up for the fight that awaits! When you enter The Nether for the first time, make note of where your portal is and don’t lose it – it is your only way back, aside from respawning, and it is easy to get lost in this hellish dimension.
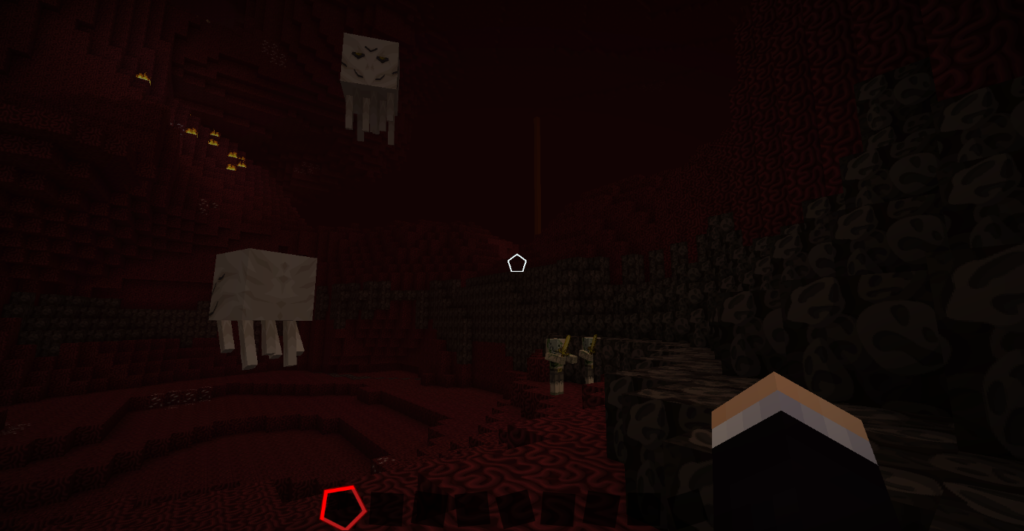
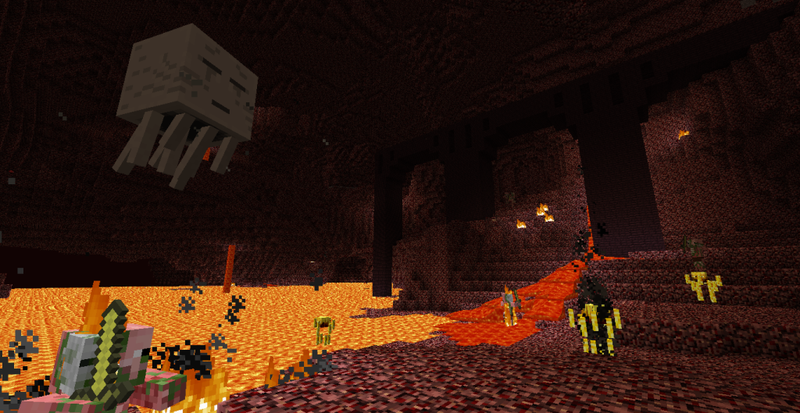
Upon arrival, you will be greeted by an unforgiving world filled with lava pools, fiery dark terrain and lots of scary mobs. You can find many treasures in The Nether, such as Nether Fortresses, but there are plenty of adversaries too. Zombie Pigmen and Ghasts are two of the commonly found monsters here, and they are not pleasant.
Ghasts are the huge, white, ghostly looking mobs that can fly and will shoot fireballs at you whenever they have a direct line of fire. Your only line of defense against these monsters is a good bow and arrow, so make sure you come prepared!
On the other hand, Zombie Pigmen will not bother you unless you attack them first; they are passive until disturbed. If you do attack one, though, get ready to run; Zombie Pigmen attack in numbers and will all gang up on you if you dare pick a fight! Their golden swords are very deadly, and you can quickly become overpowered by them.
Finding The End
Locating and exploring The End is something that should be on every Minecraft player’s bucket list; it is the ultimate fitting end an awesome game. The End is home to the Enderdragon, a large mythical beast that is viewed as Minecraft’s “boss level” enemy.
Getting to The End is not easy; in fact, it is significantly harder than building a Nether Portal. First, you cannot build an Ender Portal; you must locate a Stronghold. This is very resource intensive. Then, when you have found a Stronghold that contains an Ender Portal, you must navigate your way around the fortress – a maze of rooms and confusing corridors – to locate the portal, all while fighting off any mobs that come your way.
Although this is no easy feat, The End is an amazing realm, and if you are up for what can be a very long and tiring adventure, then you should go for it!
Locating a Stronghold
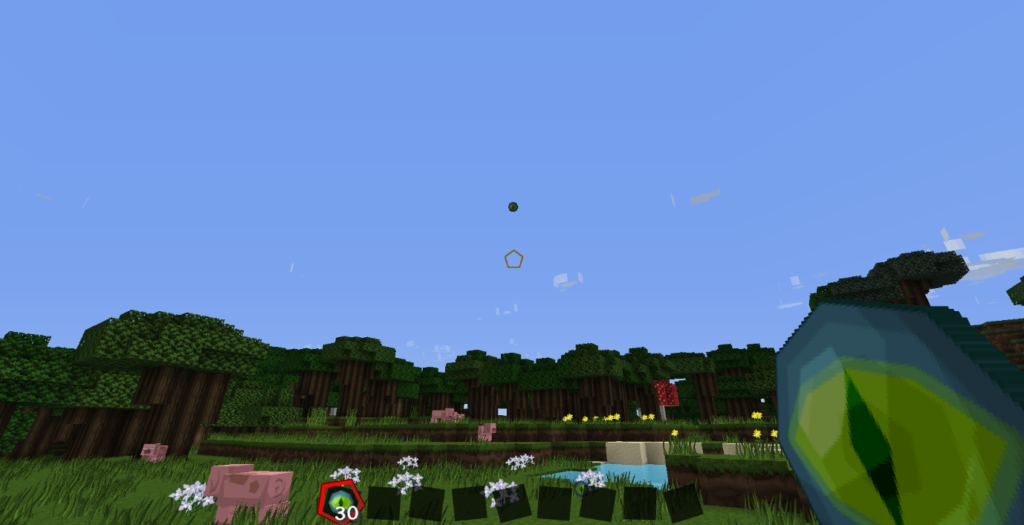
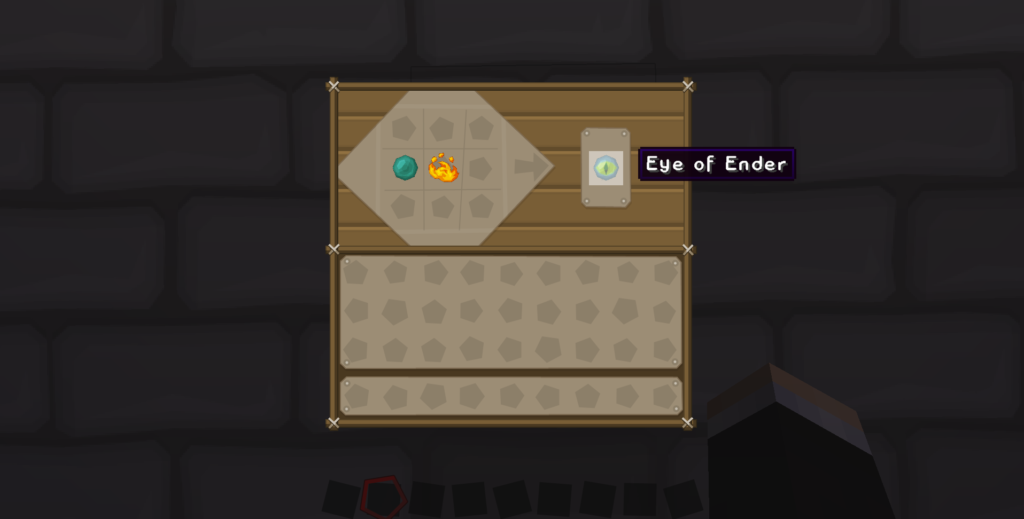
The Eye of Ender is used to locate a Stronghold. When thrown in the air, it travels upwards and then horizontally in the direction of the nearest Stronghold. Then, it will either drop to the floor (80% chance) or break (20% chance). You also need Eyes of Ender to activate the End Portal (12 in total), so make plenty of them before you start your adventure!
To make an Eye of Ender, you need Ender Pearls and Blaze Powder. You can get the pearls by killing Endermen, and the powder from locating and killing Blaze monsters in the end.
Keep throwing your Eye of Ender until it no longer travels horizontally, and instead travels downwards toward the ground. When it does this, you have located a Stronghold, which will be far under the ground on which you stand – you will need to dig far, far down in order to enter the Stronghold and begin exploring.
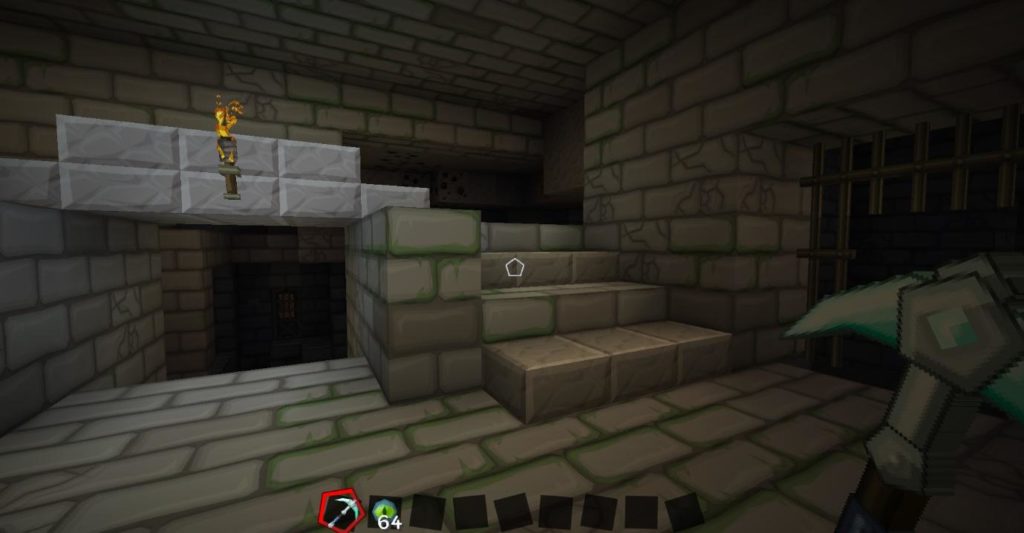
Strongholds can be made up of many rooms that may or may not be connected. If you keep finding dead ends, just keep going and digging around the surrounding area to locate more rooms. It can take a while to find the End Portal room, but you will know it when you’re there – look out for stone brick like this:
This is what a Stronghold looks like and, as we have already mentioned, it is a fortress of twists and turns, rooms which lead to nowhere and are full of surprises. It can take a while to find an End Portal, so be patient and begin exploring – there is a lot for you to find here.
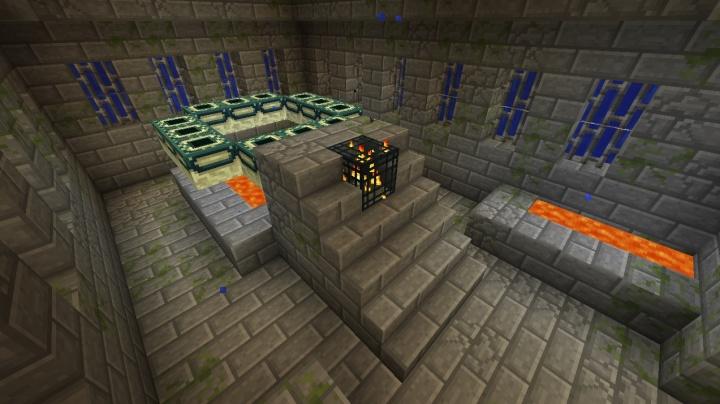
An End Portal is a 3×3 square with its corners missing, made of a white block with a green border. It always sits atop some stairs with some lava underneath it, and it looks like this:
An inactivated End Portal: note the empty black holes in the blocks.
Like a Nether Portal, the End Portal is not active when you find it. To activate it, equip your Eyes of Ender and right-click each individual white block; this will place an Ender Eye in them and when they are all filled the portal will activate. Jump on in if you’re ready to be transported to The End and face the Enderdragon!
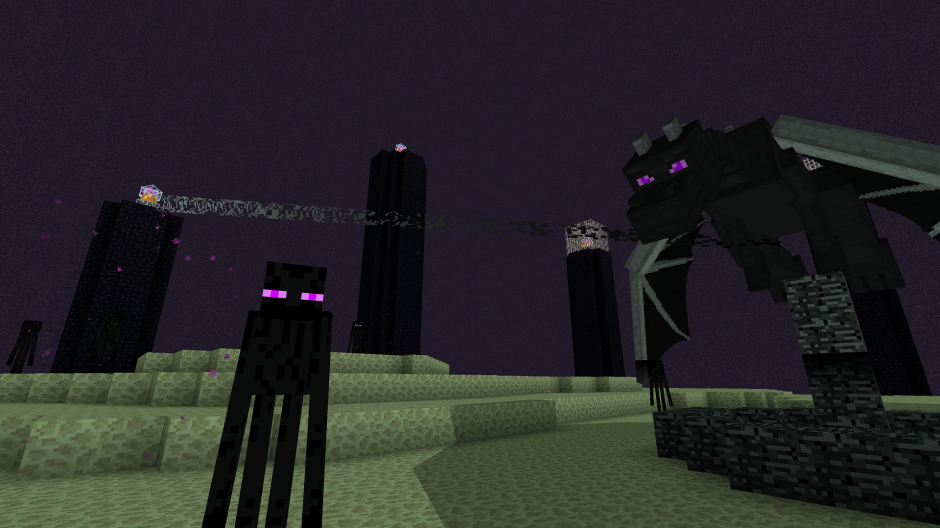
When you reach The End, you will be greeted by a big creamy-colored land mass, on top of which sit lots of towers made of Obsidian. Guarded by Endermen, these towers are what gives the Enderdragon its power and, in order to defeat the Enderdragon, you must first destroy the beacons that sit atop of these towers.
These Endermen will not bother you… so long as you don’t look at them directly!
The Endermen are harmless when passive; just don’t look at them – as I am sure you are already aware – and you won’t be harmed. A bow and arrow is the weapon of choice for both taking out the crystals and the Enderdragon itself.
It is possible to take down the Enderdragon without destroying the beacons, but you will need a very strong bow, because the Enderdragon can regenerate health from active beacons. Eventually, this mythical beast will succumb to your attack and dazzle you with a spectacular light show.
Make sure you collect all the experience points that this monolithic adversary drops! Just below where the dragon falls, his egg will spawn atop a podium – be sure that you pick it up and display it proudly back in the Overworld!
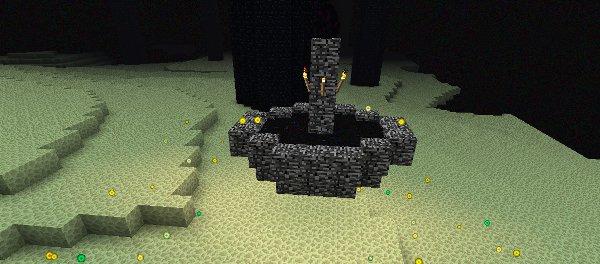
But wait, what’s this? Another portal? Yes, that’s right! A new portal will spawn where the Enderdragon died and, upon entering, you will see the game’s ending credits and be returned safely to the Overworld… much better than having to fight your way back through the Stronghold and walk home!
Rolling Study Halls is a fantastic new initiative from Google that equips school buses with free Wi-Fi and Chromebooks so that students with long commutes to school can take advantage of their time on the bus. Rather than looking out the window, the kids can do homework and study so that they’re free to do other activities once their journeys are complete.
The program began, as a pilot, back in 2016 when Google partnered with education leaders in Caldwell County, North Carolina and installed mobile Wi-Fi routers on 11 school buses. Wi-Fi alone, however, does not make a study hall so Google also ensured that there were educators on each of the buses who could help children working on their homework projects. The results of the pilot scheme were striking and students immediately began to see their grades improving.
The pilot program was expanded from North Carolina to South Carolina and positive results were maintained with reading and math proficiency increasing as well as increased digital fluency. A lot of the kids living in rural areas don’t have access to the internet at home so the pilot program provided vital access to online resources the kids needed to complete their homework effectively.
The Rolling Study Halls initiative is now being expanded across the country and Google claims that it’ll see 1.5 million learning hours reclaimed from school bus journeys that can often clock in at between an hour and an hour and a half.
Google is committing to help provide Wi-Fi and Chromebooks on school buses in 16 school districts around the country. The expansion of the program will be focused on rural communities and will be done with the assistance of school networking non-profit CoSN and broadband specialists Kajeet. Google says that the program is already being rolled out in Deer Trail School District in Colorado but that other districts in Alabama, Colorado, Georgia, Kansas, Minnesota, New Mexico, Oregon, Pennsylvania, Tennessee, Texas, and Virginia will follow.
There is no word from Google yet about how this program will be maintained in the long term but the search giant has said that it’ll be up to individual School Districts to determine policies to limit internet access to schoolwork only.
This program still has a long way to go before it can help out all kids living in rural areas and with little access to the internet but it is definitely a good start. If student engagement and homework completion keep going up while discipline rates keep going down on program school buses hopefully more and more districts will gain access to what Rolling Study Halls have to offer.
To keep yourself updated on the Rolling Study Halls initiative you can find Google’s education page here.
Let us take a look back at all the events that have Facebook up against the wall. It has been a rough couple of weeks for Facebook, and at times it has been hard to keep up with events so we thought we’d put a little timeline together to help you follow what has been happening. With Mark Zuckerberg due to testify in front of Congress, this story has a long way to go yet. If you’re already bored of the whole Facebook thing don’t worry, we thought GIFs would be the best way to tell this story while keeping it interesting.
A timeline of events relating to Facebook and Cambridge Analytica.
March 17th
The Guardian and The New York Times reveal that Cambridge Analytica had harvested the personal information of around 50 million Facebook users without permission. Facebook begins a long slide that’ll see billions knocked off its stock value and put head honcho, Mark Zuckerberg, on a collision course with lawmakers on both sides of the Atlantic.
The reports show how Facebook willingly handed over the data to Global Science Research (GSR), which was owned by University of Cambridge professor Aleksandr Kogan. Kogan was using a personality test app to collect data on 300,000 Facebook users. The disconnect between 300,000 and 50 million comes from the fact that Facebook was also allowing Kogan to collect data on the friends of the 300,000 people who had given Kogan permission, via his personality test, to use their information.
Although according to Facebook terms, Kogan was using this data legally, GSR was sharing it illegally with Cambridge Analytica.
March 18th
Although it was revealed that Facebook knew about this illegal sharing of the data back in 2015, the day after the Guardian and New York Times reports are published Facebook takes action and targets those it wants to seem responsible. A blog post is published that says Kogan lied to Facebook and Cambridge Analytica, SCL Group (Cambridge Analytica’s parent company and Kogan are all banned from Facebook. Christopher Wylie, who was the chief whistleblower for both reports is also banned from Facebook.
March 19th
The value of Facebook stocks starts to fall fast. Over $23 billion is wiped off Facebook’s overall market value.
As the crisis starts to grip hard, the true extent of the seriousness of the situation becomes apparent as the US and UK governments begin making moves for Facebook to explain what the hell has happened and what the hell is going on. Both start their own investigations.
Meanwhile, a video emerges showing Cambridge Analytica running Uhuru Kenyatta’s campaign to become the President of Kenya. Facebook really is breaking things!
March 20th
Facebook head honchos get together a full three days after the crisis hit to start discussing what exactly happened.
How to Download All of Your Facebook Data in Just a Few Minutes
It gets worse for Facebook as the co-founder of Facebook-owned WhatsApp, Brian Acton, tweets that it is time to #deletefacebook and it immediately starts trending. To make things worse, the Facebook stock value continues to plummet with an estimated $60 billion, three times the amount they paid for WhatsApp, now wiped out from the company’s overall value.
March 22nd
“We have a responsibility to protect your data, and if we can’t then, we don’t deserve to serve you.”
After days and days of deafening silence, Mark Zuckerberg finally apologizes but seemingly admits that his company doesn’t deserve to be the keeper of the data belonging to the 2 billion Facebook users around the globe.
March 23rd
Despite Zuck’s intervention the nightmare engulfing him and his company continues to grow. Elon Musk deletes the Tesla and SpaceX Facebook accounts, which were followed by over 5 million people between them at the time of their deletion.
It gets worse for the big blue social network when mere hours after saying he’ll do so if it is the right thing to do, Zuckerberg himself is called to testify in front of Congress. The Energy and Commerce Committee says that Zuckerberg needs to address, “concerns about what user information app developers are given access to, how app developers are given access to users’ information on the Facebook Platform.” They also talk more generally about what has been happening to people’s data since Facebook was formed back in 2007.
In yet another blow. Cambridge Analytica, the company at the heart of the scandal for using the data of 50 million Facebook users for nefarious purposes, has its London headquarters raided. The investigators say they’re trying to discover whether Cambridge Analytica affected the result of the Brexit referendum in any way.
March 25th
Mark Zuckerberg takes out full-page ads in some UK and US newspaper apologizing for all that has occurred and saying he wished he’d done more at the time. Apparently, Facebook is now investigating all apps that had access to Facebook user data.
March 26th
The Federal Trade Commission opens a private investigation into Facebook’s privacy practices. Tom Pahl, acting director of the Federal Trade Commission’s Bureau of Consumer Protection, says, “The FTC is firmly and fully committed to using all of its tools to protect the privacy of consumers,”
Stocks keep falling further with now $100 billion gone from Facebook’s value. On top of this, another Tech luminary, Apple CEO Tim Cook, weighs in with his two cents saying that well-crafted regulation is needed. The CEO of a massive company calling for regulation is like a Turkey voting for Christmas.
As more and users are deleting Facebook, some have been sharing some of the data that Facebook had collected, including a lot of data that they didn’t know Facebook had permission to collect. Among the Messenger messages, photos, and wall posts Facebook had the mobile phone contact lists and even SMS messages of some users.
March 27th
In another moment of seemingly incredulous arrogance, Mark Zuckerberg refuses to meet with UK lawmakers. Instead, the UK government will get to hear from the Facebook Chief Technology Officer, Mike Schroepfer, and Chief Product Officer, Chris Cox.
Zuckerberg does, however, agree to testify in front of Congress, which is awfully nice of him. Maybe he is just afraid of flying or something.
Meanwhile, Christopher Wylie, the whistleblower who kicked off the whole scandal does speak to the UK government, and he tells them that it is possible that Facebook is spying on its users in order to bombard them with highly targeted ads, similar to the way Cambridge Analytica was using the data to bombard swing voters.
How to find and block advertisers and apps on Facebook
The holiday weekend seemingly gives Zuck and Facebook a respite but then Easter is cancelled as stories start to surface that Facebook hasn’t been deleting videos that users thought they’d deleted.
There is still a lot more to come with this. Zuckerberg is due to testify in front of Congress around the 10th April so we can expect the headlines to be Facebook blue again sooner rather than later.
Facebook has seemingly betrayed the trust of its users and has amassed such vast amounts of data on so many people that the data then had the power to change the world from the inside out. As to whether Facebook can get over this, And Zuckerberg will get to keep his job as CEO, remains to be seen but the whole affair raises questions that go beyond a single social network. Questions about how we view our privacy and the effects that will have on democracy need to be addressed.
What are your thoughts on the whole Facebook scandal? Let us know in the comments below.
Amazon’s quest to deliver in packages in only 30 minutes using unmanned flying drones seems to be progressing well according to a patent filed by the online retail giant.
The patent in question is for technology that will allow these drones to interact with humans once they reach their destination. This shows a clear development path towards new dynamics that 30-minute delivery would create. If you’re ordering something you can reliably expect to arrive in 30 minutes you wouldn’t have to worry about it turning up while you were out of the house, you could simply order your package, track the drone’s location, and then wait at the doorstep as it approaches your address.
The new patent will give Amazon’s delivery drones the ability to respond differently to various gestures from the human who is waiting for their package. Gestures range from a friendly thumbs up giving the OK to land to frantic waving of the arm to shoo the drone away. The patent also seems to indicate that the drones will be able to respond to voice commands.
With ominous images of Amazon owner Jeff Bezos’ new job hitting the internet recently, let’s just hope that one of those voice commands isn’t hard-coded to Bezos’ voice and simply says destroy humanity.
Running your own little Minecraft server can be a very rewarding experience. Over time, you may build up your very own community of loyal players, which has the potential to grow in popularity if you play your cards right and run your server well.
Although it sounds complicated, running your own server isn’t as hard as you’d imagine. You do not need much prior technical knowledge to get going. Just keep in mind, you should know the Minecraft game itself very well if you are going to attempt this!
Running your own server gives you complete creative control, and there are hundreds of modifications out there which extend the multiplayer experience beyond simple, vanilla Minecraft survival; this is what has made Minecraft multiplayer servers so popular among gamers.
1. Decide on a server theme and then choose a hosting provider
The first step is to decide on a server theme, and there are plenty to choose from: factions, prison, classic survival, and towny, among others. Each gameplay theme brings completely a completely different dynamic to the game, but you probably already have one in mind.
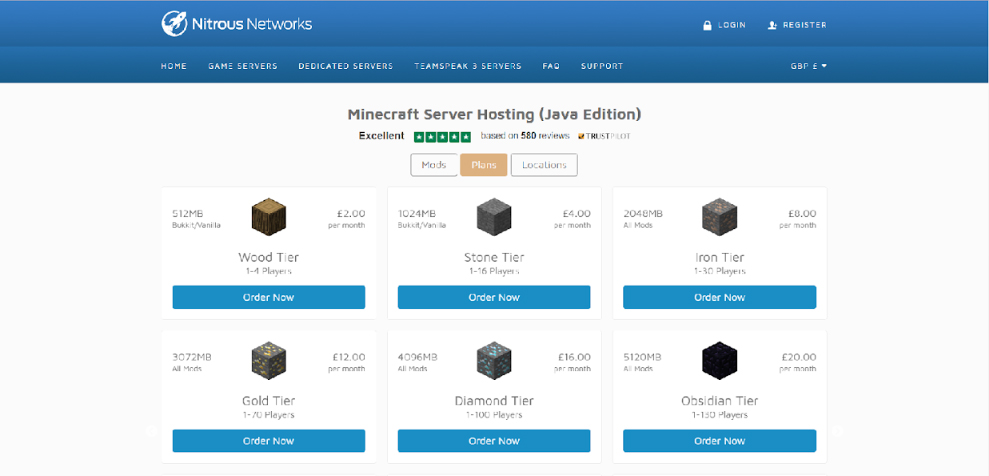
When you’ve settled on a theme, you need to choose a hosting provider. You can set up a server on your computer, but this is not feasible if you want to have a public server online 24/7. In addition, hosting a server on your computer requires a fair amount of technical knowledge, and it is much easier to go with a hosting provider, where setting up a server is as easy as clicking a few buttons. There are plenty of Minecraft hosting providers out there, but let’s use Nitrous Networks – a UK-based company – as an example.
You are free to use any provider, but Nitrous Networks has good ratings and their prices are reasonable.
2. Setting up your server
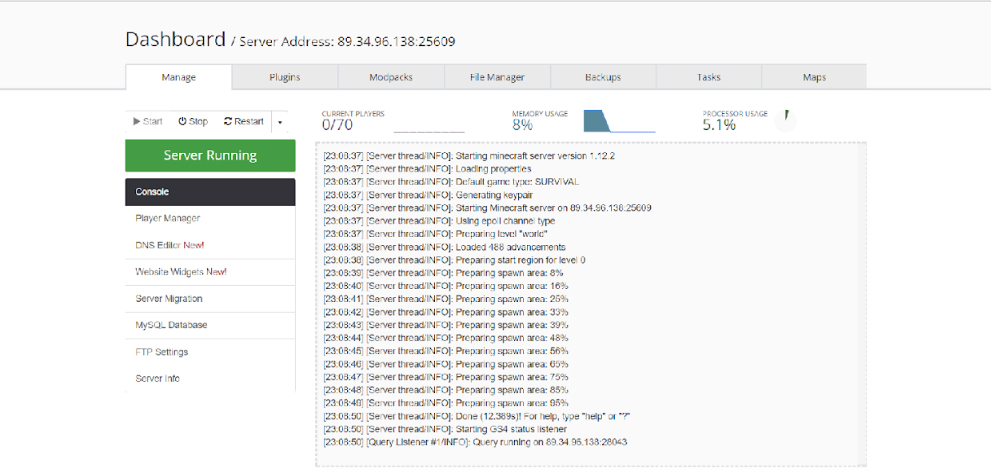
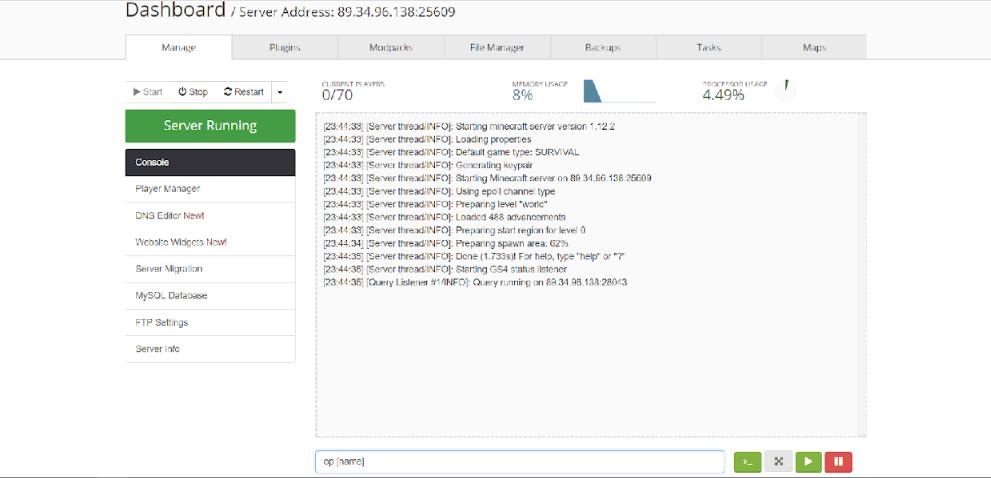
When you have paid for your server and it has all processed, navigate to your server’s control panel. It will look like this (most hosting providers follow a general layout):
Press Start, and your server console (where all the timestamped messages are) will fire up, preparing your spawn area. This will take around 10 to 20 seconds – you can see it is ready when no new messages appear.
To join your server, navigate to your Minecraft game client and direct connect to your server’s IP address.
That’s it – it really is that simple! Although, your new server will be very plain… it is what is referred to as ‘vanilla Minecraft’, that meaning it is the basic Minecraft game. Although it is possible to run a ‘vanilla’ server, they are not as popular as servers like factions, a player-vs-player game mode.
3. Installing Bukkit or Spigot
We recommend installing a Minecraft developer API mod such as Bukkit or Spigot – the two most popular Minecraft server modifications which provide
additional functionality and control to Minecraft servers – allowing you to ‘plug in’ additional Minecraft server modifications (called ‘plugins’, such as Factions or Towny) into your server.
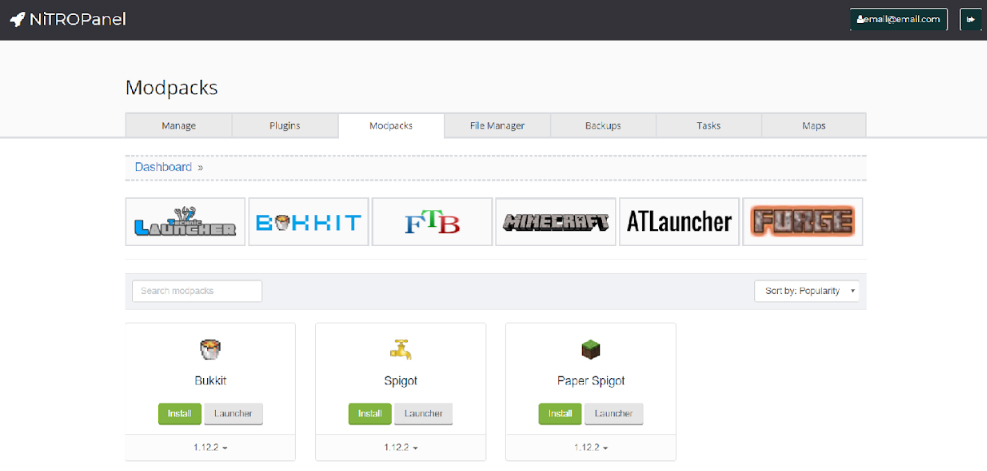
Don’t be intimidated by the jargon, installing these are very simple. In your server’s control panel, navigate to ‘Modpacks’ and choose either Bukkit or Spigot, then press Install. That’s it.
At this stage, it does not make much difference which you choose, but Spigot has additional functionality and is further optimized to support larger servers that pull in hundreds of players.
You do not need to worry too much about what Bukkit or Spigot are; they
do very little on their own and are developer tools which expose an API
which can be used by developers to add functionality to Minecraft
servers. This additional functionality is implemented through plugins
(and there are thousands), which can be downloaded freely and added
to your server.
4. Making yourself an ‘op’
An ‘op’, short for operator, is an administrator on a Minecraft server. These people have access to additional commands and abilities (for example, such as being able to kick or ban players using /kick or /ban, spawn items using /give, or fly using /fly.)
As a server owner, you will want to make yourself an operator because this is the top-level administrative level you can have on a server. It is recommended that you give operator privileges only to yourself and trusted people because some of the commands can wreak havoc on your server and cause irreparable damage.
To make yourself an op for the first time, navigate to your server control panel and type ‘op [name]’ in the input box, replacing [name] with your Minecraft name.
In future, you can type ‘/op [name]’ within your actual server to make additional people operators. But, for first-time use, it must be done on the console.
5. Installing plugins
Plugins bring your server alive, and there are thousands of them. To get an idea of what plugins are and what they are capable of, we recommend installing some and playing around with them.
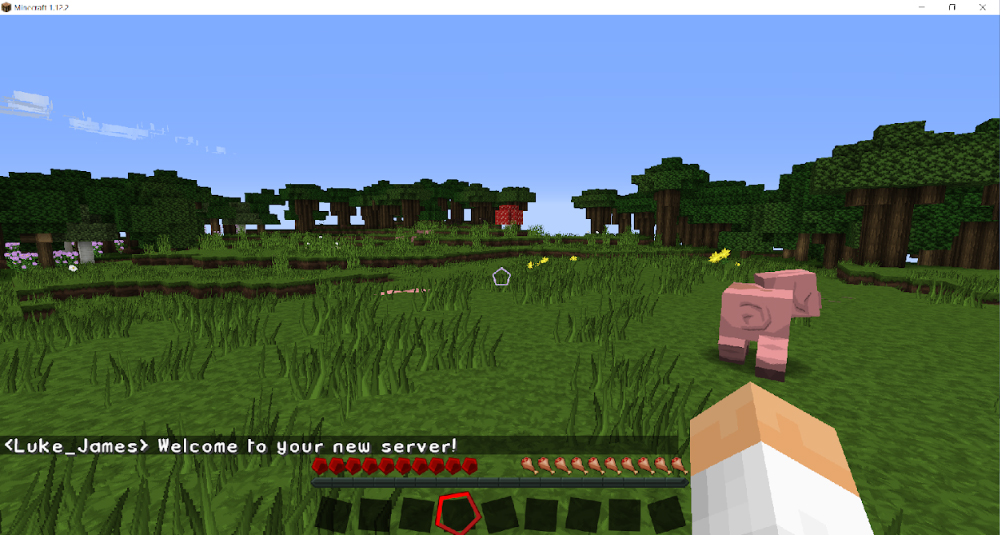
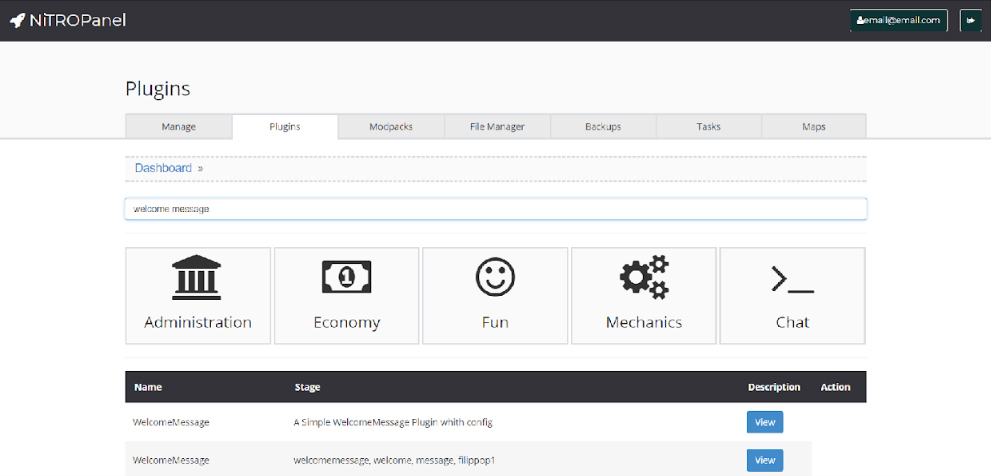
With the majority of reputable Minecraft server providers, installing plugins can be done through the control panel. Navigate to ‘Plugins’ and begin reading about some of the different ones available. We are going to install a plugin which displays a message to players who join your server. In the ‘Plugins’ search bar, type ‘welcome message’ and install the very first one.
Press View then Install and wait a few minutes. Then, restart your server by navigating to ‘Manage’ and pressing Restart. Your plugin will now be installed. Before the plugin will work, you will need to configure it. This is very easy, and most plugins have a user-friendly file called ‘config.yml’ which allows you to modify its settings.
To access a plugin’s configuration, navigate to the ‘plugins’ folder under the ‘File Manager’ tab, open the plugin’s unique folder (which is usually the name of the plugin) and then click ‘Edit’ next to ‘config.yml’ and follow the instructions provided by the plugin’s developer. It is very easy, and requires no special knowledge.
There are many possibilities with running a Minecraft server, and the best course of action is to just go with the flow, play around with some plugins and figure everything out as you go – you can only learn to run a server by running one, even if it’s just you who plays it to figure things out!
Some of Minecraft’s bigger servers and server networks pull in thousands of unique players per month, and if you create a community which appeals to the general Minecraft community, you could find yourself building a name for yourself very quickly.
Using a VPN for gaming is a great idea for security; with more and more instances of DDoS attacks taking place against competitive gamers, a VPN will help to increase your protection against these kinds of threats. But even more than that, a good VPN will help improve just about every aspect of your playing experience. For example, using a VPN to disguise your location makes it possible to play games that are geo-restricted. And if it’s set up correctly, VPN can even make your games more responsive and improve your connection speed. Surprised? Read on to find out more about why a VPN for gaming makes sense – and how to choose the right one.
The best VPNs for gamers
What to look for when choosing a VPN for gaming
Source: freeGraphicToday/ Pixabay
When shopping for a VPN to use while gaming, look for one that offers a high number of servers. The more servers available, the greater your chances are of finding one that has a high connection speed.
Of course, speed should be a priority, as it’s no use having access to geo-restricted games if you’re going to be playing them at a snail’s pace. Be sure to check the latency rates that are listed in the reviews for any VPN you may be considering. To get the most impartial advice (besides reading this article), it’s worth having a look through some games forums where users share their experiences and address the pros and cons of each provider.
The next thing you’ll want to look for is VPN services that specifically market themselves toward gamers. This will be a pretty big selling point, so you shouldn’t have to do much digging to find out if a VPN is good for gaming.
Naturally, any providers who have good scores for customer care should be in the running, as you never know what problems you may come up against when gaming this way.
If you’re not planning on using your VPN full-time, you might want to consider providers that offer monthly subscriptions to save on costs. In many cases, providers will offer a free trial that allows you to get an idea of the kinds of speed and service you can expect once you become a subscriber.
One final consideration: Look at the bonus features offered by VPN providers- if they’re offering protection against DDoS attacks, for example, then it’s probably worth shortlisting them.
The best VPNs for gaming
All tried and tested by dedicated gamers, the following VPNs should be on your shortlist.
Boasting an incredible 145 server locations spread across 94 countries, ExpressVPN offers subscribers a good bang for their buck. With workaround solutions for any geo-locked content, this is a definite top choice of VPN.
What this means for gamers is that there are plenty of servers to play around with when trying to find one that is speedy enough to provide consistent and responsive gameplay. With a free month-long trial to try out the service, it’s well worth giving ExpressVPN a shot before committing to purchase.
A particularly suitable VPN for security-conscious gamers, NordVPN offers a service that can run your connection through an additional VPN to further isolate you from hackers. Of course, this process does mean that you risk a slower connection to a gaming server, but if it’s peace of mind you’re after, then you really do not need to look any further.
Just like ExpressVPN, Nord prides itself on having a considerable number of servers to choose from, and there’s no doubt that you’ll be able to find one with a high responsiveness for competitive play.
While this VPN service may not come with the shiny interface of the previous two on the list, PrivateInternetAccess has certainly enjoyed one of the greatest responses from gamers.
With more than 2,000 servers to choose from, you can expect a highly responsive gaming experience at a relatively low cost from this easy-to-use VPN provider.
Some nice extra features include a built-in ad blocker as well as a kill switch which ends your session in the event that the VPN drops out.
All in all, PrivateInternetAccess is a good one to start with if you’re just dipping your toes into the world of VPNs and don’t want to break the bank.
The perfect VPN provider if you want to know exactly which servers are performing well, IPVanish allows you to order their choices by latency rates. Also good for those after some tough security, you can also choose to have your IP address cycle at regular intervals to make you even more protected.
With monthly, quarterly, and annual subscriptions available, IPVanish is a good choice of VPN for gamers.
Renowned for being among the cheapest VPNs for gamers, KeepSolid offers an incredibly affordable lifetime subscription, a fact that makes it well worth a look. With the option to install it across five separate devices, it’s also a great VPN for any gaming households with multiple players.
Complete with a highly intuitive interface, KeepSolid has servers in a number of locations, meaning that you’ll be able to get around any nasty geo-locks you find out there.
So far we’ve identified the cheapest, most secure, and highest rated VPN providers, but we’ve yet to look at the fastest.
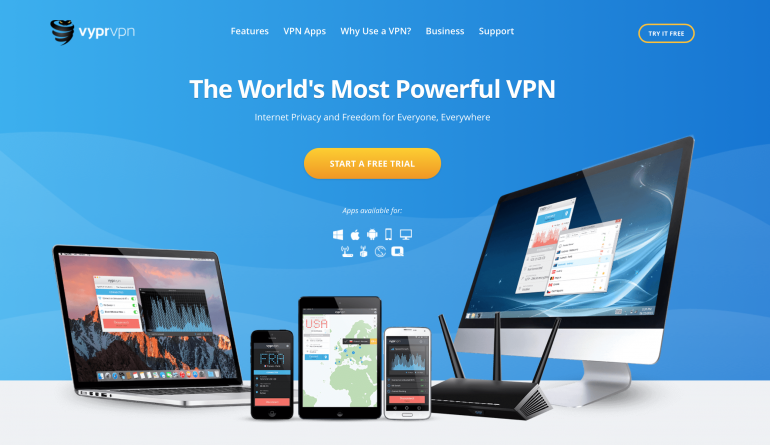
This is where VyprVPN comes in.
While it may not afford the same privacy and security features as some of the others, VyprVPN provides the greatest responsiveness and connections.
Regularly beating other VPNs in terms of download and upload times, VyprVPN is the go-to service for gamers for whom dependably fast gameplay is the most important factor.
We’ve now covered the VPNs that excel in each of the categories; but which is the best all-around choice?
SaferVPN offers gamers speed, security, and reliability, all at an attractive price. What’s more, the customer support team has received glowing reviews from the gaming community, making a subscription well worth the investment. With the option to connect up to five computers at once, SaferVPN is ideal for those living with other gamers.
The only real drawback of this service is that it does not have the same sophistication as some of the more expensive VPNs on the market. Of course, this doesn’t really pose any serious problems for gamers who aren’t looking to do too much else with their VPN.
So, there you have it: the ultimate list of VPNs for online PC gamers. Having weighed all of your options, all that remains is to sign up to the provider that best suits your needs and get gaming!