10 Cool Things You Can Do With Discord Online Chat

Manage the best Discord chat with these tips and tricks!

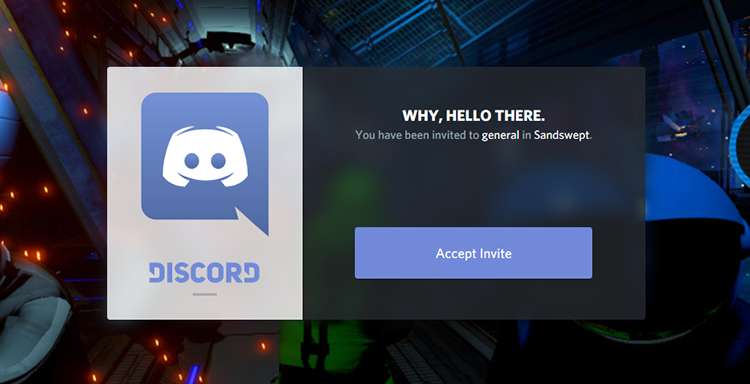
Without causing any discord, we have to say that Discord is our go-to solution for multiplayer game communication when it comes to social chat apps. Each app has a unique audience in mind. For instance, Skype and Zoom are perfect for virtual business meetings or group family video calls. However, when it comes to gaming and having to chat to more than one player on different channels, nothing beats the fun and funky Discord app.

If you’re wondering why we seem to be favoring one over the other, let’s take a quick look at the advantages it offers you when gaming:

  • Discord developed it for hardcore gamers
  • You can join existing servers or create a unique server
  • You can use voice or text chatting
  • Stunning and userfriendly interface
  • You can switch between channels
  • You can upload screenshots of your game while you’re playing
  • It has an in-game overlay to show you who’s talking when without pausing your gameplay. 
  • Discord has little to no effect on your CPU, so you can proceed to play without any delays or bumps.

These are a few things worth mentioning. The fact that Discord is free and safe to download from anywhere in the world is just one more reason why you should hook up with a server in your region soon.

Ten ways you can have more fun on Discord

10. How to stream on Discord

If you’d like to stream your game on Discord, here’s how:

  • Open the Discord app and navigate to the server where you want to live stream
  • Find the game you want to stream and open it
  • Select the ‘Go Live’ option, which is at the bottom L
  • If Discord didn’t automatically recognize your game, you could click on ‘Change’ in the ‘Go Live’ tab before marking the channel you want to stream to.

9. How to screen share on Discord

You can either share your screen in one-on-one calls or get permission to share it in public chat rooms.

  • Select the voice channel on the server where you want to screen share.
  • Click on the ‘Share your Screen’ option.
  • If you’re in a video call, you can screen share by double-clicking on your screen.

8. How to get some freebies

A little-known secret about Discord is that it has a server dedicated to sharing all of the best gaming giveaways and deals going on. Aptly named the ‘Giveaways Channel,’ the channel is where users share their findings to allow everyone the opportunity to get their hands on some free loot. Of course, proper etiquette suggests that you share it with the rest of the community if you find something unique by yourself.

Giveawaybot

7. How to add bots

bot

While the idea of bots might conjure up images of spammy and annoying technology, you can use the bots on Discord to make your overall experience more fun. Some bots play music, while others will help you connect to more appropriate channels. 

Of course, you’ll need to do some homework to discover which ones are best for you. Thankfully, as a thriving community exists around the app, you won’t have to do much Googling to find a whole range of them. 

Create a bot account with these quick steps:

  • Sign in on the Discord website
  • Select the ‘Application’ tab > ‘New Application.’
  • Choose a name for your app and press ‘Create.’
  • Go to the ‘Boot’ tab > ‘Add Bot’> ‘Yes, do it!’
  • Tick the option ‘Public Bot’ so others can invite your bot account.

6. How to use the pager function

While it might sound like a bit of a dated reference, the pager feature on the app will allow you to broadcast a message to all of your friends.

It’s handy if you want to make everyone aware of new rules you’d like adopted on your server. Maybe a new game has been released, and you don’t want to risk spoiling it for others, so you ask that everyone avoid discussing it openly. Of course, you can page individual users if you’re going to ask them a specific question that you should rather keep private.

5. How to make use of voice chat

While text chat is preferable when you’re interacting with a large group, the voice chat feature will give you crystal clear audio that users regularly praise for being better than Skype and Facetime.

If you’re playing with a squad and there’s only four or five of you, the voice chat will allow you to issue commands to each other instantaneously and respond more efficiently.

Be mindful of who’s listening and how this might affect what you do and do not talk about. For example, just like the outside world, you don’t necessarily want to start talking politics when others want to kick back with some games.

4. Get creative with your text

Some simple characters added before and afterward will allow you to make your text more expressive in many ways. If you want to yell something important, for example, you can make your words appear in bold by adding ** before, and after the info, you want to jump off the page. Another way to add emphasis is to underline words by adding __ before and after the text. 

discord fonts

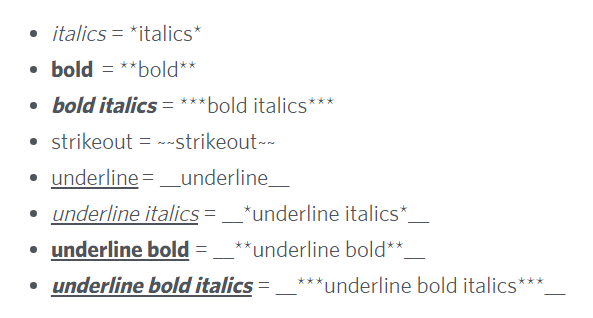
Here’s a full list of styles you can add to your chats.

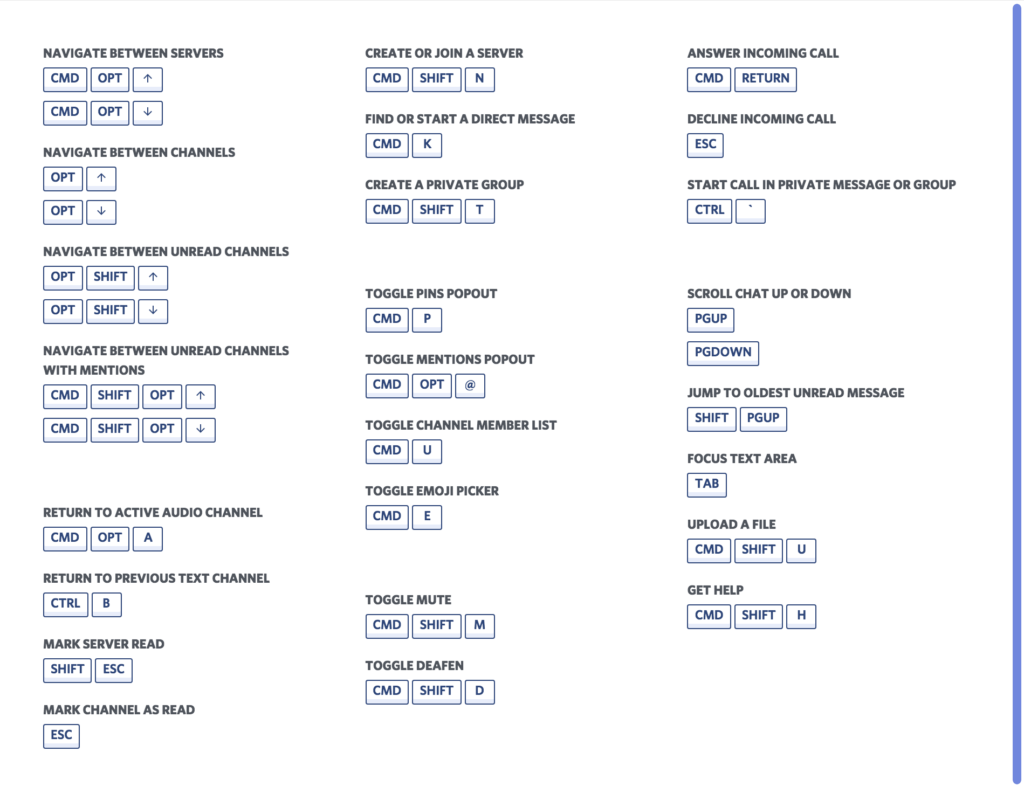
3. Use Discord’s hotkeys

To use the app in the most intuitive way possible, it makes good sense to use Discord’s hotkeys, which will allow you to change its performance without slogging through a bunch of menus.

For example, you can use Ctrl+Shift+M to mute your voice chat. Indeed, if you consider how often you need to quickly jump off your headset to deal with something in your environment, then you’ll appreciate how useful it is to be able to mute yourself with a touch of a button.

discord hotkeys

2. Change your nickname

While you aren’t authorized to do it on every server, some allow you to change your nickname occasionally. Doing this means other users will be able to refer to you directly and have a better idea of what you’re about. 

For example, you might want to add on a particular team or clan name after your name so that people will be able to recognize what side you belong to, and more importantly, where your loyalties are!

To change your nickname, click the server settings menu bar and then click Change nickname.

1. Say hello!

discord invite

Here’s some positive advice to get you started: Discord is an app that’s based around chatting, so saying hi and making new friends is the best way to use it. No need to be shy here, just have fun.

With so many public servers and users, take the time to locate places where you’re likely to find people discussing the kinds of things you’re interested in. And then dive in!

How to make Windows 10 run faster in 9 easy steps

Windows 10 is pretty fast out of the box, but you can make it even faster. How? For starters, you can eliminate those “extras” inside of the operating system that make it look great but are not exactly necessary. What’s more, there are many processes designed to make Windows more efficient, but your way of working may not require all of these cumbersome processes. Why not throw those out, too?

In this how-to, we look at all of the ways that you can make Windows 10 run faster on your PC. Follow these nine steps to attain performance nirvana.

How to make Windows 10 run faster in 9 easy steps

1. Get your power settings right

Windows 10 automatically runs on a Power Saver Plan. While this may save money on your electricity bill, it does come at the cost of your computer’s performance.

In order to get around this, head to Control Panel, select Hardware and Sound and go into the Power Options. You’ll then be presented with two more options, which are called Balanced and Power Saver.

However, if you click the down arrow beside Additional Options, you’ll be able to select the High-Performance setting. Sure, this might use up a little more juice, but it’s the first step to getting Windows 10 to run even faster on your PC.

2. Cut out unnecessary programs running in the background

You may not even be aware of this, but when you start Windows 10, a number of programs are opened and run right away. Of course, this operating system practice has been developed to make things easier for users. But, it is often more of an obstruction that can make a computer feel a bit sluggish.

To stop Windows 10 from doing this, you’ll need to enter the Task Manager, which you do by holding down Ctrl+Shift+Escape. The Task Manager will look like this:

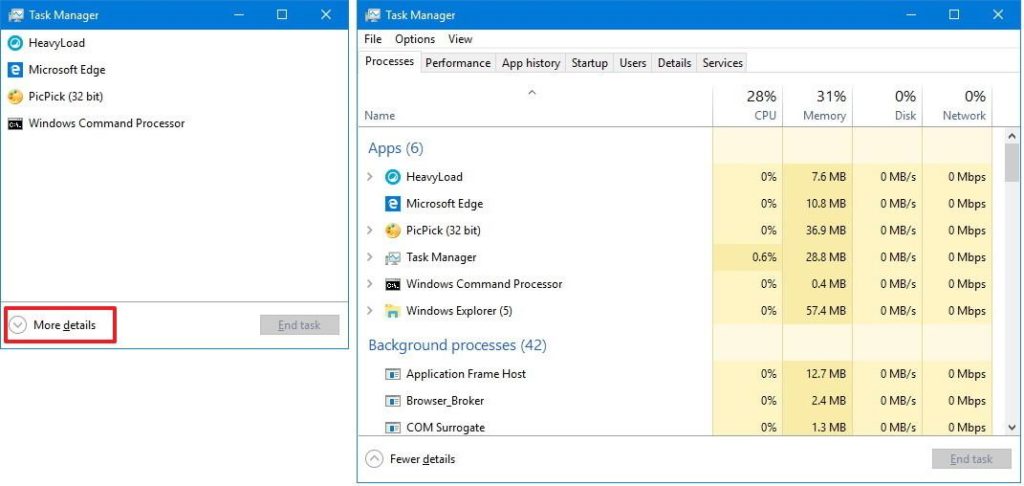
As you can see, there is a start-up tab that you can select to reveal all of the processes that run when you start up Windows 10. Find the programs you do not want to start at startup, right-click each one and select disable in order to stop it from draining system resources.

Of course, the more processes you can do without, the faster your copy of Windows 10 will run. From a practical point of view, you can also enable any programs you’d like to have up and running by the time you log on.

3. Say goodbye to the eye candy!

Sure, all of those cute animations make Windows 10 look amazing. Such visual magic, however, comes at a cost, as each shadow and effect takes its toll on overall system performance. In order to cut down on such extravagances and make some tweaks, you’ll have to carry out a couple of simple procedures.

The first is to head the search box and enter the word sysdm.cpl. Doing so conjures up the System Properties list. As can be seen in the image below, you’ll then have a range of options to either keep or get rid of the animations that slow down Windows 10.

Don’t think that things will suddenly turn bleak once you’ve switched off these visual attractions; just be aware that a few of the cute tricks you’ve become used to might not be available anymore!

4. Use the troubleshooter!

Yes, you read that correctly. In an article that promises to make Windows 10 run faster, we’re telling you to ask the operating system a few questions! The reason for this is that Microsoft has developed a more sophisticated help center that can tell you exactly why your computer is running a little slowly.

More precisely, what you’ll need to do is head to the search bar and look up Run Maintenance Tasks.

This will identify all of the surplus shortcuts and data that you don’t use in your day to day activities and get rid of them. Really, it’s a win for you because you’ll get an increased performance at the cost of absolutely nothing.

As you might expect, by cutting out all of the unnecessary processes going on under the hood, Windows 10 will start to run faster immediately.

5. Cut out the adware

While a lot of the techniques on this list identify the ways in which Windows 10 can be directly tweaked to run faster, there are additional processes outside direct control of the OS that cause things to slow down. Adware and bloatware, for example, are like infections that install themselves on your computer and slowly eat away at your performance.

Removing them may sound like a tough task, but it’s actually fantastically easy. All you’ll need to do is search for Windows Defender and run a scan. By using this software that comes with Windows 10, you’ll be able to easily locate and remove any viruses which are eating away at your computer’s performance.

Windows Defender Download Free
7

6. No more transparency

The Start menu is very pretty, isn’t it? Sorry to be a buzzkill, but these  impressive aesthetics also drain the performance of Windows 10. To get around this, go into Settings and head to Personalization > Colors.

From there, toggle off the item labeled “Make Start, taskbar, and action center transparent.” You’ll notice a small but worthwhile increase in the performance of Windows 10.

7. Ask Windows to be quiet

In an effort to make your experience more enjoyable, Windows 10 is full of hints and tips to guide you through its processes. While this might occasionally help you find the solution to a problem, it is yet another small drain on your computer’s performance.

To minimize the drain a little further, head back to Settings > System, and toggle off the switch labeled “Get tips, tricks, and suggestions as you use Windows.”

8. Run a disk clean-up

A one-size-fits-all solution to all of your Windows 10 speed problems, a disk clean-up will speed up your operating system. At the same time, it will create more space for your data by removing unnecessary files.

As simple as searching for Disk Cleanup in the Start bar, running this procedure will automatically declutter your system and remove any temporary files that are causing problems with performance.

While this isn’t a new feature created for Windows 10, it is still useful. It has a very long history of helping amateurs and professionals alike get the very most out of their operating systems.

9. …and Restart for good measure

Yes, this is the part of the article where we ask you to switch off and back on again. While this might seem like a surprising piece of advice, restarting Windows 10 will completely clear its memory during the shutdown process.
This means you’ll restart with a fresh slate and be able to use your PC with its faster and improved performance.

All better now? Tell us how these tips worked for you below in the comments.

A beginner’s guide to the Dark Web

Whether you’ve read about it on a news report or seen it in a modern day science fiction film, you’ve probably encountered the term Dark Web before. Of course, due to its shadowy name and reputation, it’s a part of the web that is rarely talked about and is relatively unknown.

In this guide, we’ll throw some light on the Dark Web and fill you in on everything you need to know about why it exists and how it works. We’ll also explain how you can gain access to the Dark Web for yourself.

A beginner’s guide to the Dark Web

What is the Dark Web?

The Dark Web is a part of the internet that can only be accessed by using a specialized browser called Tor. Made up of numerous layers known as Darknets, Tor works like a key that unlocks information contained in them.

Unlike the rest of the web, which is indexed and appears in search engines, the Dark Web belongs to a section known as the Deep Web. What this means is that you cannot access any pages or information stored there by browsing in the way that you would normally. Instead, you need to download and run specialized browsers such as Tor that can join encrypted networks that are otherwise inaccessible.

Why do people use the Dark Web?

The Dark Web gives its users greater anonymity than is possible on the regular internet. So it’s probably no surprise that it has naturally attracted users looking to participate in illegal activities. An excellent example of this is the Silk Road, a virtual black-market that once existed to allow Dark Web users to purchase drugs, weapons, and a number of illegal services via their Tor browser.

But it’s not all cloak and daggers. Indeed, the Dark Web has been used as a liberating tool for people living in parts of the world where their government severely restricts their access to the Internet.

By having the ability to browse the internet outside of the parameters enforced upon them, it’s possible for such people to learn more about the world and report on their situation in a useful way.


What Is the Silk Road?

Reportedly shut down in 2013, the Silk Road was a marketplace for users of the Dark Web. Trading with the famous cryptocurrency Bitcoin, people were able to exchange products and services anonymously.

This might sound like a perfectly logical idea until you consider that such an arrangement allowed people to sell and buy things like drugs and guns. Unsurprisingly, the authorities quickly caught onto the Silk Road and made sure they shut it down. Rumors persist that the Silk Road still exists, though nothing has been categorically proven.

Is The Dark Web illegal?

As with many things related to the internet, the legal status of the Dark Web is a complicated issue. In short, using the Tor browser and hiding your IP address is not illegal. However, using your anonymity to commit crimes is indeed against the law.

In other words, if your behavior would fall into the category of “illegal” on the regular web, then it remains so when it is committed through the use of the Tor browser. And using a Tor browser to commit crimes does not provide a criminal with an invisibility cloak, but something closer to a ski mask. It’s not foolproof.

How do I access the Dark Web?

Accessing the Dark Web is much easier than you may think. All you’ll need to do is download the Tor browser. Once you’ve downloaded the browser, you merely need to run it and begin browsing the content there.

A good place to help you navigate the Dark Web can be found at thehiddenwiki.org. Here, you’ll find a helpful list of the best places to visit as well as the best places to avoid during your time on the Dark Web.

And while this may sound like something out of a movie, it’s well worth covering up any webcams you have connected to your computer when you access the Dark Web. The reason for this is that your webcam is a little more vulnerable when accessing parts of the web that aren’t so closely regulated.

Can I get on the Dark Web using my smartphone?

Until recently, you could only access the Dark Web through a desktop or laptop. Now, thanks to the launch of compatible apps, you can browse on both iPhone and Android smartphones.

If you’re using an iPhone, the Onion Browser is available from Tor. Using it will give you all the same freedoms as using Tor on a laptop. For Android users, it’s a simple case of downloading Orbot. It is a browser similar to Tor but powered by another provider. In either case, it’s easy for mobile users to begin browsing remotely and anonymously while on the go.

Onion Browser Download for iPhone
7
Orbot: Proxy with Tor Download for Android
10

Will I get hacked if I use the Dark Web?

Due to its shadowy nature, you might think that being hacked is far more likely to happen on the Dark Web, but this isn’t the case. Indeed, it seems that modern-day hackers have spent more of their time designing software to infect computers browsing the regular internet. If you use the Tor browser with the NoScript addon, you’ll gain even greater protection against would-be hackers.

What can you do on the Dark Web?

You might be surprised to learn that many activities that take place on the Dark Web are totally innocent. For instance, there is a thriving community of book lovers who gather on various blogs to form virtual book clubs.  Some of these communities also take on more controversial types of fiction, the kind that might fail to gain an audience on the regular web.

The popular Strategic Intelligence Network is another resource found on the Dark Web. Sharing a large quantity of data, the network looks at how to survive major disasters. It might not make for uplifting reading, but it’s certainly something a little bit different than your average website!

If you want to participate in something truly relaxing, it’s also possible to play games of chess with other users of the Dark Web.

As you might expect, there is a significant social element to the Dark Web. Some users communicate with one another via an anonymous email service called AnonInbox.

How do I find my way around the Dark Web?

When it comes to surfing the regular internet, there’s no doubt that you’ll be used to using Google to find the stuff you want. For example, if you want to find out about tomorrow’s weather, or when your favorite TV show is returning, you just type these requests into Google.

When it comes to the Dark Web, however, there is no centralized search engine. Instead, you’ll need to refer to the Hidden Wiki, which serves as a directory of the most popular content available on the Dark Web.

You can take a look at this directory on the regular internet by heading to  http://www.thehiddenwiki.net/. It’s well worth spending some time doing some reading ahead of your Dark Web voyage, and it’ll certainly help you decide if there’s anything there you want to check out.

From here on out it’s up to you to decide what you spend your time looking at on the Dark Web. Equipped with all of the knowledge you’ve gained from this article, you’re sure to have an interesting and unique experience.

So, there you have it. The Dark Web really isn’t scary and mysterious after all!

The best 9 Windows 10 productivity tips and tricks

While Microsoft has helpfully designed Windows 10 to be user-friendly, there are plenty of not-so-obvious tricks you might not know about. Indeed, the software features a whole range of work-oriented features that  promise to get your productivity soaring. So, if you’ve made the move to the operating system lately and you’re keen to get the most out of it, you’ve come to the right place.

This guide explains these productivity tips, and how you can use them efficiently both at work and at home.

Customize your Start menu

A sorely missed feature in recent versions of Windows, the Start bar has returned in 10, and you can customize it so it’s personalized to you and your needs.

For example, if you spend a lot of time working in Word and Excel but not so much PowerPoint, then you can organize your Start bar to reflect this.
Super simple: all you need to do is tap the Start button, find the program or software you want to have quick access to in future, right-click, and then pin.

With this in mind, you can make the Start menu more bespoke than ever, and by carefully selecting the things you use most, you’ll see your productivity shoot up.

Learn keyboard shortcuts

While it may seem a fairly obvious point, it pays to know your way around your keyboard. You can save time by knowing shortcuts that have been built into Windows 10.

To prepare you for just about any situation, and to improve your day-to-day productivity, here are some of the most useful shortcuts:

  • Windows Button + I will open the settings window.
  • Windows Button + E will open the file explorer.
  • Windows Button + L will lock your desktop or laptop.
  • Windows Button + M will minimize all windows.
  • Ctrl + Alt + Tab will show you all open applications.
  • Ctrl + Z will undo an action.
  • Ctrl + Y will redo an action.

By making these part of your keyboard knowledge, you’ll spend less time using a mouse and more time getting on with everything you need to accomplish. While it might seem like quite a lot to take in, these shortcuts are sure to become second nature the more that you use them.

Spend time getting to know Cortana

Undoubtedly one of the coolest features of Windows 10, Cortana is a hugely powerful personal assistant that promises to boost productivity if appropriately configured. Indeed, as a voice-activated search tool, you can directly ask your PC a query and have relevant information provided to you without having to go to Google for yourself.

In order to use Cortana effectively, you’ll need to adjust some settings to make it understand your voice a little better. To do this, simply head to Settings, drop down to the Cortana section, and hit the box for Respond best to me.

Once you have done this, you’ll be instructed to speak a few sentences, so the personal assistant only replies to your requests, and not those of guest users.

Of course, what this means is that you’ll have the advantage of asking Cortana questions as you get on with your work, gaining access to valuable facts and figures without having to leave your Word document or spreadsheet.

Automate your spring cleaning

While operating systems are becoming more and more efficient, it’s still necessary to perform the occasional spring clean to help declutter all of the unnecessary files which are taking up valuable storage space.

Thankfully, Windows 10 has anticipated this and has a Storage Sense option that will automatically remove unneeded temporary files as well as any data that has been in the recycle bin for more than 30 days.

To activate this option, just head to System > Storage and turn on Storage Sense. While running in this mode, you’ll find that the overall performance of Windows is faster.

Make use of virtual desktops

A brand new (and very exciting) feature to come with Windows 10, virtual desktops allow you to switch between different desktops as though you were using separate computers. What this means is that you can set up a number of different workstations which you can easily transition between as and when you need to.

For example, let’s imagine that you’re composing a slideshow for one meeting and a spreadsheet for another; you could have an additional virtual desktop to more usefully divide up the tasks.

When you wanted to add information to your slideshow, you could go to your web browser and have all the relevant information there, while your virtual desktop would host your spreadsheet and all of the data needed for that document.

Setting up a virtual desktop couldn’t be simpler, you just need to click the New Desktop option in the bottom right-hand section of your screen.

Update and restart your PC when it suits you

We’ve all been there: You’re about to launch into a sales pitch or get into some serious work, and your computer insists on updating and restarting. While this might not be the end of the world, it’s certainly among the more annoying aspects of previous versions of Windows.

Thankfully, in Windows 10 you’re able to schedule your software updates and subsequent resets to ensure that these are done at a time that suits you.
To get an update schedule in place, simply go to Settings and head to the Updates and Recovery section. Next, all you need to do is click the Select a Restart Time and choose a time that suits you best.

Easily save and print PDFs

In the past, if you wanted to save a document as a PDF, you had to undergo the complicated process of downloading a third-party app to do it for you. Clearly responding to demand, the developers of Windows 10 have seen to it that users can now do this without having to download any additional software.

As you might imagine, this can be a real time saver, since you’ll no longer be wasting time with confusing and often buggy converters. Like just about all of the new features of Windows 10, saving an image or file as a PDF is as simple as selecting the drop-down menu and choosing the relevant file type.

Snap your apps!

The perfect feature for those who like to have everything in one place, the Snap Assist feature in Windows 10 allows you to have up to four different apps each “snapped” to a particular area on the screen.

Snap Assist is also great for the office, and it promises to enhance your overall productivity as you’ll be able to have more of the things you need in one place. In order to snap an app to your screen, you’ll have to drag your window or app to the side until it sticks in place.

Apps and windows locked in place with the Snap Assist feature

Use your PC as a tablet

No, you didn’t read that wrong. Windows 10 allows you to use your desktop or laptop as a tablet, and it’s incredibly useful for your productivity. Indeed, if you’re more used to using Windows 10 on a tablet or on your mobile, then operating in this manner will you allow you to continue your operations in a more straightforward way.

Know where something is on your tablet but can’t seem to figure it out on your desktop? No problem; you can now access everything in the way you’re used to, and use the keyboard to provide a greater freedom when inputting information.

To initiate this mode, you’ll need to bring up the Action Center from the toolbar and hit the Tablet Mode tile. To exit it, simply return to the same tile and return to Desktop Mode.

While there are many other hints and tricks to unlock when using Windows 10, these will help you to get started. Indeed, armed with all of these tips, you can be sure of taking on your daily tasks with a greater productivity than ever before.

Everything you ever wanted to know about Bitcoin (but were afraid to ask)

If you feel a little clueless when it comes to cryptocurrency, you’re not alone. The sudden and stratospheric rise of bitcoin and its ilk is all a little dizzying and unreal.

So you probably have some questions: Is bitcoin the emperor’s new clothes, or is it the ermine shawl of future millionaires? When a single bitcoin can be worth $10,000, then how could you possibly spend it? How much would a pint of milk cost? And can you use your bitcoin to pay for, say, a weekend getaway?

We’re here to debunk the enigma and claim some clarity on this very 21st-century concept of money – money that, perhaps, doesn’t really exist… Except that it does.

Let’s unravel this, shall we?

Everything you ever wanted to know about bitcoin (but were afraid to ask)

What is cryptocurrency?

First, some definitions.

A cryptocurrency is an encrypted digital payment network. There are no physical notes or coins – it’s a currency that exists solely over an encrypted network of computers.

Are you still with me? Great.

Bitcoin was invented by a mysterious developer, known to the planet as Satoshi Nakamoto, which is a pseudonym. Nobody knows if it’s one person or a group. For ease, we’ll refer to Nakamoto as “they.”

Nakamoto wanted to create a currency that was not controlled by governments or corporations; which could be traded globally at no cost and without revealing one’s identity.

What is a bitcoin?

A bitcoin is a line of code with no physical tokens, a bit like your debit card. Once obtained, bitcoin are stored in a digital wallet, which is conceptually the same as a physical wallet. Bitcoin can be traded for services and goods, just like… well, money.

You may have heard the term “blockchain.” It’s an incredibly boring term, but you need to know it to properly understand bitcoin. Sorry.

What is a blockchain?

Source: https://blockgeeks.com

A blockchain is a ledger – a record of transactions.

Your bank keeps a ledger on you. It prevents you from “double-spending” – using the same units of currency twice. The blockchain is similar, only it is powered by a peer-to-peer network.

What is a peer-to-peer network?

Source: https://www.codeproject.com

You might have used a file-sharing application at some point. Remember Vuze, Napster, and Pirate Bay? If so, you’ve used a peer-to-peer (P2P) network to share files.

P2P is an online network of computers where users open up a part of their computer. With file sharing, it’s usually just a partition of your hard-drive. But in this case, users donate processing power as well as hard-drive space. And the processing power borrowed from the P2P contributes to the overall processing power of the blockchain.

Woah, right?

Colossal processing power is required to create new bitcoin, which is why they need a network of users’ computers. And generating that processing power has a huge electricity demand.

A blockchain host on this p2p network searches the web using dedicated software so that they can find and bid for new bitcoin as they’re created. They’re rewarded in bitcoin for hosting the blockchain. This is known as mining.

Isn’t P2P illegal?

P2P got a bad rap when Napster was shuttered because people were using it to illegally share copyrighted material, such as music, video, and application files. But there’s nothing illegal about P2P networks, per se, as long as the activity they operate is legal.

The P2P facilitates the blockchain, which records transactions with a date stamp, preventing double-spending, and we transfer bitcoin from our wallets to buy things. So, it’s a bit like… well, a bank.

So bitcoin is a like a bank, but it isn’t a bank?

Nakamoto described Bitcoin as a “peer-to-peer version of electronic cash,” facilitating online payments that don’t go through a financial institution.

The P2P creates, maintains, and updates the blockchain, recording payment transactions. And the blockchain records and facilitates two willing parties where they wish to trade directly.

All without regulation. All without governments and corporations. And all anonymously.

Wow. Doesn’t this sound a little illegal?

Source: https://latestcrypto.news

Some countries, such as India, have prohibited the trade of bitcoin. Some say that they’re banning noncentralized cryptocurrencies because the government can’t trace transactions (or, perhaps more to the point, collect taxes).

But that’s the cynic’s view. The service in itself is absolutely not illegal – as long as where the money goes when it’s transferred isn’t used for illegal activity. But you could say that for all currency.

How does this not immediately fall apart?

Your bank account is an established (and regulated) form of digital currency. You have money (which is represented by numbers in an account), which you can transfer to someone else in return for goods and services. You probably use your cash card or mobile payment system more than you use dollars and coins these days.

So you’re already pretty familiar with the concept of electronic cash. The main difference here is that rather than one organization taking care of your numbers, a collection of computers keeps the numbers safe.

It is a valid concern that anonymity could facilitate criminal activity, although this certainly doesn’t imply that users of Bitcoin have unlawful intent. So you can see why it’s controversial. But no – it’s not illegal.

I’ve heard about bitcoin wallets. What are they?

Good question. And this is where the story gets interesting.

A bitcoin wallet is a dedicated program that stores your bitcoins, in the same way that your physical wallet holds your notes and cards. The digital wallet is stored on your desktop computer or on your smartphone. Bitcoin can be stored on the web, but this raises security concerns.

Are Bitcoin wallets safe?

If you lose your bitcoin wallet, you lose your money, just like if you lost your physical wallet. Except your digital wallet was potentially worth millions of dollars.

There are stories floating around the internet of a sorry gentleman who threw out his old computer and forgot to back up his bitcoin wallet. He’s regularly spotted raking through the trash at his local dump.

Allegedly.

If you forget your PIN or password, or you lose your hard drive, or it’s hacked or stolen, the value store becomes forever inaccessible. Experts recommend storing your wallet offline where it’s less vulnerable to ransomware. Just in case.

A regular internet-enabled bank account allows you to access your money (and transfer your numbers) from any computer connected to the internet.

If it’s safer to store your digital wallet offline, that means you can only access your funds from the computer that holds the wallet.

There’s a selection of mobile apps that allow you to control your digital wallet securely.

So how do you spend your bitcoin?

Transactions are recorded onto the blockchain as a file, confirming that “Bob gave Andy 5 bitcoin on [insert date and time here].”

Lucky Andy! What did he do to gain such favor?

The point?

The transaction is signed by Bob’s private, encrypted key and broadcast to the P2P, which validates and records the transaction.

Can’t this blockchain just fall apart?

The blockchain is publicly distributed, so it is potentially open to hacking. However, it’s heavily cryptographically protected. The data is divided into multiple small blocks.

Individually the blocks don’t mean anything to a hacker.

The total bitcoin blockchain is estimated at around 100gb in size. The entire chain is required to crack the encryption. And there could be, like, tons of blocks. Thousands. Millions. Superquadrillions.

Because the blockchain uses the computing power of thousands of computers around the world, it probably means hacking into thousands of computers, undetected, all all the same time. So it’s pretty safe.

However! There have been successful hacks, losing groups and individuals hundreds of millions of dollars. (But they might not have deserved those hundreds of millions of dollars in the first place. So don’t feel too bad.)

Hacks have broken into individual wallets, rather than “breaking” the blockchain. A wallet could be compromised, stolen, cloned, or manipulated.

What does the financial industry make of blockchain tech?

The bitcoin bubble may yet burst, but blockchain technology looks to be here to stay.

Six international banks (British-based Barclays, the Swiss-based Credit Suisse, Canada’s Imperial Bank of Commerce, HSBC, MUFG, and State Street) are using blockchain technology to develop a Utility Settlement Coin (USC) – rumored to release in 2018.

USC is a cryptocurrency, just like bitcoin, and will be used for international transactions between banks.

USC will be used for financial transfers on a vast scale and won’t be available at a consumer level – at least, not unless you’re dealing with multi-million dollar transactions.

These transactions will be controlled by banks (who are subject to regulation), and they’ll lack the anonymity of bitcoin.

How is the value of a bitcoin determined?

Supply and demand drive the fluctuating valuation, controlled by a pre-determined scarcity. (I love a bit of pre-determined scarcity, don’t you?) The system has been designed to prevent more than 21 million bitcoin from ever existing.

It sounds a lot, but when you take into account that this is a global currency, and the value fluctuates, this embedded scarcity infers value.

New bitcoin are released daily, at the rate of around 25 coins per 10 minutes. Where the heck they come from is beyond me, to be honest (and perhaps a subject for another article).

But the flow will dry eventually, it has been prophesied, inferring higher value upon existing coins. There are currently believed to be around 16 million in use.

So someone has done well.

Where can I pay with bitcoin?

Amazingly, there are over 100,000 merchants around the world who accept
bitcoin, including Microsoft, Expedia, and Newegg.

It’s rare to be able to spend bitcoin in physical stores, although the likes of Gyft – a mobile gift card app – provides a means of transferring the value of your digital currency into a form accepted by Amazon and Walmart.

Gyft gift cards are accepted in over 200 outlets in the US, such as Nike, Starbucks, and Target.

There are services, such as Shakepay, which convert your bitcoin into USD or Euros, for a fee.

What next?

When Amazon starts accepting Bitcoin (notice that that’s “when” rather than “if”), the value is set to increase even further, bringing usage into the mainstream.

It wasn’t that long ago that ordering a consumer item from the internet represented a massive risk, remember? Nobody thought that would catch on! So the future looks bright for Bitcoin. Yes, it could all collapse and devalue, but at the current rate of progress, it seems unlikely.

It might be too late to invest in in bitcoin and make millions, unless you already have hundreds of thousands of dollars. But now you know just enough about bitcoin to dip your toes in the water; don’t worry, it’s warm.

The best VPNs for gamers

Using a VPN for gaming is a great idea for security; with more and more instances of DDoS attacks taking place against competitive gamers, a VPN will help to increase your protection against these kinds of threats. But even more than that, a good VPN will help improve just about every aspect of your playing experience. For example, using a VPN to disguise your location makes it possible to play games that are geo-restricted. And if it’s set up correctly, VPN can even make your games more responsive and improve your connection speed. Surprised? Read on to find out more about why a VPN for gaming makes sense – and how to choose the right one.

The best VPNs for gamers

What to look for when choosing a VPN for gaming

Source: freeGraphicToday/ Pixabay

When shopping for a VPN to use while gaming, look for one that offers a high number of servers. The more servers available, the greater your chances are of finding one that has a high connection speed.

Of course, speed should be a priority, as it’s no use having access to geo-restricted games if you’re going to be playing them at a snail’s pace. Be sure to check the latency rates that are listed in the reviews for any VPN you may be considering. To get the most impartial advice (besides reading this article), it’s worth having a look through some games forums where users share their experiences and address the pros and cons of each provider.

The next thing you’ll want to look for is VPN services that specifically market themselves toward gamers. This will be a pretty big selling point, so you shouldn’t have to do much digging to find out if a VPN is good for gaming.

Naturally, any providers who have good scores for customer care should be  in the running, as you never know what problems you may come up against when gaming this way.

If you’re not planning on using your VPN full-time, you might want to consider providers that offer monthly subscriptions to save on costs. In many cases, providers will offer a free trial that allows you to get an idea of the kinds of speed and service you can expect once you become a subscriber.

One final consideration: Look at the bonus features offered by VPN providers- if they’re offering protection against DDoS attacks, for example, then it’s probably worth shortlisting them.

The best VPNs for gaming

All tried and tested by dedicated gamers, the following VPNs should be on your shortlist.

ExpressVPN

Source: ExpressVPN Screenshot

Boasting an incredible 145 server locations spread across 94 countries, ExpressVPN offers subscribers a good bang for their buck. With workaround solutions for any geo-locked content, this is a definite top choice of VPN.

What this means for gamers is that there are plenty of servers to play around with when trying to find one that is speedy enough to provide consistent and responsive gameplay. With a free month-long trial to try out the service, it’s well worth giving ExpressVPN a shot before committing to purchase.

NordVPN

Source: NordVPN Screenshot

A particularly suitable VPN for security-conscious gamers, NordVPN offers a service that can run your connection through an additional VPN to further isolate you from hackers. Of course, this process does mean that you risk a slower connection to a gaming server, but if it’s peace of mind you’re after, then you really do not need to look any further.

Just like ExpressVPN, Nord prides itself on having a considerable number of servers to choose from, and there’s no doubt that you’ll be able to find one with a high responsiveness for competitive play.

PrivateInternetAccesS

Source: Privateinternetaccess Screenshot

While this VPN service may not come with the shiny interface of the previous two on the list, PrivateInternetAccess has certainly enjoyed one of the greatest responses from gamers.

With more than 2,000 servers to choose from, you can expect a highly responsive gaming experience at a relatively low cost from this easy-to-use VPN provider.

Some nice extra features include a built-in ad blocker as well as a kill switch which ends your session in the event that the VPN drops out.

All in all, PrivateInternetAccess is a good one to start with if you’re just dipping your toes into the world of VPNs and don’t want to break the bank.

IPVanish

Source: IPVANISH Screenshot

The perfect VPN provider if you want to know exactly which servers are performing well, IPVanish allows you to order their choices by latency rates. Also good for those after some tough security, you can also choose to have your IP address cycle at regular intervals to make you even more protected.

With monthly, quarterly, and annual subscriptions available, IPVanish is a good choice of VPN for gamers.

KeepSolid VPN

Source: Keepsolid VPN Screenshot

Renowned for being among the cheapest VPNs for gamers, KeepSolid offers an incredibly affordable lifetime subscription, a fact that makes it well worth a look. With the option to install it across five separate devices, it’s also a great VPN for any gaming households with multiple players.

Complete with a highly intuitive interface, KeepSolid has servers in a number of locations, meaning that you’ll be able to get around any nasty geo-locks you find out there.

VyprVPN

Source: Vyprvpn Screenshot

So far we’ve identified the cheapest, most secure, and highest rated VPN providers, but we’ve yet to look at the fastest.

This is where VyprVPN comes in.

While it may not afford the same privacy and security features as some of the others, VyprVPN provides the greatest responsiveness and connections.

Regularly beating other VPNs in terms of download and upload times, VyprVPN is the go-to service for gamers for whom dependably fast gameplay is the most important factor.

SaferVPN

We’ve now covered the VPNs that excel in each of the categories; but which is the best all-around choice?

SaferVPN offers gamers speed, security, and reliability, all at an attractive price. What’s more, the customer support team has received glowing reviews from the gaming community, making a subscription well worth the investment. With the option to connect up to five computers at once, SaferVPN is ideal for those living with other gamers.

The only real drawback of this service is that it does not have the same sophistication as some of the more expensive VPNs on the market. Of course, this doesn’t really pose any serious problems for gamers who aren’t looking to do too much else with their VPN.

So, there you have it: the ultimate list of VPNs for online PC gamers. Having weighed all of your options, all that remains is to sign up to the provider that best suits your needs and get gaming!

Related:

5 reasons why you need a VPN


Beginner’s guide to IFTTT

Looking to save time carrying out computer-based tasks that could be automated? Or maybe you want to change the way your smart home behaves. You’ve come to the right place; IFTTT can help. We’ll show you how.

Beginner’s guide to IFTTT

What Is IFTTT?

Undoubtedly one of the most exciting new prospects to hit the web, IFTTT (it’s pronounced as a rhyme with “gift”) allows users to connect services in useful and creative ways. If, for example, you want to have every tagged picture of yourself on Facebook saved to an offline archive, IFTTT can be set up to carry out this task automatically.

Based on the famous logical expression “If This Then That,” the premise is that you can assign chain reactions that will save you time and increase productivity. Small programs called applets are responsible for these chain reactions, and these can be easily designed to do exactly what the user wants.

Now that you have an idea of what IFTTT does, let’s look a little closer at how to use it for yourself.

How Do I use IFTTT?

IFTTT is a free web-based service, so the first thing you’ll need to do is sign up and create an account. Like just about every other account you have online, registering is an incredibly straightforward process. If you really don’t like the idea of being subscribed to yet another mailing list, it’s also possible to sign up for IFTTT with your Facebook profile to cut down on a little bit of admin.

Now that you’re signed in and able to browse existing applets as well as creating ones of your own, it’s time to decide what exactly you want to automate before proceeding. If you’re stuck for inspiration and want to look at some popular applets, simply head to the Discover link, which is located at the top of the IFTTT website.

Source: Android reminders app

Should you wish to narrow down the field a little bit, a number of categories have already been established to help order applets. There are, for instance, categories for cars, kitchens, and social networks.

For the purposes of this guide, we’ll now look at how to use IFTTT on your desktop or laptop to automate social media tasks. While our guide will look specifically at using the service on a computer, IFTTT also runs perfectly well on iOS and Android.

How to use IFTTT

To begin using IFTTT on your desktop or laptop, you’ll need to head to the website and log in with either the information you provided or with your Facebook account. In our example, we’re looking at automating some social media accounts, so we’re going to show how it’s possible to have blog posts you write appear on your Twitter feed the moment you publish them.

Because it’s essential that IFTTT connects services that are compatible with applets, we’re going to take the blogging service Medium and imagine that we want to promote a post there on Twitter. To begin, find a post that has been written on Medium and scroll to the bottom of the page until you find the IFTTT logo, which will then take you to a page titled Triggers and Actions.

You’ll have three options, which include Posts Recommended By You, Posts Bookmarked By You, and Posts Published By You. As we are looking to link published posts with Twitter updates, we would click the final box and proceed to the next page, which shows a variety of social media services that can be triggered when a blog is published.

Because in this example it’s Twitter we are looking to use, we would select Twitter and follow the instructions, which clearly explain that tweets will be sent out each time the blog is updated. This means that promoting content takes far less time, as IFTTT is taking care of distributing it over social media without any further work from you.

From this demonstration alone, the logic and application of IFTTT is clear: For both individuals and businesses, the service allows content to be shared on a larger scale and with a considerable ease.

The best applets On IFTTT

Source: IFTTT applets

Of course, as time goes on and technologies advance, the list of the best applets out there will change. Here are some of our favorites at the moment.

The Bail Out Applet

Designed for people to get out of stressful situations (think internet dates gone wrong), the bailout applet allows users to text a designated number, which will send out a bogus phone call to their phone to help excuse them.

The Lights On at Dusk Applet

Using information gathered from weather services, this applet is integrated with Phillips Hue to turn on your lights the moment that dusk strikes in your location. While it might not be the most sophisticated or time-saving, it’s certainly a cool feature to have inside your smart home.

The Turn Up the Volume On Your Lost Android Phone Applet

Lost your Android but left it on silent? No problem. This applet will allow you to turn the volume up from your PC so that it will emit a loud ringtone when you call it. The perfect solution to when you’re scrambling around the living room looking for a phone you know is somewhere beneath cushions.

Each of these applets and many many others can all be discovered on the discover page. What’s more, those who make such ingenious solutions are constantly uploading new ones to the site for users to download and use for themselves.

How to Make an applet on IFTTT

Source: IFTTT applet uses

While existing applets are sure to take care of most major problems and time-consuming tech concerns you can think of, it is possible to create one of your own. In this way, you can personalize triggers to perform in exactly the way you want them to.

Daunting at first, the process of building an applet becomes easier with practice, and the thriving community that surrounds IFTTT means that you won’t ever be stuck on a problem for long.

Remember: You can only use IFTTT to automate services and technologies that recognize and respond to applets. For example, if you use smart home technology, it isn’t guaranteed that each device will be compatible with the service. Fortunately, though, there are an overwhelming number of services and technologies which can be easily integrated with IFTTT.

To provide an example of how you can create an applet of your own with IFTTT, let’s imagine another hypothetical situation. This time, let’s look at how you could create a chain reaction which will turn your heating off if you are away from home for longer than 24 hours.

To get started, select New Applet from the drop-down menu next to your name on the top right of the page. From here, you’ll need to choose one of the available services. As we’re looking to use a heating system, we’ll need to find one which provides this service.

Having done this, we’ll need to select a trigger. As we’re looking to assign one that takes effect when a home isn’t visited for 24 hours, we need to look at setting a GPS parameter in the trigger fields section.

What this means is that we’ll enter information related to a mobile phone which designates where “home” is, and where “away from home” is. With these two areas in place, it will now be possible to move onto the action service.

As we want the heating to go off, the action needs to reflect this desire. Again, we need to enter that into the IFTTT website and click finish. Having done this, life will become much easier and your heating bill will likely plummet as a consequence.

Of course, the wonderful world of IFTTT cannot be fully explained inside of one article, but we’ve certainly covered all the ground you’ll need to be familiar with in order to get started.

To build your confidence and to start using IFTTT effectively, you’ll need to enjoy experimenting, browsing the discovery page, and noticing all the ways in which applets can make your life more straightforward. Have fun!

10 things you didn’t know you could do on Safari iOS

As the default iPhone browser, Safari is naturally one of the most user-friendly and versatile of its kind right out of the box. But there are ways you can make it work even better, from speeding up your browsing experience to making things more manageable when juggling multiple tasks. And we’ll show you how! Read on to learn about some hidden tricks to optimize Safari.

If you have an absurd number of tabs open and want to close them all without having to click the x on each one individually, fear not: The long pressfeature on Safari means you won’t have to do that ever again. Simply hold down the tab icon at the bottom right for a few seconds, and you’ll see the option to remove all of your open tabs in one fell swoop.

For those of you discovering this tip for the first time, there’s a high probability that you’ll currently have hundreds of open tabs that no longer have a practical use for you. Go forth and cleanse that browser!

Use the long press buttons on Safari

Use the Tab Search function

We’ve all been there: searching the web for what seems like hours, opening up tab after tab and getting in a muddle because we can’t find the one we opened three hours ago. With the search tab function, this issue is a thing of the past. Simply hit the tab button at the bottom right of the screen and turn your iPhone to landscape (make sure the lock screen function is disabled), and you can type in the details of the tab you’re looking for.

Tailor your Reader Mode

Want to get your fill of the news in a font that is easier on the eye than the one used on the website you’re currently on? No problem, the Reader Mode on the iPhone browser allows you to tailor your web experience right down to the color and size of the font.

Simply hit the Reader Mode button located on the top-left side of the browser; and then hit the Aa button, which appears opposite. From here, you’ll be able to fully customize the words that appear on the screen.

Request a desktop site

Recently found something online when browsing on your laptop that is now inaccessible on your iPhone? Maybe you’re used to navigating a certain site on your PC but get confused when using the version optimized for mobile? Either way, by requesting a desktop site you’ll be able to use the site in the way it would appear on a laptop or PC.

To do that, press and hold the refresh button next to the web address at the top of the browser until you’re presented with an option to Request a Desktop Site.

Search pages

Recently read an article and need to get a quote that’s proving difficult to find quickly? The search tool on Safari will allow you to do this with complete ease. To do this, what you’ll need to do is hit the center button along the bottom of your browser then swipe right until you locate the Find on Page button, between Print and Request Desktop Site. So long, lengthy scrolling through articles!

Bring a tab back from the dead

We’re all prone to clumsy thumbs from time to time, and sometimes we end up closing a vitally important tab. Without remembering exactly how you arrived there – which, let’s be honest, is a big ask – you might have habitually resigned these mistakenly closed tabs to the internet graveyard.

In future, you can recall recently closed tabs on Safari by hitting the Tab button on the bottom right, and then holding down the + symbol until  the Recently Closed Tabs page appears. From here, you’ll see a lengthy list of all your recently closed tabs.

Listen to YouTube videos

Yes, you read that correctly, one of our Safari tips is to listen to YouTube videos rather than watching them. Why do you ask? Well, maybe there’s a version of a song or a podcast on there that you particularly enjoy and want to listen to while getting on with other things.

Whatever the reason, you can open a YouTube video on the browser, return to the home screen, swipe up once, swipe again to the right, and select the play button. Be aware, however, that you won’t be able to skip through a playlist of videos like you can if you’re using a third-party YouTube app.

Customize your home screen

If you find yourself returning to the same sites time and time again, and don’t want to enter the address manually each time, simply add it to your home screen. Head to the site you want to add to your home screen. Then tap the center button along the bottom and slide across to the Add to Home Screen. Having done that, you’ll then be provided with the opportunity to hit a shortcut whenever you want to head to a favorite website.

That means that when you open up the app from the home screen, you’ll find yourself with a range of favorites to choose from, which will ultimately speed up your overall experience.

Browse privately

While private browsing on Safari might conjure images of cloaks and daggers, the reality is that this kind of browsing actually allows you to optimize your overall internet experience. To be more clear, by browsing privately you can visit sites without having your information stored. In turn, that means that you’ll be able to get better rates on hotels and flights.

To do that, just select the tab button on the bottom right and choose private. It should also be mentioned that private browsing will mean that your search queries won’t be saved, so you can get to searching for gifts without being caught red-handed if you share your iPhone or iPad.

Read articles offline

There are many reasons why you might want to read a long article at a time when Wi-Fi is unavailable. Let’s imagine, for example, that you’re about to board a long haul flight and you’ve just discovered an excellent piece in the departures lounge. While you would have traditionally had to wait until you arrived at the other end, now you can simply select Add to Reading List at the bottom of the page to allow you access even when you’re offline.

By using all ten of these tips, you’ll be able to get around the internet far more efficiently. Indeed, you’ll find yourself with plenty more time to read articles and enjoy the things you love now that you’re equipped with all of these powerful Safari tips.

A beginner’s guide to Steam

Long gone are the days of PC gamers waiting in line for the latest releases, desperately hoping that the store will have enough copies to go around. Now, with the invention of the Steam platform, gamers can simply log on to a virtual marketplace, select the title they want, and voila! They can enjoy a brand new game without leaving the comfort of their swivel chair.

Running the games on the platform, users also have the added benefit of having round-the-clock assistance if they encounter any problems. There’s a highly social element, too, which means that Steam users can interact and compete with their friends. And with Steam, you won’t have all of the tedious physical parts – things like manuals, fold-out posters, and the occasional soundtrack CD – so you can speed up the process of getting a new game to play.

What’s more, there’s a huge back catalog available on Steam, so you can look forward to throwing yourself back into some classics with complete ease. To help you get started, we’ve put together the ultimate beginner’s guide to Steam.

Get started with Steam

To start with, let’s look at how you can get signed up and in a position to start shopping.

How to download Steam

  1. Download Steam for PC or Mac. Once you’ve downloaded the file, the installer will guide you through all of the steps necessary to get Steam up and running on your computer.
  2. You’ll be invited to join the Steam community by signing up for an account. Fortunately, doing so is friendly and straightforward and has many benefits. As a member of the growing and passionate community, users can interact and discover new games that they may not have heard of before.
  3. Once you have created an account, you’ll be able to browse the catalog that is available on the platform.

How to use Steam

Now that you’re up and running with Steam and you’ve created your profile, you’ll need to find some games that will run on your PC or Mac. Of course, while developers aim to make games as compatible as possible, some games are exclusive to specific operating systems. What this means, of course, is that you’ll need to pay careful attention to the requirements section in the description of each title.

If you’re a bit of a novice and are at all unsure if your device will run a particular game, it’s well worth doing a little searching on Google to figure out the best course of action. It’s always best to be 100% sure before parting with any money.

buying a game on Steam

  1. After finding a game on the Steam store, simply click the Add to Cart button, which is located beneath its description. Just like any other online store, you’ll then need to click through to your cart to evaluate your selection and choose which payment method you’d like to use.
  2. If you want to keep things entirely digital, you can pay for your game using PayPal – or, if you’re a little more traditional, you can pay with any major debit or credit card. Bitcoin was recently removed as an option, but it may return in the future.

And just like that, you’ve bought your first game via Steam. You’ll receive an email notification that serves as a receipt should anything go wrong in the next few steps leading up to your gaming.

Downloading a game on Steam

Once you’ve purchased a game, you’ll need to download it to your device so that you can get playing. Again, this is a pretty straightforward process:

  1. Click the Library tab.
  2. You’ll see your recent purchase and the button download next to it. Click this, sit back, and wait for the game to download onto your computer.
  3. Once the game has finished downloading, you’ll need to open the file and select the Install option to complete the final stage of the process.

Playing a game on Steam

Now that you’ve installed a game from the Steam store, you’re probably wondering how you can start gaming! All you need to do is return to your library, select the game, and launch it from there.


You might also be wondering why you have to play the game on the Steam platform, rather than as a stand-alone program as though you had installed it from a disk. Though it is possible to play your games in this way, there are many benefits to remaining inside of Steam. Indeed, there are some Steam-exclusive trophies that are awarded to players who complete certain tasks. These can be shared with other users of the platform to show off your prowess.

It’s also worth noting that you can select Offline Mode in the top right-hand corner if you want to play a single player game that does not require network connectivity. As your progress is stored locally, you don’t need to worry about losing data.

How to use the Steam controller

While you might be a seasoned PC gamer who enjoys using a keyboard and mouse, it’s a fact that some titles on Steam are more enjoyable when played with a controller.


Available to purchase from the Steam website, the flagship controller was designed especially for PC games. As such, its touchpad allows for a great deal of flexibility when it comes to using it with more traditional games. There are other hardware accessories available for use with Steam, and it’s  worth taking a look at those for sale on the site.

Providing family access to your Steam account

In the old days, it was possible for an entire family to enjoy playing the same game. Of course, that meant each had to install it on his or her computer with the disk. Steam also makes this kind of sharing possible; up to five computers can be authorized to share the same library.

To do this, you’ll need to download and log in to your Steam account on the computer you wish to share with. Then you’ll have to head to settings and then select the Family tab and the Authorize this computer button at the bottom. This can be repeated up to five times, so everyone will be able to enjoy the benefits of the games library.

How to buy a game for a friend on Steam

Totally forgot it was your friend’s birthday? Need a last-minute present for the person who has everything? Steam has you covered, thanks to its gift-giving service.

To buy a game for someone else on your Steam account, you’ll need to follow all of the steps we’ve outlined above, but hit the Purchase as a gift option when it comes to payment.

Making things even better, the recipient doesn’t even need to have a Steam account of their own for you to do this. All they will need is an email address to which the link can be delivered. Once in their inbox, they will be taken to the Steam site to download the software for themselves.

A few hints and tricks before you go

Now that you’re up and running with Steam, we’ve compiled a few hints and tricks that help make your experience even more enjoyable. Of course, more enjoyable often means less expensive, and the best way to sport a bargain on Steam is to download the Chrome extension Enhanced Steam.
Flagging all of the genuine steals to be enjoyed on the platform (and not just the ones that have a 75% sign next to them), this is a handy way of getting some of the best games at prices you’d never get to enjoy in-store.

Another good tip is to consider getting the Steam app on either your iPhone or Android, as this will allow you to make purchases and manage your library while you’re on the move.

Equipped with all of this knowledge, you’ll now be able to get the most out of Steam and all of the services it provides.

20 Twitter tips: Become a social media pro

Whether you’re looking to grow an impressive list of followers or simply get your content in front of the right eyes, we’ve assembled 20 tips to get you using Twitter more efficiently – whether you’re new to Twitter or you want to build up your following and get the most out of this impactful platform.

20 tips for Twitter

Check your hashtags

Hashtags can be found virtually everywhere. While they may be ubiquitous, it’s worth taking a minute to understand how to best use hashtags on Twitter.

A way of grouping tweets together, hashtags allow users to join conversations and have their content discovered. For example, if a user has an opinion on “America’s Got Talent,” by adding #AmericasGotTalent to their tweet they will show up for anyone searching for the show.

So by using relevant hashtags, you’ll be able to connect with people interested in the same things as you are. This is a particularly useful strategy if you are tweeting on behalf of a business and want to get your products in front of consumers likely to want your product or services.

Get your bio right

While Twitter’s unique selling point has everything to do with brevity, the biography (bio) section is large enough to give everyone an idea of what you’re about and what your aims are for Twitter.

For example, if you’re interested in sharing and discovering new music, make sure that you explain this in your bio. If you’re using Twitter as a business tool, then be sure to include the web address so that users can be sent directly from your Twitter page to an online store.

Be social

While the clue might be in the phrase “social media,” it’s worth a reminder that it pays to act socially. Engaging with anyone who reaches out to you is worth the effort. Indeed, by replying to tweets that you receive on your account, you’ll gain greater exposure on other users’ feeds – which will increase the likelihood of you acquiring followers.

For businesses, it’s also an opportunity to gain some free PR. Anytime you have a positive interaction on Twitter, anyone who sees it will come away with a favorable impression of your brand.

Follow the right people

To get the most out of Twitter, you need to follow the right people. If you’re interested in classic cars news, search all of the related terms to find people tweeting about this subject.

Not only does following the right people provide you with a feed of relevant content. It also increases the chances of you getting a follow back and increasing the size of your network.

Choose good profile and header images

Images are the first things users will notice when looking at your profile. Make sure to select different images for your header photo and your profile photo. Choose high-quality and relevant pictures that show who you are or reflect the image of your brand.

Keep it brief

While Twitter now allows people to post tweets that are twice as long as its original 140 characters, research has shown that shorter posts are more likely to attract the attention of other users. So try to keep posts between 120-30 characters.

Figure out the right times to tweet

When it comes to tweeting, success is all about timing. Do you want to have people actually read your thoughts about your favorite sports team? Then tweet when they’re playing, which is when other users are likely to be searching their name in the search bar.

Run a competition

Nothing gains followers faster than the promise of a giveaway. Whether you’re a business or an individual looking to make a name for yourself,  by asking users to retweet and follow you for a chance to enter a prize drawing, you can be sure that your Followers list will grow and grow.

Tweet pictures

Sure, witty words might make you famous on Twitter. But there’s nothing like a striking image to get people talking. It’s important to make sure the images you post are high-res and look good on both desktop and mobile versions of Twitter.

If you’re feeling a little more adventurous, you might consider posting videos, too. With videos as with words, brevity is key.

Use the app

If you’ve been using the browser-based version of Twitter, why not try the app?  Available for iPhone and Android, the app allows you to quickly tweet on the go and upload photos directly from your mobile. The app also boasts a user-friendly interface.

Reach out

One of the most overlooked features of Twitter is the search bar located in the top right-hand corner. By entering a word or term here, you’ll discover all the tweets that relate to your chosen subject. Searching is a great way to find users to follow or identify potential customers.

Retweet relevant content

Whether you want to be seen as the authority on a particular subject you enjoy or you have found something useful you think your followers might appreciate, be sure to retweet it.

Retweeting works similarly to replying, but since it’s public it also allows you to become a part of the broader Twitter community.

Set a good pace

Just like in real life, users on Twitter don’t want to feel drowned out by one voice. Instead, they want to hear from you when you have something exciting to share or some information which will benefit them.

In practical terms, this means spacing out your tweets so that you don’t flood anyone’s timeline but remain present enough to be remembered. Tools such as Buffer and Hootsuite can help you to schedule tweeting times for your messages.

Get people talking

Rather than simply expressing an opinion or sharing a link, consider how you might start a conversation when you tweet.

If you’re looking to find out about the latest movies, for example, it might be worth stating which ones you’ve enjoyed yourself. You could follow that up by asking your followers which films they’ve enjoyed recently. In fact, you could talk to multiple followers via your tweet; just include @username within it.

Host a poll

Can’t decide between restaurants to eat at tonight? The Twitter poll feature can take care of that for you. As simple as clicking the poll tab beneath the tweet box, you can have one up and running in seconds. This feature is also another sure-fire way to get people interacting with you.

Pay attention to trending topics

If you take a look at the left of your Twitter screen, you’ll see a range of revolving hashtags grouped beneath a Trending Topics headline. These hashtags refer to popular subjects being talked about at any given time and allow you an opportunity to join global conversations.

Beware of tweets that include Trending Topics hashtags but seem to be unrelated: Twitter spammers sometimes use these hashtags to get more visibility.

Use direct messages

The best way to form a more personal, one-to-one connection on Twitter is by using the direct message function. Sending a direct message is a good  way of saying thanks for getting a conversation rolling; businesses should be mindful of the opportunities afforded by this feature.

Tag your location

If you’re dining in a new restaurant or visiting a new country, consider tagging the location of your tweet so that users are able to find you and possibly suggest things to do when in the area.

The location feature is broad, so you won’t be revealing your exact location. However, do consider the fact that tweets are public, so tagging your location could alert strangers to the fact that you are not at home. In general, it pays to be careful about how much information you reveal publicly.

Trim the fat

Every once in a while, it pays dividends to perform a spring cleaning. By unfollowing users who have become inactive, you can ensure that only relevant information appears on your Twitter timeline.

What’s more, people will often browse through the list of people you follow if they enjoy your content. So it’s best practice to provide them with a list of useful users to discover.

Be yourself

Yes, we said it – the biggest cliché of them all. But it is the perhaps the best piece of advice for Twitter users who want to expand their engagement. By being yourself and infusing your tweets with individuality, you’ll become a memorable user who attracts attention and grows followers.

Happy tweeting, friends!