How to Make VLC Media Player Default in 2 Easy Ways

Do you want to enjoy videos, movies, and music on your Windows or Mac computer? VLC Media Player is a top-rated program to use. It plays almost any media file, including media types on DVDs and audio CDs.

VLC media player can also stream music and videos online. Your computer is usually set to open these media files with either Windows Media Player or QuickTime. So how do you change the default player to VLC instead?

  1. Method 1: Setting VLC as Default on Mac

    How to Make VLC Media Player Default

    Below are the instructions to set VLC media player as your default on Mac operating systems. 

    – Right-click on the media file you want to open.
    Click on ‘Get Info’ from the drop-down list.
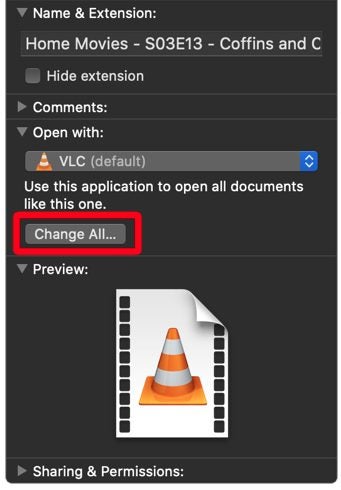
    – Click on ‘Open With’ from the following list.
    – Choose VLC Media Player from the options.
    – Click on ‘Change All’ to make this the default media player.

  2. Method 2: Setting VLC as the Default on Windows

    How to Make VLC Media Player Default

    Below are the instructions to set VLC media player as the default on Windows operating systems.

    – Click the start button represented by the Windows logo at the bottom left of your screen.
    Click on settings represented by the gear icon.
    – In the new window, click on ‘Apps.’
    – Now click on ‘Default Apps’ found in the left sidebar.
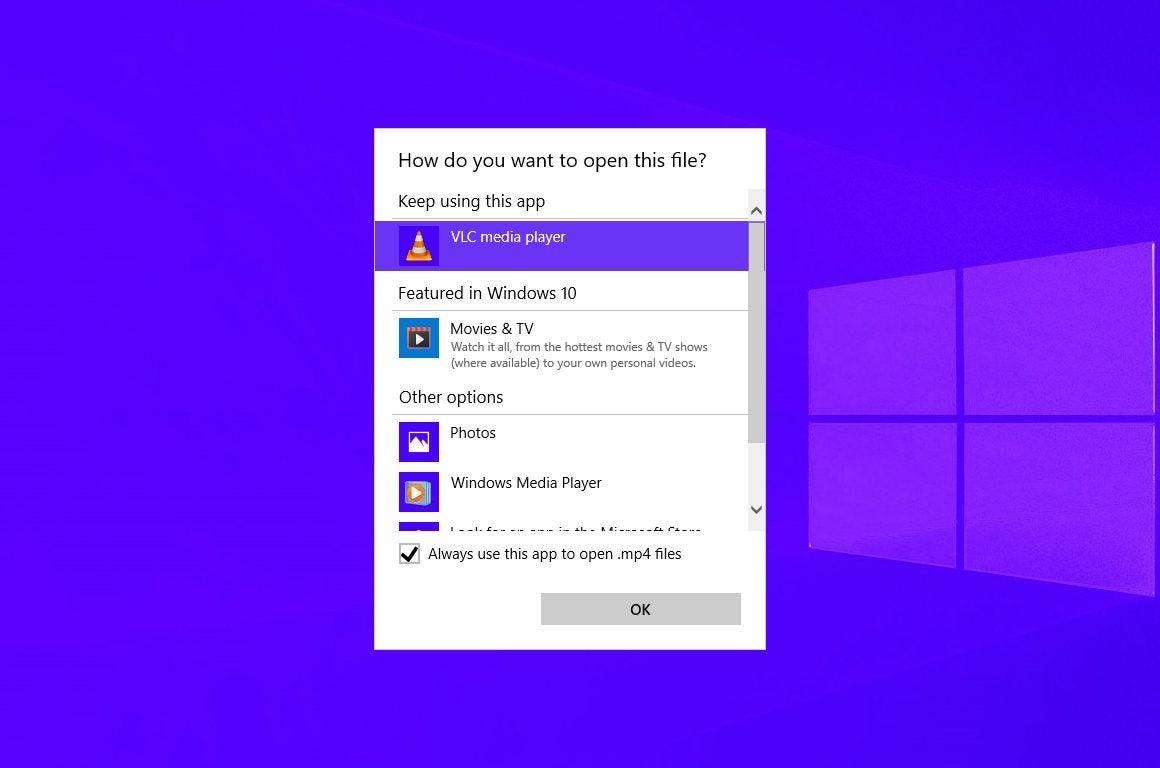
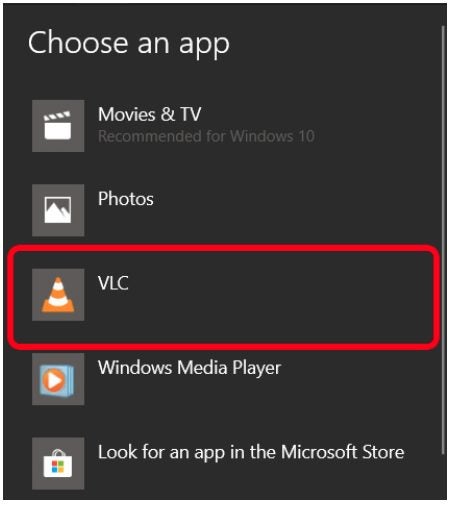
    – Click the button under ‘Video Player.’ At the moment, it will show your current default player. This might be Movies and TV or Windows Media Player.
    – Choose VLC from the list. These changes are saved automatically.

Listen to Music or Watch Movies and Videos Easily With VLC Media Player

VLC Media Player is the popular choice for users who want to play various file formats through a single media player. Setting VLC as your default player is a simple process that can be done within a couple of minutes. Enjoy your favorite music, videos, and movies with VLC.

How to Use WinRAR on Mac in 4 Simple Steps

When it comes to extracting compressed RAR files, WinRAR is a giant in the industry. WinRAR is a lightweight program that is available cross-platform and makes it easy to manipulate and create zipped and compressed files.

Unfortunately, WinRAR on Mac has no GUI (graphic user interface), which might make you uncomfortable as you will need to use the command line to use the program. We know that sounds technical, but before you get stressed, we will help you step by step to extract your files through the program quickly.

  1. Access the Command Line

    How to Use WinRAR on Mac

    First, you will need to access the command line on your Mac. Here are the steps you need to take to open it:

    – Click on ‘Applications.’
    Then click on ‘Utilities.’
    – Finally, click on ‘Terminal’.

  2. Change the Directory

    How to Use WinRAR on Mac

    Now you will need to change the directory to the location of the files you want to archive or extract.

  3. Compress a File

    How to Use WinRAR on Mac

    If you want to compress a file, type ‘rar a your_directory_name your_rar_name.rar’ into the command line to add the contents of your file referred to in Step 2 to a RAR file. Remember to change your directory name and RAR file name to match your folder name. This will allow you to find it in the future easily.

  4. Extract a File

    How to Use WinRAR on Mac

    If you want to extract a file, type ‘unrar your_rar_filename.rar’ into the command line to extract a RAR file.

Compress, Extract and Get Things Done

Using WinRAR on your Mac is simple enough when using the command line. It may seem technical at first glance, but if you follow our steps, you will soon be able to compress and extract files with ease.

How to Fix Checksum Error on WinRAR in 4 Simple Solutions

There is nothing more frustrating than downloading a zipped folder and trying to extract the files with WinRAR only to get a Checksum error that prohibits you from extracting the files.

This error usually occurs when there goes something wrong during the download process, and the file has lost bytes or even gained extra bits. When this error pops up, you will not be able to extract the files to your Windows or Mac device. So, what can you do to resolve this issue?

  1. Choose the Option to Download Broken Files

    How to Fix Checksum Error on WinRAR

    In this method, you will choose to download all broken files during the extraction.

    – Right-click on the RAR file.
    – Choose the ‘Extract File’ option.
    – In the new window, navigate to the ‘Miscellaneous’ tab. Then tick the checkbox next to the ‘Keep Broken Files’ option.
    – Finally, select the extraction location and select ‘Ok’ to start extracting.

  2. Repair the Broken RAR Files

    How to Fix Checksum Error on WinRAR

    In this method, we will show you how to repair your corrupted RAR files so that you can continue to extract them without issues.

    – Right-click on the RAR file.
    – In the drop-down menu, choose ‘Open with WinRAR.’
    – In the new window, click on the ‘Tools’ option and then select ‘Repair Archive.’
    – Choose the destination where you want to extract the file to.
    – The repair process will start. Once it is finished, click on ‘Ok’ to start the extraction.

  3. Download the RAR File Again

    How to Fix Checksum Error on WinRAR

    Try to download the RAR file again. If the Checksum error was caused by issues during the downloading process, such as drops on the internet, then redownloading the broken file can be a simple fix.

  4. Method 4: Uninstall and Reinstall WinRAR

    How to Fix Checksum Error on WinRAR

    If the problem continues and none of the previously mentioned methods work, you may have to consider uninstalling and reinstalling WinRAR. Your WinRAR may be having this error due to a bug, virus, or other problem with the software. Reinstalling the software may fix any of these issues.

Simple Fixes to Errors Make Everyone Happy

Fixing the Checksum error in WinRAR doesn’t have to be frustrating, with these four simple ways to fix the error and get you back to extracting files quickly.

How to Download With uTorrent in 3 Easy Steps

Downloading files such as movies, books, and even games has never been easier with BitTorrents such as uTorrent. Available for both Windows and Mac, uTorrent allows you to download all these torrent files easily. If you want to know how to use this popular torrent downloader, we’ve got you covered. 

How to Download With uTorrent

Step 1: Find the Torrent You Are Looking For

First off, you need to open the uTorrent program on your computer. With uTorrent in the background, head online with your chosen browser and go to a trusted torrent site.

On the chosen site, look for the torrent file that you want. Some sites have multiple options, which can be overwhelming, although the option at the top is usually the best. Keep an eye out for the seeds and leeches ratings; the more there are for your download, the better and faster the process will go.

Once you’ve found your video torrent and decided on the best one for you, you can click on the download torrent button. This button may vary slightly depending on which torrent site you use.

How to Download With uTorrent

Step 2: Open uTorrent Through the Dialog Box

Once you’ve clicked on download torrent, a dialog box will pop up asking if you want to open this file with uTorrent. Click on ‘Open uTorrent.’ Now your torrent file will automatically start downloading through uTorrent. You can just wait for it to finish downloading. This may take a while, depending on your internet speed and the number of seeds and leeches there are for this file.

How to Download With uTorrent

Step 3: Open Your Downloaded File

Once the torrent has finished downloading, you can go to the completed window in uTorrent and double-click on the file to open it. Alternatively, you can also right-click on the file and then choose ‘Open Containing Folder to open the folder that the file was downloaded to.

How to Download With uTorrent

Download Easily With uTorrent

uTorrent has made it easy to download movies, books, games and more. As you can see from the steps above, the process is simple, and nothing is stopping you from enjoying your favorite movies, music and more.

How to Fix uTorrent Connection Error 10047 in 4 Easy Ways

There is nothing more frustrating than opening a program and then facing an error, such as. uTorrent on Windows and Mac. Recently Windows users have reported an error that pops up when they open the program. This error will read ‘Connection error: An address incompatible with the request protocol was used. (10047)’. There are a few reasons that you may be experiencing this error, such as inconsistent network, bandwidth blocked by your antivirus or a third-party conflict.

How to Fix uTorrent Connection Error 10047

Method 1: Perform a Winsock Reset

  • Press Windows key with R to open the Run dialog box.
  • Type in ‘cmd’ and then press Ctrl + Shift + Enter to open the command prompt.
  • Type in the below command and press enter after each one:
  • Close the command prompt dialog box and reset your router before trying uTorrent again.
How to Fix uTorrent Connection Error 10047

Method 2: Whitelist uTorrent and Incoming Ports

This error may appear because your antivirus and firewall are blocking the incoming connections. A simple fix to this is whitelist uTorrent and incoming ports and connections in your antivirus and firewall. You will need to check the instructions on doing this with your provider as different providers have different ways of doing this.

How to Fix uTorrent Connection Error 10047

Method 3: Uninstall Third-Party Culprit

Suppose your antivirus and firewall are the culprits causing this error, and you cannot whitelist uTorrent in these third-party programs. In that case, you may have to consider uninstalling the antivirus and firewall and using the built-in version of Windows Defender and Windows Firewall instead.

This is not the best option if you are using a paid-for antivirus program, so make sure that Method 2 isn’t available before choosing to uninstall your antivirus.

How to Fix uTorrent Connection Error 10047

Method 4: Disabling IPv6 on Network Adapter

  • Press Windows key with R to open the dialog box.
  • Now type in ‘ncpa.cpl’ to open the Network Connections.
  • Right-click on your network adapter and then click ‘Properties.
  • Scroll through the list and uncheck the box next to ‘Internet Protocol Version 6 (TCP / IPv6).’
  • Click on “Ok’ to permanently save this option.
How to Fix uTorrent Connection Error 10047

Don’t Let Errors Slow You Down

Try any of the above methods to resolve your Error 10047 when using uTorrent, and get back to downloading torrents in no time.

uTorrent Connecting to Peers 0.0 Fix in 4 Easy Methods

uTorrent is a widely used application for file downloading both for Mac and Windows owners. No matter which system you use, one of the most annoying issues you can encounter is when the torrent client isn’t able to connect to peers. In other words, when the download gets stuck on 0.0 peers. There are a few reasons this happens, so each requires a specific solution.

utorrent connecting to peers 0.0 fix

The methods described in this article solve various issues, starting from the most spread to the least likely. That’s why you need to start applying them one by one until you find the fix.

Method 1: Check Firewall and Allow Port Mapping

Checking the firewall will ensure that nothing is blocking ingoing and outgoing traffic. Port mapping or forwarding can solve this problem. Just access the “Preferences” window in your uTorrent program, click “Connection,” and check all boxes except “Randomize” under the “Listening port” section.

uTorrent Connecting to Peers 0.0 Fix

Method 2: Run a test in uTorrent settings

The next source of the 0.0 peers issue could come from network configuration. The solution lies in the uTorrent Setup Guide. Access the window via Options > Setup Guide, mark the checkboxes near “Bandwidth” and “Network,” and click the “Run tests” button. This process will recommend changes to the system configuration. Click “Save and Close” to keep the results.

uTorrent Connecting to Peers 0.0 Fix

Method 3: Hide traffic from uTorrent

Your internet provider might have a specific attitude towards torrent file-sharing, blocking any peer-to-peer connection. A way around this issue is using BitTorrent protocol encryption. You can do that by accessing Options > Preferences > BitTorrent. Under the “Protocol Encryption” section, select “Enabled” from the drop-down menu and click “Ok.”

uTorrent Connecting to Peers 0.0 Fix

Method 4: Check your VPN server

If you’re using a VPN, the server might cause your problem. If all else fails, change the location you’re using and connect to a torrent-friendly one.

uTorrent Connecting to Peers 0.0 Fix

Other reasons

The torrent file having no seeds (being dead) or the torrent client being blocked might also create issues. If nothing works, search and download another torrent file or start using another torrent client.

How to Uninstall Utorrent on Mac in 5 Simple Steps

uTorrent is one of the most popular and reliable BitTorrent clients you can find and enables you to download torrent files on your Windows and Mac computers simply. If your version of uTorrent is giving you problems, you may need to uninstall and reinstall it. Or perhaps you don’t need the app anymore and would like to uninstall it to free up space. How would you do this on Mac?

How to Uninstall uTorrent on Mac

Step 1: Drag uTorrent to the Trash Folder

Drag uTorrent from your ‘Applications’ folder to the ‘Trash’ located in the dock.

How to Uninstall Utorrent on Mac in 5 Simple Steps

Step 2: Open the Finder

In the top menu bar, click on ‘Go’, and from the drop-down list, choose ‘Go to Folder’.

How to Uninstall Utorrent on Mac in 5 Simple Steps

Step 3: Search for the Library

Search for the library by typing /Library/ into the search bar.

How to Uninstall Utorrent on Mac in 5 Simple Steps

Step 4: Search for Any Folder or Files With uTorrent in the Name

Search for any files or folders with the word uTorrent as the title. Drag all of these folders and files into the trash in the dock. You need to search all the following folders within the Library folder: Caches, Preferences, Application Support, Launch Agents, Launch Daemons, Preference Panes and Startup Items.

How to Uninstall Utorrent on Mac in 5 Simple Steps

Step 5: Empty Trash Can

Now you need to empty the trash can to complete the uninstallation. Right-click on the trash can in the dock. From the drop-down list, click on ‘Empty Trash’. It’s important to note that once you empty the trash, there is no way of reversing your choice. So, you must be 100% sure that you want to erase all of the files from the trash can completely.

For best results, we recommend restarting your Mac once you remove all the items from the trash.

How to Uninstall Utorrent on Mac in 5 Simple Steps

Bye, Bye uTorrent

The above steps will help you to uninstall uTorrent on your Mac completely. Unfortunately, it’s not as simple as only moving the app to the trash as that only removes the executable file and not all the app components. That is why you would need to manually search for the other uTorrent files to delete the program entirely.

How to Use MSI Afterburner in 7 Exciting Ways

If you want to make the most of your chipset or graphics card, MSI Afterburner has amazing overclocking features. There are also many other functions it provides, all in an effort to help you get the best performance. While it was initially designed for MSI cards, you can now use it on most brands.

How to use MSI Afterburner

Method 1: Overclocking

Overclocking is a risky business, as you can burn out your hardware. MSI Afterburner lets you adjust several settings while ensuring your computer’s components remain safe. There’s also a new OC Scanner that determines what the best performance could be.

How to Use MSI Afterburner

Method 2: Monitoring

Besides pushing your device to its limits, MSI Afterburner also monitors what the current performance is. You can check the memory, GPU temperature, core clocking speed, voltage, and FPS. 

How to Use MSI Afterburner

Method 3: Benchmarking

MSI Afterburner has an internal stress tester called Kombustor. It assesses thermal performance with system stability to measure performance over a set period. As a final treat, it lets you see how specific tweaks will affect the overall output.

How to Use MSI Afterburner

Method 4:  Custom Profiles

You want to ensure that your graphics cards have sufficient heat distribution to avoid burning them out. To this end, you can create custom profiles for each fan, which MSI Afterburner measures against a curveball. It will decrease and increase speeds based on temperatures for each one.

How to Use MSI Afterburner

Method 5: Video Capture

You won’t need to download a separate program to capture your favorite gaming moments. As an extra feature, MSI Afterburner’s Predator tool lets you record your screen as you play. You can save it as a AVI or WMI file, while it also works with the H.264 codec.

How to Use MSI Afterburner

Method 6: Customized Skins 

If you don’t like the standard MSI Afterburner skin, you can choose from a wide variety. What’s more, it also offers game skins for numerous titles.

How to Use MSI Afterburner

Method 7: FPS Counter

Finally, MSI Afterburner provides an in-game counter to see who well the frame rate is performing as well as other useful information. You can enjoy your game while making sure everything is running properly.

How to Use MSI Afterburner

Give your PC the boost it needs!

As you can see, using MSI Afterburner provides an exciting experience for PC users, specifically gamers. It lets you boost system performance without damaging any parts.

How to Delete WhatsApp Group in 3 Easy Steps

The turmoil around WhatsApp and Facebook at the end of 2020 have caused a migration from the messaging app into safer spaces like Signal and Telegram both on Android and iOS. Whether you’re one of those people who want to delete all their traces from the app or do a little spring cleaning around the annoying group chats, we’re here to help. 

Whatsapp for Windows FREE DOWNLOAD
8

How to Delete WhatsApp Group

If you’re just a member, simply leaving it and removing a group from your chats will do the trick. This article shows exact steps to delete one you created or were granted admin rights for.

Step 1: Remove participants

You should start the deletion process by removing all the participants from the chat. Go over all the members one by one, tap on the name and click “Remove.” We know this might be tedious, but it’s the only way.

How to Delete WhatsApp Group in 3 Easy Steps

Step 2: Exit the group

When only you are left, tap the chat name on the top of the screen, scroll down, find the “Exit group,” and tap it. Another way is to tap-and-hold the name and choose the same option from there.

How to Delete WhatsApp Group in 3 Easy Steps

Step 3: Delete the group

The last thing to do is access the group settings using one of the methods described above and choose “Delete.”

How to Delete WhatsApp Group in 3 Easy Steps

What to do with the chat media?

Depending on your decision to keep or remove all the pictures and videos from your device, you can either check or uncheck the “Delete media in this chat” option. 

How to Log Out of WhatsApp in 4 Easy Steps

WhatsApp is a handy communications app for Android and iPhone devices that allows you to send messages, voice notes or even call people. There are desktop versions available for Windows and Mac so you can keep track of your messages conveniently from any device. But what if you need to log out of WhatsApp? 

How to Log Out of Whatsapp

There is no simple way to just log out of WhatsApp on a mobile device as the app doesn’t allow for it. Let’s look at what you need to do on your mobile device to log out.

Step 1: Open ‘Settings’ in WhatsApp and Tap on ‘Chats’

Launch WhatsApp on your mobile device and go to settings by tapping on the three dots symbol, then tap on ‘Chats’ to open the menu.

How to Log Out of WhatsApp in 4 Easy Steps

Step 2: Backup Your Chats

Tap on the ‘Backup’ option and then choose to back up all of your chats. This is an critical step so that you don’t lose valuable information when logging out of WhatsApp.

How to Log Out of WhatsApp in 4 Easy Steps

Step 3: Adjust ‘Settings’ on Your Phone

On your Android, open the ‘Settings’ menu on your phone. Once in the settings menu, navigate to ‘Apps’ and tap on it. Look for WhatsApp in the menu and tap on it. Next, tap on Storage.

Step 4: Tap on ‘Clear Data’

Now tap on the ‘Clear Data’ option and confirm your choice and effectively log out of WhatsApp on your Android device.

Until We Meet Again

It can be confusing to log out of WhatsApp on your mobile device as there is no clear option for it. But the process remains a simple one if a rather roundabout way of doing it. And since you backed up your data, you can be back in action whenever you decide to rejoin WhatsApp.