How to solve the “macOS could not be installed” failure

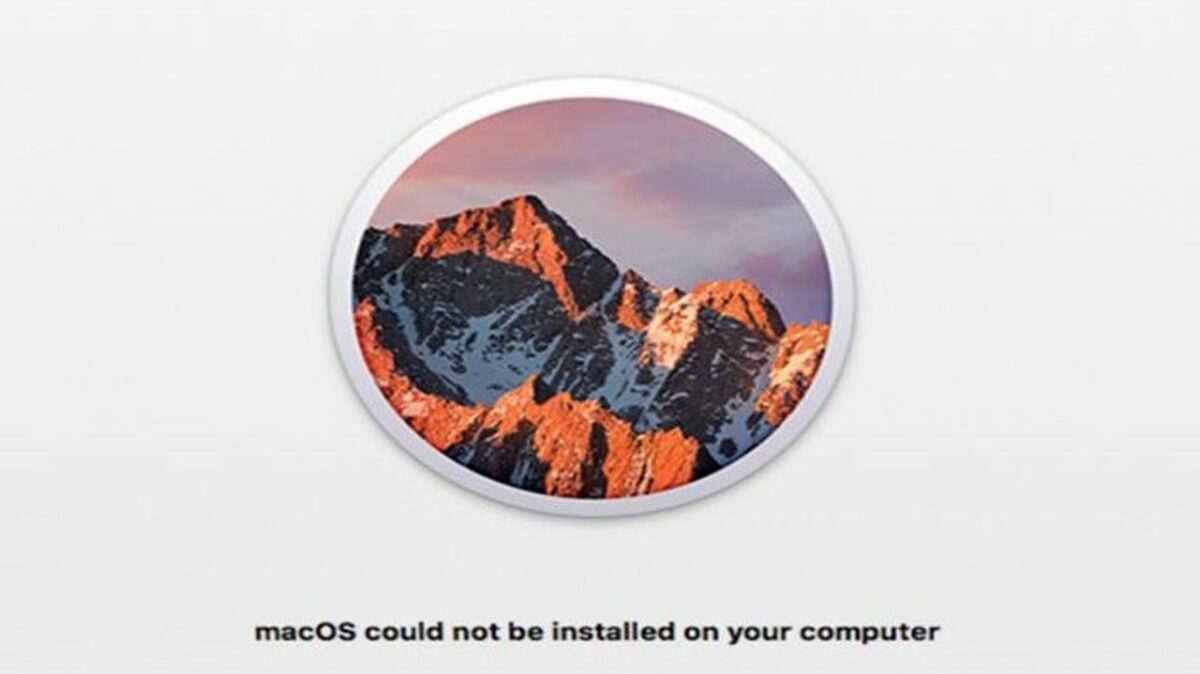
It’s definitely stressful to see a giant Mac install failed error message flashing when you turn on your computer. However, there’s no need to panic. Error codes like the “macOS could not be installed on your computer” just mean something went a little wrong during your macOS Monterey update or installation.

macOS Monterey Download

Fixing an error when installing macOS is typically as simple as doing a little troubleshooting. Follow these steps to identify the installation failed mac OS problem and figure out how to fix it.

  1. Restart your computer

    A Mac screen asks the user to confirm a restart

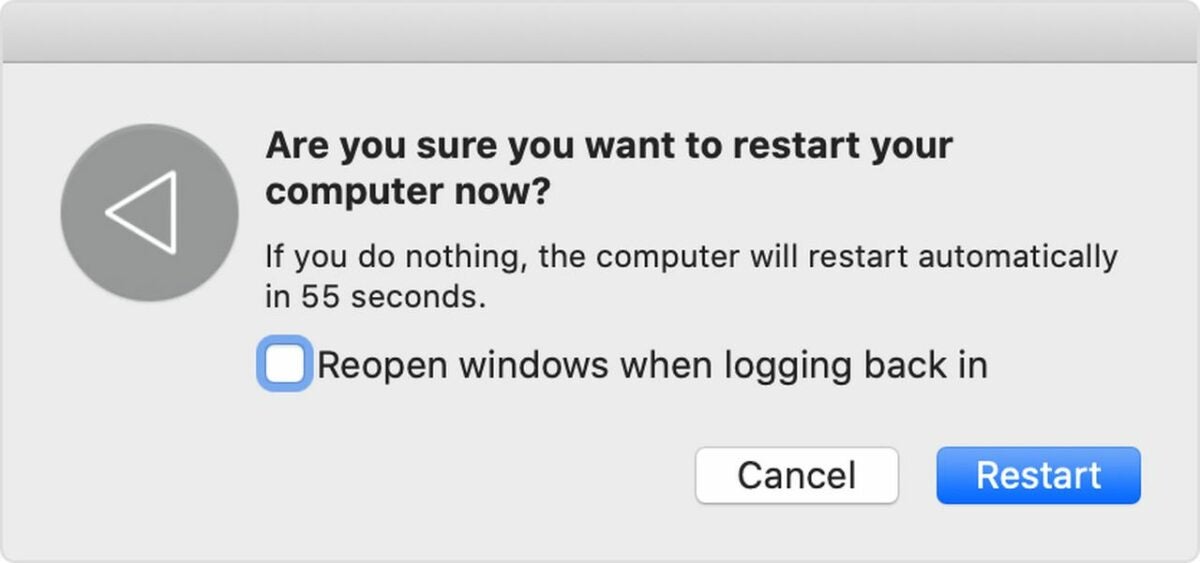
    Any time you get an error when installing macOS, the first thing you should do is restart your computer. In the majority of cases, restarting allows the installer to try again and correctly install the OS.

    Restarting the computer is usually as simple as clicking the Restart button at the bottom of the error screen or using the normal power menu restart option. When your computer won’t let you try either of these options, press and hold the power button to manually restart.

  2. Launch safe mode on your computer

    A Mac keyboard with a circle on the shift key

    The “macOS could not be installed” error often prevents you from restarting your computer normally. To get around this problem, start your computer in safe mode.

    Do this by pressing and holding the Shift key while the computer powers on. Holding Shift until the login window appears will launch safe mode. This gives you a chance to tinker around with settings without installation attempts getting in your way.

  3. Check to see if you have enough storage

    Use storage management to clear space

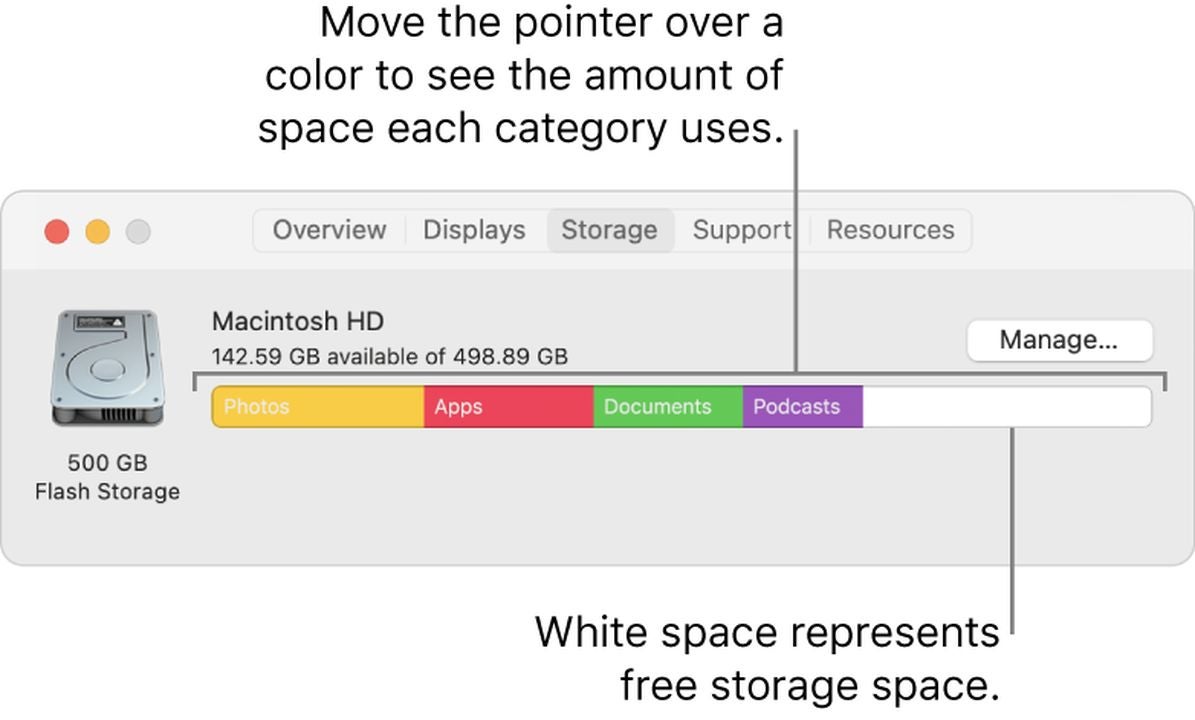
    One of the most common reasons for an installation failed Mac OS error is a lack of hard drive space. If your computer can’t fully download the new OS version, it can’t install it properly.

    Most users need around 20GB of free storage. To check the space on your computer, open the Apple menu, click About This Mac and then Storage. If necessary, use the Manage Storage function to clear space.

  4. Make sure your computer’s time and date are correct

    A Mac screen displays the date and time

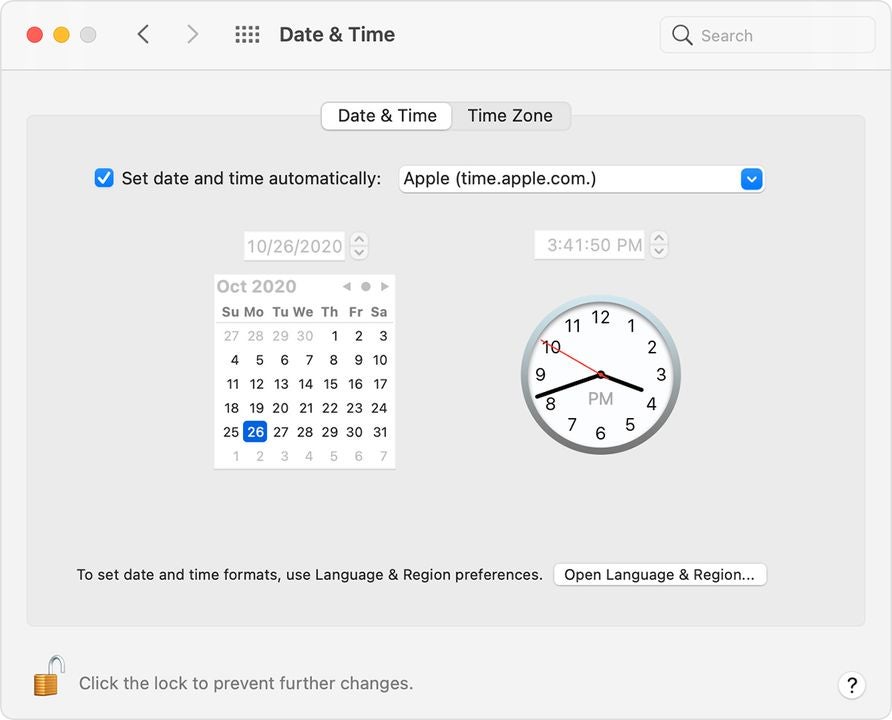
    Due to the way Mac designs their OS, it’s necessary for your computer to have the correct date and time. If your computer is using a time or date that doesn’t match reality, the contradiction gets in the way of the installation.

    Go to System Preferences and select the Date & Time option. Then click the Set date and time automatically option to bring your computer up to sync with local time.

  5. Download a fresh copy of your macOS installer

    A pink and purple macOS Monterey icon on a white background

    Many errors when installing macOS are due to a corrupt installer. If basic fixes aren’t working, go ahead and delete your installer. Once you get rid of the possibly-corrupt files, download a new copy.

    Depending on the OS you prefer, download from Apple’s website or the Apple App Store. Give the new copy a try. If it still won’t install, this indicates the problem is with the computer itself.

  6. Clear NVRAM and PRAM

    A Mac keyboard with several keys circled

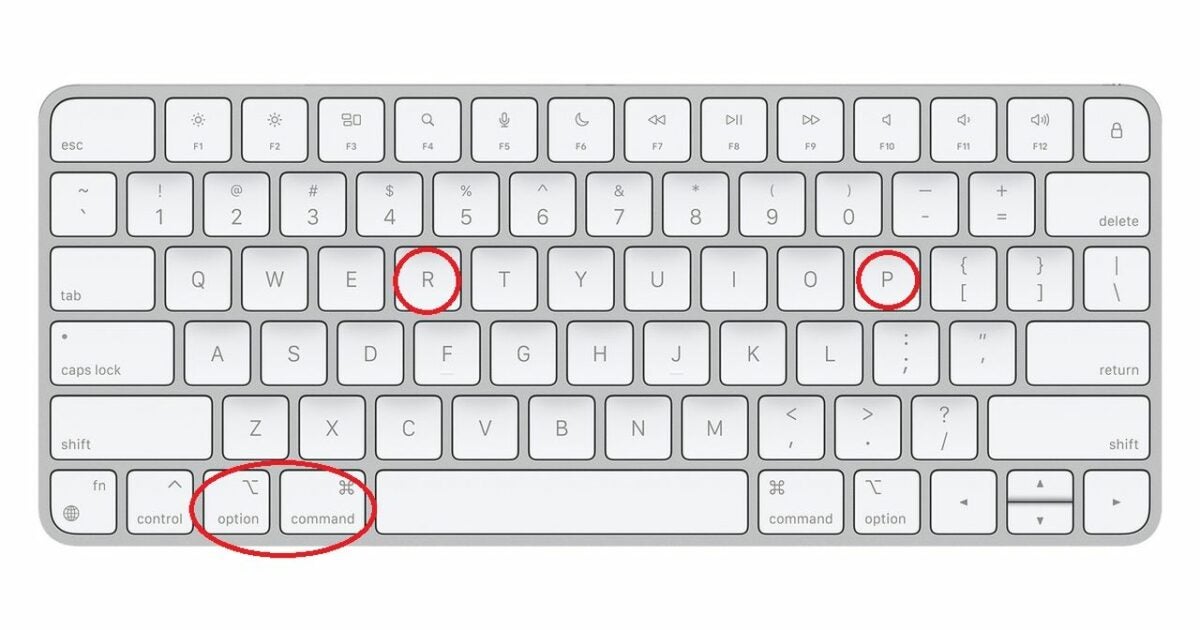
    The NVRAM and PRAM are the part of your computer that stores things like volume settings. Resetting them will get rid of any little issues that are causing the “Mac install failed” error.

    To do this, restart the Mac while holding the Option, CMD, P and R keys. The computer will make a second startup noise to let you know the NVRAM and PRAM are reset.

  7. Restore your computer from a backup drive

    Mac's Time Machine feature displays backup options

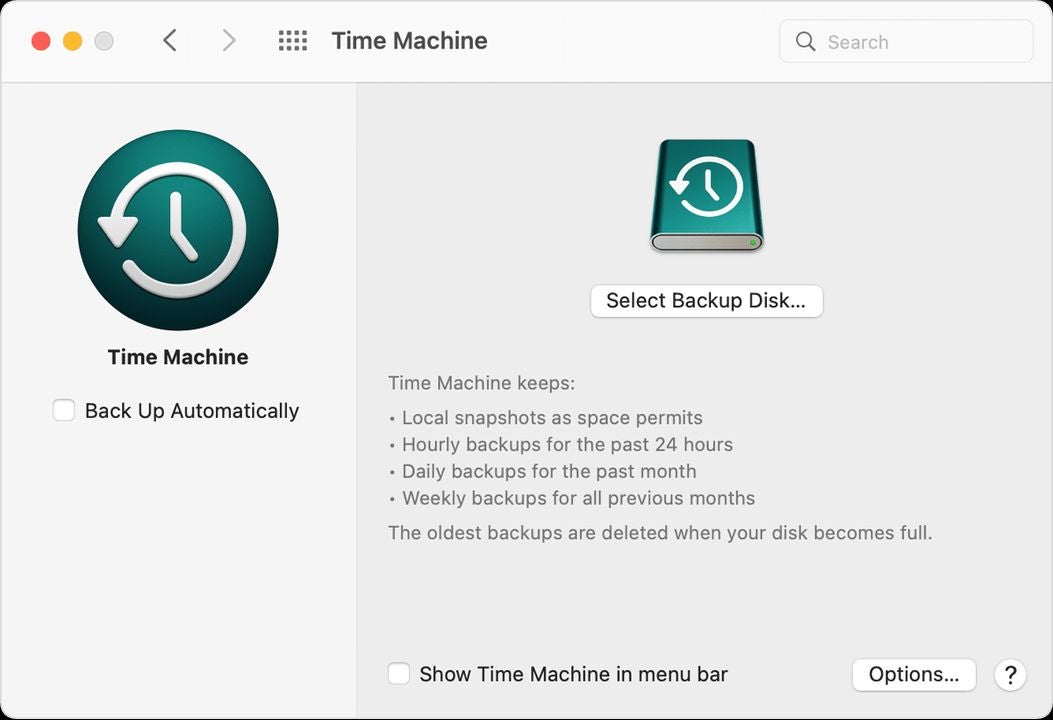
    Hopefully, you use Time Machine to regularly back up your computer. If not, make sure you upload all essential data to another storage device, because this technique will erase all pictures, documents, and other files.

    Once your data is secure, launch Recovery Mode on your computer. Select an earlier version of your computer and try installing macOS from there. This helps you work around recent errors and restore your computer to a functional version.

Final thoughts on troubleshooting Mac errors

By taking a few simple steps to tweak your settings, it’s usually possible to get your computer running again. Have more questions about troubleshooting the macOS? Check out our guide on how to fix lagging Mac apps.

How to create a pivot table in Excel

At a glance, Microsoft Excel often seems very simple. However, there are a lot of hidden tips and tricks that make this program very versatile. A pivot table in Excel is one of the most powerful techniques to know about. Once you understand how a pivot table on Excel works, you are able to easily analyze, sort, and summarize huge amounts of data.

Microsoft Excel Download

Ready to give it a try? Check out our pivot table how-to guide to learn all the details.

  1. Enter your basic data to get started

    Build your base table

    The first step in any pivot table how-to is entering your data. The method of entry will depend on your situation. Some users will simply type all their data in manually. If you have an existing document, you also have the option of using the File and Open tabs to upload a document. For ease of use, ensure the first row or column of your data has labels that explain what the data is. For example, if you’re tracking employee sales at your pizza restaurant, make sure you have an “Employee name” label above where you list each name.

  2. Highlight your cells and open the pivot table creation box

    Create your pivot table

    Use your mouse or keyboard keys to highlight the complete range of cells you want to turn into a pivot table. Then go to the Insert tab at the top of the page and click the PivotTable icon. This opens up a whole option box on the side of your Excel document. Your first option will be to create your own custom pivot table with all your own desired parameters. However, scrolling down will show a whole list of recommended pivot tables. They aren’t always useful, but it’s worthwhile to check them out. There’s a chance the recommended pivot table will have everything you need.

    Whatever option you choose, you’ll be able to pick between launching your new table on your current sheet or on a new sheet.

  3. Choose how you want your data arranged

    Drag fields to arrange your data

    Once you create the pivot table, you have many different ways of looking at your data. You’re able to select one of your labeled fields as either the new column or row label by dragging the label to the Rows or Columns section. Another very helpful arrangement is dragging your fields into the Values section. This allows you to count and summarize large amounts of data. For example, dragging “Employee” into the Rows section and “Pizza” into the Values section tells you how many pizzas each employee sold.

  4. Alter settings to get even more nuanced pivot tables in Excel

    Adjust settings to perform other calculations

    The Values section is one of the most useful parts of a pivot table in Excel. Once you drag and drop a field into the values area, you have the option of hovering over the field and clicking a drop-down menu. Selecting the Value Field Settings allows you to adjust how your data is calculated. Excel defaults to adding your numbers together, but it will also perform other calculations. It will do things like rank from largest to smallest. So for our pizza example, we would use the settings to find the average amount each employee makes for each sale.

  5. Learn how to navigate between various types of pivot tables in Excel

    Incorporate pivot tables into your document

    Once you’ve figured out the basics of creating a pivot table in Excel, the only thing left to do is integrate it into the rest of your spreadsheet. You are able to close the pivot table option box by clicking on any blank cell or reopen it by clicking on the existing pivot table. Excel always saves all data associated with that table, so you have the option of going back to the table and adjusting it to show previously hidden data. You also have the option of adding multiple pivot tables to a single document or adding plain data to another area of the document.

Final thoughts on Excel pivot tables

Ultimately, when it comes to pivot tables in Excel, your options are almost endless. Now that our pivot table Excel tutorial has explained the essentials, we suggest playing around with Excel yourself. You’ll find that there are countless interesting applications for a pivot table in Excel. We also have plenty of fantastic Excel tutorials, so check them out if you have any other questions about working with the program.

How to level up your creatures with Temtem training

In Temtem, your creature’s stats make a huge difference to combat outcomes. The right stats let you easily destroy your opponents and complete quests. Every Temtem comes with a base set of stats you can’t change. However, each creature also has Temtem training values. Called TVs for short, these adjustable stats add bonuses to things like health and stamina.

Temtem DOWNLOAD

Want to level up your Temtem? You’ll need to know things like the best Temtem training courses. Keep reading to get our insider tips on Temtem training.

  1. Plan your stat adjustments

    Analyzing a set of stats in Temtem.

    Keep in mind that you can’t max out every stat for every Temtem. Instead, you are only able to earn a maximum of 1,000 TVs, and the max TV level for each stat is 500. It’s also important to know that every TV doesn’t create an immediate jump in stats. At higher stat levels, it may take five or six TVs to see a single stat point boost. So before you start, you’ll benefit from using a Temtem TV calculator to see how a proposed TV allocation will affect your stats. Plan carefully to avoid wasting TV on unnecessary stats.

    Some people like to use TVs to make up for defects in base stats. For example, if you had a Zaobian with fantastic Hit Points and Stamina but wimpy Special Defense (SPDEF), maxing out SPDEF TVs would create a well-balanced Temtem. Another option is carefully focusing on certain stats like Speed and Attack to make a Temtem that suits your unique play style. Whatever your preference, most players find that Attack, Hit Points, Stamina, and Defense are the TVs to prioritize.

  2. Raise your TVs with certain foods

    Buying food to boost TVs in Temtem.

    The simplest and most straightforward way of increasing Temtem Training Values is with special items. You feed your creatures candies, fruits, and smoothies, and they decrease or increase TVs. How do you get these helpful items? All you need to do is go to the FreshFruit Candy Stand, the Mokupuni Fruit Co-op, or Smerelda’s Smoothie Shop. The shops have an unlimited supply of TV-increasing food to feed your Temtem. This process is easy, but it’s pricey. It costs between 9,000 to 25,000 Pansuns to max out a single stat.

  3. Find the best places to train

    Finding a new location to train in Temtem.

    You are also able to gain TV by defeating other Temtem. Each creature has its own specific type of TV that it drops. Therefore, for each stat you want to raise, you’ll need to find Temtem training courses with a lot of creatures to fight. The right Temtem TV training locations will depend on which stat you want to boost. Here are some of the best spots to go for each Temtem TV stat.

    – Points (HP): Visit the cliff near the Airship Terminal in Iwaba and look around Pasiphae’s house in Sillaro River for Scarawatt and Saipat.

    – Stamina (STA): Go to the grassy cliff near Nuru Lodge in Jino Gap to battle Tateru.

    – Speed (SPD): Search for Mushi & Orphyll in the circular grass patch near the Wreck of the Narwhal in the Corrupted Badlands.

    – Attack (ATK): Mac Aed’s Crags has a grassy plain to the north of the Properton bridge. This is a great spot to farm Mitty.

    – Defense (DEF): For DEF, look for Lapinite on the pathways near Ocelotl’s home in the Mines of Mictlan.

    – Special Attack (SPATK): Visit the north part of the Xolotl Reservoir to find Toxolotl.

    – Special Defense (SPDEF): Fomu is a good Tem to look for when you need SPDEF. They’re often near the Mini-Temporium by the Sillaro River.


  4. Earn TVs faster with special equipment

    Using Temtem items to enhance your TV gains.

    Before you go out hunting at Temtem TV training locations, stock up on special equipment. There are several types of gear that increase the amount of TV gain you get from a single fight. Consider getting a Coward’s Cloak to equip weaker creatures. This gear lets them gain TVs without having to actually go on the battlefield. Another useful option is Proteins. This gear lets the holder double the amount of TV they gain.

Strategizing pays off in Temtem

With a little strategizing and a bit of grinding, it’s possible to create some truly fantastic Temtem creatures. The time spent battling for TVs or earning money to buy fruit and candy is definitely worth it. Want to learn more about succeeding at Temtem? Check out our tips for starting in Temtem to get details on winning battles, selecting starters, completing quests, and more.

6 things you need to know before starting Temtem

If you love collecting rare creatures and battling against rival tamers, Temtem is the RPG for you. Succeeding requires more than just looking up a Temtem tier list and having experience with similar games like Pokemon. Temtem has some unique mechanics that set it apart from other creature battling games, so it pays to do some research before you start.

Temtem Download

Keep reading our Temtem starter guide to discover the basics of playing Temtem and learn a few pro tips for starting the game.

Choose a starter that matches your playstyle

Much like Pokemon, one of the first things you’ll do in Temtem is pick between three starters. However, don’t make the mistake of just picking the cutest one. Each starter has different stats that suit different playstyles. Crystle is a solid choice if you play defensively, while Houchic is a great pick if you prefer to go on the offense. If you want a balanced blend of offense and defense, go with Smazee. A properly leveled-up starter can end up ranking fairly high on Temtem tier lists.

Pick from three starters

Catch as many Temtem as you can

In Temtem, your team is more important than any single individual creature. Battles are typically two against two, and you can swap your Temtem during battle to bring stronger creatures into play. If you don’t want to get stuck in a situation where your Temtems are all weak to your opponent’s Temtem types, you need as varied of a roster as possible.

Having more creatures makes battles easier

Research the Temtem creature types

It pays to be fully informed on how Temtem creatures work. First of all, each creature has its own bonus type and debuffs when fighting specific other types. Secondly, each creature has its own special attacks that give it the upper hand in a fight. Looking at some in-depth Temtem starter guides is helpful, but you at least need to know these basics:

  • Fire: Strong against nature and crystal; weak against water and earth
  • Water: Strong against fire, earth, and digital; weak against nature and toxic
  • Earth: Strong against fire, electric, and crystal; weak against water and nature
  • Crystal: Strong against electric and mental; weak against fire and earth
  • Mental: Strong against neutral and melee; weak against crystal
  • Melee: Strong against electric and mental; weak against fire and earth
Make sure to research creature stats

Always heal before moving and stock up on Balm

Due to the way Temtem encounters are designed, you should always heal before moving. Why is this so important? After each battle, any move could immediately put you into contact with your next opponent. To make sure you’re at maximum health for any encounters, heal up before you start moving. There are a few different options for healing, including visiting Temporiums and buying Balms. Balms are one of the best things to spend your money on in the early stages of the game. Unlike many other healing methods, they’re very portable.

Save up lots of healing items

Succeed at battle with these tips and tricks

In every Temtem battle, there will be a lot of action happening on screen at once. Understanding what all the colors and icons mean can help you win. First, take a look at the attack moves and status effects. Gray ones mean you have to wait for a few turns before using them and hovering over a move will tell you how much stamina it uses. You should also pay attention to attack circle colors. If the attack is red, it means the Temtem is resistant to that type of move.

The battle screen provides lots of info

Use items to make the game easier

Temtem is filled with special items, and it’s worthwhile to hunt these things down because they make gameplay a lot easier. For example, you can pick up Smoke Bombs in Brical de Mar and use them to fast travel. Another must-have item is the Coward’s Cloak. This quest reward from Arissola makes it faster to level up wild-caught Temtem.

Search for rare items in out-of-the-way spots

Final thoughts

These tips will help you explore the world of Temtem without constantly getting destroyed by opponents. By taking the time to strategize, you can set yourself up in a good position for higher-level quests. Interested in other similar games? Explore our top monster-catching games for Android.

How to use LEGO Digital Designer 4.3.12

If you enjoy building virtual LEGO creations, LEGO Digital Designer (LDD) is a powerful program. Though the LEGO Digital Designer 4.3.12 update marks the end of official LEGO support, it still has a lot of devoted fans. The simpler interface and rendering tools make it a classic for old-school LEGO fans.

Despite seeming like a more basic version of Bricklinks Studio, LDD does pack a lot of tools into a seemingly-simple program. When working with Digital LEGO Designer, you’ll need our helpful user guide to figure out all the features.

Lego Digital Designer Download
  1. Learn the basics of LEGO Digital Designer

    Explore the homepage.

    When you first open the program, take a moment to look around at the home page. Select the yellow file folder icon in the lower, right-hand corner to upload a saved file, or click the white blank page icon to start a new build. Most of the home page is taken up with a 3D grid that is your build space. This is where you’ll place your virtual LEGOs, and it lets you zoom in, zoom out, or adjust the size.

    Next, look at the menu on the upper left-hand side. You’ll have options like saving your build and undoing and redoing steps. The Bricks tab will let you select various bricks to build with while the Templates tab lets you input helpful, pre-made templates.

  2. Find the perfect bricks for your build

    Find the perfect bricks for your projects.

    The brick library is the heart and soul of the Digital LEGO Designer. Located on the left half of the screen, it starts with common shapes like rectangles and cylinders. Clicking the plus symbol lets you view a variety of pieces in that shape category. You also have the option of using the search bar to look for a piece based on either the keyword or the LEGO ID number.

    To select the right size, you just hover over the brick to see its length and width. Placing bricks is as simple as clicking on your choice once and, then, clicking the spot you want the brick to go to. When searching for bricks, you have the option of filtering by color before placing, or you are able to pick a color after placing the brick.

  3. Explore all the helpful LDD functions

    The Paint function lets you choose colors.

    Once you get the hang of selecting and placing bricks, it’s time to start building anything you want. Technically, you don’t need to know anything else. However, there are a lot of useful little functions that make your builds easier. You access these functions from the toolbar at the top of the page. Another option is using the keyboard shortcuts, which are the same whether you have LEGO Digital Designer for iPad or Windows.

    • Delete (D): Remove a selected brick.
    • Selection (V): Use this tool to select a single brick within your screen.
    • Clone (C): Make an instant copy of your previously selected brick.
    • Paint (B): Change the color of your selected brick to your desired color.
    • Hinge (H): Rotate a brick that’s connected with a single-stud connector or hinge.
    • Hinge Align (H+shift): Connect two selected bricks with a single connector
    • Hide (L): Temporarily hide a brick without removing it, which makes it easier to build underneath or behind the blocking brick.
  4. Make big builds easier by using the groups tab

    Use the Groups tab for easier builds

    The Groups tab often gets overlooked, but it’s essential to managing big builds. With this tab, you are able to group highlighted parts of a build together. Once your group is defined, you are able to move it around or copy and paste the same group multiple times. You even have the option of adding previous groups to a new file with the File > Import command.

    This adds a lot of exciting applications to Digital LEGO Designer. For example, if you’re building a castle, you are able to create a group with all the bricks needed for a castle turret. Then, the group function lets you set the turret aside, build four different towers, and top each one with identical turrets.

Final thoughts

We hope these tips will make it easy to explore all the neat features within LEGO Digital Designer 4.3.12. By taking the time to tinker around with all the tools and settings, you are able to build some really unique LEGO creations. Give the program a try, and let us know what you think of it in the comment section below! For extra fun with LEGO, download the LEGO Movie Videogame.

Making stickers on Canva in 5 easy steps

Did you know Canva lets you design and print your own custom stickers? With Canva original stickers, you’re able to do everything from labeling food to marketing your small business. Though making stickers on Canva isn’t super complex, it does take a little time to learn how to use the program. Don’t worry, though. Once you get the hang of things, the process is simple.

Discover Canva DOWNLOAD

If you’re interested in learning how to make a sticker on Canva, all you need to do is follow these steps.

  1. Launch the Canva program

    Launch the sticker design program

    Start by launching Canva. Canva does have a free website version you are able to use for basic designs. However, we find it a little easier to use the downloadable version when making stickers. It has more features than the base website. You have the option of launching the program from your desktop or using the app version of it. To enter the sticker design area, click the Design tab and select Stickers from the drop-down menu.

  2. Explore the Canva templates

    Pick a premade template

    Most users start by looking at Canva templates. You are able to filter these templates based on things like size, style, theme, and shape. The great thing about the templates is that they’re perfectly sized for printing. When you work with a template, it guarantees the end results look fantastic. Even if you want original stickers, looking at templates is often a great place to start. Canva lets you adjust a template’s colors and various design elements. Even if you start with a very commonplace template, you are able to customize it to create something unique.

  3. Create your own unique design

    Create your own custom design

    Canva also gives you the option of designing from scratch. You begin by choosing a base shape, like Canva circle stickers, and then adding your own design. Canva allows you to customize everything from color to text to style. Check the “Elements” tab on the right to find a variety of cute graphics and basic shapes and lines. You have the option of using the basic lines and shapes to draw custom art if you don’t see any graphics you like. For example, you could create a pig by combining a few pink circles, triangles, and dots.

    Canva also allows you to upload photos, generate QR codes, and add interesting borders to the edge of your sticker sheet.

  4. Get to know the Canva interface

    Find many ways to edit your design with shortcuts

    Canva lets you shape and position elements however you want, so take some time to explore the interface. Clicking on an individual element opens up a menu where you are able to do things like orient an element to the middle, lock an element in place or adjust transparency. The Position option makes it easy to put an element in front of or behind other design elements. When working with Canva, don’t forget about helpful keyboard shortcuts that allow you to adjust things quickly.

    • Shift + arrow keys: Move an element 10 pixels in your selected direction
    • Esc: Deselect an element
    • Ctrl/Cmd + C: Copy an element or text box
    • Ctrl/Cmd + V: Paste an element or text box
    • Ctrl/Cmd + Z: Undo an action
    • Ctrl/Cmd + Z + Shift: Redo an action
    • Ctrl/Cmd + G: Group elements together
    • Ctrl/Cmd + D: Duplicate an element
    • Shift + click: Resize an element proportionally
  5. Print your stickers

    Order printed stickers directly from Canva

    When you’re satisfied with your sticker shape, it’s time to print. You have a few different printing options. If you have a printer at home that works with sticker paper, download your Canva design. Make sure you carefully select the download size so that you get a design that works with your intended sticker design. You also have the option to let Canva deal with the printing for you. Look in the upper right corner for the Print Stickers button. This lets you order stickers straight from Canva. You select your size, finish, and sticker count, and Canva will ship the finished product straight to you.

Enjoy a variety of techniques for making stickers

Ultimately, making stickers on Canva is a fun way to design the perfect sticker for your situation. The process is as simple or as complex as you want. Some people like to design Canva original stickers from scratch while others add their own text to a premade template. Either way, you’re sure to get great results. Ready to make your own awesome stickers? Download the Canva app now or explore our blog for more graphic design topics.

How to use iCloud Passwords in 5 steps

Apple makes it easy to use your iCloud passwords in Chrome. All you need to do is download the iCloud Passwords extension. This helpful add-on lets you browse online without having to remember tons of passwords.

iCloud Passwords DOWNLOAD

To start using the same passwords for Apple and Windows, just follow these steps.

  1. Verify your identity in the extension

    Enable your account on Chrome

    To use the extension, you’ll need to start by enabling its connection to your iCloud account. Look in the toolbar for a small gray and white icon. Click this icon to open a pop-up window asking for your Apple verification code. iCloud Keychain will then send you a six-digit verification code you’ll need to enter in the browser.

  2. Access your saved passwords through Chrome

    Use any saved password

    If you plan on visiting a website with a password already stored in your iCloud account, the process is simple. Go to the website and begin to log in normally. When it is time to enter your password, click on the iCloud passwords button in your browser toolbar. Select the account you want to log in with, and it will automatically fill in your password. You can use this process to fill in both saved passwords and verification codes.

  3. Update your existing passwords as needed

    Update your old passwords

    In some cases, there’s a chance that the password stored in iCloud is outdated. In these cases, you’ll need to update your password before logging in. To do this, start by visiting the website and entering your account name. When it asks for your password, don’t use the iCloud Password extension. Instead, type your new password manually into the password box. The extension will create a pop-up asking if you want to save your new password. Clicking the Update Password option will automatically store your new password in iCloud.

  4. Enter new passwords into the iCloud Passwords extension

    Add new passwords to your account

    When you’re creating a new account, you can use the extension to automatically add it to your saved passwords. Select a username and password for your new account, and enter them into the page normally. Depending on the website, the extension may go ahead and ask you if you want to save the password. If it doesn’t, log out of the site and log back in with your new password. Click the Save Password button to store your new password in the iCloud.

  5. Use your saved passwords on Apple products

    View passwords from an Apple device

    The great thing about the iCloud extension is that it has backward compatibility. In addition to adding iCloud passwords to Chrome, it also updates your iCloud based on Chrome usage. You don’t even need to download any add-on to use the extension on Apple devices. When using an Apple device, you can use saved Chrome passwords just like you would use any other iCloud password.

14 must-have Chrome extensions for Tumblr

Tumblr’s certainly a fun way to explore online content, but the web browser can be a little limited. Fortunately, Chrome has a lot of great extensions that help you get the most out of your Tumblr experience. Explore our list now to find all the best Chrome extensions for Tumblr.

Google Chrome DOWNLOAD

Tumblr Savior

Tired of running into random topics you aren’t into? Tumblr Savior is a helpful way to customize the post you see. You can open the add-on’s settings to create a blacklist for specific keywords. There’s also a white list that lets you ensure topics you care about aren’t hidden behind the filter.

Tumblr Savior DOWNLOAD
Use the blacklist to hide posts

Tumblr Safe Mode Bypass

Tumbler’s automatic settings tend to flag a lot of content and hide it away behind a filter. This helpful extension helps you get around the error. It will automatically display items covered by the adult content or sensitive media warning.

Tumblr Safe Mode Bypass DOWNLOAD
Bypass safe mode

Download Tumblr Images

This extension makes it a lot simpler to download images you like on Tumblr. It also offers large resolution images you can’t otherwise access. To use it, you simply right-click on any image you like and select the download raw image option.

Download Tumblr images DOWNLOAD
Make it easier to download images

Post to Tumblr

This is Tumblr’s official extension, so you can guarantee it will always work with the site’s new updates. Post to Tumblr is one of the best Chrome extensions for bloggers because it lets you instantly add photos and articles to your Tumblr. If you come across something you like while browsing, you just click the Post button to add it to your blog.

Post To Tumblr DOWNLOAD
Post your favorite images with ease

Better Tumblr Video

Frustrated with Tumblr’s super loud or weirdly quiet videos? This extension replaces Tumblr’s very basic video player with a more refined version. Once you have the extension, you can control volume and fast-forward, rewind, or pause videos.

Better Tumblr Video DOWNLOAD
Adjust the volume on videos

Tumblr Collage

This extension is great for those who visit Tumblr for inspiration. Instead of having to scroll through a clunky list of images, the extension turns all the images into a collage. The extension’s very easy to use too. You just click a button at the top of the page to turn the collage setting on or off.

Tumblr Collage DOWNLOAD
Turn images into a collage

Tumblr Tag Copy

If you write a lot of tags on your post, this is the extension for you. It lets you automatically copy tags when making a post. Tag Copy works seamlessly with Tumblr’s current reblog system. You just click the tag copy button to copy the original tags into your reblogged post before you submit the post.

Tumblr Tag Copy DOWNLOAD
Copy tags with ease

Outbox for Tumblr

Have you ever run into issues because you answered an Ask but can’t remember what you said? This handy extension keeps track of all public and private answers you make. One of the great things about this extension is that it saves automatically, and you can view your saved outbox at any time by clicking the icon.

Outbox for Tumblr DOWNLOAD
Store all your asks

Tumblr Optimiser

If you’re a dedicated Tumblr user, you’ve probably noticed that your dash starts to lag after several minutes of scrolling. This extension aims to optimize Tumblr and reduce lag. It works by unloading images you’ve already viewed. Once you add this extension, it runs in the background and doesn’t require any input from you.

Tumblr Optimiser DOWNLOAD
Reduce loading times

Tumblr Load HiRes Images

When you come across a Tumblr image you love, this extension ensures you see it in high definition. The app removes Tumblr’s limits on an image’s size, so you can see its original version. To use this extension, just pick an image, right-click, and select the Open image in a new tab option. The extension will then automatically load the biggest size it can find.

Tumblr Load HiRes Images DOWNLOAD
Open high-res images

Old Tumblr Dashboard

Miss the look of the older version of Tumblr? This Tumblr Chrome extension brings back that nostalgic design. After you get this extension in place, you can reload Tumblr to view the original dashboard with its blue-gray screen, wider text box, and less saturated icons.

Old Tumblr Dashboard DOWNLOAD
Use the older dashboard version

Infinite Scroll Blocker

This helpful extension works on a variety of websites including Tumblr. It helps stop you from accidentally scrolling down the page. This extension lets you choose which sites the extension affects, so you can decide whether or not sites besides Tumblr should be affected.

Infinite Scroll Blocker DOWNLOAD
Avoid infinite scrolling

Tumbler Shimeji – Kagamine Rin

If you want a cute, quirky addition to your Tumblr dashboard, consider this virtual pet. When you enable this extension, a small Kagamine Rin mascot will move around your screen as you use Tumblr. The cute little icon will peek out from behind posts and dance along the top of images, and you can use your cursor to move her around the screen.

Tumblr Shimeji - Kagamine Rin DOWNLOAD
Get cute mascots

Tumblr – Tiled Dashboard

Browse Tumblr in a whole new way with this extension. The Chrome extension Tumblr dashboard creates a tiled page similar to Tumblr’s Explore page. Using this extension lets you see more posts at once. It makes it much quicker to see what all the people you follow are posting. This extension offers a settings page that you can use to adjust the number of posts displayed.

Tumblr - Tiled Dashboard DOWNLOAD
Get a tiled dashboard

Tennis Manager 2022 review: create a winning tennis season

Tennis Manager 2022 is an exciting new sports management game. Like Virtua Tennis 4 and Tennis World Tour, TM2 helps you get ready for the 2022 tennis season. However, it stands out from other tennis games because Tennis Manager lets you get a behind-the-scenes look at how the industry is run.

In this game, you’re the leader of an academy for tennis stars. In addition to selecting the right players for matches, you also handle the press, negotiate sponsorship deals, and even navigate your employees’ moods. The ultimate goal of the game is to run a successful tennis academy and gain prestige and profits.

Tennis Manager 2022 Download

Getting started with your first save

Character creation is fairly simple, but Tennis Manager 2022 does do a decent job of providing diversity. Characters get to choose from a variety of genders, ages, and races as they select their character. However, adult players will end up chuckling over the fact that most of the portrait options for “senior” managers look like people in their late 20s.

Tennis Manager 2022 also brings in more manager customization options than the previous version had. You are able to adjust your personality, management style, experience level, and abilities before starting the game. All of these have an impact on your later gameplay, so they’re fun to tinker with.

Customize your character

Choose from a variety of playing techniques

Tennis Manager 2022 is compatible with a lot of play styles. Those who just want to play around and have fun can choose to manage an existing academy. If you’re tired of the premade options, you can create your own academies and players. This gives you the opportunity to really micromanage your game and get involved in the details of tennis management.

The game easily adjusts to your desired difficulty. If you love the satisfaction of seeing an underdog win, you can choose to start with a few resources or talented players and gradually work your way to the top. Meanwhile, those who want a less frustrating experience can choose to start the game with top-tier players and a successful business.

Create your own unique academy

Tennis Manager 2022 gameplay

The bulk of Tennis Manager 2022 gameplay is making decisions for your academy. You start each day with a set of emails to open and a set of questions from your assistant. Depending on the day, you might be doing things like choosing a new player for your academy or designing a training regimen for your athletes.

Though much of Tennis Manager 2022 might involve looking at stats and numbers, you also get to enjoy plenty of personal interactions. Things like speaking at press conferences and talking to your players about their goals will give you the chance to test your charisma and charm. You’ll get to choose from multiple reply options that all have different outcomes.

The opportunity to negotiate player contracts also gives you opportunities to explore your creativity. You can tinker with equipment to help your players perform better, or you can pick outfits that you think look neat. A lot of this equipment is based on real-world brands, so you can see actual items you like in the virtual world of Tennis Manager 2022.

Your homepage lets you perform many actions

The soundtrack and graphics are mediocre

The soundtrack is loud and busy enough to be noticeable, but unfortunately, it’s not really pleasant to listen to. It won’t necessarily distract you from the game, but you’ll probably find yourself turning the volume down after a few minutes.

Graphics also tend to be fairly mid-range. The UI itself is clean, simple, and pleasant to look at, and it runs seamlessly on most computers. The game easily renders a variety of stats and equipment options. However, if you choose to watch your players play their games, you may notice that the computer-generated graphics look a little awkward.

Graphics during gameplay may look awkward

What you need to know about Tennis Manager 2022’s UI

The user interface manages to provide a lot of information while still being very simple to navigate. Your homepage is divided into tabs that give you access to things like player stats, academy staff overviews, financial objectives, and emails. There’s also a search function that lets you filter players based on things like play style and age.

The UI is certainly complex, but it’s not too overwhelming. The game includes a lot of tutorials and tips. Even if you’re new to sports management games, Tennis Manager 2022 makes it easy to understand what’s going on. And if you’re an old pro who doesn’t need any help, the game lets you turn off the tutorials and make your own choices.

The UI is busy but easy to understand

How long does the game last?

Tennis Manager 2022 is a fairly open-ended game. If you’re enjoying it, you will find yourself quickly racking up hours of playtime. Keep in mind that gameplay remains essentially the same no matter how long you play. There are no end-game objectives and no changes to mechanics.

Essentially, you just keep doing the day-to-day aspects of management while you constantly try to improve your academy. For those who truly love grinding and constantly optimizing your performance, this is an excellent experience. However, the consistency of the game is also its downfall. There aren’t many special events or big shake-ups in the league to look forward to.

The main goal is to win matches

Tennis Manager 2022 vs. Tennis Manager 2021

Of course, with any game that has so many releases, it’s important to consider whether the new version actually adds any new content. Even if you already have the 2021 version, Tennis Manager 2022 is definitely worth a buy. Tennis Manager 2022 keeps all the same promising features mentioned in Tennis Manager 2021 reviews, but it really fleshes out the gameplay.

There are a lot more customization options, and you get more frequent tasks like responding to emails and managing press conferences. Ultimately, Tennis Manager 2021 ends up feeling like the beta version of the game while Tennis Manager 2022 is the finished product.

The new version includes extra features

Final thoughts

Ultimately, if you love analyzing graphs and rows of statistics, this is the game for you. Sports management games aren’t for everyone, so TM2 might feel a little slow and overly detailed to those who prefer platformers or first-person shooters. However, Tennis Manager 2022 is an excellent example of the sports management genre.

The game is endlessly customizable and includes a lot of opportunities for fine-tuning details. Ready to give it a try yourself? Download the game now to start your own tennis academy or find more tennis action with Tennis World Tour.

PROS

  • Clear and helpful UI
  • Extensive customization opportunities
  • Deep focus on statistics and numbers
  • Funny dialogue and cute outfits

CONS

  • Clunky animation during tennis matches
  • Repetitive and uninteresting soundtrack
  • Lack of any unique end-game content

Developer: Rebound CG


Publisher: Rebound CG


Game Modes: Single-player


Game Engine: Unity Technologies 3D

How to use Netflix Plus in 5 steps

If you love watching Netflix but feel like the program doesn’t give you enough detail, try Netflix Plus. This handy Chrome extension adds IMDB ratings to all the Netflix titles.

Netflix Plus Download

Explore our guide to discover how to download it and what to do once you get it.

  1. Add Netflix Plus to your Chrome browser

    Click the blue

    Start by downloading Netflix Plus. Click the blue Add to Chrome button to add the extension to your browser. Make sure you read the app’s permissions and click Add extension to approve the extension.

  2. Reload your Netflix page

    Load your Netflix account

    Chrome extensions are meant to run seamlessly, so you don’t have to do any complicated downloads. All you’ll need to do is reload your Netflix page, and you should immediately be able to access all the benefits of Netflix Plus. Keep in mind that some of your other extensions might not play well with this extension though. If you don’t see the change right away, turn off all other extensions besides Netflix Plus. Though not technically necessary, it can also be helpful to relaunch your Chrome browser as well.

  3. Check IMDb ratings with ease

    See IMDb ratings

    Once you have Netflix loaded, it’s easy to get more information on movies and shows. As you scroll through the homepage, look below the name of the show. Next to the play button, there will be a small yellow IMDb logo with a number. This number tells you the IMDb rating for the movie or show. It can be a great way to learn what other watchers think about it.

  4. Watch trailers for the movie or show

    Watch trailers for movies and shows

    Netflix does have some trailers available, but sometimes, these do not really tell you what you need to know about the movie or show. In these cases, click the red YouTube logo below the Netflix title. This will automatically redirect you to a YouTube video trailer. This can help you see a little more about what the movie or show is about.

  5. Use Netflix Plus on any other computer

    Login to Chrome to access anywhere

    One of the great things about Chrome extensions is that they’re attached to your account, not your device. If you’re using another computer, you don’t have to add Netflix Plus all over again. Instead, you just need to login to your Google Chrome account. Once you do so, Netflix Plus will automatically start working on the new device.

Looking for more ways to improve your Netflix experience? Explore our recommendations to find other fantastic Netflix Chrome extensions.