How to: Turn iTunes podcasts into normal music files

iTunes podcastThis trick is a little advanced and requires a bit of patience from you, however if you want to have all your podcasts saved as normal music files in your iTunes, it’s well worth doing. Although the majority of podcast episodes I download are removed after one playback, I can think of quite a few excellent ones that I’ve wanted to keep for good and listen to again. That’s where this little iTunes hacking trick comes in handy. Those of you familiar with AppleScripts should find this pretty straightforward.

Make sure you have Developer Tools installed. Then download fixid3tag. Open up your Terminal and type gcc fixid3tag.c -o fixid3tag then save the fixid3tag binary somewhere where you won’t erase or lose it. Next copy the following script into ~/Library » iTunes » Scripts:

Continue reading “How to: Turn iTunes podcasts into normal music files”

MobileMe to replace .Mac on July 11

mobileme.jpgFor all you .Mac members, there’s only three days left until the service is shut down and Apple switches you to its brand new MobileMe service. Released at the same time as the new iPhone 3G, with which it will interact, MobileMe is surrounded by high expectations, as it will be a big step up from the aging .Mac services.

An Apple support page keeps a status posted to let .Mac members know of the switch. On Wednesday July 9 at 6 pm GMT, the .Mac service will be taken offline. The new MobileMe service will then have a six hour window to be introduced, which means .Mac members could spend a few hours without access to their account. The status window shows little colored buttons next to each .Mac service to keep you updated on their availability.

The switch seems to be highly worth it though. Although the yearly subscription fee is still a little high at $99, I feel that MobileMe offers much more incentives. Not only do you get 20 GB of individual storage, which should be plenty to hold all your emails and a significant amount of pictures, but you also get better integration with all Apple applications like iCal, Mail and the Address Book. You also still get direct access to your iDisk from your desktop.

The best improvement for me though is the easy synchronization of all your data, which should be best demonstrated with the iPhone 3G. Having all your contacts, notes and emails disseminated across all your computers and devices can really drive you crazy, and you simply don’t want to waste time harmonizing personal data on each device. If synchronization with MobileMe really proves to be as seamless as they say, I might just consider signing up.

Top screen capture apps for Mac

GrabHere at Softonic, we take bucket loads of screenshots every day, as we’re constantly testing out and reviewing new programs and games. Now on a PC I simply stick to SnagIt, which is by far the best and most complete screen capture tool you’ll find. On Mac, there’s a much bigger selection of excellent programs that take high quality, crisp screen grabs of whatever it is you want to show.

When you start off taking screenshots on your Mac, you’ll probably go with Apple’s Grab tool, which is found in your Utilities. Grab is a no-fuss, hands on program, which allows you to capture full screen, a selection, a window or a timed screen. You can also select your pointer type and enable sound. Nothing too exciting, but it gets the job done, and luckily, it’s already installed on your Mac. So what are the alternatives? Here is our selection of the best screen capture tools for Mac:

  • Screenshot Plus Widget – My favorite. Available from the Dashboard, takes all sorts of captures and lets you format, display, export or save them.
  • Jing – One-click capture of anything on your screen. An intuitive new tool from Camtasia, creator of SnagIt.
  • Copernicus – Precise capture app which lets you bath preview your shots. Great if you take many screen captures regularly.
  • Red Snapper – A smart plugin for Safari that lets you capture full web pages straight from the browser.
  • SnapNDrag – A simple screen capture tool. Make your selection, set quality, format, size and snap away.
  • QuickSnap – Fast screenshots of your screen, a selection or a window. Gets the job done and looks nicer than Apple’s Grab tool.
  • Screenium – An advanced screen capture tool with presets for quality and size and a streamlined process.
  • grabUp – A smart Preference Pane item that lets you grab anything on your screen and share it online immediately.

PC users, check out Nick’s list of 10 screen capture tools for Windows.

Mac tip – Get connected drives and devices to appear in your Dock

external driveYou know that you can see all the different drives and devices connected to your Mac either on the desktop or by opening up the Finder. Wouldn’t it be nice to have them in the Dock too? You could then rearrange them in one of the multiple ways that Leopard now offers, like in a list, fan, grid or automatic. It looks cleaner and gives you right away an idea of which drives and devices are connected too.

So here’s the trick: open Finder and press Shift+Command+G. Type /Volumes in the new window and press Go.You’ll now see a ‘Volumes’ folder hidden at the root of your hard drive. Simply drag it to the Dock to have any connected volumes and devices appear there.

Mac driveThe trouble with this display is that you won’t be able to eject them from the Dock. What you’ll have to do is open up the Volumes folder and eject the selected volumes one by one. It’s probably easier to  just drag them from your desktop to the trash.

If you’re the kind of person that keeps many drives and devices connected to your Mac, I’d urge you to install Semulov. This little application displays all your connected drives in your menu bar. You’ll see them divided by type, such as disc, external and internal drives and devices. The application also allows you to eject them individually or all at once. Another useful tool to work with mounted volumes is Do Something When. This application allows you to launch actions every time a volume is mounted onto your Mac. Saves you some time, so that for example, iTunes is launched as soon as your music drive is connected, or iPhoto opens when you connect your external drive which has all your digital photos.

Try these tips out and make better use of mounted volumes on your Mac!

[Via: CyberNet]

The best mixing tools on Mac

turntable
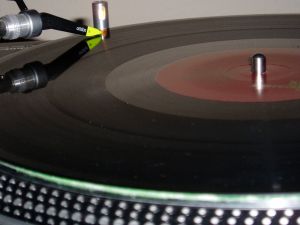
It’s funny how only a few years ago, most DJs still carried around their turntables and lugged their big heavy bags of vinyls everywhere they went. Cut to now, and most of them have all switched to powerful laptops and creative mixing software. The versatility and intuitiveness of technology have taken over from the rugged, physical contact with records. I lament the loss of this time in some ways, as I’ve always enjoyed the imperfections and grainy sound of vinyls, and the pure enjoyment of spending hours in a record store, taking records out of their sleeves to listen to them on the turntable.

Although the sound quality of MP3s still leaves a lot to be desired, I still believe that the digital switch is great for music professionals. More powerful tools means more creativity and therefore more new tracks. Extracting, editing and adding bits of sounds is easier than ever, and you can find libraries full of effects to endlessly modify your tracks. Add to that the fact that you can now carry thousands of songs with you anywhere, and not to say how easy it is to share tracks and collaborate with other artists online, and it’s tough to find areas to complain. In this traditional summer festival season, I’ve picked out a few mixing tools for you to choose from, if you’ve decided to ditch your turntables and records and go digital once and for all:

  • Ableton – A smart and flexible interface, loads of effects and a great help guide make this a top choice to create everything in music production, from recording to playback.
  • UltraMixer – A no fuss, hands on mixer that lets you handle your tracks and makes sure all your transitions are smooth.
  • Djay – Great use of the Mac Multi Touch technology for scratching and perfect integration with your iTunes library makes this an excellent choice for party mixes.
  • Disco DJ – Behind a sleek, pure white interface this mixer features all the tools you’ll need to organize your music collection and have that all important mix flow.
  • Traktor DJ Studio – Four playback decks, advanced effects and the ability to create your very own mixing setup. Also gives access to the Beatport online music store.
  • Reason – Dreamed of owning a recording studio? This all in one package brings to you everything from a sampler to synthesizer, a sequencer, drum machine and plenty of effects.
  • Ardour – Record, edit and mix audio. Ardour is a good choice for mixing video soundtracks.

PC users, check out Nick’s post on the best software for aspiring VJs.

10 new features to expect in Mac OS X Snow Leopard

So there’s one year to wait till Apple releases its next operating system, Mac OS X 10.6, also known as Snow Leopard. Although it was claimed that the new version would more or less be a more effective, faster and stabler update, nothing as big as the switch from 10.4 to 10.5, it seems we can still expect a number of significant improvements. RoughlyDrafted Magazine lists ten new features that we should find, come July 2009, in the shiny new Mac OS. Here is a quick round up of them:

  •  Use of the Low Level Virtual Machine (LLVM) architecture project should ensure faster and more effective code.
  • The integration of version 1.4 of the Common Unix Printing System (CUPS) will guarantee better and safer printing performances.
  • Read and write support for Sun’s 128 bit ZFS file system should replace the Mac native HFS+.
  • Apple’s Push Notification Service (PNS) will keep your iPhone and iPod always connected to receive updates of events any time.
  • Integration between mobile devices and desktop products, most probably via Bonjour.
  • Even better than widgets, Snow Leopard could include self contained web apps.
  • Integration of the best new Microsoft application features, like Fast User Switching, which came in Panther.
  • Presence of Data Detectors anywhere there is text on your Apple computer.
  • A new framework for Multi Touch trackpad gestures. Expect to put your fingers on the screen even more.
  • Last but not least, Snow Leopard should bring with it much smaller applications. Just take a look at the graph below to get an idea.

200806182326.jpg

Video: Firefox 3 new features

Unless you’ve been living on a desert island for the past week, you can’t have missed the release of the brand new Firefox 3. Although the event was marred by a few connection issues, which prevented users from downloading the program for a few hours, Mozilla’s Download Day was globally a success and the new version of the browser has already been downloaded more than 13 million times worldwide. This week, Nick and I took to testing Firefox and exchanged our impressions. Today, I invite you to check out a video review of the new features in Firefox 3:

//

Get to know your Mac’s Terminal

Apple TerminalApple have succeeded in creating a user interface that is both attractive and intuitive to use. The latest iteration of Mac OS X, Leopard, features even more improvements that really make you wonder what Snow Leopard (MAC OS X 10.6) and later versions can improve on. Just comparing Leopard to Panther, the difference is huge. Mac’s attractive interface has made me ponder how many people still use the Terminal, apart from those with a technical background. When you think about it, a few years back, the Terminal was central to almost anything you wanted to do on your Mac. It still remains highly useful, but only if you know how to use it. The trouble is, most users simply get scared off by the dark screen and lines of text.

If you’re curious as to how it works and want to gain a bit more control on your Mac, it’s well worth getting familiar with it. I found this excellent guide by Chris Stone, which explains in a number of steps how to master it. It’s a pretty big read though, so I’d really only suggest taking a look at it if you’re really excited about the Terminal. Others could turn to another guide I found which lists the basics, shows you how to get detailed information on your Mac and teaches you how to search for files from a command line instead of by using the Finder.

140+ plugins and add-ons for Apple Mail

Apple MailSo you like working with Apple Mail? Did you know that you can fully customize the client with all sorts of plugins, add-ons and scripts? Most of them are easy to set up and can make your Apple Mail a bit more powerful and original than it normally is. The Hawk Wings website seems to be an expert on the matter and lists out more than 140 add-ons, plugins, mail templates and other apps that work with Apple Mail. Although a few are shareware, the majority are free and should only take a couple of seconds to install.

You’ll find plenty of notification tools for unread messages like GMail Notifier or MailAppetizer. Hawk Wings also lists apps that add extra functionalities to the mail client, like the Apple Mail Signature Generator or MacResponder, which sends auto-replies. The Mail.app being an Apple product, it integrates easily with other applications, particularly Apple ones like Spotlight or Bonjour. Hawk Wings lists plugins that work with other programs such as Apple Mail Conduit to sync mail between the client and your Palm device or Daylite Mail Integration which integrates Apple Mail to the Daylite project management app. You’ll find some more switching tools to move from another client like Eudora to Apple Mail, lots of iCal and Address Book plugins, archiving and spam tools.

If the appearance of the program and your emails  is what matters to you, you’ll also find many interface tweaks and lots of Leopard templates to send original messages to your friends.

Well worth taking a look at, this list should provide some useful add-ons if you’re a big fan of the Apple Mail client.

Mac tip: hiding folders on your Mac

hide your folderSecurity is no laughing matter, and when it comes to your personal files you want to make sure you know they’re safe and protected from prying eyes. You can password protect them, but hiding them is also an excellent idea and a good precaution.

One of the best ways of controlling what people see on your Mac is by making them use a guest account. You can set it up and decide what folders appear and not worry about your friend messing up your settings and preferences. The only trouble with the guest account is that you have to make sure you actually launch it every time a friend comes over. If you’re really paranoid, the best way to work is to have a password for your own account and have your Mac automatically logout after a few minutes. Don’t set any password for the guest account, so that people are encouraged to use that one.

What about if a friend of yours accidentally ends up using your account though? You can hide information that you really don’t want him or her to see. One way is by opening up your Finder, pressing Go> Go to Folder… then searching for “/private”. Just drag anything you want to hide into that folder.

Another old trick known by Unix users is to add a dot in front of your folder name. This renders the file invisible. You normally get an error message if you try to do this from the desktop. The thing to do is open up your Terminal and type mkdir followed by the path to your folder and finish with .folder. Which gives something like this:

mkdir/Users/Bob/Desktop/Very Secret Stuff/ .folder

Your folder isn’t really protected though, as all you’ll need to do to access it is press Go> Go to Folder… from the Finder and type the name of the folder. Make sure no one knows the name of that folder to keep it protected.

To unhide the folder, go back to the Terminal and type: mv /Old/Path/.test /Old/Path/test

The folder will reappear in its normal location and will be viewable by anyone.

Another last trick is to prevent Spotlight from indexing certain files. Go to Spotlight Preferences, select the ‘Privacy’ tab and use the little ‘+’ button to add all the folders you don’t want Spotlight to index.

Make good use of these tips and your personal folders should be safe and hidden from anyone using your Mac.