Apple confirms that PWAs will not work in Europe. The reason is the DMA

The law does not allow Safari to offer features if they are not available in other browsers.

In the first beta of iOS 17.4, Progressive Web Apps (PWAs) did not work properly, and in the second one, a message warned that they would open directly in Safari. Now, Apple has officially announced its stance on PWAs in the European Union: they will no longer work. The reason behind this measure lies in the need to comply with the Digital Markets Act (DMA) of the EU.

iOS 17 Download

The law does not allow Safari to offer features if they are not available in other browsers

The company has explained that the changes imposed by the DMA involve having to support alternative browsing engines, which entails very significant security risks and a more considerable engineering effort to try —as much as possible— to implement a new solution and minimize the risks. PWAs, which run directly from the iPhone’s home screen and are built on WebKit and its security architecture, are designed to align with the privacy and security model of native applications on iOS. Running on Apple’s browsing engine allows for storage isolation and the implementation of system prompts to access privacy features individually.

It is very important to note that, without this isolation, web applications could read data from other web applications and gain access to the camera, microphone, and location without our consent. Controlling third-party code, in this case from a browsing engine —an engine that runs, in turn, third-party code from the web— is really difficult. So much so, that Apple has chosen not to support PWAs in third-party browsers.

But what about Safari? The DMA forces Apple to prevent Safari from offering better features than other competing browsers. Thus, due to the technical difficulty of enabling the long list of third-party browsers to offer PWAs, Apple has been forced to remove it from Safari.

The company argues that this decision will only affect a “small number of users” and regrets the impact it will have on PWA developers and iPhone users in the EU. However, it claims that it is a necessary measure to comply with DMA regulations and protect the security and privacy of users.

iOS 17 Download

While the EU is backtracking and the DMA will not affect iMessage and while some users on social media are already joking that Europe should “Not allow” the DMA to be applied to us and be able to recover PWAs, just like we can reject cookies, it is clear that regulating certain aspects within companies has unexpected consequences.

How to Update Safari on Mac in 4 Easy Steps

Safari is the default browser across Apple products. The Safari browser is a fast and secure graphical browser that enables users to sync their passwords, bookmarks, history, and much more across all their Apple devices and laptops.

The developers are continually making improvements to the browser, fixing bugs and increasing functionality. The latest version of Safari is version 14.0.3 (also referred to as version 14), released on 1 February 2021.

Updating Safari will ensure that you continue using the best version of the browser, and it will keep your browser running fast and working correctly.

How to Update Safari on Mac on Newer OS

There are two ways you can update your browser. The first is for newer Macs (OS Mojave or newer). You can update your Safari by simply updating your OS. The second is for older Macs (OS High Sierra or older), where you need to update Safari through the App Store. 

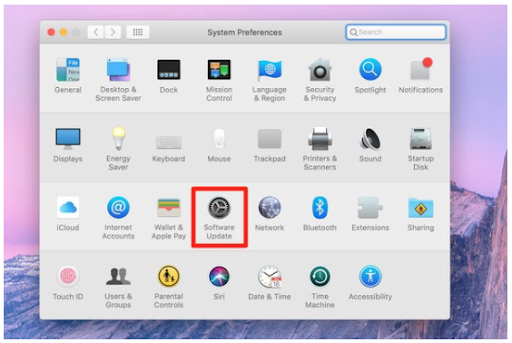
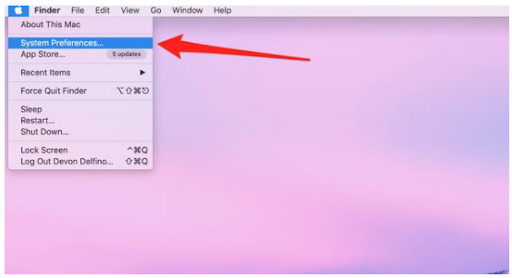
Step 1: Access ‘system Preferences’

On the desktop, click on the Apple logo in the top left of the screen. Then click on ‘System Preferences.’

Step 2: Click on ‘software Update’

Click on ‘Software Update,’ which is represented with a gear icon.

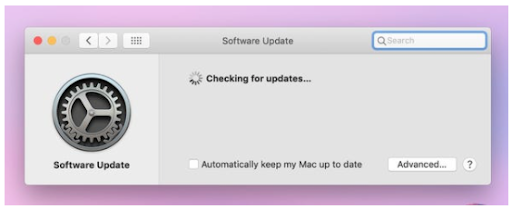
Step 3: Check for Available Updates

Your computer will automatically check for any available updates.

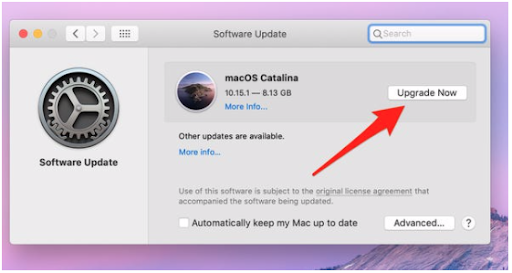
Step 4: Upgrade Now

If there are any upgrades available, click on ‘Upgrade Now’ to make the updates. If it is an OS update, this will automatically update your Safari browser.

How to Update Safari on Mac on Older OS

Next, let us look at the steps to update Safari on OS High Sierra or older.

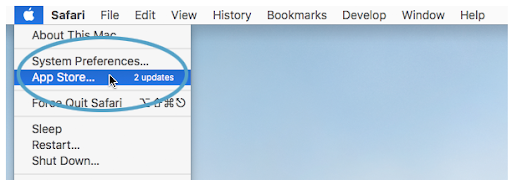
Step 1: Go to the App Store

The App Store can be accessed by clicking on the Apple icon on your desktop in the top left corner.

Step 2: Click on the ‘Updates’ Section

Click on the ‘Updates’ section to see all your apps that have updates available.

Step 3: Update Safari

Look for Safari in the list and click on ‘Update.’ If Safari does not show on this list, then there is no update currently available for it.

Update and Browse Easily

Now you can easily update your Safari browser and continue enjoying fast and reliable browsing on your Mac.

If you are looking for an alternative browser, you can look at Google Chrome and Firefox.

The 7 best Safari extensions for upgrading your browsing experience

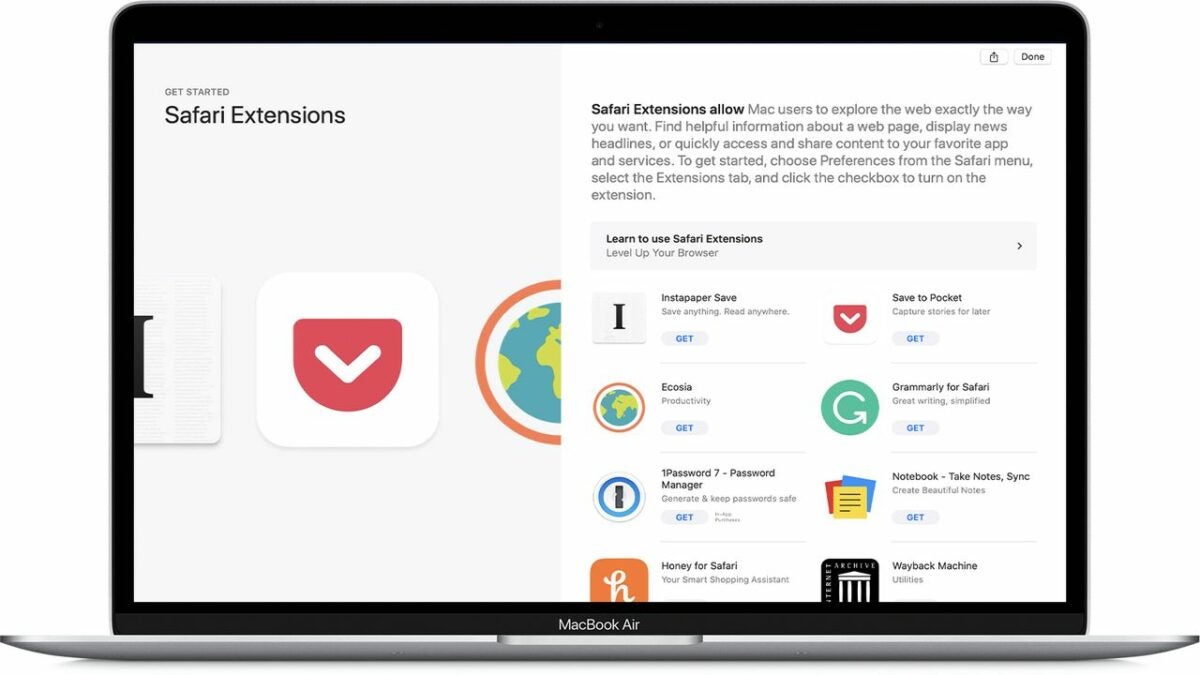
The default browsing experience on Mac is intuitive and serves its purpose for many users. However, Safari really shines when a few different add-ons are installed. You can disable ads, manage multiple passwords, instantly translate webpages to other languages, and so much more with just a few clicks.

Safari DOWNLOAD

To take your internet browser to the next level, be sure to download the following extensions on your Mac.

Ghostery

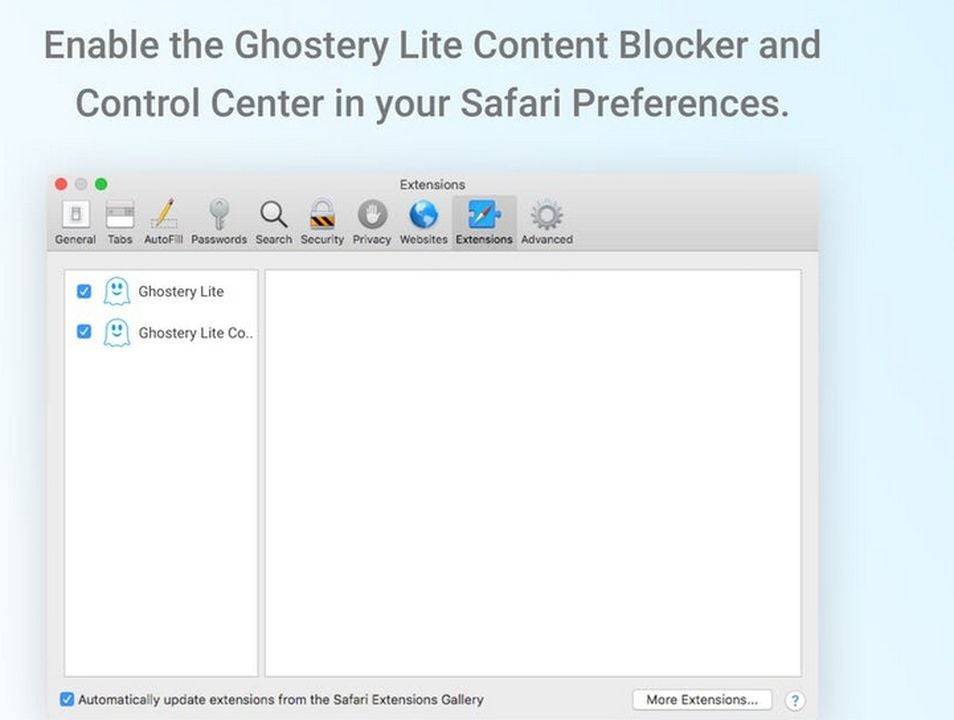
For a satisfying browsing experience, you must insulate yourself from overzealous and malicious ads. Ghostery lite is the perfect free solution to blocking unwanted ad banners and video clips. A great benefit of the extension is the ability to add custom settings and whitelist certain websites. Both features allow you to view ads on websites that deserve revenue and do not abuse the system.

Ghostery DOWNLOAD
Enabling ghostery is easy

1Password

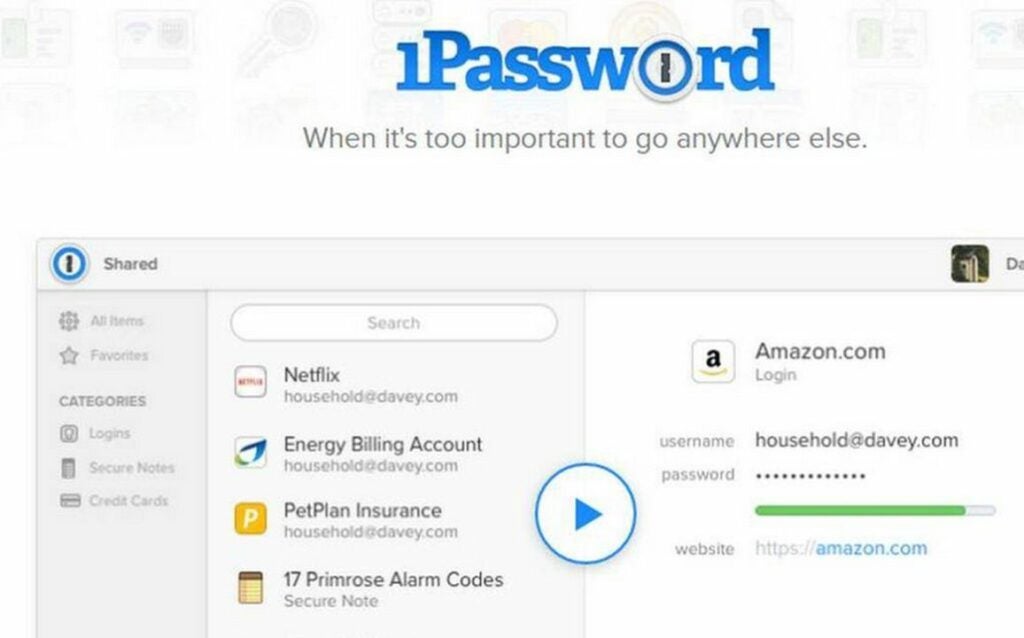
Another thing you should do early on is to organize your various passwords in one convenient location. The 1Password extension allows you to access the same functionality as the traditional app directly from your browser. View your password vault and quickly fill out forms with information stored in your account. The automated information is paired with the websites you use for seamless integration across the web. After a 30-day trial, you do need to subscribe to one of the payment plans. Considering how much time 1Password saves, the few bucks a month will be worth it for most heavy Mac users.

1Password DOWNLOAD
Keep passwords organized

Mate: Universal Tab Translator

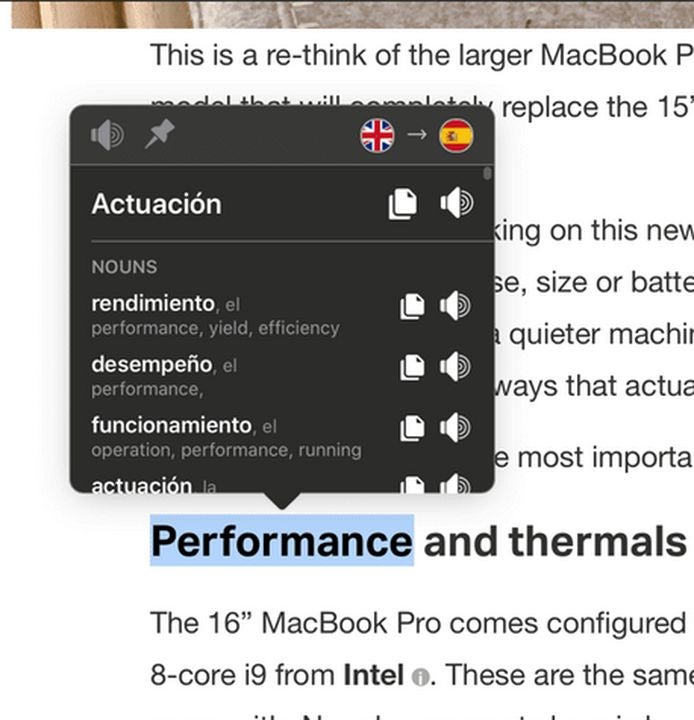
Every once in a while, you come across some interesting content in a language you do not understand. The Mate extension is the easiest way to translate entire web pages to your native tongue. All you need to do is double or right-click on any text you wish to translate. For longer passages, you can even translate your entire clipboard with the Alt+Shift+T keyboard shortcut. The add-on supports 103 different languages and will pronounce words to further enhance your learning.

Mate Translate – Translator DOWNLOAD
Mate translates with one click

Stop the Madness

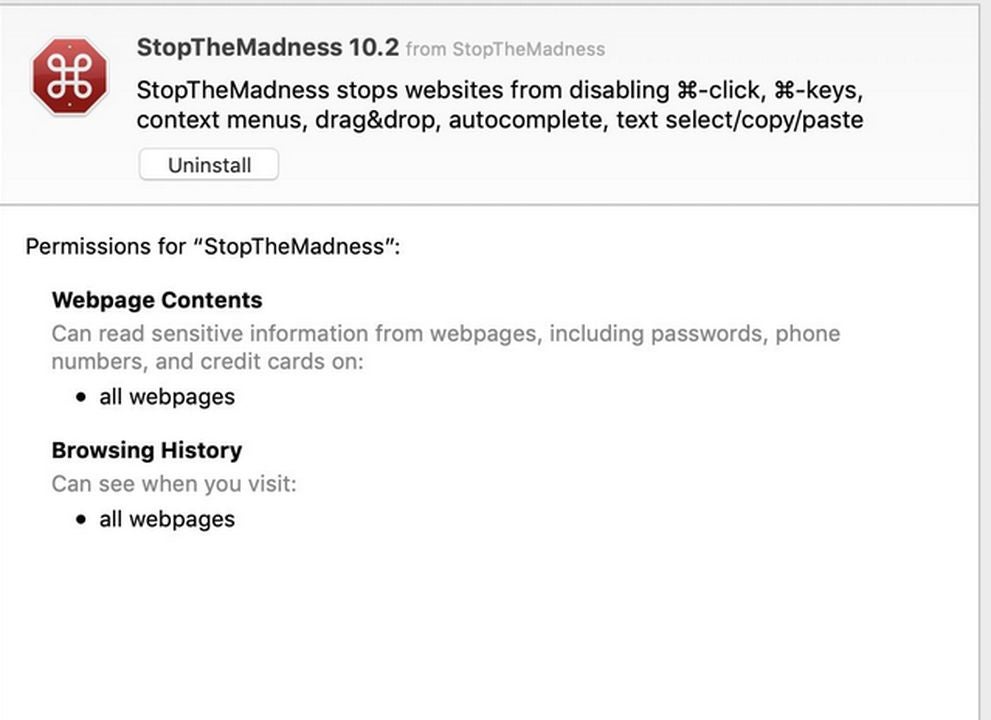
The Safari user interface has many unique quirks and features that do not play well with all websites. To restore full functionality on troublesome websites, try installing Stop the Madness. This extension re-enables classic features like opening links in new tabs and command-key shortcuts. The slick default scrolling speed is also restored on websites that attempt to throttle your performance. Interestingly enough, the app can also disable certain annoying user interface features on various websites. Most notably, warnings asking you to stay on the page can be removed entirely.

Stop the madness of stubborn websites

Honey

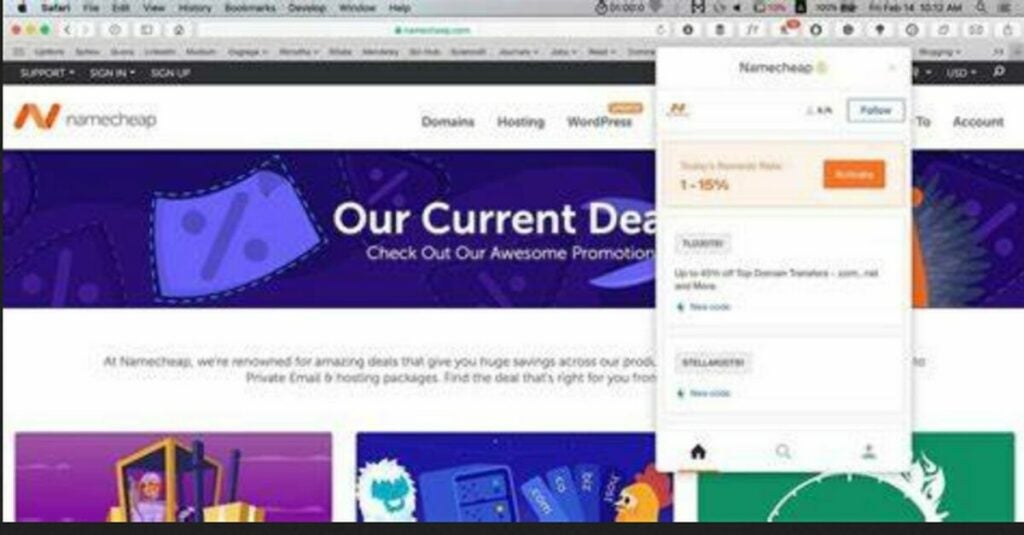
Honey is a popular browsing extension for shoppers who love to save money. Once installed, the app will automatically scan the internet for the best deals on items you are about to purchase. Add an item to your cart and Honey will begin to search for coupon codes. Apply the best one and you are all set to make the purchase. Honey ensures you save the most you can on any given day of the transaction.

Honey DOWNLOAD
Save money with honey

Ebates Rakuten Cash Back

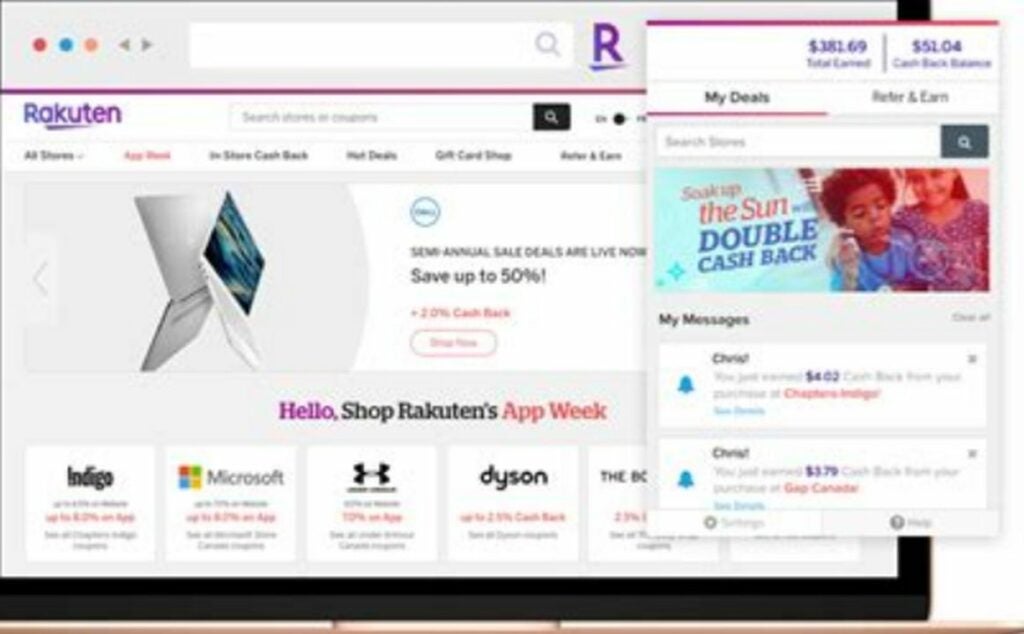
Rakuten has been giving generous rebates on thousands of products available online. This handy extension makes it easy to browse your favorite stores for cash-back offers. If your favorite retailer does not offer a product or rebate opportunity, Rakuten will automatically search for a deal on the same product from another shop. When multiple shops have offers on the same product, comparing them is incredibly simple.

Rakuten Global Market - Shop DOWNLOAD
Rakuten offers cash back

Turn Off the Lights

When watching videos, the rest of the webpage can be too bright or distracting. This extension fixes that issue by dimming the entire window except for the video player. The dimming is toggled by clicking the lightbulb icon on the Safari toolbar. The add-on supports all the most popular video platforms such as YouTube, Facebook, and Twitch.

Turn Off the Lights DOWNLOAD
Make videos easier to watch

A more productive Mac experience

Now that your Safari browser is turbocharged, you can be more productive and enjoy a better browsing experience. Mac’s default browser is designed to be fast, secure, and easy to sync across multiple Apple devices. However, it’s important to keep Safari updated if you want to get the most out of the features. Check out our guide to updating Safari in four easy steps.

How to set a custom Safari background in iOS 15

Safari’s iOS 15 comes with many new adjustments and features. From tab groups to a movable address bar, there are so many ways that you can now make the Safari browser your own. Another way that you can start to personalize the Safari browser is by uploading a custom background.

This feature has been available on the Apple Mac systems for a while but has only recently been introduced to mobile versions of Safari for iPhones and iPads. So, how do you set a custom Safari background in iOS?

What is the latest version of iOS?

The latest version of Apple iOS is currently 15.3. To change the background on your Safari browser, you’ll require iOS 15 or newer. If you’re unsure if you have the latest version on your mobile device, check your updates now. You can check for updates on your iPhone by navigating to the general settings on your device. 

To change the background on your Mac computer, you’ll need MacOS14 or newer. You can check the version of your macOS and see if there are any updates available from the system preferences on your computer. 

It is recommended to set your Apple devices to stay up to date with any updates to ensure you have all the newest features and fixes when using your device.

How to set a custom Safari background?

Let’s see how you can change the background of Safari on your mobile device to make the browsing experience more personalized.

  1. Launch the Safari app

    How to set a custom Safari background in iOS 15

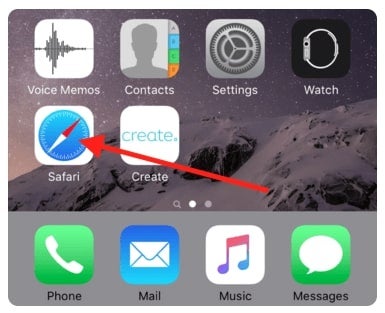
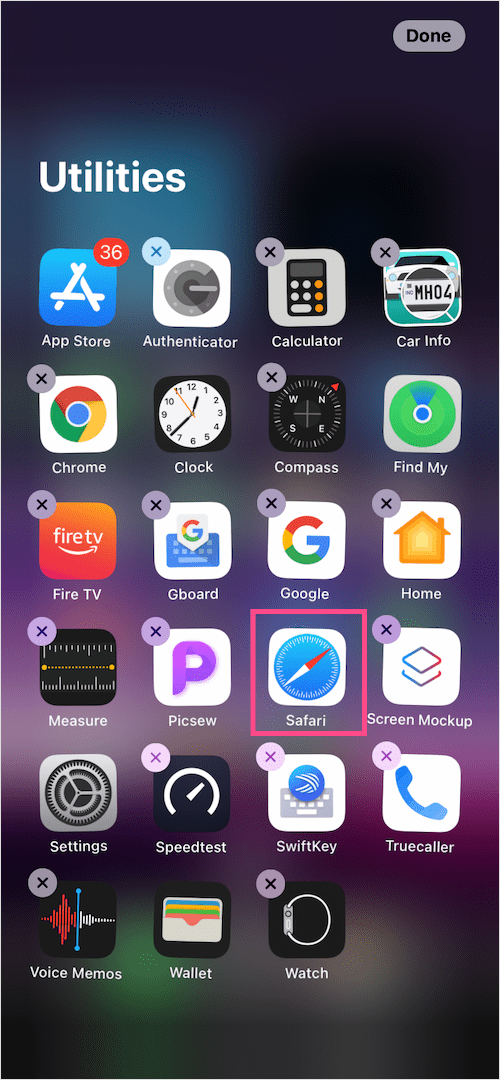
    The first thing you’ll need to do is launch the Safari browser on your iPhone or iPad. You can do so by tapping on the browser icon in your app menu.

  2. Tap on the double square icon

    How to set a custom Safari background in iOS 15

    Depending on your settings, the browser might automatically open on the last page you visited. However, you’ll have to open a new page to change the background. The first step in doing this is tapping on the double square icon at the bottom right of your screen.

  3. Tap on the ‘+’ button

    How to set a custom Safari background in iOS 15

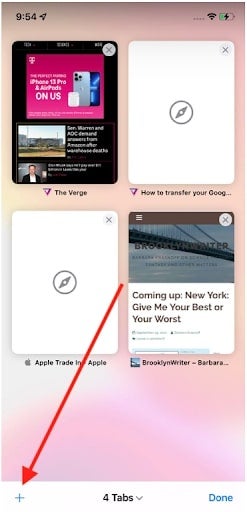
    You’ll be taken to a new page where you’ll see thumbnails of all the pages currently open in your browser. To open a new page, you need to tap on the ‘+’ button at the bottom left of your screen.

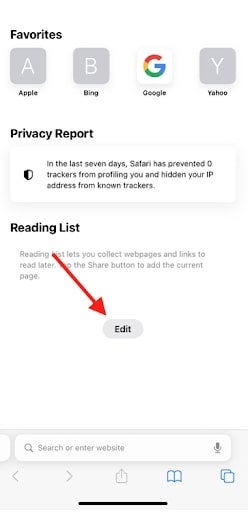
  4. Tap on the ‘Edit’ button

    How to set a custom Safari background in iOS 15

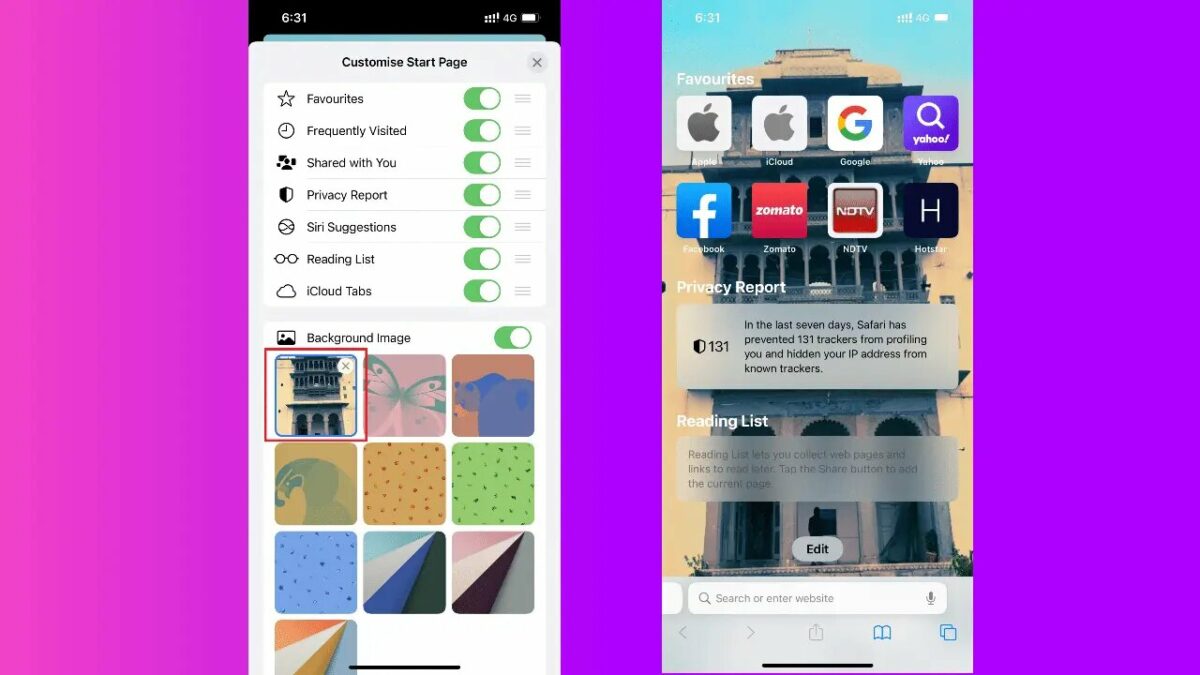
    Now you’ll find yourself on the ‘Customize Start’ page. To set your background, you need to tap on the ‘Edit’ button at the bottom center of your screen.

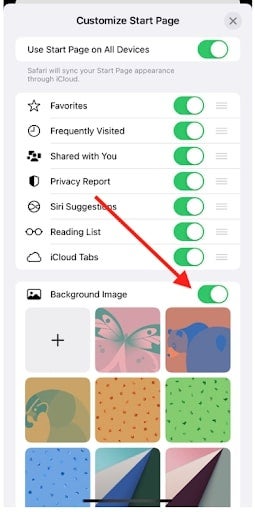
  5. Toggle background image on

    How to set a custom Safari background in iOS 15

    Now you’ll be on the settings screen where you can change various aspects of your start page in Safari. Here you can toggle what you want to see and, more importantly, what you don’t. Right at the bottom of the list, you’ll see the option for a background image. Turn the toggle on to choose a custom image for your background.

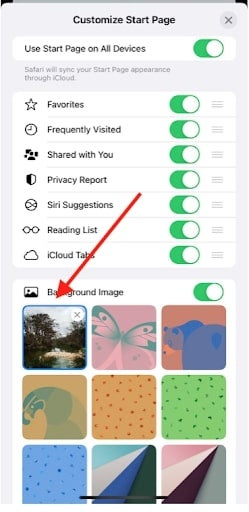
  6. Choose your image

    How to set a custom Safari background in iOS 15

    Now you can choose what image you want to use. You can select any of the pre-installed Apple backgrounds shown by tapping on them. If you want to choose from the pictures and photos on your device, tap on the first box, which is empty and shows a ‘+’ on it. This will take you to your device photos, where you can choose from your saved images.

Personalize your browsing with a unique background

Just like that, you can have a new, customized background in your Safari browser. By following these simple steps and ensuring you have the right version to support customized backgrounds, you can set any background of your choice within a few minutes.

And if you’re working on a computer, you can also enjoy expressing yourself by changing your Safari homepage on a Mac device within a few steps.

How to View History on Safari in 4 Easy Steps

Safari is a fast and safe web browser that Apple created. Although Safari is the default browser on Mac, iPhone, and iPad, it is also available for Windows.

Sometimes you may want to access your browsing history. You can use the history to find a website you visited in the past. Or it could be used to keep track of your searches which can be beneficial on a family computer with younger children using the internet.

The process of viewing your search history and data varies a little between computer and mobile devices. Let’s look at the steps you need to take to view your browsing history on Safari for both options.

How to View History on Safari on Mac and Windows Computers

Below are the steps to view your browsing history on a computer.

Step 1: Launch Safari

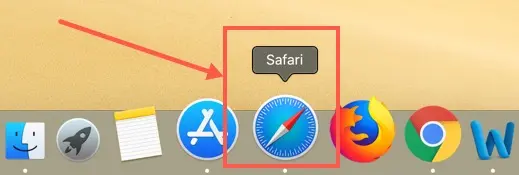
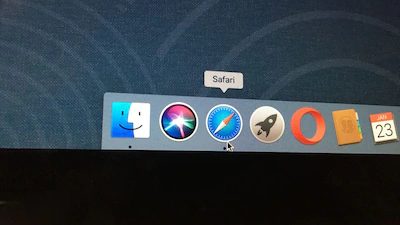
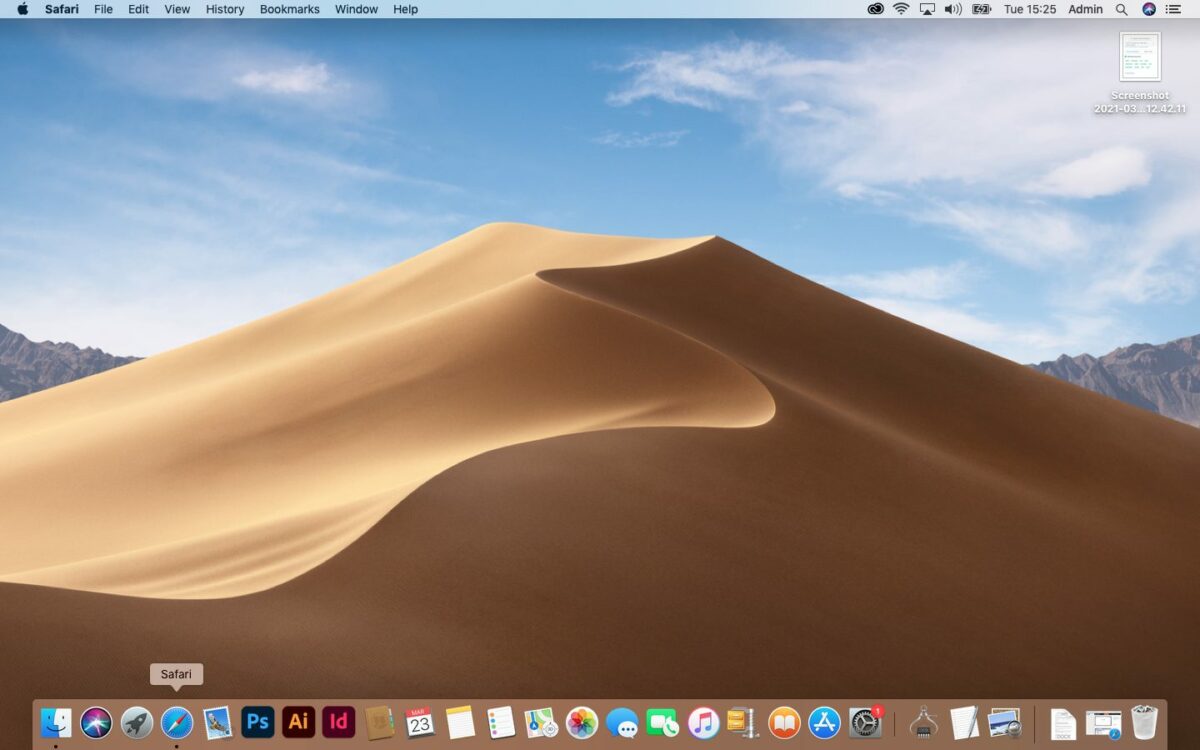
Launch Safari by clicking on the Safari icon in your dock on Mac or your desktop or taskbar if using Windows.

Step 2: Navigate to the Top Safari Menu

Navigate to the top of the screen and wait for the Safari menu to appear. 

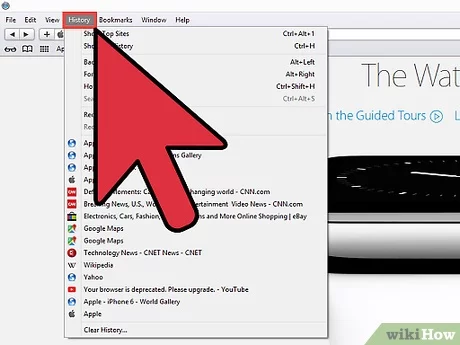
Step 3: Click on ‘History’

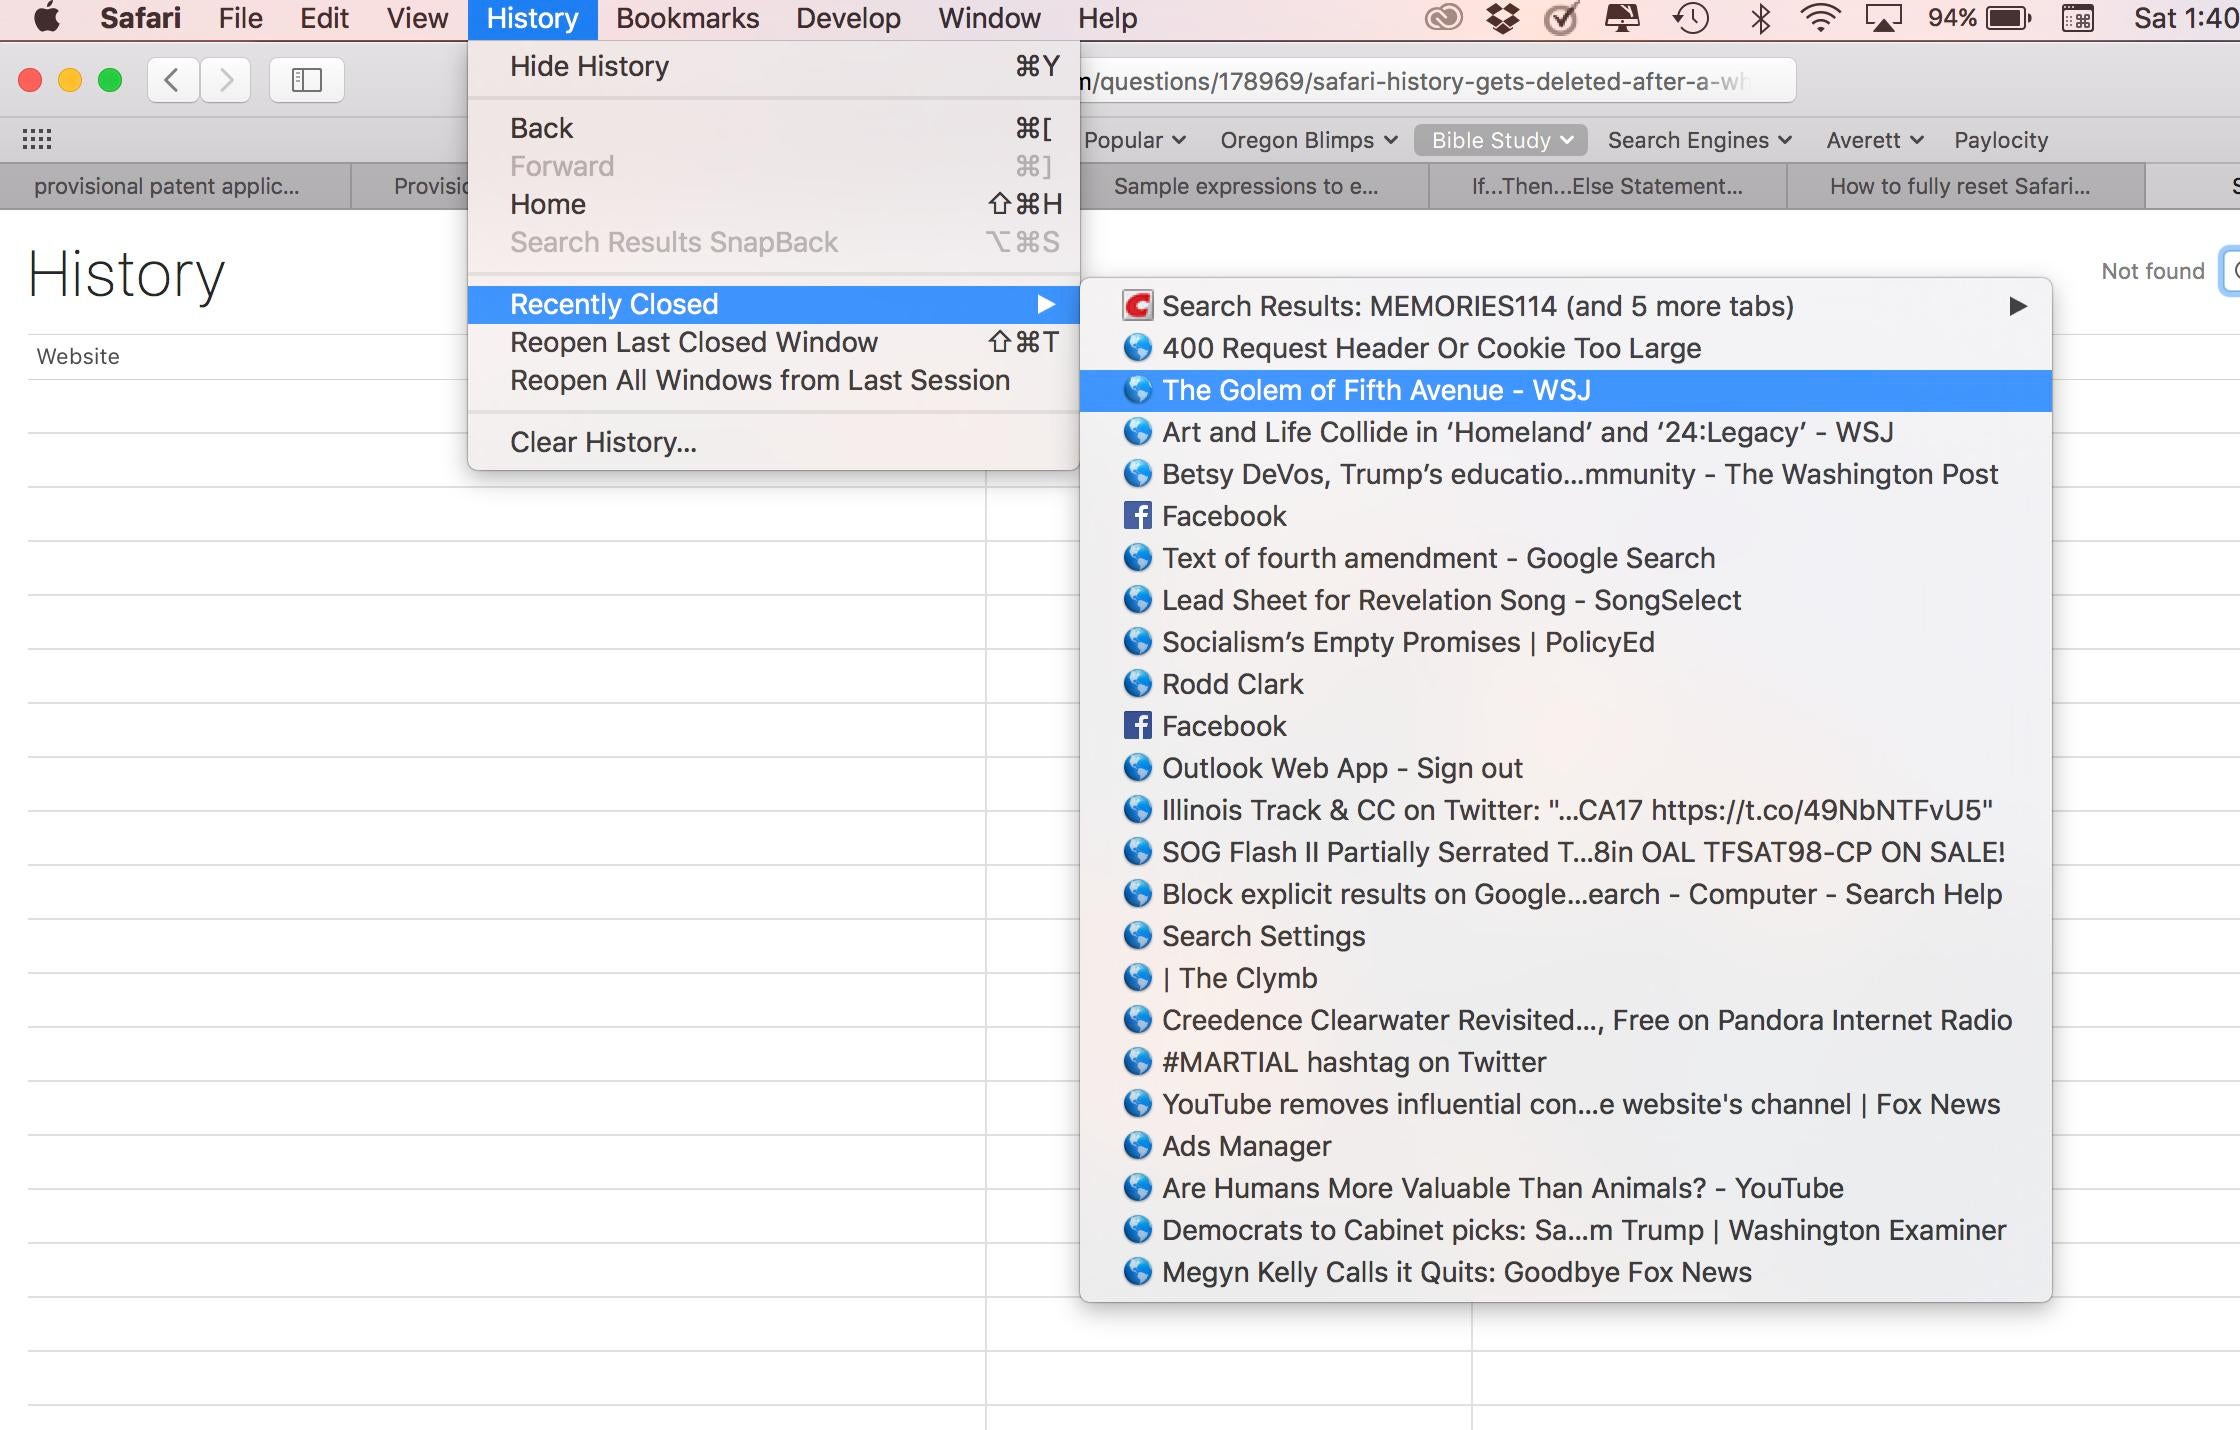
Now you can click on the ‘History’ tab.

Step 4: View Recent Site or Click on ‘Show All History’

You will see a list of the most recent websites opened on your Safari browser in the drop-down list. If you need to go further back, click on ‘Show All History’ at the top of the list.

How to View History on Safari on iPad or iPhone

Now we give the steps to follow to view your Safari browsing history on your iPhone or iPad.

Step 1: Open the Safari App

Launch the Safari app from your iPad or iPhone.

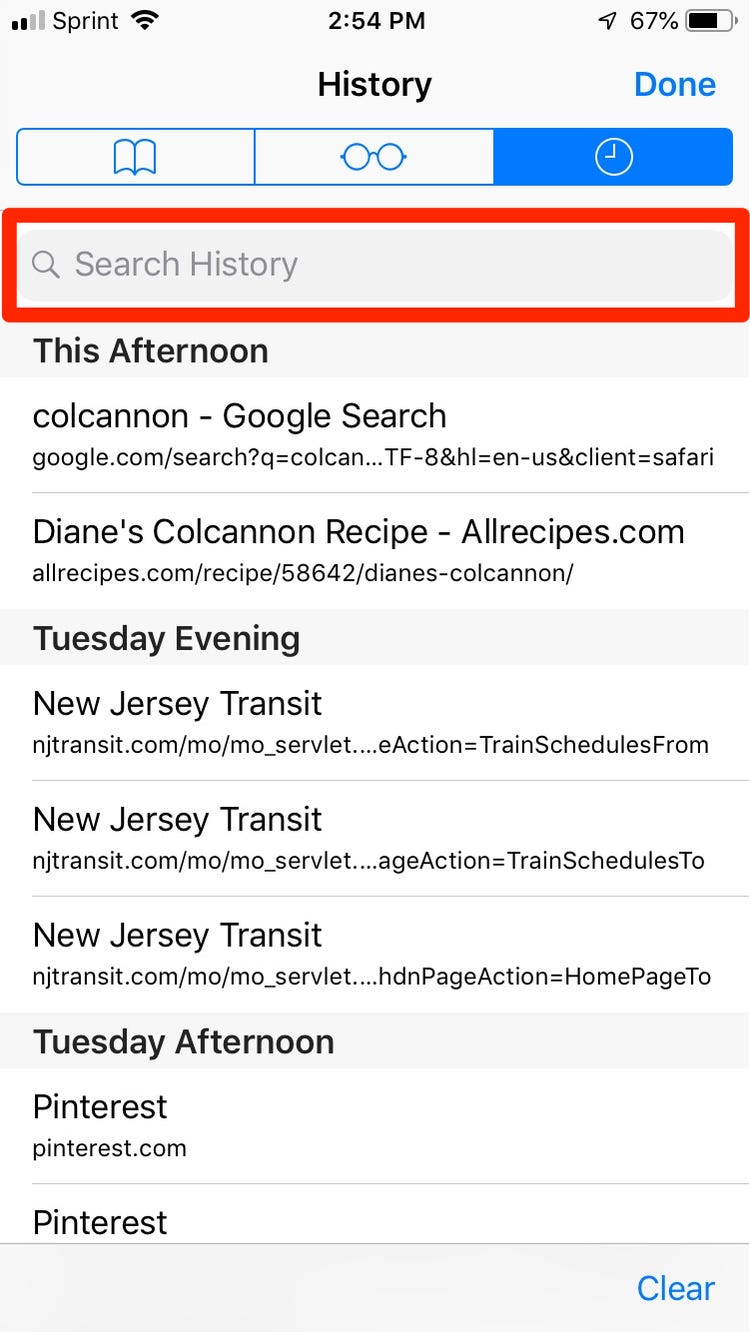
Step 2: Tap the Book Icon

Tap on the book icon at the bottom right of your screen. This will bring up your search history.

*Note: Mac keeps a record of your browsing history and data for up to one year, whereas iPad and iPhone only store the history for one month. You can manually clear this history at any time.

Easily Keep Track of Your Search History

Now that you know how to view your search history in Safari, you can keep track of your favorite pages easily. This will make finding websites you visited before much easier.

If you are considering other browsers, you can also look at Google Chrome and Firefox.

How to Change Your Safari Homepage on Mac in 4 Easy Steps

Safari is the default browser used with Apple products. This includes Mac, iPad, and iPhone. The Safari browser is one of the fastest, safest, and most user-friendly browsers available.

The Safari browser developers are continually making new updates and functions for the browser to keep it current and popular. One of the more recent updates included an option to change your Safari browser’s background to an image or photo of your choice.

Let’s look at how you can set up a different homepage for your Safari browser on Mac.

How to Change Your Safari Homepage on Mac

  1. Launch Safari Browser

    Open your Safari browser by clicking its icon in the dock.

  2. Navigate to Webpage

    Go to the webpage that you want to set as your homepage. This can be any website that you want. For this example, we will set our homepage to Google.

  3. Select ‘Preferences’

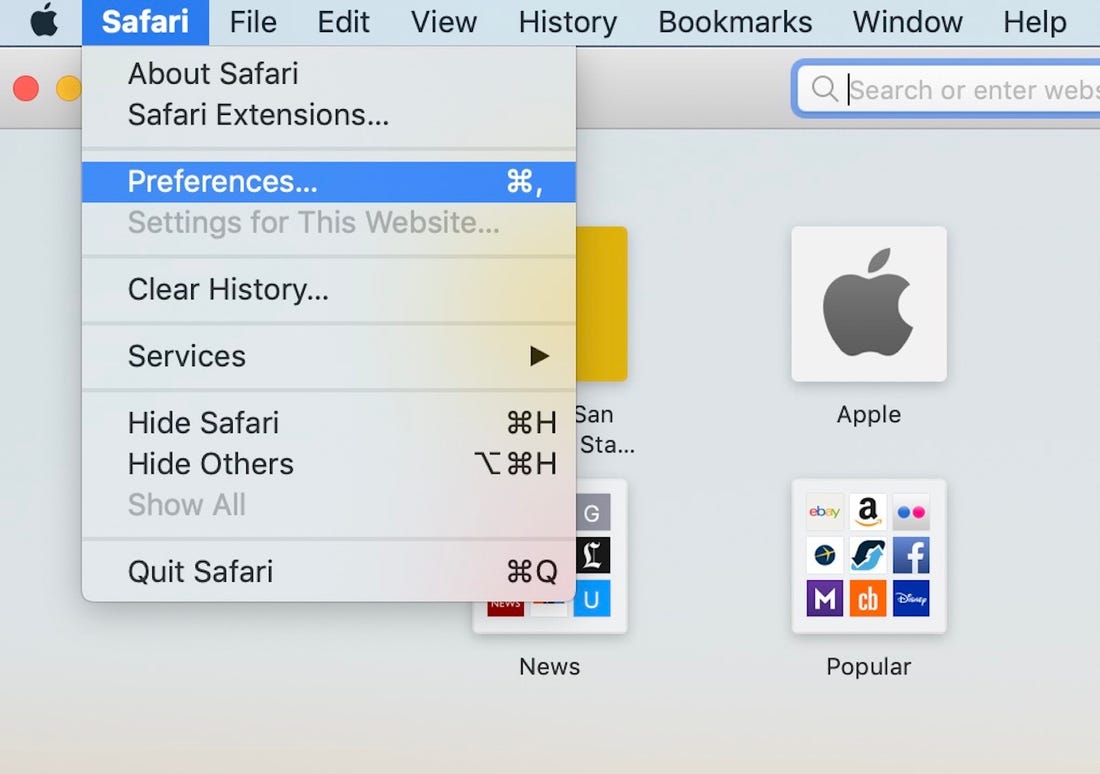
    Navigate to the Safari menu found at the top of your screen, and click on ‘Preferences’.

  4. Select ‘Set to Current Page’

    In the ‘Preferences’ section, go to the ‘General’ tab and click on the ‘Set to Current Page’ button. This will automatically set your homepage to the page you have opened in step 2. In our case, that would be Google.

    These steps are very similar to the steps above to set a homepage on your iPhone or iPad. The only difference is that instead of choosing the Safari Menu, you select the Sharing icon, which is represented by a square with an arrow pointing up. In this menu, you’ll get the option to set the current webpage as your homepage.

    If you can’t change your Safari homepage, make sure that your Safari is updated to the most recent version.

Set Your New Homepage

As you can see from the above steps, it is easy to set any webpage of your choice as your homepage. This can make your browser much more efficient to use and can get you going much quicker.

If you are looking for a different browser to try, you can look at Google Chrome and Firefox as alternatives.

How to Enable Javascript in Safari in 5 Easy Steps

Safari is a popular browser as it’s very fast, secure, and user-friendly. Safari is also the default browser on Apple products such as Mac, iPad, and iPhone. However, it’s also available on Windows computers and android devices.

Enabling Javascript in Safari may not be necessary, however with Javascript not enabled, some websites you visit may look odd or even broken. This is because Javascript is one of the most popular programming languages across the internet. To enable javascript is a straightforward process and will improve your browsing experience.

How to Enable Javascript in Safari

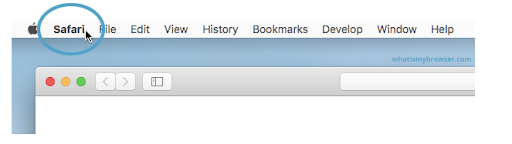
Step 1: Click on the ‘Safari’ Menu

Open your Safari browser on Mac and click on the Safari menu found on the top left side of your screen.

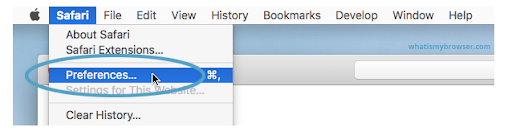
Step 2: Click on ‘Preferences’

In the drop-down list that appears, click on ‘Preferences.’

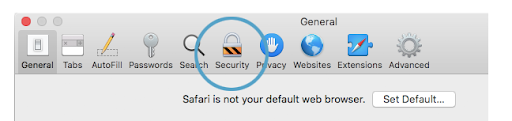
Step 3: Click on ‘Security’

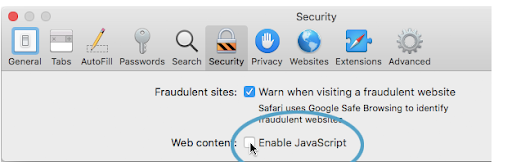
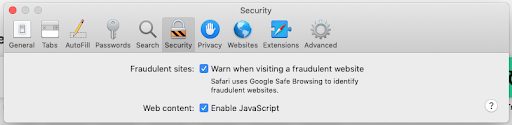
Click on the ‘Security’ tab that appears in the new window.

Step 4: Click on ‘Enable Javascript’ Checkbox

Next to the ‘Enable Javascript,’ there will be a checkbox. If it is already selected, then javascript is enabled. If not, check it to enable javascript.

Step 5: Close the Window and Continue Browsing

Now that you have successfully enabled javascript, you can close the window and enjoy browsing with your Safari browser.

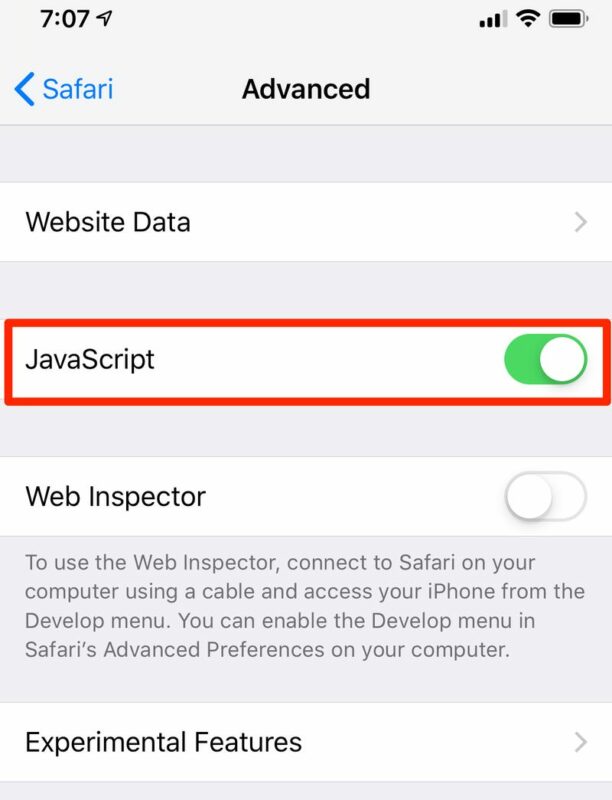
To enable javascript on your iPad or iPhone, you go to settings and then find Safari and click on it to open the Safari option page. Now you can enable Javascript from here on your iPad, iPhone or iPod. 

To enable javascript in Safari on a Windows computer is just as easy. In your Safari browser, click on the gear icon found in the top right of the screen. From here, you can select ‘Preferences’ and follow the same steps as you would on a Mac from step 2 above.

Continue Enjoying Seamless Browsing

Now that you have enabled javascript in Safari, you can continue to enjoy browsing the internet and viewing the different web pages as they were intended to be viewed.

How to Unblock Plug-In Safari

Safari is a powerful web browser for Apple devices, and older versions of the Windows 10 operating system. This browser lets you synchronize passwords, history, bookmarks and other core features of your browsing activity across your Apple devices. This means you can switch between devices with ease and expect to have all your favorite content at your fingertips, no matter which device you use. 

From time to time, however, you may see the dreaded ‘missing’ or ‘blocked plug-in’ pop-up, which can throw a spanner in the works where your browsing pleasure is concerned. To mitigate the prevalence and impact of these dreaded pop-ups, we’ve formulated 5 simple steps by which to unblock your Safari plug-ins. 

What is a Safari plug-in?

Plug-ins on Safari are essentially like extensions on Google Chrome. Just like extensions, plug-ins are utilities that you can download onto your Safari browser that increase your browser’s functionality and often the convenience with which you can perform certain tasks within Safari.

There is a wide array of plug-ins for Safari and each is specifically designed to make certain processes easier or extend the usability of your browser. Plug-ins also often let you personalize your browser in ways that are natively not possible, resulting in streamlined browsing experience that specifically caters to your individual needs. 

What does ‘missing plug-in’ mean?

If you use any plug-ins on Safari, you’ll notice that you usually see this message pop up after an update. When you update your system, either your macOS software or your Safari utility, your browser is likely to disable any additional content like plug-ins. This is a setting that a lot of software manufacturers put into their products.

Essentially, this stops any outdated plug-ins, mods, add-ons, or other custom content from conflicting with the updated software and causing massive issues with either the software or your device on the whole. In some cases, only specific plug-ins that are no longer supported or might be out of date are disabled. 

How to unblock plug-ins on Safari in 5 simple steps

Luckily, unblocking plug-ins on Safari is a really easy process. All you need to do is follow the 5 steps below and you’ll be browsing happily again in no time.

  1. Head to Safari

    How to Unblock Plug-in on Safari

    The first step is to open your Safari browser and head to your browser preferences. You’ll find the preferences option in the top left-hand side corner of your browser interface.
  2. Security

    How to Unblock Plug-in on Safari

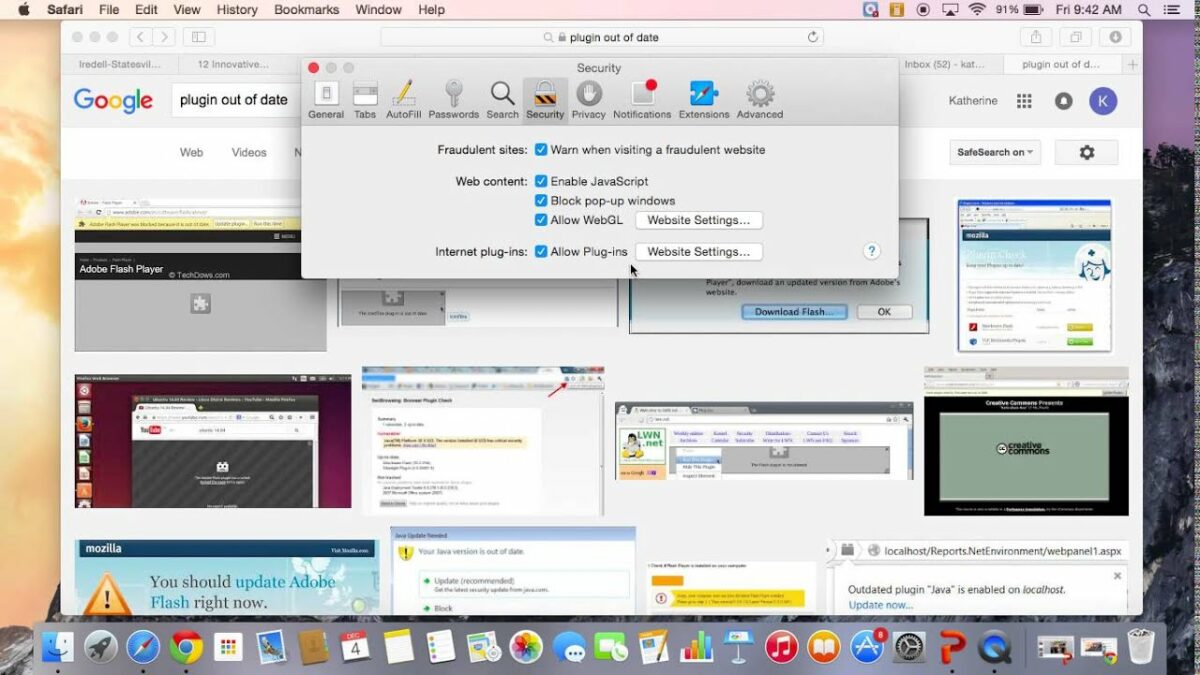
    Next, you’ll want to navigate to the Security option and click it. Here, you’ll find all of the security-related settings and features that your browser has to offer.

  3. Website settings

    How to Unblock Plug-in on Safari

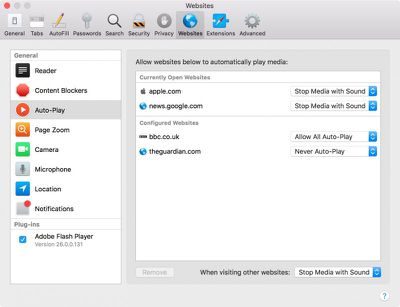
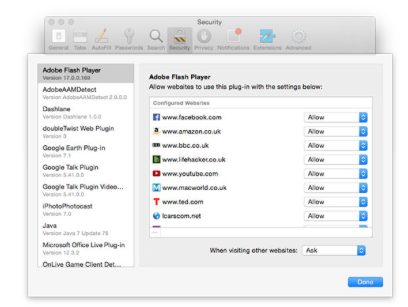
    Once you’re in the security settings, you’ll need to head to Website Security. This is where you’ll find your plug-in management options and settings. Once there, click on Allow Plug-ins.

  4. Plug-ins

    How to Unblock Plug-in on Safari

    Now, you should see a list of all of the plug-ins you have installed in your browser. From here, you can click on the plug-in that you want to reactivate or enable.

  5. Done

    How to Unblock Plug-in on Safari

    Once you’ve reviewed the activation status of all the plug-ins in question, you can exit the settings interface and resume browsing. For good measure, restart your Safari browser to ensure that the settings you’ve changed take effect properly.

Why are so many plug-ins getting blocked? 

There’s a very good reason a lot of plug-ins are facing blockage by Safari lately. Recently. Apple made the decision to block all outdated versions of Adobe Flash. Adobe Flash is a multimedia software utility required to run animations, desktop applications, mobile apps, games, and rich web utilities. Adobe Flash is also integral in the operation of utilities like browser plug-ins.
The decision to block outdated versions of Adobe Flash is one that Apple hasn’t made lightly. Older versions of the utility tend to crash various processes and other utilities that it can no longer support. Newer utilities and plug-ins require newer versions of Adobe Flash, and the older versions are more prone to crashes and bugs. Every time software is updated, holes are patched and the utility becomes more secure for users to interact with. 

The fact that so many plug-ins are being blocked from time to time basically forces Apple users to update their Adobe Flash players, therefore making their devices and the apps they interact with safer and more secure. In fact, in numerous instances, if you follow the ‘blocked plug-in’ dialogue, you’ll be redirected to a page where you can update your version of Adobe Flash.

How to Delete Safari on Mac in 5 Fast Steps

There are many different internet browsers available on the market today: Firefox, Chrome, Edge, and Safari, to name a few.

Every device that can connect to the internet comes with a default browser already installed. However, sometimes, the browser can be overly slow, the interface is unappealing, or you have had the browser for too long. 

For most devices, uninstalling a browser that you’re not using is very straightforward but removing Safari from a Mac is a somewhat tricky process. This is because Apple has hard-coded Safari into the operating system. In other words, if you remove it, it could damage the OS.

In this guide, we will show you how to remove Safari safely from your Mac. Although we must mention that this is ideal for those who are comfortable working around computers.

How to Delete Safari on Mac

This is quite a complex process. We highly recommend that you only proceed if you possess extensive knowledge of the inner workings of macOS and computers as a whole.

Step 1: Disable the SIP

We will first need to disable the System Integrity Protection (SIP). To do this, boot up your Mac while holding in the Command+R keys.

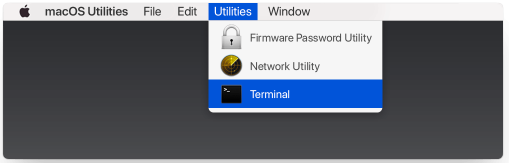
This will allow you to start up in Recovery mode. Click on Utilities in the Menu bar and select Terminal.

Step 2: Restart your device

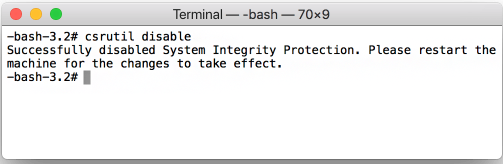
Type “csrutil disable” into the Terminal window and press Enter, disabling the SIP. Restart your machine normally and log in with the admin account.

Step 3

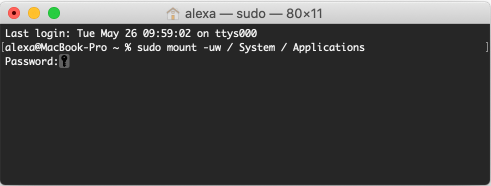
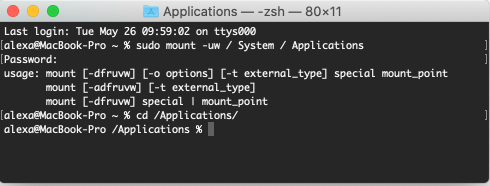
Launch the Terminal from the Launchpad and type in “sudo mount -uw /System/Applications” and press Enter.

You will be asked for a password as well.

Now you’ve enabled Read/Write permissions on the Applications folder.

Step 4

Now type in “cd /Applications/” and press Enter to display the Applications folder and then type “sudo rm -rf Safari.app/” and hit that Enter key one more time to remove Safari.

Step 5

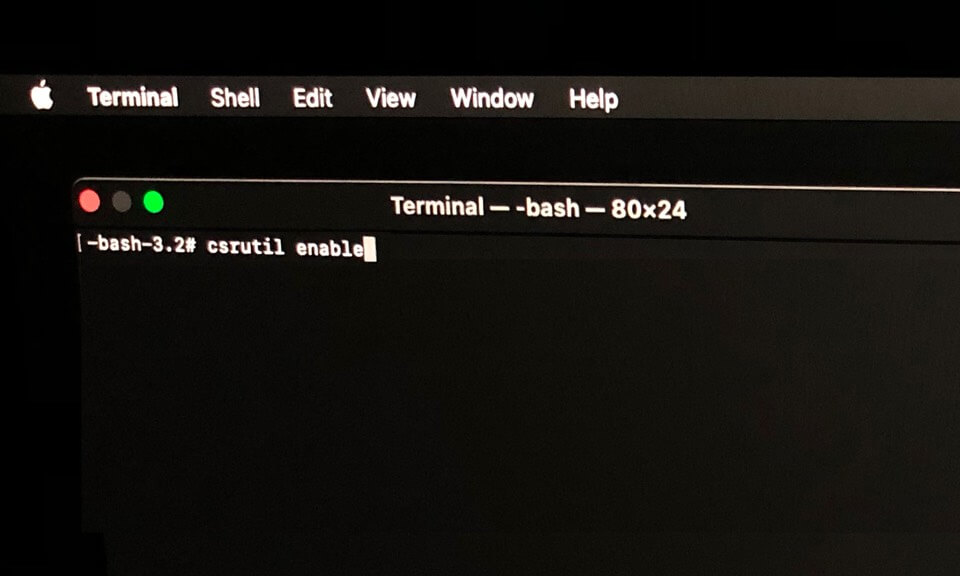
Your last step is to switch SIP back on. To do this, follow the steps in Step 1 and type “csrutil enable” into the Terminal window.

One Browser to Rule Them All

We all know how annoying it can be to open a link and the wrong browser starts up.

Sometimes, it’s better to have one program installed that does the job than having an array of browsers that bog down your system. In that case, though, Safari has proven to be a rather popular browser and it may be worth having on the computer. 

It’s available on both Mac and Windows. 

How to Reset Safari in 10 Easy Steps

Safari is the default browser on Apple devices such as Mac, iPad, and iPhone. The Safari browser is a safe and fast graphical browser.

There may be times when you need to reset your Safari. This can be when your safari browser becomes slow and doesn’t work correctly anymore. 

You need to do four things to reset your Safari browser; clear your history, clear your cookies, clear your caches, and disable your extensions. If you follow our steps below, you’ll find it is pretty simple.

Steps to Reset Your Safari

Below we give you the steps to follow to reset your Safari on your Mac. These steps will work for Safari versions 11 through 14, but not for Safari on iPhone or iPad.

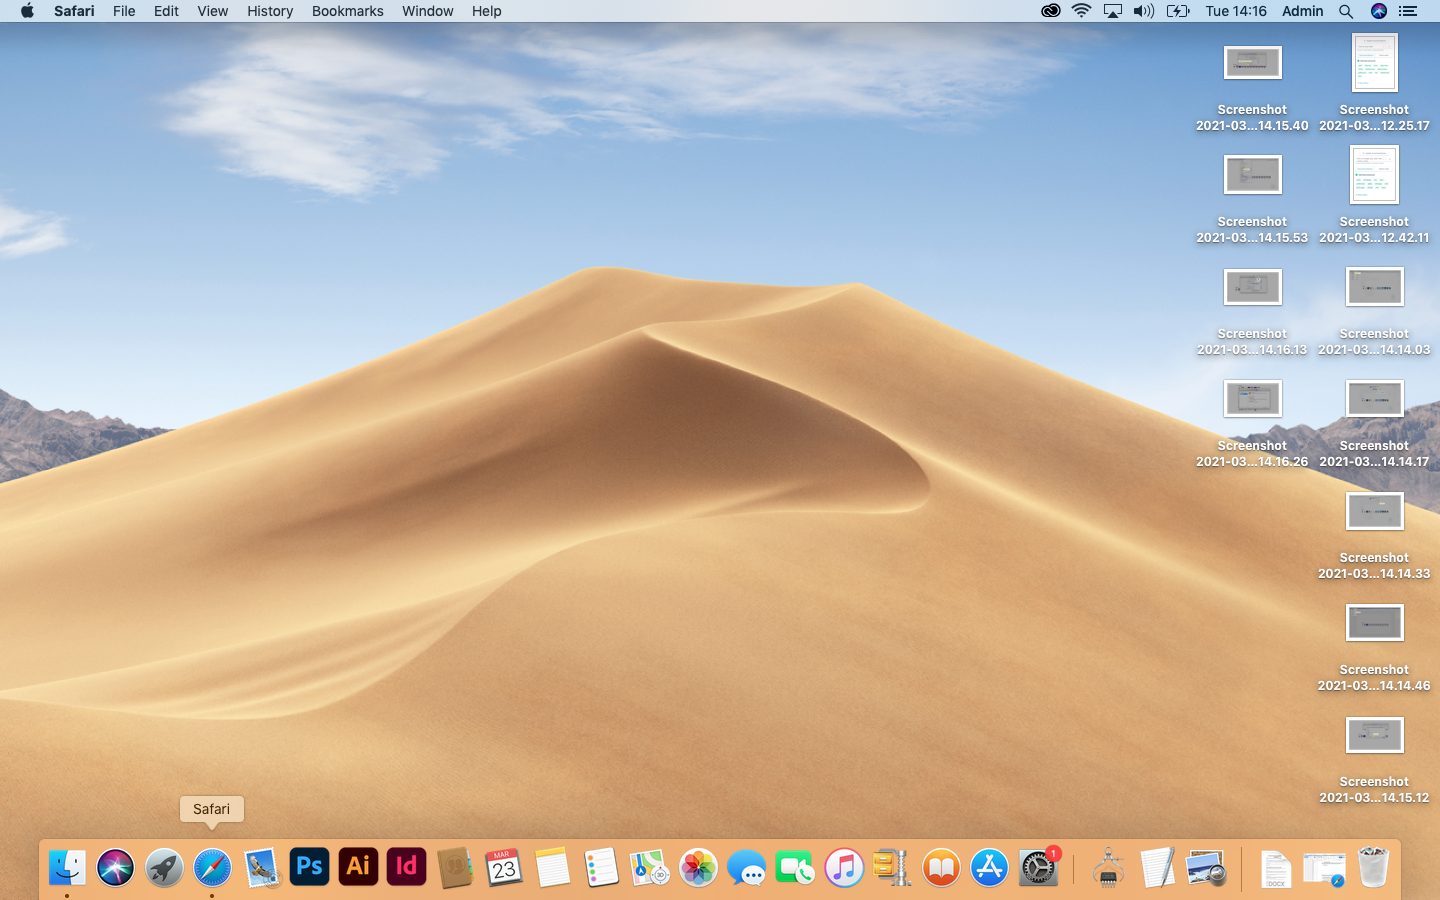
Step 1: Launch Safari

Open your Safari browser on Mac.

Step 2: Clear History

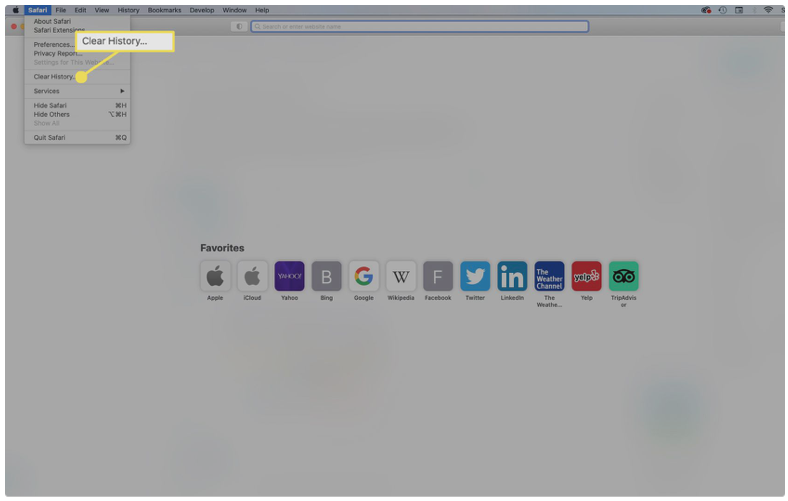
Open the Safari menu by clicking on Safari in the menu bar found at the top of your screen. Now click on the ‘Clear History’ option in the list.

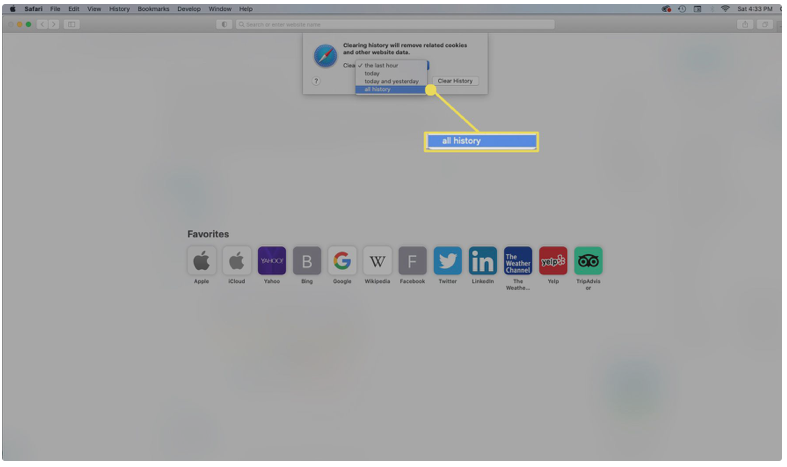
Step 3: Select ‘All History’

In the drop-down list, choose ‘All History.’

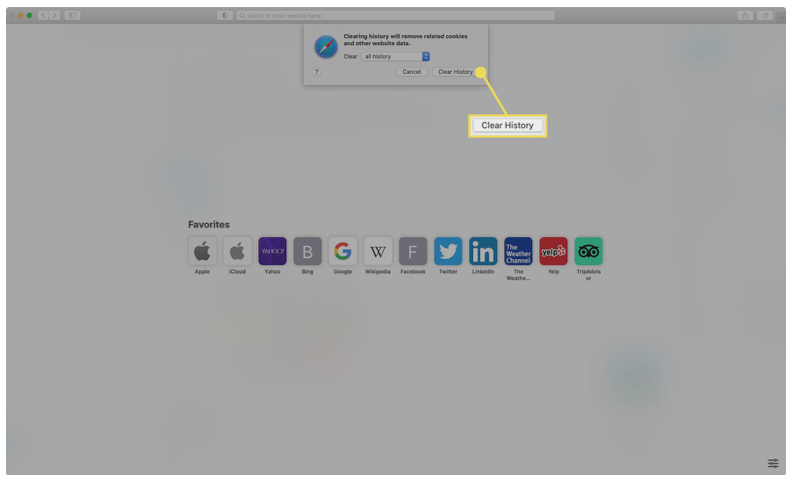
Step 4: Confirm Your Selection

In the dialogue box, confirm that you want to clear all your browsing history.

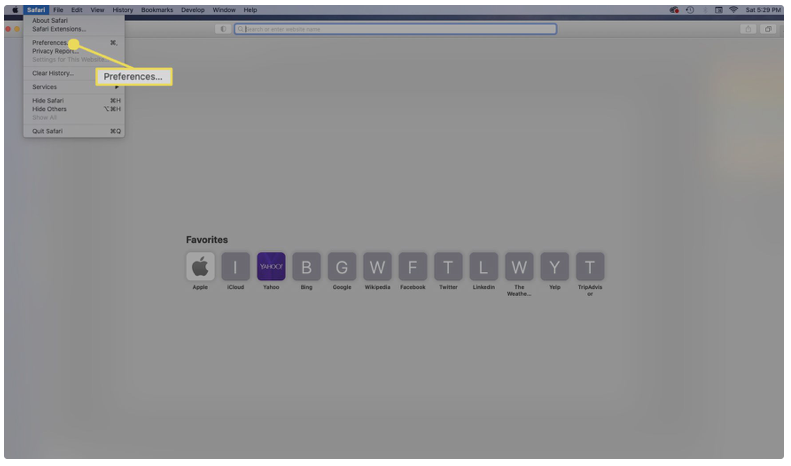
Step 5: Go to the Safari Menu and Select ‘preferences’

In the Safari menu, click on ‘Preferences’.

Step 6: Remove All Website Data

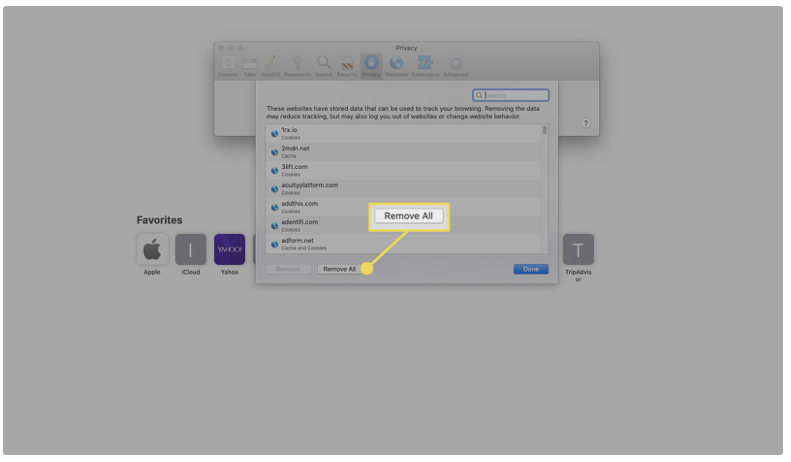
In the new window that appears, you need to click on ‘Privacy’ and then click on ‘Manage Website Data. A dialogue box will open where you need to click on ‘Remove All’. And accept by clicking on ‘Remove Now’.

Step 7: Enable ‘Develop’ Mode

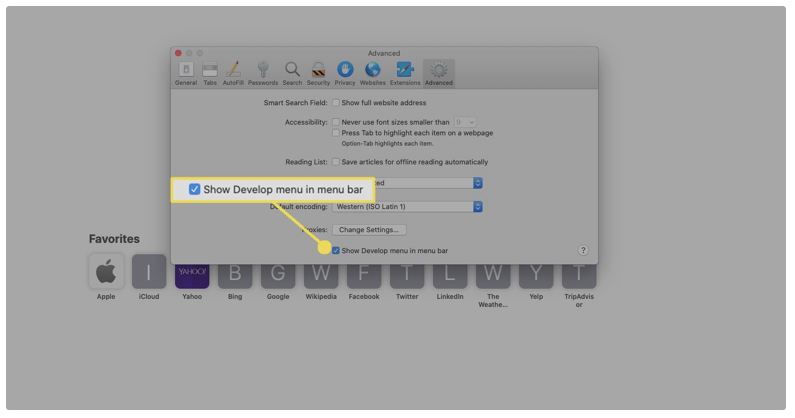
Now in the preferences section of the Safari menu, click on the ‘Advanced tab. In the menu that appears, enable the checkbox ‘Show Develop Menu in Menu Bar’.

Step 8: Empty Cache

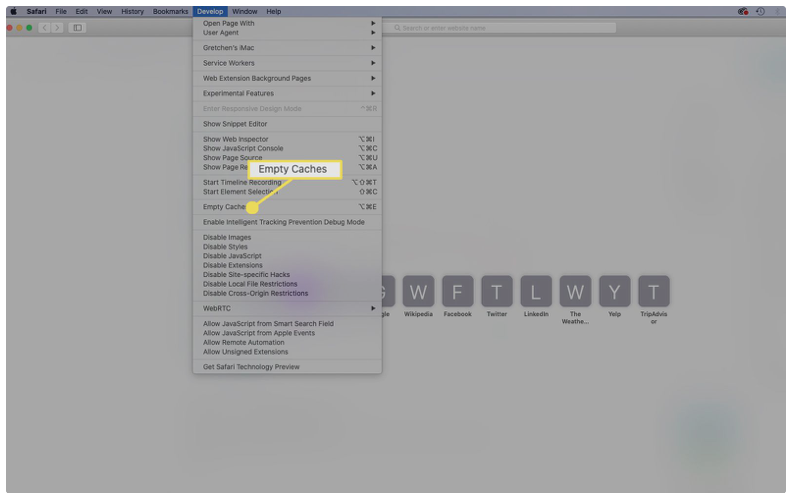
From the menu bar, you should click on ‘Develop’, and then from the list, choose ‘Empty Caches’. Remember to accept the command in the pop-up message.

Step 9: Disable Safari Extensions

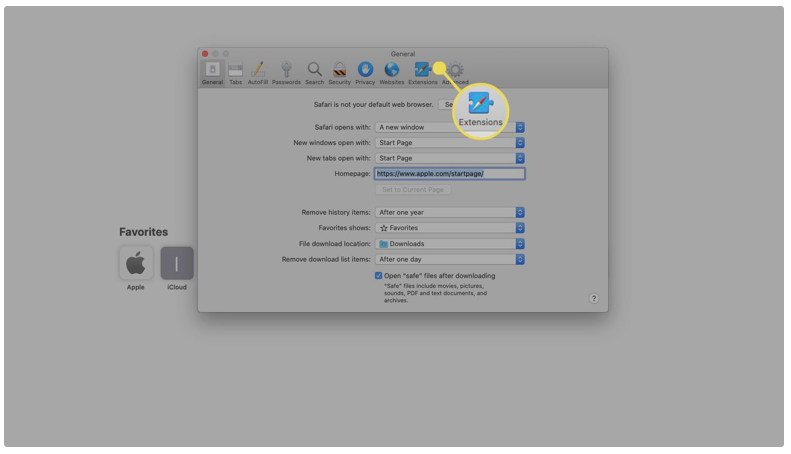
Go back to the ‘Preferences’ option in the Safari menu and click on the ‘Extensions’ tab.

Step 10: Select the Extension to Disable and Uninstall It

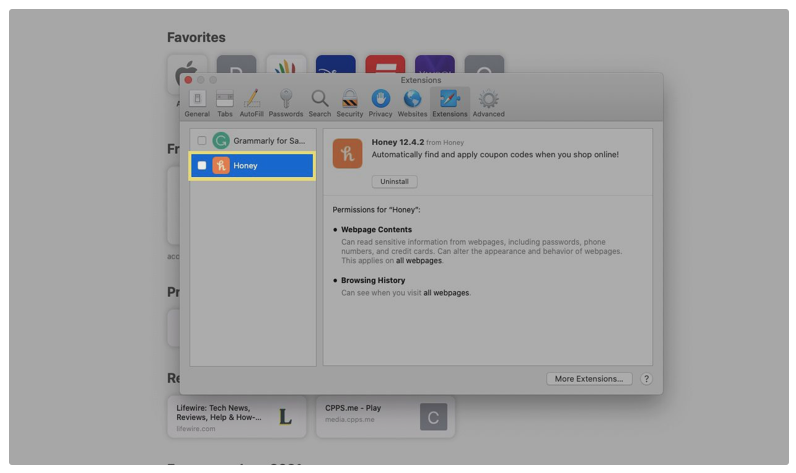
In the extensions tab, select the Extension on the left and deselect the checkbox next to it; to disable that Extension, now you can uninstall it.

Enjoy a Faster Safari Browsing Experience

Now that you have reset your Safari browser, it should work faster and without any issues the next time you use it.

If you are looking for another fast and secure browser, you can look at Google Chrome or Firefox as well.