How to activate the new animation icons in Windows 11

Microsoft is going out of its way to add subtle yet fancy features to its free operating system Windows 11 to offer even more dynamic aesthetics. The latest in this regard is the animated icons in the Settings app on Windows 11. With this feature enabled, the icons show specific animations as you click on them and move from one option to the next.

Windows 11 Download

Interestingly, Microsoft hasn’t publicly announced this feature yet. It was introduced with the Windows 11 build 25188, along with some other changes and improvements. If you haven’t updated Microsoft’s latest operating system, now is the time. Download and install Windows 11.

This feature is not available to the public yet and has been rolled out for those enrolled in the Dev Channel with the Windows Insider Program. If you don’t have Windows 11 build 25188, you won’t see the changes even if you follow the steps correctly.

If you want to enroll your Windows device in the program, you can join the Windows Insider Program from the Windows Update section in Settings. Once your device is enrolled in the program, you can download build 25188 from Windows Update. Check for updates, and follow the steps to install the new build.

Here’s how you can activate the animation icon feature for the Settings app.

  1. Launch GitHub website and download ViveTool-vx.x.x.zip

    Download the file from GitHub

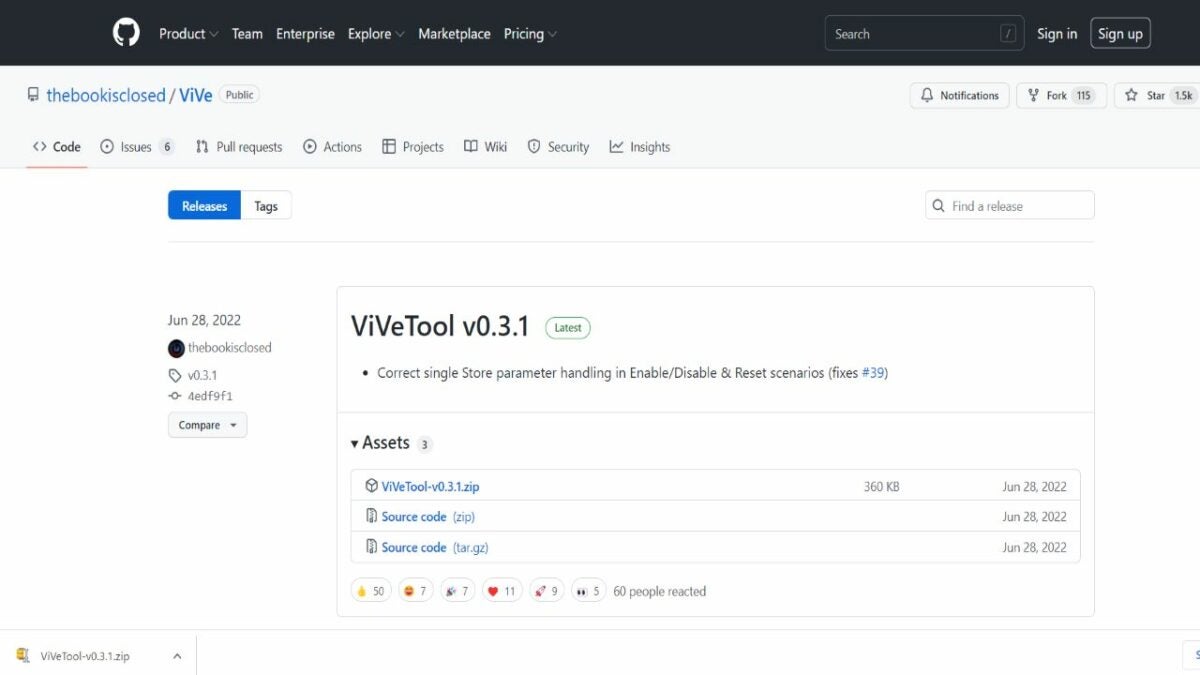
    This Windows 11 feature is not yet available to apply or activate through Windows Settings. You’ll need to download a file from GitHub. The file’s name is ViveTool-vx.x.x.zip. Simply right-click on the file name of the file under Assets and select Save link as, and download it to the desktop. You’ll see different versions of the ViVeTool releases. Download the most recent one, which is ViVeTool v0.3.1.

  2. Extract the folder

    Extract the file and copy the path

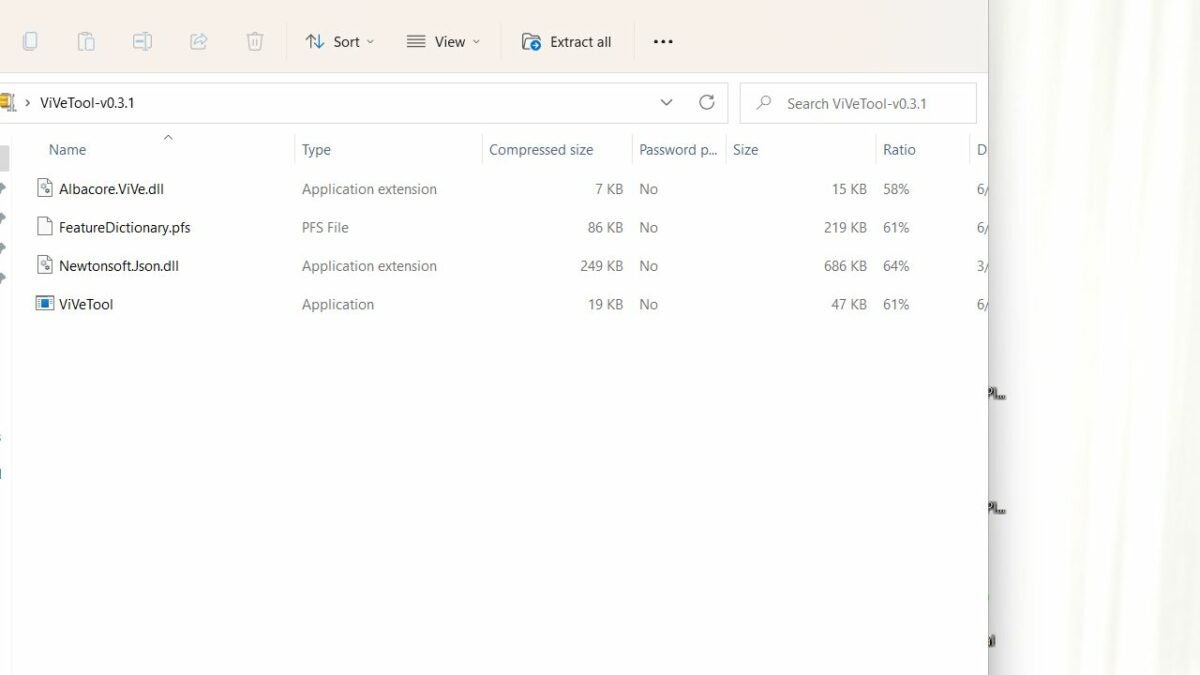
    Once downloaded, right-click on the folder and select Open With. Then, click on Windows Explorer. A new dialog will open; select Open. The folder will open in the Windows Explorer window. In the menu bar on top, click on the option Extract All.
    A new window will open with the path to the folder. First, copy the path, and then, click on Extract.

  3. Launch command prompt to enable

    Command prompt enabled

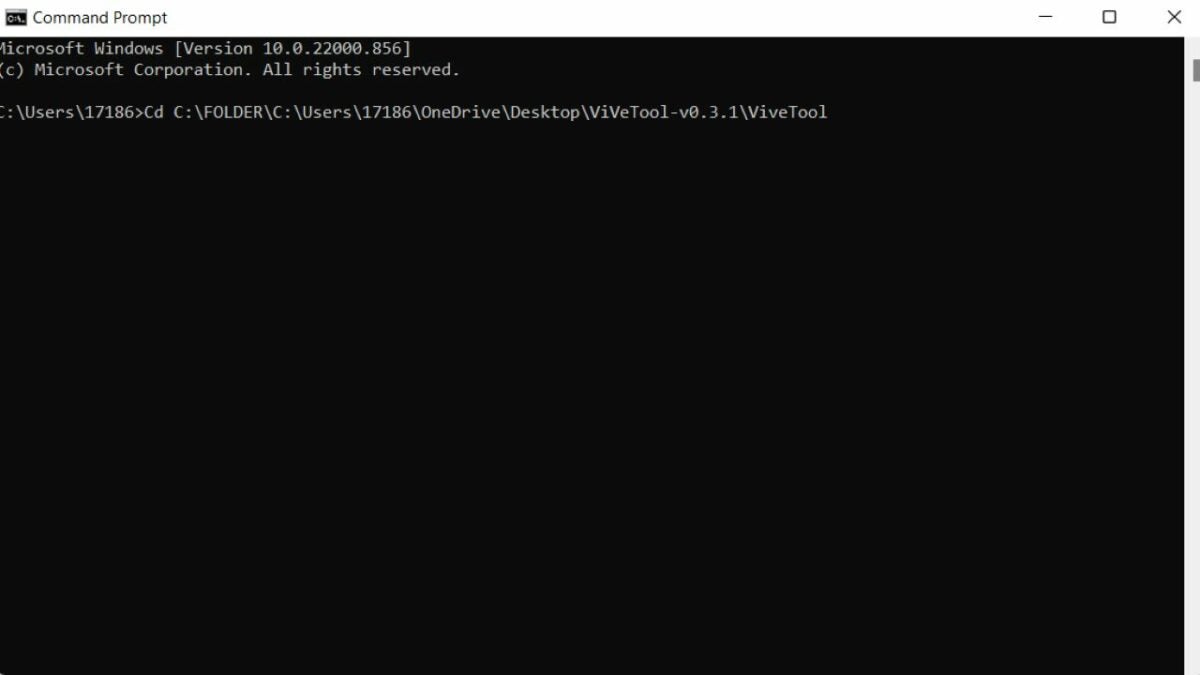
    Go to the Start menu by clicking on the Windows icon from the taskbar. In the search bar on top, type Command Prompt. Right-click on Command Prompt and select Run as administrator. In the Command Prompt window, type the following command. Cd C:\FOLDER\PATH\ViveTool Here, PATH is the path to the folder that you copied earlier. So paste Ctrl + V or manually type it here. Press Enter.

    Now, type the following command to enable the feature. ViveTool /enable /id:34878152. Press Enter and restart Windows Windows icon > Power button > Restart.

  4. Check the settings app

    Icon settings

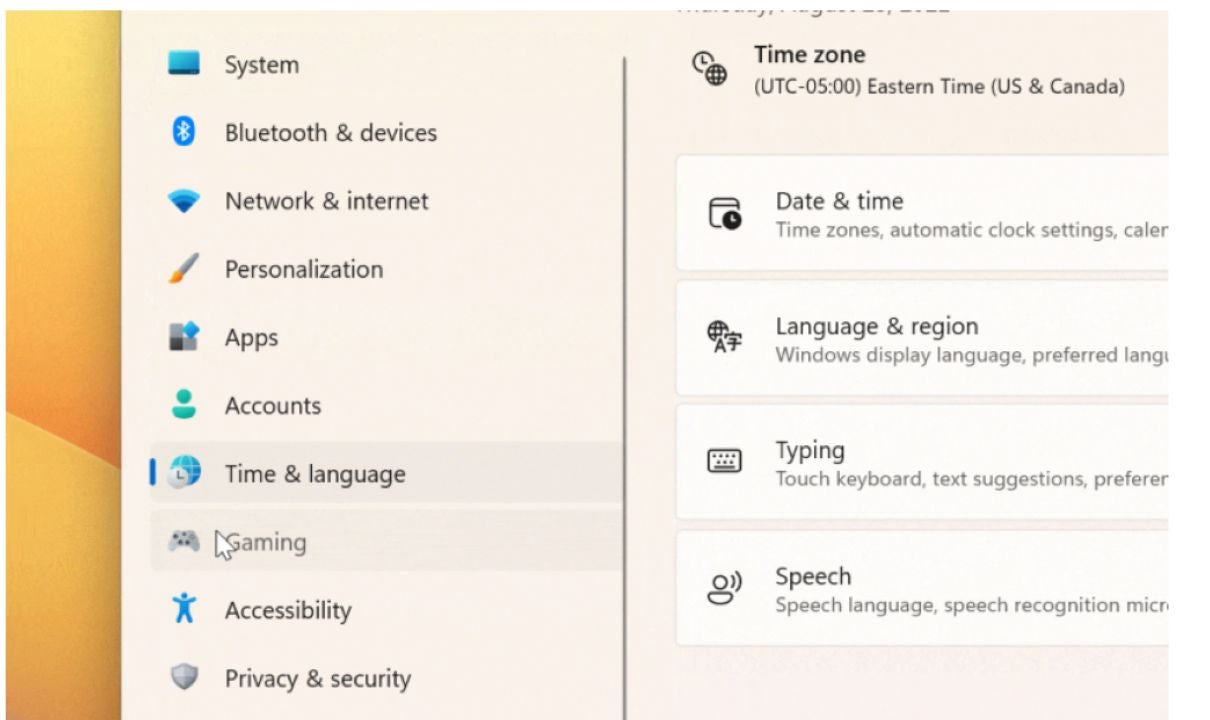
    Once the PC has restarted, go to the Settings app. Click on the Windows icon from the taskbar and select Settings from the pinned icons. You can also search for it if you don’t see it pinned. As the Settings app opens, navigate the icons on the left-hand side and see if the icons are animated. Once you click on the icon, it will show a subtle animated movie once you click on it. For example, the Time & Language icon from the menu will feature the clock moving. Other animations are simpler. For instance, the Accounts icon simply zooms in and out when you click on it. The System icon also just moves on clicking.

    What if you want to disable this feature of animated icons? The process is pretty much the same. Follow the same steps as above, but in the third step, type in this command ViveTool /disable /id:34878152 instead of this ViveTool /enable /id:34878152. This will disable the feature, and the icons in the settings app will remain static.

Getting the most out of Windows 11

Microsoft may or may not introduce this feature officially to Windows 11 as it’s only available with build 25188, which is available to subscribers of the Windows Insider Program. It’s just one of the many motions and animation features Microsoft has introduced with Windows 11, making it more fun than its predecessor Windows 10.

You can only apply it now with the ViVeTool folder from GitHub. However, it’s safe to use and may also implement other fixes to Windows 11. If you’ve followed the instructions and applied the animated Settings icon feature, tell us in the comments how you like it or if Windows should make it a permanent feature of the Settings menu.

Windows 10 settings for better performance READ MORE

How To Create Your Own Ringtones With 3uTools

The internet is full of ready-to-download ringtones that help you customize how you receive calls, but it’s a bummer when none of them seem to hit the mark! In that case, you can create your own ringtone with ringtone software like 3uTools.

3uTools is free with a wide range of apps, books, and ringtones you can download to your iPad, iPhone, and iPod touch with just a few clicks.

3uTools DOWNLOAD

If you’re wondering, “Where do I find this software, and how does it work?” you’re in the right place. Keep reading for more information on how to use 3uTools, how to create your ringtones, and where to download 3uTools.

What is 3uTools?

3uTools is free software that allows you to manage files, download apps and ringtones, and jailbreak a device. You may think the jailbreaking process for this software will be its downside, but that’s not the case.

You can jailbreak any Apple device with just one click. Plus, the software is completely safe to download and install, even on your Microsoft Windows PC.
Windows 10, Windows 8, Windows 7, Windows Vista, and Windows XP 32-bit and 64-bit operating systems are just a few that support 3uTools. You can even read up on the app’s privacy policy if you’re curious about how the software developers handle your data.

How to use 3uTools to create your ringtones

Using 3uTools to create your ringtones is a lot easier than it may seem. Here are a few steps you must follow to make customized ringtones with the software.

  1. Download 3uTools

    Start by downloading the 3uTools app

    Of course, the first step is to download and install 3uTools on your device. Then, connect your Apple device to the PC using the designated lightning cable.

  2. Make ringtone

    Click the bell icon to make a ringtone

    Launch and run 3uTools. The interface is intuitive and easy to use, allowing you to navigate to the right page in just a few seconds. At the top of the page, click on “Toolbox,” the button with the wrench icon.

    Then, click on “Make Ringtone,” the button with the bell icon. Now, it’s time for the fun part!

  3. Export music file

    Choose which media file you want to export

    Now, it’s time to choose and export the music file that you want to turn into a ringtone. After clicking on the bell icon, another window will pop up, giving you the option to select a music file “From PC” or “From iDevice.”

    If the music file is saved on your desktop, click the first option. If your music file is saved on your iPhone, iPad, or iPod Touch, click on the second option. Then, look through your collection to find a music file that suits your ringtone preferences best.

  4. Customize the ringtone

    Select which part of your sound file you want for your ringtone

    The best part about 3uTools is that it allows you to customize your files, and you don’t get stuck with the default snippet picked out by the software, as other apps do. On 3uTools, you can cut out your favorite part by moving the given slider.

    Click on “Set Starting Point” to determine where the ringtone begins, and select “Set End Point” to determine where the ringtone ends. This makes the customization process much quicker. If you accidentally mess up, you can click on “Restart” to start over! Keep in mind that 3uTools only allows you to create 40-second long ringtones.

  5. Generate ringtone

    Generate and import your ringtone from your sound file

    Once you’ve fully customized your ringtone, it’s time to generate and download your favorite ringtone. First, click on “Generate Ringtone.” The software will display “Succeeded to generate ringtone,” after which you can select “Import to iDevice.” The software will require a few moments to download the ringtone on your iPhone, iPad, or iPod Touch.

  6. Set ringtone

    Select your new ringtone on your iDevice

    Finally, you can access and set the ringtone. First, you must navigate to the Settings app on your Apple device and click on “Sounds.” Then, select “Ringtone” and scroll through your ringtones. Next, click on the ringtone you just downloaded from 3uTools, set it as your default ringtone, and you’re good to go!

Download 3uTools now!

3uTools is a fun software full of apps, books, and ringtones you can easily download to your iPad, iPhone, and iPod Touch. If you’re not sure how to use the app, Softonic is the perfect place to learn how!

Want to learn more about how 3uTools can benefit you? Check out this article on using 3uTools to manage your iPhone.

How to use Norton Password Manager Chrome Extension in 3 steps

Remembering passwords has become an ordeal as so many of us have an account for so many websites. From email to social media and marketplaces, there are numerous accounts you need to access using passwords. Fortunately, with password managers, it gets easier. The Norton Password Manager Chrome extension can help you manage your passwords on the Chrome browser.

Norton Password Manager Download

It’s a cloud-based password manager that can also help sync your passwords on different devices. In addition to passwords, it can also save bank cards and addresses, so you can enter information and check out quickly. It can even help you generate passwords when creating new accounts.

  1. Set up password manager vault

    Create an account to set up the password Vault

    Once you’ve installed the Norton Password Manager extension on Chrome, you’ll need to sign in to your Norton account or create a new one to set up the password Vault.

    If you have an existing account with Norton, simply enter the email address and password to sign in. If you don’t have one, click on ‘Create an account.’

    You can use a working email address to create an account. Enter your email address and create a password. Alternatively, you can create an account with a Google or Apple account. You will be required to confirm your account via a code.

    To set up the Vault, you’ll be required to create another password, which should be strong. Keep in mind that you cannot recover this password, so you should create a backup.

  2. Save login credentials to the vault

    Add login details

    Once you’ve set up the Vault, you can either add login information for different websites manually or do it when you log into those websites. The latter is super easy and quick.

    When you visit a website and log into your account, you’ll see a pop-up in the corner whether you would like to save the login info for that website to the Vault. Click ‘Save’ to save the password.

    You can also do it manually:

    – Go to the dashboard.

    – Click on the ‘+’ on the top menu.

    – Select ‘New Login.’

    – A form will open where you can enter the Title, Login URL, Username, and Password.

    – Click Save.


  3. Export data from Norton password vault

    Export your Vault to other devices

    You can easily export all the login, wallets, and addresses to another device or create a backup. Here are the steps:

    – Click on the puzzle icon on top right and click on Norton Password Manager.

    – Click on ‘Vault’ from the pop-up.

    – Type in your Vault password to log in to dashboard.

    – Click the three horizontal dots icon from the menu.

    – Select ‘Export vault.’

    – You will be asked to enter Vault password again (Protect Vault Action.)

    Once you enter the password, you’ll see a list of your logins, wallets, etc., that you can copy-paste to move to another device or save as a backup file.

How to Use ColorPick Eyedropper Chrome Extension in 4 steps

Whether you’re making a website or creating artwork in an app like Photoshop, you might come across colors online you want to use. However, finding out exactly what those colors are is difficult unless you’re a developer. Fortunately, you can download the ColorPick Eyedropper Chrome extension to make the process easy.

ColorPick Eyedropper DOWNLOAD

This extension can tell you the RGB and hex code of virtually any color you see on the web. It takes as little as hovering over an object to find its color. Your other option is to go through the DevTools in Chrome to find the color codes in the CSS code of a website, which, as you can guess, is complex.

So how can you discover color codes using the ColorPick Eyedropper extension? Here are the steps.

  1. Pin the Extension

    Pin the extension for quick use

    To make it easier to use the extension, pin it to the menu bar on top next to the address bar. Simply click on the puzzle icon, and you’ll see a list of installed extensions. Click the pin icon next to the ColorPick Eyedropper extension. It will turn blue, and you’ll see the extension in the menu bar.

  2. Picking a Color

    Pick a color to get the Hex and RGB code

    Picking a color using the extension is pretty easy. First, click on the extension icon from the menu. It takes a second for the snap mode to turn on with a plus-sign cursor that you can move around.

    Just move the cursor on the object with a color you want to pick. When you click on it, a small box will appear with the hex code and RGB numbers for that particular color.

    You can copy them to the clipboard if you want to use them. You can then use the number to select the color in tools like MS Paint or Adobe Photoshop.

  3. Get Colors from Color History

    Get Hex and RGB codes from color history

    Besides clicking on objects to pick their colors, you can also get those colors again in history. The extension maintains the history of colors you have picked. Here’s how you can do that:

    • Click on the extension icon and click on the ‘Settings’ icon (wheel).
    • A new window will open. Click on ‘History.’
    • Here, you’ll see boxes of colors. Just click on them to add to ‘Palette.’
    • Copy the code from the Palette list.
  4. Change Settings for the ColorPick Eyedropper Extension

    Customize the extension settings

    You can also configure settings for the extension. Click on the Settings icon after clicking on the extension icon. A new window will open where you can find all the basic and advanced settings.

    You can select if you want the hexadecimal, RGB, or HSL to show on clicking on an object. Similarly, you can de-select any of the three you don’t want to be shown.

    In advanced settings, you can make different selections like:

    • Use PNG quality when available
    • Use CSS value for RGB/HSL
    • Lower case hexadecimal values
    • Reverse history (show oldest first)
    • Show Split Color Preview

    Once you have made the selections, click on Save Options.

How to Use CurseForge to Manage Your Addons, Mods, etc.

In popular releases like Minecraft or World of Warcraft, modpacks are a game-changer. With the help of modpacks, you can add many more features and items to the game. Adding mods to Minecraft used to be a manual process that took a lot of time. However, now you can download the CurseForge app to manage addons and mods seamlessly.

CurseForge Download

What is CurseForge?

CurseForge is a free application that simplifies the installation of modifications and addons for several popular games, including Minecraft variants. You can install the modpacks through the website or within the app, whichever is more convenient for you.

5 steps to use CurseForge

Here’s a detailed guide on how to use CurseForge to add and manage modpacks.

  1. Logging in to CurseForge

    Log in with your Twitch account

    You don’t necessarily need to create an account in the CurseForge app. The app is usable without logging in. However, if you want to log in, you can do so with your Twitch account.

    – Click on the login button from the sidebar menu.

    – Click on Connect with Twitch.

    – Add your Twitch credentials.

    – You’ll need to give CurseForge authorization to access basic information from your Twitch profile.

  2. Installing the in-app modpack?

    Install in-app addons and modpacks

    The main benefit of CurseForge is that it simplifies the process of adding modpacks to games. With a few clicks, you can find and install them within the CurseForge application for PC. Here’s how you can install a modpack:

    – Launch the app and select the game you want to install the modpack for on the top left corner.

    – Search for the modpack you want through the search bar on top.

    – Alternatively, click the Browse Modpacks tab to browse through available modpacks.

    – Once you’ve found the modpack you’re looking for, click on the Install button in front of it.

    – Go to the My Modpacks tab to find the installed modpack and click on Play to start playing.


  3. Installing modpacks on the CurseForce website

    Install addons from the CurseForge website

    When it comes to CurseForge, in-app installation is generally easier and better modpack management. However, you can also download and install the modpacks for the supported games through the CurseForge website. Here’s how you can do it:

    – Go to the CurseForge website.

    – Search for the modpack page and open it.

    – Click on the Install button on the top right corner of the page.

    – You’ll be redirected to a new page and see a prompt to open the CurseForge app. Click on Open CurseForge.


  4. Detect games and mods in CurseForge

    How to detect games and addons

    Another fantastic advantage of using the CurseForge app is that it automatically detects the supported games and installs modpacks on your system. This lets you efficiently manage your addons for different games within a single app.

    That said, if you cannot find a game or a modpack, you can manually scan for it. Here’s how to do it:

    – Go to Settings in the CurseForge app by clicking on the wheel icon at the bottom left.

    – On the menu on the left, click the + button next to the header Game Specific.

    – Click on Scan computer for games.

    – The app will run a scan and tell you how many games were added.

    If it still doesn’t work, you can try adding the game manually. Here’s how to go about that.

    – Go to Settings in the CurseForge app.

    – On the menu on the left, click the + button next to the header Game Specific.

    – Click on Manually add a game.

    – A new window will open where you can browse to the game’s installation directory.

    – Select the game folder and click Select Folder.

    – The game will be added to the app.


  5. Setting auto updates for addons

    Setting auto updates for addons

    The CurseForge app can also automatically update addons. However, it only downloads the updates while the app is running. Unlike other applications, it cannot download updates in the background. Here’s how to set automatic updates:

    – Go to Settings and in the menu, click on Addons.

    – Under updates, select the frequency of updates (for example, every hour).

    You can also select update settings for specific games. Here’s how to do that:

    – Settings menu, under Game Specific, select the game.

    – Turn the Auto Install Updates button on.

Stay current on the latest modpacks

CurseForge is an excellent app for installing and managing addons or modpacks for various games. If you’re looking for ways to take your gaming experience to the next level, we recommend browsing CurseForge’s thousands of addons for your favorite titles. And the good thing is that you can do all this without leaving the app.

The app is free to use, and more addons are added weekly. If you want to keep it synced on multiple devices, it’s best to create an account and log in. Tell us in the comments which addons or modpacks on CurseForge are your favorites! And check out our favorite mods for Minecraft.

How to use Avast Online Security Chrome extension to boost safety

Browsing the internet without proper security can result in malware infecting your system or shady websites stealing your data. Since you cannot be sure about the authenticity or safety of every website you visit, it’s best to use an internet security tool. Avast Online Security & Privacy is a free Chrome extension that you can use to browse on Chrome safely.

Avast Online Security & Privacy DOWNLOAD

Avast is one of the top anti-virus providers in the world. This Chrome extension is specifically designed to add another layer of security to Chrome browsing sessions. The extension can help identify and block phishing sites, block data-collecting cookies, block advertisements, and optimize privacy.

  1. Enable and pin the Avast extension

    How to enable Avast security extension

    Once you’ve downloaded the Avast Chrome extension, you will need to enable it to let it do its job:

    • Click on the puzzle icon on the top right corner of the Chrome window.
    • Click on the three dots icon next to the extension name, and click on ‘Manage extension.’
    • Toggle the button in front of ‘On’ to turn it on if it’s not already on.

    Here’s how you can pin the Avast extension to the menu bar.

    • Click on the puzzle icon in the top right corner.
    • Click on the pin icon in front of the extension name.

    The pin icon will turn blue, and the Avast extension will be visible on the menu bar. From there, you can easily manage it.

  2. Use in Incognito Mode

    Use incognito mode

    You can also use the Avast Online Security extension in the private browsing mode of Chrome, the incognito mode. It may not be enabled by default to be active in incognito mode. Here are the steps:

    • Click on the puzzle icon in the top right corner.
    • Click on the three dots icon next to the extension name and click on ‘Manage extension.’
    • Scroll down to ‘Allow in incognito’ and turn the toggle button on.
  3. Check website security

    Use Avast to check website security status

    Whenever you visit a website, the Avast extension will notify you about any red flags about the website. Similarly, it will also let you know if the website is safe. If a website is safe to browse, you will see a message like ‘Everything looks good,’ indicating the website is safe to use when you click on the extension icon.

    Furthermore, you can check whether the website is tracking anything. Scroll down to Privacy, and you’ll see a list of trackers (Social networks, Ad Tracking, Web Analytics, and Others). It will also tell you how many trackers it blocked.

    Similarly, if a website is unsafe to visit, the website will be automatically blocked. For websites that are not blocked, you can click on the extension icon and see the notifications from the menu within the extension. In addition, you can check Anti-Tracking, Privacy Advisor, and Ads Opt-out.

  4. Block trackers

    How to block trackers

    You can choose specific or all trackers to block. If you want to block all trackers, turn on the option ‘Prevent tracking on all websites.’ You’ll find this option under the Privacy Advisor section when clicking on the Avast icon.
    Conversely, you can also select specific trackers to block, such as Ad Tracking or Social networks.
    This will ensure that all trackers are blocked and that no cookies are collected.

15 best password manager and generator extensions for Google Chrome

Do you want to elevate your browsing experience? A password manager is an excellent tool to increase your login security and allow quick navigation through different accounts. Most password managers operate on the same basic principle — the user sets up a master password that controls all password-protected accounts.

However, some apps have varying features that make them particularly good and effective for Chrome. The following 15 managers can be used directly in Chrome, saving you the hassle of leaving your browser in the middle of an important task.

Google Chrome Download

LastPass: Free Password Manager

As a fully-featured manager, LastPass is a popular choice for keeping track of your accounts and passwords. In addition, it is an efficient extension that automatically imports the password in Chrome, Opera, or Firefox browsers. LastPass is based around an organized and easy-to-use vault. This extension can also store your form content and notes. Plus, the auto-fill functionality helps identify different form fields and fill in only the appropriate information.

While LastPass offers many products at different pricing plans, the free version offers all the basics you need as a Chrome extension. This password manager also features a username generator, a digital wallet, and a password generator.

LastPass: Free Password Manager DOWNLOAD
LastPass helps you organize your passwords for all your favorite apps

iCloud Passwords

With iCloud Passwords, you can use your already-created Safari passwords on Chrome for Windows. The manager also stores your newly-created password on the iCloud Keychain so you can access it on your Apple devices as well.

To access your passwords on iCloud, open the manager’s app and sign in. Then click on the account you want to view, followed by copying your password and username.

iCloud Passwords DOWNLOAD
Save your Safari passwords onto Chrome with iCloud Passwords

Show Password

If you want to save your energy and time when logging in to different accounts, ShowPassword is pretty handy. Most websites will hide your login password as you type it. While this is meant to enhance security, it’s often a nuisance if you use your device in private. The Show Password Chrome extension displays the field content of your password while you place your cursor on the field. As a result, you may save yourself some time when logging into your website.

ShowPassword DOWNLOAD
If you use a private device, utilize the Show Password extension to save time

Norton Password Manager

Norton Password Manager is smart, secure, and straightforward. It helps secure logins in your vault and guides you to create complex and strong passwords. Additionally, it features a safety dashboard to evaluate weaknesses in your login details.

The password generator helps you create a strong password with just one click. And the auto change feature enables you to easily save your passwords. You can access your logins through biometrics and Face ID on your mobile device.

Norton Password Manager DOWNLOAD
Create strong and secure passwords with Norton Password Manager

Random Password Generator

As a simple and secure extension to generate passwords, the Random Password Generator has a minimalist interface. However, simple is better when all you need is a tool to help you come up with a secure password on the spot. This generator can create a password with a length between 1 and 99 letters, and it also excludes confusing characters. In addition, the generator doesn’t use any cookies or trackers and generates everything on your side.

Random password generator DOWNLOAD
Create custom passwords with this simple extension

Strong Password Generator

If you’re looking for a simple tool to generate a solid and compatible password, this extension may help you. You simply have to specify the length of your password to the extension and let it handle the rest. The extension generates a password that you can copy on the clipboard. You can also create more than one password at a time and then copy them altogether.

Strong Password Generator DOWNLOAD
Use this extension to generate multiple passwords that you can copy to your clipboard

Password Revealer

Password Revealer is a popular Chrome extension that shows your passwords on sites that hide them by default. This extension helps you find the password that you may have forgotten or want to reveal for other things. Using this extension is pretty simple. You’ll simply click the Password Revealer icon (located in the Chrome taskbar), to unmask the desired password.

Password Revealer DOWNLOAD
Use Password Revealer to show hidden passwords

Dropbox Passwords

While developed by Dropbox, this manager syncs and securely stores all your passwords on different devices and sites. It also auto-fills all the password and username details, so you can instantly use a website. Furthermore, it allows you to access your password anytime from any device of your choice. This extension saves you from getting locked out of your account. Users with Dropbox Basic, Plus, Family, Professional, Standard, Advanced, and Enterprise all have access to this password manager.

Dropbox Passwords DOWNLOAD
Sync your passwords between multiple devices

Password Manager

With its straightforward name, Password Manager is a fittingly straightforward and easy-to-use extension. It connects to your preferred password manager and automatically inserts all your login details in the field. Furthermore, the add-on creates a local copy of your preferred account. Also convenient is that your username and password are automatically entered on most third-party websites that you may want to use.

Password Manager DOWNLOAD
This straight-forward extension helps you organize your login details

123 Password

If you want to generate different passwords for a wide range of websites, the 123 Password extension may be your best bet. For example, this extension can help you create passwords for Facebook, Twitter, and Instagram.

You only need to enter the website URL and use your master key. The process will help generate different passwords for each website. But you only need to remember the master key to access all accounts. This is a simple and secure application to try.

123 Password DOWNLOAD
Use one master key to organize multiple passwords

Password Manager Pro

If you find it hard to track your passwords, digital certificates, and keys, give Password Manager Pro a try. It stores all your valuable information in the cloud, so you don’t lose any of your sensitive data. This Chrome extension has a user-friendly interface that helps manage your passwords conveniently.

In addition, the end-to-end key management and encryption offer optimal protection for your username and password. The extension comes with a digital vault that stores your data safely, and the password recovery team makes it convenient for you to re-access information.

Password Manager Pro DOWNLOAD
Password Manager Pro stores login details in the cloud

Avira Password Manager

This easy-to-use and user-friendly password manager keeps your password and other login details secure and safe. This is a unique password-based solution that stores all your data on different devices, so it stays safe from attackers.

If you’re using more than Chrome, Avira Password Manager can also work with Firefox and Edge. Overall, it’s an excellent tool for generating strong passwords for your various accounts.

Avira Password Manager DOWNLOAD
Avira Password Manager can store your passwords on Chrome, Firefox, and Edge

ESET Password Manager

If you’re someone who forgets their passwords often, the ESET Password Manager may tick all the right boxes for you. This extension helps you manage your login details efficiently. Also, it allows you to access all your sensitive information from any device of your choice.

Since everything you find on this extension is entirely encrypted, you don’t have to worry about third-party attackers. In addition, you can use ESET to increase your password’s security through two-factor authentication and access a security report for any breaches. Also, you can prioritize certain accounts, so their passwords move to the top of the list and use Android and iOS devices to access passwords.

ESET Password Manager DOWNLOAD
Access login details from multiple devices with ESET Password Manager

Print My Passwords From LastPass – v1.0.0

While our first LastPass entry on this list focused on the free password manager, this extension is solely for printing out a list of your passwords. Having a secure hard copy of your passwords can be helpful if you ever need to give others access. The extension allows you to hide or show passwords, PINS, and account numbers in your prints.
It is pretty easy to use this application. Simply log into the LastPass account and locate the icon for Print my password, LastPass will then export your vault, and the application will reformat your information according to the print.

ESET Password Manager DOWNLOAD
Make a hard copy of your password with this extension

Password Alert

Phishing attempts become more sophisticated every day, but the Password Alert extension can help you keep your Google password safe. This Chrome extension will notify you if you use your Google Account password on any site that isn’t Google’s. Not only will this extension help you identify and prevent phishing attempts, but it will also encourage you to use different passwords for different websites and accounts. Using your Google password on any other site will prompt an alert from Password Alert, and you’ll be able to change your password immediately or turn off alerts for that account if you use your password for multiple logins.

Password Alert DOWNLOAD
Keep your Google account safe with Password Alert

10 essential formulas for Google Sheets

Google Sheets works pretty similar to Microsoft Excel, except it’s entirely cloud-based. This living document aspect adds convenience. However, you can make Google Sheets even better with formulas that automate otherwise time-consuming tasks.

Google Sheets DOWNLOAD

The Google Sheets app formulas may be slightly different from that of Excel. Knowing these formulas and shortcuts can make your data entry much more efficient. Plus, some of these formulas can also help you analyze your data. So whether you’re making spreadsheets for business or a class project, the following 10 Google Sheet formulas will come in handy.

COUNTIF() to count cells

This formula counts the number of cells if they meet certain criteria. With this shortcut, there’s no more need to count the cells manually: =COUNTIF(range, criteria)

For example, you’re looking at the sales data for the sales team for a month, and you want to know which salespeople exceeded the minimum threshold of sales, which is $500. You can add the range of the cells in the first part of the formula where the sales data is. In the criteria section, you can define an amount greater than 500. Here’s what it will look like:
=COUNTIF(F1:F10,”>500″)

COUNTIF formula

Text() to change numbers

You can use this formula to reformat numbers into a currency or decimal format: =TEXT(cell,” Format”)

For example, let’s say you have a column with dollar prices of products. You can apply the formula to the first cell and then drag it down to apply to all the other cells in the row. If the first cell is C2, the formula will look like this:
=TEXT(C2,” $0.00″)

TEXT formula

SPLIT() to divide data from cells

This formula can help divide data from a single cell in Google Sheets into multiple cells in subsequent rows. The formula is: =SPLIT(Text, Delimiter)

Let’s say you have customers’ full names in one column. And you want to divide that into first and last names. Suppose the first cell is A2. You’ll go to the next cell B2, and enter the formula =SPLIT(A2,””). This will enter the first and last names in cells B2 and C2. You can simply drag the B2 cell down to the last name.

SPLIT formula

TODAY() for current date

With this formula, you’ll automatically get today’s date without having to type anything extra. Simply type in the cell: =TODAY()

You can also use it to create date ranges. For example, =TODAY() – 2 for two days before the current date.

TODAY formula

CONCATENATE() to append cells

If you want to append data from multiple cells, this formula makes the process super easy: =CONCATENATE(string1, string2, …)

For example, you have customers’ first and last names in separate rows. So the first data row is 2, the first name is in B2, and the last name is in C2. Here’s how you can append them and get the full name in adjacent cell D2: =CONCATENATE(B2,” “,C2)Then simply drag the cell D2 to apply the formula to all the other first and last names in the sheet.

CONCATENATE formula

SEARCH() to check the value in a string

Use the search formula to help find a string in a text. This comes in handy when you’re working with spreadsheets that have a lot of text. The formula is:=SEARCH(substring, string, or text, starting at)

Here, the substring is the text you’re looking for, the string or text is the text you want to check for in the substring, and the starting at is the position where it will start, which is 1 by default.

SEARCH formula

SUM() to get total

SUM is probably the most frequently used formula in Google Sheets. Here’s the formula: =SUM(range)

Simply type in the range of cells you want the sum for and apply the formula in the cell where you want the total. Of course, this formula applies to numeric values only.

For example, let’s say you have sales numbers for the month from B2 to B11. Here’s what the formula would look like:
=SUM(B2:B11)

SUM formula

AVERAGE() to Get Average

This formula will give you the average value of a set of numeric data: =AVERAGE(range)

If you wanted the average sales number for the month, here’s what the formula would look like: =AVERAGE(B2:B11)

You can also add multiple ranges. For example: =AVERAGE(B2:B11, C2:C11)

AVERAGE formula

SUBSTITUTE() to replace text

You can use this formula to replace text with another text. Here’s the formula syntax: =SUBSTITUTE(text_to_search, search_for, replace_with, [occurrence number])

In the formula, the text_to_search is the text within which to search, search_for is the text to replace, replace_with is the replacement text, and [occurrence number] is optional if there’s a certain number of times the text should be replaced. Otherwise, all the occurrences will be replaced.

SUBSTITUTE formula

Sort() to sort the rows in one column

If you want to sort the rows of a column in ascending or descending order, use this formula: =SORT(range, sort_column, is_ascending)

Here the range represents the cell or row range, sort_column specifies the column, and is_ascending is either TRUE or FALSE, specifying whether the order is ascending or not.

SORT formula

Google Sheets makes entering, managing, and analyzing data incredibly easy. More importantly, you can access it from anywhere and backup all your spreadsheets in Google Drive. If you want to make the app even better, check out these 10 essential add-ons for Google Sheets.