How to flood-proof your home

Within 24 hours of landfall, Hurricane Florence flooded homes and streets in North Carolina, and days later people are still being evacuated. Following a 24-hour tempest of winds 90 mph winds, upwards of 40 inches of rainwater flooded areas of the Carolinas. The hurricane left 620,000 people without power, and multiple rivers (Cape Fear, Little, Neuse, and Rocky Rivers to name a few) were severely flooded in only a two-day period.

Flood Paramedic

While some geographic areas are more prone to flooding than others, natural disasters can happen anywhere and rising water levels are a very common – and very costly – result. According to the Internation Civil Defence Organisation (ICDO), over 1.5 billion people were affected by flooding between the years 2000 and 2017, making it a more widespread issue than any other symptom of natural disasters. Flooding is also responsible for $486 billion dollars worth of damages in that same time frame, making it the third most expensive type of natural disaster, right below storms and earthquakes.

ICDO Disaster impact statistics

How to prevent flooding in your home

While a lot of factors that cause or prevent flooding are out of your control (such as building and developing infrastructure, or construction of hydraulic dams), there are also ways that you can maximize your safety and help to prevent flooding in your own home. We’ve put together a list of the best methods:

1. Unclog your gutters

This seems like it wouldn’t be so big a factor, but the whole reason to have gutters is to help irrigate water off of your roof. If those same gutters are clogged, you’re effectively blocking the water’s best means of escape, weighing down your roof and increasing the likelihood of springing a leak.

keep your gutters clean

Leaves are the number one contributor to a clogged gutter spout, so it’s really worth your while to get them removed from your downspouts and gutters at least twice a year.

2. Install backflow valves or standpipes

Household water supply systems are normally maintained at a significant pressure to enable water to flow from the tap, shower, or other fixture. If an area becomes flooded, the water pressure may rise to unexpectedly high levels.

A backflow prevention device is used to protect potable water supplies from contamination or pollution due to backflow. Backflow valves will prevent sewage backup and basement flooding, and installation and replacement can be done by yourself in a matter of minutes. Check out this video to see how it’s done:

You can buy the required parts right here.

3. Make sure your downspouts are lengthened and pointed in the right direction

Mind your downspouts!

Downspouts are the vertical gutter spouts that run the length of your home. As mentioned in our first point, their purpose is to direct water off your roof and down and away from your house. If your downspouts are broken or short, all the water feeding out of them will simply gather at the foot of your house, which can actually increase your chance of experiencing flooding. Downspout extensions are relatively inexpensive and can wind up saving you hundreds or even thousands of dollars worth of damages.

Downspout extensions

Ensure that downspouts are extended at least 10 feet from your home, and that they are directing water flow away, preferably down a hill!

4. Keep electronic devices and wiring above ground level
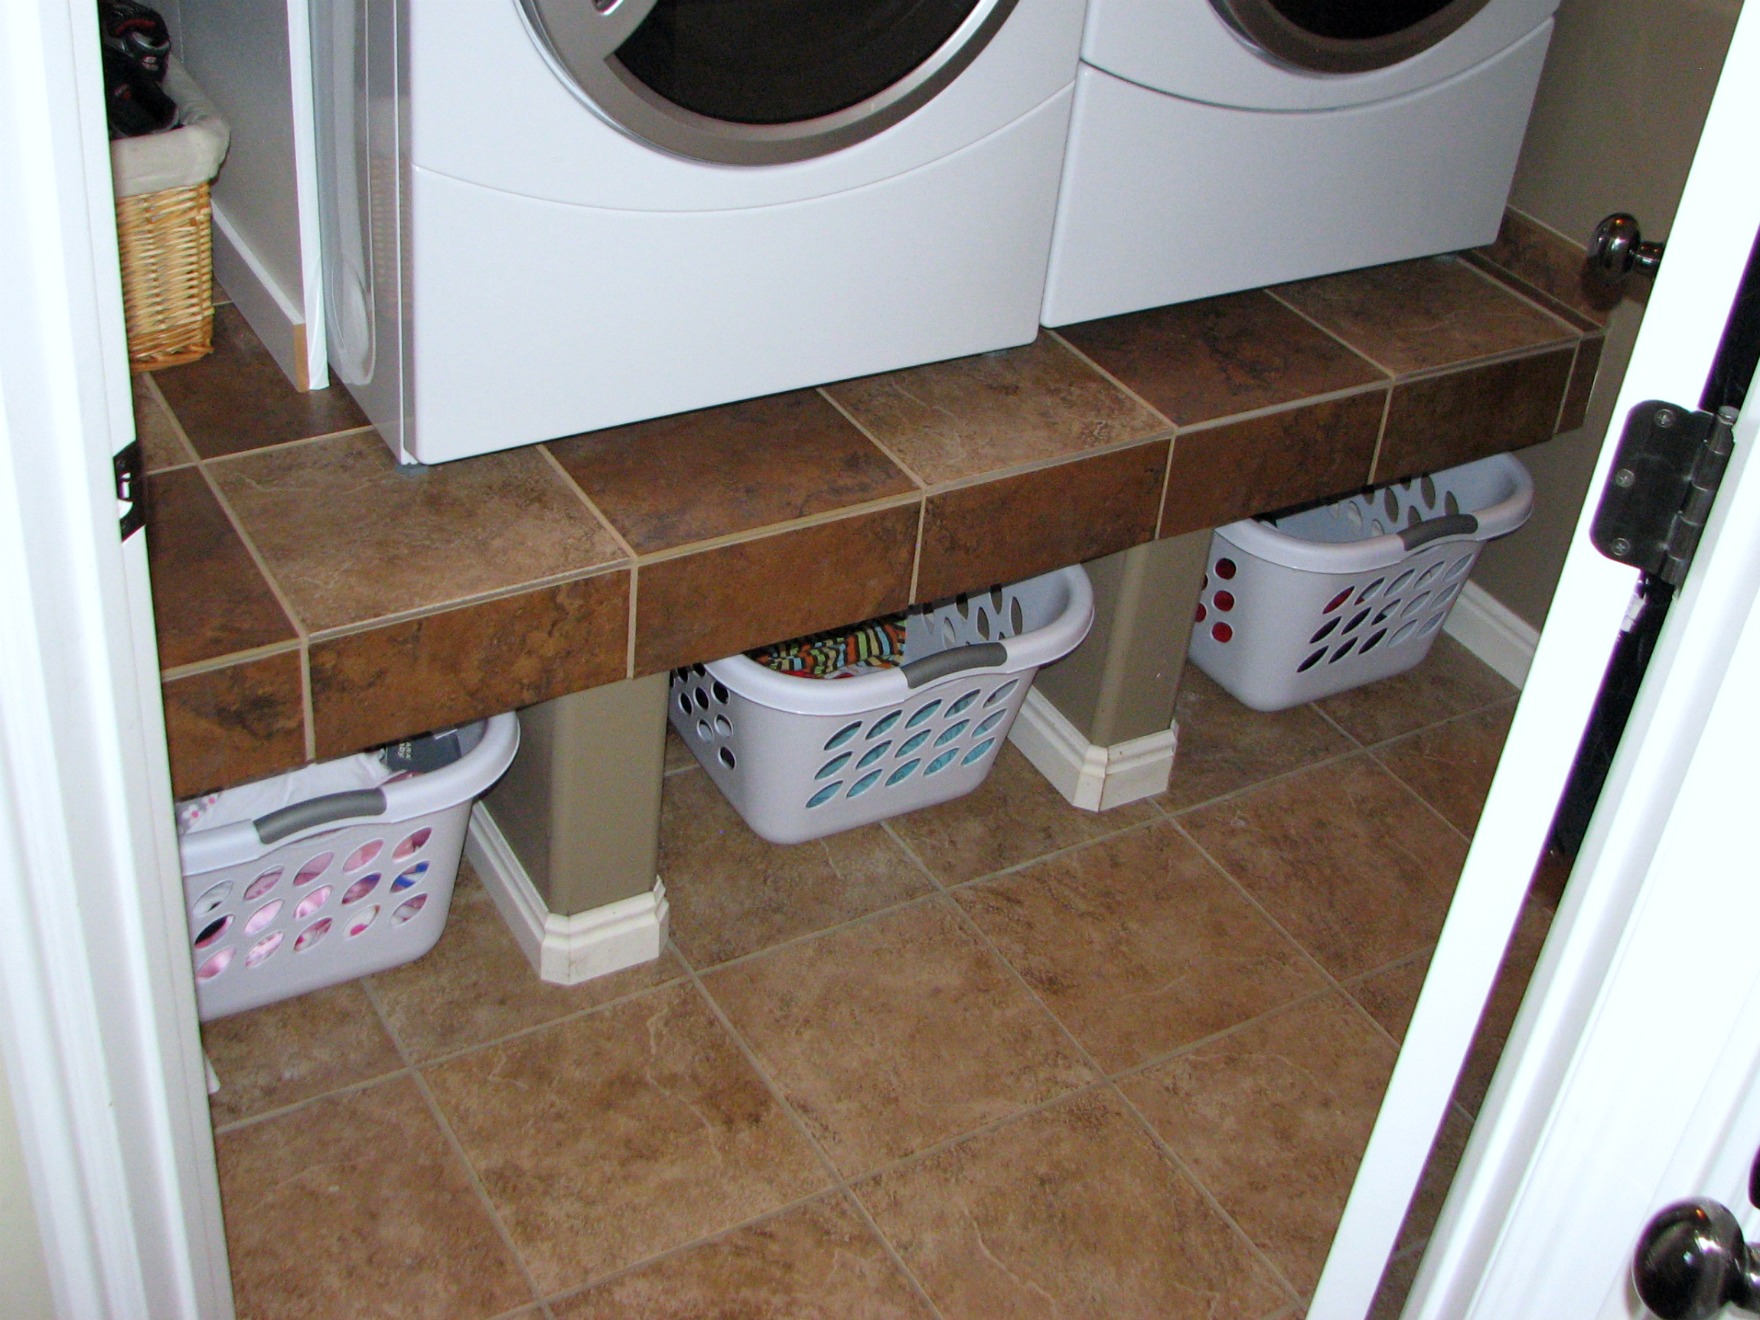
Elevated Washing machines

This is a big one: If you’ve got any electronic equipment (computer, dryer, extension cables, furnace, or washing machine) just sitting on the floor of your house it’s going to get ruined by flood water, or worse, create a hazardous environment if the area becomes submerged. It’s easier said than done with some of the heavier equipment like washing machines or refrigerators, but using cinder blocks or anchoring devices to elevate your devices can keep them safe during a flood.

Elevate electronics

Most people keep their computers on the floor, too, so if you’re one of them take precautions if your area is expecting flooding.

5. Store valuables out of the basement

Obviously, the natural behavior of water is to travel from higher ground to lower ground. That means if your house floods, it’ll be the basement that’s hit first and hit worst. If there’s even a chance that your household will be flooded make absolutely certain that all your irreplaceable valuables are stored high up so the water will not reach them.

Lastly, preparedness and vigilance are paramount when it comes to flooding safety. This can be preventative landscaping, investing in flood insurance coverage, installing flood detection devices in your basement, and noting any areas impending water flood problem. That means paying attention to water stains or mold growth on your ceilings and walls or the undersides of attic roof sheathing.

Flood rescue in Kerala

Keeping emergency numbers and knowing your local evacuation routes and relief centers is hugely important as well, and should be referenced quickly if it looks like a crisis is likely. Stay aware, and share our list with your family and friends to help keep your loved ones safe.

For more tips and prevention advice, check out this safety video:

10 tips to speed up your Google searches

Become a Google master with these advanced search tricks.

Considering how often we all use Google in our daily lives, it’s odd that most of us don’t devote more time to actually learning how to use it more efficiently. Arguably the greatest search engine in the world, Google’s near-infinite sources and extremely fast results are staggering, to say the least. Unless you know what you’re doing, though, the broad results can also be one of Google’s biggest frustrations.

When you’re looking for a specific site, article, answer, or source, it often means wading through dozens of false positives, duplicate results, and unreliable reports. The answer you’re looking for is hidden there 99% of the time, but more adept users will be able to find it quicker. Here are 10 tips to help you become that user:
10 tips to speed up your Google searches

1. Use quotes to search for an exact phrase

Starting with the very basics, when you type a phrase into Google, the algorithm selects key words and churns up results that have matching keywords. Type in ‘what’s a good cheeseburger recipe’ and Google will zero in on ‘cheeseburger’ and ‘recipe.’ Your top five or 10 hits will probably be links to something like America’s Test Kitchen, Food Network, or a YouTuber making said burger. Type in “what’s a good cheeseburger recipe” in quotes and Google instead searches for that exact phrase.

exact phrases with quotes

This is useful if you’re trying to find actual quotes or your specific words in a singular order. It will also typically yield far fewer results, which means less sifting for you.

2. Use an asterisk within quotes to search all variations of the phrase

Within the context of a quote, you can use an asterisk in place of a particular word. Your search results will return the exact quote as in our first tip, but the difference is that it will sub in all variations of the omitted word.

one word missing

Typing ” * is thicker than water” will likely result in “blood is thicker than water,” but might also turn up something like “lead,” “family,” or “marshmallow fluff.” It depends what’s been written! This is an especially useful feature when you can’t hear all the lyrics of a song – type the ones you know (within quotes) and substitute the unknown word with an asterisk. Your results will lead with the completed lyrics.

3. Use a minus sign to eliminate words from your search.

eliminate words from your search

Prefacing a word with a minus sign (-) will remove that particular word from all results. This is helpful if you’re trying to look up a word or phrase that can refer to two different things, like “jaguar” the car brand vs “jaguar” the animal. Typing jaguar -car -vehicle will turn up only results pertaining to the animal.

4. Use site: to specify results from a particular website

One of the main issues with Google is how often you’ll get results from a ton of sources.

How could that possibly be a bad thing?

It means you’re likely to find duplicates all over the place. For example, if you’re looking for a Penn and Teller coin trick, typing in ‘Penn Teller coin’ will probably give you the same video from five or six different sources.

one website only

Instead, you can narrow your search by typing ‘Penn and Teller coin site: youtube.com.’ Now you’ll only be getting video results from YouTube in your search results. This can also be a helpful feature if you follow a particular news journal. Type ‘trump site:aljazeera.com’ or even ‘Paul McCartney site:dailymotion.com’ and your result will be filtered to only show the site you specify.

5. Search with pictures

Probably our favorite feature on this list, you can search Google not only with words, but also with images. Whether they’re stored on your computer or linked via URL, Google can peek at the image you input and churn out results based on it.

search for images

To do this, tab over to Google Images. You’ll notice a camera icon on the search bar. Click it and either browse your File Explorer, drag and drop, or input an image URL, then press Search. Your results will be any and every thing Google can tell you about that particular picture. It feels like CSI. It’s so cool. (And the TV show “Catfish” wouldn’t exist without it.)

6. Find a page that links to a page

This one isn’t for everybody, but it might help in some specific instances. This yields results not from a specific site like our fourth tip, but instead links you to results that themselves have links to the website you reference.

search via links

Why would this ever be helpful?

If you’re trying to see how many people have linked to your article, video, or forum it sure is. Let’s say you find a bug in a video game. If you start a new thread on a forum you’ll only see when people on that forum reply or comment to your original post. If you type your bug followed by something like ‘link: steamcommunity.com/discussions,’ though, you’ll see how many people have linked to your original bug from their separate posts.

It’s also useful if you’re trying to find articles or websites that use video content. Typing ‘Fortnite strategy link:youtube.com’ will yield article results that also include video.

7. Use ‘or’ to search for two phrases

search for two phrases

This one can be useful if you’re looking for two distinct phrases. Typing in both (with each surrounded by quotes) will turn up results for both phrases. For example, typing ‘Windows boot options’ or ‘Windows startup options’ will give you results from both phrases, meaning you have more choices to pick from. It’s nice if you’re not sure what wording people used when the article was uploaded.

8. Search by the date your results were written.

Another of our favorites, Google has a lesser-used feature that lets you specify a date or time frame during which your subject was written. This is crazy useful if the news has blown up with a recent development and all you’re finding upon searching is that recent development. Looking for something that was written years ago is a slog.

Set the time frame for your results

To use this, type in your search as normal, then click Tools under the search portal. This will make a drop-down appear that says Any time. Click it and you can specify when you want the article to have been uploaded.

Articles from 2010-2012

9. Search for a specific file type

Specify format

If you’re looking for a specific file type, Google can do that too! This is useful if you’re searching Google Images for .jpgs only, or if you want a file to be in .pdf format. To do this, just type what you’re looking for followed by filetype pdf replacing pdf with whatever type you need.

10. Use advanced search options for even more

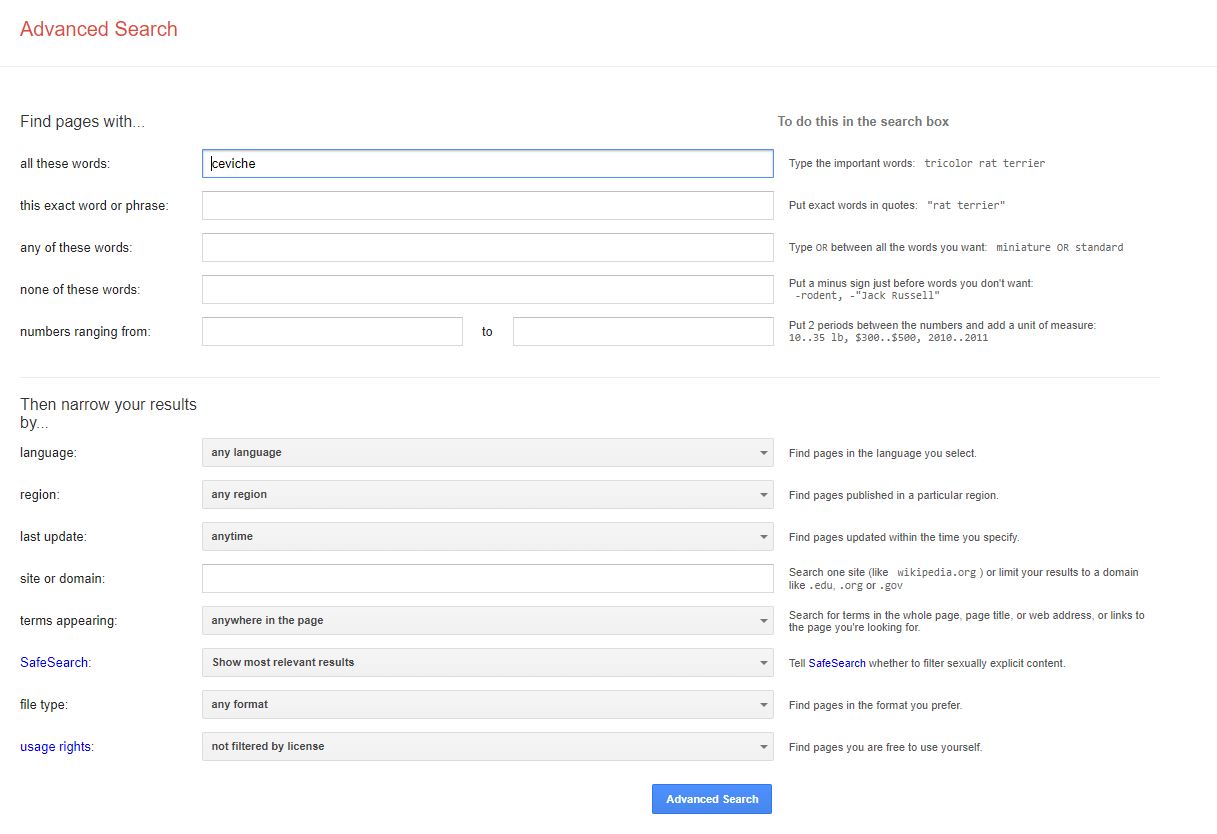
You can toggle many of the features at once (including some we didn’t cover) and even more by opening up advanced search options. Click Settings under the search portal and then select Advanced search. It will open the following window:

Advanced Search

Here you can set all kinds of search filters from ranging numbers, time of updates, languages, regions, formats, and more. For maximum control over what results you come across, this is the best place to start.

Hopefully, these search tricks will help you use Google in more efficient ways, and will speed up the rate at which Google can help you in your day-to-day life.

Why you should hold off until October to buy your new iPhone

Buy the new iPhone or wait? Here’s why it might make sense to hold on.

Just days ago, Apple opened the floodgates for customers to pre-order the new iPhone XS and XS Max. While the iPhone XR will not join the roster until October, the number of pre-orders at the launch of the XS and XS Max have already been very telling:

While Apple Analyst Ming-Chi Kuo was pleasantly surprised by the success of the Apple Watch Series 4’s opening week, he revealed that the pre-orders for the iPhone XS were “lower than expected.” While this may be surprising given the new features and marked improvements that the iPhone XS boasts, it begins to make sense when you consider Apple’s high pricing strategy: They released three phones – an expensive one, a more expensive one, and a cheaper one. The XS is smack in the middle of the price ranges, and it’s attracted the smallest crowd.

price comparison

Kuo says he believes the iPhone XS model will only take up a maximum of 15% of 2018 iPhone shipments, and has since lowered his forecast of their success. The reason for the XS’ less than stellar opening is simple: If you’re in the party of people looking to buy a brand new iPhone, you’re either going to want top-of-the-line specs across the board (in which case you’d pick the XS Max) or you’ll want new features but the lowest price, in which case you’re holding off until the XR in October. Since the XS rests in neither camp, it’s the least enticing of the three options. So that brings us to the question:

Is it worth waiting until October for the XR?

Short answer: Yes. And if you’re one of those people looking to snag an older iPhone X before they’re culled from the market, don’t do it; it’s just not worth it. Unless you get an incredible deal (like less than $500), you’re simply wasting your money. October’s XR features everything that the iPhone X has, other than the dual-camera and 3D touch. If those are two things you need and you’re willing to shell out more money anyway, you’re probably looking at the XS Max anyway, and not the X or XS.

Is the XR Better?

‘Better’ is such a subjective word. It’s certainly cheaper, starting at $749 while its bigger brothers are over $1000 easy. Don’t let the size fool you, either; the XR’s LCD screen is actually larger than the XS’ OLED, at 6.1″ while the XS is 5.8″ (the XS Max being the largest at 6.5″). If you’re unsure of the difference between LCD and OLED, check out these articles.

The short explanation is that while an OLED display will have a larger viewing angle, better uniformity, and a dramatic contrast ration, LCD can boast wider screens (thus the 6.1″) and is, therefore, less taxing on battery life. Since it’s not struggling to work as many pixels, the XR’s battery life will be longer than either the XS or XS Max. If you want your phone to last longer between charges you’ll definitely want to hold out for October. Check the chart below for specifics:

Stats comparison

The XR fits a lot of power into a compact package, fully integrated with the same A12 Bionic Processor as both the XS and XS Max. It will be equally safe and secure to use. This means you’ll be able to make money transfers and new purchases with the same degree of reliability as your friends with an XS or XS Max. As a final note, the XR’s also going to have more color skins to choose from, with double the choices of the XS or XS Max. Not important for everybody, but for some, it’s a valid point in its favor.

Six colorful skins for the XR

Our recommendation is that if you’re not desperate for a new iPhone right here and now, and you want a powerful yet affordable option, getting the XR is a win-win. That being said, the lack of an aux jack is still making us skeptical about buying a new iPhone at all.

Agree with us? Let us know in the comments below which model you’re looking to get in the coming month.

This delicious 10-minute low-cal salad will fill you up!

In just 10 minutes, you can make a filling, delicious salad. Follow along!

In the culinary world full of robust, cheesy chicken parm, golden flaky fried chicken, or big juicy burgers, choosing a salad for lunch feels like signing yourself up for crushing disappointment. Your stereotypical salad is a bowl of cold iceberg lettuce with some shredded radishes and carrots, probably with some kind of dressing dumped on it to make the whole charade more palatable. But at least you’re being healthy, right?

Actually, maybe not. Salads can quickly pack on calories if you end up adding things like cheese, taco meat, bacon, or even excessive avocado (which can be healthful in moderation).

unhealthy salad

On the flip side, you have common ingredients – like the aforementioned iceberg lettuce, radishes, or cucumber – that are, according to Washington Post essay writer Tamar Haspel, “more than 90% water.” That explains why you’re so often still hungry after lunch! Lettuce, in particular, is not the magical health food it’s so often thought to be.

So we’ve got salads that are too caloric on one hand, and salads that are lacking in nutrition on the other. Sometimes you’ve got a salad that’s just plain bad for you in every way. All is not lost, however. If you build your salad carefully, you can comprise it of ingredients that DO have health benefits, or with veggies that have larger nutritional value, protein, and more vitamins and minerals.

We’ve made a salad that not only uses more healthful ingredients, but that will fill you up and taste awesome in the process. It’s very cost-effective, too, if you’re dieting on a budget.

Ingredients:

  • 2-3 pieces of smoked salmon (lox)
  • 1 poached egg
  • spinach
  • kale
  • arugula
  • grape tomatoes
  • baby carrots
  • celery
  • capers
  • salt
  • black pepper
  • extra virgin olive oil
  • red wine vinegar

“That’s a ton of ingredients!” you might think, and yes, you’re right! We like variety, color, and a good variety of health benefits. Despite how it may come across, the prep is actually very easy. The first time we made this it took a little longer, but by the second time we knew what was up and it took us under 10 minutes (excluding waiting for the water to boil)!

Making the salad

Crack an egg

So let’s get started. The first thing you’ll want to do is start boiling water for the poached egg. If you’ve never made one before and are skeptical about how hard it’ll be, trust us – you’re about to be surprised.

Fill a saucepan about two-thirds of the way up with water, and put it over a burner on a high heat. You can splash a dollop of apple cider vinegar into it as well, if you like that flavor. This will also help to give your poached egg a better shape. Put a lid on it and let it heat up. Meanwhile, crack an egg into a small measuring cup. You’ll add it to the water in a second.

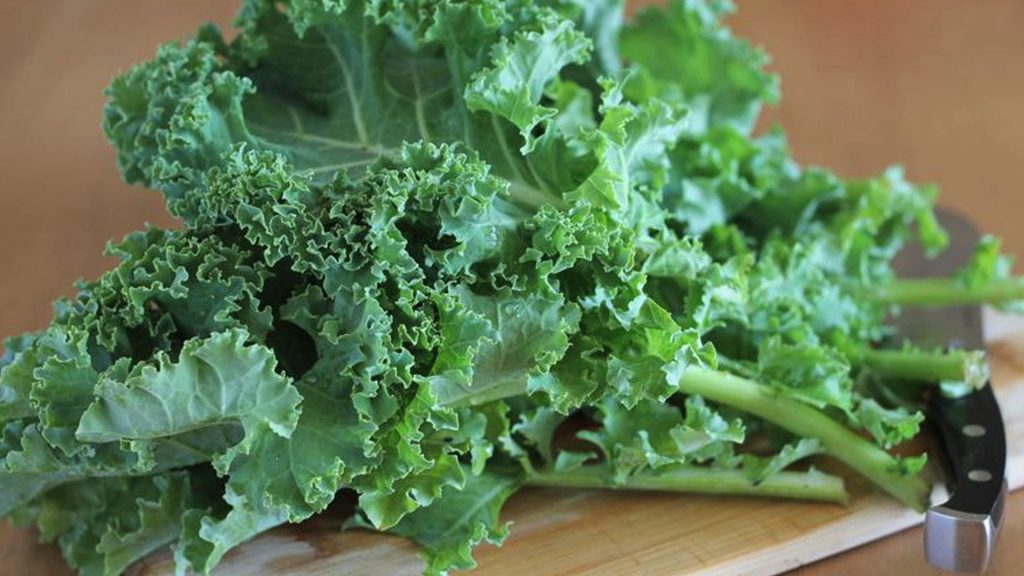
In a separate bowl, put in all the arugula, kale, and spinach you’re going to want. If you don’t like the bitter taste of those dark, leafy greens, you’re not alone. Trust us, though, once this dish is done you won’t even really taste it. They’ll just be there giving you an insane health boost.

MixedDarkGreens

Arugula is an excellent diet food that reduces risk of cancer and also improves your eyesight and bone strength. Spinach is a good source of iron and protein, and will also help your bones, as well as hair, skin, and improving glucose control for diabetics. Kale might be the healthiest of all, loaded with antioxidants, nutrients, minerals, and vitamins – particularly vitamin C. Just one cup of raw kale actually has more vitamin C than an entire orange.

ChopedCeleryCarrots

If you like tomatoes, they’ll add a great juicy, fruity contrast to the dark greens and the salty salmon we’ll put on later. Chop up some carrots and celery and you’ll get some healthy crunch too. We recommend cutting both the carrots and the celery into very small pieces. That way they’ll fit better on your fork as well as absorb more of the flavor from the oil and vinegar.

Lastly, add a couple tablespoons of capers to the bowl. Capers have a briny, pickle taste to them, so be sparing if that’s not your thing. We think they’re a great way to add extra flavor, though.

FlavorfulCapers

Now it’s time to add the seasonings – salt, pepper, oil, and red wine vinegar. Crack a generous amount of black pepper into the bowl, as it’ll really permeate the whole dish and bump up the other flavors. Be a little more sparing with the salt and oil, however, since they’re not quite as good for you. A pinch of salt stirred in goes a long way (especially if you’re heavy on the vinegar and capers). Add the vinegar last, and remember that red wine vinegar tastes like it smells and it smells really strong. Add it to taste, but our advice is to err on the side of less.

Once you’ve seasoned as much as you’ll want, shake the bowl a bunch or use a fork and spoon to toss it until that great flavor gets over every bite.

Lotsofkale

By now your water should be boiling. Lower the heat and leave the lid off until it comes down to a simmer. At this point carefully (but quickly) ease the raw egg into the water. Put the lid back on.

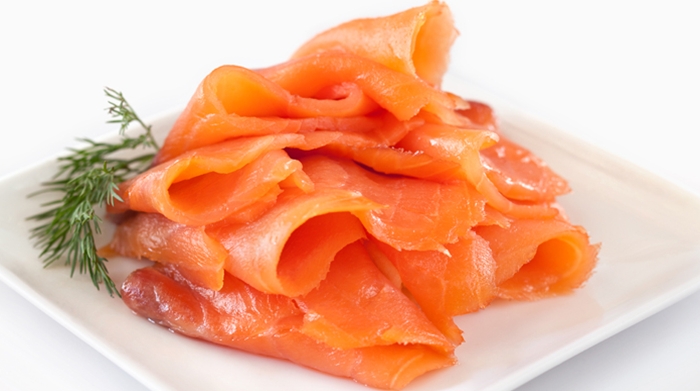
Your egg should be done in around a minute, so you’ll have just enough time to pull apart some smoked salmon and put that on top of your salad. The salmon isn’t 100% necessary, but we think it adds just one more unique texture and flavor as well as being another health benefit to the dish.

SmokedSalmon

Using a large non-metal spoon or ladel, scoop your poached egg out of the sauce pan and place it right on top of your salad. Cut it open when you eat and you’ll have rich, runny yolk mixing with the salty vinegar and smooth tang of olive oil.

RemovePoachedEgg

Now all that’s left to do is eat! This salad is one of the most healthful, filling meals we’ve found, and is an extremely nutritious lunch if you’re trying to diet. Even if you’re not watching your weight, this is a salad to sate!

Let us know in the comments below if you enjoyed the dish, and if there’s anything you’ve added to it!

Sick of a Slow Computer? 5 Simple Ways to Make Your PC Run Faster!

Computer running slow? If you’re noticing a significant drop in processing speed and startup time, it’s time to take some actions to help out your poor PC. Except for hardware issues like failed drivers or a broken power supply, there’s no reason that an up-to-date computer should ever get slower than it was right out of the gate. The slow-down occurs as a result of bloating startup menus, abundant downloads and unnecessary programs, and a handful of frustrating default settings you’ll need to fine-tune.

This is not a list about how to fix these problems specifically on Windows 10, but is rather an overall list of functions you can cull or engage on any OS. For ways to speed up Windows 10 specifically, check out our articles here and here. For simplicity’s sake, however, we will be navigating with Windows 10 in our examples.

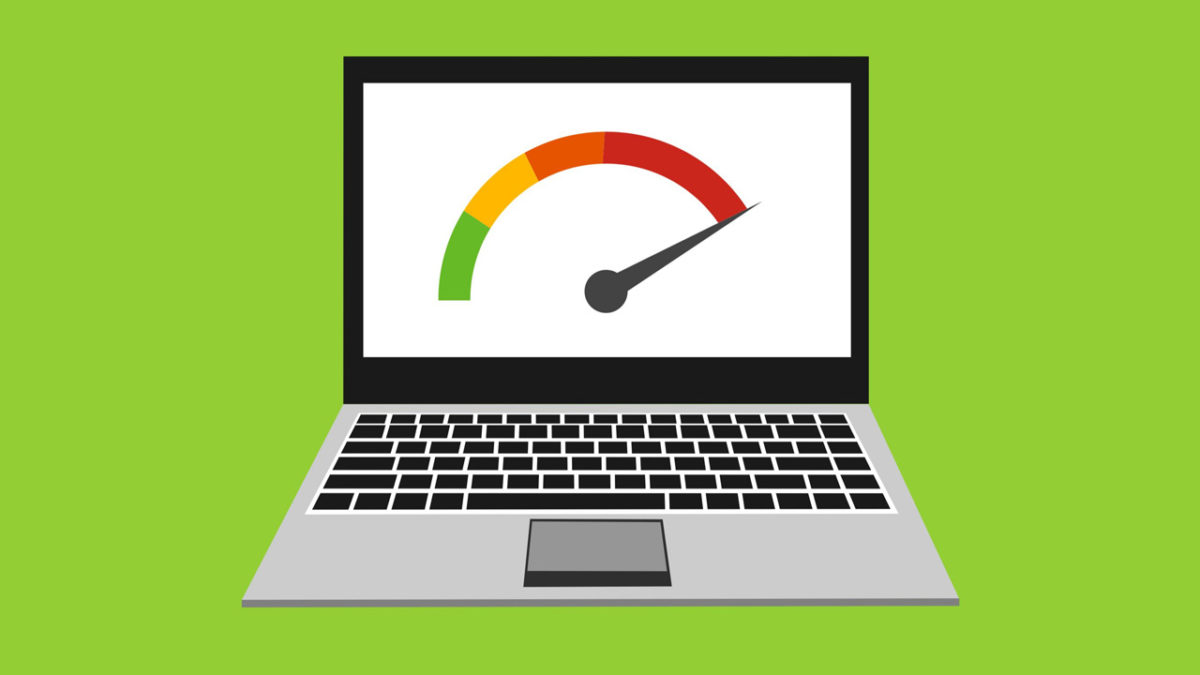
SpeedUpYourPC!

Each of our solutions in this guide will require minimal-to-zero background knowledge, so don’t worry if you’re not a computer geek. Everything we’re about to list is readily accessible right after booting up your PC. Let’s get started.

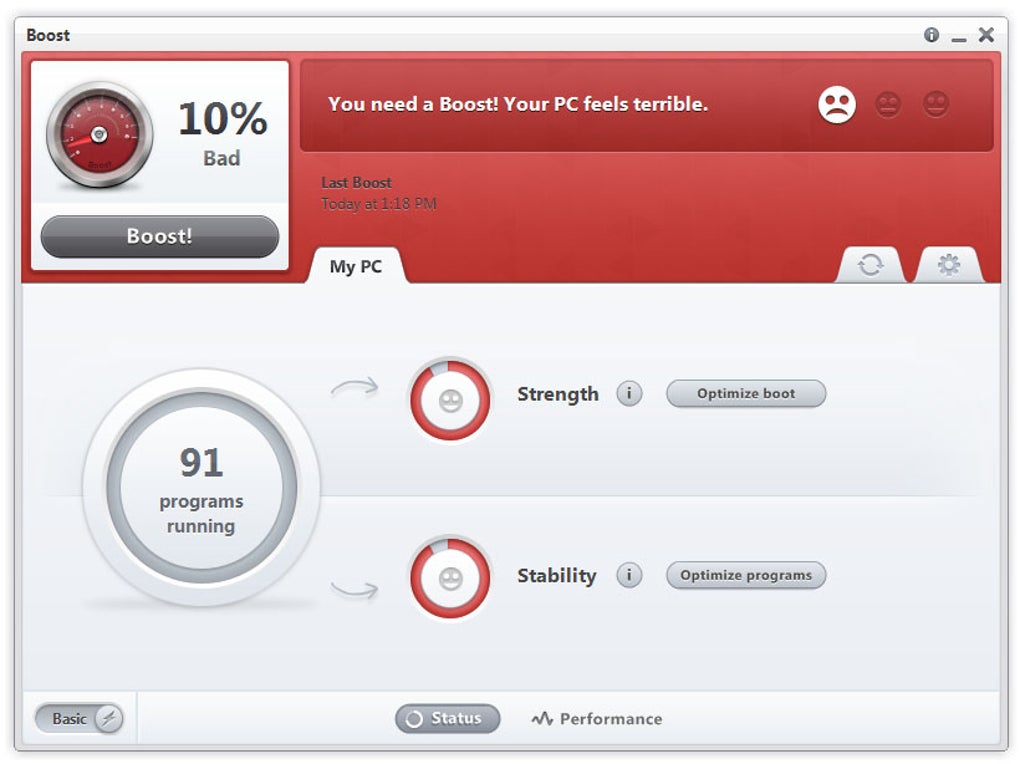
Boost Download
7

5 ways to make your computer run faster

1. Disk check, disk cleanup

Running a Disk Check will scan a specific drive for unused space or corrupt files. While a virus scan will eliminate malware (which could very well also be slowing down your PC!), the Disk Check goes further by also purging that unused space that could be bogging down your processing speed.

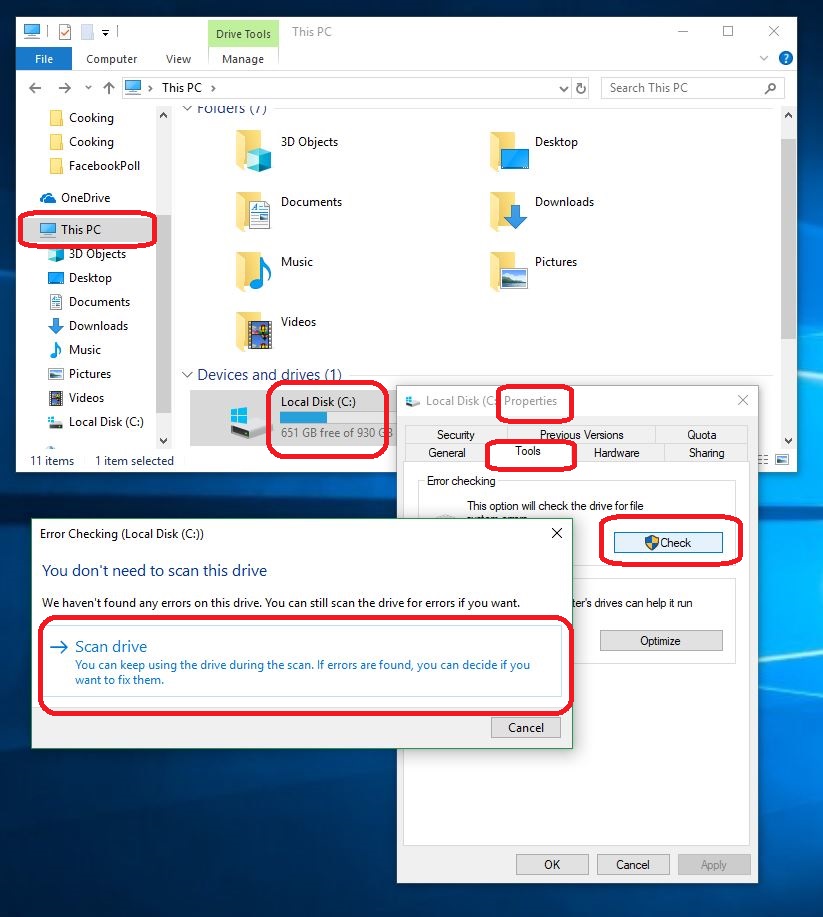
To initiate a Disk Check, open your File Explorer and navigate to This PC. You should see your drives listed under Drives and Devices.

FindYourDrives

By the way, this is a handy way to tell how much space you have left on your particular drive. If it’s full to the brim, that might help explain why things are running so slowly! Right-click on a disk (like your C: drive) and select Properties. This will open up a menu with seven different tabs up top. Click the one that says Tools. Inside the Tools tab, click Check, then say Scan drive.

CheckDisk

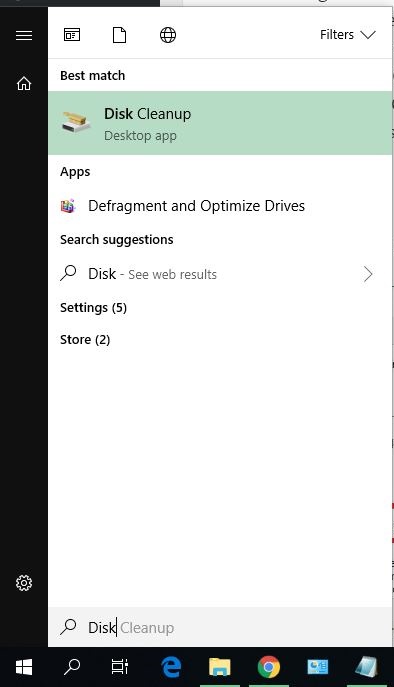
The scan might take a little while (upwards of 30 minutes if you haven’t performed this before), but it’ll be worth it. Depending on how cramped your drives were, you may even notice an improvement immediately. If not, then you should try a Disk Cleanup. This is as easy as pressing the Win key and typing Disk Cleanup. Click the top option (should be a desktop app). This will scan your PC for systems and files that can be safely removed.

OpenDiskCleanup

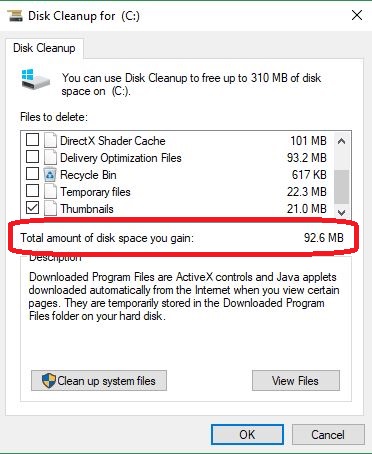
Let your PC complete its scan, then you’ll be transported to this window:

DiskCleanup


Click OK, or select more files if you feel comfortable removing them. As you can see, our Disk Cleanup eliminated over 90 MB of junk!

2. Defrag your drives

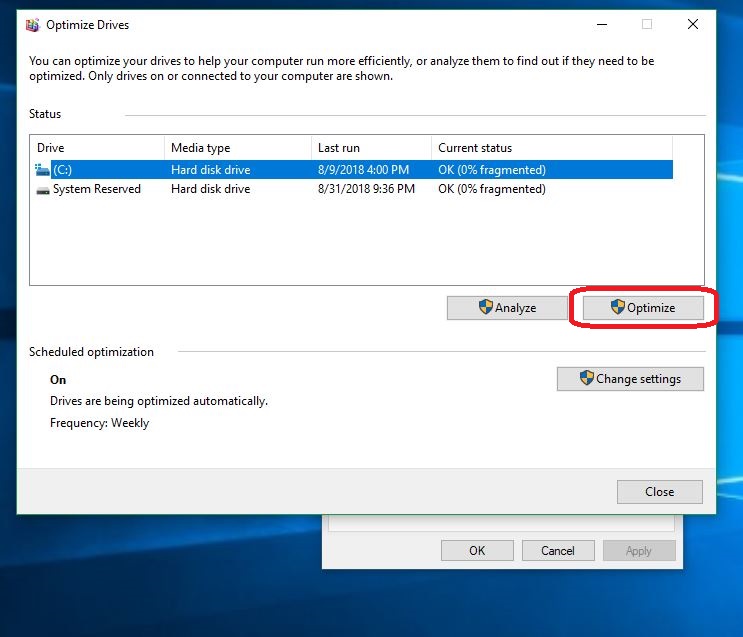
While we’re specifically working on cleaning the drives of your PC, you can also go ahead and defrag them. What this will do is reorganize the files on your hard disk so they can be accessed faster by your PC’s subsystems. To defrag, go back to your File Explorer (Win+E for a shortcut) and right-click again on your drive (C:). Open the Properties menu and go to the Tools tab. Instead of hitting Check this time, though, hit Optimize.

OptimizeDrives

It will open a window that looks similar to the picture above. Click the Optimize button and let your computer work its magic. You’ll notice that towards the bottom of the window it says that your PC is scheduled by default to optimize every week. This means that you shouldn’t need to run a defrag unless you’re specifically hit by a sudden slow-down. If you wish, you can also adjust the frequency at which your computer defrags: Daily, weekly, or monthly. We recommend keeping it on default, but if you want to adjust it just click Change Settings.

You can check out this video here for a more complete defragging walkthrough:

Be warned that the defrag will make about seven-ten passes, so this could take 30-60 minutes.

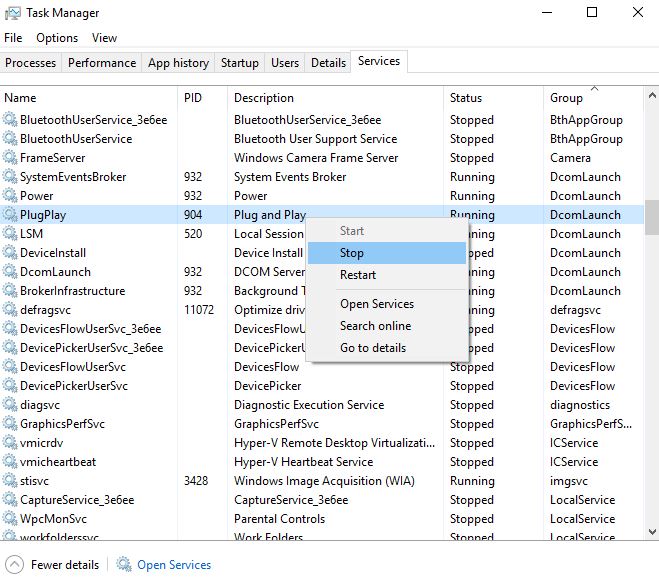
3. Remove Startup programs and services

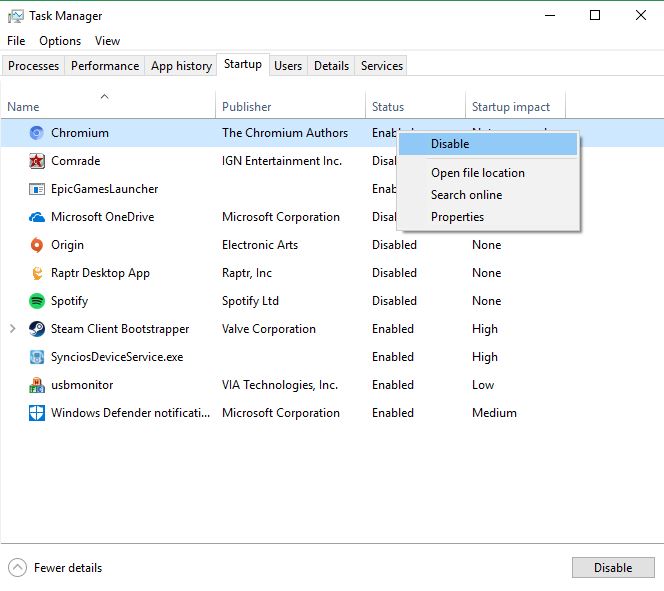
This is a big one. As you download and install more programs, some will default to be activated upon booting up your computer, and then will continue to run in the background as you carry on your tasks. Obviously, if those are big programs they’ll eat up a lot of your PC’s processing power, slowing you down. The best bet is to keep your startup programs to a minimum, if you keep any at all.

TaskManagerStartupTab

To find out which programs are engaging from booting up, open your Task Manager (Ctrl+Shift+Esc) and navigate over to the Startup tab. Anything here that’s listed as Enabled means your computer is running the program as soon as you log in. To disable them, right-click and select Disable. You should notice your booting times are dramatically faster.

TaskManagerServicesTab

If you found you had a lot of programs you didn’t even know were in the Startup menu, it’s likely your Startup Services are affected as well. Still under your Task Manager, open the Services tab. Scroll down here and if anything comes up as Automatic it’s still running at Startup, even if you Disabled it from the previous menu. Nasty. Right-click on the task and say Stop and it should put it down for good.

4. Power Settings

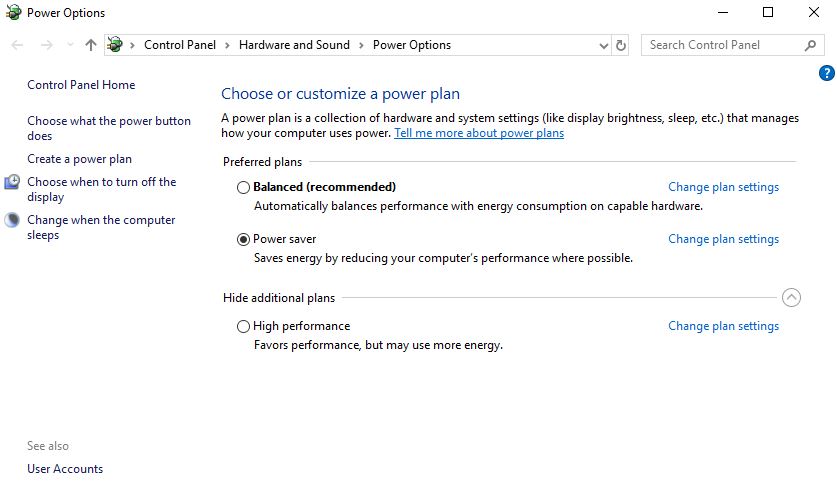
This one’s pretty easy, but the setting can be particularly sneaky if you’re working on a laptop. All computers have a default Power Setting – either Power Saver, Balanced, or High Performance. Laptops are known for switching to Power Saver when they’re not plugged into a direct power source to make them last longer on battery, so be sure to check this one if your laptop is suddenly running slower than you remember.

PowerOptions

The Power Settings can be found by navigating to your Control Panel > Hardware and Sound > Power Options. If you can’t find Control Panel, just type it in after pressing the Win key. If you want your computer to be running as fast and as smoothly as possible, keep it set on High Performance. Alternatively, if you want your computer to run less hot, it’ll be happier on Power Saver. Just be sure to turn it off if you’re doing a more taxing process like playing a video game or watching a bunch of 4k videos.

You can also click on Change plan settings if you want to specify aspects of your PC’s performance economy such as screensavers, turning off your display, or sleep mode.

5. Performance Options

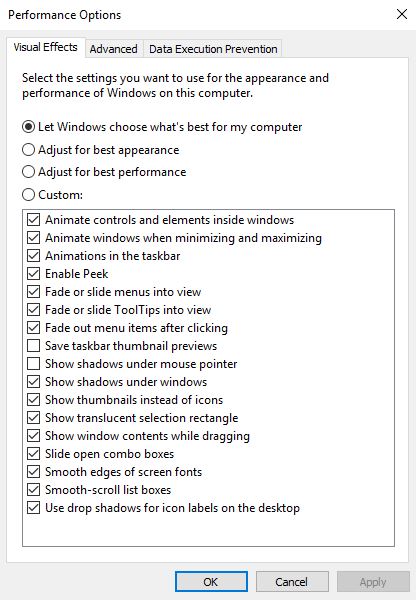
Keeping in line with adjusting power settings, you can also fine-tune your computer performance from this menu:

PerformanceMenu

This menu can be found under your System tab via Control Panel, or can simply be opened by pressing Win and typing ‘performance.’ Click the top option, which will say something like “adjust the appearance and performance of Windows.” From here you can customize your options, or you can quick-fix by selecting “Adjust for best performance.” Unless you’re running an older computer you’re probably not going to see a massive difference from toggling this function, but we wanted to include it nonetheless just so you can maximize your PC’s performance.

There are more advanced options for speeding up your PC that you can initiate through the Command Prompt, such as checking your drivers’ health and memory, but we wanted to give you a quick guide of easy first steps. For more ideas and strategies, or for detailed walkthroughs of the processes we mentioned here, check out these videos:

iPhone XS: An obituary for the headphone jack

Apple has officially killed the headphone jack. What now?

“Today Apple is going to reinvent the phone,” Steve Jobs famously said on January 9, 2007. Over 10 years ago, the original iPhone was introduced, and it’s certainly come a long way since. With technology the goal is always to make better, to make smarter, to make faster, to make simpler, and to make more versatile. The risk is that making room for these changes can require pushing old features off the shelf.

In 2016, Apple released the iPhone 7, and with it came the removal of the headphone jack. By 2018, this is old news, but now that we’re several models further along the timeline it looks like Apple has no intention of going back to its old design. ‘Going back to its old design’ is an abhorrent phrase for a company as forward-thinking and revolutionary as Apple, so it comes as no surprise that once they made the decision they stuck with it, regardless of the backlash.

Ridiculous dongles

Verge columnist Nilay Patel called the initial decision to remove the headphone jack “user-hostile and stupid” and said it would “disproportionately impact accessibility.”

The traditional headphone jack “works so well that an entire ecosystem of other kinds of devices has built up around it,” wrote Patel. “Millions of people have access to compatible devices at every conceivable price point.” To make such a drastic design change as to remove a crucial function must have given Apple designers pause back in 2016. Apple’s Senior Vice President Phil Schiller infamously heralded the design as “courageous,” citing a few reasons why they came to the decision – decision that Apple evidently stands by today:

First off, Schiller claims the lightning headphones that came with the iPhone were an effective replacement. Fine, except now we can’t charge our phones and listen to music via headphones at the same time. Well, that’s not too terrible, right?

Next, he explained that several key components of the new design were “fighting for space” in the iPhone and that the aux jack took up valuable space that was quite literally impeding new features.

Which features were these? Namely the dual-camera system, taptic engine, and the then-new 14% larger battery. Additionally, removing the aux jack pushed the iPhone’s durability up to IP67 (the new iPhone XS boasts IP68).

Lastly, Schiller maintained that the future is wireless, and that replacing the jack with Bluetooth capabilities was the only way to accommodate the growing demand for wireless functionality … except we still use wires to connect our headphones to our iPhones – now we just need more of them.

Moments later, Schiller introduced the AirPods, a set of user-friendly, efficient earbuds that sync directly to the iPhone … starting at $160.

Forbes writer Gordon Kelly criticized this choice, arguing that “you’re being pushed into an era where you will have to pay more for decent headphones due to their need for an integrated DAC and/or Lightning licensing.” True enough, Apple now charges licensing fees to millions of headphone companies who want compatibility with Apple products. The result is a scenario in which Apple is the only one really to profit.

It’s now 2018 – less than a year since the iPhone X was released – and Apple is completely removing the iPhone SE and 6s from its catalog, meaning that the last iPhones with headphone jacks will be forever discontinued.

To drive the final nail even further into the coffin, the new iPhone models will not even include an adapter in the box. If you want to use non-lightning wired headphones with your iPhone XS the dongle will cost an additional $9 on top of the $999 for the phone itself. The lightning headphones will be included, however, but it looks like the end of the road for our old traditional set.

The future is here, says Apple, whether you asked for it or not!


How to use WinRAR

Need to compress or decompress files? Here’s how to get started with WinRAR.

With download sites, online clouds, and huge compendiums of zipped files available all across the internet, you’re undoubtedly going to need a way to open and extract the contents of zipped files. You may even want to upload files of your own, but aren’t able to do it when their sizes are too big to attach or send properly. WinRAR is your one-size-fits-all solution, and is a simple, intuitive program that lets you extract, manage, compress, and secure any zipped files you want to move.

WinRAR Download
8

How to use WinRAR

Installing WinRAR

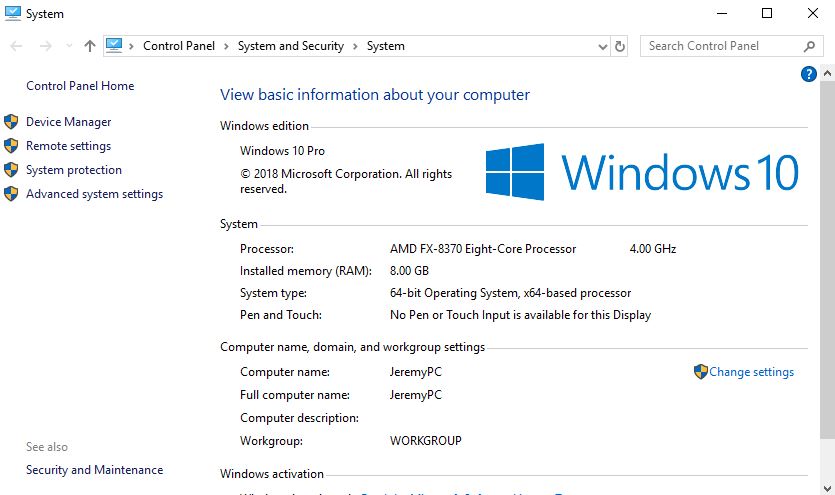
From the link above, you’ll be able to download WinRAR. Be sure to choose the correct version for your language and for your OS (either 32-bit or 64-bit). If you do not know which is correct for you, just hit Win+Pause and it will open a window showing your system type along with a handful of other useful information. The same window can also be found under your system’s Control Panel > System and Security > System.

WindowsSystemProperties

Next, you’ll be prompted to select all the file extensions you want WinRAR to be able to recognize and use. We recommend keeping this as default, you’ll typically be dealing with zip, 7-Zip, and RAR. Hit Done and you’ll be good to go!

SelectExentions

How to extract files

One of WinRAR’s main functions is to extract the contents of a zipped folder. We’ll be showing you two ways to do this.

Method 1

The first is to extract files through the WinRAR program. Once you’ve downloaded the zipped file you want, right-click on it and select Open with WinRAR. This will open WinRAR and your folder’s contents will be listed in the field below.

ExtractViaWinRAR

Next, it’s as simple as clicking the Extract To icon on the top toolbar. Select the destination and click OK. Now your files will appear right there.

Method 2

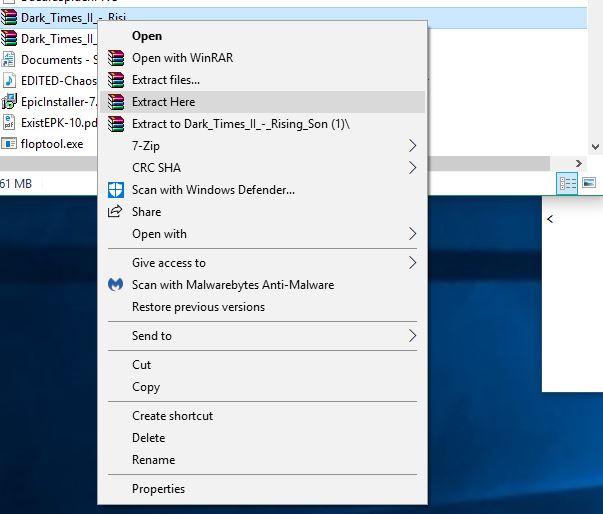
The second method is our preference. All you need to do is right-click the file you want to extract, and choose Extract Here. This will unzip all the contents from the folder right into the current window.

EasyExtract

Note: If you use this function we recommend first creating a new folder, ideally on your desktop. Drag or cut/paste the zipped file into this new folder. This way when you choose to Extract Here the contents will all end up in the same easy-to-find location, and not get lost in a huge generic folder like your C: drive or Downloads.

How to zip a file

The other most useful feature of WinRAR is its ability to compress and zip files of your own. This is especially useful if you have multiple files you wish to email someone, and they’re a larger size. You can start by either selecting the files you wish to move (ctrl+click to select multiple files), or by dragging the files onto your desktop for easy access. We recommend the second choice.

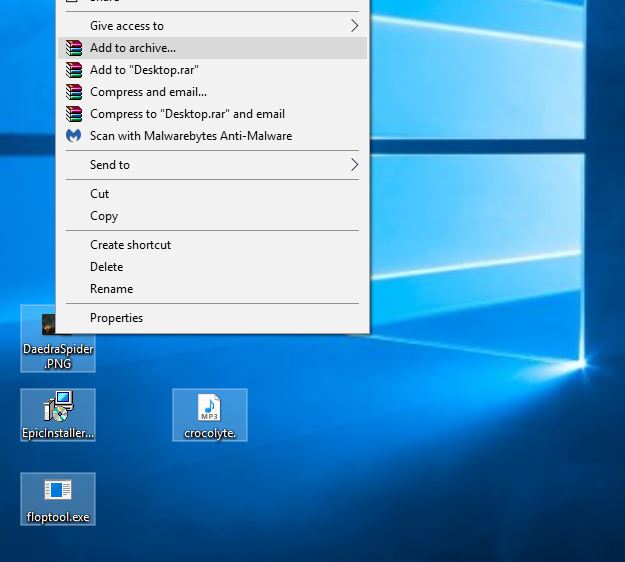
ZipTheseFiles

Once all the files are selected, right-click and choose Add to Archive. It will open a window that looks like this:

SetCompressFeatures

From here, you can input the name of your new archived file in the field up top. Before you click OK, though, be sure to select best from the compression menu drop-down.

Set the size of your file

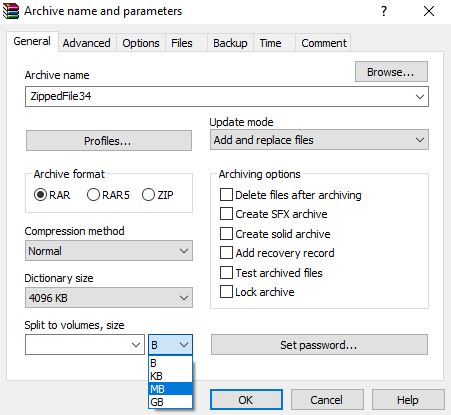
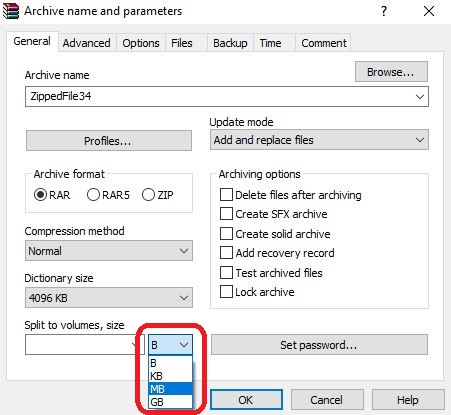
One of the most useful features when compressing and combining files into a new zipped format is WinRAR’s ability to specify format sizes, ranging from bytes up to GB. This is useful if you need to parse out smaller segments of a large file into more manageable sizes.

SetAVolumeSize

To do this, click the drop-down on the bottom left that says Split to volumes, size. This will let you decide how large each file segment will be, and the drop-down immediately to the right will affect whether the file is split into bytes, KB, MB, or GB.

Add a password to secure your file

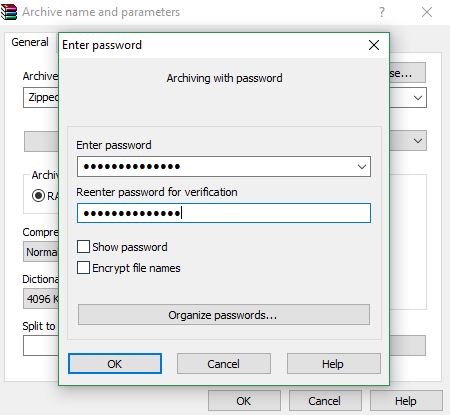
Lastly, WinRAR can secure your newly zipped file with a password. If you want to make sure the safety of the file will not be compromised, this is a smart thing to add. To password-protect your file all you need to do is click Set Password above the OK button. Enter your password here, confirm it, and then it will be requested upon trying to unzip the contents.

ArchiveWithPassword

If you’re still lost, check out this helpful video illustrating these features:

There are many more features to WinRAR, like backing up files, keeping previous versions, compressing, and storing your files to separate archives, but we just wanted to cover the gist of what the program can do. Hopefully, our guide was helpful, and you’ll be able to easily access, manage, and share content across the internet!

How to take peanut butter and jelly to the next level

Try our 9-flavor-combo recipe and prepare to have your mind blown.

Peanut butter and jelly is one of the quintessential basic foods that everyone learns how to make when they’re five years old (provided they don’t have an allergy): Grab whatever bread you’ve got in the cabinet. Slap on peanut butter on one side, then spread grape jelly on the other and you’re done. The mix of sweet and savory, fruity and nutty, rich and light, is so good that we don’t give much thought to altering the formula. And yet we still look at PB&J as “the quintessential basic food that everyone learns to make when they’re five years old.”

Prepare to add some variety to the mix. We’re going to show you how to make the ultimate peanut butter and jelly sandwich that’s going to rock your kitchen!

How to take peanut butter and jelly to the next level

1. Bread

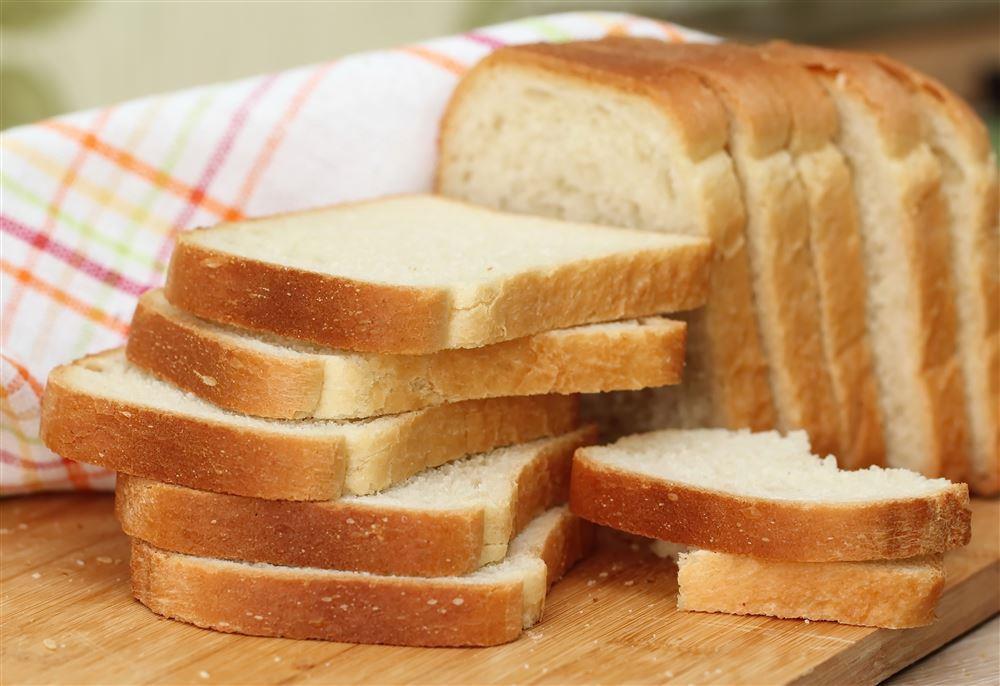
FlakyBread

PB&J by default is three ingredients: Peanut butter, jelly, and bread. You might not generally give your bread much thought, but you’re ignoring a third of the flavor! Try wheat for a hearty, earthy flavor, rye or sourdough for a contrasting tang, or a rich pumpernickel. For some textural difference, we recommend toasting one side of the bread. Didn’t know PB&J could be so fancy, right? We’re just getting started!

ToastThatBread!

2. Peanut butter

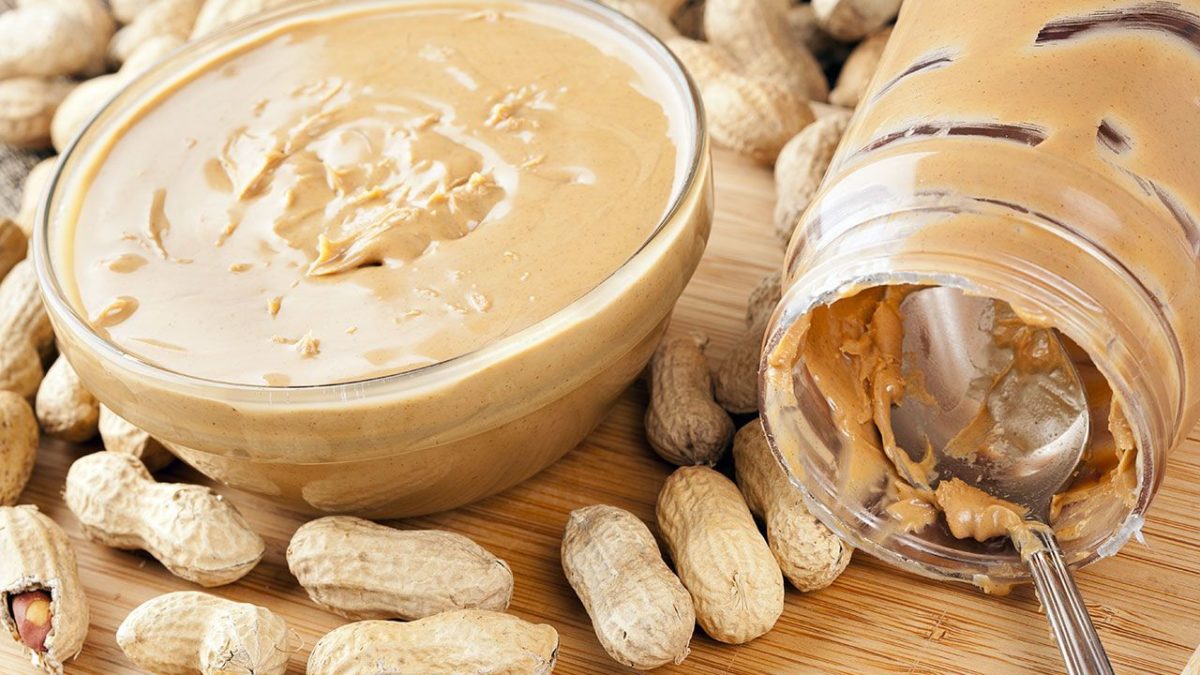
PeanutButterDefault

Peanut butter is the crux of this sandwich, as it adds that rich, nutty flavor; a smooth, sticky consistency; and the protein that adds nutritional value and makes you feel full after. Peanut butter is also, unfortunately, the biggest factor preventing people from enjoying PB&J due to common nut allergies. Fear not, for there’s a solution – a good many, in fact: Honey and flax almond butter; tahini, sunflower butter, or even coconut. For pros, cons, benefits, and brands check here, here, and here.

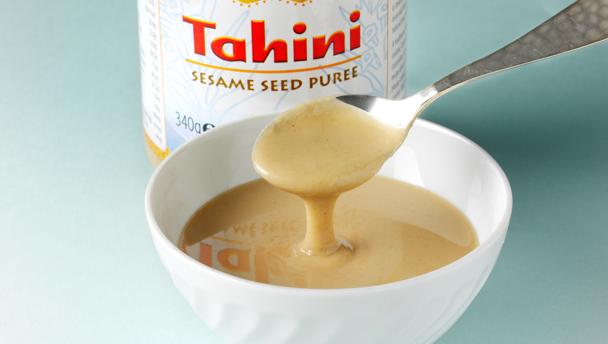
TahiniSub

The above alternatives are of course more than just for people with allergies – they’re completely new flavors. Tahini, for example, adds a distinctive Middle Eastern twist to your sandwich, and is much less sweet than your default peanut butter, meaning it pairs better with sweeter jams.

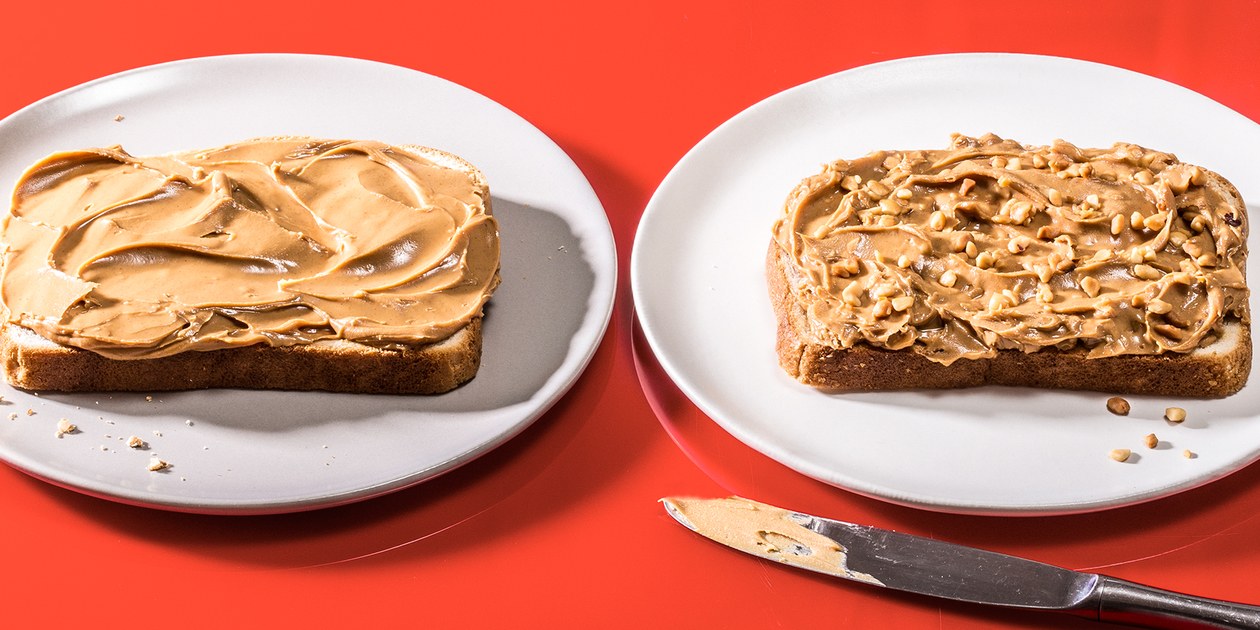
SmoothvCrunchy

If you want to stick with peanut butter that’s fine, too! If you’re looking for variety in a different way, you might try mixing up the texture by trying crunchy peanut butter instead!

3. Jelly

This is where things really hit the next level. Grape jelly is the most popular jam and jelly flavor in the United States, and it does pair excellently with peanut butter, given its sweet, fruity taste. If you don’t try other jams or jellies in your next PB&J, though, you’re shortchanging yourself.

PBStrawberryJam

The go-to for an improved PB&J has got to be strawberry jam. It’s got more of a tang to it, has a sweeter bite, and contrasts the rich nuttiness of peanut butter in a really unique way. If you’re open to experimenting, though, try blackberry, raspberry (our favorite!), blueberry, or even peach or orange marmalade. Switch up jams, jellies, and preserves. Each one brings a distinctly different flavor to the table, and you’d be surprised how so small a change can radically change the flavor of the whole sandwich.

DifferentJamsFTW

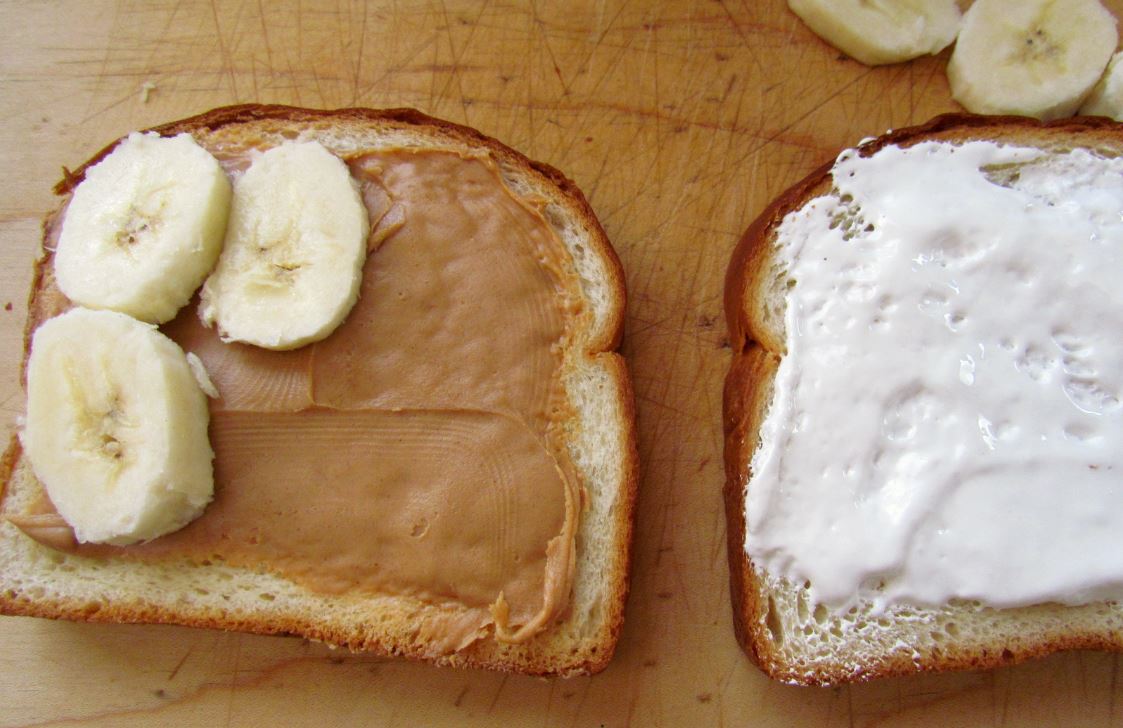
Don’t like jelly? Fluffer Nutters are the often-overlooked contender if you want a sweet sandwich with a less gloppy and more sticky, sweet change of pace. Honey or Nutella are also great substitutes, honey being especially good if you go with tahini. And if you want a more healthy choice, try slicing up a banana and adding that!

BananaFlufferNutter

4. Layering

Now for the grand finale: We’re going to make a PB&J that showcases nine different flavor combinations in one sandwich. You read that right.

First off, toast your bread if you like that crunchy, smoky texture. On one piece of bread spread three thick vertical stripes of chunky peanut butter, Nutella, and smooth peanut butter. Then on the other piece of bread spread three horizontal stripes of your choice of jam, honey, and marshmallow fluff. Put the pieces together and you’ve got nine different flavors and textures. Now that’s an awesome sandwich! It should look something like this:

UltimatePBJ

Try mixing in some of the substitutes we brought up earlier, too! You can’t really go wrong as long as you keep the thicker, richer ingredients on one side, and your lighter, sweeter ones on the other. The only limit is your imagination! Let us know in the comments below what new flavor combinations you come up with!


Meet Apple’s new iPhone XS, XS Max, and XR

Apple just announced its new phones. Are they worth the cash?

Today Apple came down with announcements for their brand new iPhones: The XS, XS Max, and XR, the first two of which will be hitting the market for pre-order starting on September 14, and shipping a week later. To start off, one of the biggest universal changes from previous models is that none of the new three iPhones will feature the home button in front, instead favoring Face ID.

price ranges

Both the XS and the XS Max will have a Super Retina OLED (organic light-emitting diode) display, the new most durable protection against dust and liquids = up to a rating of ip68 (even protects against beer!), and the new powerhouse processing A12 Bionic chip. The display for the XS is already large at 5.8 inches with 2.7 million pixels, but the XS Max takes the cake at 6.5″ with a staggering 3 million. Both models have a larger display than the iPhone 8 Plus.

bigger screens

We all know a big measuring stick for Apple is how powerful their cameras are, and how high-quality their picture resolution can be, along with any features that can be later tweaked through filters and adjustable options. Both the XS and XS Max have a 7MP front-facing camera with a 12MP dual main camera that takes the highest-quality pictures a mobile device has ever achieved, most notably the new depth segmentation map with which you can take truly breathtaking photos in portrait mode. The new Smart HDR sensor reduces blur on action shots and senses and enhances lighting based on subject and facial mapping.

beautiful HD portraits

Get ready for a slew of new super HD selfies.

New powerful camera

The XS  has a state of the art 6-element lens along with the new ground-breaking 12MP telephoto camera, which together give both a crystal clear picture as well as an adjustable depth of field, which can even be shifted in post.

One key feature that Apple users have been craving has also at last been addressed: Dual-sim functionality. With this, you can keep two phone numbers and use two different plans. With the new iPhone you can set up a primary and a secondary number so that you’ll finally know which is being contacted without question. This is especially handy if you want one number for business and another different one for your personal life.

If you haven’t seen the presentation yet, check it out right here:

As for battery life, we were pleasantly surprised to hear that the new phones actually improve battery life rather than draining it faster due to more powerful processing speed and more refined features. The XS has an extra 30 minutes of battery life and the XS Max goes up to an extra hour to an hour and a half, meaning you can go just that much longer before needing to charge.

less frequent charging is always welcome

Of all the new models, though, we were most excited about the new XR, which is basically a less expensive and smaller version of the iPhone 8 Plus. The XR boasts the same A12 Bionic chip, and incredible 12MP wide-angle camera that the XS and XS Max have, and can last up to 90 minutes longer than its iPhone 8 Plus predecessor. It also has a larger display, at 6.1″ with the new beautiful Liquid Retina LCD – 1.4 million pixels with 326 ppi. (That’s a bigger display than the iPhone 8 Plus, too).

XR skins

While the XR comes in a variety of colors (see above picture), the XS and XS Max come in three colors (gold, silver, and space gray) and three different storage sizes: 64, 256, or a huge 512 GB. Both are available for pre-order starting on 9/14, with the XS costing $999 and the XS Max costing $1,099.

The XR starts with 64 GB as well, and will hit the market a month later, starting with pre-order on 10/19, shipping 10/26. The XR, though, will only cost $749, being the most affordable option so far.

Apple made it very clear in their presentation that they are hoping to reach a larger audience with their products, both with their new phones and with the upcoming Apple Watch.

Will you be getting the new iPhone? If so, which model grabbed your interest? Let us know in the comments below!

9 delicious alternatives to peanut butter

Allergic? Don’t like the taste? Try these alternatives for a tasty twist on peanut butter!

If you (or your child) have a peanut allergy, odds are the trouble was not so much literal peanuts but rather the ubiquitous ingredients made from peanuts. Peanut oil or peanut butter are the worst offenders.

It’s rough because despite them being such a common allergen, peanuts are still the most popular nut in the world, with almonds coming in as a close second. Funny enough, peanuts aren’t even a nut. In fact, the peanut is a legume, growing underground like a pea or a bean. That’s why other nuts are largely referred to as tree nuts.

While you can’t always be too sure what you’re getting into on the road and out of the house, you can start by controlling what’s under your own roof. Peanut butter might seem like a tough thing to live without (life with no PB&J is harder already), but fear not; we’ve put together a list of nine alternatives to the popular spread, some of which use nuts other than peanuts, and others that don’t use nuts at all. See what we’ve got to share.

9 alternatives to peanut butter

1. Pecan Butter

picture perfect pecan

If you’ve had pecan pie, you already how good this nut can taste! Their delicious flavor comes as a result of pecans being a little higher in fat than peanut butter. Despite that, there’s an argument that pecans are actually able to help lower cholesterol. A good source of fiber and vitamins (A, B, and E), pecan butter is a great way to go if you want an alternative to peanut butter that’s still got the familiar flavor and texture. Pecan butter also goes really well on pumpkin bread or put on sliced bananas.

You can buy it here.

2. Almond Butter

almond butter ftw!

If you’re looking for a healthy substitute for peanut butter, look no further than almonds. An awesome source of potassium, calcium, and iron, almond butter is even considered the most nutritionally dense nut, meaning it has the most nutrients per calorie and per ounce. You can even save money by making this superfood yourself. All you’ll need is almonds, honey, and salt! Check out this recipe here.

If you think almond butter is the solution you’re looking for, you can purchase it easily right here.

3. Pistachio Butter

pistachio butter is good on everything

Dubious? Before you scroll down further, remember that pistachio ice cream is a thing of beauty. Nutty, rich, and lightly sweet, pistachio butter is a more delicate alternative that boosts antioxidant levels, lowers cholesterol, and is a good source of protein. If you’re looking to overhaul your PB&J already, we’d recommend pairing this with cherry jam.

Get it right here.

4. WowButter

looks like peanut butter

If you’re allergic to any and all nuts, then this soy butter is probably the best possible solution for you. Gluten-free, nut-free, seed-free, and dairy-free, you’d be hard-pressed to find someone who couldn’t eat this product unless they specifically can’t have soy. Carrying all essential amino acids, as well as great source for omega fatty acids and protein (there’s even more protein here than in peanut butter!), WowButter is a spread that will fill you up quickly and efficiently. It may even help to prevent cancer.

Not a believer in this product? Don’t knock it until you try it!

5. No-nut butter

no nut butter has no nuts!

Much like the above WowButter, here’s another great pick for a kid who’s allergic to any and all types of nuts. Sneaky Chef’s No-Nut butter is exactly what the label claims: A peanut butter texture and taste with zero nuts of any kind. So what is the butter made of if not nuts?

Peas.

Yeah. We were surprised too. No-Nut butter is “all the taste without the nuts” and is a decent source of fiber, protein, and iron to boot!

If you’re skeptical, see what we’re talking about by buying it yourself.

6. SunButter

sunbutter spread

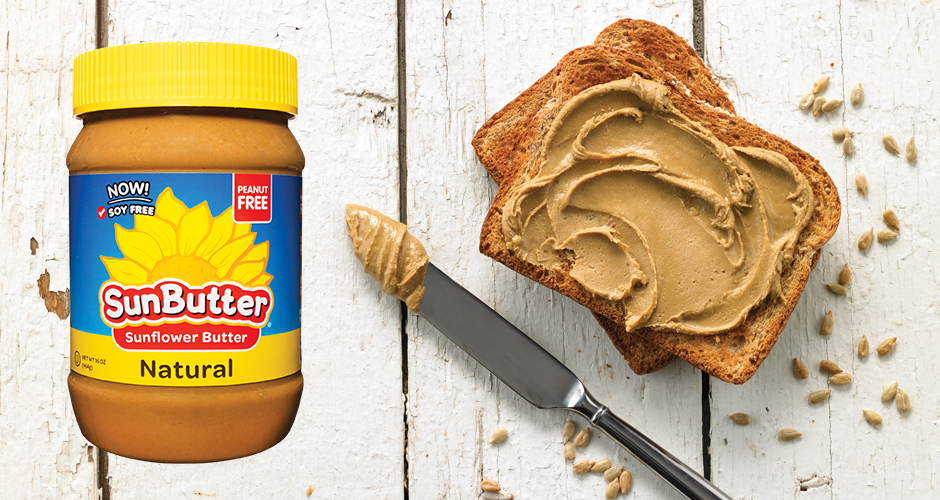
If you’re allergic to nuts but not to seeds, Sunbutter is a spread made of crushed and pureed sunflower seeds. Salty and nutty, you can see why these seeds could pass for peanut butter. With much more protein than No-nut butter, Sunbutter also has less sugar and fat than many peanut butter brands, and has a crunch on top of it all! In fact, if you’re looking for the texture of peanut butter, Sunbutter might actually be your top contender.

Buy SunButter here.

7. Tahini

beautiful tahini

Our favorite pick from this list, tahini is a Middle Eastern staple that’s a key component of hummus. We like tahini because it not only replaces peanut butter (or really any nut-based butter) for those who are allergic, but it provides a different enough flavor that you might find yourself alternating between tahini and peanut butter if you’re not allergic to either. Tahini is not sweet, however, which means it pairs really well with sweeter flavors like peach jam or honey.

Get some tahini here.

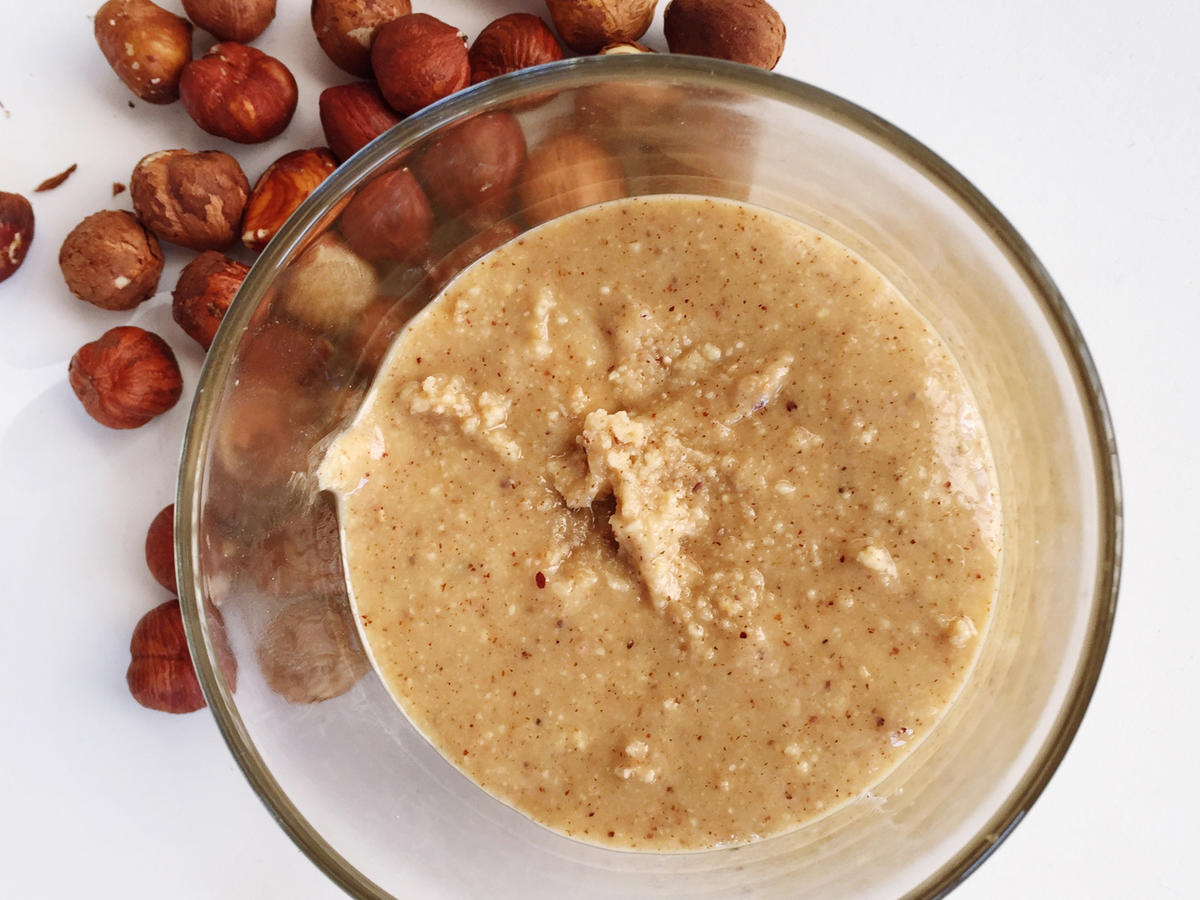
8. Hazelnut Butter

pretty hazelnut butter

Though it’s not nearly as good of a source of protein, hazelnut butter is still a possible alternative for people with peanut allergies. Hazelnuts (filberts) are a valid source of omega-6 fatty acids and can be used for way more than just spreads, and are a viable replacement for peanuts in many different kinds of dishes. Try sprinkling hazelnuts on rich, creamy pastas, for example, or even salads.

You can purchase hazelnut butter right here.

9. Pumpkin Seed butter

pumpkin pesto alternative

Often overlooked as nothing more than a Fall season fad, pumpkins have way more to offer than people give them credit for. Besides the glorious pumpkin bread (good any time of year!) and pumpkin lattes (which should also be served all year round), pumpkin seeds are perfectly edible and are a delicious snack with a little butter, brown sugar, and nutmeg.

Roasted Pumpkin Seeds

Grind the seeds up and add some olive oil, honey, and salt, and you’ve got an effective peanut butter replacement that’s higher in protein! Lastly, pumpkin seeds can also be a safe replacement for pine nuts if you’re trying to make a fresh pesto. Restaurants like Bonefish Grill have already started subbing pumpkin seeds into their pesto for that exact reason, and we applaud them for it.

You can buy pumpkin seed butter right here.

If you’re worried about living life without peanut butter and jelly sandwiches, you can clearly see those fears are misplaced. There’s a bunch of alternatives out there for you and your family. You’ve just got to get out find which one tastes the best!