We’re all taught about the importance of a daily routine (brushing and flossing) for dental hygiene. But how much thought have you given to your “backup hygiene”? Backing up your PC gives you a safety net, keeping your data secure even when your computer fails.
When asked “How often do you back up all of the data on your computer?”, 26.3% of people said they back up data once a year, according to Backblaze, a provider of cloud backup and storage services. Another 21.2% have never backed up their systems. In over a decade of conducting their survey, there has actually been an increase in the number of people who say they only back up on an annual basis.
The first step to safeguarding your computer’s data is creating a backup system image. We’ll show you how to do this in Windows 10.
How to create a backup system image with Windows 10
Why a backup plan is essential
Perhaps the availability of cloud-based storage services has led people to think they don’t need to bother with backing up their Windows systems – but they should. Having a good backup plan is essential to avert disaster. Apart from protecting ourselves from hardware or software problems that inevitably arise, having a full backup is part of your security system, too.
For instance, there’s a growing prevalence of ransomware that locks down users’ files. Thieves demand money in return for giving back access to your data, but research suggests that in most cases, giving money never results in regaining access. The best course of action? Have a backup of your system image at the ready, and do a fresh re-install of the Windows OS, your applications, and files from a point in time from before your system was infected.
What is a system image?
There are a number of terms used to describe the process of backing up computers. While a “full backup” sounds like it would save everything, it’s not the same as a system image. A full backup contains all the data in files and folders that are selected to be backed up.
A system image is a copy of the whole disk drive, including all the settings, programs and files needed to run Windows. As such, it requires more storage space and takes longer to conduct than a backup of documents and pictures, for example. Another difference: With a system image, you can’t pick and choose individual files and programs to back up; you copy everything at one sitting.
Because of the time and storage space requirements, a system image might be best done on an annual or semi-annual basis for a typical home user. Creating a system image would be done in addition to regular backups of frequently used files (pictures, documents, videos, and music) should be done separately on at least a monthly or weekly basis.
Steps to create a backup system image
Before starting, decide where you are going to store your system image. Although it is still possible to do a backup to recordable DVDs, it’s more convenient to store to a local hard disk drive or remote cloud storage. Our recommendation: a hard drive you have in hand is easier to use. If you are trying to restore a whole Windows system from a cloud storage service, remember that you are downloading data over the internet. Data transfer speeds could lengthen the amount of time required to get back up and running.
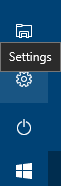
Step 1: Open the Settings window from the Start menu.
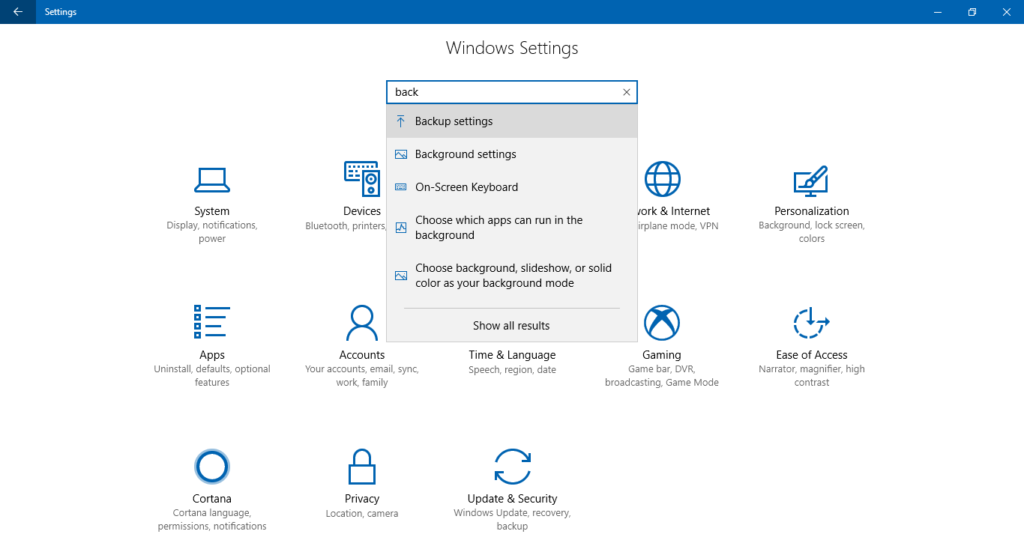
Step 2: Search for Backup settings.
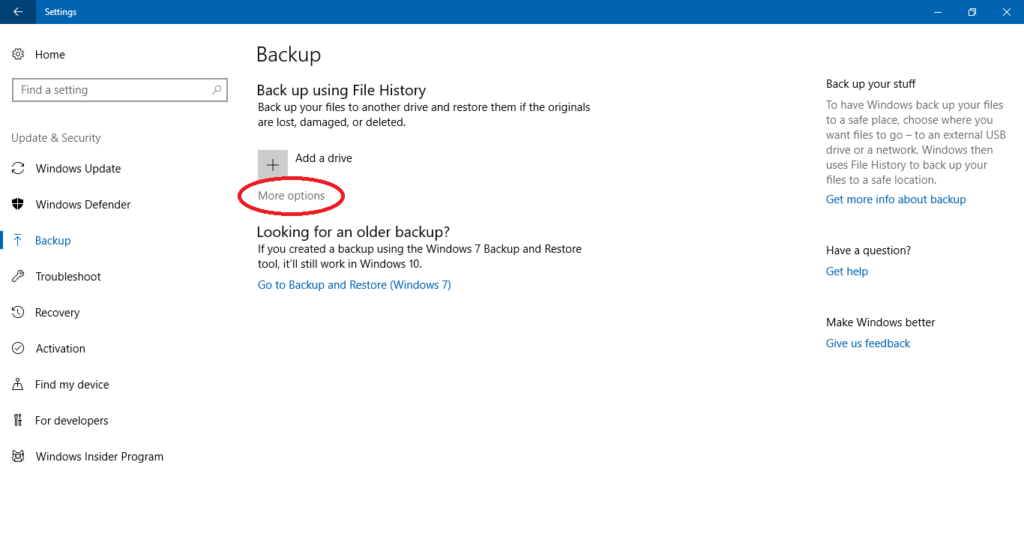
Step 3: Navigate to More options and click.
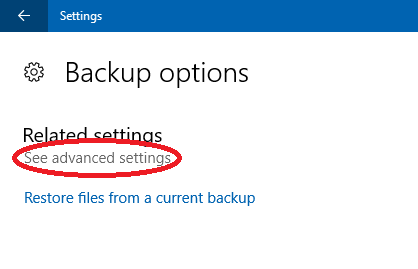
Step 4: Next, click on See advanced settings.
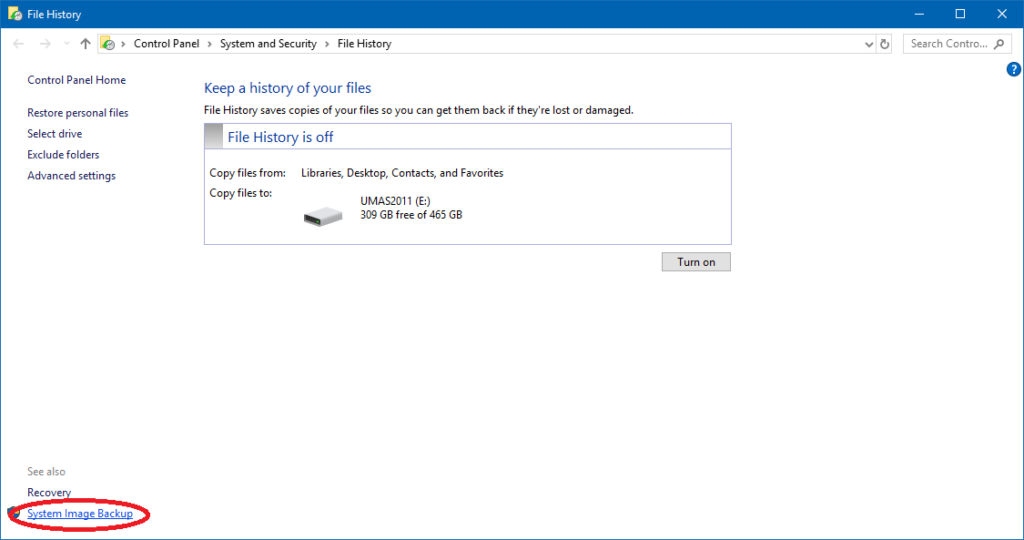
Step 5: Select System Image Backup from the bottom left of the window.
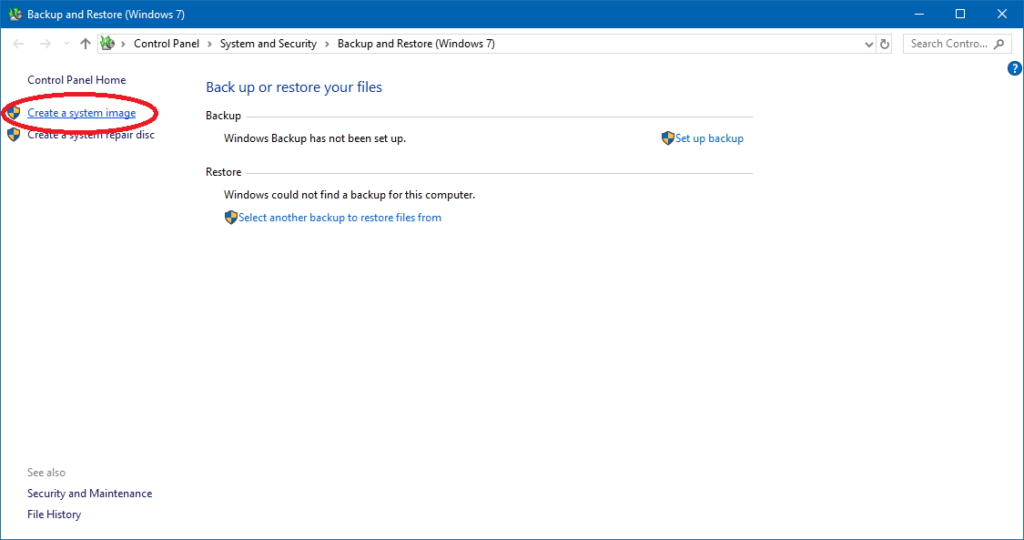
Step 6: Click on Create system image from the left panel.
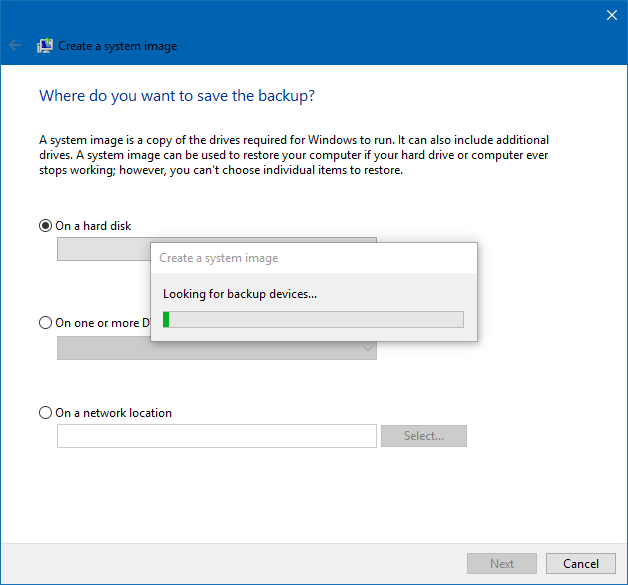
Step 7: Your PC will scan for drives or disks to save the image to.
Step 8: Be sure to select the drive you wish to save the system image to from the drop-down menu, then click Next.
Given the relative affordability of high capacity hard drives, it’s convenient to have a drive dedicated to only storing your system image.
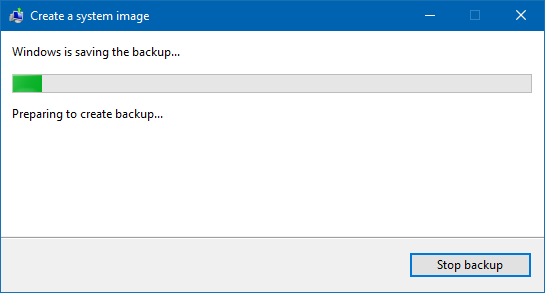
Step 9: Your computer will begin the backup.
Be patient! Be sure not to turn off your PC or unplug the external drive you are using or else you will interrupt the backup process. Don’t be surprised if the procedure lasts 30 minutes or more – how long depends on the amount of data stored on the source drive. Eventually, you will have the system image backup you need for peace of mind. And remember, set your calendar and make a backup on a regular basis.
Sometimes, parents of young kids can find themselves desperate to have a minute to themselves. The internet has been a lifesaver, with services like YouTube and YouTube Kids offering up vast amounts of entertainment and educational content for children of all ages.
The result is that children’s videos make up a significant audience for YouTube and other providers. Top children-themed channels like Chuchutv have amassed over 13 million subscribers, for example. Recent estimates suggest that children 8 and under are spending an average of 48 minutes a day on a mobile device, and an average of 2 hours 19 minutes a day with screens overall, according to a Common Sense Media survey.
While much of what kids are viewing is useful, there’s reason to be concerned that some of the more popular channels are borderline exploitative. Even when videos start out with familiar characters, some observers believe that combination of factory-like production and discovery algorithms can turn benign content into something that’s inappropriate for children.
YouTube reacted to reports of inappropriate content making its way into these mainstream channels by either taking down channels such as ToyFreaks (with 8m subscribers) altogether or removing videos. All told, the November 2017 crackdown saw the removal of 50 channels and thousands of videos. More recently, the company released new features on its YouTube Kids app that allowed parents to restrict channels to content that is verified by the company as “kid-friendly.”
According to YouTube, the company has stepped up enforcement of its Community Guidelines for both YouTube and YouTube Kids. Another key change: removing ads from inappropriate videos that are aimed at minors. By removing ads from millions of videos, the company is trying to take away the financial incentive for creating bad videos.
How to make YouTube safer for your kids
Enable Restricted Mode on YouTube
While YouTube asserts that it has thousands of people reviewing and flagging content, there are steps that parents can take to improve control over what is accessible to children.
If you are allowing access to videos from the main YouTube site, you can set restrictions by signing in and clicking on the Settings button.
Source: YouTube
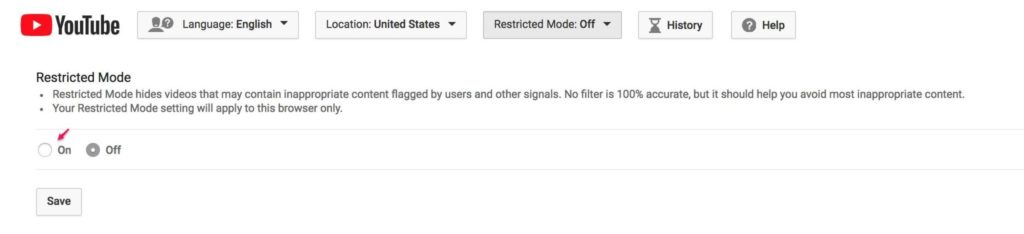
You will see a reference to Restricted Mode after scrolling to the bottom of the page.
Source: YouTube
Click the drop down button and details about Restricted Mode will appear.
Clicking the On button followed by the Save button will activate Restricted Mode. However, this will not lock the mode. To do that, make sure to log out of your account. Then, when a child uses the site, the settings be set and unchangeable by them.
Important note: If you have more than one browser on your computer, you will need to follow these steps for each browser.This also applies to tablets and other mobile devices.
YouTube offers a video that walks you through the process of implementing YouTube Controls that were just explained.
Set Controls on YouTube Kids
When YouTube introduced YouTube Kids, the app (available for Android and iOS devices) was billed as a safe, easy way for children to find and view videos. YouTube promised that content was “narrowed down” to videos that are appropriate for kids. The app also offers some additional controls that are worth getting familiar with.
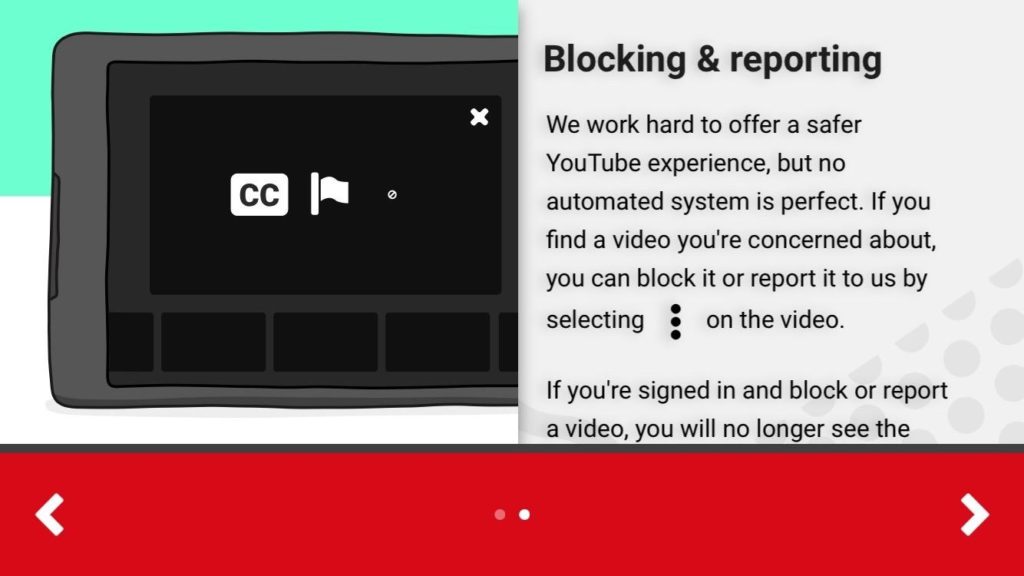
After installing the application, a setup screen reminds users that no automated system of filtering is perfect. There’s a method for blocking and reporting content that you think is inappropriate (see picture below).
Source: YouTube Kids (iOS)
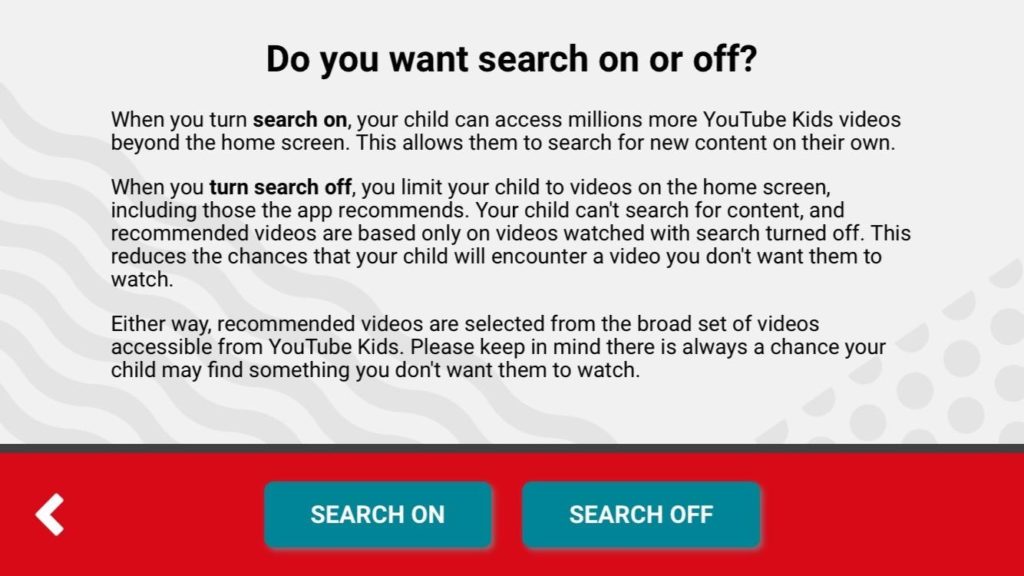
The next setup screen asks whether the user wants Search On or Search Off. Search On enables kids to search for videos beyond those seen on the home screen. Search Off limits videos to those on the home screen, and those videos that are recommended by the app, which are only listed based on videos watched with the search off. In other words, Search Off is a better option because it reduces the chance the application can find inappropriate versions of safe content
Source: YouTube Kids (iOS)
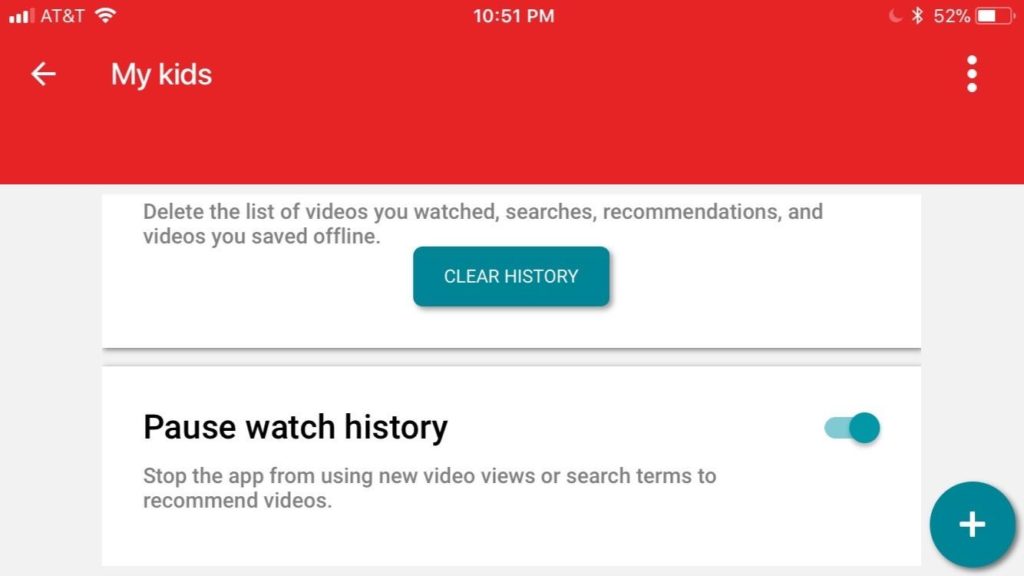
To further limit the app’s ability to discover content beyond what you have found to be appropriate, you can use the slide control to Pause watch history.
Source: YouTube Kids (iOS)
By turning this feature off, the user prevents the app from using new video views and search terms to recommend videos.
Add more layers of control
As YouTube itself says, no automated system of filtering is perfect. With automated systems creating videos as fast as YouTube’s automated systems swat them down, it’s a cat-and mouse game that parents will find hard to keep up with.
Consider adding additional tools to help you in your quest to keep your kids safe while being entertained and educated.
Use a separate parental control program. Most of the programs offer the ability to do additional filtering of content over YouTube’s built in controls, and some have the added utility of allowing a set amount of internet time per day before shutting off access.
Consider using networking services like OpenDNS (owned by Cisco) that help you manage your WiFi and internet access. These services can provide additional levels of content filtering over that offered by parental control software, and have an added benefit of helping automatically blocking access to sites that are a security risk.
Ultimately, there’s no fail-safe system to keep your kids from viewing questionable content other than to not give them access at all. Barring that, be sure to routinely monitor what your kids have been watching – there’s no substitute for a parent’s own judgement and vigilance.
As the clock on the 20th century wound down, some people were busy stockpiling supplies in case the Y2K bug caused computers around the world to crash and send the financial markets into a tailspin. As it turns out, the dot com bubble burst in 2001 for different reasons.
The 1990s can be remembered for many other things, among them advancements in software that opened up new avenues for communication, entertainment and business productivity. What were a few of the hallmark software programs that were widely used in the 90s? And what are the modern descendants that people are using today?
10 programs everyone had in the 90s, and their modern equivalents
AOL, Netscape, Internet Explorer and the internet era
The 90s was the decade that saw the explosive growth of internet use, spurred in part by the ubiquitous America Online (AOL) CDs (CDs!) that offered software for accessing the internet and email. Some estimates suggest that AOL alone spent over $300m and produced over a billion promotional CDs during the multi-year marketing campaign. The discs were made available in different languages in many countries; a sub-culture of disc collectors have archives of thousands of different disc designs.
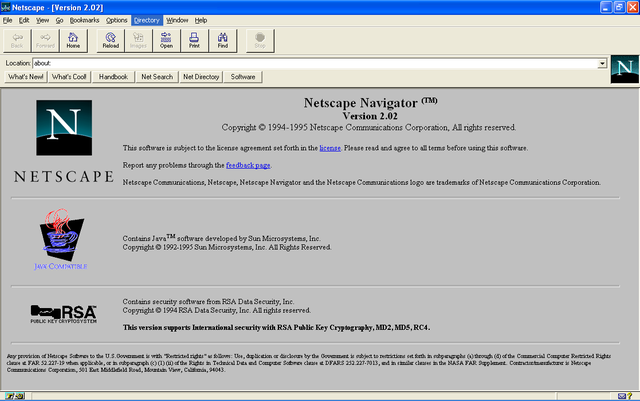
AOL integrated a graphical user interface with its email and internet browser to the point where users couldn’t distinguish between the internet and AOL services – and that was the point. It was easy to use. For another, fast growing set of users, a standalone internet browser from a small company called Netscape Navigator was the best way to view the web pages.
Source: By Indolering – Own work, CC0
After garnering a dominant share of the market for web browsers, Netscape continued to add functionality that Microsoft saw as being capable of disintermediating consumers from their use of the Windows operating system. Microsoft responded by developing Internet Explorer and offering both consumer and business their browser for free. By version 4.0, Microsoft had integrated Explorer into Microsoft Windows and leveraged its distribution to eventually overtake Netscape as the most widely used web browser. AOL acquired Netscape in 1998.
What we’re using now
Of course, now browsers are a standard application on mobile phones, tablets and other devices. Netscape’s software lives on as the Firefox browser, its code having been open-sourced and maintained and developed by the Mozilla Foundation. Numerous other browsers are based on this code, including Google Chrome. Microsoft continued to develop Internet Explorer through 2015, with Microsoft Edge being its eventual replacement as Microsoft’s web browser along with the introduction of Windows 10.
AIM and Instant Messaging
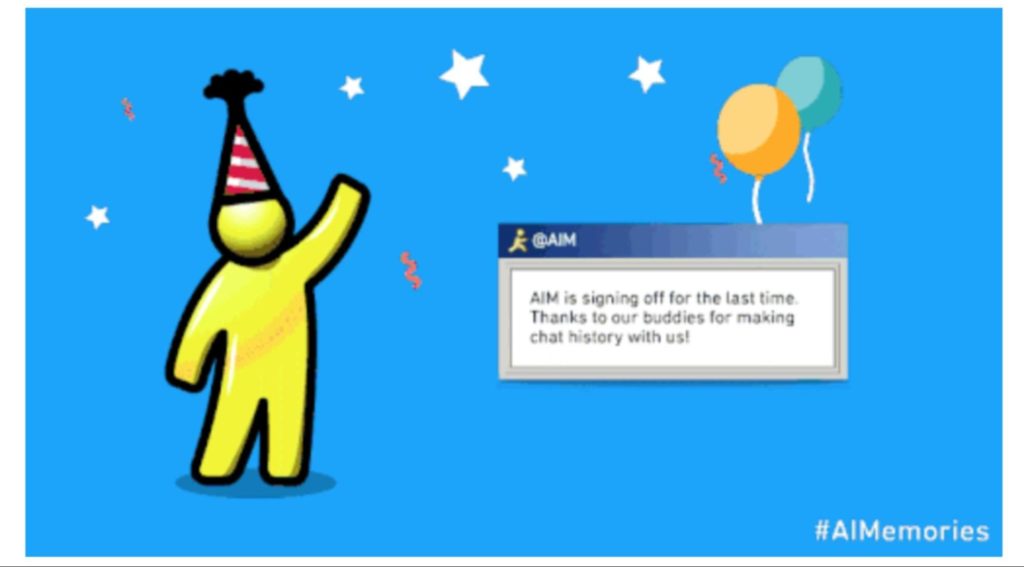
While we’re waxing nostalgic about companies and products gone by, AOL was responsible for another phenomenon- AIM (short for AOL Instant Messenger), which enabled people to see immediately who was online and available to “chat.” Technology such as IRC (Internet Relay Chat) for facilitating communications in real time had been around for a while, but AIM made the technology easy to use, and AOL marketing helped it become widely used in the late 90s. ICQ, Yahoo! Messenger and MSN Messenger were also widely used IM products at that time.
Social networks like Facebook, Instagram, Snapchat and WhatsApp have overtaken AIM as a means of communication in the consumer market. AIM, which debuted in 1997, was officially discontinued in December 2017.
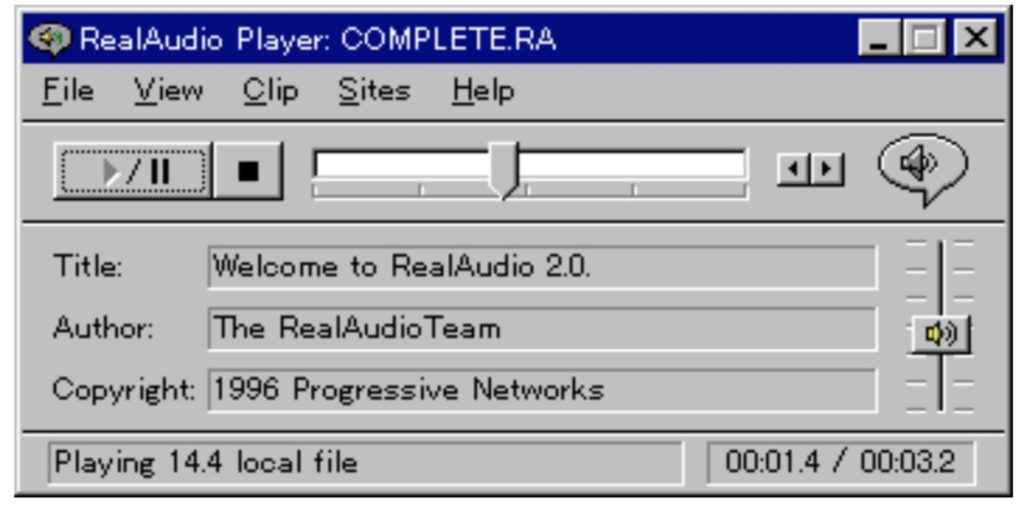
RealNetworks Player and video
The browser wars were one of the primary battlefronts for companies in the 90s, but video streaming quickly became another. At the forefront was the Progressive Networks (later renamed RealNetworks) which introduced one of the first applications that could be used to stream media over the internet. Real claimed to have over 100m registered users of its software by the end of the decade. Like Netscape before it, the ability of Microsoft and Apple to bundle Windows Media Player and Apple Quicktime, respectively, into their products blunted the impact RealNetworks had on streaming media in the ensuing decade.
Kids can’t believe that people once watched video on boxes with black and white pictures. Or on a postage stamp sized window on a PC. On-demand video can be viewed in glorious high definition on services from YouTube, Netflix, Hulu, Amazon and many others, with Netflix aiming to get more people watching in ultra high definition 4K formats – delivered over the internet. In terms of music, Spotify, Apple Music, Pandora and many other services provide vast libraries of music from their subscription services.
As processor and graphics capabilities increased during the 90s, the level of realism in game play kept moving up to the point where a whole genre of movies, called machinima, came about from the use of the graphics ‘engines’ used by the popular first-person shooter (FPS) games of the era. Doom was a sci-fi inspired FPS first released in 1993, and it later begat games such as Quake. There were many other popular games that people installed on their computers in the 90s – Myst, Star Wars X-Wing among them – but the popularity of the FPS genre remains unabated.
What we’re using now
FPS games like Call of Duty and Half-Life are popular descendants of
Doom and Quake, with Call of Duty having sold over 250m copies. The
ability to play these games on dedicated game consoles such as Sony PlayStation 4, Microsoft Xbox, and Nintendo Wii has helped extend their
popularity to the point where tournaments paying serious cash prizes are
the norm, and broadcasting of tournaments on television and the internet
has become commonplace.
Office productivity
It wasn’t all fun and games in the 90s. Office productivity applications that ruled the business world included Microsoft Office. Although Microsoft had separate word processing, spreadsheet, and presentation software, Microsoft bundled the programs together in Office in 1990. The company had competition from programs like WordPerfect (word processing), spreadsheets (Lotus 1-2-3), and presentation software (Aldus Persuasion, Lotus Freelance Graphics). Bundling with the Windows Operating System helped ensure the widespread adoption of Office.
What we’re using now
The rise of cloud computing has not left office software untouched. Running productivity applications and storing documents in the cloud has opened the door for new services. Google has its own suite of office applications (Google Docs, Sheets, Slides, and Forms) and applications like Evernote blur the lines between collaboration tools and document organization. Services from companies like Box and Dropbox enable collaboration on documents through cloud-based storage.
Collaboration
Lotus Notes was the original “groupware,” a tool that enabled centralized coordination of calendars, communications in the form of email and message boards, and directory access. Its programmability enabled the creation of document management workflows important in the running of businesses.
What we’re using now
Notes was enterprise collaboration software before anybody called it that, but these days Slack has taken up the torch for communication in the enterprise for business, while Jive and Yammer (Microsoft) are communication/collaboration tools that have also gained widespread adoption.
Operating systems – Microsoft Windows
Finally, our list of software that everybody used in the 90s concludes with Microsoft Windows. It’s not a program, per se, but the system software that is used to control a computer’s basic hardware functions and manage the use of services by applications. Perhaps a controversial choice with Apple fans, but in the 90s, Microsoft was the predominant desktop operating system supplier, and still constitutes the OS installed on the majority of desktop PCs.
Microsoft’s Windows OS came into its own by version 3.0, introduced in 1990, with other significant releases including Windows 95 and Windows 98 before the decade was out.
What we’re using now
While many computers are running Windows 10, a significant portion of
computers use Apple’s MacOS, while enterprise and cloud computing services often use variants of the Linux operating system.
What we’ll be using in the future
On the topic of operating systems, Microsoft’s hold on many forms of software has been weakened somewhat by the widespread adoption of phones and tablets from Apple that run iOS, as well as phones, tablets, and notebooks running the Android OS from Google. People are using applications like Twitter, Facebook, and SnapChat to keep friends and family updated on their activities, and they are playing games and doing live video broadcasts from their phones. Augmented and virtual reality may well be the topic that we look back on 20 years from now and ask “Whose reality was the most downloaded application of 2020?”
An argument flares up after a controversial statement. A stream of swear words and commenters are demeaning the poster. Do you throw in the towel, or spend time explaining yourself again? It’s human nature to keep trying—and that time spent keeps adding up.
One thing’s for certain: People are spending a lot of time explaining, showing, and updating on social media platforms. On Facebook, users are spending an average of 18.5 hours per month on the site, according to statistics from Verto Analytics, a provider of media measurement services. Instagram, also owned by Facebook, is number two, with 144m unique users spending an average of two hours per month on the site.
There are many different reasons to delete a social media account:
Stalkers and trolls won’t leave you alone
An account was hacked/compromised and you can’t control posts anymore
Privacy concerns for you and your family, either from Facebook or third parties who might have access to your data
Whatever the reason, people soon find that while it is quite easy to set accounts up, deleting your presence isn’t always easy or straightforward. For one thing, it’s important to understand that some services offer account deactivation as “time out” of sorts that allows you to return to using your account.
Downloading the archive of your account activity is another important feature available on some services. Having a history of your posts and other data can be a good idea; you will have a copy of images you uploaded, for example, as well as a history of your activity on the site should you decide to reminisce about posts gone by.
Here’s how to delete accounts for four of the commonly used social media platforms.
How to erase yourself from the top 4 social media sites
1. How to delete your Facebook account
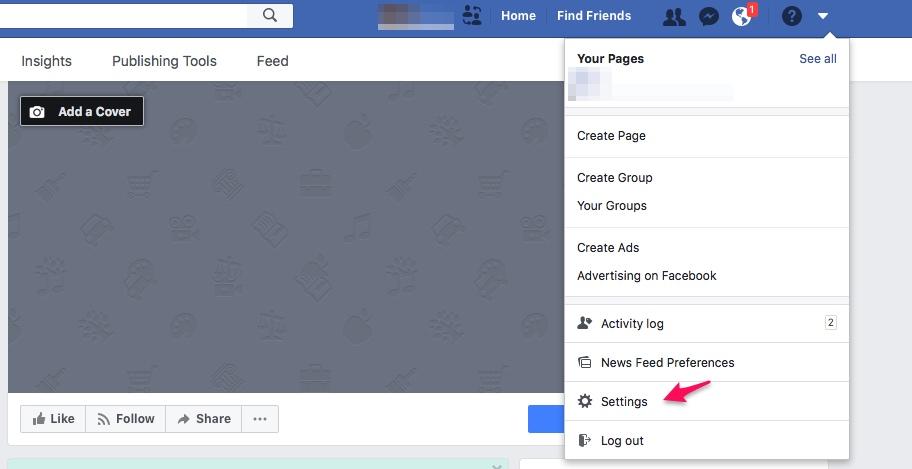
After signing in to your account, click the triangle at the right side of the page to see the pulldown menu.
Click Settings.
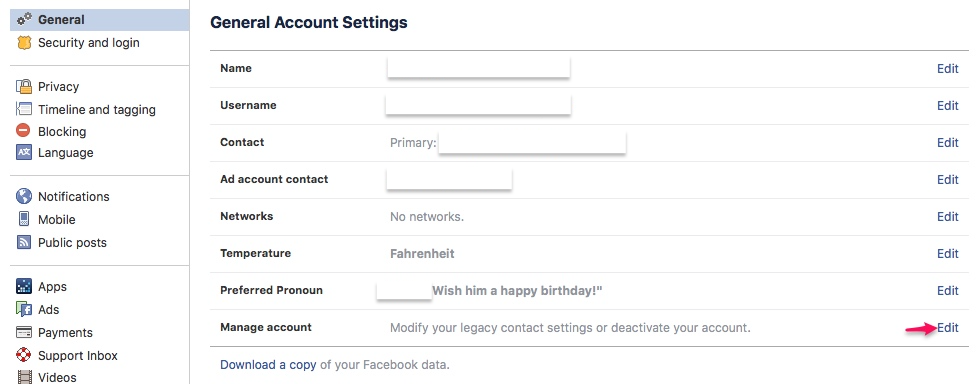
The General Account Settings pane opens. Go to the lower right-hand side of the box in the field for Manage Account.
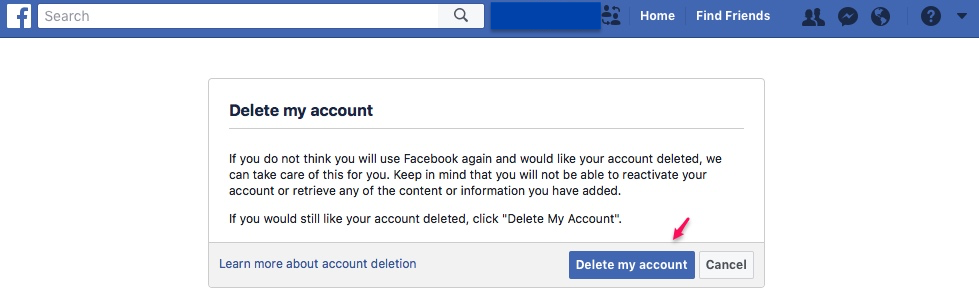
You will now see a box that includes a button for Delete my account.
When you delete your account, Facebook delays actual deletion for “a few days” after the request is made. If you log in again during this period, the request is cancelled. Once done, your account can’t be accessed again once deleted. Facebook notes that it can take up to 90 days for data to be deleted.
2. How to delete your Instagram account
As with Facebook, you can temporarily disable your Instagram account. If you delete the account, you can’t sign up again with the same username or add the username to another account. Instagram says that it can’t reactivate deleted accounts, so make sure that you are ready to delete all your photos, videos, and followers along with your profile.
To delete the account, log in on the website first. You can’t delete your account from the Instagram app itself.
You then need to go to the Delete Your Account page by clicking on the link provided. As far as we were able to tell, there is no option for deletion directly in the regular settings menu.
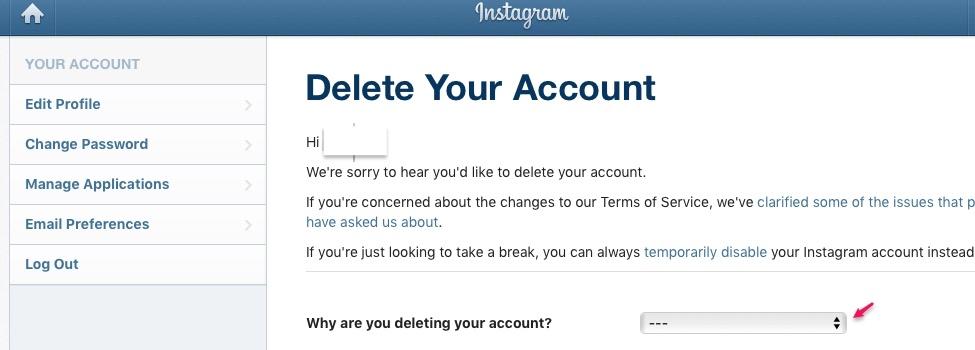
The page will look like this:
Instagram will ask you why you are deleting the account. You can select your answer in the dropdown box. Next, re-enter your password.
The option to permanently delete the account only appears after you select a reason for deleting the account.
Click or tap Permanently delete my account.
3. How to delete your Twitter account
Twitter’s process starts with a process called “de-activation,” which, unlike Facebook’s temporary suspension of activity, does actually result in the deletion of your account data.
First, log in to Twitter on the web. You cannot delete an account from mobile devices; also, you can’t delete an account from the TweetDeck client (which is maintained by Twitter).
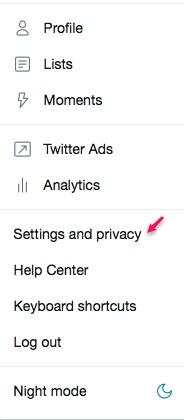
Go to your Account settings by clicking on your profile picture and selecting Settings and privacy in the drop down menu.
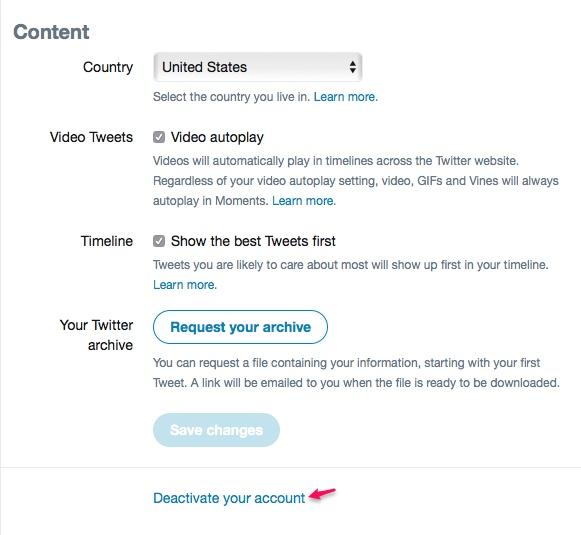
Below the box labeled Content you’ll see a link.
Click on Deactivate my account at the bottom of the page.
After reading the account deactivation information, click Deactivate @<your username>. Enter your password when prompted to verify that you want to deactivate your account.
Twitter says it retains user data for 30 days from the date of deactivation. The account can be re-activated during that time by logging in. Once the 30-day mark is reached, Twitter then says it takes up to a week to delete your data.
4. How to delete your Snapchat account
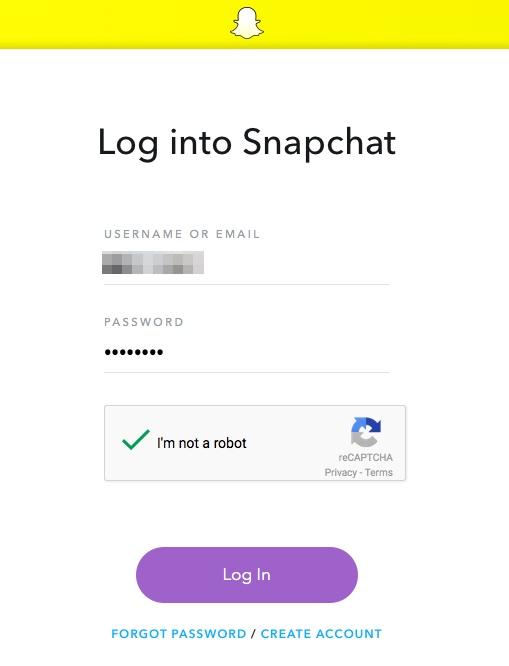
Deleting Snapchat is a straightforward process. A user visits the Delete Account page on the web and signs in.
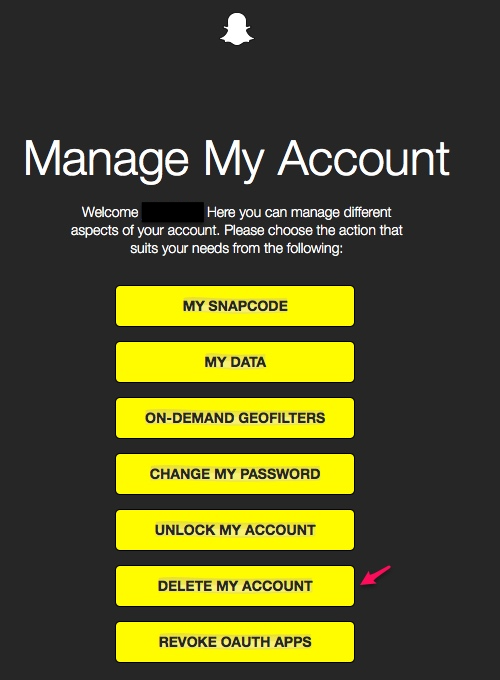
After logging in, you will see Delete My Account near the bottom of the list. Click on the button.
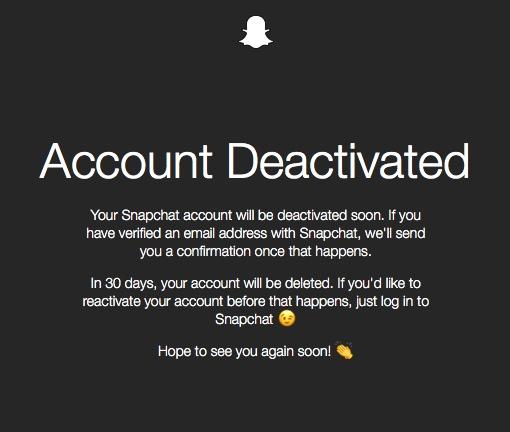
The next message verifies that your account is being deactivated.
Like other services, you have 30 days before the account is deleted. If you log in before time expires, your account is reactivated.
Gone, but not forgotten?
One of the key things to note: Deleting your social media accounts doesn’t always mean that your comments and pictures have completely disappeared from the internet. Google indexes a portion of the content from Twitter; it’s possible that your tweets are still stored by Google. To more fully erase the remnants of your social media presence, you can read this tutorial.
Over two years have passed since the launch of Windows 10, and well over half a billion devices have the operating system software installed. There have been a lot of improvements in security over earlier versions of Windows, but as is the case with all software, vulnerabilities exist.
While experts continue to find security issues in Windows 10 itself, other issues come from the interaction of devices, applications and cloud services.
With some features like speech recognition and personalized services, the issue isn’t always that there’s an immediate security threat; the issue revolves around what level of privacy the user expects, and how to protect personal information.
Taking control over Windows 10 features can help prevent some common security issues. Some of the basics of securing your system, based on Windows 10 Home Edition Fall Creators Update (version 1709, 2017) are the same, but there are also some new additions worth looking into. First, the familiar – Windows Hello and the startup screen you get after booting up your computer.
3 ways to secure Windows 10
Hello, who are you? Using passwords and lockscreens
The convenience of tablets, notebooks, and other mobile devices is undeniable. There are more than three times as many notebooks and tablets sold every year, compared to desktop PCs. Given that people use their devices in public places like coffee shops and shared workplaces, using passwords and lockscreens is essential to keeping Windows 10 devices locked down from unauthorized use.
Since the introduction of Windows 10, Windows Hello has offered the ability to use facial recognition technology in place of passwords and fingerprint readers that come on some computers. It’s definitely convenient, but consider that there might be a risk – perhaps slight – that the system can be tricked. Researchers have shown that the facial recognition technology in versions of Windows 10 prior to Windows Fall Creators Update (build 1703 or 1709) can be tricked into authenticating the user by using a photo of the user placed in front of the device’s camera.
Even if you’ve upgraded to the latest build, be sure to set up Windows Hello again to ensure that you’re using the most up-to-date settings and data.
Setting up Windows Hello
To set up Windows Hello with biometric recognition, check first to see if your device is supported. Some devices and applications are listed on this Microsoft website.
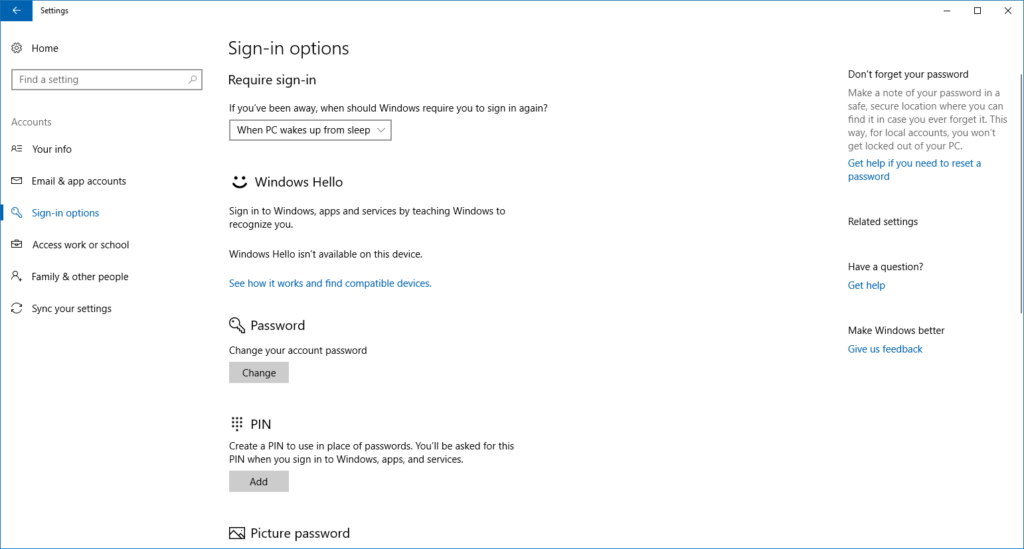
Select the Start button, then select Settings > Accounts > Sign-in options to get ready to set up Windows Hello. In the Windows Hello box, there are options for face, fingerprint, or iris scans if your PC has a fingerprint reader or a camera that supports these functions.
If you prefer to be a bit more old-fashioned or, as is the case with our test computer, your device doesn’t support Windows Hello,then make sure to set up a password or PIN.
Source: MS Windows 10 – Davis
Don’t forget to set the option to Require sign-in for When PC Wakes from sleep. That will ensure that an unauthorized user can get access after you’ve stepped away from your device.
Windows Defender offers unified view of security
Windows Defender is still the central location for security functions, with the addition of a relatively new feature called Controlled folder access. It might not sound like a security feature, but it was added to address the growing problem of ransomware. What is ransomware? It is essentially a form of malware whose purpose is to extort money from the victim by “locking” files using encryption and preventing the user from accessing her machine.
Using Controlled folder access
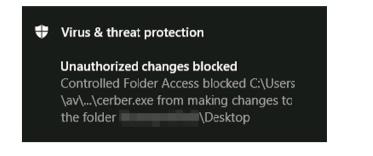
Controlled folder access is designed to prevent unauthorized access to important files. It does this by only allowing authorized applications to access data. Malicious files and scripts are denied access to folders, and Windows shows an alert when an unapproved application attempts to access or modify your files.
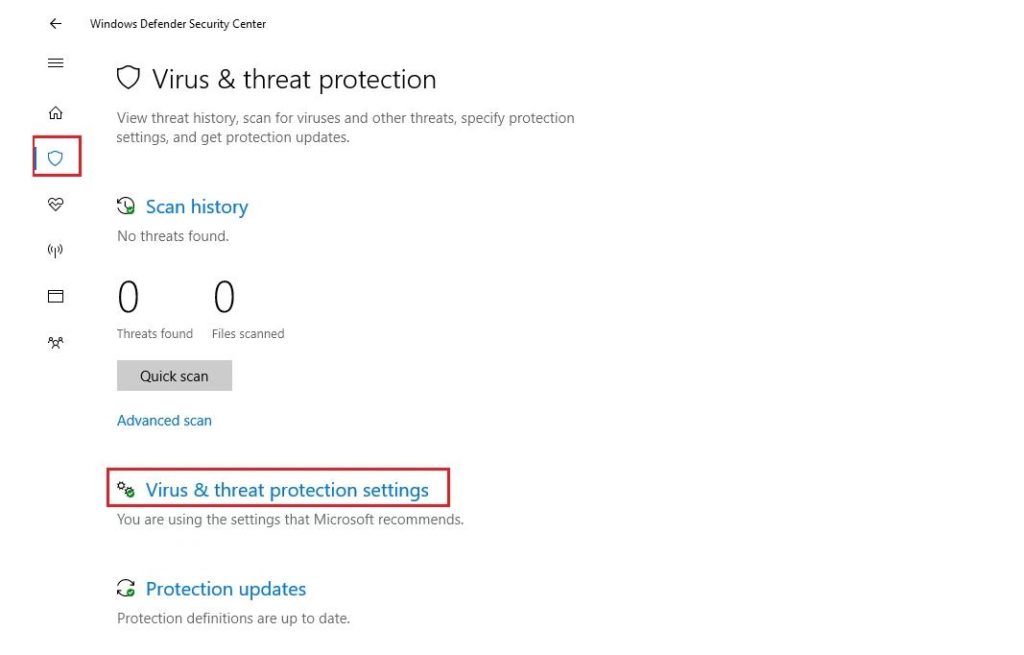
To turn on the feature, start by opening the Windows Defender Security center by clicking the shield icon in the task bar. Next, click the Virus and threat protection icon on the left side menu bar or its tile to the right.
Source : Microsoft
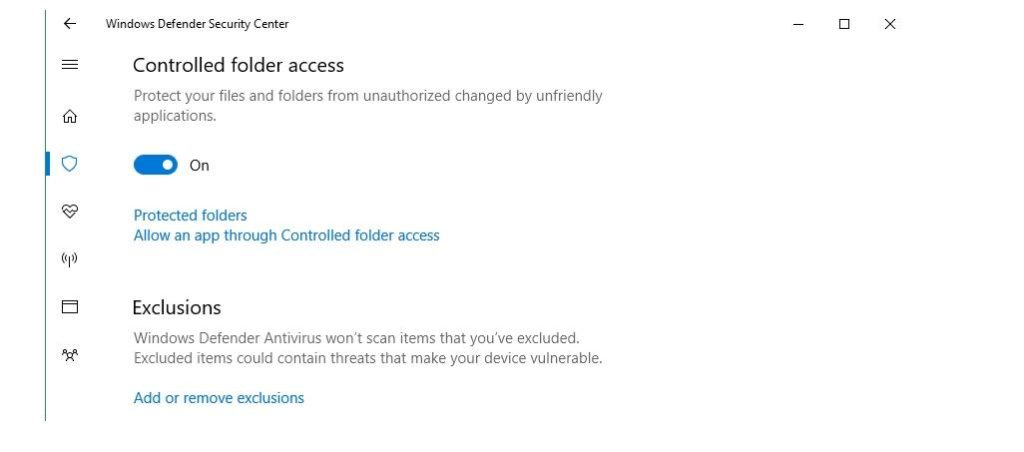
The window will show a switch for Controlled folder access, which you can now turn On.
Source : Microsoft
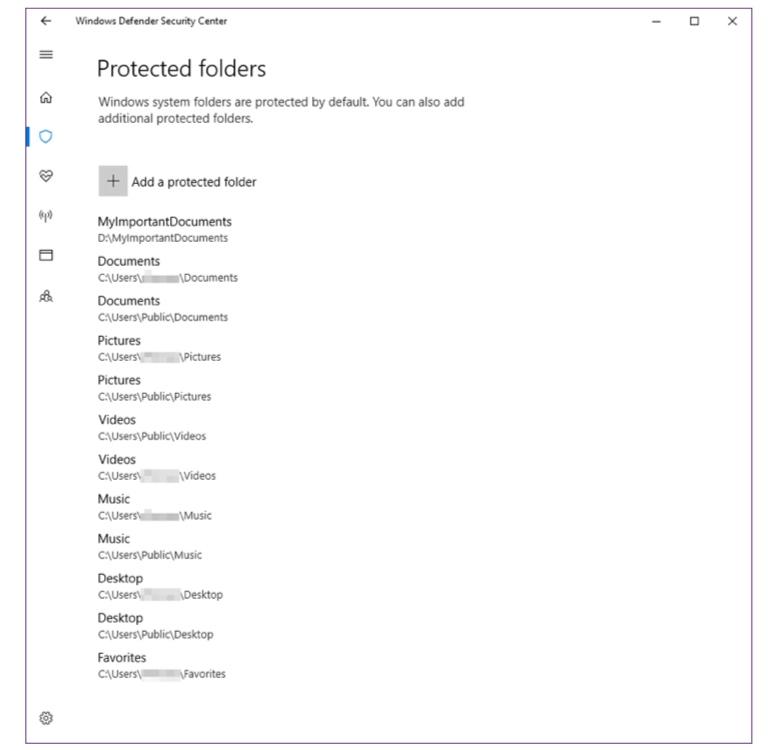
Most commonly used folders are protected, including Documents, Pictures, Music, and Videos. If you want to add other folders, including those on external drives, click on Add a protected folder and name the path to be protected.
Source : Microsoft
If an unauthorized application tries to access or modify files in the protected folders, this warning is displayed:
Criminals aren’t the only ones trying to install malware on your computer. Sometimes, users such as young children can inadvertently install applications that cause problems. Another step for locking down Windows 10 is to change permission on which apps can get installed on the computer. With Windows 10 Creators Update, there is an option to only allow software from the Windows Store to be installed.
Setting App download permission
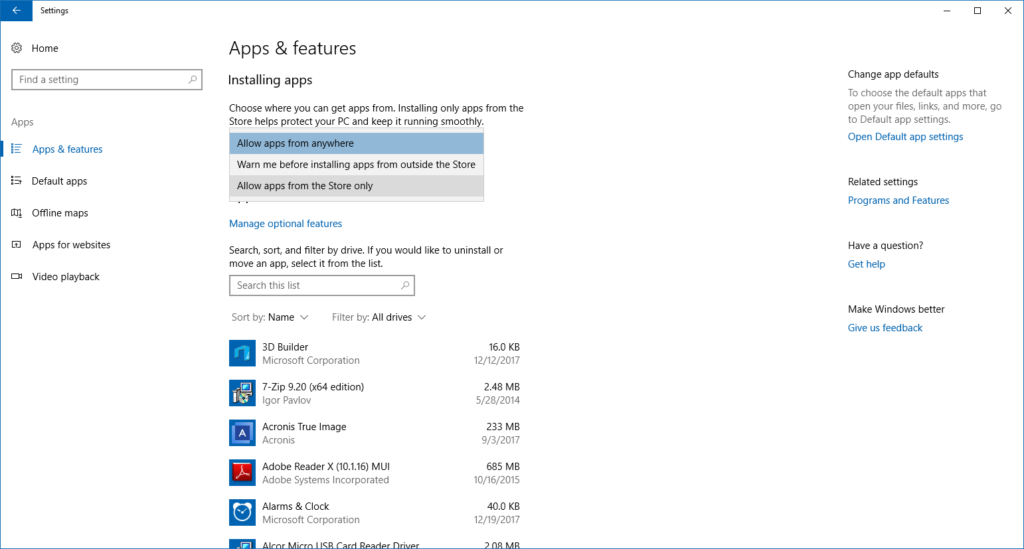
To set download permission, go to Settings > Apps & Features.
At the top of the window, you will see the Installing Apps setting.
There are three choices. Allow apps from anywhere is the default choice, but if there are young or less tech-savvy users you should consider enabling the Warn me before installing apps from outside the Store option.
Source: Microsoft Windows – Davis
This will show a warning before the installation can proceed. As long as you have set a separate account where there is only one user with administrator privileges, the other standard user accounts will need permission from the administrator to continue.
The setting for Allow apps from the Store only promises to offer an additional level of security, in that Microsoft is doing more to check the authenticity and trustworthiness of software in its store. Even apps that are checked might have security flaws, but at least (hopefully) most malicious apps will be filtered out.
Security experts talk about “layered security” as a way to protect computers and their data. It basically means that effective security means using several methods of protection to make it harder for bad guys to do you harm. Making sure that you’ve taken steps to prevent easy access by using Windows Hello is an essential first step towards locking down your Windows device. Using other features such as Controlled folder access and restricting which applications can be downloaded add another layer of protection from outsiders.