How to switch your Windows 11 system to dark mode

As more people get used to dark color schemes on their devices, the days of bright white beaming from every monitor are slowly becoming history. Dark color modes switch the principal colors in your operating system and apps from white to dark grays. Beaming less intense light into your eyes can help you cut down on eye fatigue so that you can use your device without feeling blinded. It also helps battery-powered computers conserve energy.

Windows 11 Download

One of Windows 11’s most exciting changes is the ability to enable dark mode throughout your entire system. You can find this feature in Windows 11’s Settings menu. Here’s how to turn dark mode on in Windows 11.

  1. Enable dark mode in your personalization menu

    The Colors menu in Windows 11

    Most smartphones and tablets use a dark theme as their default color setting. The first time you install Windows 11 on your desktop, it will use a light theme by default. You can enable Windows 11’s dark mode from the Personalization menu.

    Click on the Windows icon on the left of the cluster of icons in your taskbar to get started. Click on the Settings icon or just press the Windows key + i to open the Settings window automatically.

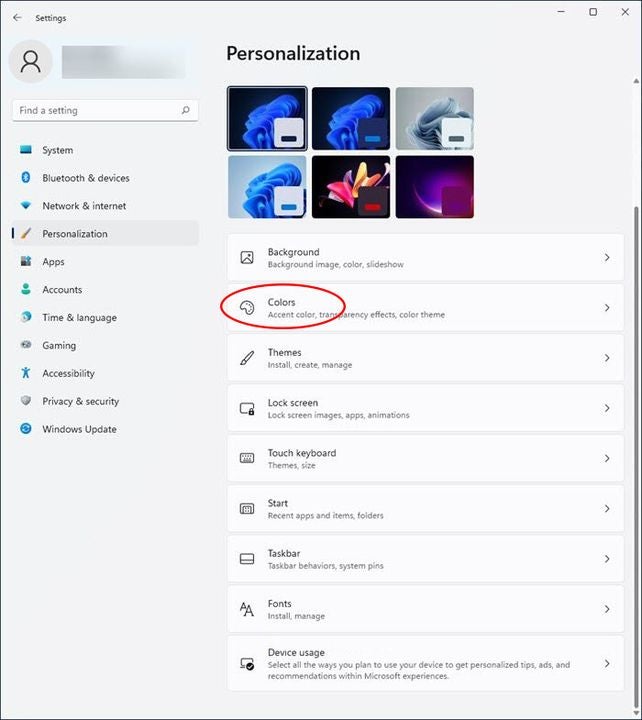
    On the left side of the Settings window, click on Personalization.

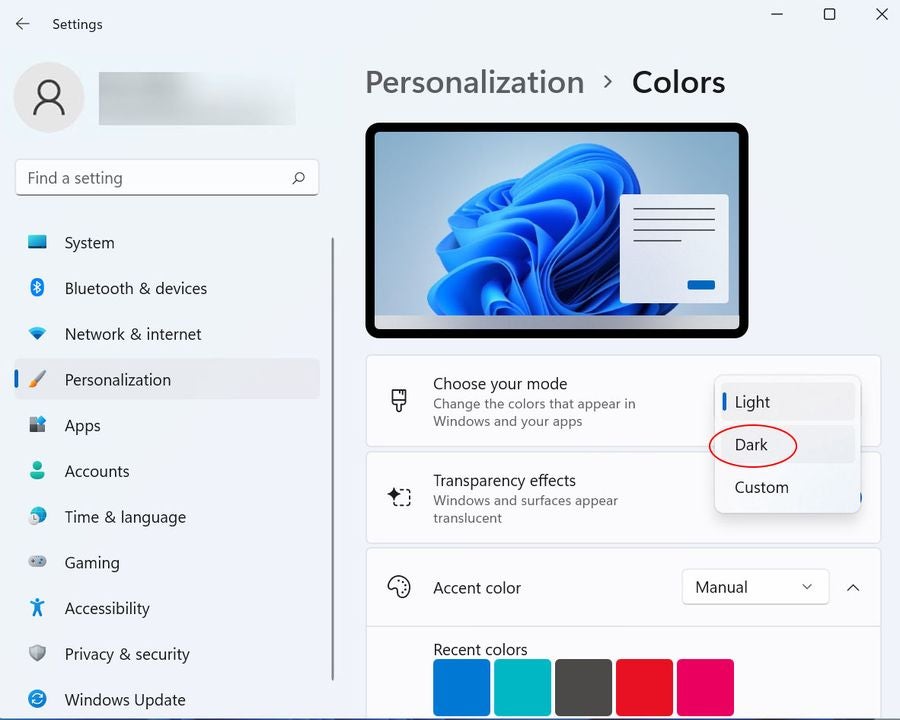
    In the Personalization menu, click on the tab labeled Colors.

    Once you’re in the Colors menu, look for where it says Choose your mode at the top of the main pane. When you click on it, you’ll see three options, Light, Dark, and Custom. Light mode is enabled by default.

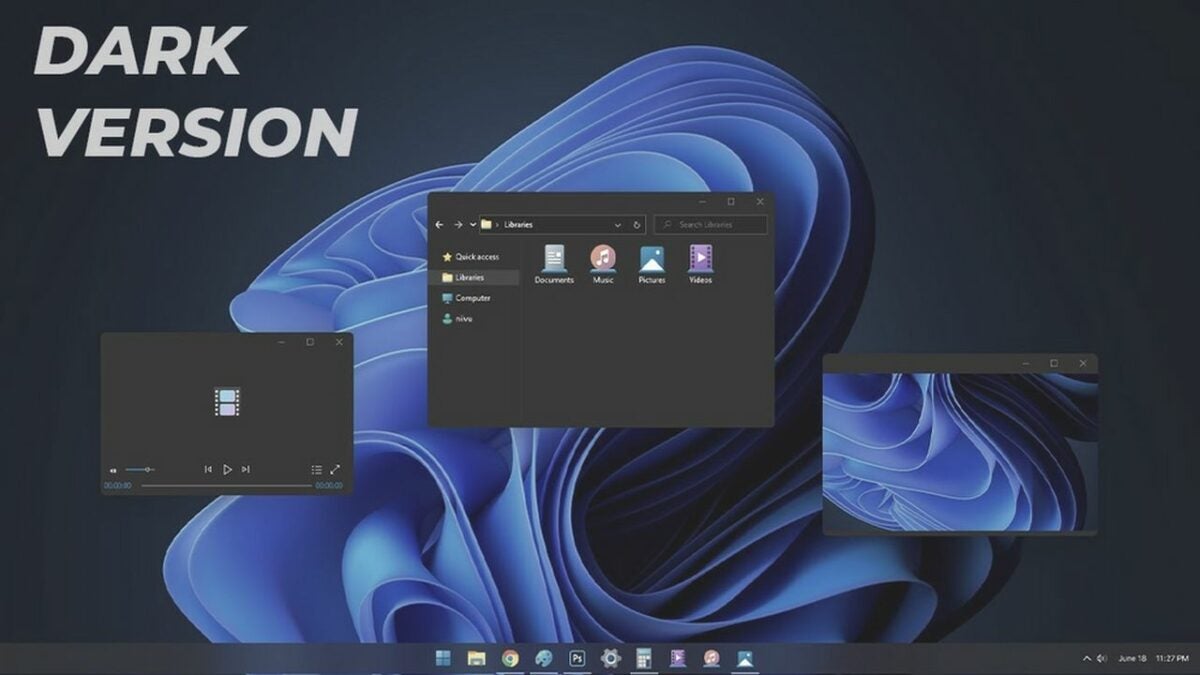
    Click on Dark to enable dark mode. The background colors in your apps and system menus should switch immediately to dark grays and the text should switch to light gray. You can close the Settings window now.

  2. Why use dark mode?

    The Personalization menu in Windows 11

    Dark mode helps protect your eyes by reducing the amount of bright light that gets projected into them at close range. A little bit of bright light never hurt anyone, but spending prolonged hours inches away from millions of tiny white light bulbs can tire your eyes out quickly. Switching most of your screen’s pixel to dark grays instead will cut down on eye strain.

    Activating dark mode also helps save your laptop’s battery. If you’ve ever used your laptop outside on a sunny day with the screen on maximum brightness just so you could see it, you probably know how quickly a bright screen can drain your battery life. Dark mode cuts down on the energy needed to power your screen.

    The more whites and light colors you need to display, the more energy your screen will drain from your battery. If you have an OLED screen, turning dark mode on can extend your battery life by up to 30%. It also makes it easier to work in dimly lit environments because your eyes don’t have to constantly adjust from the glaring white screen to the darker room around you.

Reduce eye strain and battery use with dark mode

When you enable dark mode as per our above instructions, you change both your operating system’s color scheme and the color scheme of each individual app. If you select Custom from the dropdown menu instead, Windows 11 will give you the option of changing just the operating system or app color scheme individually.

If you want an extra-dark screen with even higher contrast, scroll down in the Color menu to find the Related settings subheading. Right below it, you’ll see the Contrast themes menu. Click on it, and you’ll see a number of modes that use even darker grays and blacks. Night sky is the darkest mode available. Careful though, these high-contrast themes remove all Windows 11’s background animations and give you a drier experience.

If you want an even easier way to switch between Windows’ Dark and Light modes, check out this Easy Dark Mode app for Windows that lets you change display modes with a single click.

Supercharge your exploration with 4 helpful new Google Earth tools

Navigating our world hasn’t been the same since the launch of Google Earth. Available in desktop and browser versions, the app has become more than just an interactive map. It’s evolved into a 4D spatial search engine that brings people together and fills their lives with wonder.

Google Earth Download

Google has been steadily improving and renovating the Earth service since its launch in 2001. Today, it’s almost hard to remember how anyone ever left the house without it. Here are a few of the most powerful and practical new things you can do with Google Earth.

Find out how a place has evolved over time

Google Earth’s satellite and aerial views let you take virtual trips around nearly any location on earth from many different angles. Over time, they’ve accumulated a lot of historical data from a lot of angles.

In recent years, the app has added a feature that lets you check out how a place has evolved over the decades. You can find this Time Travel tool in Google Earth’s desktop version.

Open the Google Earth app on your computer, and zoom into a location you’d like to view. In the toolbar above the main map window, look for a clock icon with a blue arrow pointing counterclockwise.

Click on the clock icon to display a slider labeled by year and month. Move that slider to the various available dates to see how that location looked in the satellite and aerial photos from that year.

Google Earth’s Time Travel tool

Time travel in Street View mode

Besides the nearly 40 years of satellite and aircraft data it has access to, Google’s fleet of Street View cars have been taking pictures of city streets since 2007.

To time travel in Street View mode, go to your favorite location, and look for the little yellow human icon on the right.

Click on this “pegman” icon, and you’ll see the Earth areas with available street views highlighted in blue.

Drag the pegman to any blue highlighted area in the main map window to show that location in Street View.

Find the clock icon in the top toolbar again, and use the slider to see the photos that Google’s Street View cars have taken over the past years.

Google Earth’s pegman

Watch an aerial time-lapse sequence

You can use Google Earth’s historical data to make an automatic aerial time lapse of any location on earth and then sit back and watch how it has developed over a given period. This tool lets you look at how cities have grown and natural features have changed throughout the decades since people started collecting data. You can even see time lapses in 3D from specific popular locations where lots of data is available.

Open Google Earth in your web browser, and find the location you want to see.

Click on the Voyager icon in the toolbar on the left. It looks like an old-timey steering wheel from the helm of a ship.

In the Voyager menu, click on the Layers tab at the bottom of the screen. Scroll down, and click on the Timelapse in the Google Earth layer.

The app will start loading data to run a time-lapse, which can take a few seconds. You’ll see the Timelapse menu open up on the right. You can use it to pause the time-lapse, set a specific range of dates, or choose a different location to view. You can also click on the 3D button at the bottom right of the main map window to change your view of the time-lapse.

Google Earth’s time lapse feature

Create and share your own Google Earth stories

The web version of Google Earth recently added the ability to create stories and share them with your friends.

In your browser, open Google Earth, and make sure you’re signed in to your Google account.

Click the Projects icon from the toolbar on the left. It looks like a location pin over a square.

In the Project panel window that appears, click on Create, and select Create project in Google Drive from the dropdown menu.

To add a location to your story, navigate the map or search for a place by clicking New feature in the Project panel window and then Search to add place.

Once you’re at the right place, click Add to project in the popup window or use the Add placemark tool at the bottom left of the map window, which looks like a location pin.

The places you add will appear in the lower half of the Project panel window. To edit their content, hover your mouse over a place and click the pencil icon. That will open a Property editor panel for that place where you can change your story’s default view of it or add customized photos, videos, and text.

If you want to check your work, click Preview presentation at the top of the Project panel window.

Google autosaves your work as you go. When you’re ready to share a story, click the Share button at the top of the Project panel window. It looks like an icon of a person next to a plus sign.

Make a new story in Google Earth

Use Google Earth to explore the globe like you’ve never seen it before

Google Earth is like a Swiss Army knife of exploration and discovery. It hasn’t added many new features recently, but the time-lapse and story creation tools it did add have given us new ways to look at the world like we’ve never seen it before.

If you want other ways to explore the globe virtually, check out our full list of similar exploration and 3D creation programs to use alongside Google Earth.

9 tips to take control of your privacy on iOS 15/iOS 16

Your phone is full of revealing personal data like your search history, location data, and emails and texts with friends and family. This can make it low-hanging fruit for busybodies to target, whether it’s corporations that want to monetize you, nosy loved ones, or strangers with bad intentions.

iOS 16 Download

It can be hard to even find out which apps are collecting what information about you much less stop or limit them. Here are nine simple tweaks you can make in the latest versions of iOS to keep your private life as private as possible. Some of these might make your day-to-day life a little less convenient, but we’ll discuss exactly what trade-offs each comes with so you can choose for yourself which ones are worth it to you.

  1. Control app behavior tracking

    The Tracking menu in iOS

    Apps are constantly asking you for permission to access your contacts, calendar, camera, microphone, and other sensors and services so they can track your behavior. If you’d prefer not to be spied on, you can nip these requests in the bud by going to Settings > Privacy > Tracking and disabling the Allow Apps to Request to Track option at the top.

    If you’d prefer to only limit some apps and let others track your behavior, leave the Allow Apps to Request to Track option green. You can scroll down the list of apps below it and turn off permissions selectively.

  2. Track your apps with App Privacy Report

    The App Privacy Report in iOS

    If you’d like to learn more about how your apps are tracking you, turn on Apple’s App Privacy Report. Once activated, it begins to gather information about how often the apps on your phone are accessing private data, like your contacts, notes, and messages, and sensor data, like your location, microphone, and camera.

    Visit Settings > Privacy, and tap the button labeled App Privacy Report at the bottom of the menu. Next, tap Turn On App Privacy Report to start tracking your apps.

  3. Control access to your Location Services

    The Location Services menu in iOS

    One of the most egregious app overreaches is unnecessarily spying on your location. Go to Settings > Privacy > Location Services, and scroll down to see which apps have access. You’ll notice the options are Always, Never, and While Using.

    The apps that display a solid purple arrow are tracking your location right now. The ones with a gray arrow have tracked you sometime in the last day. The ones with a hollow purple arrow are using geo-fencing to provide you region-related services and notifications.

    You can select While Using for the apps you’d like to let keep their GPS functionality or Never for apps that don’t need to know where you are. Very few apps will need the omnipresent, battery-draining Always option.

  4. Control system services that track your location

    The system services that can track your location in iOS

    Stay in the Location Services window, and scroll down to the bottom. Tap on System Services. Here you can see all the system processes that have access to your location data by default.

    You can turn off location tracking for any service you decide doesn’t need to know where you are. Tap its green toggle switch on the right to turn it gray. We recommend leaving location on for only the most essential services like Emergency Calls & SOS, Find My iPhone, and Networking & Wireless.

  5. Clear your significant locations

    The Significant Locations menu in iOS

    Apple’s Maps app tracks the places you visit often, adding them to its list of your Significant Locations. This allows Maps to personalize some route information, but it can also provide details about your routine to bad actors.

    If you want to disable the feature, go to your Settings > Privacy > Location Services > System Services menu and scroll to the bottom to find the Significant Locations menu. Tap the green switch to turn it off. You can also erase your frequent location history by tapping the Clear History option at the bottom of the menu.

  6. Keep your mail activity private

    The Mail Privacy Protection menu in iOS

    Some marketers have started adding tracking technology to their emails that runs in the background to check if you’ve viewed the email and from what IP address. You can block these trackers by going to Settings > Mail > Privacy Protection and toggling the green switch to gray by the option labeled Protect Mail Activity.

    Senders will no longer be able to tell if you’ve opened their email, and your IP address will remain anonymous so marketers can’t use it to track your online activity. They will still see if you click a link in their email, though.

  7. Hide your real email address

    Hide My Email in iOS’ iCloud menu

    iCloud+ subscribers now have a Hide My Email option. This allows you to generate unique email addresses that forward to your actual email address so you can keep your real email private.

    When Safari or Mail asks you for your email address, tap the empty email field, and hit Hide My Email in the popup menu. You can create as many random simulated email accounts as you need. Manage or delete them from your Settings menu by tapping your name then iCloud > Hide My Email.

  8. Prevent websites from tracking you

    Prevent Cross-Site Tracking in the Safari menu in iOS

    Keep nosy websites from following you as you browse the internet in Safari by visiting Settings > Safari. Scroll down until you see the section labeled Privacy & Security, and disable the green toggle switch next to the Prevent Cross-Site Tracking option.

  9. Make your IP address invisible

    Hide IP Address in the Safari menu in iOS

    You can go a step further to shut out snooping websites in Safari by making your IP address invisible to web trackers. Without your IP address, trackers will have no way to uniquely identify you online.

    Right below the Prevent Cross-Site Tracking button we showed you above, you’ll see the option to Hide IP Address. Toggle the green switch to gray to turn it off.

Cut down on data harvesting with these privacy tips

It’s impossible to completely stop the data-driven marketing machine, but you can severely limit it with the above ideas. Some of these settings have a way of turning back on after iOS updates, so be sure to check on them every so often.

If you’d like to keep your iPhone even more private and secure, explore some of the essential security and privacy apps for iPhone.

How to make MS Edge safer by turning on Encrypted Client Hello

Most information you send or receive on today’s internet passes through a layer of encryption to make sure it can only be read by the sender and receiver. This task is generally done via an automatic encryption key exchange through a cryptographic protocol in your browser.

The current most popular key exchange protocol is a handshake called Transport Layer Security (TLS). By following just a few steps, you can enable the latest TLS extension — known as Encrypted Client Hello (ECH) — in your Microsoft Edge browser to make your information even safer.

Microsoft Edge Download
  1. Open MS Edge properties

    Microsoft Edge Properties

    Find the shortcut you use to access MS Edge in your Start menu, taskbar, or desktop. Right-click on the shortcut, and select Properties from the popup menu.

    Go to the Shortcut tab in the Properties box. In the Target text box, third from the top, you’ll see the path to the location of your msedge.exe file. It should look something like “C:\..\msedge.exe.”

  2. Update path location and launch

    The Target text box in MS Edge’s Properties dialogue

    Don’t change the path itself. Directly after it, add a space followed by –enable-features=EncryptedClientHello.

    Click OK at the bottom of the Properties box.

    Use the shortcut you just modified to launch MS Edge.

  3. Enable support for HTTPS records in DNS

    Enable the first flag

    Before you start browsing, click on Edge’s address bar, and paste edge://flags/#dns-https-svcb.

    Edge will display a list of services you can turn on or off. The first one is titled Support for HTTPS records in DNS. Click on the drop-down list to the right of that service, and select Enabled.

  4. Enable use DNS https alpn

    Enable the second flag

    Click on the address bar again, and type in edge://flags/#use-dns-https-svcb-alpn. Select Enabled next to the option labeled Use DNS https alpn.

    Next, press Alt + F to open Edge’s menu. Click on Settings and then Privacy, search, and services.

    Under the Security subheading, find the option labeled Use secure DNS to specify how to lookup the network address for websites. Click on the toggle switch on the right to enable this. The switch will turn blue.

  5. Select Cloudfare as service provider and relaunch Edge

    Enable secure DNS

    Directly below, click the option labeled Choose a service provider. In the list of available providers below that, choose Cloudflare.

    Restart the Edge browser. The ECH update is now enabled.

  6. Use an Encrypted Client Hello checker

    You can check that ECH is working properly in your Edge browser by visiting the defo.ie ECH check page at: https://defo.ie/ech-check.php. Check the status of the SSL ECH parameter. It should read success!

Why should you enable ECH in Microsoft Edge?

The TLS protocol was designed to protect data streams flowing between a web app like your browser and an external server. Since it was first created in 1999, TLS developers have released various updates to the protocol, the latest of which is TLS 1.3. Encrypted Client Hello is an add-on to TLS 1.3, extending its protection to include the full handshake between the sender and the receiver. This includes the initial introduction between endpoints, finally closing a privacy leak that had persisted since the beginning of the protocol.

Online servers often use the same IP address to host a number of websites, such as in shared and virtual hosting services. Server Name Indication (SNI) is a previous TLS extension released in 2003 to fix common name mismatch errors caused by multiple websites using duplicate IP addresses. These used to result in browser error messages that read Your connection is not private. SNI allows the handshake process to specify a website’s exact domain name in the certificate.

SNI data is sent in what used to be an unencrypted client hello message, in which your browser initiates contact with a server, requesting its security certificate. Before this ECH update, the SNI data was not included in the encryption protocol. That meant eavesdroppers could see which servers and websites your network had requested access to. ECH prevents server name interception by using a public key to encrypt the entire payload, including the client hello.

Using ECH in other browsers

Encrypted Client Hello is currently in the process of being standardized for the final release to the wider browser ecosystem. You can also enable the experimental version in Firefox as well as the developer versions of various Chromium browsers.

If you’re interested in keeping your web browsing as safe as possible, check out our list of the most secure browsers for Windows and Android.

How to keep your computer safe with K7 Total Security

K7 Total Security is a suite of privacy and security software with a broad range of digital well-being monitors and controls. It comes with its own virus detection algorithm, hard drive cleanup tools, and a parental control cockpit that aim to keep you safe and in control of your computer without sacrificing system speed.

The comprehensive K7 protection platform includes features that guard against:

  • Viruses
  • Malware
  • Malicious websites
  • Identity theft
  • Ransomware
  • Spyware
  • Spam

Besides its speed, it also performs well on malware detection and false alarm tests, routinely catching more than 99.9% of malware while generating a less than 0.05% false alarm rate for legitimate programs.

This guide to K7 Total Security for PC will show you how to use the suite to perform anti-malware scans, manage your kids’ computer use with its parental controls, and restore wrongfully quarantined files and folders.

K7 Total Security Download
  1. How to scan your computer for threats with K7

    K7’s system tray menu

    Once you’ve installed and activated the K7 Total Security antivirus suite on your PC, find its icon in your system tray. The icon shows K7 in black letters on a gray background.

    Right-click on the icon, and select Open K7TotalSecurity to go to the program’s main menu. Click on the Scan icon in the bottom right corner.

    K7 gives you four basic scans you can perform:

    • Quick Scan
    • Complete Scan
    • Custom Scan
    • Rootkit Scan

    The Quick Scan takes about a second to check your system files for malware. The Complete Scan checks all your files, folders, and apps for malware, which can take a few hours on machines with lots of files. The Custom Scan lets you select which folders you want to check for traces of infection. The Rootkit Scan looks for deep infections and hidden threats in your firmware, boot sectors, operating system, and kernels.

  2. How to schedule a scan

    Scan your system with K7 Security

    You can schedule an automatic scan to run when you’re away from your computer by selecting Schedule Scan at the lower center of the Scan menu. Choose the kind of scan you want to perform and the time and date to perform it. You can also automate the scan to run on a daily, weekly, or monthly basis.

  3. How to scan USB drives automatically

    K7’s Settings menu

    Go to K7’s Settings menu by clicking on Settings at the top middle of the program’s main menu.

    Click on Device Control at the top right of the Settings menu.

    USB access is enabled by default. Look for the option labeled Scan for viruses as soon as the device is connected. Click the box to enable automatic USB scanning. Directly below it, you can choose whether you want K7 to ask for your permission before it starts scanning any USB drive you insert or whether it can just run automatically.

  4. How to use K7’s parental control

    Access K7’s Parental Control menu

    K7 lets you set different access permissions for different users of your computer.

    In the Settings menu, click on Parental Control at the center right. Click on the Web Filter button in the Customize section at the bottom of the Parental Control menu.

    You’ll see two tabs, one labeled Websites Allowed and the other labeled Websites Blocked. You can choose whether to create a blacklist of websites you don’t want certain users to access or make a whitelist of sites they can access and block the rest.

  5. How to find and restore files K7 has quarantined

    K7’s Quarantine Manager

    K7 automatically places files it deems suspicious into its quarantine folder where they can’t affect your system. If a file you need mysteriously disappears into quarantine, you can restore it from the Quarantine Manager console.

    Click on the Reports button at the top right of K7’s main menu. In the Reports menu, click on the first option, Quarantine Manager.

    You’ll see a list of quarantined files, some of which might be dangerous. Select only files you know are safe, and click the Restore button on the bottom left. K7 will display a warning message prompting you to confirm you want to restore the files. Click Yes.

Try K7 Total Security for free for your first month

You can check out the K7 Total Security trial version for free for 30 days to see if it runs as fast as advertised and make sure the suite is right for you. If you’d like to compare K7 to our other top-rated antivirus programs, have a look at our Essential Security and Privacy apps for Windows page.

How to use Emsisoft’s Browser Security Chrome extension in 5 steps

Security software provider Emsisoft’s free Browser Security Chrome extension is a lightweight addon that creates an additional security layer between your browser and harmful websites. It helps keep you safe from phishing attacks and online malware without giving up your privacy.

Emsisoft Browser Security DOWNLOAD

This guide will show you how to install and use the extension.

  1. Install the Emsisoft Browser Security extension in your Chrome browser

    Download and install Emsisoft Browser Security extension

    Download the Emsisoft Browser Security extension. Click on the blue Add to Chrome button on the right. When the prompt pops up asking for confirmation, click Add extension.

    Once the extension has been successfully installed, it will run quietly as a subroutine while you browse.

  2. Get to know the website blocked page

    Websites blocked page

    If you try to visit a site it detects as malicious, the extension will display its Website blocked page and prevent you from accessing the site. The Website blocked page shows you the malicious site’s URL along with the reason Emsisoft blocked it.

    If you think they got it wrong, you can click on Report an error at the bottom of the page to add the site to your Exclusions list and send the URL to Emsisoft’s security team to double check it. You can also click Visit the site anyway to mark it as safe on your computer without sending a report.

  3. Learn the extension’s basic features

    Report a dangerous site

    You can turn the Browser Security extension on and off or customize it by clicking on its icon in your Chrome extensions bar to the right of your address bar. The icon looks like a light blue shield on a dark blue background.

    The extension is enabled by default. To turn it off, toggle the green switch labeled Block dangerous websites in the extension’s popup menu. The switch will turn red when the extension is disabled.

    The popup menu also gives you two other options:

    • Manage exclusions
    • Report this site as dangerous
  4. Customize your protection with your exclusions page

    Select your exclusions

    You can see the list of sites that Browser Security wants to block but that you’ve decided to visit anyway by clicking on Manage exclusions. This list will automatically synchronize across any device where you use your Chrome account.

    If you decide you want to once again block a site from your exclusions list, select it, and click the Remove button on the right of the page.

Browse safely and privately

Where most safe browser extensions collect and share data about every web page you visit, Emsisoft’s Browser Security extension sends only a portion of the URL encrypted into an unreadable hash for their pattern-matching process. The extension also checks the address of any files you download and blocks any downloads that come from suspicious-looking sites.

Independent tests in Chrome give this extension an almost perfect success rate against sites distributing malware and about an 80% success rate against sites containing phishing scams.

Web security experts generally recommend layering together a few of the best browser security extensions to make sure nothing gets through the cracks. Here are our selections for the 12 best Chrome addons to keep you as secure as possible while you browse.

How to use the LastPass: Free password manager in 5 steps

LastPass is a secure online password management and form-filling platform. It allows you to store all your passwords and other sensitive data in a secure digital vault that you can access using a single master password.

LastPass: Free Password Manager DOWNLOAD

The program will remember which of your passwords, usernames, and other data belong in which fields on which sites and automatically fill in the blanks when necessary. All you have to remember is your master password.

Our step-by-step tutorial explains how to install and get the most out of the LastPass extension in your Chrome or other Chromium-based browsers.

  1. Install the LastPass extension

    LastPass in the Chrome Webstore

    Start by opening your Chrome browser. You should see a link to the Chrome Webstore in your Bookmarks bar or in the displayed links when you open a new tab. If not, search for Chrome Webstore in your address bar.

    Click on the search bar in the top left corner of the Chrome Webstore, and search for LastPass. You’ll see LastPass: Free Password Manager among the top results. Or just click on the LastPass extension page.

  2. Install the LastPass extension

    The LastPass extension page

    Click on the big blue button on the right labeled Add to Chrome. You’ll see a pop-up confirming that you want to add LastPass to your Chrome extensions. Click Add extension to proceed.

    The blue button will change to read Checking, and the necessary files will begin downloading. This can take a few minutes, so be patient.

    Once the download and installation are complete, you’ll see a pop-up at the top right confirming that LastPass has been successfully added to your Chrome browser. You should also see the LastPass icon appear in your extensions bar at the top right of the browser. It looks like three dots lined up horizontally inside a black box.

    Before you can start storing your passwords, you’ll need to create a free account with LastPass. It only takes a couple of minutes.

  3. Create a free account

    Create an account

    Click on the LastPass icon in your extensions bar to go to the LastPass login window. Click Create an account.

    Type in the email address you want to use with your LastPass account, and then click the red button labeled Create Account.

  4. Set up your master password

    Make a master password

    The next screen is where you’ll set up your master password and an optional reminder in case you forget the password. Follow the on-screen instructions to design a strong unique password and a reminder known only to you. If you need help creating a strong password, check out our list of the top password generators.

    When you’re ready, click on Unlock My Vault to finish creating your account.

Keep browsing

Once your LastPass account is active, you’ll only need to type in your credentials one more time in each online location. The extension will begin saving your sensitive info to your secure vault every time you log in or sign up to any online service or site it hasn’t seen before.

Besides passwords and usernames, LastPass can also store your addresses, credit card info, insurance info, passport data, and anything else you’d like the extension to remember. When you go back to a site or form with fields that LastPass has seen before, it will ask you to input your master password and then automatically fill in the necessary information. Your master password stays encrypted at all times and will never be shared with the LastPass service.

If you’d like to supercharge your browser even more, check out our list of the eight best Google Chrome extensions.

A user guide to 5 Mac Numbers’ handiest functions

Numbers is a spreadsheet app developed by Apple. It lets you create customized spreadsheets using powerful built-in templates, formulas, and functions.

Numbers DOWNLOAD

In Numbers, functions are individual operations, like SUM to add a group of numbers or CURRENCYCONVERT to compare currency values using online data. Formulas combine functions into equations that can help you manipulate aspects of your data to extract useful information. Functions can be mathematical, statistical, logical, textual, financial, etc.

Here are five simple Mac Numbers functions that you can start using today.

Editing formulas

Use AVERAGE to find the mean of a collection of numbers

AVERAGE is one of Numbers’ simplest and most practical functions. To find the average value in your collection, start by typing =AVERAGE into any cell. The equal sign tells Numbers that you’re using a function.

Next, select the cells where you want to find the average value. You can select a column, a row, or a whole block. That collection’s average number will now appear in the cell where you wrote the formula.

Use comparison operators to compare values

Comparison operators are single-character functions that let you check if the values in multiple collections are equal or not equal and determine which is greater than or less than the other. This can be practical when you want to compare income, expenses, sales, etc.

Numbers uses six comparison operators:
• Equal to: =
• Not equal to: <>
• Greater than: >
• Less than: <
• Greater than or equal to: >=
• Less than or equal to: <=

These functions will compare numbers arithmetically, times and dates chronologically, durations by length, and text strings lexicographically, where < means text that comes earlier in the string and > means text that comes later. When you compare Boolean values, TRUE will be greater than FALSE.

Use IF to perform a simple logical test of a value

The IF function tests a value and returns one answer if it meets the criteria you provide and another answer if not.

In Numbers, IF requires three arguments encased in parentheses, each separated by a comma. The first argument is the expression, and the second and third arguments specify what to do if that expression is true or false.

The expression argument can be any logical or mathematical classifier. You can use comparison operators here, like IF(A2>A3).

Next in line, the true argument is what you want the formula to return if the tested value meets your criteria. It can contain any text, number, or function that you specify.

Finally, the false argument is what the formula will answer if the expression turns out to be false. It can also be a text answer, a number, or another function. If you’d like your true or false arguments to display text, put what you’d like to say in quotes.

A complete IF formula might be something like: IF(A2>A3,“Yes”,”No”). This would print Yes in the cell if the value in A2 is greater than the value in A3 or No if not.

Using the If function

Use MAX and MIN to find the smallest and largest values

If you want to find the biggest or smallest value in a collection, you can use MAX and MIN.

Start by typing =MAX or =MIN into an empty cell. Next, select any row, column, or block of cells. MAX will display the biggest value in the collection, and MIN will display the smallest. You can also use this function together with others, such as IF(A2=MAX,”You win”,”You lose”).

Use CONCATENATE to combine data

CONCATENATE is a function you can use to combine data from two different sources into one cell. It works with both text and numbers.

This function can be helpful when you want to, for instance, output someone’s full name by combining data from two different cells containing their first and last names separately.

Type =CONCATENATE into any cell, and then click on the first cell you want to combine. Next, type a comma, and then click on the next cell in your combination. The formula will concatenate the data from the first and second cells and display them both together. You can concatenate any number of cells.

You can also add text in quotes to your combined values to make a coherent sentence out of raw data. For example, if you have a person’s first name in A2, their last name in A3, and their age in A4, the string CONCATENATE A2,” “,A3,“ is ”,A4,” years old.” will show something like: John Johnson is 52 years old. Note the spaces in quotes that we use to separate the values.

An example of the Concatenate function

Numbers’ functions are shortcuts to simplify your data processing

Although you could probably add, subtract, and multiply a few cells manually, once you accumulate enough data, even simple operations can quickly get complicated and repetitive. By using functions to create formulas, you can put away your calculator and let Numbers do the hard work for you.

If you’d like to see where Numbers ranks in our list of Mac spreadsheet apps or check out some alternative programs in Softonic’s top spreadsheet apps for Mac.

5 ways to manage your security with Windows Defender

Windows Defender is Windows’ built-in protection against viruses, malware, and other cyber attacks on your PC or laptop. In 2020, it was renamed Microsoft Defender in updates to most Windows versions.

Windows Defender DOWNLOAD

By default, Defender starts whenever you run Windows and silently checks for suspicious activity in real-time, taking action when necessary. The app comes with plenty of customization options that you can use in case of specific attacks, conflicts, crashes, or other situations. Here are five of the most useful settings you can customize.

Enable or disable Windows Defender

You can turn Windows Defender on or off whenever you need to. This can come in handy if you want to disable its antivirus to install a program, play a game without an automatic scan slowing down your system, or troubleshoot a false positive for an app you know is safe.

You can find Windows Defender’s main menu by clicking on your Start menu and going to Settings > Update & Security > Windows Security. In the Windows Security window, click on Virus & threat protection in the sidebar on the left. Scroll down until you see the heading labeled Virus & threat protection settings, and click on Manage settings.

Toggle the On/Off button under the Real-time protection heading to activate your protection if Windows Defender is turned off or deactivate it if its already running. Unless you have a separate antivirus program installed, this button will automatically reset to the On position the next time you reboot your device.

Enable or disable Windows Defender.

Exclude specific files, folders, or extensions

Windows Defender also lets you exclude individual files, folders, or file types from being scanned so you can troubleshoot without turning off all your protection. Here’s how to whitelist a file, folder, extension, or process if you’re sure it comes from a trusted source with no harmful embedded scripts.

In the same Manage settings section of the Virus & threat protection window mentioned above, scroll down until you see the Exclusions section. Click Add an exclusion.

Click on the type of item you want to exclude and Defender will open a file explorer so you can select the individual item:

  • File will let you exclude a single file.
  • Folder will let you exclude an entire folder.
  • File type will let you exclude any file ending in a given extension, like ZIP or EXE.
  • Process will let you exclude any files opened by the process you select, although Defender will still scan the process itself.
Add an exclusion in Windows Defender.

Use the right scan for the job

To scan your computer for viruses and malware on demand, go back to the Virus & threat protection window. Under the Current Threats section, click on Scan Options.

Windows Defender gives you four types of scans:

  • Quick scan runs a brief checkup of your computer’s most vulnerable areas, including the Windows folders and registry.
  • Full scan performs a sequential examination of all your computer’s files and active programs. This may take hours to finish.
  • Custom scan lets you select individual files, folders, or hard drives to check.
  • Offline scan will reboot your device and perform a full scan before loading Windows. This can be useful to find malware like boot sector viruses that bypass Windows.

Keep your files safe from ransomware

Ransomware is a relatively new kind of attack that encrypts your data until you pay the attacker for the decryption key. By default, Defender’s ransomware protection is toggled off to avoid blocking legitimate file access.

To turn it on, return to the Virus & threat protection screen, and scroll down to the heading labeled Ransomware protection. Click Manage ransomware protection.

This is where you can control access to your most valuable folders. Turning on the toggle switch under the Controlled folder access heading will prevent access to your Desktop, Documents, Pictures, Music, and Videos folders. If you want to add more folders, click Protected folders > Add a protected folder.

Ransomware protection in Windows Defender.

Protect yourself from an active attack with Shields Up mode

If you notice suspicious activity on your network or want to guard your device from an unsecured network while traveling, you can turn on Shields Up mode in your Windows Defender firewall.

Under Windows Security > Firewall & network protection, you should see three types of networks, Domain network, Private network, and Public network. Click on each type of network, one at a time, and find its box labeled Blocks all incoming connections, including those in the list of allowed apps.

You’ll see a box with that same label in the individual window for each type of network. Check all three boxes to enable Shields Up mode and block all incoming connections. If you want to get online again, revisit each network window and uncheck each individual box.

Windows Defender's firewall option.

Use Windows Defender to customize your security to your situation

Defender’s default options will work for most typical situations, but it’s useful to know how to customize a few basic settings in case of an emergency.

If you need stronger protection, you can install a separate antivirus or firewall program with more features and options. Check out our list of the top 10 antivirus solutions.

The best new additions in the PUBG Mobile 2.0 update

After a long wait, the PUBG 2.0 release date is finally here, and the update we’ve all been waiting for has rolled out to mobile devices around the world. This PUBG update gives players a new map, new themed items, new tiers, improved game experience, mechanics, and control, and unexpected collaboration.

PUBG Mobile DOWNLOAD

PUBG Mobile is a smartphone spinoff of the bestselling battle royale game, PlayerUnknown’s Battlegrounds. On May 19, 2022, the freshly updated game launched its latest Royale Pass Month, which will be the game’s second cycle of its sixth season. Read on to find out what exciting new challenges and rewards are in store.

The best PUBG Mobile 2.0 updates

Explore the new Livik map

The new map included with this update is called Livik. It’s more playful than previous territories, featuring more vibrant colors. Livik is mostly made of urban environments, but its standout feature is an erupting volcano overlooking the cities and villages.

This map represents a massive game overhaul. You’ll get more supplies and plenty of stations where you can find weapons upgrades to make your arsenal more lethal than ever. Livik is also filled with fun minigames, including a soccer challenge, zip lines, and vehicle ramp competitions.

Stock up in the Advanced Supply Zone

In PUBG 2.0’s Livik map, when you start a match, the game will spawn an Advanced Supply Zone at a random location. You’ll find it sprinkled heavily with a wealth of supplies and shop tokens, as well as more enemies competing for the resources.

If you need some loot and don’t mind getting into a few fights, find the Advanced Supply Zone and slug it out for the supply crates and treasure maps that will help you locate special rewards.

Navigate difficult terrain with the new Utility Task Vehicle

The new release also comes with a brand new all-terrain vehicle. The Utility Task Vehicle (UTV) seats four players and can easily master even the most complex terrain. Whether you want to explore a bumpy forest or climb the foothills of the treacherous volcano, the UTV can handle it. This vehicle has also been added to PUBG’s Aftermath map.

Utility Task Vehicle (UTV), a new all-terrain vehicle

Get out of tight spots with the Emergency Pickup

Another fun and helpful update is the Emergency Pickup item available in the Erangle and Miramar maps. When you first lay eyes on it in the world, it looks like a small, unthreatening duffle bag that you can pick up and later use from your Quick Items stash.

Once you deploy it, the Emergency Pickup bag automatically inflates a giant hot air balloon, which levitates high into the sky to signal to your airborne friends that you need a rescue. It takes a while, but if you attach yourself to the balloon’s tether and wait long enough, eventually a rescue plane will swing by and snag the balloon to lift you and up to three more of your squadmates into the air together.

The plane will head toward the center of the play area, but you can let go and leap off whenever you like. Be careful, though, the balloon, plane, and any airborne players can be seen by everyone on the ground. If your enemies spot you and open fire, you’ll still be able to take damage while aboard the Emergency Pickup.

Emergency pickup allows your friends to rescue you

Enjoy the Evangelion-themed collaboration

If you’re an anime fan, you’ll be thrilled to hear that the new PUBG release comes with a collaboration with Neon Genesis Evangelion. It includes Evangelion-themed armor and weapons that you can use.

The Evangelion-themed mode will take place in a special blue zone that’s a bit smaller than usual to make combat snappier and more action-packed. In the middle of this shrunken blue zone, you’ll be able to watch or participate in a massive shootout between the Sixth Angel and Evangelion’s EVA Unit 01.

New weapons and armor based on the anime Evangelion

Progress faster through the tier system

PUBG Mobile uses a tier system to keep gameplay more exciting for experts and less overwhelming for newbies. Before this update, the lower Bronze and Silver ranks had five levels each. The 2.0 overhaul cuts this number down to three Bronze levels and four Silver levels. This will help new players get to the most exciting action as fast as possible.

As you progress through the tiers, this update will also give you more commemorative titles, new Core Circle achievements and missions, and exclusive rewards that you can unlock if you collect the right crates.

More improvements to the gameplay, mechanics, and control

Here are a few of the other top upgrades you’ll find in the PUBG Mobile 2.0 update:

  • Improved recall feature with automatic respawn and clearer battleground view from the plane
  • Haptic feedback system allows you to enable real-time vibrations and additional haptic feedback for weapons, vehicles, footsteps, gunshots, and other triggers for a more immersive experience
  • Now you can collapse the backpack’s Item Bar to maximize the gameplay view
  • Merged Graffiti and Emotes buttons with even more Emotes available to use in matches
  • Mark and elimination messages as well as tips are a bit easier to see
  • Certain player actions now trigger automatic in-match notices
  • Quick voice messages can now be used to mark enemies hidden behind obstacles
  • Bigger chat area
  • Shotgun has higher range damage and hit damage ratio
  • Smoother smoke grenade animation

The PUBG Mobile 2.0 update is full of brighter colors, faster gameplay, and more goodies

This impressive update gives PUBG Mobile fans more of the colorful chaos they’ve grown to love. If you have an Android device, you’ll need at least 785 megabytes of space to install the update. If you have an iOS device, you’ll need about two gigabytes free.

Still developing your battle royal strategies? Check out our guide on the best tactics to survive PUBG Mobile.