How to change background in Photoshop

By changing the background of specific images in Photoshop, you can completely transform that photo. When working with images and photos, sometimes you need to adjust the background as well. In some cases, you may want to remove the background altogether. Or maybe just replace parts of it.

Regardless of what you need to do, with Photoshop, it is easy to make changes and edits to your backgrounds. What is Photoshop? It is a very powerful image and photo editing platform that is part of the Adobe Creative Cloud. It is also one of the most popular editing software for both professional photographers and designers and beginners.

Let’s take a look at how to change the background in Photoshop.

How to Edit the Background of Images in Photoshop

Adobe Photoshop is an extremely powerful editing tool. You can work in layers, which makes separating the subject from the background much easier. With it, you can completely transform images and photos. When it comes to backgrounds, you can isolate the subject and change the color of the background, or you can blur it, or even make it completely transparent so that only the subject can be added to other images. 

Let’s look at some of the steps you need to take to edit the background in Photoshop.

How to Remove the Background in Photoshop?

If your photo was taken against a solid background, you can easily remove the background and replace it with any color you want. This is ideal in situations where you want to add a fun pop of color to the subject of your photo.

Step1: Upload Your Image to Photoshop

To get started, you have to upload your image to Photoshop.

Step 2: Select the ‘Auto Remove Background’ Option

To remove a simple background from your image, you can click on ‘Auto Remove Background’ in the ‘Quick Actions’ section in the panel on the right side of the screen. You can also use Photoshop plugins to help with more complex images. The photoshop plugin, remove.bg, is very effective at automatically removing the background, even with more complex photos such as ones with hair.

Step 3: Choose a New Background Color

Now you can easily change the background color by selecting the background layer and choosing a color from the swatches in the right-hand panel.

How to change background in Photoshop

Tip: In some cases, if you have a really solid background color, you can also change the color just by using the paint bucket tool and clicking on the background.

How to Make the Background Transparent in Photoshop?

Sometimes you may want to use only the subject of your photo and use it in other photos or images. You cannot just add it as is, or you will be adding it background and all, and it will not blend in. In this case, we need to make the background transparent so that only the subject is visible when added to another image.

Step 1: Upload Your Image

Upload the photo or image you want to edit to Photoshop.

Step 2: Use ‘Recolor’ to Change a Solid Background to Transparent

For a simple solid-color background, you can click on ‘Picture Tools.’ Next, you can select ‘Recolor’ and ‘Set Transparent Color’ from the drop-down menus. Now you’ll have to choose the color you want to make transparent, i.e., if your background was green, you choose to turn green transparent. 

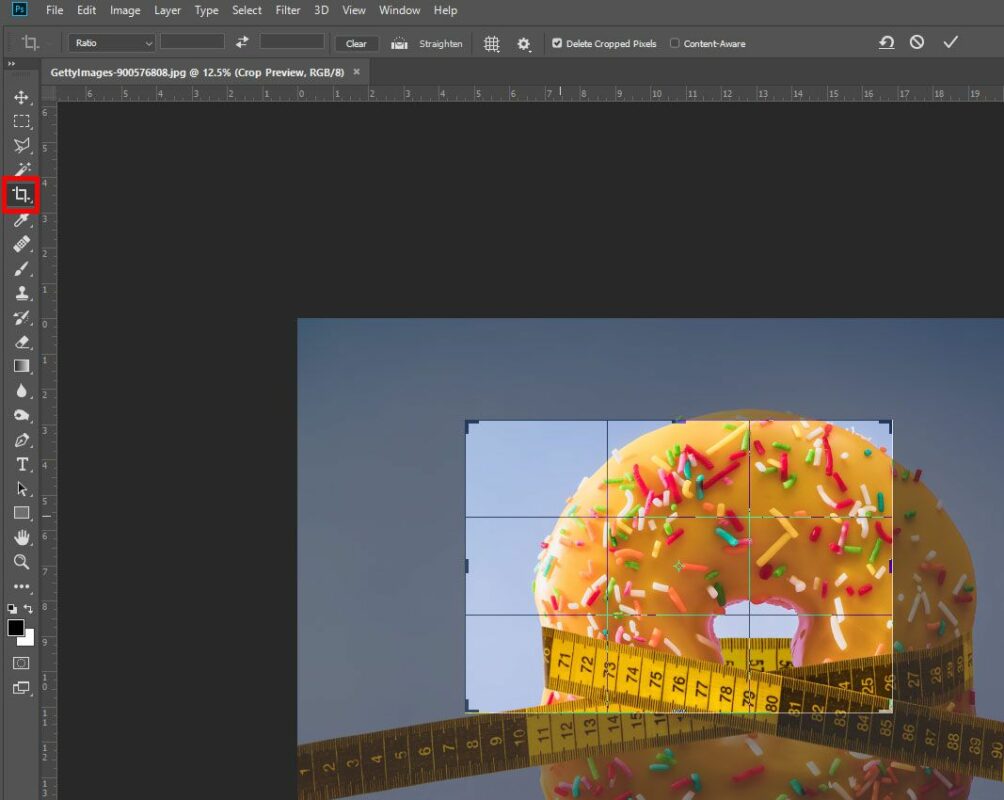
Step 3: For Complex Backgrounds Use the ‘Quick Selection Tool

If your subject or background is more complex, you will have to work manually. Click on the ‘Quick Selection’ tool from your toolbox to the left of the screen.

How to change background in Photoshop

Step 4: Choose’ Select Subject’

You’ll be prompted to choose between ‘Select Subject’ or ‘Select and Mask.’ Choose ‘Select Subject,’ and the software will automatically try to select the subject.

How to change background in Photoshop

Step 5: Refine Your Selection

The program isn’t foolproof and uses contrast to distinguish between the subject and the background. This means that certain areas may be left out. Using a small brush, click on all the areas that have been missed to include them in your selection. If you need to remove areas from your selection, hold down Alt while clicking on the areas to be removed.

How to change background in Photoshop

Step 6: Choose’ Select and Mask’

Now that the subject has been selected, you can click on ‘Select and Mask.’ This will remove the background from view so that you can see your selection more clearly.

How to change background in Photoshop

Step 7: Use the ‘Refine Brush’

Now you can use the ‘Refine Brush’ around harsher sections that should be softened. This is usually areas such as around the hair of a model and similar. 

How to change background in Photoshop

Step 8: Choose ‘New Layer With Layer Mask’ as Output

Once you are happy with your image, click on ‘Output’ and then choose ‘New Layer with Layer Mask’ and click on ‘Ok.’ This will save a copy of the image with a transparent background so that it can be used in other images.

How to change background in Photoshop

How to Change the Background in Photoshop?

Sometimes you want to change the background of your image to improve the image and enhance the mood. To do this, you will have to make the background of your image transparent (like we discussed above) or use a subject that already has a transparent background.

Step 1: Open the New Background

Open your chosen background image in Photoshop.

Step 2: Open the Subject With Transparent Background

Open the subject you want to add to the background by clicking on ‘File’ in the main menu and choosing ‘Place Embedded.’

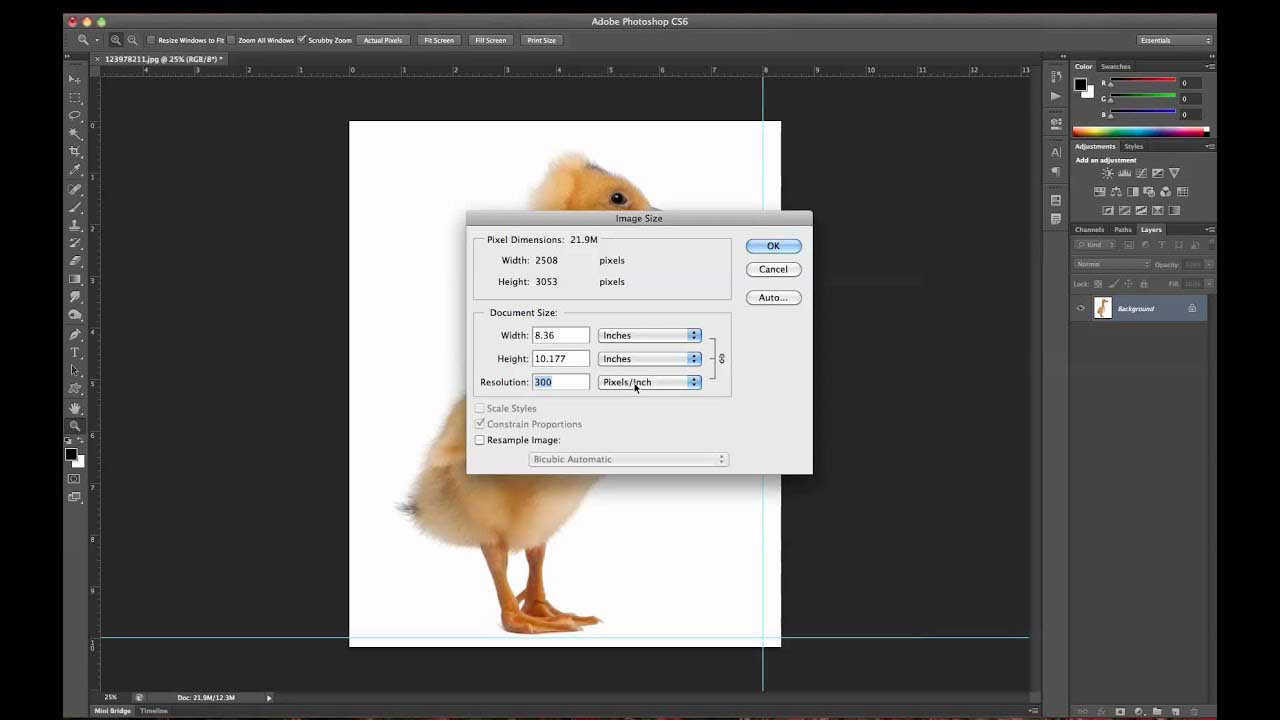
Step 3: Resize the Subject

You can move the subject to the desired spot and resize the image to fit in with the new background.

Step 4: Match the Colors

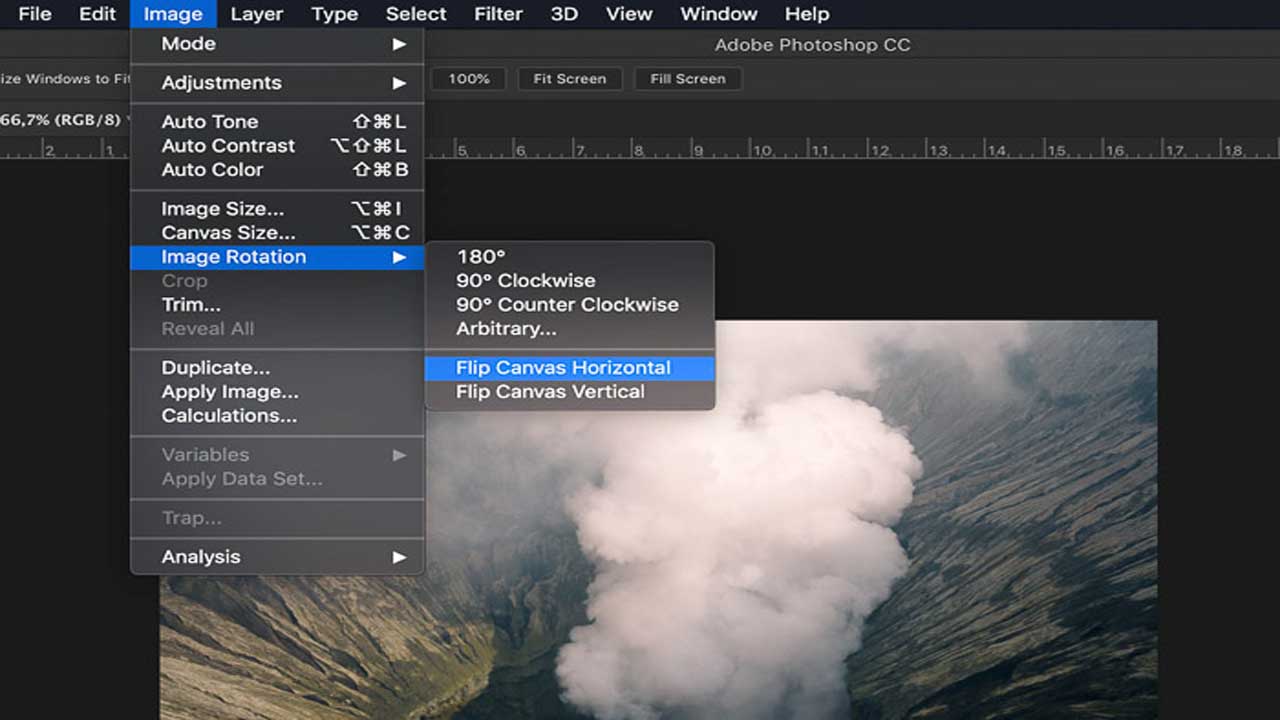
Once you’re happy with the positioning and size, you’re almost done. Choose your foreground image, not just the layer. Once the image is selected, click on ‘Image’ in the menu, select ‘Adjustments,’ and then ‘Match Color.’ A new panel will appear. Go to ‘Source’ and choose the image you are working with, and under layer, select the layer you want to fix. Depending on what you need, you can match the subject to the background or the other way around. 

Now check the ‘Neutralize’ box, and use the ‘Luminance’ and ‘Intensity sliders to match your foreground and background images.

More Photoshop Guides

If you need some more guidance in using Photoshop, here are a few extra how-tos and guides.

Make editing a breeze

Photoshop makes photo and image editing much easier. Once you get used to how the software works and what all the different tools do, you can start creating true masterpieces. Removing, editing and changing backgrounds is one of the features that make Photoshop such a powerful tool.

Top 3 Photoshop Tips To Resize Images

The best thing about the internet is all the free and safe tools that came with it. Who could have imagined in the ‘90s that we wouldn’t have to buy photo film cartridges forever? If you’re from that era, you’ll know what we mean when we say that trying to protect those films was a disaster.  

In the good old days, we didn’t have the option of editing our pics with free tools like Adobe Photoshop, Pixlr, and Photoscape. On top of that, it’s free to use, and you can create magic from your favorite memories, whether you want to change your background or add your mom to your holiday pics in Rome. It’s all possible with a few easy clicks once you know how to do it. 

Adobe Photoshop TRY IT NOW
9

If you haven’t played around on a free photo editing tool yet, you’re missing loads of fun. The best ones, such as Photoshop, are free to download and get started. You don’t have to worry about messing up your favorite pics either. If you don’t like what you’ve done to a photo, you can quickly undo it and start again. You also don’t lose the original photo. You make an additional copy in Photoshop to play around with until you have the perfect image.

Tips on how to resize and flip your images using Photoshop

1. How to resize an image

  • Start by opening your photo in the Photoshop app.
  • Navigate to ‘Image’ that’s at the top of your screen
  • Click on ‘Image Size,’ which will open a new window.
  • Select the option to ‘Constrain Proportions,’ which will keep your image proportions intact.
  • Go to ‘Document Size’ and follow the next steps: Choose ‘inches’ as your preferred measurement unit and ensure that the image resolution is ‘200 pixels/inch’ or higher. If you’re planning to print the image, then opt for ‘300 pixels/inch.’ Please enter the height and width you want for the photo and crop it where necessary. If you’re happy with the result, then click on ‘Ok.’
  • You can now save your new file.

2. How to flip my images 

  • Open your Photoshop app and select the image you want to ‘flip,’
  • Choose ‘Image’ on the toolbar at the top of your window and select ‘Image Rotation.’ 
  • Click on ‘Flip Canvas Horizontal.’
  • Save your image in the new position.

3. How to change resolution and dimensions 

  • Open your Photoshop app and click on ‘Image’ > ‘Image Size.’
  • Here you can change the image resolution or print dimensions.
  • If you don’t want to change the image ratio of width to height, then select ‘Constrain Proportions’
  • Now you can change the image ‘Resolution’ value and save your image.

How to Add Grammarly to Word

If modern tech has done anything well, it’s made everything we create better. Think about all the ways that it has improved processes in various industries. Architects don’t have to spend months behind a drawing board any more. With the mere click of a button, they create breathtaking skyscrapers and homes. They can add life to it by adding avatars in the picture for a more realistic image of what it’ll look like when complete. 

Writers create the same magic when putting pen to paper, and once again, technology saves you many hours of searching for the right word, grammar, or punctuation. Grammarly is a writing app every writer needs if you’re serious about being published or need to impress your editors. You can download it for Microsoft Office or Chrome as an extension to your Word documents.

Even in the corporate world, it has become a tool everybody uses to remain professional and even diplomatic. Yes, Grammarly gives you suggestions when it picks up that your tone could improve, according to your pre-set requirements.

Is Grammarly free?

You can quickly sign up for the entry-level version of Grammarly that’s free and safe to use. All you need is an email address and password, and you’ll have access to the essential functions that’ll help you correct typical grammatical errors, localization, and tone of voice.

If you’re a professional writer, you’ll find tremendous value in the Premium version of Grammarly. It makes your work effortless as it takes care of localization and grammar in one quick scan.

How to add Grammarly to Word?

You can create a shortcut on your desktop and, after writing, run your entire script through Grammarly, or you can integrate the app add-in to Word and receive all suggestions as you write.

  • Close all the projects you have open in Microsoft Word and enable pop-ups in your settings.
  • Open your Grammarly app on your device.
  • Log in with your sign-up details.
  • Navigate to the dashboard on the left side of your screen and select the ‘Apps’ option.
  • Scroll down to the ‘Microsoft Office’ option and click on ‘Install.’
  • Allow the ‘Add-In’ to download in your browser window and then click on ‘Open.’
  • If a pop-up window appears asking if it should run the application, you can check the ‘Run’ option. It’s safe, don’t worry about allowing this source to work in the background.
  • Make sure that you have the correct version, and then click on ‘Install.’
  • Once the installation is complete, you’ll have to restart your device.
  • You can now select ‘Finish’ to complete the installation.

Other helpful apps for writers

If you want to take it a step further in delivering top-notch writing projects to teammates or editors, consider using Grammarly in conjunction with Hemingway and Desktop Plagiarism Checker. It all integrates seamlessly with Grammarly and helps you deliver flawless work.

Rust Twitch Drops in 3 Steps

Rust is back and claiming its online popularity fast. The creator recently let slip that the game’s performance is showing mega revenue. Players are lining up to get on board. It’s also the most viewed title on Twitch currently, with more than 700,000 viewers.

Facepunch Studios, the Rust developer and publisher, confirmed that the paid game is now releasing Twitch Drops for all followers who meet the minimum viewing criteria. Yes, this multiplayer survival title just got way trendier with well-known gamers such as Shroud, Pokimane, Sykkuno, and Jacksepticeye onboard. 

Now you’ll have all the more reason to switch over to the Rust channel and start collecting some awesome Twitch Drops.

If you’re watching Rust on Twitch and spot a hoodie that you’re dying to lay your hands on, don’t worry! The chances are pretty good that you can grab it as in-game loot if you’ve linked your Twitch account to the game.

How do I activate Rust Twitch Drops?

It’s a quick and easy three-step process:

Step 1: Sign in with your Twitch account

Step 2: Sign in with your Steam account

Step 3: Activate Twitch Drops in your Steam account

What are the latest Rust Twitch Drops?

When you’ve linked your Steam and Twitch accounts, you can start unlocking exclusive rewards for simply watching Rust. It doesn’t get easier to reap fun rewards. 

You have to watch specific players’ streams for four hours to be eligible for their drops. Here are some of the coolest loot drops currently on Rust:

  • xQcOW’s assault rifle
  • Myth’s chest plate
  • Jacksepticeye storage container
  • Pokimane’s garage door
  • Shroud’s hoodie
  • Lilypichu’s hoodie
  • Sykkuno’s long sleeve shirt

There are a few non-streamer items available for shorter viewing time requirements, and they include cool furniture and a hobo fire to keep the cold out. Watch out for these three currently available after two to eight hours of watching Rust:

  • A cool, but warn in, brown leather sofa (yours for only a mere two hours of watch time)
  • A hobo fire in a drum (eight-hour watch time for the heat)
  • A large red industrial door (four hours needed for this one)

Keep in mind that the items don’t stay available indefinitely. If you love it, you have to watch your favorite player while the drop is hot. 

Other games with Twitch Drops

If you’re a League of Legends or Minecraft enthusiast, remember to follow the players who activated their Twitch Drops icons for more exciting in-play prize drops.

Best Zoom tips and tricks (advanced users)

Video calls, video conferencing, and group chats have become more significant than ever in recent times. Of all the apps available, Zoom has risen to be the ruler of them all. Step back Skype, we’re not here for you Microsoft Teams, and Google Meet needs to have a quiet word with itself too. No, it is Zoom that has won all our hearts and that’s why today we’re going to unlock all of Zoom’s best features for you.
After publishing a guide for beginners, we are sharing new tips for advanced users. Check it out if you haven’t seen it yet. The application is available on Microsoft Windows, Apple Mac, Android, and iPhones.

9

Use the space to bar mute/unmute your microphone

This one does exactly what it says on the tin. Rather than fiddling around looking for that tiny little cursor next to your microphone icon, simply hit the space bar to mute yourself. Then, when you’re ready to talk again, hit space again and your good to go.

Always mute your microphone when entering a call

When you’re in a group video meeting with lots of different people, muting is actually a very powerful tool. Background noise coming from one feed can easily distort and dominate what somebody is actually saying on another feed. This phenomenon is even worse when somebody is already talking, and another account joins the meeting. You definitely don’t want to be that person but fortunately, Zoom has a setting that will always mute your mic when you go into new meetings.

To activate the always muted microphone you need to open Zoom and then access the Settings menu. From there you want to go to the Audio Settings tab. Here is where you’ll find the checkbox that says Mute microphone when joining a meeting. Tick this box and you’ll be saved those embarrassing blushes every time you join a new meeting.

Do the same with video

OK, we get it, first and foremost, Zoom is a video calling platform but sometimes video can really slow the app down and make effective communication harder. Like we’ve just described above, this is particularly grating when it happens every time somebody new enters the conversation. You can make sure that isn’t you by this time going to the Video Settings tab instead of the Audio Settings tab and ticking the box that says Turn off my video when joining a meeting.

Don’t forget the digital whiteboard

There’s a big button that says Share Screen, which makes the screen share a pretty obvious feature on Zoom. What’s not so obvious, however, is that Zoom actually has a few different screen sharing functions including a digital whiteboard that is particularly useful for meetings. It’s also good though, for upgrading that family quiz night to family games night that includes games like Pictionary and hangman. If you throw in the obvious charades too, you’re well on the way to having a full-on party.

Add a beauty filter

This one isn’t strictly a beauty filter, but it is supposed to smooth out any issues you may be having with your skin. The feature is called Touch up my appearance and it softens out the focus from your webcam’s camera. To give this one a go you need to go to Settings, then Video, and tick the box next to Touch up my appearance. The key here though is not to get too upset if you go there and find that it has been ticked the whole time.

Top 5 Tips for Improving in Friday Night Funkin’

If you’re bored on the weekend, you should try Friday Night Funkin’ and have a blast as you dance and rap your way into The Girlfriend’s heart. You’ll have to rap and sing your way past Daddy dearest if you want to convince her to get down from the beatbox and join you for a romantic duo on the dancefloor. 

She’s got her eye on you, too, as she shares tips and tricks in the tutorial to help you win The Father’s favor. Look, The Mother doesn’t look any less sinister, so don’t expect any free brownie points there either.

What is Friday Night Funkin’?

Friday Night Funkin’ from Ninjamuffin99 is a cartoon-style rhythm game with tunes from Kawai Sprite for its soundtrack, and PhantomArcade and evilsk8r are responsible for the fun graphics and animations. You can download the Friday Night Funkin’ game for Mac or Windows and play it free and safely on PC or mobile.

Try not to miss a note during a high combo, as you’ll have The Girlfriend in tears on the boombox. She’s terrified of thunder, but soothing her with some Cherry Dr. Pepper will score you some points as it’s her favorite drink.

The game is all about practicing as you work your way through the various weeks. Each week introduces new features, singing challenges against The Father, and characters that’ll either help you or block you from getting the girl.

Tips for getting better in Friday Night Funkin’

Practice makes perfect guys and gals. But let’s see what else you can do to find the courage and beat The Father at his rock and roll song.

  • Start every new week with the ‘Easy’ mode and work your way up through ‘Normal’ and then ‘Hard’ as you get better.
  • Listen and get to know the soundtrack.
  • In week two, there’s a part of Spookeez that might be difficult to get past. Focus on mastering the red arrows in that specific part.
  • To improve your hand position, try to use your left hand on L and UP and your right hand on R and DOWN.
  • You can play PaRappa the Rapper or other rhythm games as additional practice.

Other games similar to Friday Night Funkin’

Bemuse is another excellent rhythm game that you can play for free, and it’ll help you practice keystrokes for Friday Night Funkin’. Although PaRappa the Rapper is one of the oldest rhythm games and was published for PlayStation back in 1996, it still delivers hours of fun. Other interactive and fun games that hit the scene big time recently is Among Us and Night of the Dead.

How To Save Adobe Flash Files in Firefox and Chrome

Now that you know Adobe Flash will not be with us much longer, it’s a good time to start migrating all your existing Flash files to your current, or alternative, browser. Flash files are generally embedded in websites, and it can be challenging to save. You can use any preferred browser to find a web page’s source code, and that will show you the Flash file location to save it to your PC.

You’ll typically find two types of Flash files embedded, namely SWF and FLV files. The SWF files typically hold the FLV files. You’ll be surprised once you start looking for it just how many of your favorite apps, music videos, and games are indeed free Flash files. The quickest way to download flash files as and when you find them is to add a free extension to your Google Chrome browser. You can download Flash extensions for Mac and Windows that are free and safe.

How do I save a Flash file in Chrome?

  • Open Google Chrome and go to any Web Store page with a Flash extension, such as Flash Video Downloader, Sothink Flash Downloader for Chrome, or VFD Video Downloader.
  • Select ‘Add to Chrome’ and then press ‘Add.’ Chrome will install the extension. Once the installation is complete, Chrome will add a new icon to the window.
  • Open the Web page with the Flash file and click on the new icon in your Chrome window. All Flash files that can be downloaded will show in the pop-up window. Select the Flash file you want, and it will download to your hard drive.

How do I save a Flash file in Firefox?

Firefox is one of the easier browsers for downloading Flash files because each unique object on the page can be viewed and downloaded.

  • Launch Firefox.
  • Go to the specific page that has the Flash file you want to save.
  • Once you’ve found the Web page, you must right-click on it and choose ‘View Page Info.’ Keep in mind during this step that you shouldn’t right-click directly on the Flash file but rather on the background of the page.
  • Select the ‘Media’ tab to list all the files containing music, videos, and pictures.
  • Select the ‘Type’ tab to find the Flash files easier.
  • Scroll through the files and select the ‘Object’ types where the Flash objects are grouped.
  • Choose the specific Flash file you want to save.
  • Now you can ‘Save As’ the file to your preferred location.

Adobe Flash Player extensions beyond 2021

Many people are concerned about the Flash Player End of Life, as announced by Adobe recently. Even if you don’t use Flash in your regular browsers, such as Internet Explorer or Chrome, the new alternatives are excellent. Apps and videos in WebAssembly or HTML5 are built for the future, and you’ll notice how much easier it is to enjoy all your favorite apps and videos on mobile.

How to Uninstall Adobe Flash Player Now That It’s Leaving

Developers and users worldwide are all speculating about the precise reason why Adobe is considering kicking Flash to the curb. There are a few points worth discussing, which mainly revolve around the software’s overall security and the broad-spectrum attacks happening through it frequently. However,  Flashpoint remains a widely used web browser that enables many of your favorite games.

Some developers can’t help but reminisce about the unexplored and under-utilized potential welled up in Adobe Flash. Whichever way you look at it, the fact remains that, although Adobe Flash Player is still needed to run most of your apps and games, it could be something of the past. It’s time to prepare your online environment and platforms for whatever comes next to uninstall Flash without losing usability or apps.

Why are Flash websites redundant?

  • Flash websites rank very low Google PageRank;
  • Search engines can’t read websites that are 100% Flash creations;
  • You can’t optimize Flash sites for mobile use;
  • Flash websites are more expensive to develop due to the lack in the market of Flash website developers.

What comes next when Adobe Flash Player is no longer supported?

Most developers have already transitioned to platforms such as HTML5, WebAssembly, and WebGL. Adobe will in no way leave users in the dark once they finally discontinue Flash in Explorer, Chrome, or other browsers. There are countless speculations, and according to Forbes, millions of Flash websites will be left unusable, so it might be valuable to migrate your Flash website to a new browser before the Adobe Flash Player End of Life. 

The transition will be much smoother for end-users than for the developers, and you’ll most probably only have to do a software update on your already installed apps to enable other formats.

How to uninstall Adobe Flash Player

Remove flash from your windows PC:

  • Step one is to download the official Adobe uninstaller on your PC
  • Close all your apps, tabs, and browsers
  • Double-click the Uninstaller you downloaded
  • You click ‘Yes” to all the prompts
  • Restart your PC when completed
  • Hold in the Windows key while pressing ‘R’ – it’ll activate the ‘Run’ command
  • When asked what to ‘open’ type in: C:\Windows\system32\Macromed\Flash and press ‘Enter.’
  • Delete all the files in the specific Flash folder, repeat all 3 preceding steps again and this time delete all the content within the folders of:

C:\Windows\SysWOW64\Macromed\Flash
%appdata%\Adobe\Flash Player
%appdata%\Macromedia\Flash Player

Remove Flash from your Mac:

  • Download the official Adobe uninstaller for your Mac version (you can determine it by pressing the Apple icon and then select ‘About this Mac.’
  • Run the uninstaller version that you selected
  • As soon as the uninstaller starts to run, click on ‘Uninstall.’
  • Ensure that all your browsers and apps are closed
  • Once the unistaller finished its process, delete the following folders individually: 

           <home directory>/Library/Preferences/Macromedia/Flash\ Player
           <home directory>/Library/Caches/Adobe/Flash\ Player

Other browsers to consider

The most used web extensions used by web developers and end-users of late include HTML5, WebAssembly, and WebGL. These software platforms allow for seamless mobile optimization, which is vital in today’s day and age as we do most of our business, payments, and even play our games from our phones. Although it may seem like an unnecessary move, it’ll be better in the long run for developers and end-users.

How to use Google Classroom for Teachers and Students

The pandemic has led to a lot of changes in the way we conduct our everyday lives. From remote working to remote teaching and learning, everything was affected. Luckily, Google Classroom provided a simple way for teachers and educators to continue giving classes online.

With Google Classroom, educators can do everything online. They can take attendance, present lessons, set quizzes, tests, and assignments, and continue to interact with their students all through the platform. 

Let’s take a look at how teachers and students can use Google Classroom.

Google Classroom Tutorial – How to Use It?

Although the world of online teaching and learning may seem daunting, the Google Classroom platform is quite simple to learn. By covering some of the basics, you’ll be well on your way to running your classroom as you did before the pandemic in a virtual setup.

First, you, as a teacher, will need to create your class on Google Classroom. You can press on the ‘+’ sign to create your first class. Next, you’ll need to add more details about your class, such as the class name and description. You can also use the ‘section’ field to split your class into periods. Once this is done, students can start joining the class.

Students can join the class by using the link sent to them by the educator, they can use a class code, or an educator can invite students via email. 

There are also fun ways that you can customize and personalize your class. It is a good idea to take advantage of this before your classes start so that you have a fun profile picture and header waiting for your students.

How to Use Google Classroom for Teachers and Students

Tutorial and Tips for Teachers

Google Classroom has many valuable features that make it a great asset to teachers and educators. From creating quizzes and assignments to using fun and interactive lesson tools to ensure your students stay engaged in the classes.

In this Google Classroom tutorial, we will look at a few other things teachers can do on the platform. We will also be sharing some helpful Google Classroom tips for teachers.

How to Use Google Classroom for Teachers and Students

How to Use Google Meet With Google Classroom

Integrating Google Meet with Google Classroom makes a lot of sense for educators. Google meet is a powerful video-conferencing application that makes it possible to host virtual classes with your students. 

To use Google Meet from within Google Classroom is a straightforward process and can be done from the Stream header. All you do is go to the class you want to schedule the meeting for. Then click on the ‘Stream’ header. Next, select ‘Generate Meeting Link’ and click the button. Choose to save the link. This will now be the link you use whenever you want to schedule a video conference with your students.

Now you can share the link with students. There are two main ways that you can share this meeting link. You can either share the link in announcements, assignments, or any other way you prefer to share links. Alternatively, you can also click on the toggle to make the link visible to students. When doing this, the link will be visible in the student’s Google Classroom header, and they can simply click on it to enter the meeting.

How to Teach Using Google Meet

Google Meet is a video conferencing platform. You can thus use it to host virtual classes via a video call. Google Meet also allows you to share your screen and has a whiteboard option which is great when you need to explain certain topics visually or want to share other video content with your students.

How to Take Attendance in Google Classroom

Taking attendance in a virtual classroom can be difficult, especially if you have more students. Luckily Google Classrooms has an easy way to take attendance despite there not being a built-in feature for this.

To do this, you will be using the question feature. In your classwork tab, you will create a new attendance feature in the form of a multiple-choice question with one simple query to check the box acknowledging that they are present.

How to Use Google Slides in the Classroom

Using Google Slides in Google Classroom is another handy feature that allows educators to create very interactive and compelling lessons. It is also very simple to do, and you can even create the presentation directly from within Google Classroom.

Once you are in your class, you can click on the particular class you want to create a slideshow for. Then choose the ‘Classwork’ tab. Now you can either edit an existing topic that already has material by clicking on the settings represented by the three vertical dots. Or you can create a new topic if needed. Once in the material section, you can click on ‘Add’ to attach an existing Google Slides presentation or click on ‘Create’ to make a new one using Google Slides.

How to Use Google Classroom for Homeschool

Google Classroom is ideal for homeschooling as it provides parents with an ideal platform to set projects, assignments, quizzes, and tests. You can also reuse the lesson plans and assignments, which will save you a lot of time. Another benefit is that your child can see exactly what they need to do for the day if you are busy with another task or another child, so instead of waiting around and wasting time, they can continue working.

How to Use Google Forms in Google Classroom

Google Forms is an ideal way to create quizzes and include them in your Google Classroom. Google Forms lets you create questionnaires with various question types, from short and long questions and even multiple-choice questions. You can create your quiz in Google Forms and choose the ‘Quiz’ option so that you can allocate a point value. Next, you can add the quiz in Google Classroom by creating an assignment and attaching the link to your quiz.

How to Use Google Classroom for Teachers and Students

Tutorial and Tips for Students

Initially, it might be challenging for students and their parents to navigate a virtual classroom setup. However, with this Google Classroom tutorial, you can soon start using the platform effectively. Aside from the tutorials, we will also be sharing some helpful Google Classroom tips for students.

How to Use Google Classroom on Phone

There is a mobile app version of Google Classroom for Android and iOS. This means that you will be able to use Google Classroom on your PC or mobile device. To start using Google Classroom, all you need to do is download the app to your smartphone and then sign in using your Google account.

How to Use Google Classroom on iPad or Tablet

Similar to using Google Classroom on your mobile device, you can also use the platform on your tablet or iPad. All you need to do is download the app and sign in with your Google account.

How to Take Test on Google Classroom

Taking tests on Google Classroom is also an easy task. You simply enter the class, and your quiz or test will show as an assignment. Click on the assignment, and then open the attached quiz link. The test will open, and you can start answering the questions. 

Other Tips and Tricks

There are many more ways that teachers and students can use Google Classroom. To learn even more about the platform, here are some more Google Classroom tips.

Gacha Club Tips and Tricks

Gacha Club is a free, creative, and fun anime creator that teaches children the art of storytelling and character development. Your children can give wings to their imaginations as they create new animes, dress them up, accessorize them, and even give them weapons to fight each other.

It’s in no way only for children to enjoy, as the developer, Lunime, is known for creating casual strategy RPGs that are fun for people of all ages. The game has only two chapters at the moment, but Lunime loaded it with features and mechanics that can seem overwhelming to newbies. Today we’ll take a look at some Gacha Club tips and tricks to help you through the game faster.

You can download Gacha Club for Android, Windows, and iOS on the respective app stores. Many parents ask about the online safety of the game. It’s worth mentioning that it has in-app purchase options and a live chat feature. As with any online activity for children, parents should monitor who they interact with online. It’s also a good idea to keep your credit cards out of reach of the children if you don’t want to run up a bill for anime accessories overnight.

Let’s take a look at some tricks to work your way through the story successfully.

How to progress through the main story faster

You and the team you select build the unique storyline. You have to get stronger in each round to beat the team at the end of each level. It takes time to build up strength and accessories, and in the beginning, you might lose more battles because you haven’t earned enough gems, gold, or experience. You can skip the final fight by replaying your previous conquests continuously. It’ll strengthen your team to win more battles later on to level up.

Tip 1: Keep your team balanced

Gacha Club has eight elemental affinities that determine the outcome of a battle. It’s a simple game mechanism of which one is ranked stronger in the gamification. Much like rock, paper, scissors. Here are a few pointers to keep in mind when selecting your characters:

  • Water is stronger than fire but weaker than wind
  • Fire is fiercer than wind but weak against water
  • The wind is strong against water but weaker than fire
  • Light and dark only have advantages or disadvantages against each other
  • Heroes with a corruption element deal 1.5x damage against all other elements
  • DJ elements take only 0.9x from all other elements
  • The shadow element deals and takes 1.1x from all others

Tip 2: Bring your animal friends along

Yes, you can add some pets to your units for a bit more fun. When you head to the Gacha Club Studio, you can select pets to take with you. So, if there’s a dog you favor, feel free to place him with your gang for your next adventure. You may add up to ten pets to improve your character’s stats, such as defense or attack.

Similar games to enjoy

Lunime has another similar game for hours of immersive fun that’s worth a try named Gachaverse. It’s another Anime dress up and RPG video game for mobile devices. Gachaverse doesn’t include the battles and could be a safer alternative for children. ROBLOX is a superb fantasy creation game and is aimed at the adult market.