How does iCloud Private Relay work?

Usually, your network provider and the websites you visit can see information like your DNS records and IP address. This can indicate your identity and build a picture of your location and browsing history. That’s where iCloud comes in.

iCloud Private Relay protects your privacy. It ensures that when you browse with Safari, not even Apple can see who you are and which sites you’re visiting. But, how does iCloud Private Relay work?

What is iCloud Private Relay?

iCloud Private Relay is a service from Apple that allows those using iOS 15, iPad 15, or macOS Monterey plus an iCloud+ subscription, connect to the internet more securely and privately while browsing with Safari. 

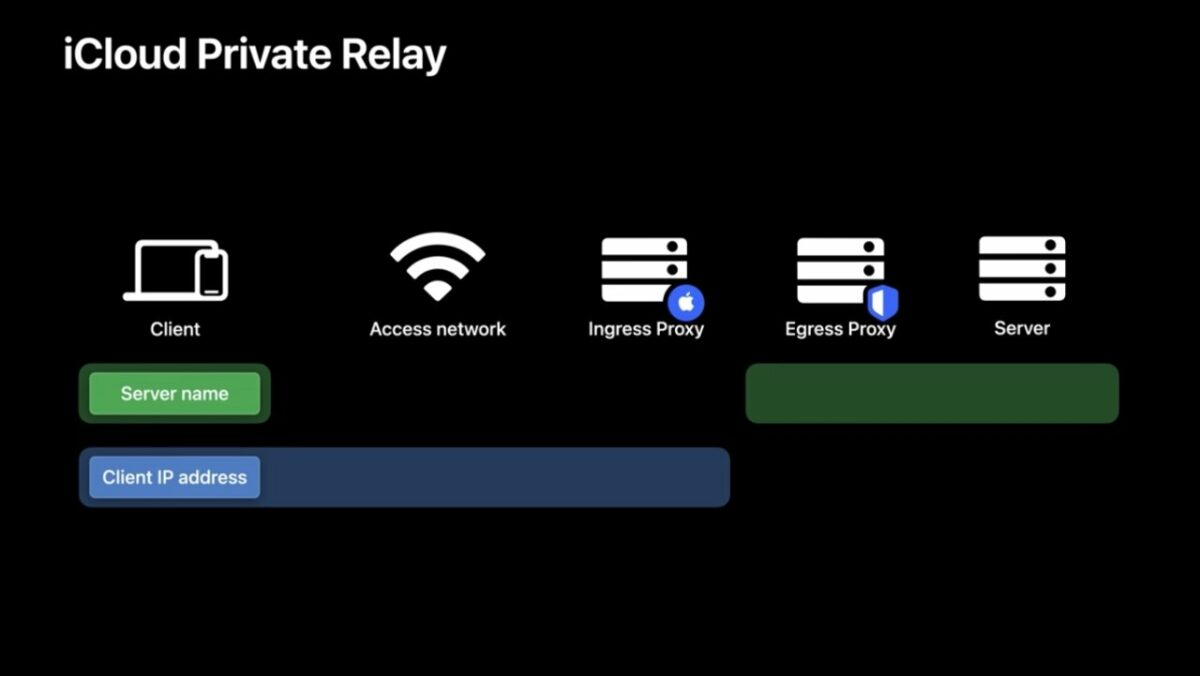
When you enable Private Relay, your browsing requests are sent through two secure internet relays. Your network provider can see your IP address and on the first relay, operated by Apple. Your DNS records will be encrypted so that neither of them can see the address of the website you’re visiting. The second relay, operated by a third-party content provider, will generate a temporary IP address.

It will then decrypt the website’s name you asked for and connect you to the site. It’s all done using the highest internet standards while protecting your privacy. Here’s a step-by-step guide to setting it up and using it.

Steps for using iCloud Private Relay

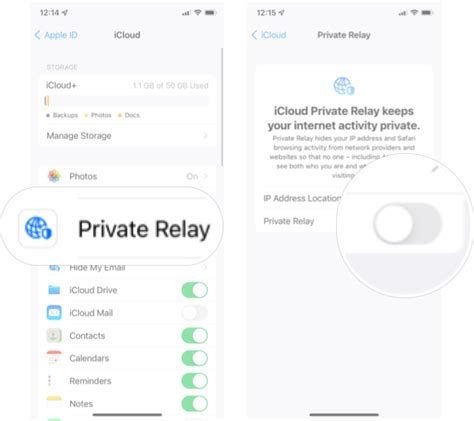
  1. Turn on Private Relay

    How does iCloud Private Relay work

    On your Mac: in Apple menu, go to System Preferences. Then you click Apple ID. Select iCloud > Private Relay.

    On your iPhone, iPod touch, or iPad, go to Settings > [your name] > iCloud > Private Relay.

    After you’ve set up the iCloud on your Mac devices, you can download it on your Windows PC and access emails, videos, files, and other information directly.  

     To choose a setting for your IP address, tap IP Address Location. You will see two options.

    – Maintain General Location will allow your IP address to remain hidden while allowing sites you visit with Safari to show you localized content. 

    – Use Country and Time Zone to still operate in your country and time zone while using a wider location for your IP address.

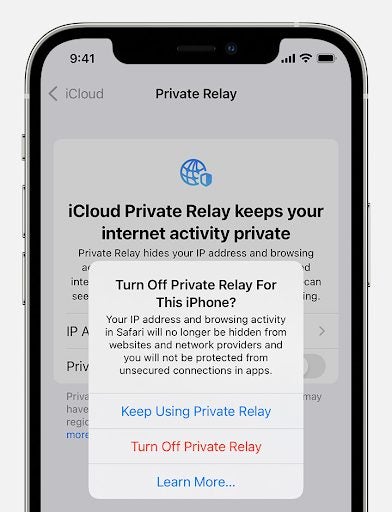
    If a website, service, or network is not compatible with Private Relay, you can turn it off in iCloud settings. You can also turn it off for a specific network. But remember, if you turn it off, websites and network providers can see your activity on the internet.

  2. Turn off Private Relay

    On your Mac: in Apple menu, go to System Preferences. Click Apple ID. Choose iCloud > Private Relay. 

    On your iPhone, iPod touch, or iPad, turn off Private Relay in Settings > [your name] > iCloud > Private Relay. 

    Please note: If you travel to a place where Private Relay isn’t available, it will turn itself off. It will turn itself back on again when you’re back in a country or region where it works. Private Relay will let you know when it’s unavailable and when it turns back on.

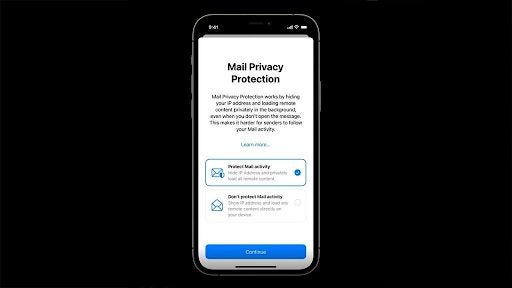
  3. Limit IP Address Tracking preference

    How does iCloud Private Relay work

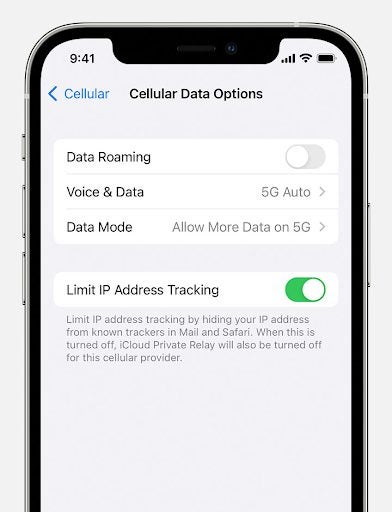
    Another way to turn Private Relay on or off for a specific network is with Limit IP Address Tracking preference.

    On your Mac:

    1. In Apple menu, go to System Preferences.
    2. Click Network.
    3. Choose the network from the list. 

    Go to Settings> Wi-Fi on your iPhone, iPod touch, or iPad, go to Settings > Wi-Fi, then tap More Info next to the Wi-Fi network. Go to Settings > Cellular > Cellular Data Options for cellular networks.

  4. Using Network Settings

    How does iCloud Private Relay work

    If you’ve turned off Private Relay for a specific network, the settings for that network apply to all your devices. You can turn Private Relay back on in Network settings, Wi-Fi, or Cellular Data Options. If you often switch between network configurations like dual-SIM or Wi-Fi and Ethernet, ensure this preference is set separately for each network.

You could need updates for Private Relay

Private Relay will protect your internet privacy while maintaining a great browsing experience. Some websites, networks, or services might have to make updates for Private Relay. These might include networks that have to audit traffic or perform network-based filtering. These could also include business or education networks or services that rely on viewing browsing activity, like parental controls.

Private Relay and network speed tests

Private Relay is designed to use one secure connection to maintain performance and privacy. This could affect speed tests that use several connections at once to give the test the best possible result. While some speed tests might seem slower when Private Relay is active, your browsing experience will actually be fast as well as private. 

 Why use Private Relay?

Private Relay is a superb service for Mac, iPhone, iPod touch, or iPad if you value your privacy on Safari and don’t want your browsing history to be available for all to see. It’s easy to turn on and off and will bring you some peace of mind too.
How to remove preinstalled apps from Windows 11

The release of Windows 11 caused great excitement worldwide, although it needs many special requirements to run on your PC. These include 64 GB of storage, as much as 4 GB of RAM, and at least a two-core processor. It also only works on a 64-bit system, so if you have a 32-bit system on your PC, you won’t be able to switch it to run on Windows 11

But if you do have the system requirements, it’s a welcome upgrade because it comes with many built-in features like Microsoft Teams and Widgets in a taskbar that allow you to add shortcuts. But what if you want to remove the preinstalled apps from Windows 11?

Built-in programs and apps you might not want

You might have advertising software installed on a PC or laptop you bought already set up. There will also be programs, Windows Store apps, System apps, and Windows updates you might not want or need on your device. You can uninstall most unwanted apps with just a click, but others could be more complicated to remove from your system. There are different methods you can use to do so. Here are a few of them with step-by-step guides on how you can make them work.

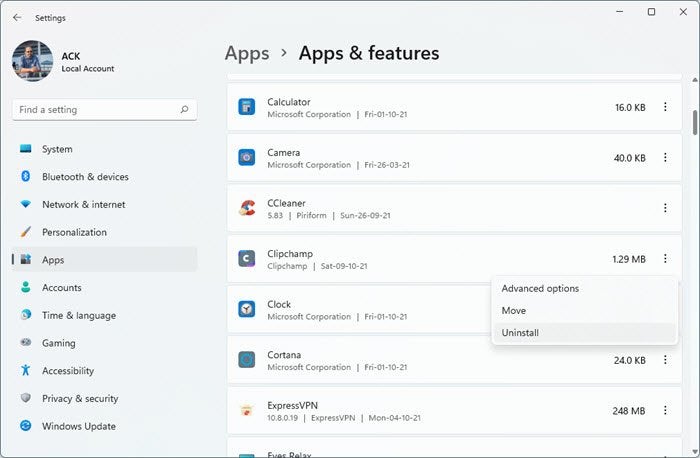
  1. Method 1: Uninstall from Settings

    This method can work with apps or programs that stubbornly resist being removed! But remember, you should only use the Registry Editor when nothing else works. Opening it and making changes can possibly cause damage to your system. Hold down the Windows and R key to open the Run application. In the Run box, under Open, type Regedit. This will get you into the Registry Editor. Press Yes in the prompt that you see next. The Registry Editor page will open. Take the following course: HKEY_LOCAL_MACHINE > SOFTWARE > MICROSOFT > WINDOWS > CURRENT VERSION, to delete the applications you don’t want. Right-click the app you want to get rid of and click Delete from the pop-up menu. You’ll be asked to confirm whether you want to permanently delete what you have chosen. Click Yes.” width=”512″ height=”467″><p><span style=Open Windows Settings and click on apps. Scroll to the apps list, find or search the app you want to delete. Double-click on it, and you’ll see an Uninstall option. Click on it and again on the confirmation prompt.

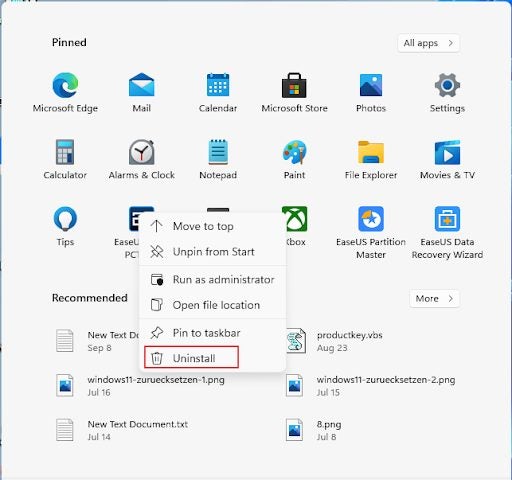
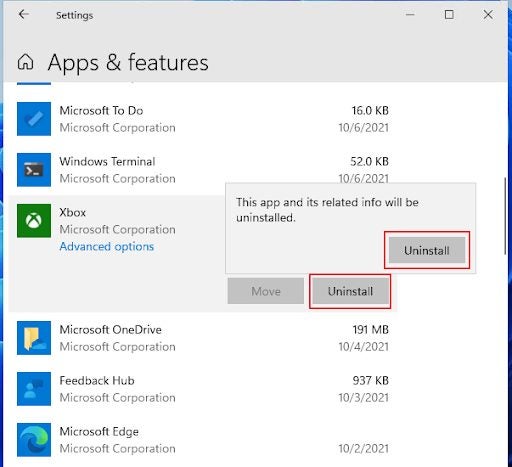
  2. Method 2: Uninstall from the Start Menu

    This method can work with apps or programs that stubbornly resist being removed! But remember, you should only use the Registry Editor when nothing else works. Opening it and making changes can possibly cause damage to your system. Hold down the Windows and R key to open the Run application. In the Run box, under Open, type Regedit. This will get you into the Registry Editor. Press Yes in the prompt that you see next. The Registry Editor page will open. Take the following course: HKEY_LOCAL_MACHINE > SOFTWARE > MICROSOFT > WINDOWS > CURRENT VERSION, to delete the applications you don’t want. Right-click the app you want to get rid of and click Delete from the pop-up menu. You’ll be asked to confirm whether you want to permanently delete what you have chosen. Click Yes.” width=”512″ height=”480″><p><span style=Click the Windows icon to open the Start menu, where all the apps on the PC are listed. Find the app you want to uninstall, right-click on it and choose the Uninstall option. If the app is from the Microsoft Store, you’ll see a window telling you the app and its related information will be removed. Click Uninstall again.
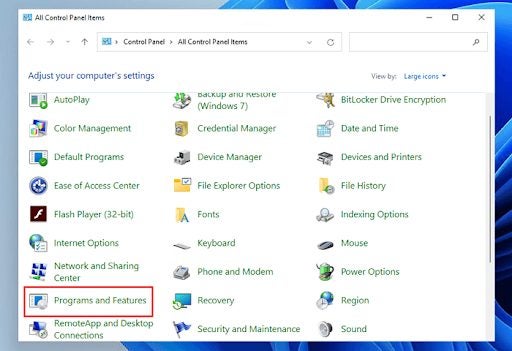
  3. Method 3: Uninstall from the Control Panel

    This method can work with apps or programs that stubbornly resist being removed! But remember, you should only use the Registry Editor when nothing else works. Opening it and making changes can possibly cause damage to your system. Hold down the Windows and R key to open the Run application. In the Run box, under Open, type Regedit. This will get you into the Registry Editor. Press Yes in the prompt that you see next. The Registry Editor page will open. Take the following course: HKEY_LOCAL_MACHINE > SOFTWARE > MICROSOFT > WINDOWS > CURRENT VERSION, to delete the applications you don’t want. Right-click the app you want to get rid of and click Delete from the pop-up menu. You’ll be asked to confirm whether you want to permanently delete what you have chosen. Click Yes.” width=”512″ height=”351″><p><span style=In the Control Panel, select Programs and Features. In Programs and Features, you’ll see all the installed apps on your computer. Right-click on the one you don’t want and click Uninstall. A window will pop up asking if you want to make changes to your device. Click Yes in reply, and it will uninstall.

  4. Method 4: Uninstall Using PowerShell

    This method can work with apps or programs that stubbornly resist being removed! But remember, you should only use the Registry Editor when nothing else works. Opening it and making changes can possibly cause damage to your system. Hold down the Windows and R key to open the Run application. In the Run box, under Open, type Regedit. This will get you into the Registry Editor. Press Yes in the prompt that you see next. The Registry Editor page will open. Take the following course: HKEY_LOCAL_MACHINE > SOFTWARE > MICROSOFT > WINDOWS > CURRENT VERSION, to delete the applications you don’t want. Right-click the app you want to get rid of and click Delete from the pop-up menu. You’ll be asked to confirm whether you want to permanently delete what you have chosen. Click Yes.” width=”512″ height=”457″><p><span style=The methods mentioned earlier may not be effective for all preinstalled applications. That’s where Windows PowerShell comes in. 
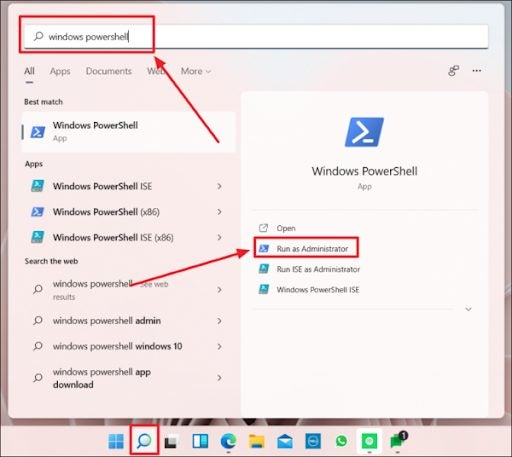
    Click Search in the taskbar (or hold the Windows key+X and choose Search from the pop-up menu). Type Windows PowerShell in the search bar. You’ll have to run PowerShell as an Admin to remove built-in apps. Click Run as Administrator to do so.

    Copy the command from the list below that’s appropriate for the built-in app you want to uninstall and paste it on the PowerShell page and press Enter. 

    – Alarms and Clocks – Get-AppxPackage *windowsalarms* | Remove-AppxPackage 

    – Calendar – Get-AppxPackage *windowscommunicationsapps* | Remove-AppxPackage

    – Calculator – Get-AppxPackage *windowscalculator* | Remove-AppxPackage 

    – Camera – Get-AppxPackage *windowscamera* | Remove-AppxPackage 

    – 3D Builder – Get-AppxPackage *3dbuilder* | Remove-AppxPackage

    – Get Started – Get-AppxPackage *getstarted* | Remove-AppxPackage 

    – Get Help – Get-AppxPackage *gethelp* | Remove-AppxPackage 

    – Photos – Get-AppxPackage *photos* | Remove-AppxPackage 

    – Microsoft Store – Get-AppxPackage *windowsstore* | Remove-AppxPackage 

    – Maps – Get-AppxPackage *windowsmaps* | Remove-AppxPackage

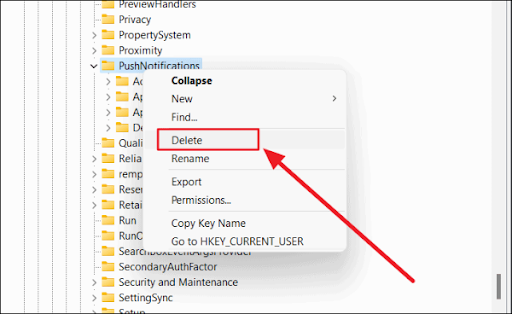
  5. Method 5: Uninstall Using the Registry Editor

    This method can work with apps or programs that stubbornly resist being removed! But remember, you should only use the Registry Editor when nothing else works. Opening it and making changes can possibly cause damage to your system. Hold down the Windows and R key to open the Run application. In the Run box, under Open, type Regedit. This will get you into the Registry Editor. Press Yes in the prompt that you see next. The Registry Editor page will open. Take the following course: HKEY_LOCAL_MACHINE > SOFTWARE > MICROSOFT > WINDOWS > CURRENT VERSION, to delete the applications you don’t want. Right-click the app you want to get rid of and click Delete from the pop-up menu. You’ll be asked to confirm whether you want to permanently delete what you have chosen. Click Yes.” width=”512″ height=”314″><p><span style=This method can work with apps or programs that stubbornly resist being removed! But remember, you should only use the Registry Editor when nothing else works. Opening it and making changes can possibly cause damage to your system. 


    Hold down the Windows and R key to open the Run application. In the Run box, under Open, type Regedit. This will get you into the Registry Editor. Press Yes in the prompt that you see next. The Registry Editor page will open. Take the following course: HKEY_LOCAL_MACHINE > SOFTWARE > MICROSOFT > WINDOWS > CURRENT VERSION, to delete the applications you don’t want.

    Right-click the app you want to get rid of and click Delete from the pop-up menu. You’ll be asked to confirm whether you want to permanently delete what you have chosen. Click Yes.

Adapt Windows 11 to your needs

Many changes have been made in the long-awaited and exciting new operating system, Windows 11. Firstly, the desktop looks different. The taskbar is in the center, and the user interface (UI) design has been altered. There are also great preinstalled programs and apps. However, if you don’t want to use them all, there are different ways to remove them from your system.

Of course, you can’t just delete the desktop icon. You have to uninstall to completely remove a program or app, including all the program and configuration files. We hope our guide has made it easy for you to choose the best method to uninstall what you don’t want or need.

How to use Zapier to automate your boring tasks

Zapier for Windows is not only helpful to unify the online presence of your small to medium-sized business. You can also use it very effectively to automate your boring tasks. It will eliminate repetition and frustration and save you time and effort you can use better on other projects.

It’s a workplace automation tool that connects all the web applications and services you already use. To do this, you set up triggers that tell the apps what to do in specific situations. Follow our step-by-step guide to setting up Zapier to streamline your business operations.

  1. Make a list

    How to use Zapier to automate your boring tasks

    This is the easiest way to see exactly how much time you spend on your daily tasks and how many times you have to do them. Is it every hour, every day, every week or every month? Look at which tasks are tedious and don’t require much thought, and which ones are wasting time you could use more productively. Those are the tasks you should automate with Zapier.

  2. Look at examples

    How to use Zapier to automate your boring tasks

    Look at some examples of tasks you can automate with Zapier.

    – Turn emails into Trello cards.

    – Create lists. They can be things to do, business contacts, or anything else.

    – Reply automatically to messages.

    – Get a text message when someone cancels a Calendly meeting.

    – Advertise your business on your Facebook page.

    – Easily move files between different web apps you use.

    – Post videos or blogs between Facebook, Twitter, LinkedIn, Instagram and others.

    – Save attachments from emails to storage in the cloud.

    – Add event guests to a Google Sheet.

    – Follow up with a client after you’ve made an online sale.

    – Create a weekly newsletter and send it to clients.

    – Send your blog posts to different social media sites.

    – Monitor your websites and inform you of crashes.

    • Automate all your routine HR tasks.
  3. Design the automation

    How to use Zapier to automate your boring tasks

    The above examples are just the tip of the iceberg when it comes to the amazing variety of tasks you can automate using Zapier. It’s best to look at your list, decide precisely what to do and then following the basic guidelines below, work out what to call your zap, the instructions you give to automate, the trigger that sets it in motion, and the action you want your automation to perform. Each business will have different needs to streamline tasks.

    Your specific requirements for automation could be unique. In that case, you’ll have to research how to set it up. A multitude of apps can be linked in Zapier to automate tasks. The ones you use are very likely to be featured.

  4. Create a Zapier account

    How to use Zapier to automate your boring tasks

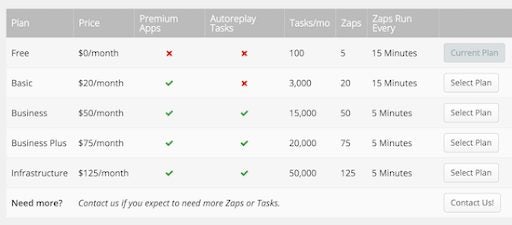
    Getting started: Firstly, you’ll need a Zapier account. It’s free to sign up, and you’ll get five free zaps when you join. You can remain free for good or sign up for other price plans for different types of businesses, which will allow you to automate more. One option is a free 14-day trial

  5. Make a Zap

    How to use Zapier to automate your boring tasks

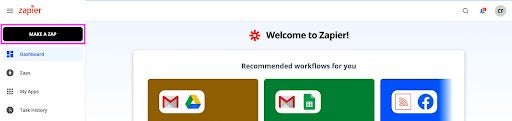
    The next thing to do is create a zap. Log into your account, and you’ll see a MAKE A ZAP box on the left.

  6. Connect apps

    How to use Zapier to automate your boring tasks

    Now you have to tell Zapier which apps you’d like to connect

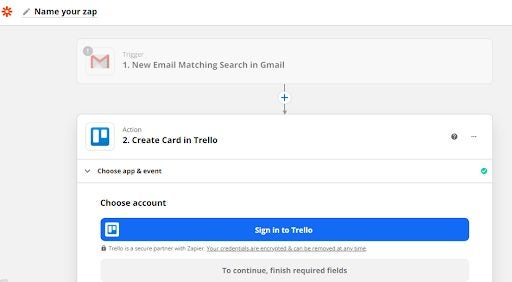
    For instance, the first example on our list above of things you can do is turn emails into Trello cards. So you’ll name your Zap, then name your trigger as New Email Matching Search in Gmail and your Action as Create Card in Trello. Once you set up your zap, Zapier will frequently check the trigger for new data. Zapier will automatically carry out the action you have set up if the zap is triggered. You don’t have to do anything. Your data will move seamlessly from one app to the other one that’s linked to it.

  7. Create templates

    How to use Zapier to automate your boring tasks

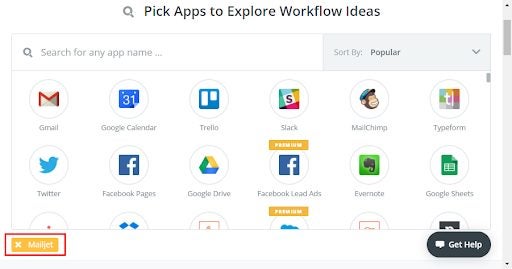
    Zapier also allows you to create templates for zaps that you use often. It features an explore section where you can look at various Zap templates for the different apps you want to link to use in your automation. When you’ve selected the apps you want to connect, look at the available zap templates and then click Use this Zap.

Zap your workspace

 Zapier is an invaluable assistant to your business that will help your staff work more efficiently and use their time more productively. It takes care of the mundane but time-consuming tasks we’re all confronted with every day. You integrate the applications you use on the web and get them all to work together.

Based in Sunnyvale, California, Zapier employs 350 people around the US and 23 other countries and is a force to be reckoned with. So just zap into a new way of doing things if you want to save time and make your working life more manageable!

How to Turn Your Old Mac into a Chromebook

Do you have an older Mac that no longer gets security updates from Apple and battles to run the latest macOS? Well, now you don’t have to ditch it. You can fish it out of wherever you’re keeping it and give it new life by turning your Mac into a Chromebook

This is possible with Chrome OS Flex, a cloud-first operating system that you can install on devices initially built to run macOS (or Windows and Linux). Installing Chrome OS Flex will make your old Mac boot fast. It won’t slow down over time and will keep your device secure with regular updates. 

What is Chrome OS Flex?

In 2020, Google bought Neverware, a company that produced CloudReady, which allows users to convert old PCs into Chrome OS machines. Google then introduced Chrome OS Flex, which essentially replaces older operating systems with a way of computing that’s primarily managed in the cloud. It’s similar to Chrome OS because it uses the same code base. 

Please note: Using Chrome OS Flex is free for individuals. However, businesses and schools currently using CloudReady will continue to be charged a subscription rate and a fee, respectively.

What’s needed to install Chrome OS flex?

To install Chrome OS Flex and turn your old Mac into a Chromebook, you’ll need a post-2010 Apple Mac that has the Chrome browser installed on it and16GB of free internal storage. If your Mac has components like a processor and graphics card made before 2010, it might perform poorly. You’ll need an Intel or AMD x86-64-bit compatible device with 4GB of RAM. The device must also be bootable from a USB drive you’ll use to install Chrome OS Flex.

The USB drive must have at least 8GB of storage space. You will also need full administrator access to the BIOS to make adjustments there during the installation. 

Please note: The graphics hardware for Intel GMA 500, 600, 3600, and 3650 do not meet the performance standards required by Chrome OS Flex.
How to install Chrome OS Flex

  1. Open Chrome Browser

    How to Turn Your Old Mac into a Chromebook 1

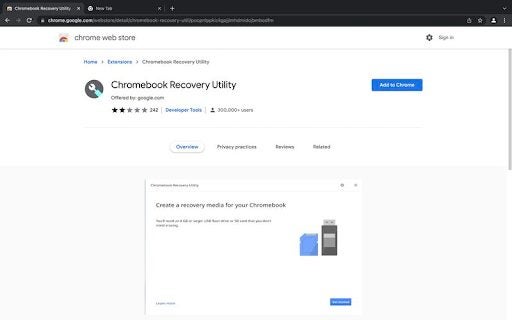
    Open the Chrome browser on your Mac and select the Chromebook Recovery Utility in the Chrome web store. At the top right, click Add to Chrome.

  2. Enable Chromebook Recovery Utility

    How to Turn Your Old Mac into a Chromebook 1

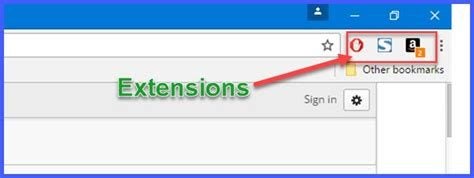
    In your Chrome browser window, click Extensions -> Manage extensions, at the top right. Next, go to Chromebook Recovery Utility and turn it on.

  3. Identify Chromebook

    How to Turn Your Old Mac into a Chromebook 1

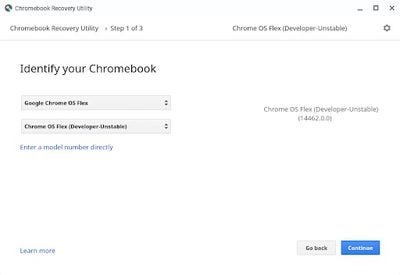
    In the Chrome Recovery Utility extension under Identify your Chromebook, choose  Google Chrome OS Flex, then click Continue.

  4. Create recovery data

    How to Turn Your Old Mac into a Chromebook 1

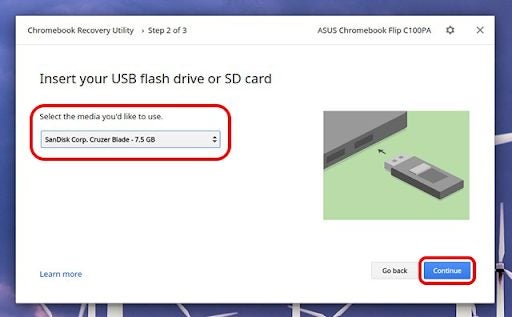
    When prompted, insert your USB drive, select it from the drop-down menu and click Continue, then click Create Now. Remove the USB drive when it says it’s safe to do so.

  5. Finalize

    Shut down the device on which you want to run Chrome OS Flex and then reinsert the USB drive. Hold down the Option key and power up the MAC again. When you see the boot menu, choose USB drive and hit Enter.

Safely install Chrome OS Flex

After successfully following all the steps above and installing Chrome OS Flex from your USB installer, you can erase your device’s existing OS and replace it with Chrome OS Flex. 

However, if you’re not yet ready to commit immediately to Chrome OS Flex on your device, you can temporarily run it from the USB installer. This will allow you to test and verify it and make sure it’s what you want and that everything is working as it should. If you’re happy, you can erase your device’s existing operating system and install Chrome OS Flex permanently. 

Get a ‘new’ Mac for an old one

It’s like a dream, isn’t it? Your slow old Mac that’s not getting upgrades suddenly transforms into a dazzling, fast machine with a new operating system that bases it firmly in the cloud. Well, it’s not a dream but a reality. Using Chrome OS Flex, your old device can become a Chromebook! All you have to do to make it happen is get a USB drive and follow the instructions to replace your old operating system. What could be easier or more rewarding?

How to add subtitles to a movie or video on VLC Media Player

You can watch videos and movies from different sources using the VLC Media Player, which is available on different platforms, including Microsoft Windows, macOS, Android, iOS, and Linux. If you’re watching overseas movies or foreign language films, you’ll probably want to download subtitles. 

They’ll help you better understand what’s happening in the movie or TV series. Here’s how you can add subtitles to a movie or video on VLC Media Player.

  1. Method 1: Add subtitles to your movies or videos manually

    add subtitles to a movie or video on VLC Media Player

    Adding appropriate subtitles to your movies or videos can enhance your experience of watching them and sometimes also make them easier to understand. There are different ways to add subtitles in the VLC Media Player and to get them to play along with your video or movie.

    Step 1

    Open the file for the video or movie you want to watch in VLC. Select Subtitle from the top menu. Select Sub Track, and you will see a listing of the available subtitles. Select the appropriate file in the language you want your subtitles to play in. VLC should then display subtitles while you’re watching your video or movie.

    Step 2

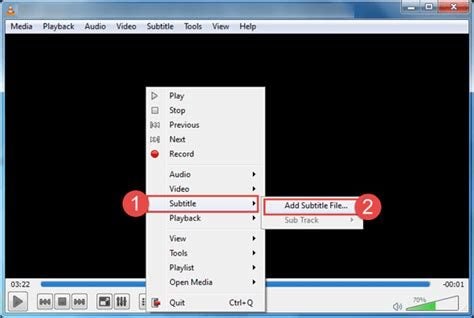
    If you don’t see the subtitle file, select Add subtitle file from the Subtitle menu and manually select your downloaded file. VLC should then be able to pick it up and play it.

    Step 3

    If you can’t download subtitles, try resetting your settings to default. Make sure the subtitle file and the movie or video file you want to watch have the same name (leave the extension off). Then just drop the subtitle onto the VLC playing file. Play the movie with the VLC Media Player, and it should automatically show the subtitles

    Step 4

    You can permanently add subtitles to a VLC file. When you open a video file, the VLC Media Player will automatically recognize the presence of a related subtitle file and open it at the same time. You can do this on VLC for iOS, iPhone, and Android

  2. Method 2: Download subtitles automatically

    add subtitles to a movie or video on VLC Media Player

    Another way to get subtitles onto the movies you watch through the VLC media player is to download them automatically from opensubtitles.org using an extension called VLSub. It’s a very easy and useful trick to learn. Here’s how you do it:

    Step 1

    Go to https://addons.videolan.org/p/1154045/. Then click on Files. After that, right-click vlsub.lua. Then choose the Save link to download VLSub into whatever system you are using. 

    Step 2

    Go to your Downloads folder and find the vlsub.lua file. Move it into the Extensions folder in the VLC root directory.  

    Step 3

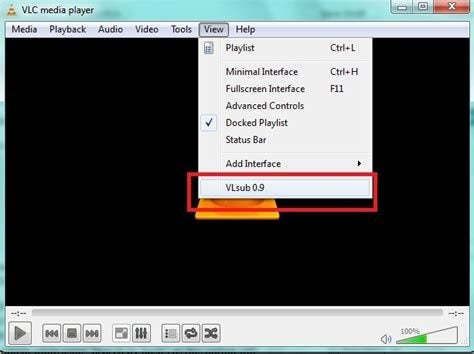
    In the  VLC media player, click Media > Open file to import a movie or video that you want to watch. Or you can just drag the movie or video file to the VLC Media Player. You can also press the shortcut key Ctrl + O. then click VLsub under View. VLC will open a dialog box. In the dialog box, choose the subtitle language that you want. Input the movie title/series episode/ season you want to watch in the dialog box. Then click Search to fetch appropriate subtitles from OpenSubtitles.org.

    Step 4

    The subtitle file will download to the default location of the video or movie and automatically play with your video or movie. What could be easier?

Change the size of your subtitles

Go to Tools → Preferences (set your Show Settings to All) and Video → Subtitles/OSD → Text renderer and Adjust. Setting the Font Size In pixels overrides the Relative Font Size selection. Press the Save button in VLC Setup to save your selected subtitle size and restart the VLC Media Player. 

You can edit a subtitle file

Download Subtitles Edit and run on your computer. Add your subtitles file by dragging and dropping it or adding it through the File tab. Then click on Edit it. You can now change the font style or color of your subtitles. Save your  Subtitles file. 

Enjoy subtitles on your foreign movies

VLC Media Player is a versatile platform for watching movies and videos on many different devices and operating systems. Being able to add subtitles is just one of the advantages of using VLC to enhance your experience of watching your favorite content.

If you are experiencing issues with the program, please check our guide on how to fix 3 common errors with VLC Player.

How to Use Universal Control Across Macs and iPads

Apple has introduced the long-awaited Universal Control with iOS 15.4 and macOS Monterey 12.3 updates. This amazing feature allows control and movement between Mac and iPad with a single mouse or trackpad and keyboard, so you don’t have to clutter your desk with separate input devices and can work comfortably on both devices at the same time.

  1. Connet to iCloud

    How to Use Universal Control Across Macs and iPads

    Both your devices must be signed in to iCloud and share one Apple ID using two-factor authentication. It won’t work across devices signed into separate ‌Apple ID‌ accounts. For wireless use, you must enable Bluetooth, WiFi, and Handoff on both devices. They should be within 10 meters (30 feet) of one another and connected to the same network. The ‌iPad‌ and Mac must not share a cellular and internet connection. So the Mac can’t be tethered to the ‌iPad‌). Using a USB connection, the Mac must be trusted on the ‌iPad‌.

  2. Adjust the settings

    How to Use Universal Control Across Macs and iPads

    To set up Universal Control on your Mac, go to the Apple icon → System Preferences. Choose Displays. Click on Advanced to access Universal Control’s settings

     Use the Displays section12 of the Mac’s System Preferences to ensure Universal Control is working correctly. 

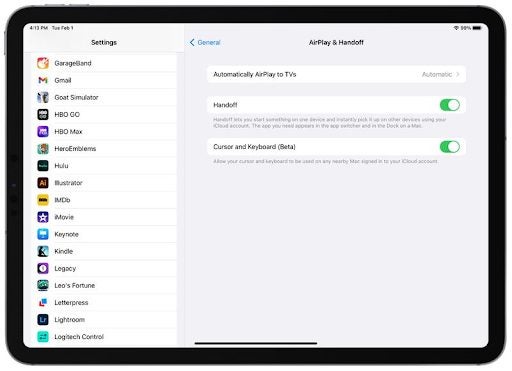
    On the ‌iPad‌, if you go to Settings -> General -> AirPlay & Handoff, you can toggle off Cursor and Keyboard if you don’t want to use Universal Control.

  3. Operate multiple devices

    How to Use Universal Control Across Macs and iPads

    If, for instance, you are using an iPad Pro and a MacBook Pro, you can set them up next to each other and use the MacBook Pro’s keyboard and trackpad to work on the ‌iPad‌. You can also switch the devices’ roles by using the Magic Keyboard on your iPad‌, for example, to control and work on the Mac. Each device will still be running its respective operating system (macOS on the Mac and iPadOS on the ‌iPad‌), but you can use the same keyboard and mouse to work on both devices.

  4. Using Universal Control

    How to Use Universal Control Across Macs and iPads

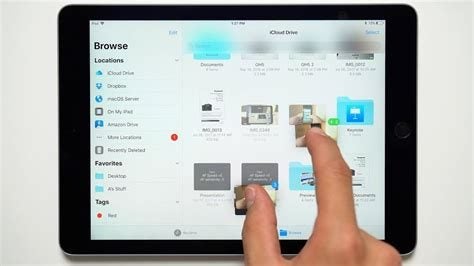
    You can use one keyboard for both devices to type into text input fields like Notes or Safari. Best of all, you’ll be able to move material from one desktop to the other by simply dragging and dropping it. BUT, you’ll have to have an app open that’s compatible with the file type you are using on an ‌iPad‌ and a Mac. For example, if you want to transfer a picture from the Mac to the ‌iPad‌, ensure you first open the Photos app on the ‌iPad‌. It’s similar if you want to move a document: First open the iPad’s Files app.

  5. Format support

    How to Use Universal Control Across Macs and iPads

    The Mac’s desktop supports different file types, so dragging a file or photo from the ‌iPad‌ to the Mac is easy. The home screen on the iPad‌ does not support different file types. But the three-finger swipe between pages, and other macOS gestures, are compatible on the ‌iPad‌ since the Magic Keyboard supports these features. Some of the multitouch gestures (like Mission Control) aren’t available on iPad‌s. So, if, for instance, you open an app on the ‌iPad‌ and want to exit using the Mac’s trackpad, you can use a three-finger swipe. Or you can move across the dock with your mouse and swap apps.

Customize or disable Universal Control


In System Preferences, go to Displays, then to Display Settings- > Advanced to customize some Universal Contro features.

  • Control your Mac and iPad from one mouse/keyboard: This setting is enabled automatically when you upgrade to ‌macOS Monterey‌ 12.3. If you don’t want Universal Control, uncheck this box. 
  • Push trackpad or cursor towards another Mac or iPad: This feature is enabled by default. 

Universal Control vs Sidecar

If you’ve been using Sidecar and are thinking about switching to Universal Control, these are the main differences between the two options: Sidecar converts your iPad into a secondary display for your Mac. This means that your Mac screen will be mirrored on the iPad. Universal Control, however, lets you see different content on each of your screens, access it on both, and move material between them. 

Unclutter your desktop, and have fun too

Universal Control will definitely unclutter your desktop! It will also allow you to work easily on two devices using only one input device, like a keyboard, mouse or trackpad. This will surely make your work much more manageable. And moving your content effortlessly between your two devices is not only practical and efficient, but it can also be lots of fun.

What’s new on iOS 15.4

iOS 15.4 is an update of iOS 15, the current release of Apple’s iOS mobile operating system developed for its iPhone, iPod, and macOS devices. iOS 15 brought outstanding new features to iPhones that made them even more useful and enjoyable to own than they were and got rid of a few bugs in the process. iOS 15 took Apple devices to a whole new level. For example, it introduced many exciting new options like FaceTime SharePlay, which allows users in different places to watch movies and TV shows, or listen to music together on their FaceTime calls.

The iOS 15.4 update of iOS 15 brings a range of improved features to enhance the already advanced and user-friendly iPhone experience. Many already consider the iPhone to be the leading mobile phone on the market, and now it’s being improved on yet again. So, iPhone lovers, you’re in for a range of treats once you’ve downloaded iOS 15.4, the best Apple operating system update yet because of the number of innovations it introduces. You’ll get the following improvements.

Facial recognition wearing a mask

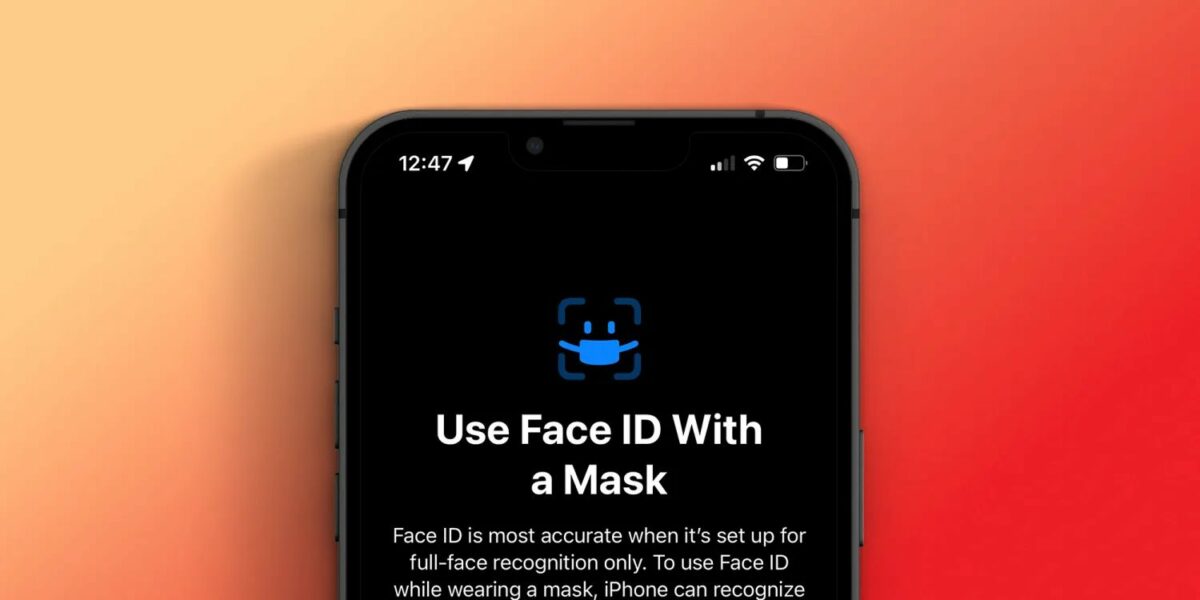
Possibly the most innovative and useful change brought by the iOS 15.4 update is that you can use facial ID on your phone while wearing a mask. This radical change in facial ID acknowledges the impact of the Covid 19 pandemic. It makes it easier for you to unlock your phone where wearing a mask is mandatory to get access to the features you need to use. The photograph you take for facial ID scans the eye area of your face in great detail to allow you to authenticate yourself while wearing a mask.  

All you need to set it up is to do a second round of facial ID. In other words, scan your face twice. The facial ID wearing a mask will allow you into apps locked by Face ID. It’s even secure enough for Apple to let you access Apple Pay. 

One proviso is that this feature only comes with the iPhone 12 and newer phones, so you won’t be able to use it if you have an iPhone 11, iPhone X, or iPhone XS. 

6 Exciting new features

iOS 15.4 brings a large collection of new features. You get a home screen widget for Apple card and Apple Wallet that shows your balances and gives you other information. 

What’s new on iOS 15.4

Signing into Wi-Fi networks

iOS 15.4 enables you to sign into captive Wi-Fi networks using your phone. You’re likely to encounter these networks in hotels, office buildings, and shopping malls.

Health records on your phone

You will be able to upload your Covid vaccination records onto your iPhone. You can copy digital certificates into our Wallet or Health app, which will eliminate the need to carry a paper certificate. 

Keyboard brightness

You won’t struggle to see your keyboard in low light because you can adjust it.

New email domain

You can use iCloud Mail, a custom email domain that you’ll find in Settings.

Shortcuts

You can switch off notifications for shortcuts personal automations. 

Notes on passwords

iOS 15.4 allows you to add notes to your passwords in the iCloud Keychain.

Fun emojis

iOS 15.4 is a serious software update, but there’s some fun stuff as well, including 37 new emojis. Among them are seven new smileys: a melting face, a face with a hand over the mouth, a face with a peeking eye, a saluting face, a dotted line face, a face that has a diagonal mouth, and a face with tearful eyes. There’s also a range of new hand gestures that are also very expressive.

What’s new on iOS 15.4

Two of the new emojis are determinedly gender-neutral. They depict two people who are pregnant. One is a woman, but the other one is clearly a man. This must surely be a first for any emoji you’ll be able to find anywhere! 

What’s new on iOS 15.4

Some of the new iOS 15.4 emojis are very unusual. There’s an ogre, coral, a water lily, birds’ eggs in a nest as well as an empty birds’ nest (above), and an X-ray, a crutch, a ship’s lifebelt, liquid being poured from a glass, a playground slide, bubbles, a car tire, disco ball, and multi-racial handshakes. And could one be a hand with an evil eye in the palm? (below).

What’s new on iOS 15.4

Universal Control

The long-awaited Universal Control feature is one of the variants of iOS 15.4 for iPadOS 15.4. Another is for macOS 12.3. Universal control will allow you to work on multiple devices like iPads and Mac computers simultaneously, controlling them with one keyboard and mouse or a trackpad.

This is a radical and very welcome step towards ease of use if you’re working with more than one device at a time. It almost seems like magic when you have the screens of two devices next to each other on your desk, and you drag an item off one screen, and it appears instantly on the screen you’re using next to it. 

When will iOS 15.4 be available? 

Developers and members of the public who enrolled for the beta testing program have been thoroughly checking out the new operating system update in advance of its release. But by the time you read this, iOS 15.4 should be available to everyone who wants to update their Apple device and enjoy all the cool new advantages it will bring to their communication experience. 

Enjoy the new iOS features!

The new iOS 15.4, iPadOS 15.4, and macOS 12.3 bring innovative and enjoyable enhancements to your already excellent Apple devices and the multiple tasks they can perform. Manufacturers and developers always recommend that you download their updates.

They do this for several good reasons, one of them being that they iron out any bugs discovered between updates every time a new one becomes available. And they introduce improvements to your Apple experience that you really don’t want to miss. 

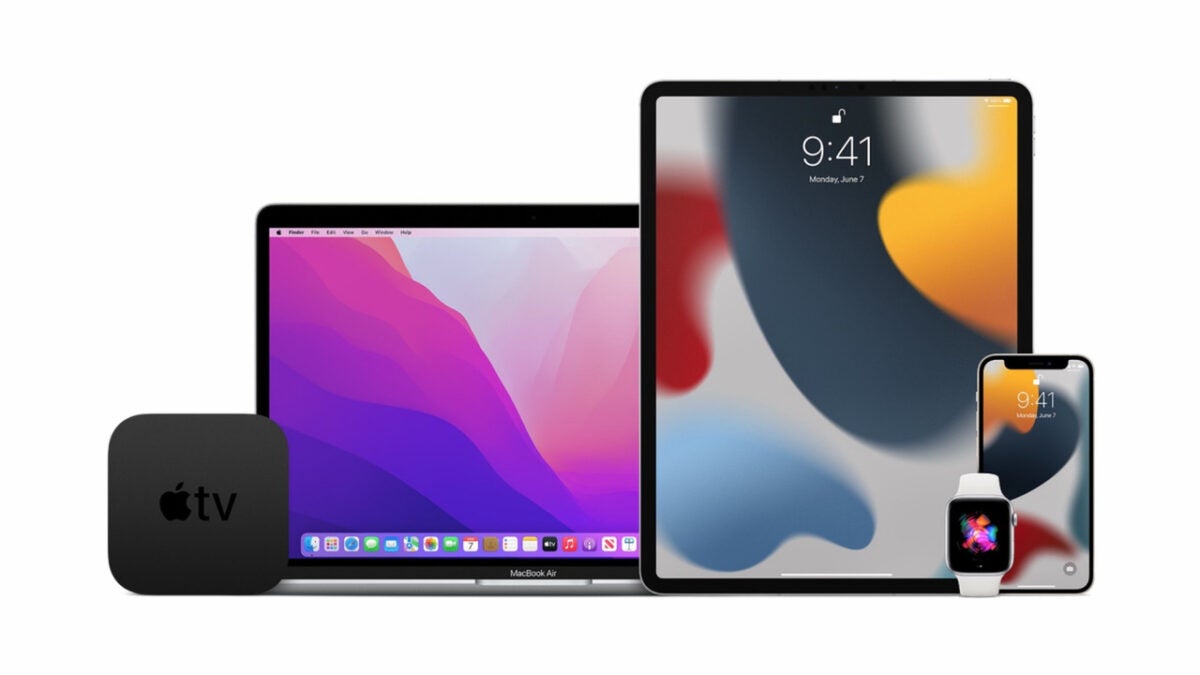
Why Upgrade to iOS 15.3, iPadOS 15, and macOS Monterey?

If you’re an Apple fan, chances are you’re a loyal supporter who’s not planning to go for something else, like an Android operating system, in a hurry. Let’s face it, there are Mac people, and they remain Mac people, no matter what! So for all you Macintosh fans out there, the good news is there are new and exciting software updates that are now available to the public.

Whether you’ll be using iOS 15.3, iPadOS 15, or macOS Monterey, the upgrades include security enhancements, bug fixes, and performance improvements. There’s even a new wallpaper.

iOS 15.3

Apple recommends iOS 15.3 for all iPhone users because it focuses on security updates and bug fixes. iOS 15.3 is a smaller update than iOS 15.2, but iOS 15.3 is loaded with bug fixes and performance enhancements.

The most important bug fix is for a Safari browser problem that made it possible for malicious websites to see your browsing activity and get your Google ID and personal data. The bug has been eliminated, so your browsing data is now safe. iPhone users who have fallen victim to this bug will be very happy to hear that and should put the upgrade on their devices as soon as possible.

iPhone models that will work with iOS 15.3

You will be able to download the upgrade on any of the following compatible iPhones: 

  • IPhone 13,
  • iPhone 13 mini
  • iPhone 13 Pro,
  • iPhone 13 Pro Max
  • iPhone 12,
  • iPhone 12 mini,
  • iPhone 12 Pro
  • iPhone 12 Pro Max
  • iPhone 11, i
  • iPhone 11 Pro, 
  • iPhone 11 Pro Max
  • iPhone XS
  • iPhone XS Max, 
  • iPhone XR
  • iPhone X
  • iPhone 8
  • iPhone 8 Plus
  • iPhone 7
  • iPhone 7 Plus
  • iPhone 6s
  • iPhone 6s Plus
  • iPhone SE
Upgrade to iOS 15.3, iPadOS 15,   and macOS Monterey

iPadOS 15

The iPadOS 15 upgrade brings a large number of very useful features to help you become even more productive than you already are. Here are just some of the easy-to-use features you’ll be able to enjoy once you’ve downloaded the new upgrade.

There’s a multitasking menu that you can use to get a split view, full screen, or center window with just a tap. You can still see your home screen from split view, including your pages and App library. The App library automatically organizes your iPad apps into categories. The arrangement gives you a very simple view of all your iPad apps that’s very easy to navigate. The App switcher has also been improved. 

 If you want to look at an email message or note without leaving where you’re working, touch and hold the email or other message, and a window will open in the middle of the screen. 

iPad models that will work with iPadOS 15

If your device is on the list below, it’s compatible with iPadOS 15, and you’re free to download the upgrade and enjoy its new features:

  • iPod touch 
  • iPad Pro 12.9-inch 
  • iPad Pro 11-inch 
  • iPad Pro 10.5-inch
  • iPad Pro 9.7-inch
  • iPad 
  • iPad mini 
  • iPad mini 4
  • iPad Air
Upgrade to iOS 15.3, iPadOS 15, and macOS Monterey

macOS Monterey

The new upgrade for macOSMonterey (12.2) contains exciting new FaceTime updates, a redesigned and streamlined Safari with no bugs, and new ways to work with Shortcuts. There’s even a Focus feature to keep you in the present! And there’s much more. If you haven’t yet installed macOSMonterey, do so after first checking whether it’s compatible with your computer.

Check compatibility

macOS Monterey is compatible with the following Apple Macintosh computers:

  • MacBook, 2016 or later
  • MacBook Air, 2015 or later
  • MacBook Pro, 2015 or later
  • Mac mini, 2014 or later
  • iMac, 2015 or later
  • iMac Pro, 2017 or later
  • Mac Pro, later than 2013 

If you’re upgrading from macOS Sierra or later, your Mac has to have 26GB of available storage. If you’re upgrading from an earlier macOS version, your computer must have up to 44GB of available storage.

It’s a good idea to back up your Mac before installing anything, including new software or upgrades. Next, you can download and then install macOS Monterey onto your computer. Allow the installation to finish before shutting down your Mac or putting it to sleep. During the process, your Mac might restart several times. It might show a progress bar or blank screen. To allow enough time for the installation to be completed, you should begin it in the evening. That way, your installation can finish overnight.

If your Mac isn’t compatible with the installation of macOS Monterey, you could install an earlier version.

Upgrade to iOS 15.3, iPadOS 15, and macOS Monterey

Stay up to date

Upgrade your macOS Monterey to the latest version, which is 12.2, after you have finished installing it. Choose Apple menu > System Preferences to check for updates. Click Software Update. You will be excited by the many new features in the upgrade and relieved to see there are bug fixes as well. The updates will ensure that your Mac is faster. And it will enhance its performance in other ways too.

Stay updated at all time!

Upgrade your operating system whenever it’s possible. It improves and enhances the performance of your device. Improvements include security enhancements, upgraded operating procedures, and many features that enhance how you can use your device and what it can enable you to do. Even better, the updates very often iron out bugs that have been discovered since the last upgrade was issued.

For example, in the latest releases, a Safari browser problem that allowed access to users’ personal information like their Google account details and which URLs they accessed last was eliminated. This very traumatic security breach is one of the major issues that were dealt with in the latest Mac upgrades.

This will surely have all Mac users breathing a huge collective sigh of relief while they enjoy their upgraded devices. So remember it’s advisable to keep a lookout for new upgrades as they become available and install them as quickly as you can if they are compatible with your device. You won’t be sorry.

Your guide to Classroom Live

Classroom Live’s mission is to help teachers worldwide upgrade their skills to become adept at using virtual classrooms and thriving in a relatively new environment. The developers see Classroom Live as a tool to help educators and learners move towards the recent trend of working in a virtual space.

They want Classroom Live to become the ultimate partner to help teachers develop and manage their virtual education sessions better and for students to learn more easily and comfortably.

What is Classroom Live? 

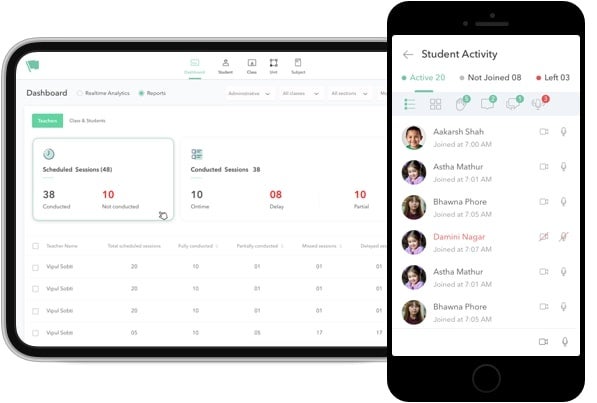
A virtual classroom designed specifically to deliver education, Classroom Live reduces the teacher’s workload. This allows the teacher to give more personalized attention to students and enhance their learning outcomes. Classroom Live is involved with over 150 institutions, 2,500 educators, and 25,000 students

classroom.live

Teaching anywhere at any time

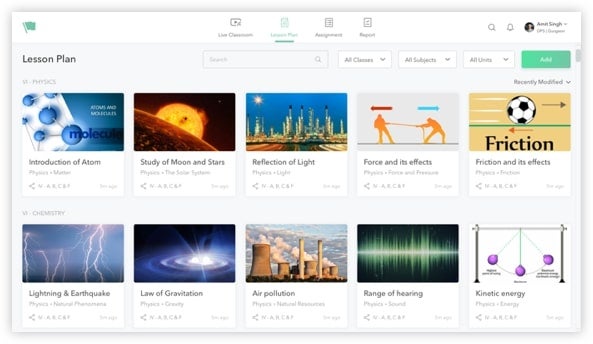
Classroom Live aims to be the ultimate teacher’s partner. It has a content generator that allows teachers to create lessons that will make an impact. There’s also an assignment and assessment module that will enable teachers to intervene speedily and accurately to remedy any problem a learner might encounter. Monitoring attendance and assignments are also easy.

Teaching sessions are recorded and available with study materials to students 24/7. Teachers can create interactive presentations using videos, YouTube links, web URLs, pictures, and their own notes. It automatically keeps attendance records

classroom.live

Students can learn more easily

Classroom Live believes educated students are the pillars of a better future. It aims to offer learners of all ages the opportunity to acquire knowledge more easily. Students who have missed virtual sessions can view them later. They can learn at their own pace, in their own space, and in their own time.

There’s a single virtual classroom that is free of distractions. Every student gets personal attention from the teacher in the live sessions. 

What makes Classroom Live different?

Classroom Live has many competitors in the virtual education field. How does it compare to some of them? What are its advantages over other applications that offer online virtual education? Let’s look at three of them.

Zoom

On its website, the popular video conferencing software, Zoom, states that classroom learning, education administration, staff and school board meetings, as well as parent-teacher conferences, have all moved into the virtual sphere. No one can be sure when the world will be able to return to traditional classroom learning.

Many believe that the future of education will lie in a combination of traditional and virtual learning modalities. Classroom Live is well-placed to give Zoom a run for its money in the virtual education marketplace. 

classroom.live

Google Classroom

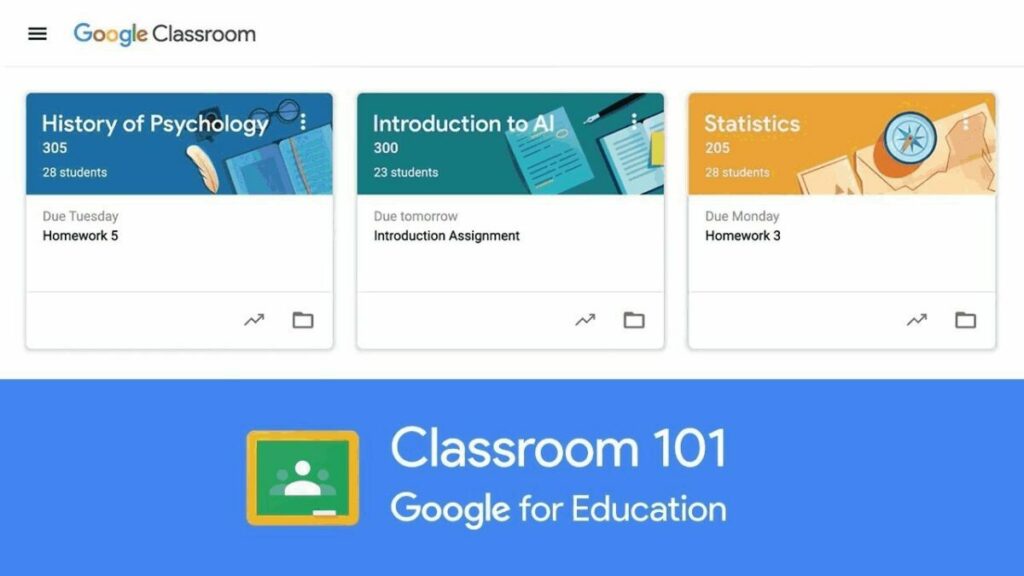
A suite of online tools, Google Classroom allows educators to teach students online. They can set assignments, have work submitted by students, mark, and return graded papers. The idea behind it is to eliminate paper-logged classes and make digital learning possible.

The advent of the Covid pandemic strengthened this idea and forced millions of students worldwide out of classrooms and into online learning. Like Classroom Live, it offers education online to the benefit of teachers and learners. Both get the job done.

classroom.live

Microsoft Teams

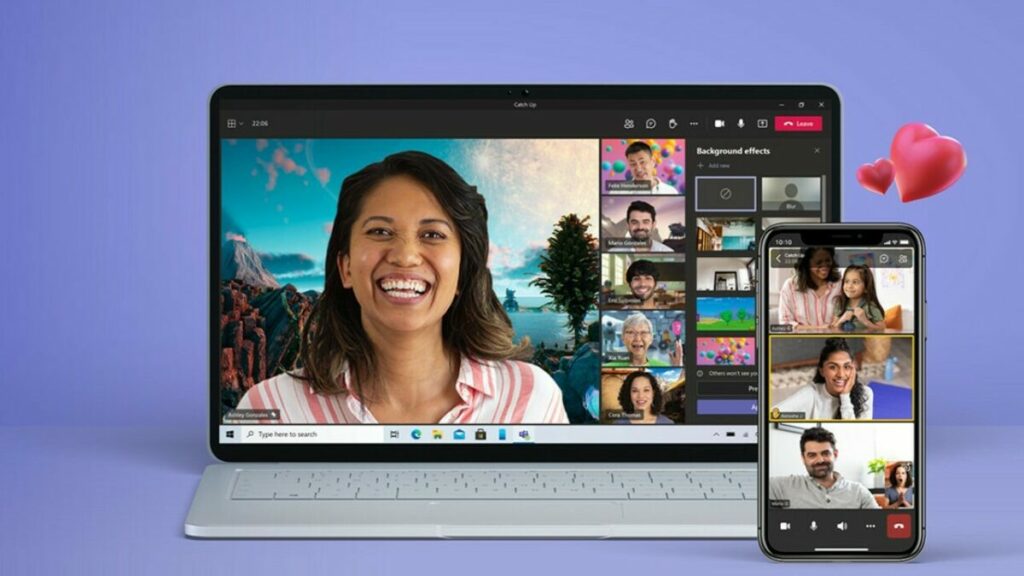
The new Windows 11 comes with Microsoft Teams for online teaching and learning. The idea is to cater to the new era of digital education that arrived very quickly two years ago. Some students struggle with the lack of face-to-face interaction that’s part of online teaching and learning.

Microsoft Teams allows teachers and learners to “get together” online to do group projects or have one-on-one sessions with instructors. Classroom Live also offers all these features.

Microsoft Teams

 The company behind Classroom Live

Unthinkable Solutions LLP is a company within Daffodil Softwares Pvt Ltd. Daffodil is a software engineering group that partners with more than 100 organizations across the globe. It helps them make their software products more robust, their workforce more productive, and their processes more efficient. Unthinkable Solutions has developed many technologies to enrich the quality of education. The company works closely with more than 400 schools.

classroom.live

 Who are the people involved?

A team of more than 150 enthusiasts, developers, and designers, who believe in bringing about change in education are behind Classroom Live. They are driven to create quality education, solve problems, provide customer satisfaction, innovate, and get results that benefit online teachers and learners in virtual classrooms. 

Are you ready for a new live classroom experience?

Since the start of the pandemic, education has moved towards virtual classrooms to keep students and teachers safe from devastating illnesses. During that process, people discovered the advantages of educating in this way, and it’s becoming an unstoppable trend.

Classroom Live is at the forefront of this development and offers the best in virtual education for students worldwide as well as their teachers.

Best 15 video downloader Chrome extensions

Best extensions for downloading online videos on Google Chrome

Google Chrome is the world’s most popular browser. Among its many outstanding features is that it supports add-ons or extensions that allow you to download all kinds of videos from just about anywhere. Many different extensions can do so.

In this article, we tell you about 15 of the best video downloaders for Chrome.

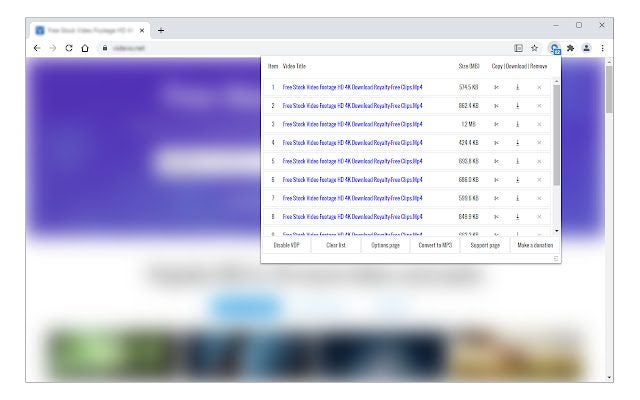
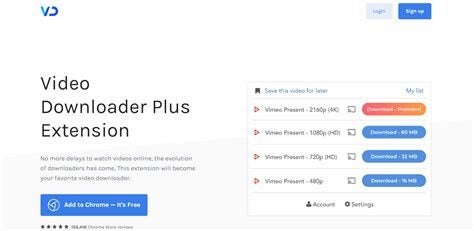
Video Downloader PLUS

This excellent and popular Google Chrome extension allows you to save videos from almost any website onto your device. It can deal with any media type, including 3gp, .mp4, .wmv, .flv, .swf, and .mp3. It can even download several videos at once to save you time. It’s easy to use and completely free. 

Note that Google Chrome restrictions prevent it from downloading adult, illegal or copyrighted content or YouTube videos.

Video Downloader Plus DOWNLOAD
Best 15 video downloader Chrome extensions

Flash Video Downloader

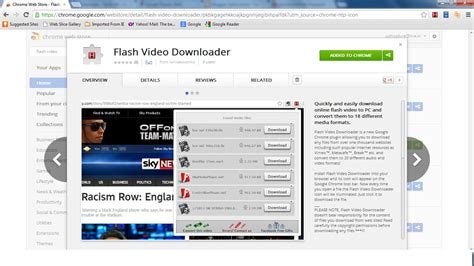
With Flash Video Downloader you can download nearly all media formats like flash, videos, and audio files from 99% of websites. No special skills are required as this downloader is one of the easiest to use.

Just click the extension’s icon in the browser and start downloading. It supports Mp4 Videos, Mov, Fly video, Webm and Facebook videos. It’s free, and the developers say it will never be a paid app. 

Flash Video Downloader DOWNLOAD

Video Downloader professional

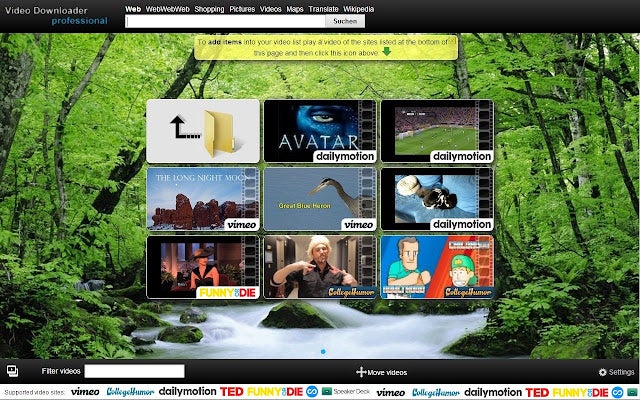
Using Video Downloader professional allows you to download videos from many websites and select different resolutions to play them on. Or you can collect them in your video list without downloading them. You can also play MP4 videos on your TV using Google Chromecast. 

The extension locked the downloading of YouTube, Instagram, Dailymotion, Vk, and Tiktok videos because of Google Chrome restrictions. For those videos, use www.videodownloaderultimate.com.

Video Downloader professional DOWNLOAD
Best 15 video downloader Chrome extensions

Easy Video Downloader

Easy Video Downloader is a Google Chrome extension that lets you quickly download video, audio and image resources from multiple web pages. It works by using internal and external browser download managers. 

Easy Video Downloader says it’s not responsible for the content you download. You must verify the copyright permission before downloading anything. Google, YouTube, and Chrome Store policies and restrictions will apply to videos you want to download from their sites.

Easy Video Downloader DOWNLOAD

Video Downloader Prime

Video Downloader Prime is a Google Chrome extension that allows you to easily download popular video formats from your Google Chrome browser’s toolbar popup. This gives you an easy interface for downloading videos or copying them to your clipboard. 

You can see the number of videos on the page and then delete, add or disable them from the Options page. You can specify the minimum you want your videos to be.

Video Downloader Prime DOWNLOAD
Best 15 video downloader Chrome extensions

Twitter Video Downloader | Fast and Free

This Google Chrome extension for Twitter allows you to download Twitter videos and Gifs with just one click. It’s free, fast, and easy for anyone on Twitter to use. 

After you’ve installed the extension, you’ll see a Download button underneath every Twitter Tweet, which will link you to a video. Simply press Download under a Tweet and choose the quality of the video you want. The video will then download immediately, with no effort or fuss, on your part.

Twitter Video Downloader | Fast and Free DOWNLOAD
Best 15 video downloader Chrome extensions

Video Downloader for FB

To download videos from Facebook using this Google Chrome extension, go to Facebook.com on your computer’s desktop. Select the video you want to download and click it to open it on its own screen. Then refresh the screen. 

To save the video you have selected, press the Download button that appears on it. Save the video as an MP4 in HD or SD quality. Then it’s ready for you to watch whenever you like.

Video Downloader (Facebook) DOWNLOAD
Best 15 video downloader Chrome extensions

Video Downloader Pro

Video Downloader Pro will enable you to download any video you want from any site on the web. It’s fast, easy to use, and free. Simply click on the extension icon and see all the files available. Choose a file, and it will save on your device quickly. 

Due to Google Web Store policies, you cannot download YouTube Videos. But Video Downloader Pro can find and quickly download videos and music from 98% of web pages all over the Internet. 

Video Downloader Pro DOWNLOAD
Best 15 video downloader Chrome extensions

ZED: Zoom Easy Downloader

Zoom Easy Downloader is the easiest and fastest way to download Zoom videos. To get it, just click Add to Chrome on the top right of your screen. 

When you visit a page with a Zoom video, you’ll see a blue banner at the bottom of the page. Right-click on it. Then click Save link as, and you’ll download an .mp4 video. This software is from Zoomcorder.com. With it, you can record any Zoom video and watch it later. 

ZED: Zoom Easy Downloader DOWNLOAD
Best 15 video downloader Chrome extensions

Video Downloader for TikTok

Now you can download videos from TikTok with one click by using its Video Downloader. The software allows you to download photos and videos completely free of charge. 

All you have to do is go to any TikTok video or photo and click on the browser extension icon. This will make the download button available, and you’re ready to go! The downloader opens a world of excellent video content for you to save on your PC.

Video Downloader (TikTok) DOWNLOAD
Best 15 video downloader Chrome extensions

Free Video Downloader 

The Free Video Downloader allows you to save any video from any website onto your PC or another device. It’s one of the most popular download extensions in the Chrome Web store. You get an online downloader, player and playlist in one complete software package! 

Play the video you want and click the browser extension button to download it. You can download any MP4 files on the net. Just choose the size and quality when you save it. 

AVGO Free Video Downloader DOWNLOAD
Best 15 video downloader Chrome extensions

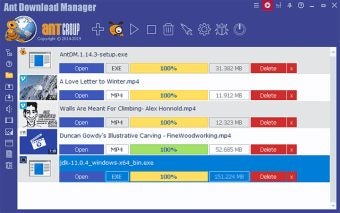
Downloader with Ant Download Manager

Ant (AntDM) is a free download manager and accelerator for Windows from Google Chrome. Using it, you can download videos automatically, manually and in batches. You can use it alongside the DLHelper, an auxiliary extension for Google Chrome that you can also get from your Chrome browser. 

The software contains no ads, spyware or malware. It has a companion application for downloading and merging streaming videos and supports YouTube, HTTP Live Streaming (HLS), Vimeo, and direct links to media files you want.

Ant Download Manager DOWNLOAD
Best 15 video downloader Chrome extensions

MuGet HTML5 video downloader

With the free MuGet HTML5 video downloader, you can download HTML5 videos embedded in pages. It works on many popular websites like Vimeo and generic HTML5 videos, and other popular video platforms. You can also download videos in MP4 and WEBP formats. 

Because of Chrome Webstore policies, the app doesn’t work on YouTube videos. But there are many other sites it works on, so you can download as many videos as you want whenever you like and enjoy them!

MuGet HTML5 video downloader DOWNLOAD
Best 15 video downloader Chrome extensions

Pincase-Pinterest Video & Image Downloader

Pincase is a free Pinterest video and image downloader available as a Google Chrome extension. You can use it to download whatever you like, including images, videos, GIFs, and story pins. It’s very easy to use and powerful, making downloading any material from Pinterest fast and trouble-free. 

It supports board, search page, main feed page, and self-owned pins, among others, and allows batch image downloads. It’s completely free to download and use. 

Pincase-Pinterest Video & Image Downloader DOWNLOAD
Best 15 video downloader Chrome extensions

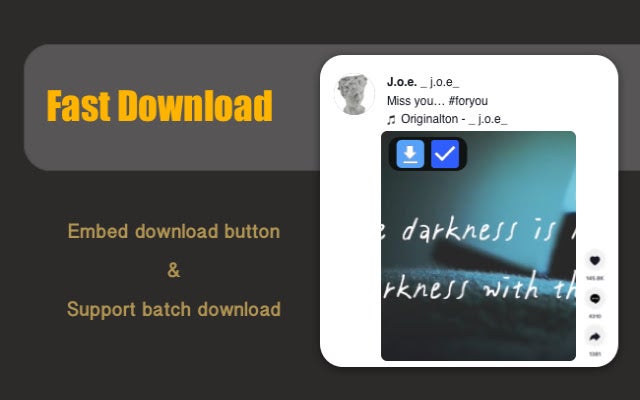
TikFast – Free TikTok Video Downloader

TikTok is the world’s leading destination for downloading short-form mobile videos. TikFast, a Google Chrome extension, is a powerful TikTok download tool that allows you to download videos quickly and easily. 

It can, among other features, download TikTok videos in batches with no watermark, which most other tools are unable to do. Using TikFast, you can download videos from tiktok.com with just one click. It also downloads TikTok music as MP3 files. The extension is completely free.

TikFast - Free TikTok Video Downloader DOWNLOAD
Best 15 video downloader Chrome extensions