How to use 3uTools to manage your iPhone

If you have an iPhone or other Apple device and want the advantage of ultimate control over it from your Windows PC, 3uTools is the best route to get there. It’s a great option to manage your Apple devices from a central point, and it also gives you access to many exciting features that you can’t find anywhere else. It’s very easy to download and use, and it’s free.

This download works on both the 32-bit and 64-bit versions of Windows. 3UTools has a user-friendly interface that makes it easy to use. You won’t need a subscription but must have iTunes installed to be able to run 3uTools effectively. Here’s how to manage your iPhone with 3uTools.

Use 3uTools to manage iPhone device

3uTools is only available for Windows PCs or laptops. It cannot be downloaded onto computers using the macOS operating system. The installation process is simple, quick, and easy. Just follow these steps:

  1. Download and install

    How to use 3uTools to manage your iPhone

    On your Windows PC or laptop, download 3uTools.

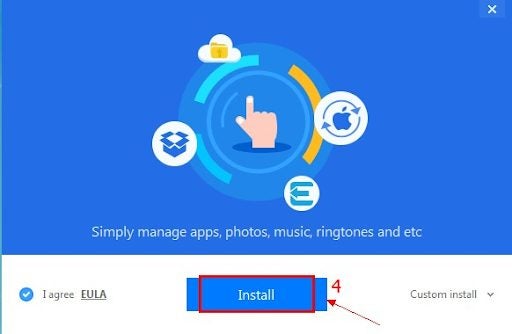
    You’ll see: Do you want to run this file? Click on Run to continue your download. Click on Install. 3UTools will install itself and tell you when it’s finished.

  2. Launch 3uTools

    How to use 3uTools to manage your iPhone

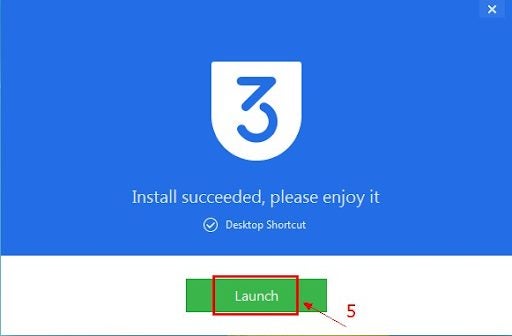
    After 3uTools has been installed, click on Launch.

  3. Connect your device

    How to use 3uTools to manage your iPhone

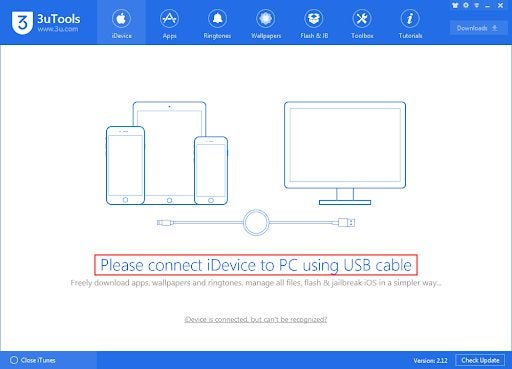
    Now connect your iPhone or other Apple device to your PC. The best way to connect is with a USB cable. 3uTools is only available for Windows PCs or laptops. It’s not available for computers using the macOS operating system.  You’re now up and running and can enjoy all the benefits of using 3uTools.

3uTools system requirements

3uTools can be installed on the 32-Bit and 64-Bit Windows operating systems (OS). You need 1GB of memory to run the program. You must have an internet connection and an up-to-date graphics card.

Features of 3uTools 

3uTools offers a large variety of valuable features. Here are some of them:

  • Flash and Jailbreak your iPhone;
  • reboot or turn off your Apple device;
  • import, export, and convert HEIC images and files;
  • Convert audio and video files;
  • edit audio tags;
  • compress images;
  • clean junk files off your iPhone;
  • transfer data from one device to another;
  • see detailed information about your Apple device on your PC screen;
  • backup and restore your iDevice;
  • place your iPhone into recovery mode;
  • read audiobooks in m4b format;
  • create your own exclusive ringtones;
  • open an SSH tunnel;
  • view a real-time screen and real-time log;
  • get access to many apps and tools to download for free.

Why you need 3uTools

3uTools is a highly efficient way to manage your iPhone, iPad, or iPod touch from your Windows PC or Laptop. It includes device cleanup, screen sharing, and backup/restore tools. You can use it to manage your data, apps, files, photos, ringtones, flashing tools, music, and videos. It also lets you look at detailed information, check your battery and lock statuses, jailbreak, and activate your Apple device.  

FAQs

What is 3uTools?

It’s a free program that allows you to manage your iOS device data from a Windows PC or laptop. You can manage iOS apps, ringtones, and multimedia files, to name a few. You can take a good look at your iDevice, including its activation, battery and iCloud lock status, and jailbreak your iPhone with one click.

Is 3uTools free?

Yes, it is. All its outstanding features won’t cost you a cent. 

Is 3uTools available for Mac?

There is no version for Mac operating systems on a computer. You can only use it on Windows PCs linked to portable iOS devices.

Is 3uTools safe?

It’s completely safe. The developers thoroughly tested the app before making it available to the public. You can install it on Windows PCs and laptops using Windows 10, 8, 7, Windows XP 32-bit and 64-bit operating systems, and Windows Vista. It works with Apple’s iPhone, iPod, and iPad devices.

Can you install 3u Tools directly to your iPhone?

3uTools cannot install directly onto iDevices. It has to be installed on a Windows PC or laptop and then linked to your iPhone or other Apple devices. It’s compatible with any iPhone, iPad, or iPod Touch with iOS 4 or above.

What can you download with the app?

Lots of super apps, wallpapers, ringtones, themes, games, and other programs you can’t find anywhere else. 

Can 3uTools speed up iDevices?

Yes. One way is to use 3u Tools Garbage Cleaner to remove junk and duplicates. Your iPhone will work like new.

Can you back up personal information?

Yes. 3uTools will allow you to back up everything on your Apple device and restore it when you need it. It works in the same way as iTunes & iCloud when saving your personal information.
How to use Apple Reminders in 5 easy steps

Apple Reminders is an app that does exactly what its name suggests: It reminds you of what you have to accomplish in your busy day or week, whether it’s buying groceries, calling business contacts, going to a meeting or a hair appointment, or even walking your dog!

It makes it easy for you to have all the information you need about what you have to do and when you’re supposed to do it, in the palm of your hands. You can use the app on your iPhone, iPad, iPod touch, at home, or in your office on a Mac or laptop. It’s even possible to use it on a Windows PC if you’re using a phone and computer with different operating systems. Here’s a quick guide on how to use Apple Reminders.

How to set an Apple Reminder

If you don’t have it already, it’s a good idea to set up iCloud before you start using Reminders. It will enable you to keep all your reminders synced and updated on all your devices. That means you’ll be able to see any reminders you set up on one device on all others signed in to your Apple ID when you open iCloud.

  1. Set up a new reminder

    How to use Apple Reminders

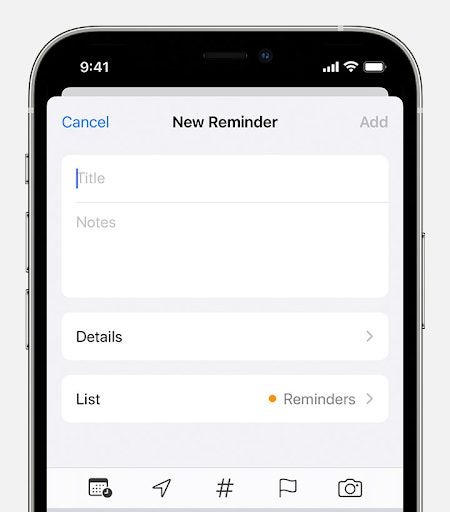
    Open the Apple Reminders app and tap +New Reminder. Then type what you want to remind yourself to do on any given day and time.

  2. Add a location

    How to use Apple Reminders

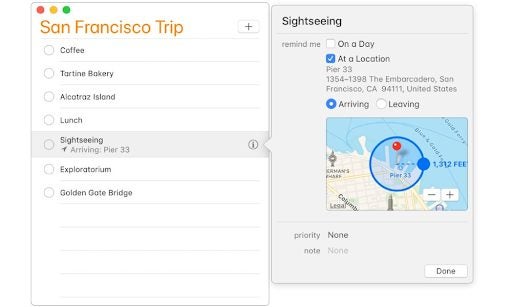
    If you want to be reminded to do something based on where you are, tap the Location button and choose one of the options provided. For instance, if you want to be reminded to turn on the coffee machine when you get home for your wife. You will only get location-based notifications if you have Location Services turned on.

  3. Set a date for your reminder

    How to use Apple Reminders

    The Date and Time button will allow you to arrange a reminder for a specific day and time. You can select Today, Tomorrow, This Weekend, or set up your own reminder for a day and time, like Tuesday, April 5 at 10 am. You could make it a reminder for meeting someone or having a haircut, for example.

  4. Add subtasks to Apple Reminders

    How to use Apple Reminders

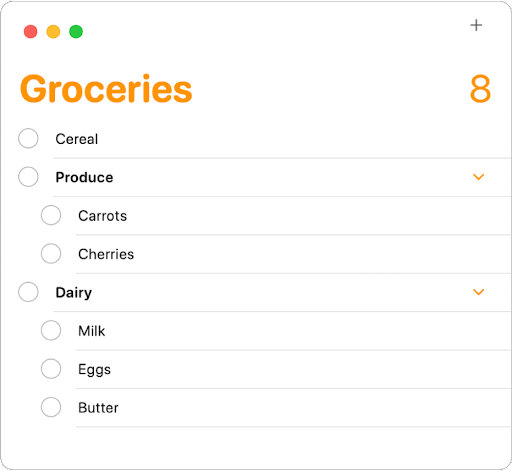
    You can add subtasks if you want more details in your reminder. One way to indicate that they’re subtasks is to place them below a reminder and indent them. You can do this by choosing Edit > Indent Reminders.

  5. Add an attachment

    How to use Apple Reminders

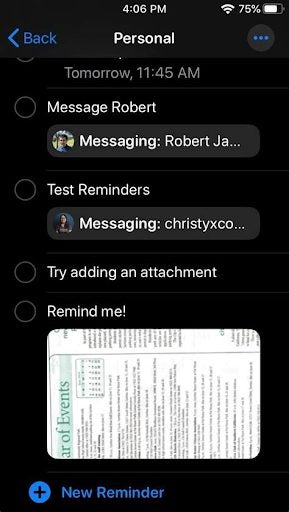
    You could add a picture of the place you want to be reminded to go to, or the person you want to be reminded to meet there and/or a document you want to show them. You’ll see them when you get your alert for the reminder, and be fully prepared for your meeting.

Create a reminder by talking to Siri

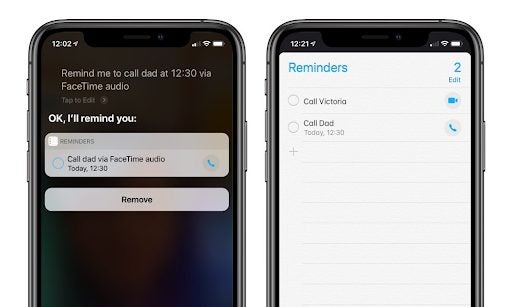
Creating a reminder with Siri is as simple as talking. All you have to do to set up a reminder is to speak into your device and say something like, “Siri, set a reminder to turn on the sprinklers in the garden when I get home.” Or “Remind me to feed the dog in the morning before I go to work,” or “Remind me to buy groceries on my way home after work.” If you use an Apple Watch, talking to Siri is a quick and easy way to record your reminders.

How to use Apple Reminders

Share and assign Apple Reminders

You can share your reminders with other people and get them to help you, for instance, by picking up some of the groceries on your list. In other words, share the tasks.

Open the Reminders app and tap on the list you wish to share. Tap the More button, then tap Share List. Tap the Assignment button in the quick toolbar. Assign the remainder to a specific person. Then tap Done.

Get Apple Reminders on Windows

You can access apple services on Windows using iCloud Web, iCloud app, and Outlook integration. You can access Reminders from iCloud.com on the web. But you will only be able to view and complete tasks in reminders on the web. You can’t add new lists, times, and dates or get notified in the Windows notification panel.
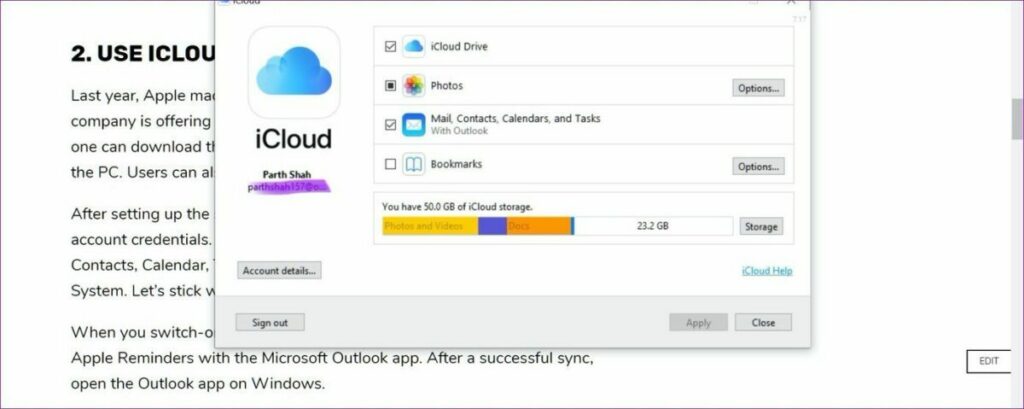
A better option is downloading the iCloud app onto your PC from the Windows Store. If you turn on Integration for iCloud Tasks, it will sync Apple Reminders with Microsoft Outlook, which you can open in Windows. You will then be able to see reminders you might have set up on your iPhone, for instance.

How to use Apple Reminders

Helping you to remember

Sometimes you’re so busy you can forget to do things we’ve arranged or agreed to do. Apple Reminders takes all the stress out of remembering to complete our tasks. Get them listed in your phone or other devices, and let Apple Reminders do the work of remembering for you, even if you’re using Windows!

How to record a Microsoft Teams call or meeting in 3 ways

There are different reasons for making a recording of a Microsoft Teams call or meeting. You might want one for your own or your company’s records, or you might want to offer it to colleagues who could not participate in the meeting but should be informed about what took place or what was said or decided. Or you might want to listen to the recording yourself to hear some important points made again. 

The video conferencing and collaboration tool is popular because it runs on many operating systems, is easy to operate, and can accommodate large numbers of people in its meetings. A useful feature it also offers is a built-in recording facility. But please note that not everyone at the meeting may record it. Only the meeting organizer or person from the same organization designated by the system manager may do so. Note that the recordings can only be a maximum of four hours long and that participants should be informed that the meeting is being recorded. There could be legal implications if this is not done.

  1. Recording a Microsoft Teams meeting on a PC

    How to record a Microsoft Teams call or meeting

    You’ll find it easy to record your group video call or meeting on your laptop or PC. And doing so will facilitate collaboration with colleagues because you’ll be able to share the contents of a group call or meeting by using the Microsoft Teams built-in recorder.

    Step 1 

    Once you have organized a meeting or joined one you’re going to take part in, you can start recording it. Start by hovering your pointer over the centre bottom area of the window. You’ll see the different options below.

    Step 2

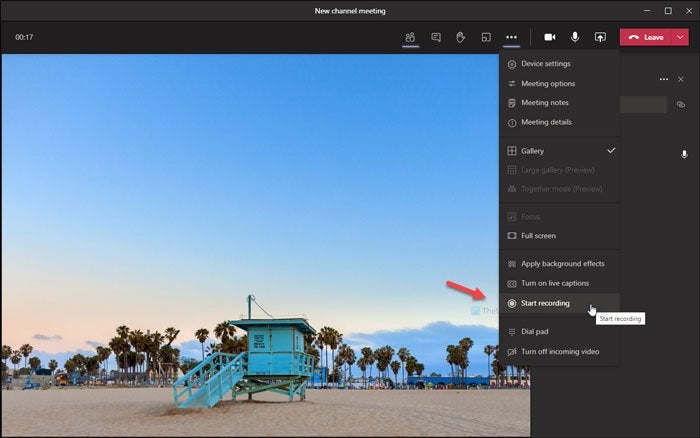
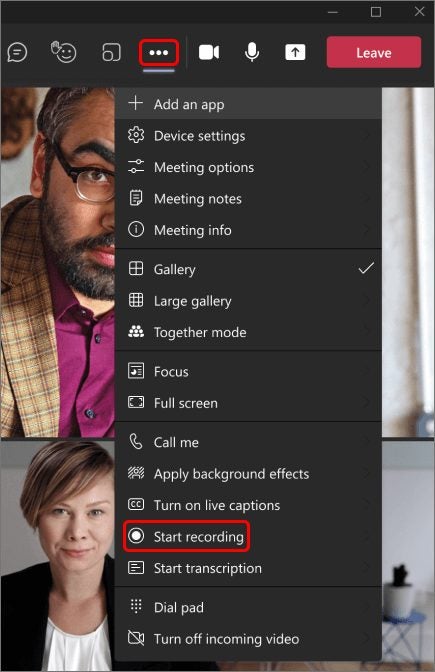
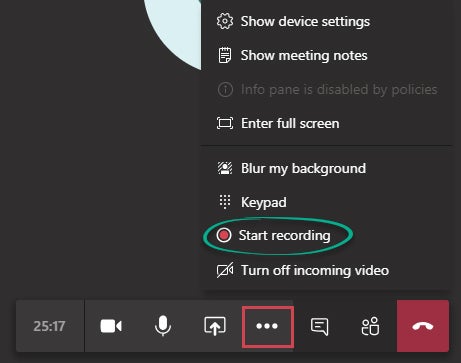
    Click on the ellipsis icon at the bottom of the screen. The More Actions icon there will give you many options that you can use, such as full screen, captions, and enabling transcribing.

    Step 3

    One of the options the More Actions icon will give you is to record the meeting. To do so, click on the Start Recording tab. You and everyone else taking part in the discussion will then see a notification that a recording is being made. 

    Step 4

    When you want to send the recording manually, choose Stop recording. The app will notify you on-screen that the recording has been saved in the cloud. If you don’t do this, the recording will automatically stop by itself when the last person attending signs out of the meeting.

  2. Record a Teams meeting on Android

    How to record a Microsoft Teams call or meeting

    Many people who use Microsoft Teams prefer to use their mobile devices to join meetings or group calls because it does not tie them down to a desk. If that’s your preference, you’ll be happy to know you can still record meetings on your Android device.

    Step 1

    Launch Microsoft Teams. Chat must be selected. Tap Instant meeting, then Start meeting. Tap Join now on the next screen to join or start a meeting.

    Step 2

    When the meeting is underway, tap More actions. Then Start recording. You will be able to see confirmation that the meeting is being recorded.

    Step 3 

    To stop the recording, tap More actions again, then the option to Stop recording.

    Step 4

    Once the meeting is over, the recording you have made will be saved in that meeting’s chat window.

  3. Record a Teams meeting on iPhone

    How to record a Microsoft Teams call or meeting

    It doesn’t matter whether you’re using an Android or Apple cellphone. You can attend or record Microsoft Teams group calls or meetings with either device because the software accepts many different operating systems. Here’s how you record on an iPhone:

    Step 1

    Launch Microsoft Teams. Chat should be selected in the options at the bottom. Tap the Camcorder icon, then Start meeting.

    Step 2 

    To start recording, tap More actions, and then Start recording.

    Step 3 

    To end your recording, tap More actions again, and then Stop recording.

Why make a Microsoft Teams recording?

It’s not difficult to record a Microsoft Teams meeting or group call, whether you’re using a PC or Laptop, Android, or iPhone device. That’s why the software has become a leader in the field of video conferencing, which became so vital during the Covid-19 pandemic. Now that employees and companies have realized the advantages of having employees working from home, it’s unlikely it will come to an end soon. So it’s a good idea to learn as much about the software you use as possible. 

Recording a meeting is a useful skill to know, as is knowing how to see everyone on Microsoft Teams. The steps are very similar for all the different devices and should not prove too much of a challenge to anyone reasonably computer literate. Just bear in mind that it’s frowned upon to record meetings secretly. It would be best to let everyone taking part in the meeting know that it’s being recorded.

How to make a presentation on Apple Keynote

Apple Keynote is a presentation tool that comes with all iOS devices like Macs, iPads and iPhones. It’s not available for PCs, where PowerPoint and Google Slides, among other programs, are mostly used to make presentations. But you can save Keynote documents as PowerPoint files or import and edit PowerPoint documents in Keynote. This can be very helpful, for instance, if you want to collaborate on a presentation with someone using a different operating system.

Among Keynote’s advantages are how easily you can incorporate charts and graphics into your presentations. They are easily accessible in the toolbar. Here’s a quick guide to making presentations on Apple Keynote.

Getting started with Apple Keynote presentations

Keynote has at least 30 templates to use when you’re determining the design of your presentation. They will give whatever you do a professional look that will have our viewers sitting up and taking notice. You can also download themes if you think they will show off your presentation’s personality and style better.
With Keynote, similar to PC presentation tools, you also build your presentation using slides. But Keynote goes a step further with a touch interface that allows you to draw and sketch on your slides. To make your presentations pop, you can also add elements like text, images, video, and animations, including 2D, 3D, and interactive options. Our step-by-step guide will help you quickly create a Keynote presentation.
  1. Choose a theme

    How to make a presentation on Apple Keynote

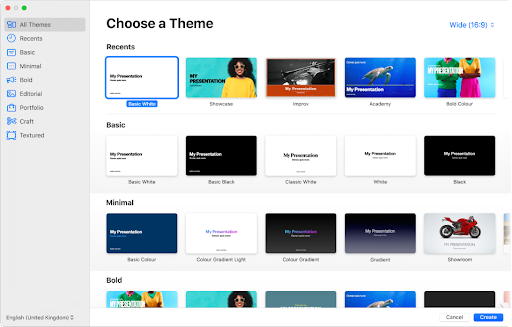
    Keynote offers layouts for slides grouped into themes. You can use them to give your presentation an overall cohesion in its design. Each slide layout includes images and text that you replace with your own content as you go along. To get to the themes, open Keynote, then go to the theme chooser. You can look at themes you might want to use by category or open All Themes and double-click the one you want to open.

  2. Choose a slide layout

    How to make a presentation on Apple Keynote

    To choose a layout for the first slide of your presentation, click the Slide Layout button in the Format sidebar. Each layout has its own unique design containing placeholder images and text. The idea is for you to replace it with your own content of text and images as you create the slides for your presentation. You can add a slide, replace or delete one at any stage.

  3. Add your own content

    How to make a presentation on Apple Keynote

    To add text, you have to double-click the placeholder text in the slide layout design, then type or copy and paste your own text in its place.

    To add an image, drag one onto a placeholder image in the slide layout design to replace it with your own image.

  4. Save your presentation

    How to make a presentation on Apple Keynote

    When you have finished adding your own content to as many slides as you have decided to use in your presentation, you should save it. Then you’ll be able to access your presentation easily when you want to show it to others. If you have iCloud set up on your device, Keynote will automatically save your presentation there.

  5. Play the presentation

    How to make a presentation on Apple Keynote

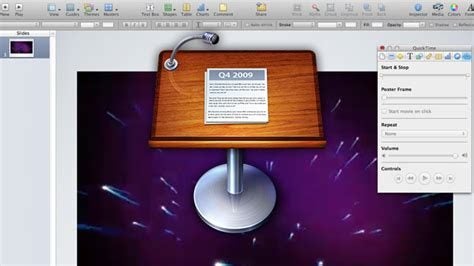
    In the toolbar, you will find a big Arrow sign. Click on it to play your presentation. To look at each slide in turn, press the arrow key once to look at each slide in turn. Have a good look at your presentation to ensure you’re satisfied with how it looks before you show it to other people
  6. Finish and close the presentation

    How to make a presentation on Apple Keynote

    To indicate that you have finished your presentation, press the Escape key. 

    If you want to close your new presentation, click on the red Close button. And you’re done! You have made your first professional-looking presentation on Keynote and are ready to show it to your clients or colleagues!

It’s fun with serious intent

It’s enjoyable to play around with Keynote, trying out different designs for your slides and learning how to quickly and easily replace the placeholder images and text with your own. Doing so will ensure that you are totally familiar with the software. This will give you confidence in your ability to use it to create brilliant presentations.

Remember, though, that the core of this software has very serious intent. It’s a sleek Apple product with all that implies: excellent design at your fingertips using remarkably easy tools to locate and use. But you don’t have to spend a considerable amount of time looking for clever new ways to incorporate what you want to show off in your Keynote presentations.

Everything you need has been arranged in the software to find exactly what you need with very little effort. It will seem much easier than you ever anticipated to make your presentation pop than with any other software out there designed for you to use for making presentations. So, get ready to enjoy the process!

How to export emails in Microsoft Outlook

There are different reasons why you might want to export your emails from Microsoft Outlook in Microsoft 365 or from Outlook for Macs. You might want to store your emails or access them in other programs or operating systems. Outlook efficiently manages emails, so sending them to different destinations is not difficult.

One way to do it from your PC is to send emails to a .PST (personal storage) file. You can also send them from Outlook to Gmail or Microsoft Excel. From Outlook for Mac you can put them in a .OLM file and store or send them as you wish. Here’s a guide to how to do it.

Exporting Microsoft Outlook emails

  1. Export emails from Outlook on Windows

    How to export emails in Microsoft Outlook

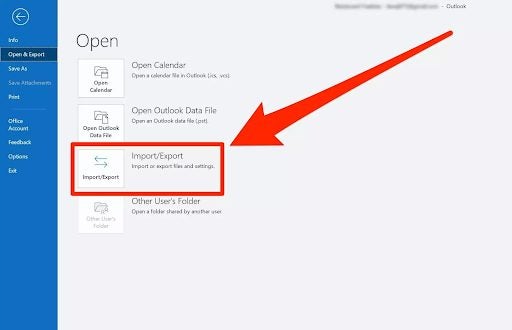
    – In Outlook, click File. In the side pane, click Open & Export. Click Import/Export.

    – Under Import and Export, choose Export to a file and click Next.

    – Click Outlook Data File (.PST) and click Next.

    – Click o the account from which you want to export emails. Check Include subfolders. Then click Next.

    – Decide where to save your new .PST file. 

    – Click Finish.

    To put a .PST file onto your hard drive, go to Info in Outlook. Then select Account Settings > Account Settings. Go to the Data or Data Files tab in the dialogue box, name the file or account, then select Open Folder Location or Open File Location. Copy the .PST file to your hard drive. In Windows File Explorer, copy the .PST file to a location of your choice on your PC or onto a flash drive.

    You can then copy the file to Outlook on a different PC, another version of Outlook, or another operating system.

     Note: No matter which version of Outlook you are using, the export process might take a while, especially if you want to transfer a large volume of emails.

  2. Export to Gmail

    How to export emails in Microsoft Outlook

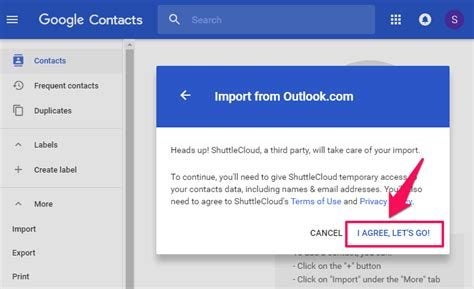
    You can export emails from Outlook to a Gmail account. First, you have to add your Gmail account to Outlook. You can do this by creating a folder, copying and pasting all the emails you want to export into the folder, and then copying them into Gmail. It’s advantageous to have emails you want to keep in two accounts or to save them on an external hard drive or a memory stick.

  3. Export to Microsoft Excel

    How to export emails in Microsoft Outlook

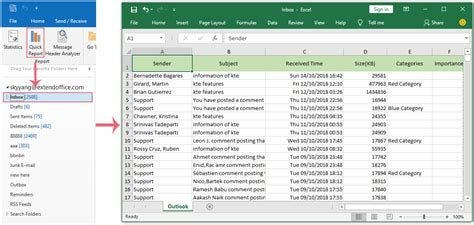
    Another way to export your Outlook emails is to put them into an Excel spreadsheet. You can create the spreadsheet with various columns like From, Subject, Message etc, so that you file your mails where you can easily find them once you have saved them. You can also save your spreadsheets wherever you like on your hard drive, on an external hard drive or on a flash drive so that you can access them easily.

  4. Export emails from Outlook on a Mac

    How to export emails in Microsoft Outlook

    – In Outlook, go into the account from which you wish to export emails.

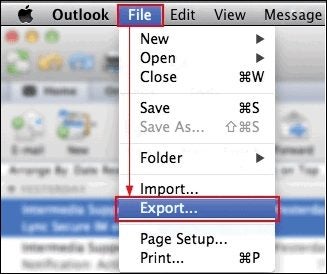
    – Under File at the top of your screen, choose Export.

    – Select all the emails you want to export.

    – Decide where you want to save your .OLM file and what you want to name it. 

    – Save the file.

    Note: If you want to access your saved Mac Outlook emails in Windows Outlook, the best way is to use an OLM to PST converter.

Outlook makes exporting easy

You’ll see from the above that there are as many options for exporting and saving your emails as there are reasons for doing so. The PC or Mac versions of Microsoft Outlook are both versatile and user-friendly. You should have no trouble in using it, whatever version of Outlook you happen to be using. If your version differs slightly from the latest one, you can still pick up the basics of how to do it from this guide.

How to use Tiny Task?

With the free automation tool, Tiny Task, you can easily record boring and repetitive actions as macros and then play them to repeat the actions at any time. This frees you up to focus on more essential tasks, which will help make you more productive. You can run your macros manually or set the time and date on which you want them to play, making the repetition of your tasks fully automated. 

The latest version of Tiny Task supports Microsoft Windows (the 32-bit and 64-bit versions) and the macOS and Linux operating systems. It not only performs small tasks you automate, but it’s also tiny in the sense that it uses very little system space (about 35Kb).  Let’s take a look at how to use Tiny Task.

Steps to use Tiny Task

The application is a small, portable automation tool that’s easy to use. The developer, Vista Software, created it as a freeware product, but donations for continued development are always very welcome. As soon as you open Tiny Task, you will see a tutorial that teaches you how to use it. Here are the basic steps.

  1. Record

    How to use Tiny Task

    There are two ways to start recording in Tiny Task. 

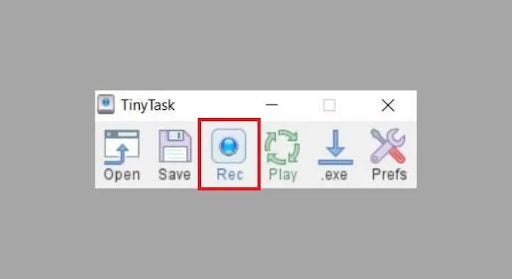
    – Click on the Rec button in the Tiny Task window, or 

    – Use Ctrl-Shift-Alt-R to record,  

    The software will then record whatever you do on the PC, like mouse movements and clicks, keyboard taps, navigating to a website, or opening a folder or file. After recording what you do, it will create a macro. If you’re happy with it, click Stop and then Save. Give your macro a name so you can find it easily later.

  2. Play

    How to use Tiny Task

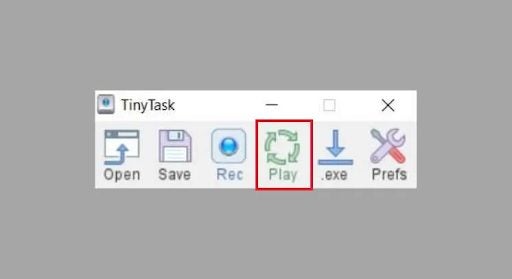
    Whenever you want to repeat your recorded action, you click Play once. The Tiny Task software will redo the action you have programmed into it in precisely the same way as when you recorded it. Any repetitive tasks can be programmed and repeated whenever you want. Remember that when you play your recorded macro, you can set the speed of play, which is also a very useful feature.

What’s special about Tiny Task?

You don’t need to have much technical knowledge to operate Tiny Task. There’s no need to learn how to write computer scripts or code. You can even set keyboard hotkeys to access different features. That means you can just hit the allocated hotkey and use the feature without going into the application. What could be easier?

Why automate with Tiny Tasks?

Automating tedious, repetitive tasks is becoming more and more popular. It saves time, freeing you up to concentrate on more important things. There are other apps that allow you to do this, like AutoHotKey and FastKeys, but Tiny Task is the top-rated small task automating app.

Its advantages are that it’s free, straightforward to use without any training, and the app itself takes up minimal space on your device. Recordings are saved in small compressed files, which also take up very little space in your computer system. So all things considered, Tiny Task is very lightweight in terms of the space it occupies.

 What can you automate?

Examples of activities you can automate using TinyTask include:

  • Open and close your files and folders.
  • Transfer files from one place to another.
  • Open your web browser and go to a website.
  • Open a media player and play music or videos.
  • Open and close software and applications installed on your device.

Automate tasks quickly

It makes sense to let an app take over your mundane tasks. If this is the route you would like to take, you can’t go wrong with Tiny Task. You can save your recordings as independent executables (.EXE) files that you can easily access and play back. It makes automation easy for everyone. There’s no need to learn a scripting language. You do everything with Tiny Task’s user-friendly interface. The app could save you lots of time and effort.

How to run multiple instances of VLC Media Player

Developed in France and launched in 2001, VLC Media Player is registered internationally by the VideoLAN non-profit organization. It’s open-source software that’s completely free. There are no ads and no tracking of users or spyware.

VLC stands out in a crowded field because it plays anything and everything, from files and discs to webcams, streams, and devices. It recognizes a vast number of video codecs, but even better, it reads many obscure or outdated formats and even allows you to convert them into files like MP4s that are in everyday use. VLC also allows you to play multiple videos or other media files simultaneously, one of its best features.

Enabling multiple instances in VLC Media Player

VLC Media Player allows multiple instances to be played simultaneously by default. You can even play different types of files at the same time, like a video file and an audio file or two audio files. You can multitask by cutting video files or converting audio formats in one instance of VLC while playing something different on another. If this feature is not enabled, here’s how to do it

  1. In Windows

    How to run multiple instances of VLC Media Player

    Go to Tools > Preferences (CTRL + P).

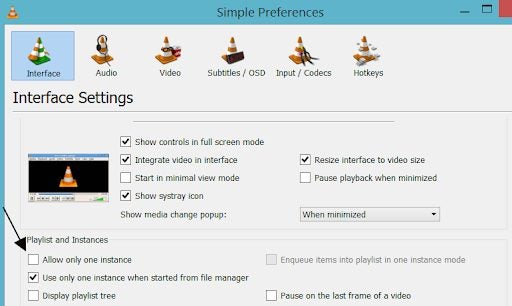
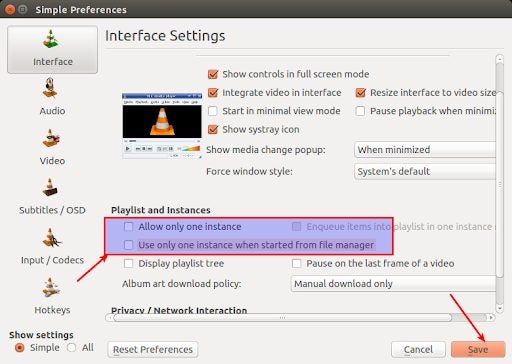
    Find the heading that says Playlist and Instances. Ensure that the Allow only one instance checkbox is not selected.

    If you’re going to open multiple files and you want each new one to open in a new VLC window, do this: Go to Tools > Preferences (CTRL + P). Under Playlists and Instances, uncheck Use only one instance when started from the file manager.

    Every media file you open after this from wherever you keep it or want to download it, will open in a completely new VLC Media Player window.

  2. On a Mac or iPhone

    How to run multiple instances of VLC Media Player

    Download VLC Player on your Mac or iPhone. The VLC.app MUST be saved in Applications. Download and unzip it. You will end up with a file called VLC-MULTIPLE-VIDEO.app on your screen that you can use as a second video player. You can also keep it in your Applications folder.

    To play a second video, right-click it, then -> Open With -> Other, and choose the VLC-MULTIPLE-VIDEO.app. The video will open in a new VLC Application. Your device will prompt you to open the file because it will treat the app as a new application not yet opened.

  3. In Linux Ubuntu

    How to run multiple instances of VLC Media Player

    Download the VLC Media player if you don’t have it installed and open it. From the Tools option in the Menu bar, choose Preferences. Go to the Interface tab. Uncheck Allow only one example. Also disable Use only one instance when starting from File Manager. Save. You will now be able to open two interfaces for VLC and watch two videos or other media at the same time.

    Another way is to open Terminal, type VLC, and Enter. This way, you’ll use only one instance at the start. This is ideal if you only occasionally want to open more than one file at a time. You’ll still need to uncheck Allow only one instance in Preferences before running a second video.

  4. On Android phones

    How to run multiple instances of VLC Media Player

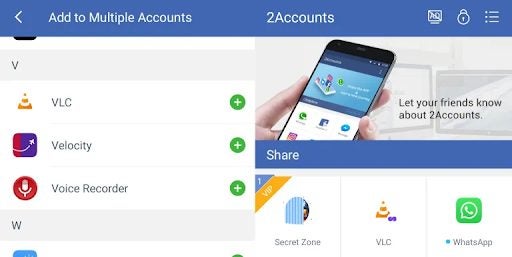
    Install the 2Account Android app from the Google Play Store and open it. To add apps, you need to be able to run two elements at the same time, tap on Add more apps. Go to Other Application and select VLC. Tap Add. On the following screen, click Enable. Give the permissions requested. Now access VLC in 2Accounts. VLC will welcome you as if you have installed it for the first time.

    Now load the VLC app on your home screen. You can split the screen and watch both videos simultaneously.

What is enqueue and dequeue in VLC?

VLC has the option of specifying where you want to place an element in a shared stream, playlist, or file. To enqueue an element means to play it last. You can add it as a Settings preference to ensure that all new elements will be added at the end. Removing an element from the front of the list is to dequeue it.

Why VLC tops the pops

VLC is not one of the most popular media players out there for nothing. It’s versatile, can read just about anything in any format, and can convert files in obscure formats to more modern and transportable ones. Among its best features is that you can watch more than one file or video at the same time very easily on a Windows PC, Mac, or your phone.

You can have multiple instances of VLC Media Player open at the same time, each streaming a different video. It takes multitasking to a whole new level, and what’s more, it’s completely free!

How can I easily get images to align perfectly top to bottom in Microsoft Word?

Microsoft Word has excellent image management tools and they have become easier to use with the release of each successive version. Once you’ve learnt how to use them you’ll have no problem placing your images exactly where you want them and how you want to align them with other images, objects or text.  

For starters, the Position tab in the Layout dialog box allows you to place and align images perfectly. Using it and other methods, you can align your images horizontally along their top or bottom edges, or vertically (from top to bottom) through their centers. You can also use the Snap To guides to align them. Here’s how to do it.

Align images perfectly in Microsoft Word

  1. Group images and align them

    How can I easily get images to align perfectly top to bottom in Microsoft Word?

    You can align your images vertically by grouping them first.

    Select formatting

    To align an image in Microsoft Word, first select Picture Format or Picture Tools > Format.

    Then choose the images you want to align. To select images that are stacked or hidden behind text, go to Home > Find and Select > Select Objects, and draw a box over them.

    Select images

    Choose two or three images that you want to align. Bear in mind that they must fit on the page next to each other if you want to align them vertically, in other words get their top and bottom edges to line up perfectly. Select the first image, then hold CNTRL and choose the others you want to align it with.

    Align

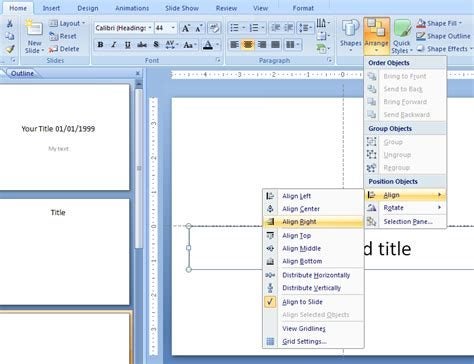
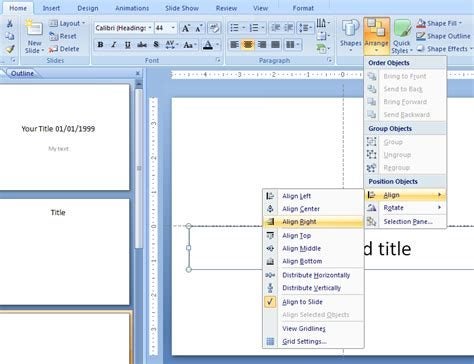
    In the Arrange group, click Align, and then select the following command from the menu.

    Align Center: Aligns your images vertically through their centers.

    The other options you can use are Align left, Align right, Align top, or Align bottom, to align images along their left, right, top or bottom edges. You can also choose Align middle to align them horizontally through their middels. This is the same as Align Centre, except it aligns them in the opposite direction.

  2. Use the Snap to command

    How can I easily get images to align perfectly top to bottom in Microsoft Word?

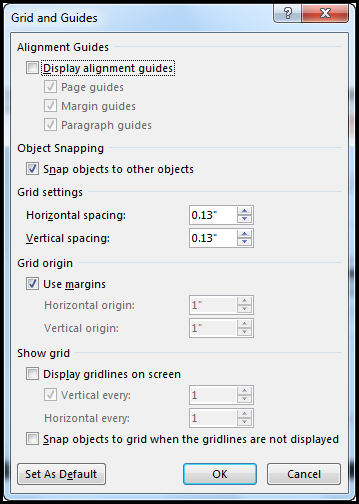
    Make pictures, (or charts and other objects) align perfectly on a Microsoft Word page by using the snap to option You can only do this if you’re working in Print layout.

    Select the images (or other objects) in your Word document that you want to align. 

    In the Grid and Guides dialog box, you’ll see various choices. Select Snap objects to other objects. This will make the images line up perfectly.

  3. Put images into a table or text box

    How can I easily get images to align perfectly top to bottom in Microsoft Word?

    Another way to align images vertically, or any other way, in Microsoft Word, is to put them into a table. Create one with one row and two columns. Put one image in one column and another in the other column. You can set the gridlines around the table to invisible, then all you will see are the pictures fitting perfectly along the top and the bottom of the unseen outline.

    You can also do this using a text box. You create one, put your image in it and then move it around the page and put it where you want it or align it with another picture in a text box. You can remove the text box borders by using the Text box format option.

Image alignment made easy

There are so many options for aligning your images in Microsoft Word that there’s no need to stress about it anymore. You can define their spacing, height, and width and align them perfectly using the method you prefer once you’ve tried out a few!

How Background Sounds work on iPhone

Apple’s new phone operating system, iOS 15 for iPhones, introduced several exciting new features to the device, including being able to play soothing soundscapes in the background. Called Background Sounds, this feature provides a tranquil listening experience for the user, which counters unwelcome noise in the environment and makes it fade away. Listening to this feature can be done along with music, which adds a new dimension.

If you like listening to soothing sounds, like the ocean and rain, to help you calm down, focus, fall asleep, or drown out the environmental racket, you can now get the sounds you need very conveniently right there on your iPhone.  

Use headphones or earphones

It’s recommended that you use headphones or earphones to enhance your experience of using Background Sounds and get the full effect. The sounds do play without headphones or earphones, but they are really necessary to get the full benefit and to be able to immerse yourself in the sound. It’s distracting to have the sound play out in front of you, trying to compete with all the other sounds around you.

How to access Background Sounds

  1. Accessibility settings

    How Background Sounds work on iPhone

    The Background Sounds feature is in the Accessibility settings on your iPhone using iOS 15. Here’s how you access it to enjoy the sounds:

    Step 1: Access the feature

    – Go to Settings on your iPhone and open it.
    Then go to Accessibility and tap on it.
    – Go to Audio/Visual and open it.
    – Select Background Sounds. 

    Step 2: Set the volume

    The volume for your background sounds is not the same as the normal volume on your phone. You can make it as loud as you want by setting the volume to max. Then turn up your iPhone’s volume as well. You can also use it when your phone media is playing. You can also play background sounds at the same time as playing music for an enhanced experience. Just switch on Use When Media Is Playing to be able to play both at the same time.

    Step 3: Change the sound

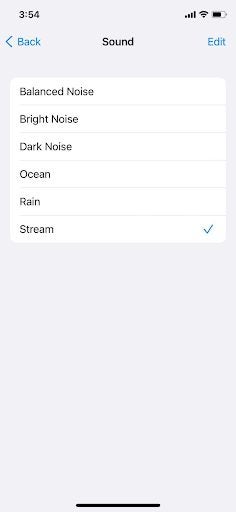
    Tap on the Sound button to listen to a different background sound. Six sounds are available: Bright Noise, Balanced Noise, Dark Noise, Rain, Ocean, and Stream. Find the one you like most or listen to different ones for different purposes, like helping you relax or sleep or filtering out noise in your environment.

  2. Control Center

    How Background Sounds work on iPhone

    You can also access the background sounds on your iPhone via the Hearing tab in the Control Center. Some users consider it the quickest and most reliable way to change Background Sounds or turn them on or off. 

    Step 1: Activate the Control Center

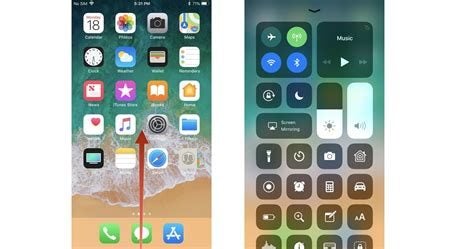
    Go to your Settings > Control Center. Look for Hearing, then tap on the Add (+) icon.  

    Step 2: Access Background Sounds

    Swipe up from the bottom of the screen if you’re using Touch ID, or swipe down from the top right of your screen if you are using Face ID to access the Control Center.

    Then tap on the Hearing icon, followed by Background Sounds to turn them on.

    Step 3: Choose your sound

    Just tap a sound to preview it, and then play it, or choose another one. You can turn the volume up or down by moving the slider. You can also press Background Sounds and hold to switch from any of the six available ambient sounds easily. They are Ocean, Bright Noise, Balanced Noise, Dark Noise, Rain, and Stream.

Control Background Sounds with Back Tap

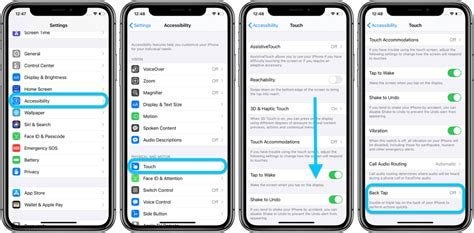
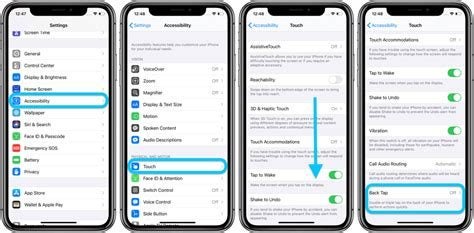
iOS 15 has an option called Back Tap that allows you to tap on the back of your phone twice or three times to get it to perform an action. You have to set up an Accessibility Shortcut to get it to do something. 

  • Go to Settings, Accessibility, and tap on Accessibility Shortcut. Choose Background Sounds from the list of options that appear. 
  • Then go to Settings, Accessibility, Touch, and scroll down to Back Tap. Tap on it to turn it on, and then tell it what to do.  
  • Choose Double Tap or Triple Tap, and tap on it. Then tap Accessibility Shortcut. 
  • Tap on Back Tap to exit. 

After this, when you double or triple tap the back of your phone, depending on what you have chosen, background sounds will start — or stop. 

How Background Sounds work on iPhone

Soothing sounds to make your day

Background Sounds, brought to you conveniently on your iPhone using iOS 15, could make a big difference to your life. We all have to put up with noise in our daily lives. There’s someone’s loud music you don’t like, chatter in your office, traffic noise, and more. Now you can tune it out by listening to soothing sounds on your phone or tablet. Or tune into them when you want to relax or sleep. Bliss!

If you have some more time, be sure to check out how to use universal control on mac and iOS devices.

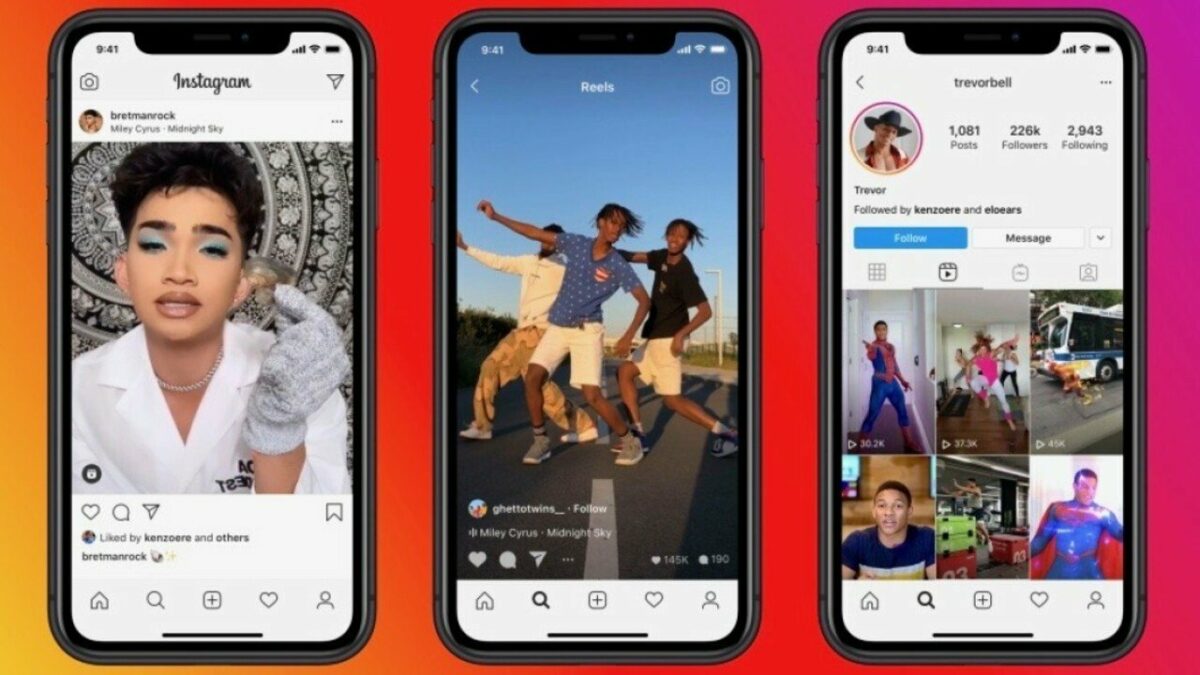
How to make an Instagram reel

An Instagram reel is a short video 15, 30 or 60 seconds long that you can make and share with followers on your Feed, Stories, and the Reels Explore page if you have a public Instagram account.

You can edit your reel, add text, effects, audio, and music, use the draw tool, stickers, captions, GIFs, AR effects, and filters and remix it. All this will make your reel exciting and unique. Let’s show you how to make an Instagram reel.

Dimensions for Instagram reels

Bear in mind when you’re shooting your reel that, like Instagram stories, they’re meant to be viewed on mobile. They should be vertical and full-screen, and the ideal size is 1080 x 1920 pixels. The aspect ratio should be 9:16. Sticking to these dimensions will ensure that your reel reaches the widest audience.

Creating an Instagram reel

Reels are fun for individuals to make and share. But they also offer businesses a great opportunity to push their brands and reach millions of people to tell them about their products. Interested?

Here’s a step-by-step guide to how to make your own reel:

  1. Getting started

    How to make an Instagram reel

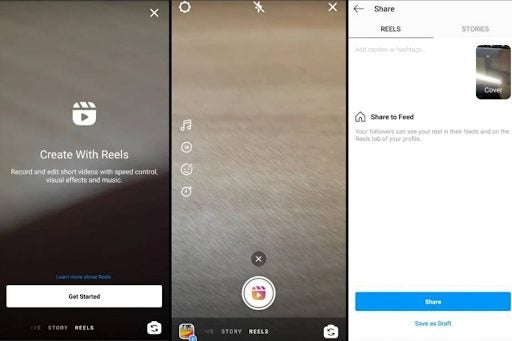
    Open Instagram and click on the Add icon (the plus sign in the square) to get started. Select Reel. You can also tap on the Reels icon in the middle of your screen at the bottom. Then, tap the Camera icon on the top right to start making your reel. Or swipe right on the Instagram home screen and then tap on Reels.

  2. Get your video content together

    How to make an Instagram reel

    The main component of your Instagram reel is the video. You can record your own videos. Remember to make sure Instagram has access to your camera and that your clip is 15, 30 or 60 seconds long. Or you can upload videos from your Gallery and trim them to the right length.

  3. Add audio and music to your reel

    How to make an Instagram reel

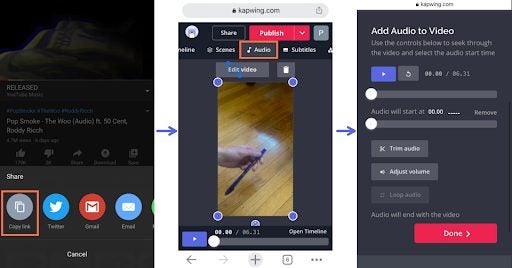
    The next step to creating your reel is to add audio or music. You can use your own original music or choose from the Reels library. Tap the music icon on the left. Then use the search bar to find music to match your video. You can add other audio like speech as well.

  4. Add text or captions

    How to make an Instagram reel

    If you click on ‘Aa’, you’ll see a cursor where you can start typing text to add to your Instagram reel. It can include descriptive words or captions. You can adjust the fonts and the size of the type.

  5. Add effects and filters

    How to make an Instagram reel

    You can access effects from Instagram’s Gallery by tapping the icon with three stars above the record button. You can also import effects like animations and visual enhancements and filters from different apps on the internet like Adobe Photoshop and Spark AR Studios or create your own to make your Instagram reel more entertaining for other people to watch.

  6. Share your reel

    How to make an Instagram reel

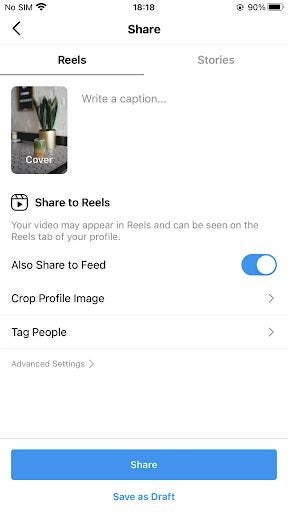
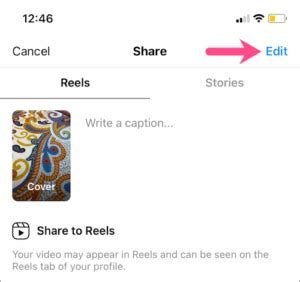
    Before sending your reel out into the world, you might want to make a cover “page” with an image and some type. This can be taken from the video as a frame or an image you’ve created or shot yourself. You can share your Instagram reel in different ways. Sharing it on your feeds will give you wide coverage. So will putting it in Stories. You can also save it to the Reels tab on your profile.

Showcase yourself on Instagram reels!

Instagram reels are an exciting way to get short visual messages about yourself, your business or interests out to your followers. They’re fun to make and will enhance your profile, and help you get the most out of Instagram. We hope you had fun making your first one.