Beyond Google Assistant: the best voice assistants for Android

Voice assistants have become more and more important for cell phones. It’s what made Siri trendy – though she wasn’t the first, of course. Now, this feature is commonplace for nearly all devices. Why? Well, because Google has  Google Assistant many smartphones already come with this default assistant.

Though Siri and Assistant lead the market, there are other options. Here at Softonic, we’ll focus on Google’s operating system: the three best voice assistants for Android.

Bixby

Android has both the good and the bad: it has a lot of updates, but in turn, this means its fragmentation is awful. Millions of Android devices have different versions, while for iOS, it’s common for all devices to update to the latest version if possible.

Here’s where Android’s personalization comes into play, as well as Samsung’s. These Korean companies have a very dynamic operating system for their smartphones, and one of their updates is Bixby, Samsung’s voice assistant.

6

At the moment, Bixby is exclusive to Samsung Galaxy S8, S8+ and Note 8. However, it’s expected to reach more Android devices in 2018, especially Samsung devices (which dominate the market). Don’t lose hope: it’s closer to a global launch than you think.

Cortana

Have you ever played Halo? If so, Cortana will bring back good memories. If not, you may know Cortana from something else: it’s the default voice assistant for Windows.

7

Available for both PC and mobile operating systems, Cortana is available for almost all Android devices from recent years. The only downside is that this smartphone version doesn’t recognize other languages (which is absurd when Windows for PC can).

We’re eagerly awaiting an update for more languages. After all, it’s only a matter of time before we have everything on our mobile device that we do on our PC (or so we think).
Sherpa

We could have listed other voice assistants that are better, but they’re all in English, and we’ve already got that with Cortana. So, we’ve added another highly recommended option: Sherpa.

For many Android users, Sherpa is the best voice assistant currently available. That’s because of the app’s search algorithms, i.e., when you’re searching for something, Sherpa learns to return more accurate results with you. This kind of AI manages to create a closed feedback system. And that’s excellent news for us.

7

We strongly suggest you try it. Though at first, it’s a little rough, over time it learns from your searches.

Top plugins and add-ons for Outlook/Hotmail

Are you more of a Gmail or Hotmail person? The two biggest email services on the internet. In fact, it’s typical when somebody asks for your email, after saying the @ sign, to check if “you’re Gmail or Hotmail?” If you’re the latter, today’s post is for you: four plugins or add-ons for Outlook/Hotmail to make the most of your account.

7

PayPal

In our opinion, this is the best service for sending and receiving money: PayPal. It’s convenient, popular and easy-to-use, and it’s unusual for an online business not to accept payment through this platform. Did you know you can integrate it with your email?

To use it, you only have to write a new email and go to the classic system icon. If you click it, Hotmail will open a window to the right side, where you have to put in your username and password. Do that and now you can send money to anybody as if you were on PayPal itself. Awesome, right?
Insert GIFs

Did you really think GIFs weren’t possible on Hotmail? Of course they are! The popular image format has a lead role within this Microsoft email system.

To add GIFS just click on the add image button, and you’ll see Bing next to the option to upload an image from your computer or the cloud. Here is the critical point. Search for the image you want and in the type bar select animated GIF image. Then, the search engine will return the most fitting results for your search.

Translator

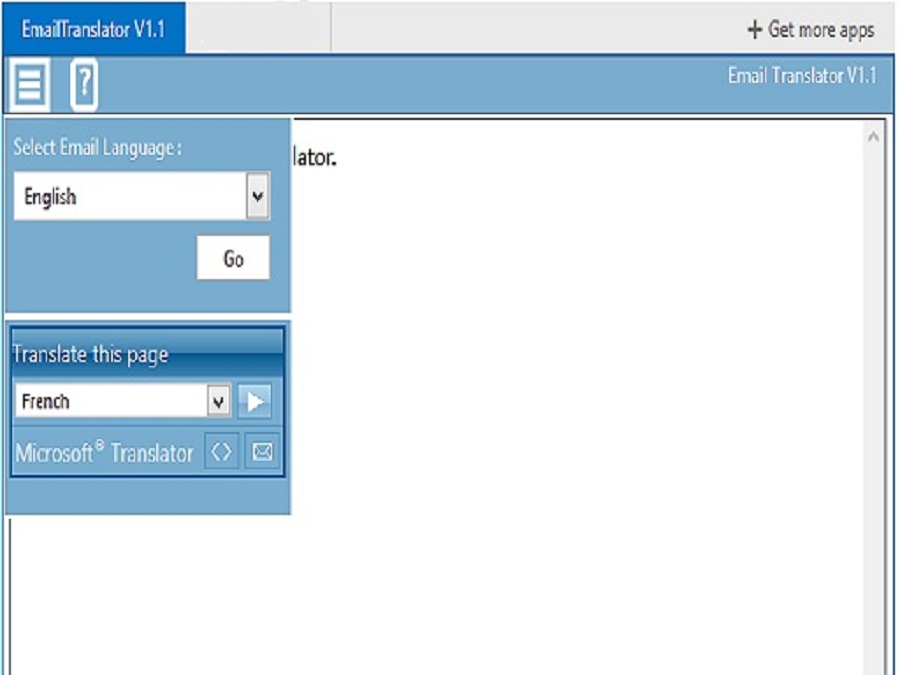
You can add a default translator to your email. We’re not kidding. With this extension, which you can download here, you can get all emails in other languages to appear translated.

The only thing this plugin asks for is the source language. It’s easy to see why: the extension can’t automatically identify the language, so after you select the source, the database will do the rest. Don’t expect a fantastic translation though; it’ll give you a quick-and-dirty one.

Evernote

We’ll wrap up this list of plugins and add-ons for Hotmail with Evernote. It’s not the first time we’ve talked about this app for note-taking. In fact, if you’re a Softonic fan, you know we’re in love with it, because of how easy it is to use.

Evernote is also available for Hotmail using this extension. It acts as a database: collecting all possible notes and keeping them organized. The best part of having it linked to Hotmail is that you can attach all notes captured with Evernote directly to your email. This will make your life easier if you use the app.

Top apps to improve your Instagram experience

Instagram has been with us for many years, but it started out rocky until Facebook bought it. When that happened, the social network mixed two elements: enhancing its strengths and copying Snapchat’s best ideas. That’s how Instagram began to grow in users to this day: around 1,000 million users, almost half created in 2017.

Instagram Download Instagram
7

The popularity of the platform shows no sign of stopping, so we’ll tell you how to make the most of it: here you’ve got the four best apps to improve your Instagram experience.

Ins Story Repost

Instagram stories have tons and tons of followers. Stories are very demanded content from users since they’re both easy to create and consume. As you know, you can download personal stories, but what about from other profiles?

INS Story Repost for Instagram Download Story Repost
7

Though you may think it’s impossible, it can be done. On iOS, you can do this with Stories Repost. If you download this app, you’ll have access to all the stories of people you follow. It’s as easy as permitting your account to be linked to the program. You’ll then see stories available at that moment. When we want to download one, click on it and ta-da. The downside: the number of downloads per day is limited.

If you’re looking for an alternative on Android, we recommend Story Saver, which has the same features as Stories Repost. If you want to learn more about this app, click here.

Story Saver for Instagram Download Story Saver Now
7

Repost or Regram

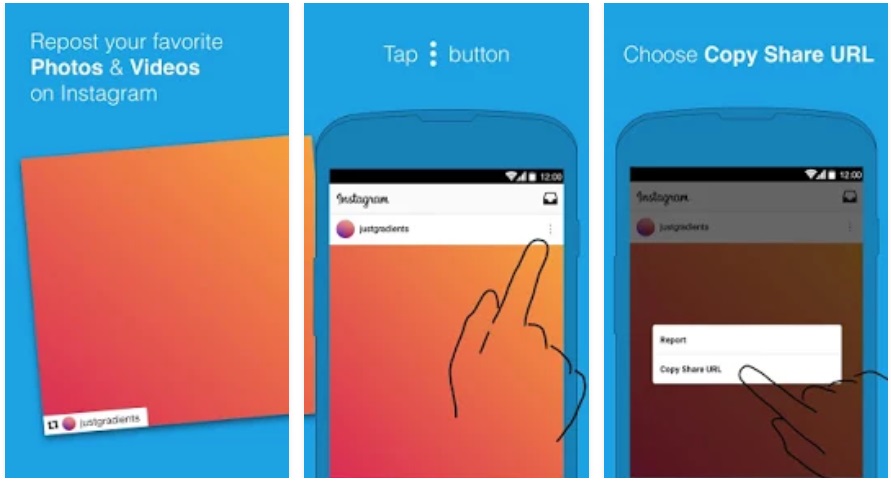
On Twitter or Facebook, you only have to click retweet or share respectively, so content appears on your profile. But how is this done on Instagram? For this, you have to download the app Repost or Regram.

Repost for Instagram Download Repost
7

Once you enter your username and password, Repost or Regram works the same as Instagram. The difference? A little button with that word is the key to “retweeting.” With this mechanism, if there’s a photo that you really want to appear on your profile, click on it and you’re good to go.

To the lower right, a box will appear to indicate who the photo belongs. Give credit where credit is due.

VSCO

Instagram filters are quite useful; we’re not going to lie. But if you really want to make the most of the photos you upload, the app VSCO is for you. It’s possibly the best quick touch-up tool that you’ll find for mobile devices.

6

Why is it so good? Well, first because it has a huge number of filters, but above all, because it lets you touch up numerous photo fields: saturation, light, brightness, clarity, focus and a long list of other options. In fact, we don’t just recommend it for Instagram, but also for any photo you want to upload online quickly and easily.

Hyperlapse

Stories, reposts, images… and videos. We’ll wrap up this list of must-have Instagram apps with Hyperlapse. With this service, you can create fun videos with a time-lapse effect.

Hyperlapse Download Hyperlapse
10

Its options are diverse, from cutting frames that you don’t like to changing the speed of each one of them. Also, you can adjust the final format for Instagram.

Now that you have all these recommendations don’t forget to download them from the app store.

How to make a cheap (and old) phone go faster

Buying a smartphone is a real investment these days. Years ago, only a few models were released at a high price, while the market average was relatively affordable. However, in 2017, we’ve seen the bar of 1,000 euros surpassed with devices such as the Samsung Galaxy Note 8 and the iPhone X, which has created a new dynamic, raising the cost of all models.

With these prices so prohibitive for most mortals, old cell phones will be hanging around longer. So, we’ve dedicated this post to you: how to make a cheap (and old) phone go faster.  

Disable automatic downloads

A key point for all devices: to disable automatic downloads from WhatsApp. Considering that it’s the most used messaging service, it’s unusual to see a phone without it installs and downloads enabled by default.

To get rid of them, you only have to take the following steps: go to WhatsApp -> Click Settings button to open all options -> Click Data and storage -> Disable all automatic multimedia downloads (photos, audios, videos, and documents).

The next time somebody sends you something, you get to decide if you want to download it. That’s less space taken up in your memory, and more life for your phone.

Do a clean sweep

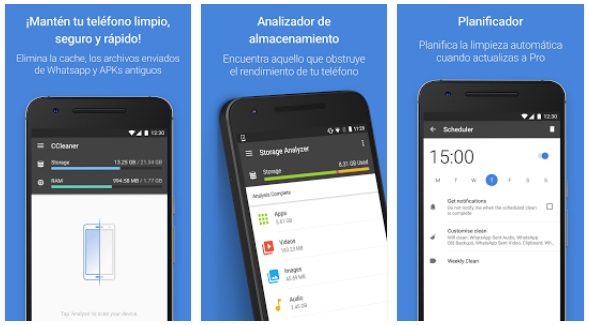
Most likely you have the wonderful CCleaner installed on your PC. If you have it there, why not for your cell phone too? The most famous cleaning software on the market is also available for smartphones and has nearly 100 million downloads in the Google Play Store.

CCleaner Download Now
8

With CCleaner, we can enhance the performance of our phone; remove wasteful messages that, although they’re deleted, take up a small fraction of our memory; see which apps consume the most resources on our device and a long list of other possibilities.

This app can be downloaded entirely free, though it has a Pro paid option with improved features: it cleans automatically with a simple scheduling program; has priority assistance by the team; gets rid of the biggest files, etc.

Reset to factory settings

Another is a classic option that never fails: reset to factory settings or the default settings of your cell phone. In general, we’re all guilty of saying “my phone worked better when I first got it.” And you’re not lying; your smartphone performed better when you first opened it for one simple reason: it didn’t have anything installed on it.

Adding apps, as well as general wear-and-tear, has slowed down all its features. The best thing to do in this case is to reset to default settings, i.e., return your cell phone to how it was when you first got it.

You only have to open Settings, go to System, click on Reset settings, then Reset factory settings and finally Reset phone. Easy, right? This way, your phone will run faster, as good as new (but remember that you’ll lose everything if you haven’t made a backup copy).

How to read your favorite newspapers and websites on your Kindle

It’s undeniable: digital books just keep climbing. At every turn, more electronic devices are sold for consuming ebooks, though it’s true that the skyrocketing growth of previous years has slowed down. However, there’s a problem. Or rather, there’s a lack of awareness: many users don’t know how to make the most of their ebook, in this case Kindle, the most famous ereader of all.

Here at Softonic, we’re going to take the chance to teach you how to read your favorite newspapers and websites on your Kindle. It’s easier than it seems at first and only takes a few minutes. Here we go!

Kindle App Get the Kindle App
6

Kindle for everybody

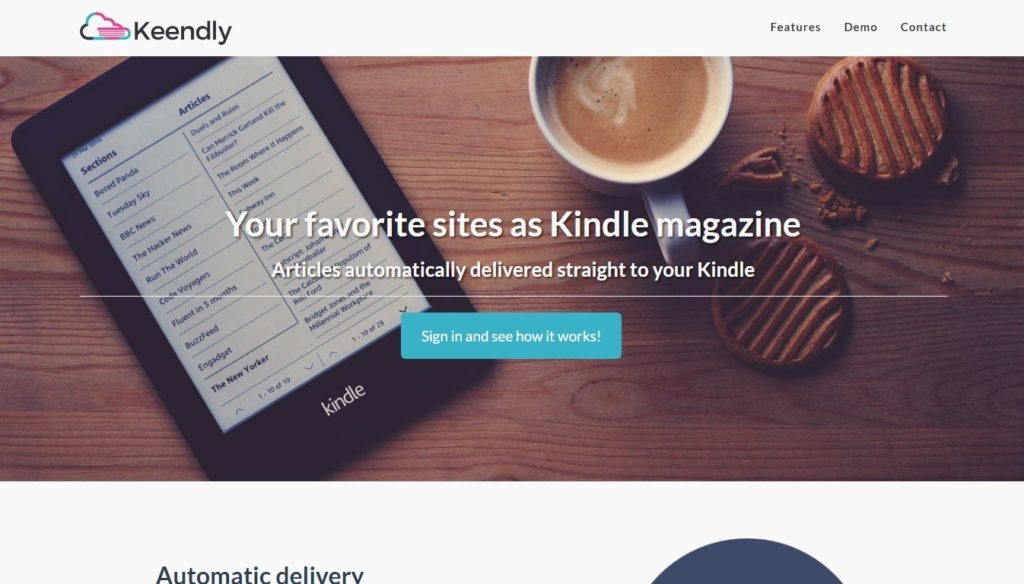
Keendly. Take note of this name, since it will be the ringmaster for accomplishing our mission. What is Keendly? It’s a service responsible for aggregating the best websites with RSS services to put them on your Kindle. It’s that easy and simple (for us, of course).

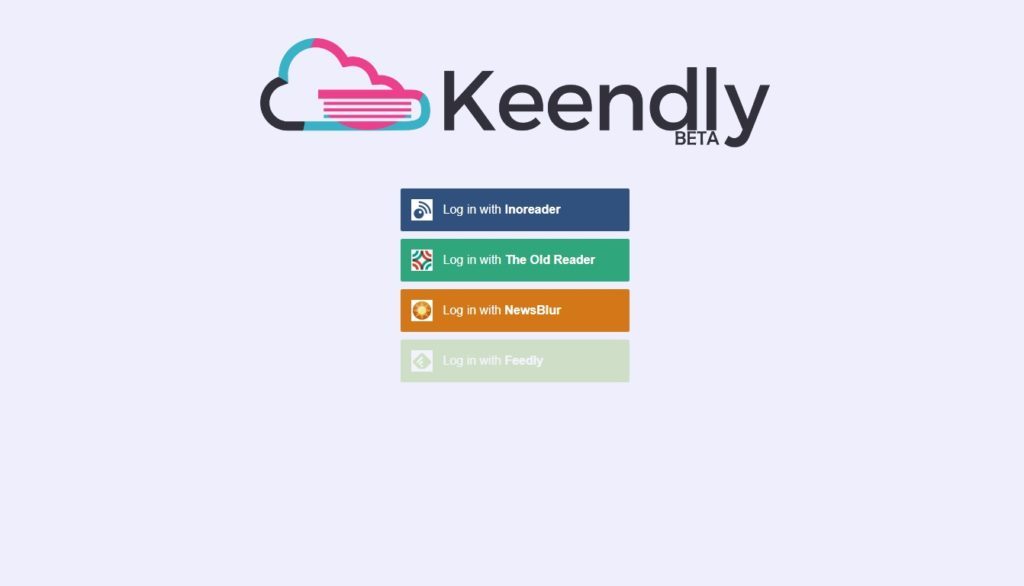
Currently, the service is available in beta and has a few things to improve. For example, it’s not compatible with Feedly, which may be the most famous RSS manager in the world (and the most widely used). However, it’s all good: if you have all the feeds from your favorite newspapers and websites on Feedly, you just have to export a saved list to any of the available platforms.

Regarding this last point, here’s where one of Keendly’s perks comes into play: it allows the use of other well-known services on the current market, i.e. Inoreader, The Old Reader and Newsblur.

How it works

To activate Keendly, you only need access to one of the three previously mentioned services. Once you enter the dashboard, Keendly will ask you what feeds you want to put on your Kindle, i.e. you can choose all your associated accounts or simply those that interest you most. For example, you can turn the device into a portable digital newspaper, something that will help you stay constantly informed without needing to take out your cell phone.

Likewise, the service lets you configure a wide number of features. Among other things, you can choose whether to download images or not, which will speed up your reading of articles. In the same way, it also lets you adjust the dimensions to the device frame, or read them in the original format that they were published (this isn’t recommend for a quick glance, but when you use the browser, the entire media website does become available.)

It’s important to note that all articles sent via RSS will be available in a folder called “Keendly Feeds.” If you want to read any of these, just go into the folder and the device will do the rest.

Currently, Keendly already has a great deal of features. For example, its last update introduced QR codes at the end of every article. This way, you only need to pick up your cell phone, read the code and the news piece will jump to your smartphone.


How to avoid sharing compromising moments on Facebook

It’s very likely that you’re reading this article with your Facebook account open. The social network, created by Mark Zuckerberg, is arguably the most important in the world. According to figures reported this past summer, Facebook already has more than 2 billion users; in other words, one in four people on this planet has an account. 

Despite this incredible figure, the data also says that very few people know how to make the most of their Facebook account. What does this mean? For one, they don’t take basic actions to protect their security and avoid sharing compromising moments on the social network.

We’ll show you three simple tricks to keep your Facebook account secure and hopefully humiliation-free. The rest is up to you.

Who can see my stuff

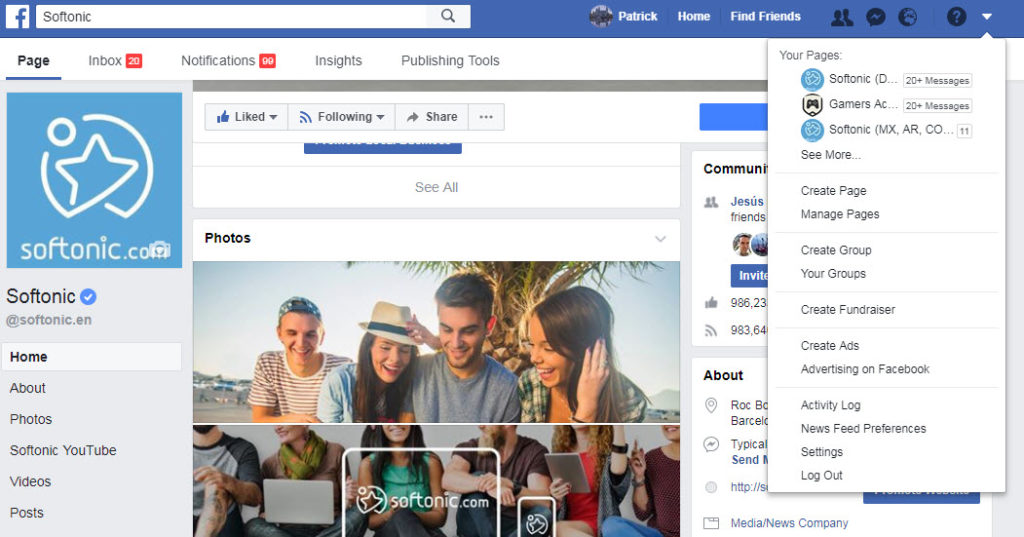
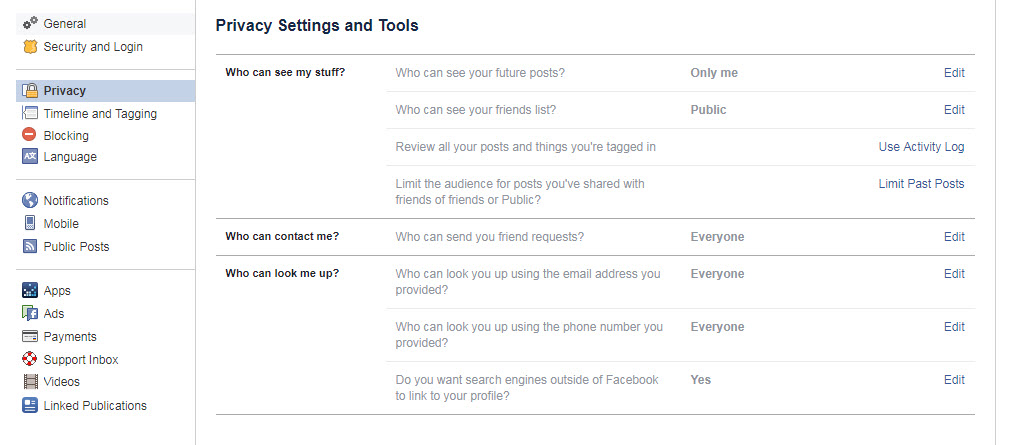
The first thing is to go to the tab that appears on the right of the question mark and click on Settings. Once there, the insides of Facebook will be at our disposal via a page that shows your privacy on the social network. Yes, the first section there is the most important of all.

Mind you, the first section you should click on is: Who can see my stuff? Our advice is to simply select just Friends. This way, all your content will be protected from the eyes of those who want to spy on your account (they won’t be able to access your photos or posts).

On the other hand, in case you don’t like to get friend requests, changing the settings of Who can send you friend requests? is another section you should keep in mind.

Timeline and tagging

We’ve already restricted access to just our friends. Now it’s time to avoid sharing awkward moments on our account, because even friends don’t want to see that.

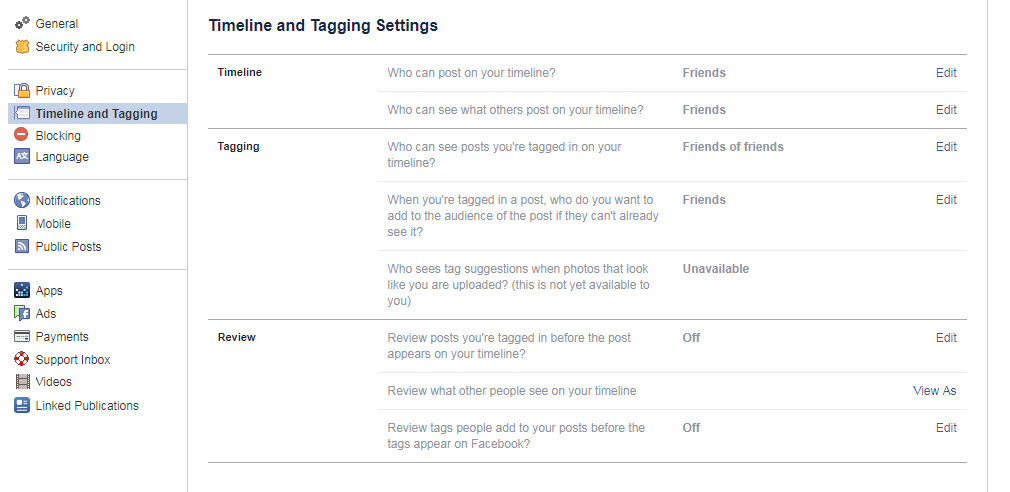
In the section Timeline and tagging, we have a wide range of options to avoid having posts that we’re tagged in appear on our personal profile. So, let’s give a typical practical example: A friend uploads a photo of you drinking a beer, and you don’t want your coworkers to see it, especially your boss.

To prevent this, you only need to go to the Tagging section and change the subsection Who can see posts you’re tagged in on your timeline? Choose the one that best fits your needs and say bye-bye to trouble.

Review

The last trick is on this same screen in the Review section. If you look carefully, you’ll see a section called Review posts you’re tagged in before the post appears on your timeline? As the question suggests, this is a preliminary step to tagging (as we mentioned before). So, if you don’t want to be so strict about people seeing your tagged photos, you can always enable manual review to decide which posts go through your personal filter.

This is a recommended feature if you want some photos you’re tagged in to be visible to your friends. So, if you’re popular, get ready for a barrage of notifications!

The 5 best lock patterns for your Android phone

Do you have an Android phone right now? If so, it’s likely you’ve unlocked your screen using a lock pattern. Only you know the combination of the nine movements maximum that give you access to all the information available on your device, so creating a good one is a must.

Many use something simple and accessible to prevent them from forgetting it, but others are creative about making amusing patterns. In this tutorial, we’ll show you five great, simple lock patterns for your Android cell phone.

5 tips to prevent security issues with your phone Read Now

Pattern 1

In general, people often resort to very basic patterns to unlock their cell phones, but this means that security is considerably reduced. The first lock pattern involves an easy, but uncommon combination. Point 1 starts in the upper middle and goes to 2, in the lower right-hand corner. Then we cross the screen to 3, back down to 4 in the lower middle, left to 5 and to the upper right-hand corner at 6.

Pattern 2

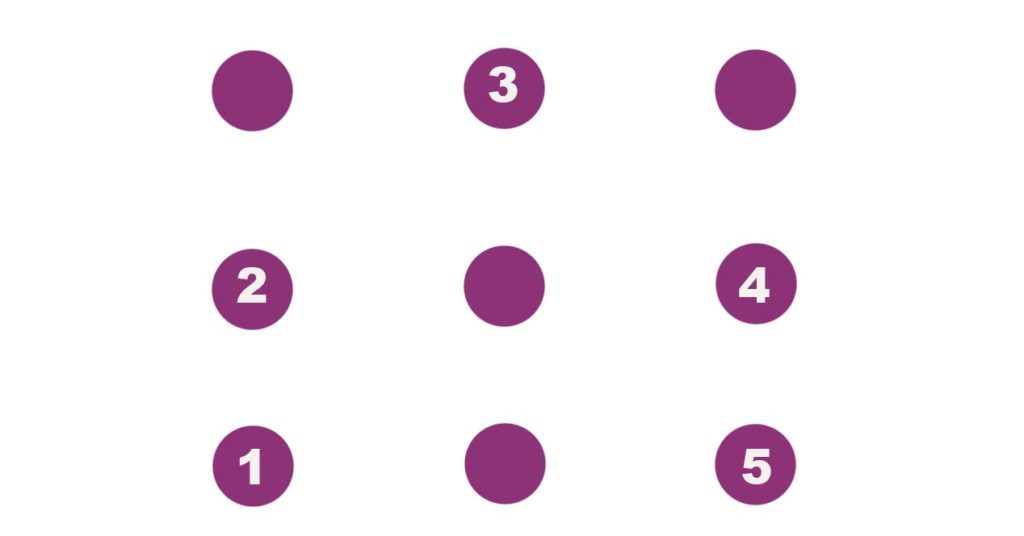
This is one of the most classic patterns, which we’re taught when we’re little: a house. The most accessible way is to start from the lower left-hand corner at 1, go up to square 2, again to 3 in the upper middle, then down to the right middle at 4, and finally to the lower right-hand corner at 5. Our house drawing, on our Android.

Pattern 3

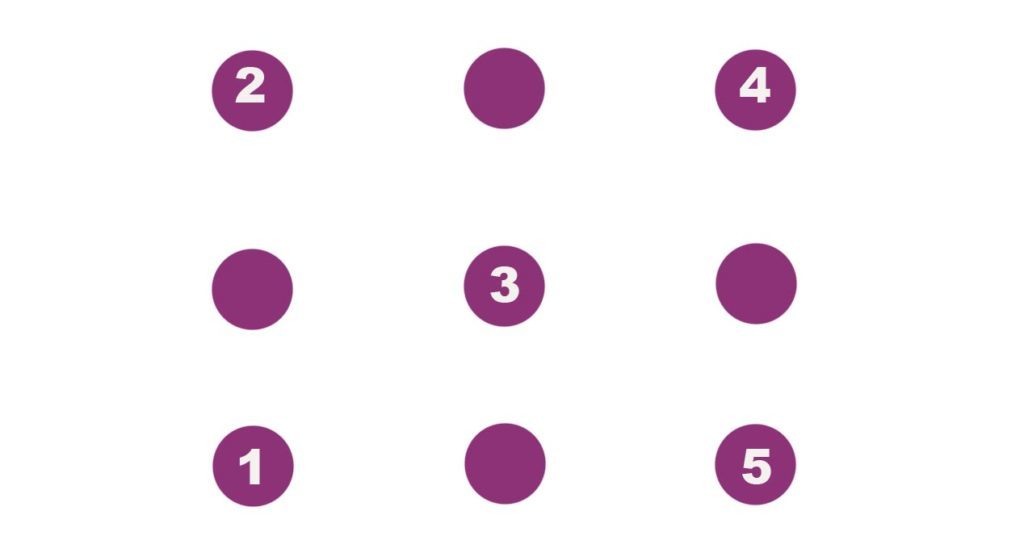
Do you like Mario Bros? In case you haven’t noticed, this pattern makes the letter “M,” one of the easiest lock patterns to make. It’s as simple as starting in the lower left-hand corner at 1, going up to the upper left-hand corner at 2, going right to the middle at 3, going back up to the upper right-hand corner at 4 and finishing in the lower right-hand corner at 5.

Pattern 4

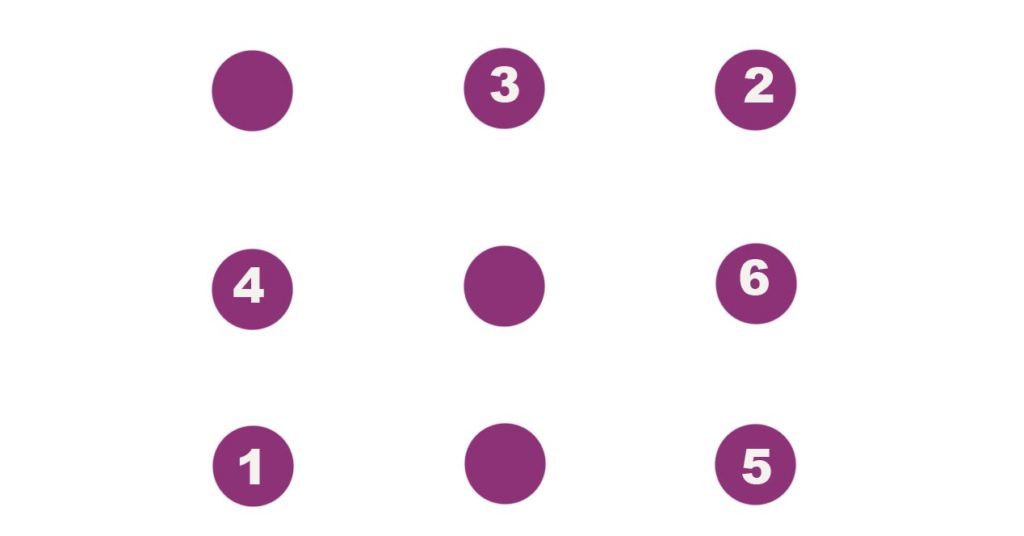
We’ve enjoyed starting in the lower left-hand corner, so we’ll start from there again. Now, from 1 we’ll go to the upper right-hand corner at 2, to the upper middle at 3, down to the left middle, over to the lower right-hand corner at 5, and finish by going up to the right middle at 6.

Pattern 5

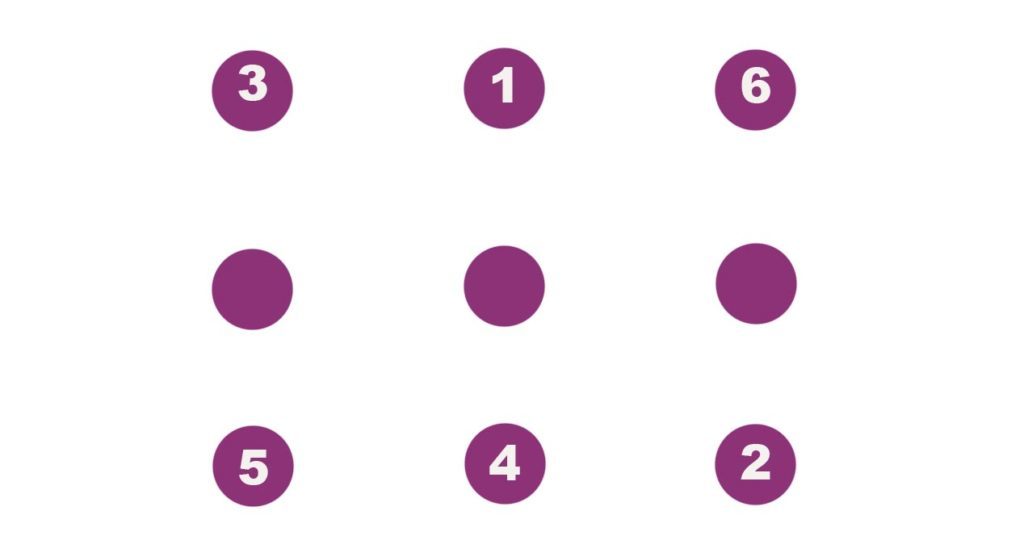
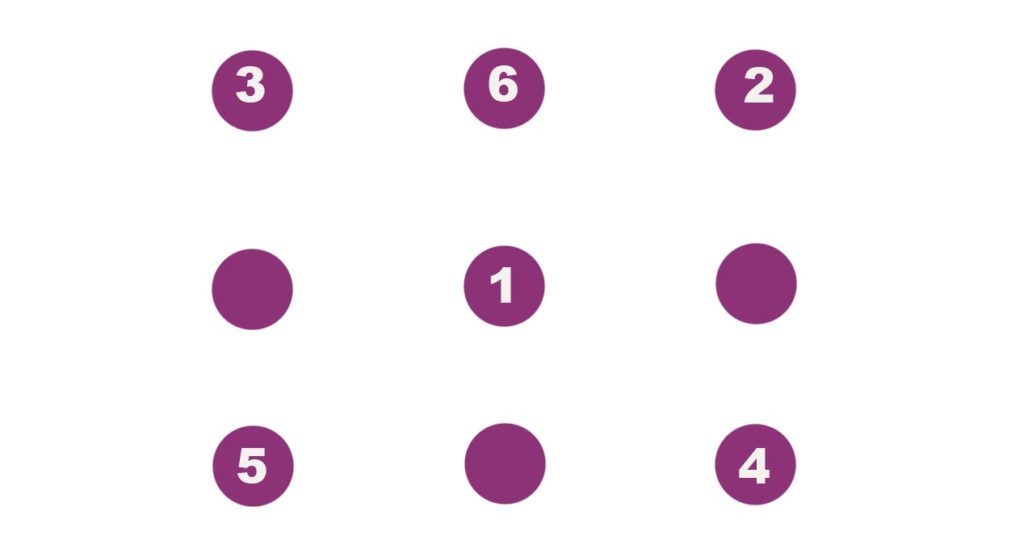
We’ll wrap up with what we think is the most difficult pattern of all, because of the twists and turns. We’ll start in the middle at 1 and go to the upper right-hand corner at 2, then to the upper left-hand corner at 3, go down to the lower right-hand corner at 4, go over to the lower left-hand corner at 5, and head up to the upper middle at 6. We’ve made different triangles on the screen, so if somebody was looking over our shoulder, they wouldn’t know where we started.

What about you, which one do you like best? Don’t miss the chance to post your own combinations in the comments. We haven’t shown the most difficult ones, but rather a mix of nice patterns and more complex ones.

How to avoid getting random invites on Steam

Today we’ll continue our guides on the main digital gaming platforms. Here we told you how to disable random notifications that usually pop up on the PlayStation Network (with PlayStation 4 as the system of reference, of course), and now it’s time to discuss the most popular platform in the world. Yes, we’re obviously talking about the famous Steam.
8
Steam is a platform for online games that lets you download the latest from the world of video games as they are released – an indispensable tool adopted by many publishers.The Steam client also maintains a social dimension, allowing you to share a lot of information and content with a very active community. The forums can help you find interest groups or partners for casual gaming. You can also connect with friends to discuss or start a game.

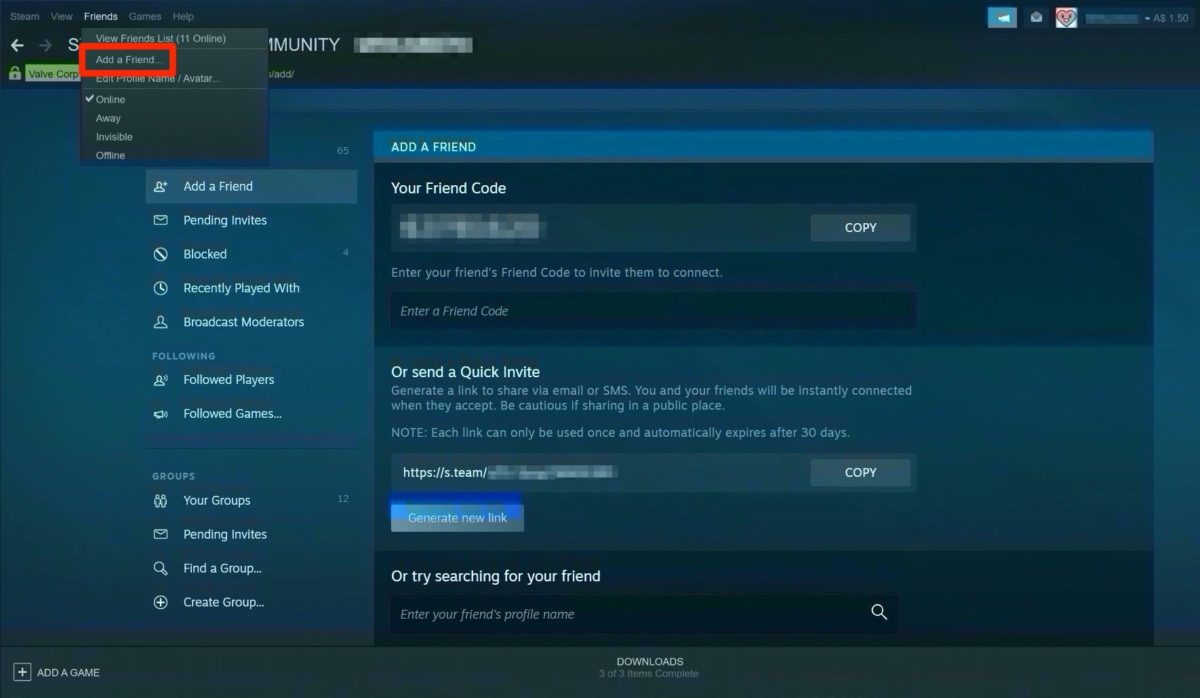
If you play on your PC, you already have an account created. Moreover, we predict that you have a huge amount of titles in your library. As you know, every game has its own notifications and you have to personalize them to your liking. However, there are general invites or messages that are from Stream, and they can be removed if need be.

Inside Steam

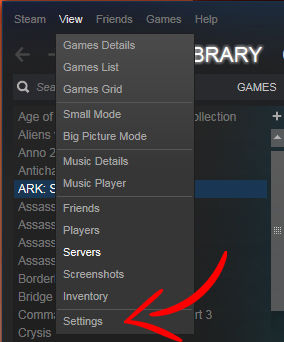
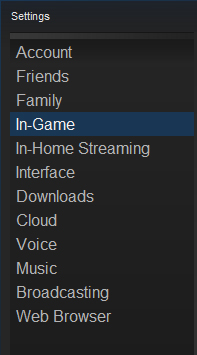
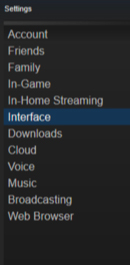
The first thing you must do is open Steam (elementary, my dear Watson). Once you’re at the main page, head to the upper section where it says View and click on that tab. Of all the fields that come up, the one we’re interested in is the last, which is called Settings. Go ahead and click on it so it opens a new tab.

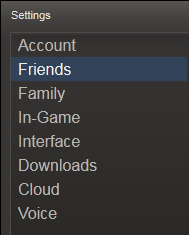
Once here, you’ve got all the Steam platform options at your fingertips. What interests you? Well the first thing we recommend is that you start with the subtitle Friends. There you can see several fields related to notifications and we recommend removing them to enjoy a pleasant gaming experience: When any friend joins a game, When any friend comes online, For group events and announcements, When you receive a message and Flash window when you receive a message. Mostly, beyond the text messages, the Play a sound may be the most annoying of all, so don’t hesitate for a second to remove it from your Steam settings (it’s even unpleasant, let’s not kid ourselves).

The next subtitle you should check out is In-Game. Here you won’t find many fields for notifications, just When a screenshot is taken. Do we recommend disabling it? Well, it all depends on whether you use that feature a lot or not. In our case, and given that we take a lot of screenshots, we’ll leave it activated for both message and sound. But we repeat: you always have the last word here, so don’t forget it.

The last subtitle within Parameters is Interface. Here you can remove Display Steam URL address bar when available and Notify me about additions or changes to my games, new releases and upcoming releases. Also, and this is advice from the Softonic team, take away this option: Run Steam when my computers starts. All programs that are loaded when turning on your PC slow down the process. Steam, specifically, consumes lots of resources, so uncheck this option as quickly as possible.

Now that you’ve got all these little tricks, we recommend that you take a look at the rest of the subtitles that appear within “Parameters.” Making the most of the platform is always in your hands.

How to avoid getting random invites on PlayStation Network

Imagine that you’re playing an online game of Call of Duty or FIFA on your PlayStation 4. The map or game (respectively) is very heated, but suddenly several notifications on the upper right corner of the screen pop up. Yes, those random messages or invites usually jump out at the player and, thus, concentration is lost. Now, did you know that you can disable them so they don’t bother you ever again?

This option is pretty hidden within the different PlayStation Network menus, so we’re going to guide you step-by-step and explain each option, so you don’t have any trouble getting rid of them.

In depth

The first thing to do is to turn on the console, log into your user profile and head to the upper bar to the right of everything. “Am I going to turn it off again?” No, relax, the key button is just to the left of the off button, i.e. Settings. Let’s go in.

There are many tabs and you won’t have a clue what some of them are for, right? It’s happened to us all at some point, so the important thing now is to click on Notifications, which is the one we want.

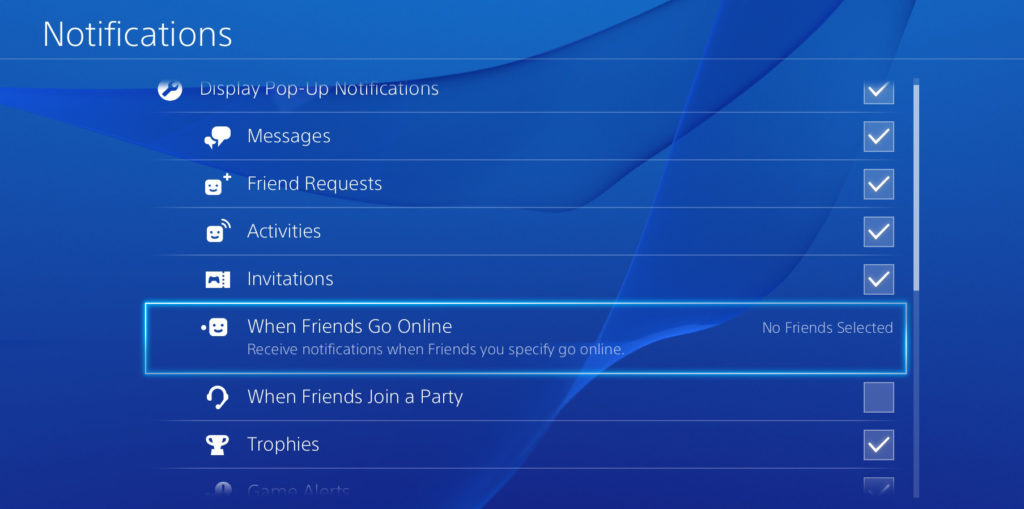
Within this category, you’ll see five new ones: Pop-up notifications, Disable pop-ups while playing video, Pop-up color, Display message in notification, and Notifications when friends go online. Our advice is to disable the second option forever, i.e. while playing video. There’s nothing more annoying than a notification while you’re watching a movie. Once you’ve done this, go to Pop-up notifications and press X.

Here are the most important ones within this vast world of notifications: Messages, Friend requests, Activities, Invitations, When friends go online, When friends join a party, Trophies, Game alerts, Downloads, Uploads, Communities, Requests to watch gameplay, Events, Teams, Current song, Blocked scenes for video recording, When taking screenshots, Live from PlayStation and When you have a new follower.

The names don’t leave much room for error, so here you can decide which you prefer to get rid of. For example, if you have a lot of added friends, maybe you’re interested in unchecking the option When friends go online, while if you play a lot of FIFA, the option for disabling Messages is advisable (for all those insults that’ll come your way after finishing the game, from our experience.)

There are other tabs that truly have little use, such as DownloadsUploads and even Events. However, and as we’ve been saying throughout this article, the final decision is always in your hands (or, at your fingertips, to be more exact).

You should remember that these instructions won’t get you a safer PlayStation Network account, but simply will prevent you from getting too many notifications while you’re playing or using your PlayStation 4. After all, the goal is that our console doesn’t look like a cell phone with a lot of notifications on screen every few seconds.

How to identify fonts in any photo

“I love the font in this photo, but I don’t know what it’s called.” As you step into the exciting world of design and creative work, this question has definitely popped up in your head. And that’s completely normal: we all want to know as many font styles as possible, since they could be useful for future work and create a better end product.

If this question continues to puzzle you, don’t worry: we’re here to help. We’ve brought you the three best webpages or apps to find out the type of font used in a text, image or video.

What Font Is

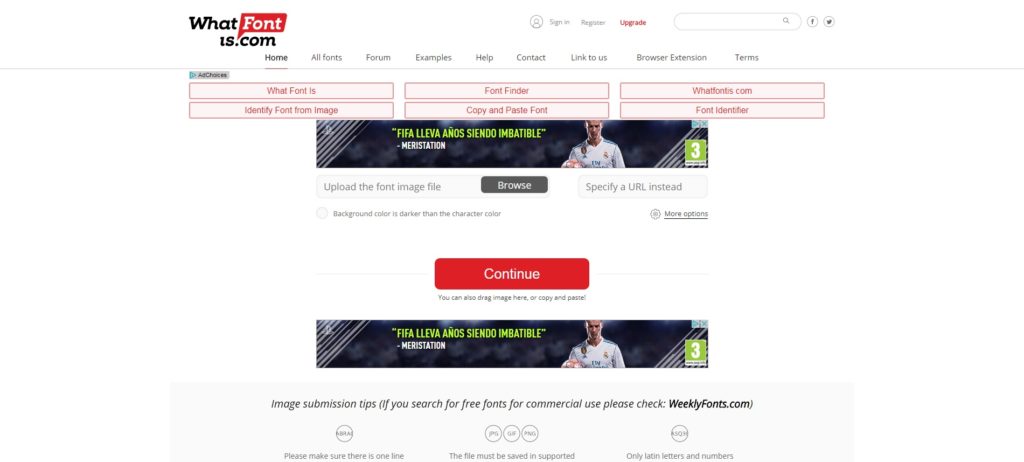
It may seem a bit uninspiring to just look it up, but it’s the best suggestion if you’ve got little time to write and/or design. What Font Is is a website that accomplishes the mission of this post, i.e. finding out the type of font we don’t know at the moment. The best part? It’s free and works well. Very well, in fact.

All you have to do is upload an image with text from your PC (or paste a link to the website in question) and the website will take care of the rest. Of course, we’ll give you a few tips to narrow the search.

Also, and this is important, it has a browser extension for Chrome and Firefox that lets us send over the font we want to look up. In other words, we’ll save time going to the website, since it will send the font directly through the browser extension.

My Fonts

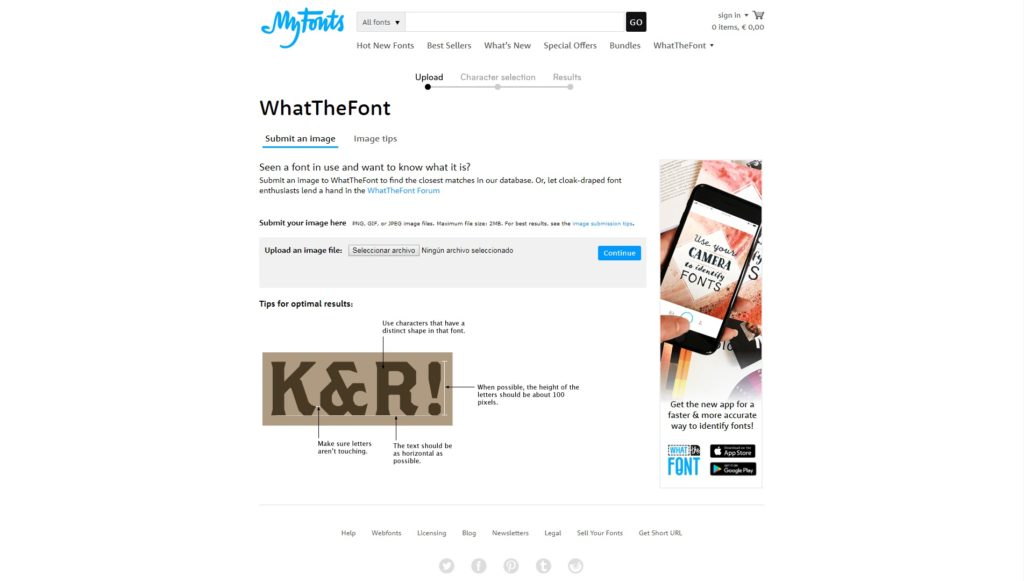
This one is almost identical to What Font Is, so we also recommend it for its high success rate: My Fonts. The mechanism is the same: we take a photo and upload it to the website. Once there, it gives us some results with the font in question used in the text.

We’ll point out that if the system doesn’t find the font we’re using, it will offer a series of alternatives that try to get at the result we want (ideal if it’s needed urgently).

Matcherator

This is the last, but not least on the list: Matcherator. Unlike its two rivals above, this website has the benefit of being regularly updated, which makes it easier to search for fonts more accurately.

Currently, for example, it has an advanced mode, an image editor and can detect less common font types within standard templates on the internet.

Also, its system is similar to the previous two: you upload an image to the platform and it comes back with the font to download. Moreover, it lets you detect typeface on websites with a higher success rate than the other two rivals (especially in this area).

Now you’ve got this complete guide for detecting fonts, so you won’t be in a rush when looking for the design that’s just right.