How to Curve and Wrap Text in Illustrator in 2 Different Ways

Illustrator is another useful program from Adobe and forms part of the Creative Cloud, along with favorites like Photoshop, After Effects and Premiere. Illustrator has become the industry standard when it comes to creating vector images and designs.

Illustrator is jam-packed with many valuable features such as removing image backgrounds and curving or wrapping text around images.

How to Curve Text in Illustrator

  1. Open Your Project

    How to Curve Text in Illustrator

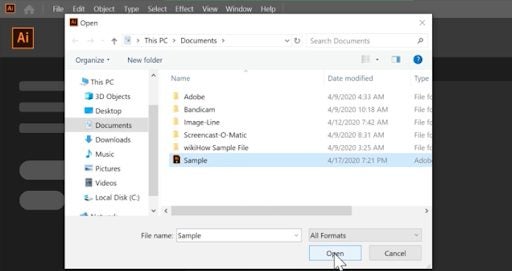
    Launch Illustrator and click on ‘File’ and then ‘Open’ to choose your project.

  2. Select or Type the Text You Want to Curve

    How to Curve Text in Illustrator

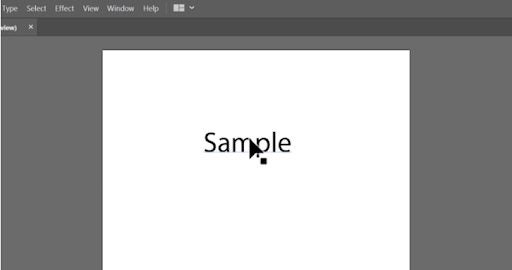
    Once you’ve opened your project, select the text you want to curve. If there is no text yet, use the ‘Text’ tool from the toolbox to create your text.

  3. Click on the ‘Effects’ Tab

    How to Curve Text in Illustrator

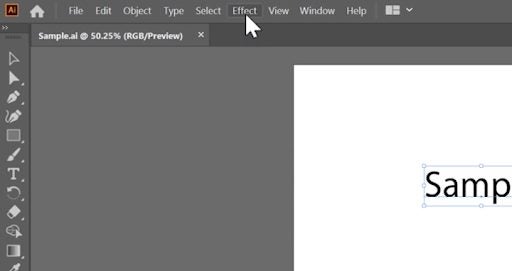
    With your text selected, click on the ‘Effects’ tab in the menu.

  4. Scroll to ‘Warp’

    How to Curve Text in Illustrator

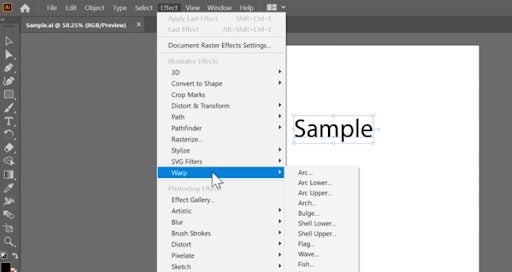
    Scroll down to the ‘Warp’ option.

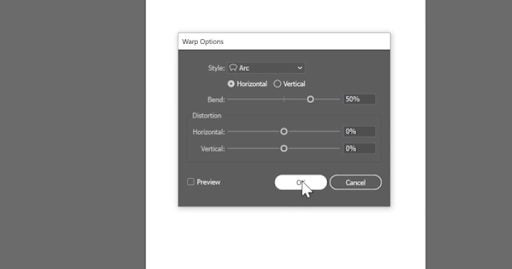
  5. Choose ‘Arc’

    How to Curve Text in Illustrator

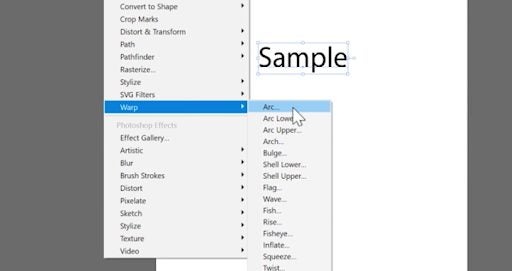
    From the range of options given, choose ‘Arc’ to curve your text. You will see there are also many other options that you can use to manipulate your text.

  6. Adjust as Needed

    How to Curve Text in Illustrator

    Now you can adjust the arc of your text as needed. The default setting creates a basic arc, but you can adjust the percentages to change the shape.

How to Wrap Text in Illustrator

Now let’s take a look at how to wrap text in Illustrator around a specific shape using the ‘Type on Path’ tool.

Step 1: Open Your Project

With Illustrator open, click on ‘File’ in the menu and choose ‘Open’ and select your project.

Step 2: Draw a Circle With the Ellipse Tool

For this example, we will be using a circle, but you can do the same with any other shape. Use the ‘Ellipse’ tool from the toolbox to draw a circle that you want the text to wrap around. You will need to click and drag your mouse with the ellipse tool selected to make your circle. The exact process applies to creating other shapes.

Step 3: Click and Hold Down the Text Tool for More Options

Once you’re happy with your circle, click and hold down the mouse button on the ‘Text’ tool to see the menu with more options.

Step 4: Click ‘Type on Path’

Among the options given, click on ‘Type on Path’. This is usually the second or third option on the list.

Step 5: Click on the Circle

With this tool selected, click on the edge of the circle where you want your text to start. As you type, the text will automatically hug the perimeter of the circle. The same will happen for any other shape you’ve chosen. 

If you want to edit your text, you will have to change it back to the general selection tool by clicking on it in the toolbox.

Get Creative With Text in Illustrator

Illustrator is a great vector image designer with many useful features, such as curving and wrapping the shape and flow of your text for some customized designs. With these simple tools, you can create arcs of text as well as text that follow other shapes, which is very useful in design.

If you are still new to Illustrator, we have a beginner’s guide that can get you started.

How to make a GIF in Photoshop

A GIF is an image file, similar to files like a JPEG, PNG, or BMP. They are essentially highly compressed image files. GIF stands for ‘Graphics Interchange Format’. GIFs are firstly graphics, which makes them visual by nature.

When you want to create them, you need the best image-editing software for top results. Here’s how to make a GIF in Photoshop.

40% off
BLACK FRIDAY

From: All Adobe Creative Cloud Apps

How to make a GIF in Photoshop

  1. Load your images into Photoshop

    How to make a gif in photoshop

    Collect a group of images that have a connection you can convert into a flow that you can animate. In File > Scripts > Load Files Into Stack, you can open a range of images simultaneously so that you don’t have to drag them into your document one by one.

    Then select the Browse option and find each file you want to place in the document. Press OK, and Photoshop will create a layer for every image you want to include.

  2. Open the Timeline Window

    How to make a gif in photoshop

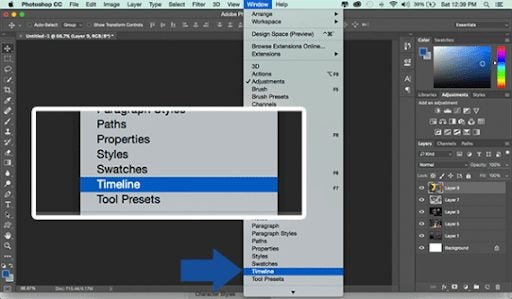
    Before you can animate your GIF, you’re going to have to create Keyframes. Open the Timeline window. Navigate to Window > Timeline and get started. Via Timeline Frames (keyframes), you can apply frame-by-frame edits to our images and create animated effects through layers.

    The Timeline window lets you adjust layers, move elements, apply filters, rotate text, and set the length of time for which frames will appear. Once you’ve chosen the Timeline option, the animation window will show at the bottom of your screen.

  3. Create Frame Animation

    How to make a gif in photoshop

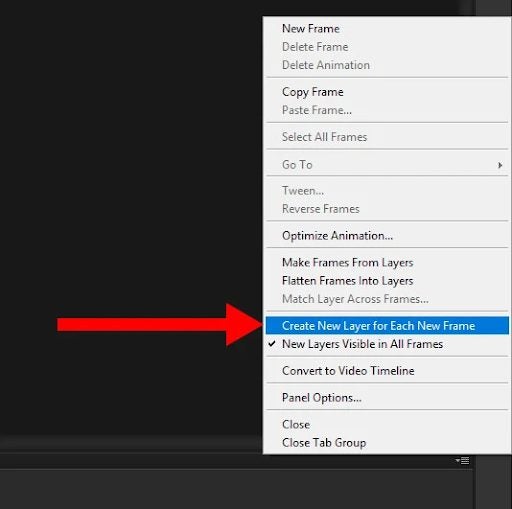
    Click on the button, Create Frame Animation, in the Timeline. This will change the Timeline mode to a style for working frame-by-frame. You can apply your animation edits in these frames. You’ll have to make sure each frame has its own layer so that you can edit a frame without affecting any of the others.

    To split your images into layers, choose Select > All Layers and then locate the Timeline menu icon at the top right of the window. Then choose Create New Layer For Each New Frame.

  4. Make frames from layers

    How to make a gif in photoshop

    Making Frames From Layers will turn each of your layers into a frame in your Timeline.
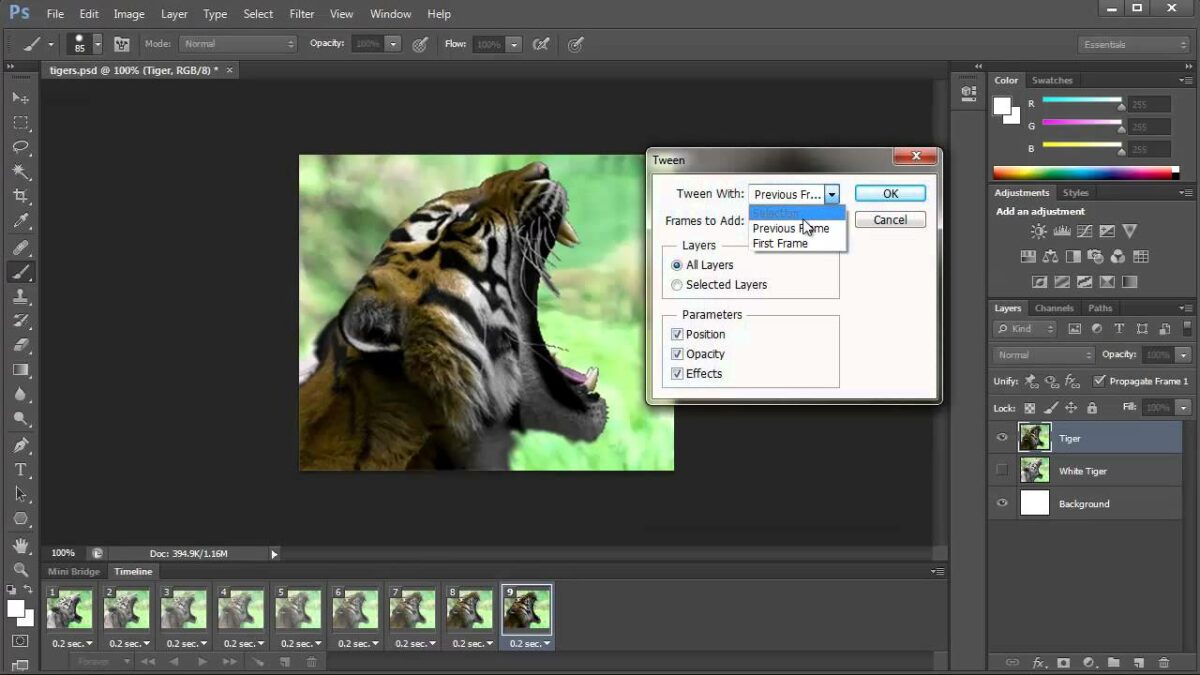
    This means that you’ll be able to edit elements in each frame in your Timeline separately without interfering with any of the others. The more complex you want to make your animations, the more frames you’ll need to be able to set up good transitions between the different frames.

  5. Set durations of your frames

    How to make a gif in photoshop

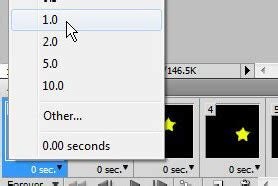
    The next step is to decide how long each of your frames will play for. If you don’t, your animation might work. First, choose the frame you want to edit. Click the arrow and select the time you want the frame to run from the dropdown menu that appears. The default for each frame duration is 0 seconds. You can change it to, say, 0.2 or 0.5 seconds to start with and change it to a different time later.

  6. Looping options

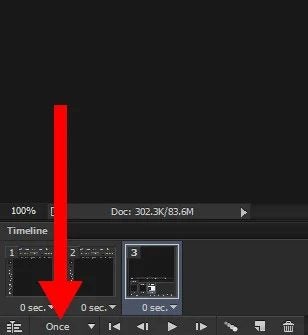
    If you want your image to repeat more than once, you’ll have to set up looping options. Below the Timeline, select the Once option, which will open a dropdown menu. You’ll be able to choose from preset options or set up your own. Choose whatever suits you. The most common choice is Forever since most animated GIFs are designed to play repeatedly as long as they stay open.

  7. Preview and export

    To make sure your GIF looks and plays the way you want it to, you can preview it by simply pressing the Play button on the Timeline.

    If you’re happy, you can save your GIF in Photoshop. You can’t use the usual Save command. You’ll have to go to File > Export > Save for Web (Legacy) instead. Name your file and save it as a Photoshop (PSD). You might want to edit it later. You can now export your GIF to whoever you like and await the reaction.

Why GIFs are so popular

GIFs are used on blogs, instant messaging applications, and social media, often conveying humor and a wide range of emotions. They are used extensively for animated memes. Use is so widespread that the word GIF was named the Oxford Dictionary word of the year in 2012. A GIF search engine called GIPHY has 500 million users, more than Pinterest and Twitter. They send out over seven billion GIFs every day!

Guides to Photoshop

Here are some sites to visit that have excellent guides to learn about Photoshop.

Conclusion

There’s a reason GIFs are so popular. You can use them to good advantage in your work or just have fun communicating with friends and associates on social media. The creative possibilities are limitless. Follow our step-by-step guide to create your GIFs quickly and easily.

20 Great Things You Can Do With Adobe Creative Cloud

Adobe Creative Cloud (CC) is a dream come true for any graphic designer. This powerful suite includes more than 20 programs built for photo and video editing as well as creating digital illustrations. Among them, you’ll find popular and award-winning tools such as Photoshop, Illustrator, and Lightroom. With this amazing collection of software, it’s clear why Creative Cloud is the first choice of professional developers and designers around the world.

With Black Friday around the corner, why don’t you take this chance to get a subscription to Creative Cloud? If you’re still unsure about it, keep reading because today we’ll share with you 20 great things that you can do with Adobe CC.

40% off all Creative Cloud apps Subscribe now
9
Offer available from November 15th until December 2nd, 2021

Change facial expressions from any photo

Adobe Photoshop CC lets you scan the facial features of any picture and easily enhance them with its Face-Aware Liquify tool. You’ll also be able to change the expression of your model just by moving a few sliders, making it very easy to get the perfect portrait.

Face-Aware Liquify tool

Fix blurry pictures

There are few things as frustrating as taking a great photo and then realizing it’s blurry. Thanks to the Shake Reduction tool from Photoshop you’ll be able to sharpen your picture in just a few clicks.

Shake Reduction tool

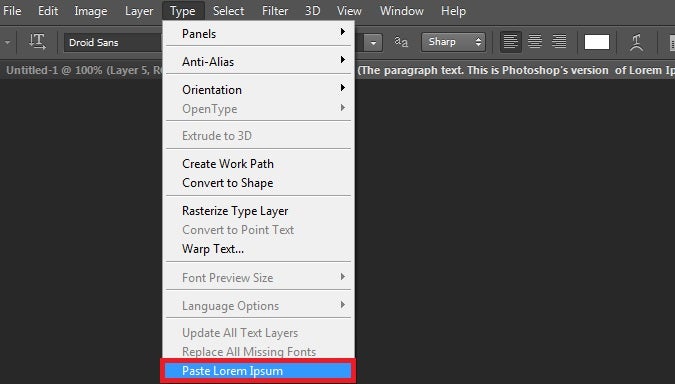
Add dummy text

When testing the layout of text content in a picture, one will typically turn to the well-known Lorem Ipsum placeholder text. Adobe Photoshop CC will save you precious minutes thanks to its tool to automatically add this dummy text into your projects.

Paste Lorem Ipsum tool

Edit your pictures from your mobile

Android and iOS users are able to easily import and edit any picture stored in the cloud with the help of their smartphone thanks to the Adobe Photoshop Fix app.

Photoshop Fix

Identify any font from a photo

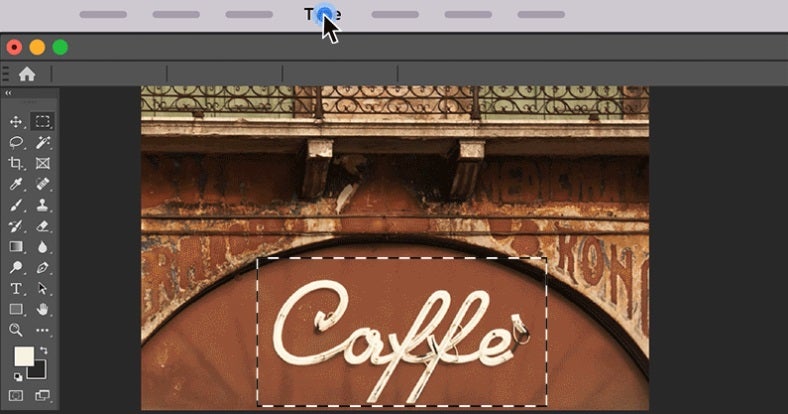
Photoshop can help you identify any font you find in a picture thanks to its Match Font tool. After uploading the photo, let the software do its magic and compare the mystery font with the ones installed on your computer as well as the Adobe Fonts catalog.

Match Font tool

Export and share your assets

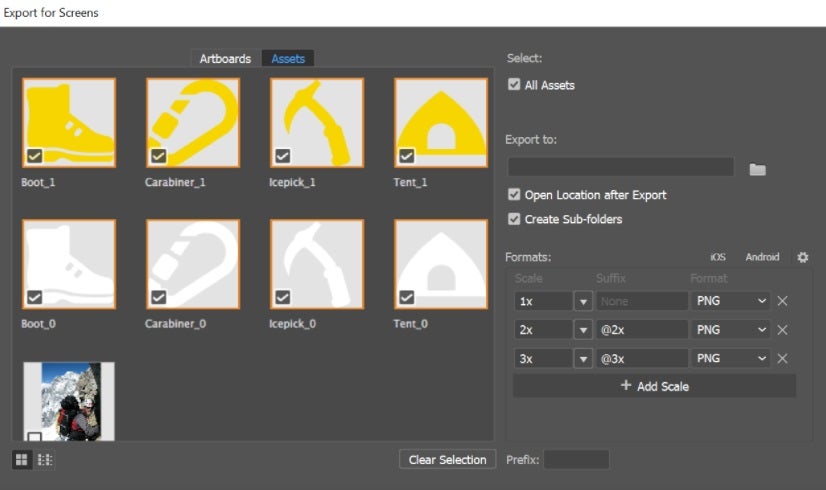
If you’re a graphic designer, you’re probably losing a lot of precious time exporting files to share with your clients. Adobe Illustrator CC can help you increase your productivity thanks to its helpful tool to export all your assets in seconds.

Export your assets Illustrator

Make perfect shapes

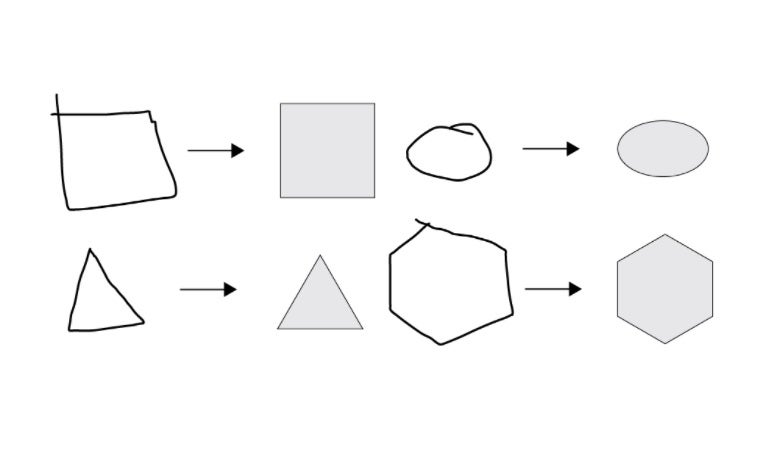
Being able to draw symmetrical shapes is vital for any designer, though it’s not always an easy task. Adobe Illustrator includes a useful tool that will turn any poorly hand-drawn shape into perfect geometric vector art.

Vector art Illustrator

Design your own fonts

Thanks to Illustrator, you’ll be able to quickly design and create fonts that will give identity to your brand or project. Starting from a sketch, just follow Adobe’s step-by-step process and surprise everyone with your personalized fonts.

Font design in Illustrator

Add color and edit your strokes

The Live Paint tool in Illustrator will let you draw and paint like you would on a canvas and then turn every single stroke into a vector. This way you’ll be able to freely turn your ideas into color and then easily edit them with just a few clicks.

Live Paint tool in Illustrator

Draw and design from your mobile

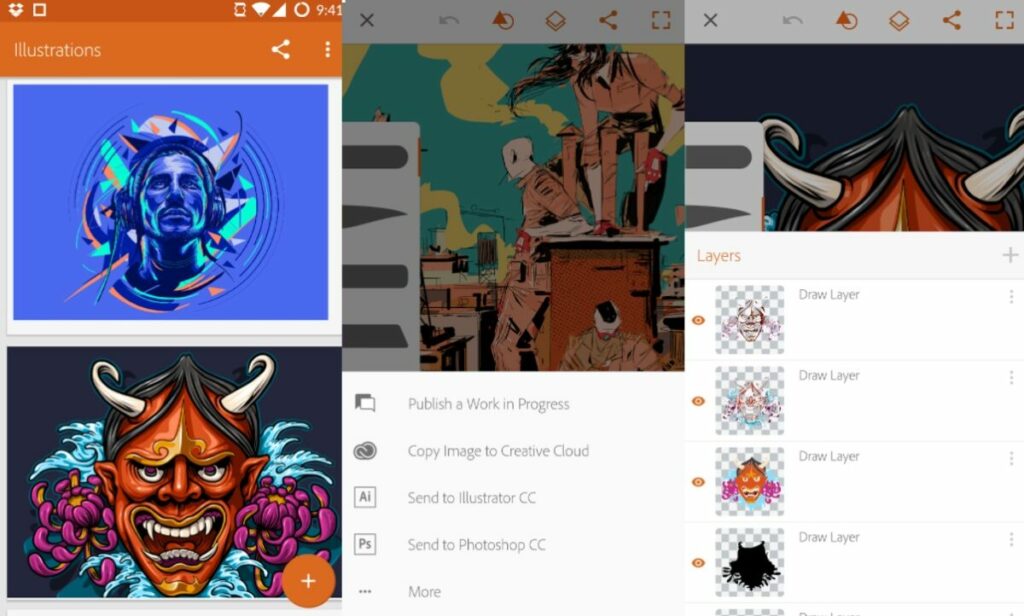
With Adobe Illustrator Draw (Android/iOS) you’ll be able to draw, design, and send your projects to Photoshop and Illustrator right from the screen of your smartphone or tablet.

Adobe Illustrator Draw

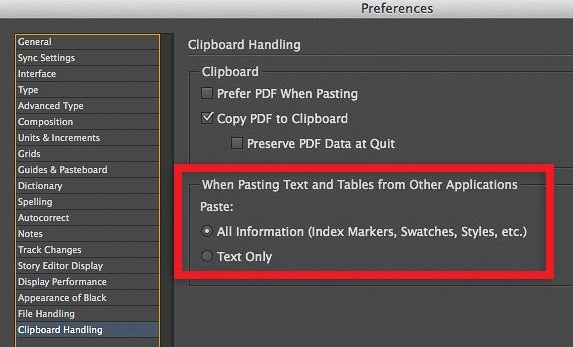
Keep your text’s original formatting

When you copy and paste some text from Word to any Adobe app, it will typically lose its formatting. Using InDesign there’s a workaround to this setback thanks to its option to keep the formatting of all your documents.

Keep formatting Indesign

Create HDR panoramas

Do you want to surprise everyone with a picture of a breathtaking landscape? Adobe Lightroom includes a tool that will let you merge a large number of photos into a single one, creating amazing HDR panoramas.

HDR Panorama

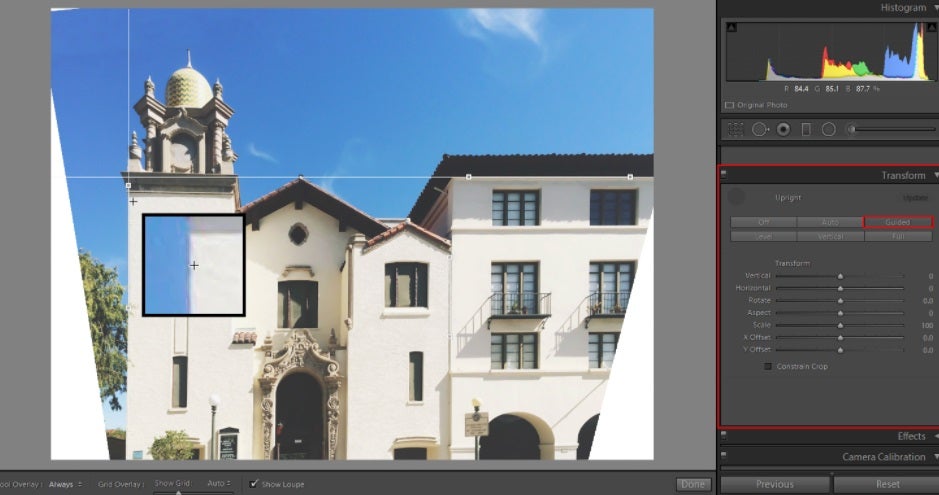
Correct the alignment of your pictures

Thanks to Lightroom’s Upright Guided feature you’ll be able to correct the perspective of any picture in just a few seconds.

Upright Guided

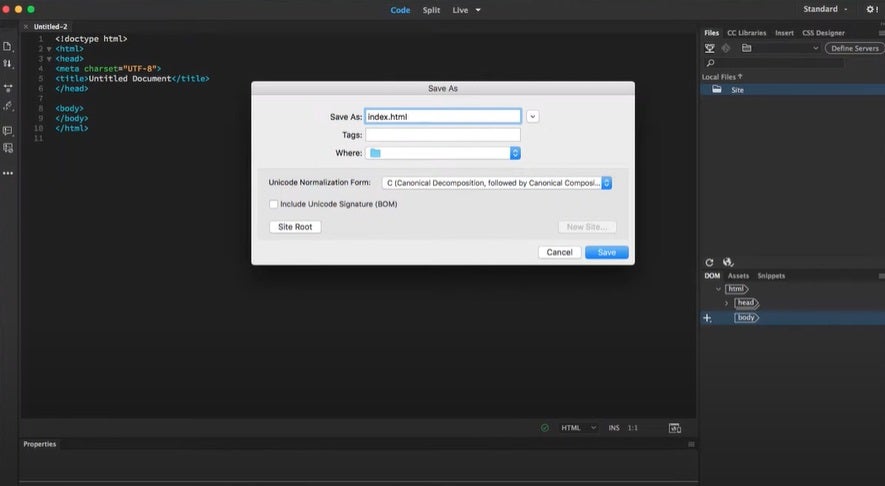
Create a responsive web design

As a web designer, you already know how important it is that your site is responsive. Sometimes this is easier said than done, but don’t worry. Dreamweaver can help you create attractive and responsive websites in record time.

Adobe Dreamweaver

Edit CSS in a visual editor

Dreamweaver includes a CSS Designer Panel that will let you add and edit your site’s CSS as well as see all the changes in real-time.

Dreamweaver Designer Panel

Design and integrate animations

With Adobe Animate you can design and create interactive animations for videogames, tv shows, and websites. You can also make dynamic avatars and doodles, as well as breath life into all of your infographics.

Adobe Animate

Auto-generate captions

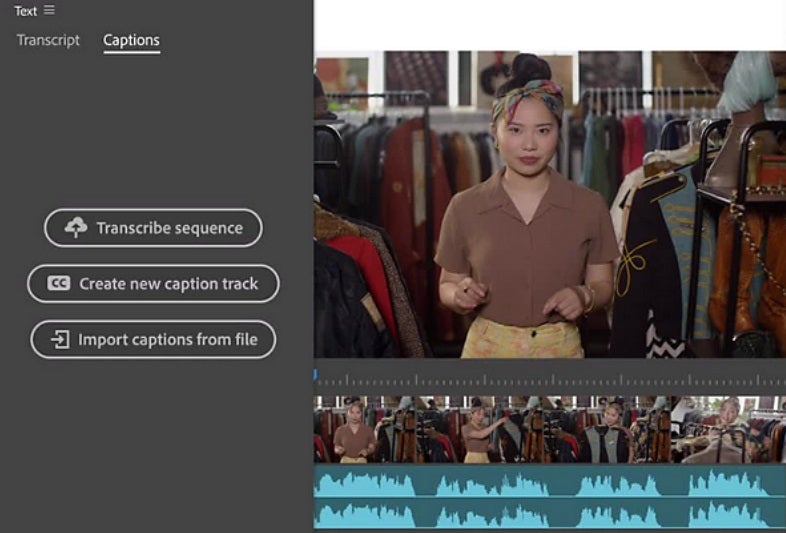
Need subtitles for your videos? Adobe Premiere Pro can auto-generate captions for all your videos with its improved transcription and caption tools.

Color matching made easy

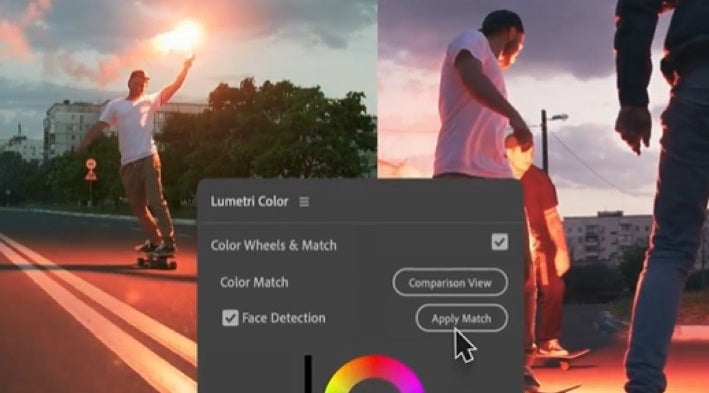
Thanks to Adobe Sensei’s AI and the Lumetri Color panel, you’ll be able to easily adjust and edit the color of your videos with Adobe Premiere Pro.

Lumetri Control panel

Find perfect images for all your projects

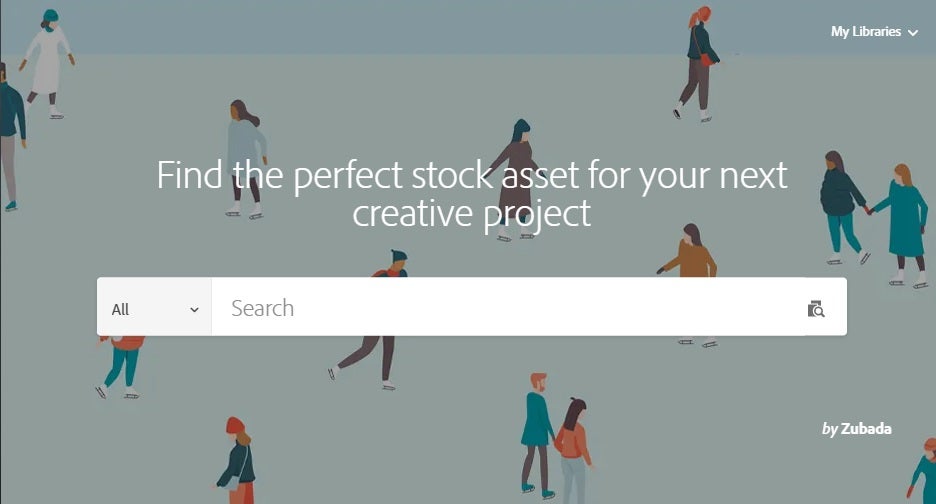
Download stock images and photos, videos, audio footage, royalty-free templates, and vector illustrations suitable for any project with the help of Adobe Stock’s catalog.

Adobe Stock in English

Easily sync with all Adobe apps

Thanks to the cloud, you’ll be able to seamlessly create, edit and synchronize all your projects with the entire Adobe CC suite.

Man with computer

Unleash your creative power

Adobe Creative Cloud is a powerful suite that will help you create anything you can imagine, always with professional results. What are you waiting for?

BLACK FRIDAY OFFER: 40% off all Creative Cloud apps Subscribe now
9
Offer available from November 15th until December 2nd, 2021

What is TIK TOK and how it works

The Chinese company ByteDance bought lip-sync app Musical.ly in 2017. A year later, it was rebranded as TikTok and became a worldwide sensation, being downloaded over 2.6 billion times.

There’s a bit of a learning curve to know how to work TikTok, so here are some basics on what you can do and how to do it. 

What is TikTok?

TikTok is a social media app on which users can create and share video clips no longer than 60 seconds shot on cellphones. It also gives access to songs, audio clips, and effects. The app is highly addictive, probably because of its quirky videos that are short and fun, with music and sound effects. People engage with it and use it for many different types of video clips, including memes, challenges, comedy, and more serious content.

Getting started on Tik Tok

When you first open TikTok, you’ll land on the For You page, featuring posts aimed at individual users. The tab called  Following shows posts from people you follow. On the Trending page, you’ll find Hashtags that show you popular challenges people issue and take part in. You can also search Hashtags if there’s something specific you’re looking for or if you just want to browse.

Downloading Tik Tok and opening an account

If you want to message people on Tik Tok and make and post videos, you’ll have to be 13 and older and open an account. But you don’t need one just to browse. To set up an account, you must download TikTok from the App Store or Google Play. Once it’s downloaded, you open the app and tap on Profile on the right at the bottom.

There you choose a method to sign up: with an email, phone number through Facebook, Google, or Twitter. Use only a valid email address and phone number, as you will need them to log in and recover your password. You can look at links to TikTok videos on your desktop, although there’s no official desktop version yet.

What is Tik Tok and how it works

Understanding the panel

On every TikTok video, there’s a panel of icons on the right. The top one allows you to follow the person whose video you’re watching. You can ‘like’ the video on the heart icon and place your comments on the one below it. Tapping on the icon that says record at the bottom takes you to the audio clip the video’s creator is using.

It will also show you other videos it has been used in. You can also ‘duet’ with other users on TikTok. It does this with split screens. When you’ve posted a video, hit the ‘share’ arrow to go to Duet and choose who you want to join up with. 

TikTok tips and tricks

How to shoot a TikTok video

If you tap the plus sign icon, you’ll see the camera screen. You can add sound or shoot video. You can upload a pre-recorded video longer than 15 seconds. You can access filters, effects, and timers. You can choose how long your video should be just above the pink record button before you tape it. You can choose to make a 15 second, 60 second, or three-minute or shorter video.

Here are some sites to visit with guides that cover just about everything you need to know about Tik Tok.

TikTok challenges

TikTok users collaborate and add to other users’ videos. If you want to see how it works, look at the Yee Yee Juice challenge: a user drinks a juice and changes into a cowgirl or cowboy. There are many challenges on TikTok and the move fast.

Business via TikTok

TikTok marketing is a rapidly growing field in which advertisers reach a desirable youthful market. Old-style advertising that focuses on a product’s superior qualities doesn’t cut it. Fun campaigns set to music do. Some successful TikTok marketing campaigns include:

  • The “Boorito” coupon giveaway Chipotle restaurant chain Halloween campaign encouraged TikTok users to dress up and post their images. It gained four billion views.
  • The NBA opened an account and has gained more than 12 million followers so far. It wants to increase global awareness of the NBA, especially among the youth.

Have fun with your audience

TikTok is a wildly popular platform for making videos, communicating with people, and issuing and responding to challenges. It’s so popular that people have downloaded it billions of times. Getting on the bandwagon can be great fun.

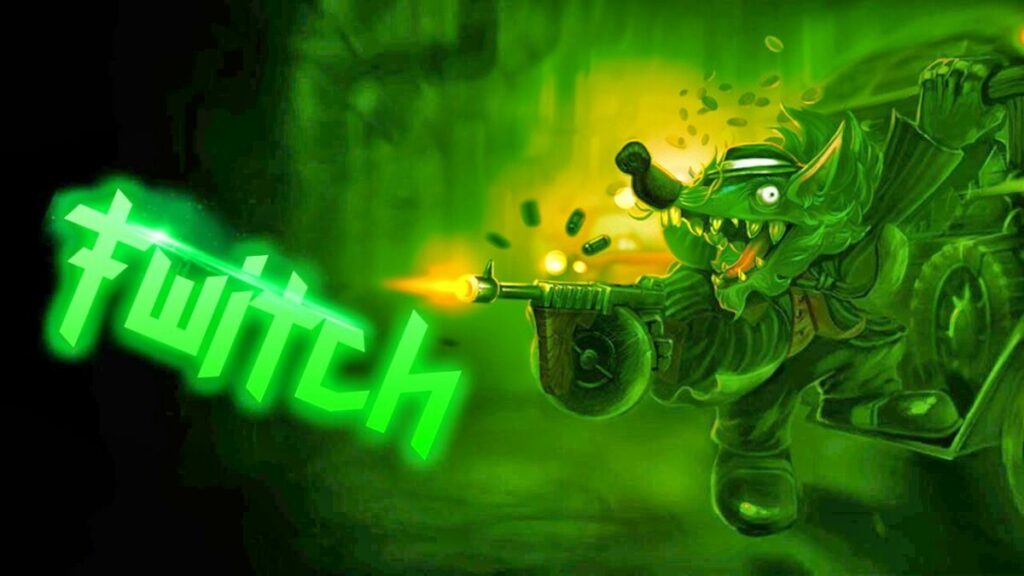
What is TWITCH and how it works

Twitch launched as an exciting platform for people to stream from their PCs while talking to their audience. Most of them consist of gamers playing their favorite games, but you do get a few that show movies and other content while revealing their reactions or making comments.

If you’re new to the platform, here’s a quick tour of what Twitch is and how it works. We also have some valuable insight to show you how to make the best of your time on the streaming platform.

What is Twitch?

When it comes to platforms that allow you to stream to several devices worldwide, it’s challenging to find an alternative as incredible as Twitch. Whether the audience members use their phones, tablets, or PCs, they’ll have a clear view of what you’re playing, watching, or talking about. Creators can also earn money via subscriptions or reward their viewers with digital prizes.

How Twitch works

Besides streaming the content on your screen, Twitch also has various functions that tie in with the platform. Let’s see how you can join and make use of everything that’s available.

Accessing Twitch

If you’re a viewer, you can watch any Twitch broadcast without an account as long as you have the URL link of the stream. However, you won’t be able to comment or join in the conversations. You’ll also need an account if you want to create a channel. You can also download Twitch on your mobile device as an app.

Is a Twitch account free?

You can create a Twitch account free of charge, which will also allow you to stream any content at no cost. It doesn’t have to be live, as you can also share any gaming videos you recorded. The only time you have to pay is if you want to take advantage of any premium features.

Does watching Twitch cost money?

You also don’t need to pay if you want to watch a stream. However, the broadcasting channel may have some subs or requirements for payment to see specific content. It’s an enticing marketing method for content creators to make some money for their hard work.

What is subscribing on Twitch?

A content creator sets subscriptions on Twitch so that followers can support their work. You can get once-off or recurring subs, while you can also send gifts and receive sub-only rewards. 

For instance, you can earn Twitch Runes for League of Legends. There are also various rates for local and international subscriptions. 

What are bits on Twitch?

When the audience loves what you are doing, they can Cheer on your Twitch channel. You’ll see small emotes, called Cheermotes, appear on your stream. These gems are known as Bits that they use to interact with you, and they receive small monetary rewards every time they do so.

Is Twitch just for gamers?

While the original focus was for gamers, Twitch is now used by a multitude of various content creators. Some examples include digital illustrators, authors, painters, singers, and movie broadcasts. Anyone who wants to share an experience with their audience can benefit from it.

Can you make money on Twitch?

There’s a Twitch Partnership Program that lets broadcasters receive a cut of advertisements used in their streams. The subscriptions also provide monetization, but the revenue is split with the Twitch company. You can also win monetary prizes by taking part in gaming competitions via Twitch.

How does Twitch make money?

Twitch uses an advertisement revenue model for the most part, but there are also subscription royalties the company receives. It receives some incentives from top gaming companies and other well-known brands.

What is TWITCH and how it works

Twitch tips and tricks

Now that you have a better idea of what Twitch is and how it works, it’s time to show you some tips on how to improve your channel. These tricks should help you increase your followers.

What do you need to stream on Twitch?

To be able to broadcast via Twitch, you’ll need a recording device on your PC and a stable internet connection. You’ll also need streaming software, such as OBS Studio. Finally, make sure you have decent tech for video and audio recording.

Here are some guides to help you configure Twitch:

Customizing your page’s channel

When people visit your channel, the content on the page sets the tone for whether or not they’ll return. Spend as much time as possible setting everything up in each of the panels to display as much information as is needed. The top sections to visit are Channel Page, Account Settings, and Moderation Settings.

Make a stream schedule

Do you know that feeling when you’re excited to see the next episode of your favorite show on a specific day and time? Well, Twitch viewers enjoy it too. When you set a schedule of planned streams, make sure you stick to it so you don’t let them down.

Announce your live Twitch stream

People won’t know you’re streaming on Twitch if you don’t let them know. When you go live, your followers will receive notifications. You can also share the news over social media, which might bring more viewers to the screen. The more you engage with your audience, the quicker you’ll see your numbers grow.

Describe your purpose

It helps if you describe what your main objective is with the Twitch channel. It can be for gaming, showing your skills, pure entertainment, casual talks, or just to create a social hub. When you explain your intent, you’ll have a better target audience to engage in conversation.

What is TWITCH and how it works

Enjoy the live streaming experience!

Learning how Twitch works is easy once you get into the groove. Remember to target a specific audience, as gamers might become bored listening to you talk about your knitting skills. We hope you have fine streaming your content and grow your channel quickly!

How to play Skyrim with tips

The Elder Scrolls V: Skyrim presents an outstanding journey and adventure in a fantasy land. You can spend months or even years playing it and not becoming bored, as there are so many things to do.

With the Skyrim Anniversary Edition available as of November 11, 2021, gamers will be setting off on the action once again. It celebrates 10 years since the original launch. So, we’re going to show you how to play Skyrim if you’re new to the game.

What is Skyrim?

Games like Skyrim are referred to as roleplaying games, or RPG for short. It has an open-world platform, which means you can travel anywhere in Tamriel without any forced linear progression. There are plenty of quests you can embark on in a mission to level up your character, weapons, and armor to become the ultimate Dragonborn hero.

The story starts with you as a prisoner about to be beheaded. Suddenly, a dragon attacks, a mystical creature that the people of Skyrim haven’t seen for decades. You somehow hold the power to speak the same language as them, but will you use it for good or evil?

How to play Skyrim

How to play Skyrim?

When it comes to learning how to play Skyrim, there’s a lot of ground to cover. You’ll need to know the basics before we can move on to more advanced tips. 

Various Skyrim editions

Since the original launch of the game on PC, there have been many Skyrim editions on various platforms. They’re mostly the same in terms of gameplay, but you may find combat easier on some of them or the graphics better. For instance, the Skyrim Switch edition actually lets you move your hands with the Joy-Con controllers to hit and block.

Here are some of the top Skyrim editions:

  • Skyrim for PC
  • Skyrim PS3/PS4/PS5
  • Skyrim Xbox 360/One/Series X/S
  • Skyrim Nintendo Switch
  • Skyrim VR
  • Skyrim Legendary Edition
  • Skyrim Special Edition
  • Skyrim Anniversary Edition

Most of the latest versions include DLCs, such as Skyrim Dawnguard and Hearthfire. There’s also the popular Skyrim Creation Club where games can show off their item creations, approved by the publisher Bethesda.

Getting started

Once you’ve decided which version of The Elder Scrolls 5 you’ll be playing, you’ll need to purchase and install the game. For PC, it means downloading the files onto your computer where you have enough storage. Make sure to check the system requirements for the version of Skyrim you’ll be playing.

Character creation

With the game installed, you’re ready to play Skyrim. There will be a long introduction to the story, but it will reach a point where the guards will ask you for your details. You’ll need to select one of the races, each one with special abilities. 

You can also play around with character customizations. There are face paints to apply, while you can change facial and physical features to make your hero unique. When you’re done deciding how to look, you’ll apply a name and continue with the story.

Starting out

When the first part of the story is done and you’re out of danger, you’ll be on your own with most of the tutorial complete. There will be the main quest for you to follow, but you can wander around as you wish. Take your time getting to know the basic game mechanics and explore. The quest is going nowhere.

Most of all, get used to opening your inventory and checking new items. Also, read through all your upcoming abilities when you level up. It will help you choose which path you want to focus on, which we’ll touch on more a bit later.

Main and side quests

There are three types of quests you’ll unlock once you get the hang of how to play Skyrim. The primary ones are the main missions, which will propel you towards the end of the story. There are companion, city, or guild quests that will earn you stature and unique rewards. Finally, you have random side quests if you’re looking to collect some coin or obtain a special weapon or armor set.

While you can only focus on the main quests to reach the end sooner, you may find some difficulty later in the game fighting the tough bosses and opponents. It’s best to take your time journeying through as many side quests as you can to level up and hone your skills.

Abilities and levels

Finally, you’ll need to understand how the leveling-up system works. Every time you engage in a specific activity, it slowly increases your skill in that regard. For instance, using a sword or a mace in one hand pertains to the One-handed Weapons skill. When your character levels up, you obtain points you can then use to unlock on that skill path.

However, you can only unlock it if the ability is at the correct level. So, if you want to make Dwarven armor, you need Dwarven Smithing that’s only unlocked when your Smithing level reaches 30. To speed up a specific skill, you can engage in the required activity (making potions, using magic, etc), read books, or speak to a master in that art for further progression.

How to play Skyrim

Skyrim: tips and tricks

As you can see, it can be daunting learning how to play Skyrim if it’s your first time. Therefore, we’ve put together a list of tips and tricks that will help you along the way.

Start slowly

Don’t be in a rush to tackle dungeons and massive beasts too soon. If your level is too low or your weapons too weak, you’ll find your character and motivation to play Skyrim dying quickly. Take as much time as you need in each city, and make sure to complete as many quests as you can in every location before moving on.

Choose your path

It helps to select a path you want to focus on besides the main story. For instance, you can join the Mages Guild and progress towards becoming an archmage. If you join the Companions, you’ll unlock the ability to transform into a Werewolf. Each path has an ending, and then you can choose a new one to complete.

Use your abilities well

You need to strike a balance between leveling up one of your skills and distributing points between several of them. While you play, you’ll inevitably power up more than one ability. Learn which ones work well in specific situations, such as archery for more damage in quiet dungeons.

Build your wealth

You’ll need plenty of coins to buy items or books when you want to level up faster or unlock a set piece of armor. When you begin learning how to play Skyrim, try and collect as much as you can. You’ll be able to sell objects at merchants, but pay attention to which ones are more valuable than others. You can also clear out caves and kill bandits for some decent loot.

Get to know the regions and cities

Every region and city has a unique quality and theme. There’s also a Jarl that watches over the main towns, and the people are eager to give you small quests to complete to improve your reputation. Once they’re all happy and the Jarl approves, you’ll become Thane of that area with a special weapon or item as a sign of your glory.

How to play Skyrim

Learn about potions

When times are hard and you’re struggling with a mission, it helps to have a potion at hand. Whether you need to heal or become invisible, there are many types you can use to aid you. Make sure you read what each one does before your character drinks it, as not all of them will work in your favor.

How to use scrolls in Skyrim

Scrolls are magical items you can use when you need a spell, but you can’t cast it by yourself. To use a scroll in Skyrim, you need to equip it and then use it. The scroll will vanish after you’ve used it, so it helps to have a few on you, depending on the situation.

Choose what you collect

Unfortunately, Skyrim is as realistic as a fantasy game can be when it comes to inventory weight. You can’t collect everything your heart desires without slowing you down. 

While you can increase your Stamina when you level up or use other items to increase your limit, you’ll need to be wise on which items you pick up. You can also try and come back for anything you left behind if it hasn’t vanished by then.

Storing objects

You’ll reach a stage where you really don’t want to sell a special weapon or armor piece, or you’re rewarded with something spectacular. To avoid it taking up needed inventory space, you can store it in a chest or a safe storage unit that you own. It will remain safe from looting, while you can also display some of them on walls or unique cases.

Make your own items

While collecting items in Skyrim is fun, you can also craft many objects using your skills. With alchemy, you can make potions from various ingredients. With smithing, there are weapons and armor for you to craft. They may not be as valuable as some of the rewards from quests, but at least you won’t need to spend money on them.

Solo and companions

If you find a mission challenging to complete, you can ask someone to join you. There are some non-playable characters (NPCs) who will gladly embark on the quest for you, as long as they like you. To gain their favor, just complete a small set of tasks for them. You can also send them back home when you’re tired of them.

Buying or building a home

One of the rewards of becoming a Thane in a city is that you can buy a home there. When you own one, you can then speak to the Jarl’s assistant about decorating it. There are set pieces you can unlock, so don’t expect much customization. 

With the Hearthfire DLC, or in any of the Skyrim special editions, you can build your own home in a few select locations. You need permission from the Jarl first, and then you’ll need to collect all the necessary resources. There’s a blueprint table to select how you want your home to look, and then you can start making all the decorations that go inside.

Starting a family

It can be a lonely life in Tamriel, so part of knowing how to play Skyrim is starting a family. There’s a quest you’ll need to complete if you want to marry an NPC in the game, and you can adopt children. When you have your family, you select which home they’ll stay in. Be sure to check on your partner now and again between missions, as she may have some rewards waiting for you.

How to use mods in Skyrim

The final tip we have for playing Skyrim is using mods, such as the Skyrim Nexus platform. Modders are always looking for ways to improve the game, such as enhanced, unique weapons or having plenty of followers. There are even ones for improving lighting and graphics.

How to play Skyrim

An adventure awaits you, Dragonborn

Learning how to play Skyrim doesn’t need to be challenging, but there’s a lot to know. If you’re a completionist and want to complete all quests, the game can take you months. We’re looking forward to seeing what Elder Scrolls 6 has in store for us when it launches.

Among Us update: New roles and Cosmicubes

While Among Us is still one of the top games to play on mobile, gamers have been crying for something new to give them an edge. InnerSloth has listened, and a brand new update brings with it new roles and Cosmicubes. 
Here’s a quick trailer from the publisher before we show you what you can expect. It’s sure to lend some excitement to the social deduction game!

What are the new roles in Among Us?

Before, you could only play as a Crewmate or Impostor in Among Us. Well, four new roles are about to change the dynamics of the game. Players will have to find innovative ways to win with the latest characters available.
Here are the four new roles in Among Us:

  • Scientist: you can assess vitals anytime you want, but you’ll need to complete assigned tasks to recharge the battery
  • Guardian Angel:  give your crewmates a protection shield for a limited time to prevent any harm
  • Engineer: with this new role, crewmates can finally investigate the vents!
  • Shapeshifter: fool the crewmates with this impostor role by looking like another player

You’ll be able to customize any of these roles in the settings, stating how much of an advantage they have.

Among us update: New roles and Cosmicubes

What as Cosmicubes?

Cosmicubes are cosmetic items you can add to your characters. There are freed and paid objects, while you can also browse through various categories. You can also unlock special Cosmicube by completing various tasks on the ship. 

However, they won’t change any gameplay elements like the roles. Among Us Cosmicubes are purely visual elements to make you look good. It also works in the favor of the new Shapeshifter role, as the impostor will look just like you. What’s great is that your DLC cosmetics you bought will be part of the new system.

Among us update: New roles and Cosmicubes

How to get Cosmicubes?

Besides the paid method, there are various ways you can get Cosmicubes in Among us:

  • Branching path: while you play the game, you may find pods along the way that will unlock these special, themed objects
  • Beans: these are resources you’ll win along the way which you can use to buy Cosmicubes
  • Stars: Use real cash to buy premium stars and unlock cosmetic items quicker
  • Pods: If you have a specific Cosmicube attached, you’ll receive pods to unlock more items in that branch
  • XP: When you level up, the experience gained can be used for multiplier bonuses on pods and beans.
Among us update: New roles and Cosmicubes

Some Among Us guides:

If you’re new to Among Us, you may want to check out these guides that offer some tips and tricks:

Find your role in Among Us and dress up

These new roles and Cosmicubes are bound to add new excitement to Among Us, and we’re excited to see how players will use these new positions in their spaceships. We’ll be watching for gameplay videos to see how the strategies play out.

How to play ZELDA Classic – Guide for Beginners

There have been many Zelda games over the years that have brought joy to Link fans worldwide. However, nothing beats pure nostalgia like the Zelda classic game on the original Nintendo Entertainment System (NES). 

If you’re new to this title and never saw the original, you may be struggling to work out how to get started and try it on your modern PC. Stay tuned as we show you how to play Zelda Classic with a few tips!

What is Zelda Classic?

When it comes to retro gaming, few 90s titles live up to the hype like the original Zelda. Sure, Legend of Zelda: Breath of the Wild looks stunning, but there’s something about going back to the first one that sets the right tone. It falls in the 2D action-adventure genre with pixellated graphics and old sounds that takes you back a few decades.

How to play Zelda Classic

While you can still play Zelda Classic on NES emulators, Nintendo has released a version that’s compatible with Windows and Nintendo Switch. Some of the controls have changes to work with keyboard and touchpad mechanics, but the quests and characters remain the same.

Getting started

To play Zelda Classic on your PC, you need to download the executable file from a reliable source. It provides the three quests from the original game, while there are a few more additions for you to enjoy. You’ll load them as qst files, which loads them as custom games.

For now, ensure you save the executable file to your PC, extract the files, and create a shortcut on your desktop.

How to play Zelda classic

Version details

You should always check which is the latest version you have of Link and Zelda Classic. While 2.50.2 is more closely related to the original game and characters, there are newer versions that offer ZQuest as a game editor. There are also other developers on Discord channels providing other builds. 

How to play Zelda classic

Starting the game

When you’ve figured out how to play Zelda Classic from the guidelines above, you can now run the executable file. On the main menu, you’ll click on “Start: Play Game” for the action to begin. You can also register your name to save your profile for future gameplay.

How to play Zelda classic

Loading custom quests

When you play Zelda Classic for the first time, the game will ask you for the quest directory. It will only do this once. When you set the location on your PC, it will show you the other custom games you’ve saved, created by other developers using the ZQuest editor. Feel free to try those when you’re done with the main game.

How to play Zelda classic

Play Zelda Classic

You’re now ready for action in one of the oldest Zelda games available. You’ll need to fight monsters and find items to complete each level in the dungeons. For instance, level one has a raft, stepladder, and flute you’ll need to discover to aid you on your quest. You can only access the next level when you complete the current one.

How to play Zelda classic

Zelda Tips and FAQs

With a better understanding of how to play Zelda, it’s time to turn to some tips and questions you may have. You can also check out our article on the top-ranked love interests in Zelda games. 

Where can I play the original Zelda?

If you have an NES emulator on your PC, you can still play the original Zelda. However, the quality isn’t good, and the controls aren’t aligned with modern technology. To make it work, you’ll need the latest version that’s available for Windows and Nintendo Switch. There’s even a Zelda Joy-Con controller to add to the experience.

How long does it take to play the original Legend of Zelda?

For the main story in Legend of Zelda, it will take you about 8 hours to complete. If you add some of the extra quests, it may take you close to 9 hours in total. For the completionist achievement, you’re looking at about just under 11 hours.

Why are Zelda games so good?

When it comes to Link and Zelda games, there are many reasons why gamers love them. For one, the dungeons provide many items to find and quests to complete. You’ll also love the quirky characters and the humor that comes with them. The combat system is also kept simple to make the titles more enjoyable.

How to unlock and play new quests in Zelda

While you may like the main storylines linked to Princess Zelda, you can also play other quests in the Legend of Zelda classic game. They’re available from developers that use the ZQuest editor. You’ll need to obtain qst files and place them in the same quest directory you indicated when you first start the game.

Get Linked to the Zelda classic

Well, you now have a full overview of how to play Zelda classic on your PC. You’ll have better controls that are compatible with keyboards, while there are some new tones and sounds for the latest quests. It’s time to head out and save the day!

How to add keyframes in Premiere Pro

Adobe Premiere Pro is a comprehensive software for video editing and production. It’s an Adobe Creative Cloud app with a flexible, intuitive interface packed with excellent features. You can create new projects and access others you’re working on.

Learning how to use keyframes is vital for getting the best out of Premiere Pro and creating stunning professional-quality videos to send out into the world.

40% off
BLACK FRIDAY

From: All Adobe Creative Cloud Apps

What are keyframes? 

You use keyframes to alter the properties of a video or audio effect in stages, which gives the impression that they’re moving. You create more than one keyframe and set values at each one. Premiere Pro will then gradually change the values between one keyframe and another. This is called interpolation.

For instance, you could set up one keyframe with a volume of -20dB and another 10 seconds later with a volume of 0dB. Premiere Pro will interpolate this into a smooth 10-second increase in volume. There are two methods for working with keyframes: the Timeline and the Effect Controls window.

How to add keyframes in Premiere Pro

  1. Method 1: Using the Timeline panel

    How to add keyframes in Premiere Pro

    To expand a video track to work on it, double click in the video header. Once expanded, you’ll see three buttons to help you use a keyframe: Go to Previous Keyframe, Add-Remove Keyframe, and Go to Next Keyframe. A white horizontal line will show along the length of your clip, allowing you to look at your keyframes in the Timeline panel. To change an attribute, Ctrl+click on the clip’s FX badge.

  2. Method 2: Using the Effect Controls window

    How to add keyframes in Premiere Pro

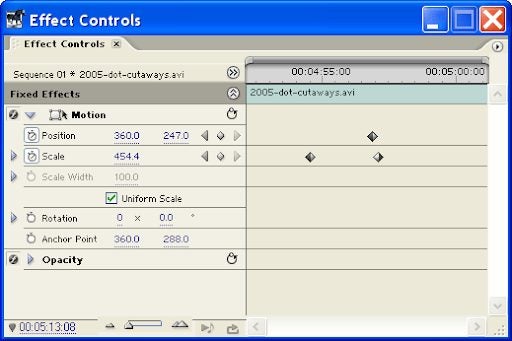
    To use the Effect Controls window, select your clip in the Timeline and open it (Window > Effect Controls). You’ll be able to see your image and any effects you have added.
    Using the Toggle Animation button will allow you to add keyframes. Navigating between the keyframes with the arrow buttons creates an animated effect.

    The right side of the window shows a mini timeline for the clip you’re working on. It shows keyframes as diamond-shaped icons. This view lets you see keyframes for all your effects simultaneously and gives you god control of the process.

When to use Keyframes

There are many ways to use keyframes in Premiere Pro. Here are a few:

  • Create dynamic graphics, including for your main titles.
  • Simulate camera effects such as panning and zooming.
  • Bring still images to life using Position and Scale keyframes.
  • Improve your audio using volume attributes.

Perfect your video

Adobe Premiere Pro is the ultimate package to use if you’re creating and editing videos. Using keyframes to animate parts of your video will play a significant role in creating the stunning effects you’re after.

How to change aspect ratio in Premiere Pro

Adobe Premiere Pro is the perfect video editing tool for producers and content creators. The Adobe Creative Cloud app provides you with everything you need to work with, including effects, transitions, color adjustments, layers, and filters. 

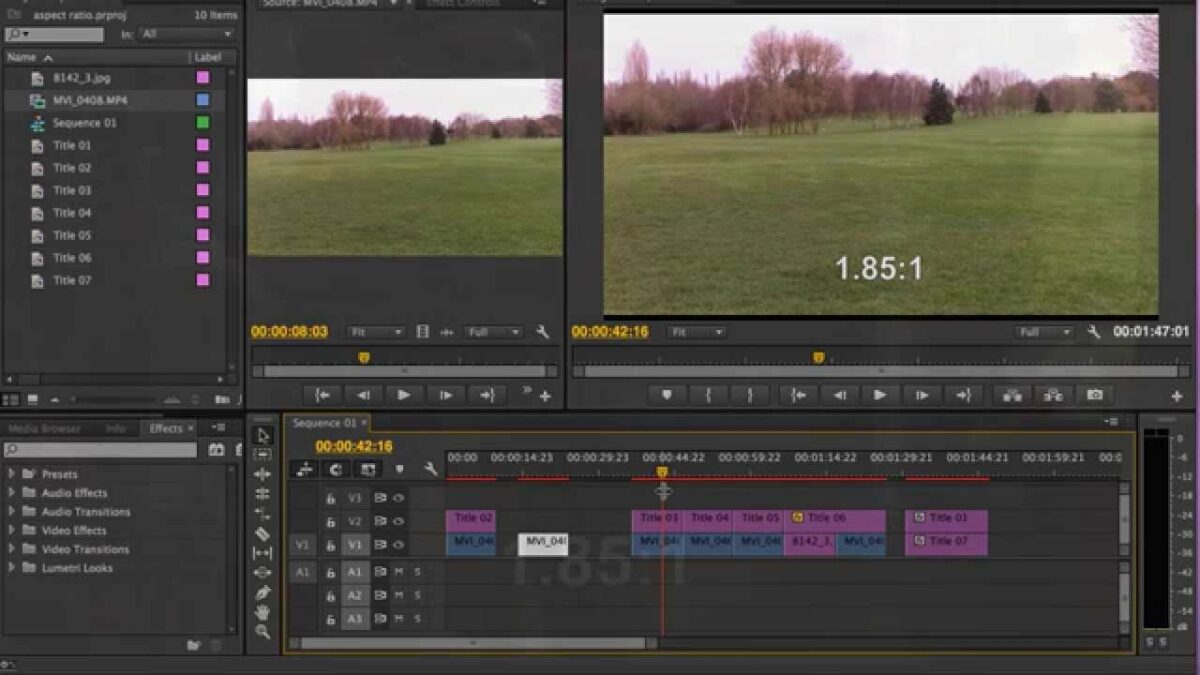
You can change the parameters of your video project as you go along. One is the ratio of width and height, known as the aspect ratio. Video frames have a Frame aspect ratio. Pixels that compose the frame have a Pixel aspect ratio (PAR). When you start a project in Premiere Pro, you set the frame and pixel aspects and cannot change them. But while you’re working on a sequence, you can change the aspect ratio and use items created with other aspect ratios.

40% off
BLACK FRIDAY

From: All Adobe Creative Cloud Apps

How to change aspect ratio in Premiere Pro

  1. Access Sequence Setting

    How to change aspect ratio in Premiere Pro

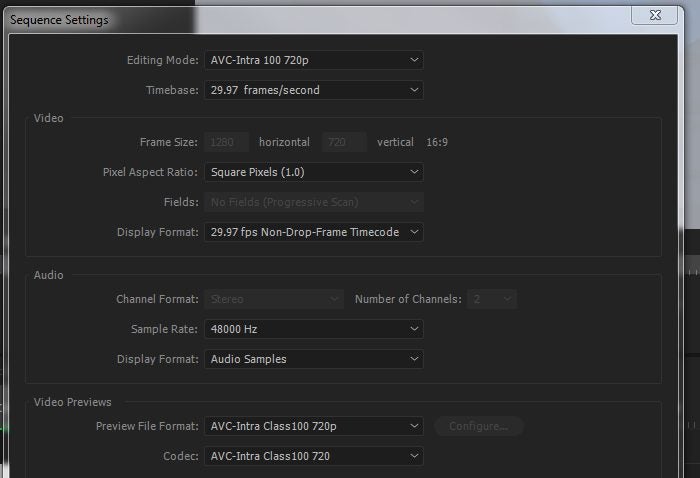
    Right-click the new sequence and choose Sequence Setting. Choose Square Pixels for the pixel aspect ratio. 

  2. Target the aspect ratio

    How to change aspect ratio in Premiere Pro

    You can change your aspect ratio in the middle of editing in Premiere Pro. 

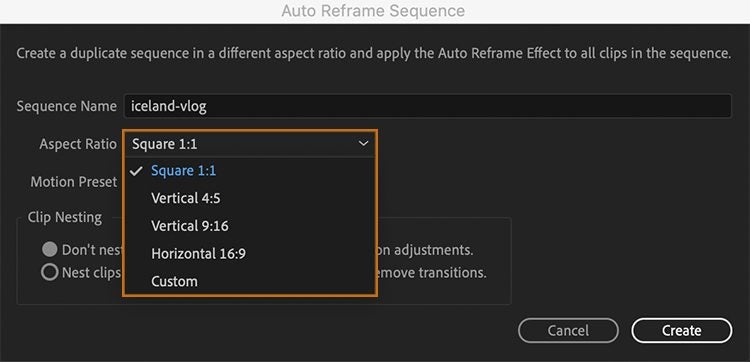
    From the “Project Panel,” use the feature called ‘Auto Reframe Sequence,’ which provides different aspect ratios you can select from, like square 1:1, vertical 9:16, horizontal 16:9, and custom if you want cinema widescreen. Choose the ‘Target Aspect Ratio’ you want, say, vertical 9:16. Motion tracking and clip nesting should be on default. Click on ‘Create.’ Premiere Pro will automatically create a duplicate sequence with the updated aspect ratio.

  3. Adjust the frame

    How to change aspect ratio in Premiere Pro

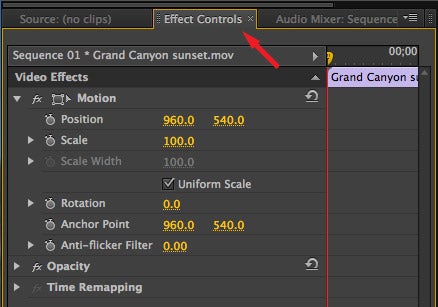
    Now go through your video clips to adjust the framing. Use the ‘Motion’ parameters in the ‘Effect Controls’ panel. If the motion effects are disabled because of the ‘Auto Reframe Sequence’, click on ‘fx’ to enable them. Now you can adjust the framing using ‘Position’ and ‘Scale’.

Commonly used aspect ratios 

Your video is shaped by the aspect ratio. You should know what the shape of your video must be before you start shooting it. This will help you frame your video and set the correct aspect ratio. Here are some examples: 

Widescreen (16:9)

Used for films, documentaries and online videos. 

Vertical (9:16)

The typical video on your phone.

Fullscreen (4:3)

Used on TV before widescreen. Focuses on a single element.

Square (1:1)

This perfect square is often used on Instagram.

Anamorphic (2.40:1)

A widescreen used in movies. It’s like 16:9, but it’s cropped top and bottom. 

Setting the aspect ratio

Create a new sequence. Select File > New > Sequence. In the New Sequence dialog box, go to the Settings tab. Go to Video, and enter the Frame Size (height) as well as the horizontal (width). Premiere Pro automatically generates the aspect ratio. Name the sequence, fill out the required fields, then click OK. The aspect ratio is set for the sequence.

View it from a new aspect

Changing the aspect ratio in Adobe Premiere Pro is just one of the valuable features that this powerful video editing software package provides. It allows you to set the perfect relationship between width and height on your videos to suit your target market.