Complete Guide to Amazon Photos

Photos have been a way to hold on to precious memories for a very long time. However, hard copies or even copies saved to external sources such as hard drives can get lost, stolen, or damaged.

Can you imagine losing these precious memories, such as photos from your wedding day or the birth of your children? Therefore cloud storage for photos is a valuable alternative – enter Amazon Photos.

What Is Amazon Photos?

Amazon Photos is a cloud-based photo storage program that lets you keep your memories close by and safe. It also makes sharing these moments so much easier. Amazon Photos makes it easy to backup, organize and store your photos.

Depending on which device you use to upload photos from, you can either add them to Amazon Photos manually or automatically with the right settings enabled. Not only that, but you can even use the platform to share your memories with families, friends, and co-workers.

Using the cloud-based service offered by Amazon means that your photos will no longer take up precious storage space on your phone or computer. This frees up more storage for other apps while still ensuring your photos are safe.

You can also download the Amazon Photos app for Android and iPhone. This will make accessing your photos and sorting your albums much easier. You will need an Amazon account to log in to your cloud-based photo storage.

Complete Guide to Amazon Photos

How Much Is Amazon Photos?

Amazon Photos is included with all Amazon Prime subscriptions and has unlimited storage. Alternatively, you can also purchase a subscription for Amazon Photos by itself. The free version comes with 5GB of storage, which might be enough for some. However, should you require more storage space, there are packages ranging from 100GB to 1TB. For the latest prices for Amazon storage, you can visit their website. 

How Much Cloud Storage Do I Get With Amazon Photos?

If you are an Amazon Prime member, you will receive unlimited photo storage with Amazon Photos. Alternatively, the free version comes with 5GB of storage space, with the option to add more at an additional cost. You can buy up to 1TB of cloud storage, which should be more than enough for most.

You are also able to store videos on Amazon Photos. However, these file sizes are usually much larger than a photo. As such, you will have to carefully keep track of your storage space if you are not an Amazon Prime member.

Features of Amazon Photos

One of the features of Amazon Photos is that you can set it to automatically upload any photos taken with your device to the cloud storage. This is similar to the iCloud feature on Apple devices. This means you don’t have to manually scroll through your photos and upload them to the Cloud while risking losing or forgetting about some.

Aside from that, there are also other useful features to note. Once you upload a photo, Amazon will identify the objects, people, and scenery within the photo. You can then use this to search for specific photos later on.

Sharing these precious memories with family and loved ones is a great gift. Amazon Photos has a feature that lets you share photos and albums easily. You can also create groups that consist of family, friends, or co-workers so that you can easily share photos, and others can add photos to your album.

For example, if you were putting together an album for your great-grandmother and want all the aunts, uncles, and grandkids to contribute photos to make it extra special. You can add all these members to a group and easily collect the photos. Members of a group can also add comments to photos – which can be very useful. 

The Family Vault feature will let you add up to six family members to your Amazon Photos account. This means that they won’t each have to get their own Amazon subscription but can work off yours while still having their own account for free.

Finally, another useful feature of Amazon Photos is printing your photos and shipping them to your address. This feature is only available if you reside in the US.

How to Use Amazon Photos? 

Now, let’s take a look at how to use Amazon Photos.

How to Upload Photos to Amazon Photos?

You can upload photos to Amazon Photos using your browser or the Android and iOS app.

Using Your Browser

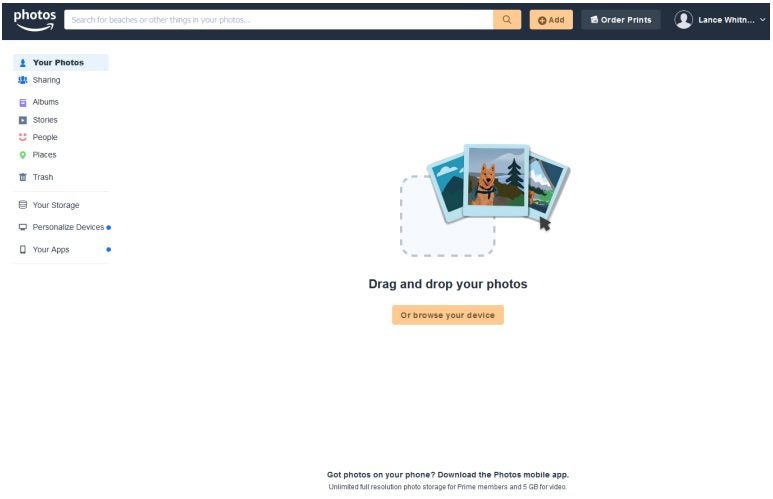
Are you wondering how to Add Photos to Amazon Photos using the browser? First off, you’ll need to open Amazon Photos in your browser. You may be prompted to sign in to your Amazon account if you haven’t already. Next, you simply click on the ‘+ Add’ button and then select ‘Upload Photos’. Now you can choose all the photos from the device you wish to upload to the Cloud and click on ‘Open’ when done.

Complete Guide to Amazon Photos

Using the App

Using the app to upload photos is very easy. Also, you won’t upload doubles as any photos already in Amazon Photos will not appear when trying to upload photos. First, you’ll need to launch the app. Tap on ‘More’ and select ‘Upload Photos’. Next, tap on ‘Camera Roll’ and choose the photos you wish to upload. Once you’ve selected all your photos, tap on ‘Upload’ in the top-right corner.

How to Create Albums and Share Photos?

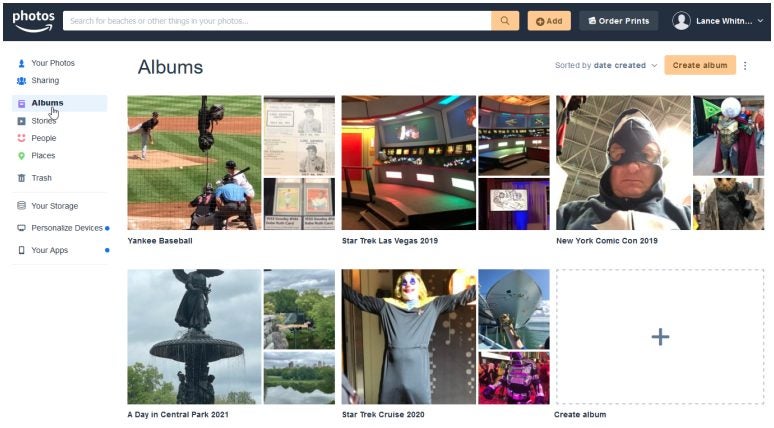
Creating albums in Amazon Photos is a simple task and makes it convenient to store and refer to specific photos. For example, you can store all the photos from your last holiday in one album so that you can easily refer back to them when feeling nostalgic. To create an album, click on ‘Albums’ in Amazon Photos and select ‘Create Album’.

Next, you can start selecting the photos you wish to add to the album. You can select them individually, bulk upload them or upload according to date. Once all of the photos have been selected, click on ‘Create Album’. Don’t worry if you missed photos. You can always add them later.

To share photos on Amazon Photos, you’ll first have to create a sharing group. To do this, click on ‘Sharing’ once you’re in Amazon Photos. Next, click on ‘Create Group’ to add people you want to share your albums with.

Name your new group and then click on ‘Add Photos’ to add photos or albums to the group. Once done, you can click on ‘Invite People’ to add members to your group. These members will need an Amazon Account to see the photos you shared.

Additional Options

While you can upload photos manually using the above method, which is ideal if you have limited storage space. You can also set your Amazon photos to update automatically. This means that every photo you take will be safely stored in the Cloud without you having to think about it. To do this, go to the settings in your Amazon Photos and enable auto-save.

Where Are My Amazon Photos?

All of your precious memories are safely stored in the Cloud when using Amazon Photos. To access them, you can either use the app or the browser version of Amazon Photos. If you can’t find your photos, make sure you are signed in to your Amazon account.

Complete Guide to Amazon Prime Video

The popular IT giant Amazon Prime offers many added benefits to its members. There are so many, in fact, that of the more than 175 million US subscribers, only a fraction of them use most of the benefits. 

These features include using AmazonFresh to buy tons of products with free two-day shipping. Another benefit included with your membership is access to their on-demand streaming site known as Amazon Prime Video. Prime Video has gained popularity since its launch in 2006.

What Is Amazon Prime Video?

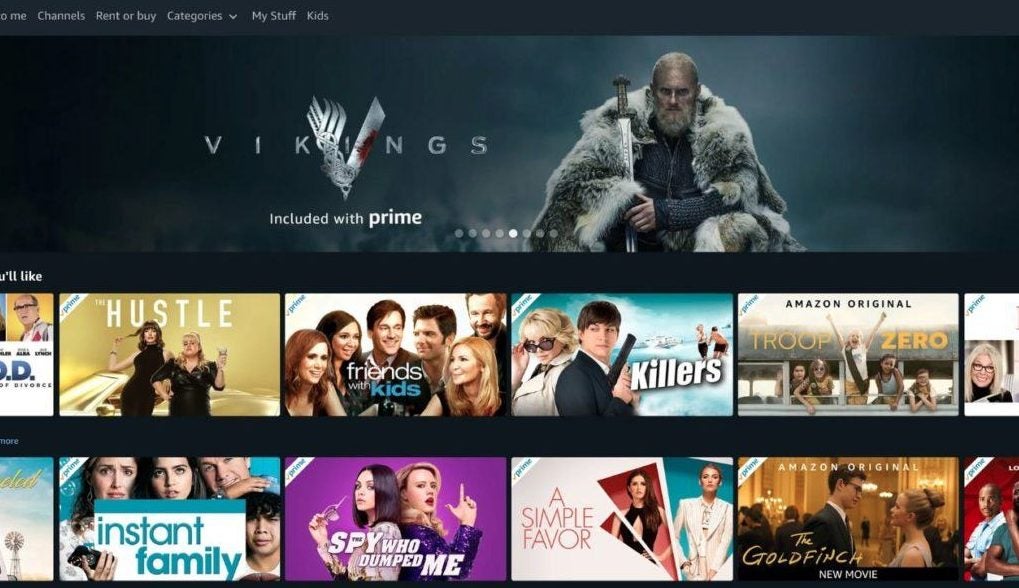
Amazon Prime Video is an on-demand video streaming service that features thousands of popular movie and series titles in its collection. Among some of the more well-known titles, you’ll also find original Amazon Prime movies. This streaming service is very similar to HBO, Netflix, and Hulu.

With a subscription to Amazon Prime, you no longer need the services of a cable company. With your Amazon Prime subscription and access to the internet, you can stream movies and shows from anywhere on your chosen device. If you don’t have, or want, an Amazon Prime subscription, you can also sign up for Amazon Prime Video on its own.

Prime Video currently features approximately 24 000 movies and 2 100 series. You also have the option to buy or rent movies or episodes that aren’t currently listed. Among the vast library of video content, Amazon Prime Video also has a Prime Video Channels feature, which allows users to add streaming access to other popular services such as HBO or Cinemax at a small additional cost. This means you can access all of your favorite streaming content from one convenient platform.

How Much Is Amazon Prime Video?

If you have an Amazon Prime subscription, you have access to Amazon Prime Video and many other Amazon Prime benefits such as shopping, delivery, music streaming, reading, and more. The subscription is $13.00/month or $119.00/year. Alternatively, you can also buy a subscription for only Amazon Prime Video at $5.99/month. This subscription will allow you to use the on-demand movie and series streaming service without all the other additional benefits.

Complete Guide to Amazon Prime Video

How to Cancel Amazon Prime Video Subscription?

If you want to find out how to cancel your Amazon Prime Video Subscription, there are a few ways you can do so. You can cancel the subscription online through the website, email, or even telephone. Before canceling your subscription, make sure that you’re getting the most of your Amazon Prime Video subscription to see if it is worth the money you’re spending.

Cancel Subscription Online

To cancel your subscription online, go to the Amazon Prime Video website and sign in to your account. Navigate to the ‘Prime Video Channels’ page, and access the ‘Accounts’ page. Click on the ‘Edit’ button and find the subscriptions you want to cancel, in this case, Amazon Prime Video. Click on ‘Update Settings’ in the ‘Manage Membership’ box and wait for the drop-down list. Click on ‘End Membership’ and confirm your cancellation in the list.

Cancel Subscription Via Email

You can also cancel your membership via email by writing to cis@amazon.com. You can request that the support team cancel your account. Make sure to provide them with your account details to prevent any delays.

Cancel Subscription Via Telephone

If you prefer canceling your Amazon Prime Video subscription telephonically, you can call the support center on 1-888-2804-331 and talk to a representative. Make sure that you can provide them with all the requested details of your account and follow the instructions they provide.

How Does Amazon Prime Video Work?

Amazon Prime Video works similar to many other streaming services like Netflix. You can use it to stream movies or series through your browser or the handy app available for Windows, Android, and iPhone.

Once you’re on the Amazon Prime Video website or have the app open on your chosen device, you’ll have to sign in to your account. You will need a valid Amazon Prime or Prime Video subscription to start streaming. Once signed in, you can browse through the different movie and series titles and choose which ones you would like to start watching. To start watching, you simply click on the play button.

How to Download Amazon Prime Video?

Another benefit of using Amazon Prime Video is that you can also download series and movies to watch offline. There is a time restriction on viewing downloaded content that users should be aware of. Once downloaded, you can view the title for the next 48 hours, after which the download will be removed. If you want to watch the same title, you will have to download it again.

You will only be able to download content with the app on either Windows, Android, or iOS devices. Launch the app and find the movie or series you wish to download. Simply click the download button to save a copy of the movie to your device for movies. For series, you’ll have the option to download the entire series (remember, it will only be available for 48 hours), or you can download the episodes separately.

What to Watch on Amazon Prime?

There is a lot of great quality content on Amazon Prime Video. If you’re looking for movies, there are quite a few 2021 Oscar-nominated and winning movies such as ‘Sound of Metal’ and ‘One Night in Miami,’ among others. Aside from these, you’ll also find popular movie titles such as ‘The Girl with the Dragon Tattoo’ and ‘Zodiac.’

You’ll also be spoiled for choice if series are your thing. Amazon Prime Video has titles such as ‘I, Robot,’ ‘Alias,’ American Horror Story,’ and many more. New titles are being added all the time, so you’ll be spoiled for choice.

Stream your Favorite Shows

As you can see, there are loads of movies and series to watch with Amazon Prime Video. When you’re a subscribing member, you’ll have plenty of benefits while accessing the library of content at any time.

What is Google Chrome, and How does it Work?

Google Chrome was originally launched in 2008 for Microsoft Windows. It’s a free web browser that can now be used on mobile devices, Linux, and Mac. There are many features and tools that make browsing easy and enjoyable. It allows users to find anything on the internet from articles, images, videos, news, books, maps, and more. 

Follow this guide for what Google Chrome is and how it works

What is Google Chrome? 

Google Chrome is a search engine you install on your desktop, tablet, laptop, or mobile device. It has a simple interface with fast and safe browsing. 

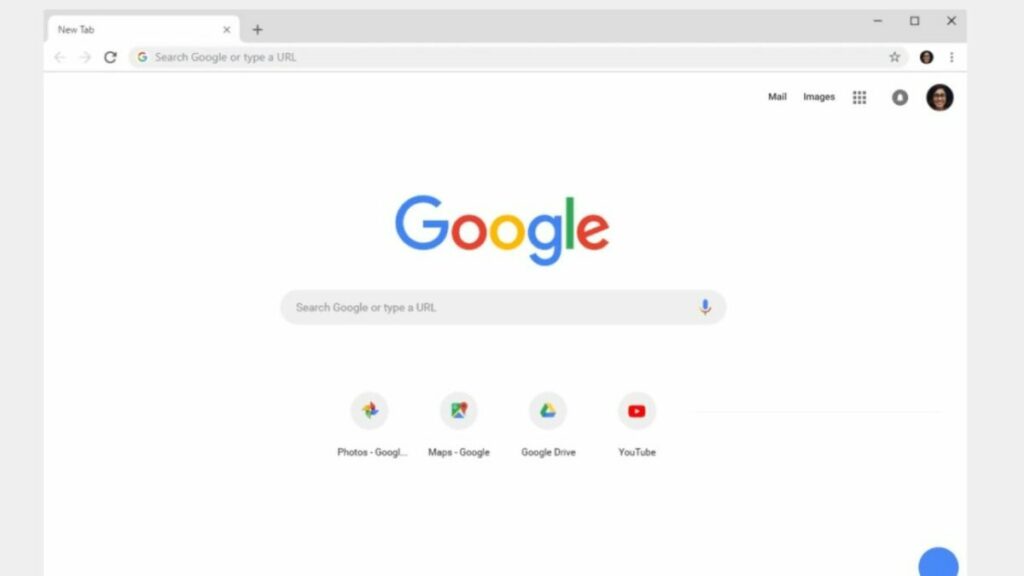
You can search endless topics with suggested search options based on specific keywords that you type. You can also sign in to your Google account, which you can access on the Google homepage. Once you have signed in, you can access your Google Documents, Photos, Gmail, YouTube, and many more applications designed for you. 

How to Install Google Chrome

You can download the Google Chrome program directly onto your laptop or computer. It’s known to use quite a bit of your computer’s memory, so make sure that you have enough available memory before installing it. You don’t want it to slow down your computer, so get rid of anything unnecessary to free up some space. 

You will then be asked if the program can make some changes to your device. Click yes, and the program will be installed onto your device. After that, there is a basic setup that you have to do before you can start using the search engine. The default language setting is in English, and it will ask you for your language preferences. 

It will set your location and ask you to agree to their terms. The program will finish installing where it can be set to open automatically after the installation is complete. You can also add an automatic shortcut to your desktop.

If you have a Google account, you can sign into it to gain access to all your Google account apps and features. If you don’t have a Google account, you can easily create one via the homepage.

What is Google Chrome, and How does it Work

How Google Chrome works: top features

Google Chrome has many features that make your web browsing secure and fast. Take a look at a few Google Chrome tips and tricks that will make your browsing easy. 

Google Suggest 

Google Chrome uses Google Suggest; an algorithm developed to find matching phrases to the main keyword to suggest popular searches. This helps you quickly choose the right suggestion without having to type out the entire phrase or question. 

Google Suggest allows you to quickly and easily find a location before leaving, search for a topic while having a discussion with friends, or access alternative searches while finding information about your topic. 

Google Accounts 

One of the greatest features of this web browser is having access to your google account and apps while on the internet. 

While browsing on the web, there is a drop-down menu in the top right corner of your screen where you can sign in to an account. You can have many different accounts signed in at once to switch to when you need. 

There is also a drop-down menu to access all your Google apps. You can quickly access your emails while working or go to your Drive to access anything saved on the cloud. You can go through all your saved Documents or Photos via Google Chrome. 

There are also many other apps that you can explore like News, Classroom, Podcasts, and Travel. For work, enjoy a synchronized Google Calendar for important reminders and appointments and Google Meets for all your meetings. 

Google Chrome Extensions

There are many third-party apps that you can use as chrome extensions for your personalized browsing. Add shortcut icons to your favorite apps such as grammar checkers, speed tests, translators, and bookmark bars. 

Cross-Connectivity across Devices 

The best part of Google Chrome is its cross-connectivity functionality. Once you have signed in on your Google account, all your searches, apps, and uploads will automatically synchronize across your devices.

It will be included in your history across all devices whenever you search for something. So if you search for a specific place on your phone, the history of your search will be recorded on your laptop as well. However, you can quickly clear the history on Google Chrome if you wish.

It will automatically synchronize the rest of your Google apps across all platforms. So if you add an appointment on Google Calendar on your phone, you can view it on your laptop or computer too. 

Google Collections App

If you come across an article, product that you like, or any other page that you would like to view at a later stage, you can bookmark the link by adding it to the Collections app. When you want to access the bookmark again, you can view all your bookmarks in the bookmark section of your Collections. You can also categorize bookmarks according to personalized folders. 

Secure Browsing 

Google Chrome ensures secure browsing with automatic blocks from any sites or tabs that could contain viruses or malware that would damage your device. They are also always releasing updates to improve the user experience and create safer browsing for all.

Google Chrome guides

Now that you know what Google Chrome is and how it works, here are a few tips and tricks to using it.

What is Google Chrome, and How does it Work

It’s Time to Browse with Ease

Google Chrome is a web browser that offers ease with a simple interface and functionality with various Google apps that you can instantaneously access while browsing. Enjoy browsing the web with various third-party extensions and access any information you need when you need it.

What is WINDOWS 10, and how it works

If you use a personal computer for work or play, chances are you’re either using macOS, Linux, or the ever-evolving titan of personal computing operating systems, Microsoft Windows. Windows is possibly the most iconic operating system in human history and has dominated the industry since its inception. Its latest version, Windows 10, continues this proud legacy by dominating over 70% of the personal computing industry. With figures like that, you’re probably wondering what Windows 10 is and how it works

You’re in luck; below, we’ll explain Windows 10 for first-time users, as well as sink our teeth into this feature-loaded successor to Windows 8.1. Discover why Microsoft is the preferred operating system provider and why Windows 10 is so successful. We’ll also give you insight into how to use Windows 10 to its full potential. 

What is Windows 10?

Windows 10 is the next major release of the Microsoft Windows NT operating system. It succeeded Windows 8.1 and set a new standard for what windows could achieve. Shipped as standard with most new computers and laptops, Windows 10 is easy to use, quick to set up, and features a host of programs and functions that generally make computers easier to use

The birth of Windows 10

Windows 10 is easier to use than its predecessor, Windows 8.1. Windows 8 came under heavy media and public fire for being a little too controversial. Throughout the history of Windows, there has been a theme of progress without trying to reinvent the wheel.

Windows 8 emerged onto the market just as touchscreen systems became more popular. Microsoft wanted the new OS to be purpose-built for these new devices, and Windows 8 was born. Unfortunately, not many people were on board with the innovative, bold reinvention of Windows

Windows 10 is a valiant and successful effort to take Windows OS to a refreshed but familiar state. In a nutshell, Windows 10 has many of the features and functions Windows 8 introduced, but in a more familiar package. You ultimately have seamless touch screen functionality without sacrificing usability on none touchscreen devices, which is one thing Windows 8 was criticized for. 

What is WINDOWS 10, and how it works

How to use Windows 10

Windows 10 is one of the easiest systems to familiarize yourself with. With Windows dominating the market, chances are you’re simply moving from one Windows system to another. However, even if this is your first time using a Windows operating system, Windows 10 has a step-by-step guide to help you as you set your PC up. This guide takes a few minutes to follow, and we’ll review the entire process below. 

Because we understand not everyone’s situation is the same, we’ve included short guides on how to install Windows 10, upgrade to it from an earlier version, and set it up on a new PC where it is already installed. 

Upgrading to Windows 10 from Windows 7 or 8.1

Before you take any steps toward upgrading, check that your device is compatible with it and able to run it properly. Also, check for any manufacturer-specific driver update information for your device. 

From 2015 to 2016, if you were using Windows 7, you’d see a popup on the bottom right-hand side of your screen prompting you to ‘try Windows 10.’ This was a period when it was completely free to switch from Windows 7 or 8.1 to Windows 10. The process was guided by prompts and was easy to complete. 

Jump to years later, and Windows 10 is still free to upgrade, provided you have a valid product key for Windows 7, 8, or 8.1.

To check if your copy of Windows 7 has been activated and is valid, click on the start button at the bottom left of your screen, right-click on ‘computer’ in the sidebar, and click on ‘properties.’ This will open up a section of the control panel and gives you an overview of your version of Windows. Scroll down until you see ‘Windows activation.’ Under this section, it should say ‘Windows is activated, and you’ll also see your product key.

To check the activation status of your copy of Windows 8 or 8.1, right-click or tap the bottom left corner of the screen and select ‘system’ from the quick access menu. Scroll to the bottom of the window and check that it says ‘Windows is activated.’

Now that you’re sure you have a licensed copy of Windows, you’re ready to start preparing for the upgrade. Now you need to head to Microsoft’s website and type ‘Windows 10’ into the search bar at the top right-hand side of the screen. You’ll be taken to a screen with all the relevant entries on the website. The first two options are ‘Download Windows 10’ and ‘Get Windows 10.’ Clicking on the second option will take you through a quiz before the download to determine whether you should upgrade to Windows 10 on your existing system or whether it would be better for you to buy a new Windows 10 device.

To access the upgrade files, click on the option that says ‘Download Windows 10’. This will take you directly to the update page. It’s important to note that there are a few different ways to upgrade. You can either click on ‘Update now,’ which will activate the Windows 10 Assistant to help you upgrade, or you choose to create Windows 10 Installation media. 

The installation media creation tool is the best option because you’ll have the files on hand if you ever need to perform a clean installation of Windows 10 again or if you need to install it on a new system. On the off-chance that you are still running Windows XP or Vista and would like to upgrade, you’ll need to use the installation tool as well, but you’ll need to use a different PC to access the tool. This tool is only useful if you upgrade from Windows 7, 8, or 8.1

Install to Current Device

This is the easy bit. Select ‘Download tool’ and then click on ‘Run.’ If you don’t have administrator access on the device, you won’t be able to run the tool. Read and accept the license terms on the end-user license agreement page. If you don’t accept the terms, you won’t be able to run the tool. Now, you’ll get to a page that asks, ‘What do you want to do?’. Click ‘Upgrade this PC now, and then hit ‘Next.’

Once you’ve downloaded the tool, open it and follow the step-by-step walkthrough of how to install Windows 10 onto your computer. You’ll be able to choose any version of Windows 10 except for the Enterprise edition. When Windows 10 is ready to install, the tool will show you a recap of the choices you’ve made and what is automatically kept during the upgrade. 

There are three options of what to keep. To access these, simply click on ‘Change what to keep.’ You can either select ‘Keep personal files and apps, ‘Keep personal files only, or ‘Keep nothing.’ Save and close any files you have open and anything you’re working on. You are now ready to click ‘Install.’

It’ll take some time to install the new horizon that is Windows 10, and your PC may restart several times. So take some time for yourself, make yourself some coffee, grab a comfy seat, and why not read through some of our other articles? 

Create Installation Media

You’ll need a USB flash drive, DVD, or ISO file handy for this. 

Before you attempt to download the media creation tool, check that you have the following:

  • A stable internet connection
  • Sufficient space on your PC, external drive, or USB for the download
  • A blank USB drive with at least 8GB of free space or a blank DVD if you choose either of those options for the download
  • If you use an ISO file, you might need to use Dual Layer (DL) DVD Media

There are some other things you might want to check before continuing: 

  • Whether you have a 64-bit or 32-bit processor (CPU), this is important because you’ll either choose to create a 64-bit or 32-bit version of Windows 10. Go to your control panel in ‘Settings’ and look for the type of system you have. 
  • Check the language of your current version of Windows; you’ll want this and the region to be the same on Windows 10.
  • Check your edition of Windows in the control panel. All editions except the Enterprise edition are available in the media creation tool. You’ll want to select the same version of Windows 10 as the Windows version you currently have a product key for. 

Once you’ve made sure you can run Windows 10 and that your system meets the requirements, you’re ready to start the installation process. 

Select ‘Download tool now, and then click on ‘Run.’ This follows the same initial procedure as installing on your current device, but when you get to ‘What do you want to do?’ you’ll click on ‘Create installation media for another PC.’ Select ‘Next,’ and you’ll be prompted to choose the architecture (64-bit or 32-bit), edition, and language. 

Next, you’ll need to choose whether you’re downloading the tool onto a flash drive, ISO file, or DVD. Once the installation media is created, you can install Windows 10. 

Using the installation media

Before installing Windows 10, ensure that you’ve saved and backed up any work you were busy with. If you used the ISO option to create the installation media, you’d need to burn it to a DVD. 

Insert the flash drive or DVD into the computer. Next, you need to restart the PC. Changing the boot order in your PC’s BIOS or UEFI settings might be necessary if your PC does not automatically boot from USB or DVD media. As soon as you turn on your PC, you will typically need to press a key (like F2, F12, Delete, or Esc) to open a boot menu or change the boot order. To learn how to access your PC’s boot menu or change the boot order, refer to the documentation that came with your PC or visit the manufacturer’s website.

 A PC manufacturer may be able to provide you with instructions on temporarily disabling Secure Boot in your BIOS settings if you do not see the USB or DVD media device listed within the boot options. Your PC might not have fully shut down if it boots directly into the OS you’d like to replace after changing the boot menu or order. The best way to ensure the PC completely shuts down is to select the power button on the login screen or the Shutdown option from the Start menu.

When you get to the ‘Install Windows’ page, choose your time and keyboard layout, click ‘Next,’ and install Windows.

Getting Started

Once Windows 10 has been installed, you’ll be prompted to sign in with your Microsoft account and take care of a few more easy steps like connecting to a network and setting up your new PC.

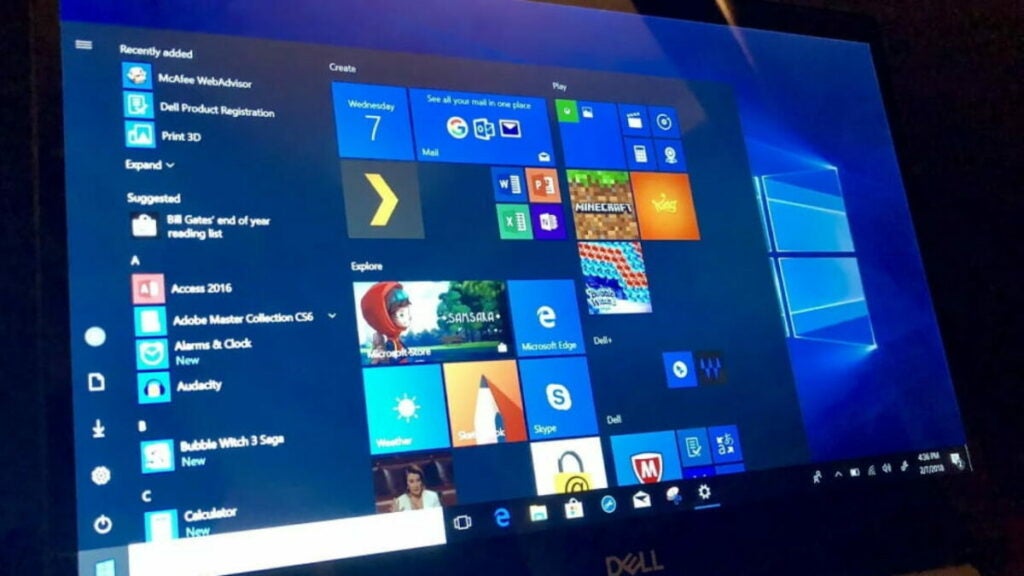
Once your PC is ready for work, you’ll be taken to the new Windows 10 home screen. This is where you’ll open apps from and access all the amazing features of Windows 10. Your first stop will be the newly designed Start button at the bottom left-hand side of the screen. If you’re using a new laptop, you’ll notice a matching symbol on a key in the bottom row of your keyboard. This is a quick access feature for the Start menu from any app you’re using. Tapping this button will instantly open up the start menu and its increased functionality. 

The start button will open up your new start menu; from here, you can open any app installed on the PC. You’ll see that the start window is divided into three sections. You’ve got File explorer, settings, power options, and All apps in a list at the bottom. Then you’ll see a list of applications at the top.

The third section is a tile interface displaying various apps installed on the PC. Right-clicking on any app allows you to pin it to the taskbar at the bottom of the screen, pin it to the start tiles if it isn’t already there, and even uninstall it directly from the start menu. 

Microsoft Edge

One of the new apps is Microsoft Edge. This is Microsoft’s brand new web browser, replacing the controversial Internet Explorer. While most people only use Edge is to download Google Chrome or Mozilla Firefox, the app does come with its own unique features. These features actually make Edge a better, more integrated browser for Windows users.

Sidebar Search

Edge lets you highlight text on a website and search for results in a new dedicated sidebar. This is similar to Safari’s ‘Search with Google,’ but for Windows, and some argue better optimized. This means you no longer have to open hundreds of new tabs to search for more info; just do it in the sidebar. 

Install Websites as Apps

We all have our favorite websites that we visit religiously. Whether virtual house tours, recipes, or our favorite social media sites, you can now install these websites onto your computer with Edge. Edge lets you pin websites to your start menu either in the list or as a tile. Pinning tabs to your taskbar also means you no longer have to go into the browser to visit the websites you use most often. 

Pin Tabs

Edge also lets you pin tabs to your browser so that they don’t take up as much space. This means you can open more tabs at a time without sacrificing performance or space. Pinned tabs are also out of the way, so it’s not as easy to accidentally close them. 

What is WINDOWS 10, and how it works

Windows 10 Features

Windows 10 is packed with features that give it far more functionality than its predecessors. Integration is the buzzword Microsoft seems to have had on a mood board when designing Windows 10 because that’s what it is. In its simplest form, it is the seamless integration of the touch screen functionality of Windows 8 with the user-friendliness and versatility of Windows 7. 

Windows 10 and Android

Windows Mobile was an interesting time. Microsoft powered a number of smartphone models around the release of Windows 8 and 8.1. The idea was to create better integration between your desktop, tablet, and mobile devices, but like Windows 8, Windows Mobile was reinventing the wheel. Smartphones existed, and most already ran on Android.

The way to integrate Windows and mobile phones was not to create mobile OS, but rather to build cross-platform functionality between the desktop OS giant and that of the mobile OS industry; Android. 

Windows 10 is compatible with the Microsoft Launcher App available on Android devices and gives you many ways to synchronize your Android mobile device with your Windows 10 PC. With this app installed, you can send photos, websites, and apps between your PC and mobile phone and even send text messages from your phone using your PC. This merges productivity on your phone and your desktop into one integrated space.

Snip & Sketch

This app takes the functionality of the modest print screen button to new levels. Activated by pressing ‘Shift-Windows key-S,‘ Snip & Sketch means you no longer have to capture an entire screen and then cut it later in a different window. Choose to drag out rectangular captures or switch to freehand mode and draw around objects on your screen to snip them.

Snip & Sketch automatically saves the most recent snip to the clipboard, which can be pasted into a document with ‘Ctrl-V.’ You can also now make your own notes directly on a snip and even do a bit of sketching over it. 

Voice Typing

In the past, voice dictation was something you had to purchase expensive software to use. With Windows 10, you can use voice dictation for free. Voice typing and speech recognition are now integrated directly into Windows 10.

It is as simple as clicking ‘Settings,’ clicking ‘Speech,’ and then enabling ‘Online speech recognition. When this is enabled, you can use the ‘Windows key-H’ to type with your voice instead of typing text whenever you have an application that requires text-typing.

It is convenient to use this feature in Microsoft Word because it automatically capitalizes sentences and inserts the terminating period. You can also use this feature to dictate emails or chat with friends through instant messaging.

Task View

Even though Task View has been a part of Windows 10 for a while, many people are unaware of its existence. The people that do know about it report some significant productivity gains.

Next to the Cortana search field is an icon for Task View on the taskbar. The icon looks like a film strip.

The list of open applications you see when you click it will include all files and applications you had opened earlier, as well as any documents you have open at the time. Just click on any open (or previously open) app or file in the task view to switch to it.

Xbox One

It’s odd seeing an independent gaming console on a list of Windows 10 features, but that’s the world we live in now. Windows 10 and Xbox are no longer separate entities. Here’s another prime example of the kind of integration Windows 10 has introduced. 

Windows 10 comes with the Xbox app pre-installed. This app creates beautiful synergy between your Xbox games, accomplishments, and friends and does it all from your Windows 10 PC. While there is still a ways to go before true cross-platform play is possible, in other words buying games on Xbox One and playing them on your PC, the groundwork has been laid. Currently, games with cross-platform multiplayer functionality like Minecraft for Windows 10 and Xbox let players play together no matter which platform they’re playing on. 

Virtual Desktops

You can increase your productivity by dragging any open app up to the New Desktop icon at the top of the Task View. As a result, you’ll be able to switch to a new virtual desktop session and focus on the current task. Using this tool, you can create a desktop session for social media and browsing the web and another for work. Press ‘Ctrl-Windows key-Left/Right Arrows’ or use the Task View window to switch between desktops.

Windows 10 User Experience

Because of the seamless integration of innovations in Windows 8 with the familiar functionality of Windows 7 and before, Windows 10 appeals to most computer users. Prime evidence of this integration is in the Windows 10 Start feature. If you left-click on the start logo, you’ll see the tile menu introduced in Windows 8.

However, if you right-click on the logo, you’ll be greeted with the familiar list-style menu found in Windows 7 and before. Both menus give you access to power options, apps, and features, device management, and the handy search function. This means that whether you have a touch screen system or not, you can use Windows 10 comfortably. 

Overall, the Windows 10 user interface is innovative without being too different to become familiar with easily. The visual aspects are even more customizable than Windows 7, and the entire system is powered by better AI than Windows 8 and 8.1. For instance, when you change your desktop background, you can toggle an option that lets Windows 10 choose the most visually appealing and least obtrusive accent color from the dominant colors in your chosen background. 

Even the notification area is less intrusive than notification panels usually are. Almost everyone receives notifications on their mobile phone, but many Windows 10 users are unaware they also have a convenient notifications area on their PC.

If you click the comments icon in the lower right corner of the screen, you will be able to see your notifications. It displays notifications from your apps like your calendar and your mobile notifications if your phone is synced, as well as buttons so you can quickly enable Wi-Fi, Bluetooth, and access Settings.

What is WINDOWS 10, and how it works

Window to a new world

Windows 10 is the next stage in Microsoft’s evolution. While it isn’t perfect software, it more than does what it’s designed to do; streamline and increase productivity. As much as Microsoft dominates the market, they also go the extra mile with each new update. Windows 10 adds even more functionality as Windows 8 did but does so with the finesse and recognizable charm of Windows 7 and earlier. Using the system, you know it’s new.

But you can’t help but feel it’s a return to the good old days of Microsoft. With its mobile and gaming console integration, in addition to all the other features we highlighted, Microsoft Windows 10 is, in a word, synergy.

Disney+: The Best Holiday Releases to Enjoy with Your Family

Disney Plus wants to make this Holiday Season unforgettable, bringing all subscribers a magical selection of new releases. The streaming service knows very well that December is one of the most special months of the year and there’s no better way to spend these heartwarming festivities than with the company of our loved ones. For that reason, Disney+ has filled its catalog with new movies and shows to enjoy not just with your little ones but with the entire family.

Get into the Christmas spirit and enjoy these holidays thanks to the best movies, documentaries and TV shows from Disney+. If you still don’t have a subscription, then don’t miss out on this deal and get 20% off your annual membership. That’s two whole months of Disney Plus for free!

Disney+ SUBSCRIBE NOW
9

Foodtastic

Disney invites you and your family to play with food in Foodtastic. This fun-filled series will launch on December 15, bringing artists from all around the world to create the most amazing works of art… with food! Hosted by Keke Palmer, Foodtastic is a great treat both for kids and grown-ups thanks to its original and surprising approach. In each episode, the show will select one of Disney’s most iconic franchises and the artists will have to bring that world to life through the magic of food. Are you ready to have fun with these tasty battles?

Foodtastic

Diary of a Wimpy Kid

Bring out the child in you and spend some quality time with your little ones watching Diary of a Wimpy Kid. Based on the first book from Jeff Kinney’s renowned series, this exhilarating animation film invites you to join Greg Heffley in his greatest challenge: Survive middle school! Thankfully, Greg won’t be alone since his best friend Rowley will be there with him. However, growing up isn’t easy and Greg will not take well to Rowley’s sudden popularity while he still stays a nobody. Witty and hilarious, Diary of a Wimpy Kid will take you back to school while learning not just how hard is to fit in, but also the true value of friendship.

Diary of a Wimpy Kid

The Most Magical Story on Earth: 50 Years of Walt Disney World

This Christmas, visit one of the most magical locations of the planet without leaving the comfort of your living room thanks to The Most Magical Story on Earth: 50 Years of Walt Disney World. This heartwarming special takes us on a journey through the 50-year history of Walt Disney World, sharing never before seen footage of the park as well as teaching everything about its past, present and future. Don’t miss it!

The Most Magical Story on Earth: 50 Years of Walt Disney World

Duck the Halls: A Mickey Mouse Christmas Special

Join Donald on his very first Christmas along with Mickey and his pals in Duck the Halls: A Mickey Mouse Christmas Special. Tired of having to migrate every winter to stay warm, Donald Duck defies Daisy and the rest of the ducks by staying with Mickey and the gang to enjoy Christmas together. Donald will be overwhelmed with happiness while he discovers snow, sings Christmas carols, decorates the tree and waits for the arrival of Santa Claus. However, the frozen weather won’t be gentle on poor Donald and everyone’s favourite duck will have to learn the hard way the true meaning of Christmas.

Duck the Halls: A Mickey Mouse Christmas Special

Christmas Again

Did you ever use to wish that every day was Christmas? Be careful what you wish for because you might just get it… Otherwise, ask Rowena! On December 17, Disney+ premieres its original movie Christmas Again. In it, we’ll meet Rowena Estevez, a young girl that after experiencing a disappointing Christmas day, she asks Santa Claus for a second chance to celebrate it properly. However, things don’t go as planned because from that moment on… Every day will be Christmas!

Christmas Again

Mickey and Minnie Wish Upon a Christmas

On December 24, join Mickey and the rest of the gang to celebrate Christmas Eve. In Mickey and Minnie Wish Upon a Christmas, Mickey’s friends will face trouble because, after a series of mishaps, they will be separated all over the world. However, no distance can prevent them from spending Christmas together.

Mickey and Minnie Wish Upon a Christmas

Ice Age: A Mammoth Christmas

Have fun with all your Ice Age friends thanks to this lighthearted Christmas special. In Ice Age: A Mammoth Christmas we’ll follow the misadventures of Sid who, after breaking Manny’s Christmas rock, will be put on Santa’s blacklist. To solve this problem, Sid will travel to the North Pole to clear his name. However, little does he know that his problems have only just begun…

Ice Age: A Mammoth Christmas

Home Alone (The Complete Franchise)

All of the Home Alone movies are available in Disney Plus so you can enjoy them with your whole family this Christmas. Don’t forget that you can also watch Home Sweet Home Alone, the long-awaited reboot of the classic 90’s movie, exclusively on Disney+.

Macaulay Culkin in Home Alone

Hawkeye (New Episodes)

The Marvel Cinematic Universe (MCU) wants to celebrate the Holiday Season with you through the release of Hawkeye. This new and exclusive show follows the former Avenger Clint Barton and his young apprentice, Kate Bishop, in an action-filled adventure that will lead them to face one of Hawkeye’s most dangerous rivals. Will they manage to save Christmas? Find out every Wednesday on Disney+.

Hawkeye

Marvel Studios: Assembled (New Episodes)

Satisfy all your Marvel needs thanks to the premiere of two new episodes of Marvel Studios: Assembled, the documentary series that chronicles the creation of all the new thrilling Marvel shows and movies. On Wednesday, December 22, you’ll be able to watch The Making of Eternals and on December 29, find out all the secrets of Hawkeye in The Making of Hawkeye.

The Beatles: Get Back

There’s no better way to celebrate these Holidays than enjoying the best music with our loved ones. The Beatles: Get Back is a Disney+ exclusive miniseries that covers the making of the album Let It Be. Directed by Peter Jackson, this documentary shows never-before-seen footage of Paul, John, Ringo and George while they compose, play and share their thoughts throughout their private recording sessions. Also, for the first time, this miniseries shows their iconic goodbye concert from the rooftop of Savile Row in London!

The Beatles: Get Back

Do you want more? Don’t miss out everything coming this December

If you’re still hungry for more movies, shows and documentaries, don’t forget to check out all of December’s Disney+ releases. You’ll find the perfect selection of entertainment to make this Holiday Season special.

Ron's Gone Wrong
Disney Plus: What’s Coming in December 2021 READ MORE

Have a family-fun filled Christmas with Disney Plus

Make the most out of the Holiday Season by sharing the best movies, shows and documentaries with Disney+. What’s not to love? And remember, if you’re still not a member, don’t miss out on the 20% off deal from every annual subscription to the service.

Disney+ SUBSCRIBE NOW
9

Top 10 mods for Farming Simulator 19

While FS22 is performing well with gamers worldwide, many players are still enjoying Farming Simulator 19. What made it outstanding was the various mods you could apply from the main menu, adding new items and vehicles not available in the vanilla version.

Here’s our list of the top 10 mods you need to try in Farming Simulator 2019 for an incredible experience. 

Best Farming Simulator 19 mods

Before we start on our list, you’re probably wondering how to access them. On console, you’ll notice a Mods section in the main menu, and all you need to do is select the ones you want and install them. 

For PC, you’ll download the mod file to your mod folder, but don’t unpack or extract the zip files. The default location is “C:/Users/”user_name”/Documents/my games/FarmingSimulator2019/mods”. When you start the game, you’ll find the FS19 mod in the Mod section on the main menu.

And now, onto our list of the top 10 mods for Farming Simulator 19!

Top 10 mods for Farming Simulator 19

FS19 – La Coronella Map

If you’re tired of the generic maps on Farming Simulator 19, La Coronella may just be what you need. It features brand-new farm layouts that are not based on any real place. You’ll start with two lands, but there are plenty more you can acquire as you progress.

Most of the functionality is the same, such as silos, transport missions, animals, and more. It’s also ready for seasonal changes so that you can work through realistic situations. You can farm on the lands you own, perform contracts on other lands, and sell your products to stores and warehouses.

Top 10 mods for Farming Simulator 19

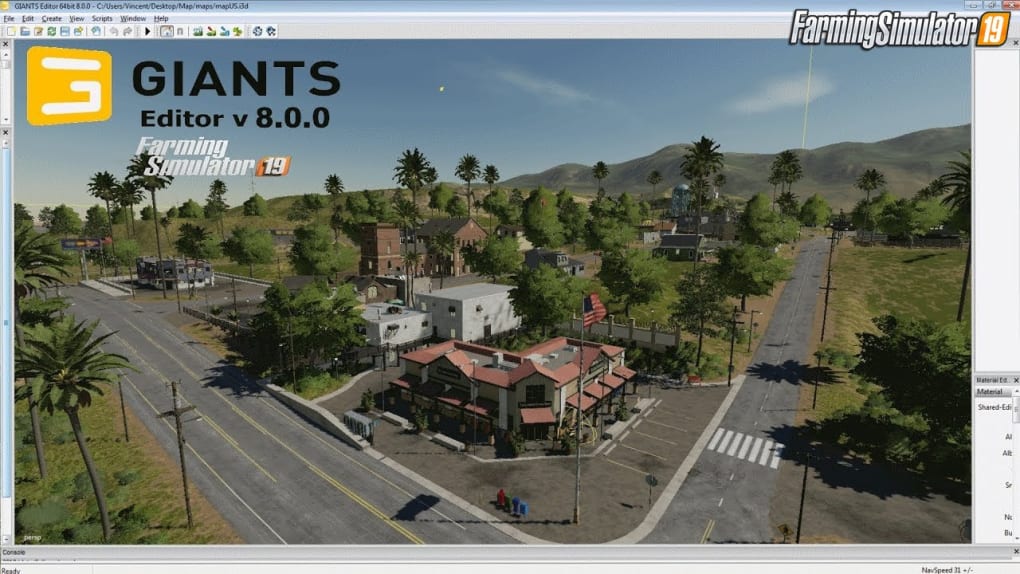
FS19 – Giants Editor Mod

We know you probably have some excellent ideas for maps you would like to create. Well, the Giants Editor Mod gives you the ability to edit the terrain in Farming Simulator 19 as you please. Make small adjustments or alter the entire map, the choice is yours.

It has an easy-to-use interface so you don’t need to deal with a complicated editor. If you know how scripts work, you can check shapes and clipping points to ensure that the game doesn’t crash when you test the new map. Even if you’re a beginner, it’s not challenging working out how to edit maps.

Top 10 mods for Farming Simulator 19

FS19 Midtown USA 4X Mod

The Midtown USA 4X mod uses many features from the Nebraska Lands map, but there are new locations and terrain. It incorporates the new seasons, with rivers icing up in winter and the leaves changing color in fall. The proportions and object scaling matches the map size, which prevents Farming Simulator 19 from crashing.

The mod uses the Multi Terrain Angle utility so that you have the best texture appearance, no matter how you’re looking at objects from any direction. It has an enhanced distance mesh so you can see rolling hills in the distance. Of course, you’ll have all the standard gameplay mechanics, such as farming, contracts, and selling.

Top 10 mods for Farming Simulator 19

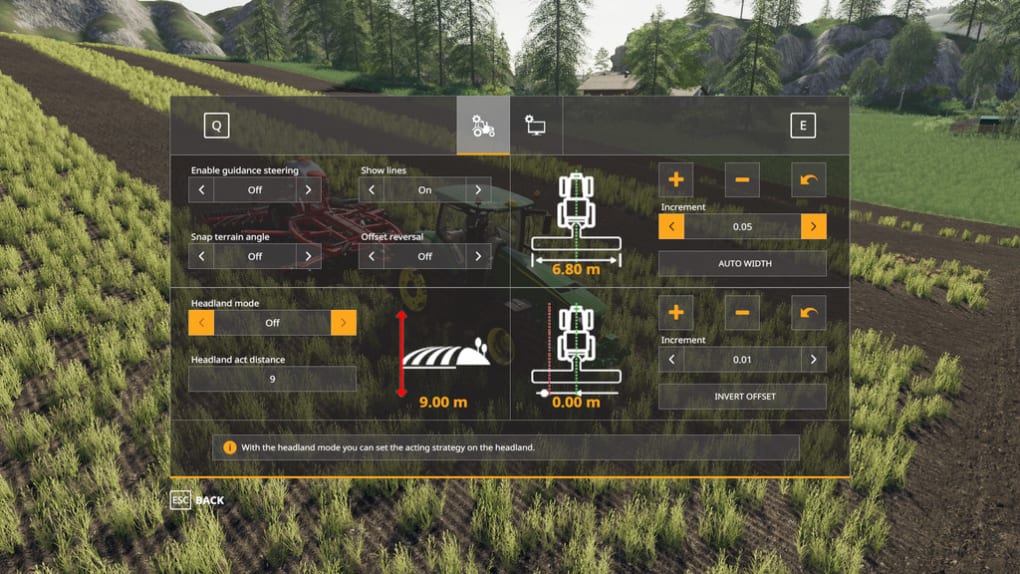
FS19 GPS Mod

Have you ever farmed land in Farming Simulator 19 and become annoyed that you’re not going straight? Don’t worry; so have we. The workers seem to know exactly how to harvest or cultivate without going off the line.

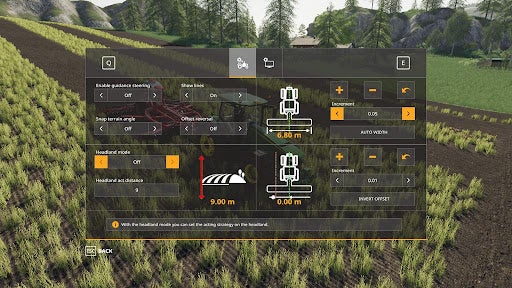
The FS19 GPS mod solves this issue. After you install it, you’ll need to head to the store and apply the GPS system to your vehicle. It adds a new interface that lets you add visible lines to keep you heading straight to prevent wasting time. There are various keyboard shortcuts to assist you in quickly adding increments to your measurements.

Top 10 mods for Farming Simulator 19

FS19 Marwell Manor Farm Mod

Here’s another new map for Farming Simulator 19 called Marwell Manor Farm Mod. It’s based in the United Kingdom in Hampshire. You’ll even see that the map looks realistic like something from Google Maps. It also includes seasonal changes.

The map includes areas where you can keep animals if you own the land. You can rotate sheep as needed or grow cows and chickens. If you paint the land with grass with the built-in editor, the grass will grow there naturally. Water shaders and other effects improve some of the visual elements.

Top 10 mods for Farming Simulator 19

FS 19 HW80 Trailer Pack Mod

The FS 19 HW80 Trailer Pack Mod adds three HW80 trailers with different capacities, namely, 11000, 18000, and 22000 liters. You can place covers over them when not in use or storing crops. There’s also the choice to change the colors as you would with any of the standard vehicles and equipment.

The trailers have similar realistic gameplay elements as the other vehicles. When you use them, they collect dirt over time that you’ll need to wash. You’ll also need to repair them over time. The parts are animated, and you’ll see the brake light switch on when you stop.

Top 10 mods for Farming Simulator 19

FS19 County Line Mod

The County Line mod was originally created for Farming Simulator 15 and then upgrade for FS17. It was so popular, that the developer made an FS19 version that included the seasonal changes and new crops. There are two maps based in the Midwestern USA with 33 farmable lands.

When you begin on one of the maps, you’ll have a starter map with some equipment and grain. The land sizes are huge so that you can use your massive vehicles on them for plenty of crops to sell. It also includes all the animals introduced in FS19 and is compatible with other mods.

Top 10 mods for Farming Simulator 19

FS19 Guidance Steering Mod

Similar to the GPS mod, the FS19 Guide Steering Mod makes your life easier when working on your farms. You won’t need to head back and redo a line you missed, as time is money. All you need to do is indicate two points, and the tool will determine what the straight line is.

While there may have been some miscalculations in the past, the developer has worked hard to fix them. Once you set up the guidance system, it determines what your steering angle should be and provides the data on the screen.

Top 10 mods for Farming Simulator 19

FS19 Midwest Horizon Mod

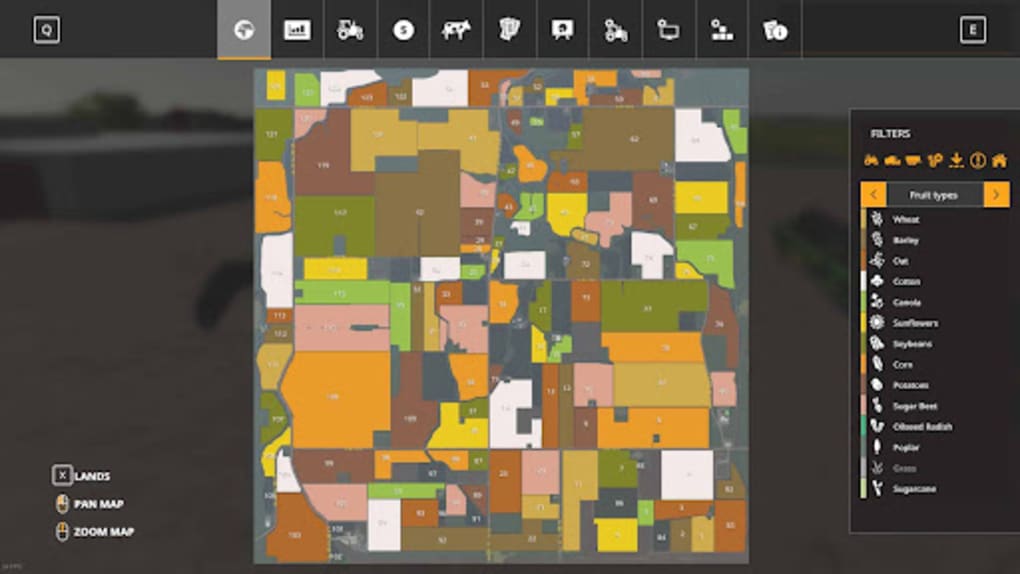
If you’re looking for a map with a massive number of farms, you should check out FS19 Midwest Horizon Mod. There are over 127 locations, but you can place animals on any of them to help produce other products. You’ll also find several stores and warehouses to sell your crops.

To aid you with free water, there are plenty of places with standing liquid just waiting for you to collect. If you’re into forestry, you’ll also have loads of trees to chop down if you own the land. Contracts, seasons, and delivery missions are available as a standard feature.

Top 10 mods for Farming Simulator 19

FS19 Batco Augers Mod

As one of the simpler packs on our list, the FS19 Batco Augers Mod introduces new tools and equipment from the Batco brand. You’ll be able to harvest your crops and work your farms with the latest items, which you can show off to your friends in multiplayer mode. Some of them have some extremely exotic designs that we like.

Top 10 mods for Farming Simulator 19

Enhance your farming experience!

Now that you have our list of the top 10 FS19 mods, we hope you use some of them for a more enjoyable experience. Some add new maps, while others provide additional technology. Which ones did you like the most, and have you installed any of them? We’d also like to know your recommendations on mods you’ve enjoyed.
What is Word, and how it works

Not too long after its launch way back in 1983, Multi-Tool Word, which was later renamed Microsoft Word, became the industry standard for word processing packages on personal computers. At that stage, it ran on the MS-DOS operating system. Its competition was WordStar and WordPerfect. But there’s no denying that Word sets the bar for word processors right up to the present. The proof is that it’s reported to be used by a billion people worldwide every day. 
In 1985, Microsoft released Macintosh Word 1.0. In the 1990’s Microsoft started developing original code for Macs rather than copying existing DOS code. Today, it’s one of the widely accepted programs for creating documents. If you haven’t tried it before, here’s a closer look at what Word is and how it works.

What is Microsoft Word?

Word is the most widely used word processing program there is. It’s used in schools and colleges, government departments, office workers, and home users, including children. Knowing how to use it is pretty much a must, whether you or your company use Windows or Mac computers.

You can create documents, write letters and reports, resumes, and anything else. Its advanced features allow you to easily create, format, and edit what you write. You can even check your spelling and grammar.

What is Word, and how it works

What does Word do?

Microsoft Word is a powerful word processor. You can do advanced page layouts to create personal, business, marketing, and educational documents, including flyers, labels, business cards, and reports with pictures. It has templates to help you create letterheads, bills, receipts, and other business essentials. You can use Word on your mobile devices. And you can save Word files in the One Drive Cloud. To work with Word, you learn important basic computer skills you can use in nearly all businesses, jobs, and professions. 

What is Word, and how it works

Word Tips and Tricks

Now that you know what Word is and how it works, here are some tips and tricks to getting started!

Show hidden characters

Editing can be complicated if you’re working on a document with different formats, columns, and styles. But you can make the task easier by making invisible marks like tabs, hard and soft returns, and spaces visible. In Windows, press Ctrl + Shift-8 to show them. In Mac, use Command-8.

Protect your document

You can encrypt your writing so that no one can tamper with it. There are different ways to do it. Start by Clicking on File > Info > Protect Document. You will see a drop-down menu. In it, choose Restrict Editing, Restrict Access or Encrypt with Password. Selecting the latter will help you manage your viewing and editing permissions.

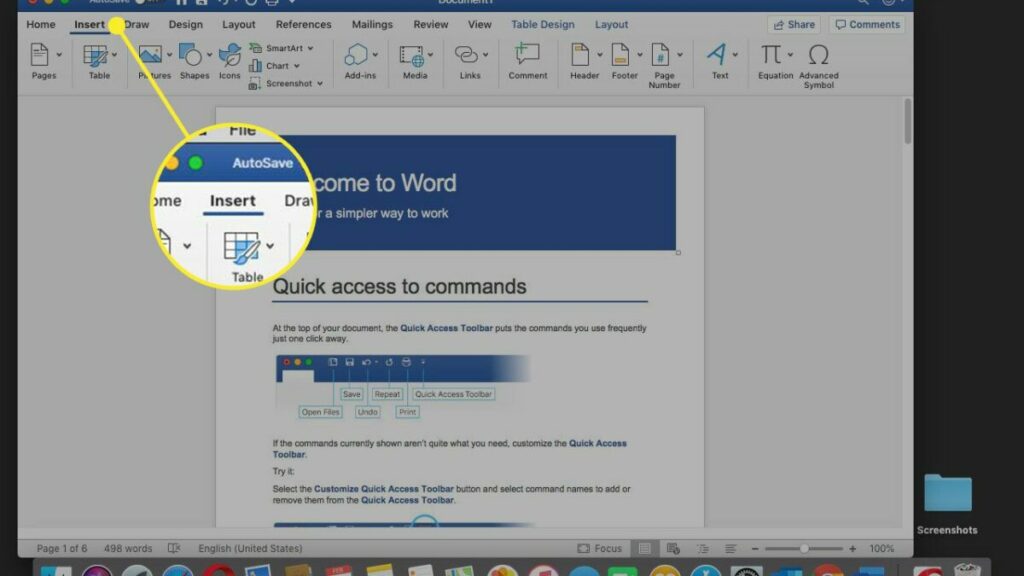
Create tables

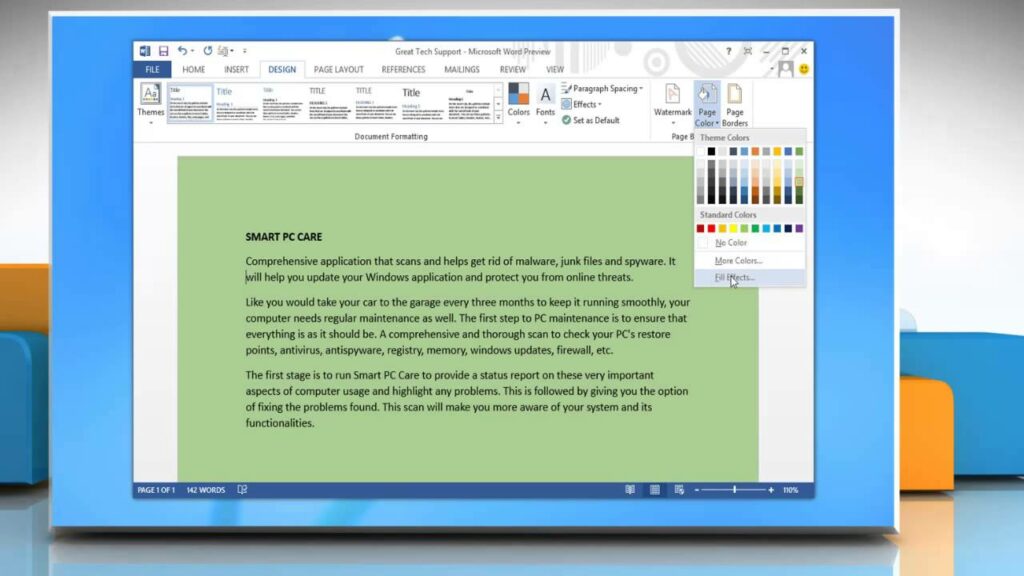
In your document, place your cursor where you want to put a table. Choose Insert tab > Table. Then specify the number of columns you want. Then place the text cursor where you want the text, and start typing.

Print selected pages

 You can choose which pages you want to print in the pull-down list under Print all Pages. You can print only odd or even pages or specify as follows: 3-7 will print from page 3 to page 7; 1,3,5,7 will print only pages with those numbers; 3, 7-11, 13 will print page 3, then 7, 8, 9, 10 and 11 followed by page 13.

Print sections of a page

 Highlight the words or images on your page that you want to print, making only one selection at a time. Choose File, then Print.

Remove the Toolbar

You can hide the toolbar that runs across the top of your Word document by pressing Ctrl + F1. When you have finished what you’re doing, press it again to put the toolbar back in its place.

Easily Undo or Redo changes

If you’ve made a mistake or want to change something you’ve done, Word makes it painless. To undo a single change, click on the Undo icon at the top of the page. You can undo a large number of actions in Word, even after saving the document. Redo is the opposite of undo. It redoes something you have undone if you change your mind. The Redo icon is available only immediately after you’ve undone something.

Use ‘Tell me what to do’

Newer versions of Word have a shortcut in which you can type what you want to know and immediately get the answer. For instance, typing ‘Insert Tables’ will give you a description of how to insert a table into your Word document.  

Zoom in and out of a document

So many people want to be able to zoom in and out of a Word document that Microsoft placed a bar on the right side of the status bar at the bottom of the window to make it easy for you.

Create a bulleted or numbered list in Word

The keyboard shortcut to create a bullet is Ctrl+Shift+L. Or place the cursor where you want the bullet list to start. In the Toolbar under Home, click the bullet list button, and a bullet should appear. Type your text. Press Enter to place the next bullet. To end the list, press Enter twice. 

Place the cursor where you want the number list to start. In the Toolbar under Home, click the number list button. A number 1 should appear. Type your text. Press enter to place the next number. To end the list, press Enter twice.

What is Word, and how it works

Learn more about Word

For more information on Word, visit the following sites: 

Get started on documents!

Microsoft Word is the industry standard for computer word processors for Windows and Macs. It’s an essential tool to learn whether you’re in business, working at home, or going to school or college. It has a range of useful and sophisticated features that allow you to create professional and beautiful documents that can even include clipart and pictures. Learning it can position you optimally to do any personal or professional work.

What Is Google Meet? Video Conferencing with Google Integration

The tech giant, Google, has created many great apps to streamline productivity and communication. Google Meet is another one of these apps. Google Meet used to form part of Google Hangouts but has been made a separate app for convenience.

Google Meet is available to anyone with a Google account and can be accessed from within your Google Account through any browser. You can also download the Google Meet app for web apps, iPhone, and Android devices. The most basic version of Meet is available to all Google users for free and allows you to join and participate in meetings. However, to gain access to all the features, you will need to purchase the Google Meet subscription.

What Is Google Meet?

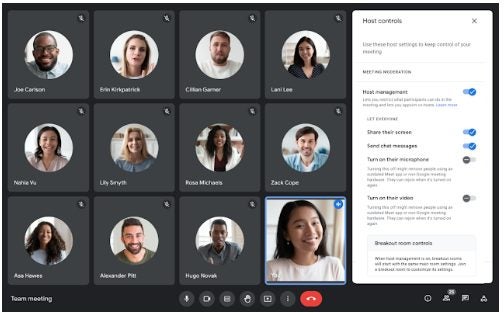
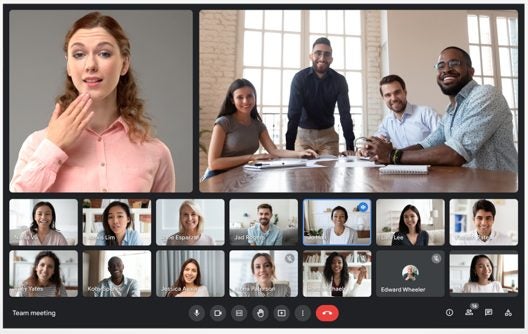
Google Meet is a video conferencing service that allows users to connect with others virtually. Both individuals and businesses often use it to host video calls, virtual meetings, seminars, and conferences remotely. As long as you have the internet, you can use Meet to connect with hundreds (sometimes thousands) of other people virtually through the app.

How Many People Can Join Google Meet Calls?

With the free version of Google Meet, you can host a video conference for up to 60 minutes with 100 participants. Once you move to the subscription package, you’ll have access to more features, including the ability to host a meeting for up to 250 participants. If you decide only to host a live stream, you can have up to 100 000 viewers in a single domain. The subscription version also has many added features such as noise cancellation, recording meetings, breakout rooms, and more.

How Do I Use Google Meet?

Google Meet has a simple and intuitive design, making it easy to work with. It works similar to other popular video conferencing apps like Skype or Zoom. 

How to Sign up for Google Meet?

The free version of Google Meet is already included in your Google account, and you can access it simply by signing in to your account. You’ll also see the options to join or create a meeting from within your Gmail account, making setting up meetings even easier.

If you’re interested in getting a paid-for version, you’ll have to sign up for a Google Workspace account. If you already have a Workspace account, you can simply log in to your account to start using Meet. In some cases, you’ll have to enable video calling for your organization in the settings.

How to Access Google Meet?

You can download the handy app for your mobile device or tablet. Once the app is installed, you can simply access Google Meet by tapping on the Meet icon. The app will launch, and if it’s the first time, it will ask you to sign in to your Google account.

Alternatively, you can also access Google Meet from any other Google program, such as Gmail or Drive, by simply clicking on the Google Apps button, represented by six dots that form a square. By clicking on this button, you will see a drop-down list showing all the available Google Apps. From this list, simply click on Meet, which is represented by a video camera in Google colors.

How to Make Video Calls Using Meet?

Once you are inside the Google Meet platform, you can click on the ‘New Meeting’ button to set up your meeting or video call. In the window that opens, you can set all the details of your meeting or call, such as the date, time, etc. You can also add participants directly by including them from your Google address book. Alternatively, if you struggle to find them, you can also send them a link to the meeting with a code they can use to join the meeting.

With the meeting scheduled, all you need to do next is show up on the day of the meeting, log into your Google Meet account and host the video call.

What Is Google Meet

How to Join a Google Meeting?

The organizer would have sent you a link invite with a code to join a Google Meet video call. At the time of the meeting, simply click on the link and enter the code provided in the invite. This will enable you to join the video call from your chosen device or browser. Alternatively, you can also dial into the meeting using the dial-in number and pin provided in the invite.

What Is Google Meet

Who Uses Google Meet?

Google Meet is used by businesses and individuals alike. If you are a Google user who wants to connect with family or friends that live far away, you can use Google Meet to host a video call. Large companies can also benefit from using Google Meet to host meetings with remote workers or other branches/offices. Also, when you combine Meet with other Google Workspace apps, it becomes a great cloud-based solution for many businesses.

What Is Fabric API and How to Use It?

If you enjoy using mods while playing Minecraft, then you’ve probably come across the Fabric API already. Mods can make a game more enjoyable by adding new textures, new challenges, and more. In an immensely popular game like Minecraft, many different mods are available that give you different gameplay options.

However, you’ll need a mod loader to get mods to work properly. So let’s look at what Fabric API is and how to use it.

What Is Fabric API?

The Fabric API is a utility software used by Fabric mods to interact with Minecraft. Most Minecraft mods require this API, and it is worthwhile to make sure you download this API and add it to your mod folder if you want to start using Minecraft mods.

While it doesn’t offer many customization and editing tools for existing mods, you are still able to develop your own mods with this API. You will have to run the Fabric Mod Loader along with the API, and while these two programs are available separately, you’ll need both.

Fabric API

What Is Fabric API Used For?

Fabric API is a hook layer that provides common hooks and interoperability required to run Fabric mods. Fabric API is used to run Minecraft mods more effectively. While some mods might appear to work even without this, or a similar API, you might notice more lagging and a significant drain on system resources. Using Fabric API’s modular toolchain, you can port mods much faster and make game instances much leaner. 

Since Fabric API is such a lightweight mod-loader, it works faster than most others. Fabric receives updates faster, and they are faster to install. The API also loads mods faster and even increases the startup time of Minecraft.

How to Start Using Fabric API?

To start using the Fabric API effectively, there are a few steps that you’d need to follow. Let’s look at those now.

How to Download Fabric API?

To use Fabric API, you must first download the Fabric Installer. These two software packages are not bundled together and will have to be downloaded separately, but you require both to use the program. You will also need to download Fabric API

How to Install Fabric API?

Now that you’ve downloaded both the Fabric Installer and Fabric API, we can proceed to the installation. Here are the steps to install Fabric API.

Step 1: Run the Installer for Fabric

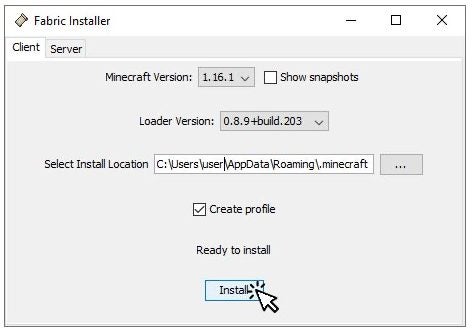
Start running the installer by double-clicking on it in your downloads folder. Next, click on the ‘Client’ tab and select the ‘Minecraft’ and ‘Loader’ versions. Using the latest versions of both should be sufficient. Check that the ‘Select Installation Location’ option points to your Minecraft launcher data folder. Now, click ‘Install’ and wait for the installation to be completed.

What Is Fabric API and How to Use It

Step 2: Edit the Game Directory (Optional)

This step is optional, and not editing the directory will mean that all mods and new game instances will all be saved in the default directory. This folder can quickly become very cluttered, which is why some prefer making a new directory folder for the use of mods. To do this, create a new folder inside your user profile. Name this folder something that is clear to understand, for example, ‘mynewfabricinstallation’.

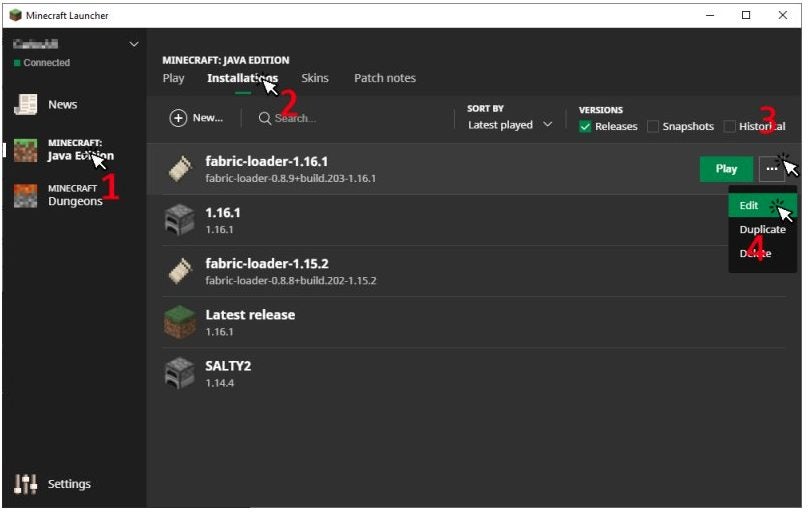
This is just half of the step. Next, you need to open the Minecraft launcher and select ‘Java Edition’ and then ‘Installations’. Click on the three horizontal dots next to Fabric Installer to see more options. In the drop-down menu, select ‘Edit. In the next window, change the game directory to the new folder you created and click ‘Save’. 

What Is Fabric API and How to Use It

Step 4: Install Fabric API

Although you’ve just installed Fabric, there are still no mods available. For this, you’ll need the Fabric API. Go to your downloads folder and move the Fabric API from there to the new directory you created in Step 2. If you did not create a new directory, you’d have to move the file to your default game directory.

Step 5: Install Fabric Mods

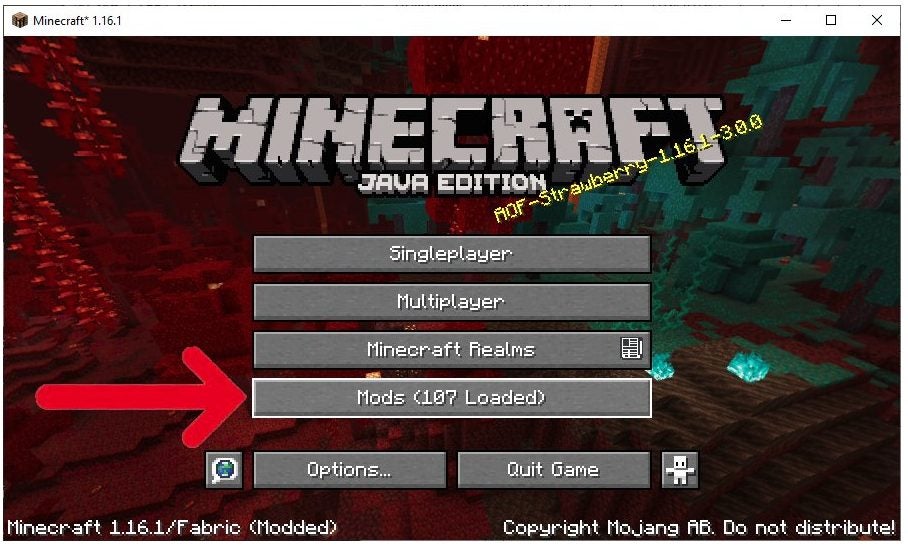
Now you can finally start installing mods. You could install the Fabric Mod Menu to make this even more convenient. This program will add a ‘Download Mods’ button directly to your Main Screen in Minecraft. You can click here to easily download Fabric mods. Alternatively, you can manually download mods from reputable sources and then move them to the same folder where your Fabric API is located.

What Is Fabric API and How to Use It

FAQ About Fabric API

Here is a handy list of the most frequently asked questions and responses if you have any more queries.

What Does Fabric API Do in Minecraft

Fabric API is a hook-layer that is required to run most Minecraft mods. It works like a mods library to add all your downloaded mods to your Minecraft game through the Fabric Installer.

How Do I Get Fabric API?

To get Fabric API, you will need to download the install file from a reputable source such as Softonic or the developers directly. Once downloaded, you will have to move this file to your game directory.

Why Should I Use Fabric Minecraft?

Fabric API is a very effective and lightweight mod-loader making it ideal for running mods in Minecraft without lags and strain on system resources.

Should I Use Fabric or Forge?

Fabric and Forge are both great options for mod-loaders. Choosing which is better is a personal choice. Forger currently has a larger selection of mods as they’ve been around for longer. However, Fabric is much easier to use and updates automatically. Also, Fabric is compatible with all versions of Minecraft and even some other Java programs, whereas Forge is not.

How Do You Put a Fabric API in Minecraft?

To add any mods to your Fabric client, you’ll have to download them from a reputable source. The file type will be JAR. Once downloaded, move the mod to your game directory, where the file for Fabric API is also located.

Alternatively, you can also download and install the Fabric Mod Menu, which will add a ‘Download Mods’ button to the main screen of your Minecraft so that you can easily download mods from here.

Adding texture and fabric to your Minecraft experience

When it comes to enhancing your Minecraft world, it’s beneficially understanding what Fabric API is and how it works. You’ll be able to use your mods more efficiently, but you’ll need to ensure you installed them correctly.

What Is Microsoft Teams? Collaborate and Communicate With Your Team

Microsoft Teams is a popular collaboration and conferencing program that forms part of the Office 365 suite of programs, alongside Microsoft Outlook, Microsoft Word, and many more. Although it was released in 2017, it only became well-known and useful in 2020 after the pandemic started. 

Microsoft Teams is available on Mac, Windows, iPhone, Android, and web apps. This makes it very useful to connect cross-platform and share files. Teams has a limited version that offers the basics for free with your Office 365 subscription. More advanced plans are available that give you more options and features for an additional fee.

What Is Microsoft Teams?

Microsoft Teams is a cloud-based collaboration and conferencing platform. The platform was designed as a way for people to communicate in the easiest ways possible. The program has features that let users host business meetings, calls, video conferences, and file sharing.

Teams allows users from remote locations to collaborate on different projects, which is why it became so popular during the pandemic as more people started working from home. While Teams was originally aimed at businesses, many other industries have found the platform useful and have started incorporating it into their daily activities. Some of these include schools and universities, freelance specialists, and even individuals.

What Is Microsoft Teams

How Does Microsoft Teams Work?

Microsoft Teams works by connecting groups of people and allowing these groups to interact, communicate and collaborate on projects. Members of the group can share files, have meetings and communicate using the program.

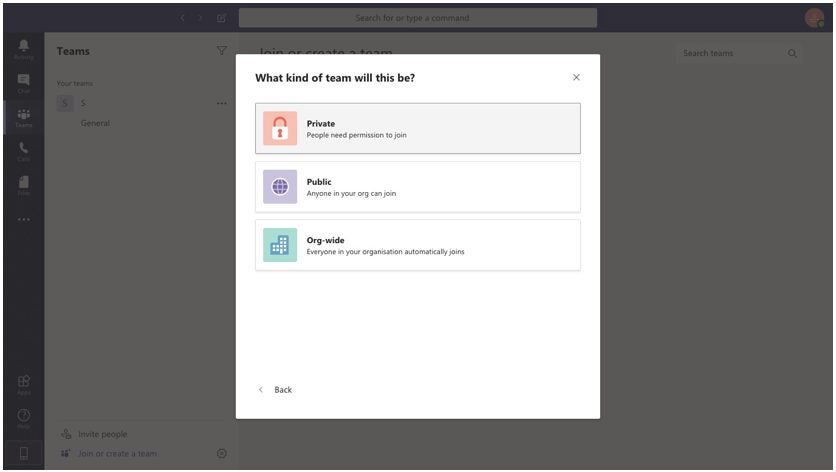
There are two types of teams or groups available on the platform. The standard team is public and visible to all, whereas a private team is only visible to members of that particular team. All teams are gathered around a topic or project, known as the channel. Channels are where you host meetings, communicate, collaborate and share files on the project you’re working on.

What Is Microsoft Teams

Getting Started With Microsoft Teams

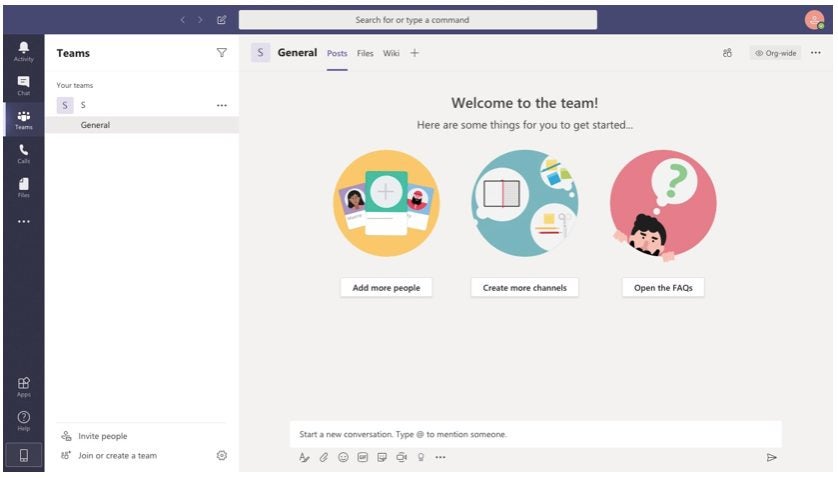
When you open Teams for the first time, you’ll be asked to sign in using your Office 365 username and password. Once you’ve signed in, you can personalize your profile and add any details you wish to share with team members. This can include your business email address, etc. Next, you’ll need to start creating a team or joining other teams. The teams you create will be known as channels. Once you have a channel set up, you can interact and collaborate with the team or individual members.

What Is Microsoft Teams

Microsoft Teams Features

Teams is known as Office 365’s collaboration hub. Therefore it offers many features that can be used to communicate and work on different projects remotely.

Chat

With Teams, you get a powerful chatting platform that enables users to chat to the entire team or individuals as they need. You also have the use of emojis and GIFs to keep the team entertained and motivated. The message history is kept in the thread to revert to previous messages easily. With Teams, you can also easily call or video calls a team member directly from the chat.

Calling

The Teams app allows users to make VoIP (voice over internet protocol) calls to their team members. To make these calls, you don’t need another third-party provider; you need Teams and a stable internet connection (on your end and the receivers). There are also other calling options available that let users connect to landlines. Other calling features include audio conferencing, 911 support, voicemail, and more.

Video Conferences

With Teams, you can also host virtual meetings, conferences, classes, and more. This feature makes it easy to connect remotely with your team and discuss projects, progress, and more. Some of the video conferencing features of MS Team include virtual backgrounds, the ability to record meetings, transcription, a whiteboard, screen sharing, and breakaway rooms.

Screen Sharing

As mentioned, screen sharing is a very useful feature offered by Teams. With this feature, users can share their desktop or mobile screens and files and folders with other users during an audio or video call. This makes demonstrating and sharing information much easier and more convenient.

Calendar

The Teams’ calendar is integrated directly with your Outlook Calendar to make sure you keep on track of your workday, week, and any upcoming events. 

File Sharing

The document management feature of Teams allows users to share, store and edit files in real-time, directly through the platform. This makes collaborating on documents easy and much faster.

Webinars

With Teams, you can host interactive webinars for up to 1000 attendees. If you host a view-only webinar, you can raise the number of attendees to 10 000. Many useful features allow the webinar host to have more control over the broadcast. This includes muting participants, disabling video or audio, recording the broadcast, and more.

External Collaborations

The Guest-Access feature and the Teams Connect feature (being released in 2022) enable users to invite other individuals outside their usual team to work and collaborate on specific projects. This facilitates business-to-business (B2B) project management.

Who Uses Microsoft Teams?

Microsoft Teams is the ideal communication software for large businesses with many individuals working together. It also works well for businesses with employees who work remotely. Recently, Teams has also been used by schools and other educational institutions as a way for teachers to present classes, connect with their students, share assignments and work in virtual teams with other students. It is easy to use and intuitive, making it a breeze to set up and get everyone started.

Microsoft Teams Tips and Tricks

We’ve covered most of the basics of what Teams is and how it works in this handy Teams guide. However, if you’re looking for some more Teams tips and tricks, here are more articles related to Teams and getting started with the platform.