What is Soundcloud, how does it work and how to use it

Spotify may be the big dog when it comes to music streaming, but there’s a lot to like about SoundCloud!

SoundCloud is a free website and app that lets users share, collect and discover music and podcasts. It is the ideal platform to share your own musical creations and mixes with the world. All the music you upload to SoundCloud is streamable. The artist can even make the songs or playlists downloadable or redirect interested parties to a website where they can purchase the songs/albums.

The app is a great platform for discovering new artists or sharing their music with a new audience, thus growing their following. SoundCloud has a desktop version for Mac as well as mobile apps for iPhone and Android. In this SoundCloud guide, we will cover what SoundCloud is, how it works and how to start using it.

What Is SoundCloud?

SoundCloud is known as an online audio distribution platform, which simply means it is a platform where users can share music. SoundCloud was founded in 2007 and remains one of the premier artist-first platforms that is driven by a community of artists and listeners.

While SoundCloud is free to use for artists and listeners alike, a subscription version is available. If you want more freedom, you can consider SoundCloud Go. What is SoundCloud Go? SoundCloud Go is the first tier in the SoundCloud subscription and costs $4.99/month. The subscription version doesn’t contain any ads and offers offline listening options as well. 

If you are an artist, SoundCloud is a great platform to get your music out into the world and start building a global following. If you are a music enthusiast that loves staying on top of the hottest music trends, SoundCloud is a great space to find new talent.

Soundcloud

How Does SoundCloud Work?

To start using SoundCloud, you’ll have to create an account first. This can be done through the Mac desktop client directly or via the app. Once you’ve created your account, you can start listening to music or uploading your own. Anyone can start using SoundCloud to listen to music or start uploading music for free.

If you are an artist, there are also subscriptions available specifically for music creators. These subscriptions include more insights and stats, support and other opportunities. This is perfect once you’ve established your profile and are starting to grow a following.

It is important to note that you can only upload music you have rights to on the platform. This means you cannot just upload your favorite artists’ songs. The creators who hold the rights to those have to upload them.

What Is the SoundCloud App?

The SoundCloud app is a convenient way to take all your music, playlist and likes with you wherever you go. The SoundCloud app is available on both Android and iOS devices. Once you have the app installed on your phone and logged in with your account, you can take your music with you wherever you go.

How to Use SoundCloud?

To start using SoundCloud, the first thing you’ll need to do is create your account. You can do this easily through the SoundCloud website, the app or the Mac desktop client. Once logged in, you can customize your profile by clicking on your display name at the top right of the screen and then selecting ‘Profile’. Once all the basics are in place, you can use the below SoundCloud tips to get started.

Discover new music on SoundCloud

soundcloud feed

Everything is taggable, and it’s easy to bump into music similar to or related to the music you like.

Here are some of the new features included in the SoundCloud app this year:

  • Personalized recommendations
  • “The Feed” is a feature that curates an artists’ likes, follows and reposts on the platform. The idea is, it helps foster a connection between artists and listeners, giving artists a chance to share recommendations.
  • New playlists: The Morning Mourning, Drippin (new rap), and Speed Bumps (new electro), and more.
  • Communities: Genre-based pages designed to help you find new music, in a way that feels different than the Netflix or Spotify approach.

Many of the newer features aim to give users a sense of community, which certainly isn’t unique to the SoundCloud website.

Find your community

SoundCloud is aiming to position itself as a digital community. As such, they’ve introduced community profile pages, which work just like any of the other pages on the SoundCloud website. However, it aims to bring together “authentic” communities (their words).

What these community pages look like out in the wild represents something a bit different than what you’ll get from your average profile page on social media.

Instead, you can follow any of the following communities:

Here’s what AURAS looks like:

Soundcloud communities

As you can see, you’ll get a round-up of different playlists based on your favorite types of music.

While initially, we were a bit confused about how this feature differs from say, following Spotify playlists, it turns out that Communities are a cool way to discover new music. It is not some shoddy attempt at turning SoundCloud into, say, Facebook for music.

The community building part comes in here. Fans and creators can connect with other people who share similar tastes. Join Scenes if you’re looking for some low-key relaxation vibes.

Follow Hustle for the latest in hip hop. AURAS is all about R&B, while Circuits represents the electronic underground.

How to download from SoundCloud

Not every track on SoundCloud is downloadable. To figure out if a track is downloadable, first, find a track on SoundCloud that you’d like to download. Click the More button, and look for the Download file option. If you don’t see one, that means that the creator of the track did not want the track to be downloaded.

SoundCloud
Source: SoundCloud

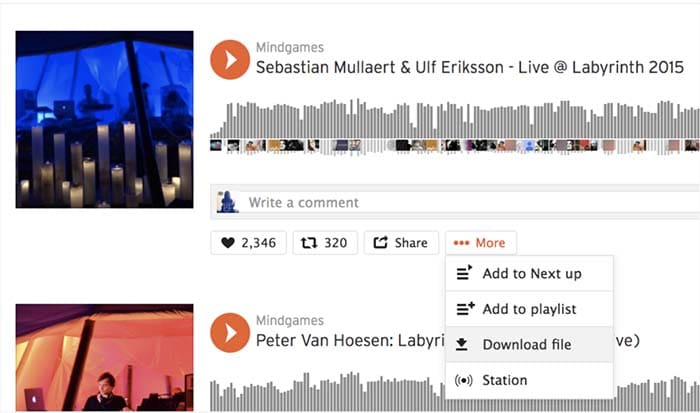
If it is there, you are in luck, and you can commence with your download! Just make sure you have a decent app for listening to the track.

VLC media player Download free ►
8

How to upload to SoundCloud

Uploading tracks to SoundCloud is a pretty quick and painless process. First off, in order to upload anything to SoundCloud, you need to sign in. Once you’re signed in, go to the Upload page. From there, you’ll see a page that looks like the one below:

SoundCloud

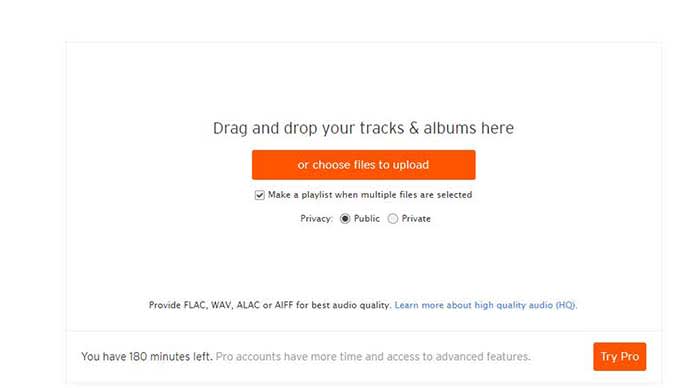
You can either drag and drop tracks and albums onto the page, or you can use their file uploader. Check the box on whether you want to share your tracks publicly or privately.

Please note that if you don’t have a Pro account, you have three hours worth of content that you can upload. If you only have a few singles you want to share, that should be enough for you. However, if you also have several diss tracks, love ballads, a swan song, and a comeback album, you may want to consider upgrading to pro. 

Once you choose the tracks you want to upload, click the button to begin uploading. Once you’re done, you can fill out the track names, the genre, and add whatever tags you’d like. After that, you’re all done! Make sure you give yourself a cool artist name and tweet out to all your friends so you can share your tracks with them!

Promoting your music on SoundCloud

Not just a listener? SoundCloud is one of the few accessible forms of DIY distribution and marketing for independent artists.

While podcasters have tools like Stitcher, Anchor, Apple, and Google, there are few places for aspiring artists to connect with their fans.

Spotify and Stem recently discontinued their music distribution offerings. Stem announced it would be dropping tens of thousands of artists, while Spotify called it quits on their self-upload beta program.

Music

It may be in your best interest to create a page or a site to help promote your work. WordPress has great tools for making a free website, or a cheap website if you want access to more customization.

Wordpress Download now ►
7

However, one of the best tools for promoting your work is Tumblr. Although posting on all your social networks can help, Tumblr is a cut above the rest.

If you make a Tumblr post, you can copy your track or playlist’s URL and paste it into the Audio section of a post. Tumblr allows users to use tags to help discover new tracks. If you include the genre, your name, and the themes of your music, Tumblr users can start finding you. For example, if you write a break-up song, include “break-up” in your tags so all of the lonely hearts out there can find it!

SoundCloud recently announced that it is adding distribution to its self-monetization Premier program.

Eligible creators now have access to an open beta where they can upload songs, monetize, and publish to external streaming platforms like Apple Music and Spotify.

What’s more, SoundCloud says those who use its distribution service will keep ALL royalties obtained from third-party services.

How to Embed

This is just a quick little note for promoting, but if you want to embed a track, click the Share button next to the track and then on the Embed tab. From there, you will get an embed code that you can copy and paste to your heart’s desire.

SoundCloud vs. Spotify

From a user standpoint, SoundCloud and Spotify bring very different experiences to the table. While it’s almost not really a matter of SoundCloud vs. Spotify, here’s a quick look at some of the pros and cons associated with each platform. You’ll see that there’s plenty of reason why you should get a SoundCloud account.

Spotify vs SoundCloud
8

Spotify

Pros

  • Spotify is more polished. The user interface is super easy to use. You can search for artists, follow playlists, and browse through recommendations without any onboarding tutorials.
  • Spotify allows for offline use. You can download as many songs and podcasts as your phone storage allows. No need to worry about usage caps or dead spots.
  • Spotify has established artists are on the platform. From indie bands to pop stars, most artists that you can name can be found here. It’s the leading streaming platform, so you’ll generally find what you’re looking for.

Cons

  • The free version is super limited. Unless you love hearing ads after every other song, regular listeners should invest the $10/month for an upgrade.
  • It’s not great for finding underground artists and hidden gems. Spotify hosts a ton of music, but mainly from established artists. If you’re all about the “obscure” Spotify won’t cover all of your bases.
  • It’s missing some big names, too. From time to time, an artist might feud with Spotify and pull their music. There’s no guarantee every song you want will be on the platform.

SoundCloud

Pros

  • It’s great for finding independent artists. SoundCloud hosts known artists alongside those still grinding it out from home. The platform provides a great way to find hidden gems from total unknowns. “Old Town Road” and “The Git Up” are recent songs that exploded from SoundCloud.
  • Discovery feels less “algorithm-driven.” While personalized recommendations are a core feature, it’s easier to break out of the recommendation loops you’ll find on Spotify.
  • Stream provides a unique way to get updates. Users can follow artists and playlists they like to receive updates and keep track of their favorite tunes. They can also share tracks with the community, almost like retweeting on Twitter.
  • SoundCloud has private sharing. You can use the share button to privately embed and share artists and tracks.

Cons

  • It does not have the best sound quality. Spotify has SoundCloud beat when it comes to audio. We’re talking 320 kbps vs. 128 kbps. You’ll notice the difference.
  • The user-experience can be confusing. While the design is attractive in a lot of ways, SoundCloud is somewhat hard to figure out.
  • There is no offline support. You’ll need to signup for SoundCloud Go to download songs to your device.

Wrapping up

There’s a lot to take in when it comes to breaking down the SoundCloud experience. For creators and listeners alike, the platform remains a solid choice for anyone who wants to discover new content and break away from the algorithmic rut that sometimes happens when you depend on Spotify or Pandora for recommendations.

Ultimately, the SoundCloud app has some limitations. Again, the usability and sound quality could be better, but it’s also one of the few places online where not everything is super polished, commercial, and on everyone’s radar.

How to find Discord friends that aren’t in a shared group

While Discord initially started as a chat app similar to Skype and TeamSpeak, it has quickly grown into one of the most popular social media channels. While Discord is particularly useful to gamers who want to chat while playing a game, many other industries have also started using Discord as a platform to build and interact with their community.

Discord DOWNLOAD

However, despite being very useful for chatting with friends and a community, finding or adding friends to a shared group can be difficult. We’ll be sharing how to find Discord friends that aren’t in a shared group and send them a friend request.

What makes Discord groups different?

Although Discord groups may appear similar to Reddit, Facebook, or Instagram groups, there is one major difference. Like Slack, users on Discord can’t just join a group and immediately start scrolling through the content. You have to be invited to the group first. 

Each Discord group is hosted on its own server. This means that the roles and permissions available to hosts and moderators are much more complex compared to platforms like WhatsApp or Skype. Each server can also consist of multiple subchannels covering specific topics. Discord has gone to a lot of trouble in fixing its voice channels so you can enjoy the topical discussions more.

Discord is tidying up its dedicated voice channels READ MORE

What do you need to add friends to a shared group on Discord?

While it is possible to search for friends using their username, chances are you’ll struggle to find them. Discord assigns a 4-digit tag to each user to make it possible to differentiate between users. This is why you should always get the username and 4-digit tag when wanting to add a friend to Discord.

Steps to find Discord friends who aren’t in the same group

  1. Open Discord

    How to find Discord friends that aren’t in a shared group

    Open Discord on your chosen device and log in to your account. You’ll see all your existing friends on the left panel of the screen. To the left of the screen you’ll see thumbnails representing your different groups. Click on the one you want to access.

  2. Search for the username and tag

    How to find Discord friends that aren’t in a shared group

    Click on the search bar in the top right of the screen to look for friends to add to the shared group. In the search bar, type the username and tag for the friend you’re looking for. It’s critical to add the tag; if you only type the username, the results will turn up with nothing. You’ll type it as ‘username-pound key-tag’, so, for example, ‘SoftonicFriends#1234’.

  3. Send a friend request

    How to find Discord friends that aren’t in a shared group

    Once you’ve found your friend in the group, you can send a friend request and, once accepted, start interacting with them.

Why is the Discord tag so important?

Unlike many social media platforms, Discord allows users to use any name, regardless if it already exists on the platform. However, by doing this, they still need a way to differentiate between different users. Users also need a way to ensure they add the right person. If there were 50 profiles with the username John Smith, how would you know which one is your friend? 

Perhaps Discord purposefully wanted to allow users to use any username. Another possible reason is that they wanted to introduce a system that would keep users from being inundated with friend requests for sharing the same (or very close) username.

If this is your first time using the platform and you’re not sure how it works, here’s a beginner’s guide to Discord.

Beginner’s guide to Discord READ MORE

Where can I find my tag on Discord?

Your Discord username and tag are the easiest way for friends to find you. Without the tag, they will have a hard time tracking you down. If you’re wondering what your user tag is after you download and install Discord, you can see it at the bottom left corner of your screen where your profile appears. Here you’ll see your username and 4-digit unique tag. By clicking on it, it will be copied to your clipboard, so you can easily send it to your friends.

How to download, install and configure Discord READ MORE

Where can I find Discord groups?

Some groups on Discord are public, whereas others are private. You’ll have to be invited first to join a private Discord group. However, public groups are much easier to join. You’ll see a compass icon at the left of the screen. When hovering over it, it’ll read ‘Explore Public Servers’. By clicking on it, a new screen will open where you can look at the different groups available and join ones that interest you.

This article is useful if you want to learn how to start using Discord. Alternatively, if you already have the basics, you might want to find out how to start streaming to a community in Discord.

How to stream to Discord Community in 5 easy steps READ MORE

What is Garena Free Fire and How to Play It: The Complete Guide

This free-to-play battle royale is a ton of fun!

If you like games like Fortnite or H1Z1, then Garena Free Fire is right up your alley. Here’s the real perk: it is completely free to play! Available on both iPhone and Android, Garena Free Fire has all the elements of battle royale games we love from player customization to taunting enemies with emotes. 

More and more players are jumping into the game. Between January and March of this year, 73 million more players entered the fray. If you’re looking for the next great battle royale experience, here’s what Garena Free Fire is and how to play it.

What is Garena Free Fire the Game?

Garena Free Fire, or simply Free Fire, is a wildly popular battle royale game available on Android and iOS. The game takes place in the third-person perspective and involves up to 50 players landing on an island by parachute. With this many players involved, stakes are high. You’re forgiven for wondering what Garena Free Fire is and how to play it. 

The main objective of Free Fire is to gather as much equipment and weaponry as possible and eliminate everyone else on the island. 

The game starts onboard a plane. The players choose locations on the island to drop over as the plane flies; this way, no one needs to land in the same spot. Once on the ground, your primary goal is to find as much medical equipment, weaponry, utility items, and special items as you can. 

As players are eliminated, the safe area of the island will decrease. This forces remaining players into closer combat situations so that no one can prolong rounds by hiding far off. The game operates on the last man standing mechanic, where the last player to survive wins the round. Players can also team up and play cooperatively; in this case, the team that survives will win the round.

Garena Free Fire

Tutorial on How to Play Garena Free Fire

Free Fire is an exciting game with a fairly straightforward control setup and graphics that suit mid- to low-spec mobile devices. Having a good handle on the basics of battle royale gaming is always an advantage, but you’ll have even more of an edge with a dedicated guide on how to play Garena Free Fire. 

Garena player customization

The Basics

Your journey begins on a plane. Looking at your head-up display (HUD), you’ll see a circle around a portion of land on the map. This is the field of play. You are allowed to land anywhere within this area. As soon as you see a place you think would be good to start in, press eject on your screen, and your character will jump from the plane. From here, you can control your direction as you hurtle through the air toward the ground. Steer yourself toward your desired area, and before you fall too far, deploy your parachute. 

Once you land, it’s a race to see who can pick up weapons first. Because Free Fire supports up to 50 players in each round, you will likely land somewhere near another player and your first target. You can find your weapon anywhere near where you landed. Weapons are distributed fairly well, and it shouldn’t take you long to find your first gun. 

Weapons

There are five classes of weapons in Garena Free Fire. These are launchers, large machine guns (LMG), small machine guns (SMG), melee weapons, and automatic rifles (AR). Each class has a few weapon choices with varying degrees of damage, rates of Fire, reload speeds, and accuracy. The range of weapons is quite wide, you can pick up a pan or a baseball bat and hit your opponents, or you can slice them into obscurity with a katana.

Guns are the best option for early gameplay, however, as you’ll be able to hit targets from further away. It’s always a good idea to have a melee class weapon, though, because you never know when you’ll have to face someone in close-quarter combat. 

Characters

You can choose from a decent selection of characters, from musicians to physicists, and almost everything in between. As of the latest update, there are 39 individual characters to choose from. Each character has its own perks and special abilities, apart from Nulla and Primis. 

Characters can also use emotes, which are fun gestures that you use to communicate with other players. There are currently over 60 emotes in Garena Free Fire. You can equip your character with up to eight emotes at a time and can change them at any point during gameplay. Emotes are purchased from the in-game store using the in-game currency, diamonds. Before buying an emote, check if any special events offer the emote you want as a prize.

Events

There are numerous events in Free Fire that offer all sorts of rewards. 

Daily Task events require you to complete a task to earn a token. Tokens are what you use to purchase other rewards. Remember to collect your tokens once you achieve the Daily Task objective; otherwise, they will be forfeited. 

Gacha events mimic the real-life gacha toy vending machine. Here you can get random items from a list of possible rewards. The four lists you can choose from are Mega Luck, Gold, Character Royale, Incubator, and Weapon. 

Item sales are not so really events but more special opportunities. Some of the game’s items will be sold at discounted in-game prices. Sales range in length from a day to a couple of weeks. 

Login rewards are bonuses you can claim simply by logging in to the game.

Top-up Promos require you to top up your diamond loot with a specific amount of diamonds to get a prize. These range from one-time top-ups to more lucrative cumulative events. The first op-up usually awards you with extra diamonds or character skins.

Pets

The inclusion of helpful sidekicks in the form of pets is one way Garena Free Fire sets itself apart from other mobile battle royale games. You can choose between 13 pets as of the latest update, and each pet boasts unique special abilities that can help you in your quest for domination. Pets are obtained from the in-game store. 

Garena pets
LOOK AT THAT FACE!!!

Kitty

Kitty is a simple cat. Other than looking cute, Kitty has no special skills. Kitty has 6 levels, the last of which introduces players to Detective Kitty. This upgrade comes with a new skin, and occasionally Detective Kitty will find hidden objects and items in the world. 

Shiba

Shiba is a dog based on the viral Shiba Inu meme and also the actual dog breed. Shiba has an ability called Mushroom Sense which enables it to find mushrooms around the world. At level 1, Shiba marks mushrooms once every 180 seconds. At level five, this frequency increases to 150 seconds. Shiba is a good companion pet for players that move around a lot. 

Mechanical Pup

Apart from looking like an animatronic dog, Mechanical Pup has no skills. Increasing Mechanical Pups levels isn’t really necessary as there are no skills present to increase. Mechanic pup is a good visual companion for players that don’t need much help. 

Spirit Fox

This fox comes with the healing power of Well Fed. Spirit Fox grants you an additional 4 health points (HP) when you use a health pack. Upgrading Spirit Fox to level 5 increases the HP given to 7. Spirit Fox is a well-rounded companion suitable for all players. 

Robo

Robo is a small, spherical robot with cute cat ears. This companion’s special ability is Wall Enforcement which grants 60 HP protection by increasing the efficacy of the Gloo Walls you build. At level 5, this protection increases to 80 HP. Robo is, therefore, good if you rely on defense rather than attack as your playstyle. 

Poring

Poring is a sentient gelatinous blob. It carries Stitch and Patch as its special ability, which increases the durability of your armor and helmet every 3 seconds. It also prevents a level 1 helmet from being destroyed. Upgrading Poring to level 5 increases its effectiveness to every 2 seconds and prevents level 2 armor and helmets from being destroyed. 

Ottero

This is a cute otter-like creature in a hoodie and headphones. Ottero comes equipped with Double Blubber, a skill that recovers energy points (EP). When you use a treatment gun or medkit, Ottero increases your EP by 35% of your current HP. When you upgrade Ottero to level 5, this increases to 50%. 

Night Panther

Night Panther is another addition to the robotic companion family. Resembling a panther, this companion’s ability is called Weight Training. Useful to any type of player, Weight Training increases your inventory capacity by 15. If you upgrade Night Panther to level 5, your inventory capacity by 30. This is a good choice if you’re the kind of player who collects everything they see. 

Detective Panda

Detective Panda bestows Panda’s Blessing on your character. This restores 4 HP with every kill you make. Upgrading Detective Panda to level 5 increases the HP received after a kill to 7. If you initiate battles a lot, Detective Panda is the companion for you. 

Falco

Falco is the newest addition to the Garena Free Fire pet collection. Its skill is called Skyline Spree, and it will increase your starting skydiving speed. It also increases the speed you have while parachuting to the ground. 

Lobby

In general RPG and battle royale terms, a lobby is the screen you see just before the game starts. This is where you can see the details of the game you’re entering, and often you can see a list of the players. In Garena Free Fire, you can communicate with other players from here. The lobby is also where you make final character adjustments and wait for players to join.

Joining a lobby is easy, but Garena also lets you create custom lobbies so that you can play with your friends. To create a custom lobby in Free Fire, you need to have a Custom Room Card. This functions as a payment for each room you create. You can obtain a Custom Room Card in two ways.

Garena lobby

With Diamonds

You can buy a Custom Room Card with 100 diamonds. With the current Garena diamond exchange rate, this is equivalent to about $1 each. 

Garena free fire money

As Guild Rewards

During the guild tournaments, players receive dog tags as rewards for any mode they play in. Dog tags can then be exchanged for a Custom Room Card. You need 1,800 dog tags to get the Custom Room Card, but this isn’t such a massive task if you band together with the players you want to create a room with. You’ll make more dog tags collectively and get a Custom Room Card sooner. 

To play the game’s classic mode, you need at least 10 players to join your lobby. 

Tips and Tricks

With all of its features and possible specifications, Garena definitely deserves its place near the top of the battle royale food chain. To help you rise to the top quicker and more effectively, we’ve compiled a few tips and tricks to get you playing like a pro. 

Keep Moving

Moving targets are easier to kill. As soon as you establish a home base or a camping spot, you’re a likely target. Keep moving across the safe area, and don’t settle down anywhere for long. The objective is to be the last player standing, and this is far easier if no one can catch you or find you. 

Sneak Your Way to Victory

Garena Free Fire is all about survival. This game isn’t dependent on kills; all you need to do is be the last player or team alive. Use every opportunity for cover you can find, and don’t linger too long in open areas. If you do choose to camp, pick a spot that gives you an edge as a sniper. This will be somewhere high up and fairly well hidden. 

Vehicles

Don’t use vehicles early on in the game. While driving is faster and more efficient than walking or running, it makes you an immediate target. If you are intent on driving around, only use vehicles in safe zones. Avoid open vehicles because you’ll be easier to kill if you’re in a roofless car. 

Weapons

You can carry three firearms and a melee weapon at the same time. Choose these weapons carefully. Base your choice of weapons on your primary playstyle. So if you’re a sniper, grab up a few rifles, and if you prefer close-quarters combat and sneaking up on your enemies, use more melee-style weapons.

Get your game on!

The main reason to pick this game up is that it’s free. You can do fairly well in matches with all of the basic weapons and armor available to you without spending a dime. Sure, you have the chance to absolutely dominate the competition if you spend a few bucks here and there. However, you also might buy all that and get killed within the first few seconds.

If you are a fan of battle royale games, this one is a lot of fun, and worth your time.

What are Instagram Stories and how to use them as a PRO

Spice up your Instagram story with these tips and tools.

Instagram has been around for quite a while. It has also grown into one of the most popular social media platforms in the world. According to most recent statistics, Instagram is just slightly behind Facebook and YouTube regarding the number of active users on the platform. 

You may be wondering, “What is my story on Instagram?” If that’s the case, don’t worry, we have created this guide to get you using Instagram Stories like a pro. Whether you’re a business owner, influencer, or just enjoy the Instagram platform, Stories has something for everyone to enjoy.

What Are Instagram Stories?

Now, back to your original question, “What is my story on Instagram?” Simply put, Instagram’s Stories work similarly to Snapchat or statuses in WhatsApp. When you upload photos to your Story on Instagram, it will vanish after 24 hours. Instagram Stories are also published separately from your photos and videos on your main feed.

Instagram Stories can be up to 15 seconds long. They are also displayed at the top of the active users’ app and need to be tapped on to be viewed. Once you’ve viewed one user’s Stories, the app will automatically start playing the next user’s Stories.

Why tell your Story?

Apparently, Instagram Stories drive a ton of engagement. We mentioned the authenticity factor, but Stories are essentially a secondary feed that’s a bit more exclusive than your main feed.

How long are Instagram Stories?

Each video has a maximum length of 15 seconds. If you add a video from your phone, it will only play for 15 seconds, no matter how long the original video was.

If you’re posting a live video, then you’ll have 60 seconds. Anything longer than that, you’ll need to get some help from a third-party app like CutStory. The app lets you import videos of any length to your camera roll in 15-second segments. This way, you can post longer content as a series of videos.

How to get started with Instagram Stories:

Okay, here is the basic rundown for setting up your first Instagram story:

Camera Icon

First, open Instagram and hit the camera icon in the left-hand corner of the app.

Select Photo

Upload a photo or video from your camera roll by clicking that little icon to the far left. You can also swipe up on the screen to access your gallery.

You can also create something new by clicking the big circle in the middle.

If you choose to record within the app, you’ll have a few options:

Normal

This will take a regular-looking photo, much like one you’d shoot from your phone. Just like your “normal” Instagram posts, you can choose to use one of the app’s built-in filters, or skip that part and edit elsewhere.

Boomerang

Boomerang allows you to create a GIF-style video that loops on repeat. While most features allow you to create a 15-second video, boomerangs only last a few seconds. Let Jimmy Fallon and Zendaya show you how this can work:

Superzoom

Superzoom allows you to take a video that automatically zooms in on your subject and automatically plays a dramatic sound. To use this feature, you’ll tap an area of the screen to zoom in on, then tap the circle at the bottom of the screen to start recording.

Rewind

Rewind looks just like your default videos, the only difference is (you guessed it), it plays back in reverse.

Hands-Free

Hands-free also allows you to record a 15-second video, but you don’t need to keep holding down the button. All you do is tap it once, and the camera rolls until the time runs out.

Type Mode

type mode for instagram stories

Type Mode is the feature for those who want to share what’s on their mind without posting a photo or video. To access Type, hit the Type button and add your caption.

Instagram Live

Instagram Live

Instagram Live is a feature that lives inside Stories, allowing users to share live videos with the users. One of the perks of “going live” is that you’ll immediately be shown at the top of your followers’ feeds. It stands to earn you some engagement points if you care about that sort of thing.

Keep in mind, you’re sharing live videos in real-time, so you might want to get used to the rest of the features before diving into the deep end.

To start a live video:

  • Tap the camera icon in the top left corner.
  • Tap Live at the bottom of the screen, then hit Go Live.
Live Instagram
  • From there, you’re on the air. Click “comment” to add a comment or tap a user’s comment and select “pin comment to the top” so other viewers can see it.
  • You can also choose to turn off comments.
  • When you’re done, tap “end” in the top right corner.
  • Just like your pre-recorded Stories, Live Stories are available to your followers for 24 hours before they disappear.

How to edit Instagram Stories

Inside the app:

According to Instagram’s help section, swipe left or right to add a filter. You can access your editing features by the “creative tools” at the top of the screen.

Creative tools are relatively limited. There’s the “draw” (the pencil icon) option or text (the Aa). Within the text setting, you’ll handle emojis, mentions, and hashtags.

Instagram editing tools

The draw feature is pretty standard. It allows you to draw on top of the photo, and you can choose the color and line thickness.

There’s also the sticker option which allows you to add stickers over your Stories for a little dose of whimsy. You can choose from a lineup of items like emojis, as well as cute little watermelons and pool toys.

Third-party apps

Just like with Instagram photos, there’s only so much you can do if you stick to the stock features. While the Stories feature was initially designed with on-the-fly spontaneity in mind, it didn’t take long for third-party tools to fill the void.

If you’re not stoked about Instagram’s built-in editing tools, here are a few recommendations for upping your filmmaking game:

Unfold

unfold for instagram stories

Unfold is a free app you can upgrade with in-app purchases. It’s an influencer fave, and it allows you to create collages within your Instagram Stories. You can also add professional-looking boxed text to Stories that put Instagram’s features to shame.

7

Splice

Splice app video

Splice is a video-editing app that allows you to make changes without switching over to the big screen. The app is made by the people behind GoPro, and it’s a solid video editor. It also allows you to add in sound effects and music for that added cinematic flair.

Additionally, you can crop, trim, and add effects and transitions. While it might be a little more difficult to learn than Instagram’s built-in tools, Splice is a sophisticated editing app you can download free.

7

Hype Type

hypetype editor

This one is for all the typography nerds out there.

Hype Type is an app that’s all about bumping up your story-telling game with animated text, or “motion typography.”

While the idea of an editing app solely dedicated to typeface initially seemed a little extraneous — Hype Type really kicks your Stories up a few notches.

The app is free, but there are some in-app purchases that dramatically improve your output. It’s $2.99 to remove the Hype Type watermark and unlock all the full range of fonts.

Hype Type Download Now ►
10

Over

over instagram editor graphic design app

Over dubs itself a social media branding tool, poster maker, and photo editor. It’s also a killer app for making your Instagram Stories a little more exciting. The app is free, but there are tons and tons of in-app purchases.

The tool gives you access to thousands of templates, fonts, and graphics that can dress up your Stories with pro-grade design flourishes.

FAQ About Instagram Stories

We’re sure you have plenty of queries related to how Instagram Stories work. Let’s take a look at the more popular ones.

Can you see who views your Instagram Story?

Yes. To see a list of people who have seen your story, open the story, swipe up, and you’ll get a list of your viewers’ usernames.

Does Instagram notify when you screenshot a Story?

Not anymore! Last year, Instagram changed its rules, so now, you can screenshot to your heart’s content (and others can do it to you) without the risk the creator will find out.

Who gets to see your Instagram Story?

Checking Instagram

For public account holders, all followers can see your Instagram story. With private accounts, only approved followers can watch your stories. But that’s just the default setting.

If you’d rather send a story to a select group of people, you can easily update this in the settings. Per Instagram, you can hide your story from specific people by following the directions below:

  1. Go to your profile and tap the settings icon.
  2. Tap Privacy and Security > Story Controls.
  3. Tap Hide Story From.
  4. Select the people you’d like to hide your story from, then click the check box to unselect them.

Can you edit an Instagram story after posting?

Kind of…

You can’t edit a published post within the feed, story, or standard post.

However, the app automatically archives your Stories after they’ve expired from public view. From there, you can edit and reshare these posts as highlights on your main profile.

Highlights are permanently displayed in your feed, and you can organize them as collections. For example, you can organize posts from a wedding into a collection.

instagram highlights

How to repost an Instagram story?

As we mentioned, you can reshare all or part of your story as a highlight. You can also share your past stories as posts. All you’ll need to do is tap the “…” button and then “share as post.”

Instagram stories archive

How to Add Multiple Pictures to IG Story?

To add multiple pictures to your Instagram Stories, tap on the box with the ‘+’ sign to create a Story. Next, tap on the camera roll icon showing an image from your camera roll (found at the bottom left of the screen) to start adding images to your Story. Tap on the photo icon and then select the ‘Multiple Photo’ icon above your gallery. Now you can tap on the photos in the order that you want them to appear in your Story.

How to Add Video to Instagram Story?

Before you can add a video to Instagram Story, the video has to be in your camera roll on your device. If that is the case, all you do is start creating a new Story, click on your camera roll, and then choose the video you want to upload.

How Does Instagram Story Views Work?

Instagram Story views are determined by quite a complex process. When you tap on your Story to see who has viewed it, you will see that Instagram arranges the views in a particular order. For a long time, people believed that those closest to the top are your followers that interact and view your Stories and posts the most. That is not actually true. It may be the other way around, and Instagram will show you the users you interact with the most first as they believe that information will be more important to you.

How to Play Video on Instagram Story?

Videos posted to Instagram Stories usually start playing automatically. However, a few things can cause an image not to play, such as the length of the video or your internet connection. 

How to Add YouTube Video to Instagram Story?

It is easy to add a YouTube video to your Instagram Story. To do this, tap to create a new story. Next, tap on the chain icon at the top of the app. Tap on the URL option, paste the link to the YouTube video and tap on ‘Done.

How to Add Location On Instagram Story?

To add your location to your Instagram Story, tap to create a new story. Add your images to your Story, and then tap on the smiley face icon at the top of the screen. This will open up more options. From this menu, you can tap on ‘Location’ to add your location to your Story.

How to Add Music to Multiple Instagram Stories?

You can easily add music to multiple Instagram Stories from Apple Music, Spotify, or SoundCloud. All you do is open your favorite music app, select the song you want to share and then tap on the three vertical dots to open the menu. Now you can tap on ‘Share’ and then wait for Instagram Stories to come up and tap on it.

More Helpful Guides to Using Instagram

If you want to make the most of your Instagram, here are some more helpful guides to get you using this popular social media platform like a pro.

Wrapping up

Nobody wants to be that guy who posts an entire concert with distorted audio into their Instagram story. We have so many tools that allow us to post better, more engaging content.

Use the tools we provided to engage your audience, and go beyond the typical.

How to play Pokémon TCG, the Ultimate Guide

Ready to play the Pokémon Trading Card Game? Here’s how to start.

The Pokémon franchise has been entertaining audiences since February 1996. Since the release of the original Nintendo games, there have been animated series, animated and live-action movies, mobile games, and even a popular Pokémon card game.

Collecting and trading Pokémon cards is an exciting hobby for many, but the real thrill comes from using your collected cards in a Pokémon card battle. If you’ve ever wondered how the card version of the game works, this Pokémon TCG guide will provide you with all the answers.

What Are Pokémon Cards?

The Pokémon Trading Card Game (or Pokémon TCG) is a card game based on the popular Pokémon franchise. Each card features a different Pokémon and their other stats such as health, attack power, etc. You can collect, trade or even battle with your cards.

At the top of the card, you will find the Pokémon’s name. To the left of the name, you’ll see a rectangle that states if the Pokémon is ‘Basic’ or an evolved form of the Pokémon (Stage one or two, etc.). To the top right, you’ll see how much HP (health points) your Pokémon has. To the right of your Pokémon’s HP is a circle indicating the type, i.e. electricity, water, grass etc.

Below the Pokémon image, you’ll find a list of the Pokémon’s attacks and how much damage each attack does. To the left of each attack, you’ll see the energy cost for that attack. You’ll need to equip your Pokémon with the required energy cards to use the attack. Some attacks have additional effects. Make sure to follow the instructions under the attack to see the other effects.

pokemon cards

FAQ About Pokémon Cards

Although the Pokémon TCG is easy enough to understand and start playing, players always have a few additional questions. This next section will provide answers to a few of the most commonly asked questions about the Pokémon TCG.

How Many Pokémon Cards Are in a Pack?

A Pokémon Booster pack contains ten cards. Of these cards, six will be common cards, three will be uncommon, and one will be rare. Along with these ten cards, you’ll also get one foil card, with the possibility of it being a rare foil card. The packs are completely randomized, so there is no knowing what you will find in a pack. 

What Do Pokémon Code Cards Do?

Every Pokémon TCG product you buy, whether a booster pack or starter set, should have a code. This code can be used to unlock in-game items on the Pokémon TCG Online version. By entering the code in the online game, you will get digital cards from your booster packs and even promo cards.

How to Win the Pokémon TCG?

There are a few ways to win at Pokémon TCG. The easiest way is to knock out all six of your opponent’s Pokémon and collect the prize cards you set aside at the beginning of the match. Once you’ve picked up the sixth card, you win.

Another way to claim victory is by knocking out your opponent’s active Pokémon, and if there are no more active Pokémon on his bench, you’ll win. Finally, if your opponent runs out of cards and has no more in their deck, you’ll win by ‘decking’ your opponent.

Is There a Pokémon TCG App?

There is a new free-to-play app available that lets trainers take the POkemon TCG online. With the app, you can enjoy all your favorite aspects of the card game, such as collecting cards, building decks, and battling. The Pokémon TCG Live app is available on PCs, Mac’s and smart devices such as tablets.

What Pokémon Card Should I Buy?

When buying booster packs, you end up with ten random cards. However, now and again, you may stumble upon Pokémon cards that are for sale. You should try buying the rare cards or ones that you don’t have in your deck when this happens. Make sure you consider the energy types you have since it’s no use buying a card with a Pokémon you have no energy for. Some of the most valuable Pokémon cards to buy include Shaymin EX, Surfing Pikachu, Charizard GX, or Lysandre’s Trump card.

How to Trade Pokémon Cards?

Trading Pokémon cards is an exciting part of the game. However, it is important to know how to trade Pokémon cards to ensure that you get a fair trade and don’t end up with cards less than the value of the one you traded. In order to do this, make sure that you research trades and the value of cards beforehand.

Knowing the value of your cards is the best way to ensure that you end up with fair trade. To trade cards, you and the other trainer have to come to an agreement on which cards you are willing to trade, and if both parties feel it’s fair, you can make the trade.

How to Play Pokémon Cards? Beginner’s Guide to the Pokémon TCG

There are a few rules and steps that you need to be aware of if you’re starting to play Pokémon TCG. We will be sharing a few tips on how to play Pokémon cards for beginners.

Basic rules

Pokemon TCG setup

The main objective in the Pokémon TCG is to take all of your prize cards before your opponent does. Every time you defeat an enemy Pokémon you’ll receive one of your six prize cards. Additionally, you win if your opponent has no Pokémon on the field, or runs out of cards in their deck.

Each deck is comprised of 60 cards. The game begins by drawing seven cards and tossing a coin to see who goes first. You must place at least one active Pokémon onto the field before starting the game (you can also place any other basic Pokémon from your hand onto your bench, with a maximum of one active, and five bench Pokémon). Pokémon require energy cards (typically of their specific type) to use their moves. The moves themselves are self-explanatory, as they contain their own unique details.

Trainer cards can also be used by each player for a variety of effects. There are four main types of Trainer cards: Stadiums, Tools, Supporters, and Items.

Pokemon Stadium

Stadiums are cards that affect both sides of the field, and only one can be in play at a time.

Pokemon Tool

Tools attach themselves to a specific Pokémon, and only affect that Pokémon for the entire time that they are attached. They are also occasionally listed under Item cards.

Pokemon Supporter

Supporters are special Trainer cards with extremely powerful abilities. As such, only one can be used per turn.

Pokemon Item

Items are standard Trainer cards, which allows you to use as many of them as you want in a turn.

Additionally, only one energy card can be played per turn (unless a card says otherwise), a Pokémon can only evolve once per turn, and the player who goes first is not allowed to attack on their beginning turn.

For more details on the rules, you can check out Pokémon.com’s guidelines for the game.

How to set up: Building your deck

As a rule of thumb, each deck should have around 20 Pokémon cards, 20 trainer cards, and 20 energy cards. Of course, you can bend these a little bit, but it should always be around those amounts. Additionally, you should avoid having any more than two types of Pokémon in one deck (other than colorless).

Special Conditions

Within the TCG, there are five different conditions that Pokémon can be affected by. These are all negative effects caused by the moves or abilities of opponents. Burned and Poisoned are stackable conditions, so a Pokémon can be affected by both, along with one of the other three conditions. However, all three of the other conditions (Asleep, Confused, and Paralyzed) are mutually exclusive, so a Pokémon can only be affected one at a time. Here is how each special condition works:

Pokemon Burned

Burned – As stated above, this is one of the two special conditions that is not mutually exclusive with the rest. To represent being Burned, Pokémon with this special condition receive a “burn marker”, which is a large red circle. While Burned, a Pokémon receives two counters of damage between turns. After receiving the damage, the player then flips a coin. If heads, the Burned condition is cured.

If tails the Burned condition remains. In older versions of the TCG, Burned Pokémon would only receive the damage if the coin flip was tails, but would not be cured if the coin flip was heads (instead they would simply retain the special condition but with no damage taken).

Pokemon Poisoned

Poisoned – A very common special condition, Poisoned Pokémon also receive a special counter. This “poison marker” is a large green circle. Poisoned Pokémon receive one damage counter between each turn.

Asleep – Pokémon that are Asleep are turned counterclockwise to the side. When affected by this special condition, they basically can’t do anything. They are unable to attack or retreat. Between each turn, the player flips a coin. If heads, the Asleep Pokémon wakes up and is no longer affected by the special condition. If tails, the Pokémon remains Asleep.

Confused – Confused Pokémon are placed upside-down. These Pokémon have to flip a coin if they want to attack. If heads, they are able to attack normally. If tails, they receive three damage counters, and the player’s turn ends. In older versions of the TCG, Confused Pokémon would only receive two damage counters on failed coin flips. Additionally, they had to flip a coin in order to retreat, and would lose their energy cards if they were unsuccessful.

Paralyzed – Paralyzed Pokémon are turned to the side, clockwise. Similar to being Asleep, a Paralyzed Pokémon is unable to attack or retreat. However, after the end of the player’s turn, the condition is automatically cured.

It is interesting to note that in addition to moves that would typically Paralyze a Pokémon in the video games, such as an Electric move, will cause this special condition, moves that would other Freeze a Pokémon in the video games will also often cause this condition.

There are other unique abilities that can affect a Pokémon’s stats or moves, however, they are not given unique counters or placements. Instead, you will just need to follow the directions of the card that inflicts the condition.

Additionally, all conditions can be removed through evolution or retreated an active Pokémon to the bench (since only active Pokémon can be affected by special conditions).

The video games vs the TCG

If you’re used to playing Pokémon games or watching anime, then you may be confused about some of the terminology used within the card game. The main difference in terminology is the type names. Many of the types have been merged into different types, while others have been renamed altogether. Below is a list of the TCG types and their corresponding video game types:

  • Colorless – Normal, Flying
  • Water – Water, Ice
  • Fire – Fire
  • Grass – Grass, Bug
  • Fighting – Fighting, Rock, Ground
  • Lightning – Electric
  • Psychic – Psychic, Ghost, Poison (old versions of the TCG have Poison types marked as Grass instead)
  • Dragon – Dragon (old versions of the TCG have Dragon types marked as Colorless instead)
  • Metal – Steel
  • Darkness – Dark
  • Fairy – Fairy

Additionally, Some Pokémon have weaknesses and resistances, but typically they only hold one. So while a Pokémon like Diglett may be weak to both water and grass in the video games, a card version may only be weak to one of them. This can lead to unique cards among the same species, with one Diglett card being weak to water, while another is weak to grass.

Moves also have their own unique names and traits within the card game, so be sure not to get hung up on some of the video game rules that you may be accustomed too.

Type Differences – Choosing your playstyle

Other than terminology and weaknesses, you may be surprised by some of the unique qualities present in the Pokémon types of card game. Each type has its own playstyle that it tends to lean towards, which is important when deciding what type to use in your deck.

Pokemon Colorless

Colorless Pokémon can be used in any deck since they can use any energy type. This makes them an incredibly versatile type, which shows and in the large variety of Pokémon they have. They often tend to be on the defensive side, but you will find Colorless Pokémon to provide any number of unique traits.

Pokemon Water

Water Pokémon cards tend to rely heavily on energy manipulation. This means that they frequently have abilities that let them draw energy cards from the deck, and may deal more damage based on how many energy cards they have attached. Water types also may have the ability to force opponents to switch Pokémon on their bench. This type is highly recommended for new players, as it isn’t as risky as many of the other types, and it has a plethora of Pokémon to choose from.

Pokemon Fire

Fire types have extremely powerful attacks that can often Burn opponents, leaving them with a devastating status condition. However, they require extensive amounts of energy, since they often are forced to discard energy when using their most powerful attacks. Because of this, Fire types are somewhat of a one-hit wonder, often being able to take out powerful Pokémon instantly, and then needing to survive a few turns before they can do it again. Alternatively, these cards may deal damage to themselves instead of causing you to discard energy.

Pokemon Grass

While Grass-types may be known for their frailty in video games, the TCG allows them to take advantage of a few skills in order to help them, survivor, for a while. One of the main strengths that Grass types have over the others is their ability to heal themselves whenever they attack. This can allow them to outlast their opponents long enough for their Poison abilities to slowly kill them off. It takes some strategy to pull these tricks off, but Grass is one of the best types for strategic beginners.

Pokemon Fighting

Nothing says “high-risk high-reward” like Fighting types do. Often relying on coin flips, Fighting type Pokémon can do devastatingly high amounts of damage, but are almost solely reliant on chance. Thankfully, they have some abilities and trainer cards that lower the negatives of this chance, so you’ll need to include these cards to maximize your probabilities if you choose to use this type. Despite the risk, Fighting type Pokémon can easily decide a game early with a few lucky coin tosses.

Pokemon Lightning

One of two energy manipulation types, Lightning Pokémon never has to worry about not being able to attack. While Water primarily manipulates energy from the deck, Lightning Pokémon are able to retrieve their cards from the graveyard. This ability works well with itself, as there are a few powerful Lightning types that must discard their energy to use their attacks. Additionally, Lightning Pokémon are known for their ability to Paralyze their opponents, as well as being able to attack benched Pokémon.

Pokemon Psychic

Psychic types are masters of special conditions. No matter what expansion you are playing with, it’s rare to find Psychic Pokémon that don’t inflict the opponent with Confusion, Paralysis, Poison, Sleep, or on even Burns on some occasions. They are able to use this to their advantage, as they can whittle down their opponent’s defenses, while their opponent is unable to attack back.

Pokemon Dragon

Probably the most powerful and unique type out there, Dragon Pokémon are actually the only ones without their own basic energy cards. Instead, each Dragon has two other types that they must pull from in order to be used. For example, this Goodra card requires both Water and Fairy energy to be used. Despite this requirement causing some trouble for Dragons, they have some of the most powerful moves in the game, with practically no other type resisting them.

Pokemon Metal

Just as its video game counterpart, Steel, is able to resist many different types, Metal Pokémon are known for their strong defensive abilities. Often they are able to increase their defenses, preventing any damage from penetrating their walls. They also have great synergy with Trainer cards, that allow them to bolster their offenses.

Pokemon Darkness

Darkness types are all about trickery, as one might expect from the name. These Pokémon are similar to rogues and thieves in other RPGs and trading card games. As such, their primary ability is being able to force their opponent to discard cards from their hand, the field, or their deck. In addition to this, they can force your opponent to switch their bench Pokémon, and deal additional damage to already weakened foes. This can disrupt any strategy your opponent may be thinking of using. 

Pokemon Fairy

The most recent type to be added to the TCG, Fairy is also somewhat tricksters in their own right. They are known for their ability to weaken opponent attacks, and occasionally being able to prevent their opponent from attacking altogether. Fairy types require high levels of strategy to use, and are not often the best for new players to start with. However, if you’re able to successfully create a Fairy deck, you’ll be able to compete with the best decks out there.

When deciding on multiple types to use, it’s important to think of what types would work well together. For instance, both Lightning and Water focus on energy manipulation, so they are an easy combination to make work. In contrast, you may want to look into types that make up for each other’s weakness. Since Lightning allows cards to return from the graveyard, and Fire sends energy cards to the graveyard, Lightning can help make up for Fire’s main weakness. This may be harder to make work then the synergistic Water/Lightning combination, but can yield powerful results when used correctly.

It’s important to keep in mind the main strengths of each type, and the similarities they have to other types, when deciding on what combination you want to have. Water and Lightning rely on easily managed energy manipulation; Fire, Fighting, and Dragon are risky, but provide incredibly strong moves; Grass and Metal are defensive types that wish to simply outlast their opponents; and Darkness, Psychic, and Fairy rely on messing with the opponent’s status condition and strength. Each of these can also be enhanced with Colorless Pokémon, which has its own unique abilities and play styles that mesh well with any type.

Also keep in mind that while these are the general strategies for each type, there are Pokémon within each of these types that break the norm. For example, even though Water and Lightning are known for their energy manipulation abilities, this Ribombee is also able to manipulate energy to some degree. Keep this in mind when building your decks, as you may come across a useful Pokémon that does not fit the standard mold of that type.

Tournaments – where can you play with others?

If you’re serious about getting into the Pokémon TCG, then it’s important to find places where you can play and practice. Most comic book shops that hold Magic: The Gathering tournaments, will hold some kind of Pokémon event on occasion. However, there is an easier way to find out about tournaments near you, rather than simply contacting nearby comic shops.

The Pokémon Company has its own special tournaments that are regulated through their Play! Pokémon site. These range anywhere from small get-togethers to major national championships. Often these tournaments have prizes to be won and are free to participate in, so they are worth checking out if you have the chance.

TCGO

If you prefer not to play in person or are simply looking to get better in your free time, the Trading Card Game Online app can provide an excellent source of practice. It also contains its tournaments if you want to stay competitive but aren’t able to go to Play! Pokémon’s events. The rules work the same way with the live card game, so it is the perfect way to become a TCG master.

Pokemon Trading Card Game Online Free Download
7

How to play Hollow Knight

Hollow Knight is an addictive, incredible game. Here’s how to get started.

Hollow Knight is a beautifully created two-dimensional game. As the Hollow Knight, you are dropped into a grim world armed only with your nail. There are countless levels to explore as you progress through the game. You’ll also find that a lot of deaths will mark your path. Some will be your slain enemies, and other times it will be your death, especially early on in the game.

The game is available across all popular platforms such as Playstation 4, Nintendo Switch, Xbox One, Windows, and Mac computers.

In this guide on how to play Hollow Knight, we will cover the basics of the game and provide you with some helpful tips to get your journey started.

How to Play Hollow Knight

You will be dropped into the world with not much information on getting started. You can go either left or right from your starting point. It is important to remember that the game features a labyrinthian world filled with many different nooks and crannies, so it is easy to get lost. Here is how to get started with Hollow Knight.

How to play HOLLOW KNIGHT

Focus on Melee Combat Early On

At the beginning of the game, you won’t have a lot of magic. As such, you must focus on melee combat and save your magic for when you need to heal. Slashing with your nail is an excellent way to keep enemies from reaching you. However, in some cases, you’ll have to get creative when an enemy blocks. In these cases, you might try attacking from the air or getting around the enemy. 

Your magic will get stronger, and later in the game, you’ll learn many spells you can use as. However, whenever your soul (which is required to use magic) starts running low, you’ll want to fall back on melee attacks.

Find and Upgrade Maps as Early as Possible

In Hollow Knight, maps are precious tools. Because it is so easy to get lost, a map can help guide you. Whenever you enter a new area, make sure to find the map vendor as soon as possible and buy the map for the area.

How to play HOLLOW KNIGHT

Maps are usually relatively cheap, with the first one being only 30 geo. Geo is the currency within this world. To make the maps even more valuable, you can buy pins to show you where other valuable locations are. The most significant upgrades for your map are:

  • The compass (220 geo) as well as the quill (120 geo).
  • Bench pin (100 geo).
  • The vendor pin (100 geo).
How to play HOLLOW KNIGHT

Customize the Hollow Knight to Fit Your Gaming Style

In the beginning, the charms you get seem very basic. However, as the game progresses and you start earning more charms and notches, you can start to customize the Hollow Knight to your preferred gaming style. You only have a limited amount of notches, so make sure that you choose your charms carefully. Many charms work well together, and some build on each other, so it’s a good idea to try them all and see how they work.

Be Prepared to Backtrack

The game is primarily about exploration, especially in the beginning. This means that you will spend a fair amount of time moving back and forth between locations. The more bugs you collect on your travels, the more vendors will appear in town. Make sure to visit them frequently to buy any new upgrades. Eventually, you will have the option to unlock the stag stations, which will enable you to fast travel between locations.

How to play HOLLOW KNIGHT

Use Benches Whenever You Find Them

Finding a bench should be your first priority whenever you enter a new location. The benches act as a checkpoint, and you can rest on them to regain health. With this checkpoint activated, if you were to get killed at any point, you will respawn at the last bench you rested on. 

How to play HOLLOW KNIGHT

Sitting on a bench also lets you equip any charms you’ve earned or purchased. Also, if you have already purchased the quill, you can use it while sitting on a bench to fill in your maps with details of your exploration.

The areas usually contain a few benches, so it is worthwhile to explore around a bench until you find the next one and repeat the process to explore deeper into any new area. 

Return to Where You Were Killed

There will be times in the game where you will die. This is inevitable as Hollow Knight is not an easy game. However, if you die, you can just return to the place where you died and claim back any items of geo’s you had on you. However, to get them back, you will have to fight and beat your shadow first.

How to play HOLLOW KNIGHT

Tips and Tricks for Playing Hollow Knight

Now that we’ve explained how the game works, we’ll be sharing a few tips and tricks you can use while playing Hollow Knight.

Persevere Through the Early Stages

In the early stages of the game, it may feel like it drags on a bit. Unfortunately, the opening area, Forgotten Crossroads, is probably also one of the duller areas in the game. Since there is so much gameplay to learn, it can feel like it just drags on. However, once the game starts opening up, you’ll find it enthralling and entertaining.

Talk to Everyone

Don’t forget to talk to everyone. The backstory of Hallownest is actually quite interesting, and every character you talk to shares more about the world.

During Combat Stay in the Air

The Hollow Knight can attack in all four directions. Although a regular forward/backward attack is sufficient for most enemies, you’ll soon find that jumping over an enemy and attacking down is usually more effective.

It’s a good idea to start practicing attacking from above early on in the game. Simply jump over an obstacle or enemy and repeatedly attack downward in a pogoing effect to remain safe while dealing damage.

Buy Custom Map Pins

The Hollow Knight maps are very sprawling, with many locked areas and secrets. Map pins are extremely valuable and well worth the geo required to buy them. Buying custom map pins will let you mark locked areas for future reference. This is valuable because as you travel through all the different maps, it will become increasingly difficult to remember where certain locked areas are once you have the upgrade needed to unlock the area.

Play With Headphones or Volume Turned Up

Not only is the audio of this game fantastic, but audio cues play a big part in the game. For example, you can hear Hollow Knight grubs cry out for help, and you can hear enemies moving ahead. Even some of the bosses’ attack cues have an audio trigger. Playing Hollow Knight with the audio enriches the gameplay and provides the player with useful cues.

Rescue the Grubs

Right from the start, you will see grubs spread out all over the world. These Hollow Knight grubs are trapped in glass jars and calling out for help. By finding and saving them, you can earn rewards. The rewards vary from geo to charms and other useful items. It is definitely worthwhile to find as many of these grubs as you can. Some of them will be hidden in plain sight, whereas others will be hidden behind platforming challenges.

Don’t Underestimate Charms

The charms may seem a little useless in the beginning; however, as you progress through the game, you will start unlocking more charms. The charm system of Hollow Knight is much deeper than you first expect. There are charms that will give you potent advantages, whereas others might drastically change your gameplay. If we can recommend any charm, it would be Quick Focus. This charm lets you recharge health much faster, which is useful in those difficult boss battles.

How to play HOLLOW KNIGHT

Set off on a fun adventure

Hollow Knight is an exciting two-dimensional exploration game that is set in a beautifully created world. The game is a welcomed challenge that combines platforming challenges with boss fights. All of this combined with beautiful storytelling and music score. Don’t miss out on this gem.

Guide to Slay the Spire with the best tips and tricks

This strategy game called Slay the Spire from Mega Crit Games is ideal for those who enjoy the combination of rogue-like elements with card game mechanics. The game takes place within the Spire that is inhabited by strange creatures and powerful relics. You have to try and make it to the top by collecting your unique deck and battling many different enemies. But how do you make it to the top of Spire in this game?

In this Slay the Spire guide, we share more about the game, the best strategies, differences between the characters, and more.

What Is Slay the Spire?

Slay the Spire is a strategy game that fuses card games and rogue-like elements to create a stunning single-player deck-building game. The game was developed by American gaming studio Mega Crit Games and is available on Mac, Windows, iOS, and Android. 

There are four characters you can choose from to traverse the Spire. Each character has its strengths, and the decks you build for each one will also be unique. As you travel up the Spire, you will have to battle many different enemies, which is where the card game elements come into play. 

The game is also procedurally-generated, meaning that each instance is different from the last, meaning that no two games are ever the same. This gives you a great opportunity to play with all three characters and even reply with the same character for a completely different experience.

Guide to Slay the Spire With the Best Tips and Tricks

Slay the Spire Best Strategies

One of the most challenging things about Slay the Spire is that there is no set strategy to guarantee a run to the top. Each run is completely different, with a different map, different cards and decks, and different enemies. This makes planning a strategy from the start almost impossible.

Instead, you have to think on your feet and handle each situation as it comes up while still also thinking about the path ahead. Throughout the game, you will have to conserve as much health as possible while not being afraid to spend energy during your turn as you travel through the Spire. 

A good strategy when starting a route is to plan carefully. There are six different room types; monsters, elites (mini-bosses), treasure chests, merchants, and mystery; that you can visit. Plan a route that doesn’t have too many battle rooms (monsters and elites) following each other to conserve your health. Also, aim to hit as many of the other rooms as possible along your journey.

Defect Vs. Silent Vs. Ironclad Vs. Watcher

There are four different classes that you can play within Slay the Spire. Choosing which one is the best is a very personal choice that is based on your preferred playing style. As you gain experience with the different characters and get to know their individual strengths and weaknesses, you’ll be able to beat the game with all the classes.

Slay the Spire: Defect Guide

The Defect is a robot character designed around engine building. While it takes a while to get your character strong, you have the ability to create an all-around developed character. The Defect has a very fundamental design which makes it a great character to provide playstyle flexibility.

Slay the Spire: Silent Guide

The Silent is one of the most popular characters in Slay the Spire. This character has a great deck boost that allows you to draw 12 cards from the start, which gives you a lot more options early in the game. This character also has a decent mix of block, attack, and status cards to use. This character is best used by players who enjoy a more stealthy approach, but the development of this character can be a bit slow compared to the others.

Slay the Spire: Ironclad Guide

The Ironclad is the starting character for most players of Slay the Spire. It is a solid character with a lot of strength and attack. If you are an attack-first-strategize-later type of player, then you will enjoy the Ironclads immense attack power. There isn’t a lot of variation with Ironclad, but you can develop a truly formidable character with the right deck.

Slay the Spire: The Watcher Guide

The Watcher wasn’t part of the early release of Slay the Spire, but it has quickly grown into one of the most popular characters. While starting with this character can sometimes be challenging as she is not very strong initially, but if you bear through it, you can have a very strong Watcher on your hands. If you enjoy playing in a ninja-monk style fashion, you’ll love The Watcher.

Slay the Spire Achievements

In our Slay the Spire achievements guide, we’ll be sharing some of the achievements you can get in the game. If you enjoy earning achievements, you’re in luck. Slay the Spire has 46 different ones to achieve.

They’re worth a total of 1070 gamerscore points and can take up to 200 hours to unlock all of them in the base game. Although the achievements don’t unlock anything special, they do contribute towards a saved file’s completion score.

Here are some of the achievements include the following:

  • Shrug it off: Completing a battle with only one health point remaining
  • Come at me: Win a battle without playing an attack
  • The pact: Use 20 cards in a single battle
  • Powerful: Have ten or more buffs active in one battle
  • You are nothing: Defeat a boss on the first turn

There are many more achievements to unlock. Some of them are easy, and you’ll start earning them simply by battling. However, some of the achievements take a bit more finesse and planning to earn.

How to Play Slay the Spire: Tricks and Tips

Now that we’ve covered the basics of the game, here are some more Slay the Spire tips and tricks to get you started with the game on the best possible footing. May the cards be forever in your favor.

Understand the pros and cons of each class

While you’ll likely have a favorite class, there is no doubt you’ll end up playing each of them at some point. It’s important to understand what each one is capable of, and where they struggle compared to the others. For example, the Silent often has bursts of damage through poisoning the enemy or getting free daggers. The trade-off for her, however, is being rather weak defensively and relying on quick kills to survive.

Alternatively, the Ironclad can build blocks or strength and has a healing starting relic, so he can keep safe while applying his burst. The Defect is a little different than these two, focusing on long battles and manipulating his orbs to attack when needed. Each of these classes has unique cards and starting relics, so you’ll need to practice a bit to fully understand what they can do.

Plan ahead

Question marks and campfires are typically the best way to take at all stages in the game. Try to plan your routes to encounter as many of these as possible. Early in the game, you won’t be able to take on many elite monsters, so you should avoid fighting too many. However, once you’re more powerful, these can be very useful since they give you a relic. Keep that in mind when you’re planning your path.

Farm for relics, not cards

Once you have a strong deck strategy, you can stop getting cards for the most part. In fact, you may even want to get rid of some early cards that no longer fit into your strategy. Deck synergy is important in this game, and if you have a huge deck then it’s hard for everything to be beneficial to each other. Just because a card is good doesn’t mean it’s necessary for your deck.

Alternatively, most relics are inherently useful. While some come with downsides (often boss relics), most are fully beneficial. Take advantage of this. When you are shopping, you’re more likely to find use in a relic or card removal, rather than buying an actual card.

Be careful about the risks you take

Risk-taking is necessary for a game that’s partially based on random chance. However, you don’t want to go too far with it. For example, you typically don’t want to forgo your starting relic at the whale, since it’s powerful and you may end up with something useless. That’s not to say that you need to play safe all the time.

One risk you should take pretty frequently is upgrading your cards at campfires, rather than healing. This is because you’ll be automatically healed after each boss, and the upgrade is more valuable, assuming you can survive. The only time you should take the heal is when you absolutely need it.

Be ready to adapt your strategy

You’ll want to start building a strategy early on. For example, you may get access to some really strong block cards as the Ironclad early on in a run. You can build a strategy around this so your cards can strengthen each other. Be careful though, because you won’t always be able to stick with one strategy.

Be ready to adjust a bit when necessary, and make some sacrifices if you need to. Slay the Spire is all about adapting to your situation, and the sooner you learn how to, the sooner you’ll reach the top!

Adobe Photoshop guide for beginners

Adobe Photoshop is one of the most advanced image post-processing tools available. If you are a photographer or aspiring to be one, you’ve probably heard about Photoshop before. The term ‘photoshopping’ has become synonymous with referring to edited photos and images, so much so that even people unfamiliar with the program are using the term.

However, anyone who’s ever worked in Photoshop will tell you that it is overwhelming the first time you open the program. Since the software is so robust and powerful, there are a lot of tools and menus on the main screen. However, with a bit of guidance, you’ll soon find that this photo editor is quite simple to use. Let’s show you our detailed Photoshop guide for beginners.

What Is Adobe Photoshop?

Photoshop is one of Adobe’s oldest and most popular programs. It was first released in 1990, and since then, it has become the industry standard in raster graphics editing and digital arts. Photoshop is a raster graphics editor that is used to edit and enhance photos and images.

Photoshop is often the editing software of choice among photographers because of the vast range of tools. It is available on Windows and Mac computers and can integrate with other Adobe programs such as Adobe Lightroom.

How much is Photoshop?

Photoshop is not a free program, and you will have to get a subscription to use it. If you want just Adobe Photoshop, you are looking at $24.14/month. However, Adobe also has a promotional photography plan that includes Photoshop and Lightroom for $11.49/month. Alternatively, you can also subscribe to the Creative Cloud for $34.49/month, which gives you access to 20 programs, including Photoshop, Lightroom, After Effects, Premiere and more.

What Is Photoshop CC?

This is the full version of Adobe Photoshop that you get when paying a subscription. During this article, we will be discussing Adobe Photoshop CC.

What Is Photoshop Elements?

Photoshop Elements is a simplified version of Photoshop that can be used for quick photo editing. It does not have all of Photoshop’s features, which means there are some limitations, but it is still a pretty powerful photo editor. The latest version, Adobe Photoshop Elements 2022, has been released, and there is a once-off fee of $99.99 to use it. Like its predecessor, Photoshop Elements is available on Windows and Mac computers.

What Is Photoshop Express?

Adobe Photoshop Express is the free app version of Photoshop that is available on Android and iOS devices. This app is not as full-featured as Photoshop CC but still contains enough tools for some basic photo editing while on the go.

What Is Photoshop Used For?

Photoshop is most commonly used to edit photos and images. However, it is not only limited to these actions. Being such a robust program with many different features means that it is also used for digital painting, graphic design, web design, creating GIFs and editing photos for videos.

Features of Photoshop

As we’ve mentioned, Photoshop has many valuable features that can be used to edit, create and manipulate images and photos. Here is just a small sampling of some of Photoshop’s features:

  • Adjusting hue and saturation
  • Working in layers
  • Adjust the color balance and tonal range with levels
  • Creating adjustment layers
  • Color channels palette
  • Applying filters
  • Sharpening images

How to Use Photoshop?

Photoshop can be a complex yet powerful tool capable of many different image editing, manipulation and improvement tasks. In this beginners guide, we’ll only be covering a few of the basics of using Photoshop. There is much more than you can do with the program, but this is an excellent place to start. Once you’ve mastered the basics, many more guides and tutorials can help you with more advanced Photoshop practices.

It is also important to remember that Photoshop was built as more than just a photo-editing platform. It also contains features that are more relevant to illustrators, graphic designers and art directors. And while photographers rarely use these features, they still have their place, so it’s a good idea to learn a bit about them and keep the knowledge in your back pocket for that special project where you may need some more advanced techniques.

The Basics of Photoshop

Before starting with the basics of using Photoshop, it is essential to understand the program’s layout first. This way, you’ll know where to look for specific tools, features or settings. Photoshop is divided into several different work areas. Each of these areas offers different ways that you can edit or manipulate a photo or image.

Navigation

Let’s begin with some of the basic areas and what you’ll find.

Menu

The menu bar can be found at the top of your screen. Here you will see different commands for a wide range of tasks, from opening a new project to saving one you are busy with. From this menu, you can also rotate images and photos or add special effect filters. This menu is the primary control panel for Photoshop.

Tools

Your tool panel contains all the powerful tools you may need to adjust, edit and manipulate images. Think of it as a handyman’s toolbox, but for a photographer editing photos. You can use functions such as the paintbrush or pen from this toolbox, which can be used for touch-ups or more intricate design work.

You’ll also have access to the magic wand and lasso tools from this toolbox. These functions will allow you to isolate specific areas of a photo or image for editing without altering the rest. You’ll also find the shape and text tools here, which you can use to add text or shapes to your images. Finally, there is also an eraser, healing and clone stamp tools that can remove imperfections.

Adobe Photoshop guide for beginners

It’s important to note that some tools, like the lasso, have different variations. Each variation is designed for a different aspect of photo editing. If you click on a tool with additional functions such as the lasso, you will see a drop-down menu that displays the different options.

Adobe Photoshop guide for beginners

Tip: Unsure of what a specific tool does? It can sometimes be difficult to know from the icons what each tool does. However, by hovering over the icon, a text pop-up will show what it is.

Options

Right beneath the menu bar at the top of the screen, you will see the options bar. This bar will allow you to change the settings and parameters of any tool that you are currently using. For example, after choosing the Paintbrush tool from the tools menu, you will see different options appear in the options menu that will let you change the size of the brush, shape of the brush or opacity of the brush strokes.

Adobe Photoshop guide for beginners
Floating Panels

In addition to the above panels, which are permanent, there are also floating panels that appear when you select specific commands from the menu. These floating panels can be moved to any position on the screen, or they can be closed if you aren’t using them. Some of these floating panels include ones for editing color, contrast and layers. You can open any of these floating panels by clicking on the ‘Window’ tab on the menu bar.

Getting Started

Now, let’s get started with how to use Photoshop.

Opening a File

The first thing you will need to do before getting started is open a file in Photoshop that you want to edit. There are two main ways that you can open a file in Photoshop. You can drag and drop the file you want to edit onto the Photoshop icon on your computer’s menu bar. Alternatively, you can open Photoshop and click on ‘File’ in the menu and then ‘Open’.

Adobe Photoshop guide for beginners
Zooming

You may want to zoom in or out of a specific image so that you can make more precise edits. To do this, you can click on the zoom function from the tools menu. A magnifying glass icon will represent it. If you prefer using keyboard shortcuts to zoom, you can press Cmd+ or Cmd- to zoom in and out of your image.

Adobe Photoshop guide for beginners

Once you’ve zoomed in and out of the image, you can use the hand tool (also in the tools menu, represented by a hand icon) to pan left, right, up and down. 

Saving

To save files in Photoshop is similar to most other programs. You can click on ‘File’ in the menu and select either ‘Save’ or ‘Save As’ from the drop-down menu. If you choose ‘Save’, it will save this image over the current copy you have. By selecting ‘Save As,’ you will save it as another copy of the image and will have the chance to rename the files and choose the location where you want to save the image. Alternatively, you can also use the keyboard shortcut Ctrl+S (Windows) and Cmd+S (Mac).

Adobe Photoshop guide for beginners

You can continue saving an image as a JPEG file unless you add a layer. Once you start adding layers to JPEGs, they will need to be saved in a PSD or TIFF format.

Cropping and Straightening

Cropping or straightening a photo or image does cause some loss of image quality. This is why we recommend that you shoot your photos with the exact composition you want to avoid using these tools too often and losing image quality.

Adobe Photoshop guide for beginners

Sometimes cropping or straightening a photo is unavoidable. To crop a photo, you select the ‘Crop’ tool from the tools menu. A ‘crop’ border will appear around your image so that you can adjust it to only select the area you want. You can drag the edges or corners of the border until you get the desired shape of the photo you want. Once you’re happy with the image, you can press Enter (Windows) or Return (Mac) to complete the process and finalize your cropping.

Brightness/Contrast

Adjusting the brightness or contrast of a photo can sometimes be a simple and effective way of improving a photo. Adjusting the contrast and brightness of an image during the editing stage can change the look and atmosphere of your photo and can sometimes help to unlock its full potential.

Adobe Photoshop guide for beginners

To adjust the brightness or contrast of your photos, you can click on ‘Image’ in the menu bar. Then select ‘Adjustment’ and ‘Brightness/Contrast’. You will see a new adjustment panel appear on your screen. In this panel, you can adjust the appropriate slider to change the contrast and brightness.

Adobe Photoshop guide for beginners
Color

Once you are happy with the contrast and brightness of your photo, you can start looking at the colors. This is another critical step in editing photos. Several different tools in Photoshop let you adjust and change colors in your images. Let’s look at some of the essential color tools next.

Color Balance

The Color Balance Panel will be your best friend when it comes to adjusting colors in an image. To get to this panel, you will need to click on ‘Image’ in the menu and then ‘Adjustment’ and ‘Color Balance’. The color balance panel will have sliders that allow you to adjust the Cyan/Red, Magenta/Green and Yellow/Blue color balance in your image.

Adobe Photoshop guide for beginners

You will also see buttons for Shadows, Midtones and Highlights in the panel. By clicking on these, it will allow you to adjust the color balance for those sections only. By adjusting these areas separately, you can make the elements of your image stand out.

Adobe Photoshop guide for beginners

Before making any of these changes permanent, you will get an option to preview the image. You will be shown a side-by-side of the original image and one with your changes during the preview. If you are happy, you can press Enter (Windows) or Return (Mac) to make the changes permanent.

Hue/Saturation

To adjust the hue and saturation of your images, you click on ‘Image’ in the menu. Then you can select ‘Adjustments’ and ‘Hue/Saturation. This will open a new panel to adjust these settings. 

Adobe Photoshop guide for beginners
Saturation

By increasing the saturation of your photos, it will make the color stronger and more vibrant. This will give the image more impact and help it stand out. However, if you are going for a more somber and serious look, you may want to decrease the saturation. Which way you adjust the slider depends on the type of photo you’re editing and the mood you want to invoke.

Adobe Photoshop guide for beginners
Lightness

As the name suggests, this slider can increase or decrease the light (or brightness) of colors in your photos. It can also be used to desaturate colors. Using the lightness and saturation tools together can often give you the precise result you are looking for better than only using one of them.

Hue

You probably won’t be using this function quite as often as Saturation and Lightness, but it can be a useful tool in certain editing instances. Adjusting the hue slider will change the overall color of your photo, not just certain parts. It can be used to drastically change the mood of a photo but should be used with caution.

One Color at a Time

Sometimes you may be tempted to change all the colors in your photo with the functions mentioned above. However, in some instances, it may not be necessary and can appear too extreme. You can also only choose to make adjustments to a single color, for example, red, without altering the other colors in your photo.

Adobe Photoshop guide for beginners

To do this you can navigate to the drop-down menu at the top left of the Hue/Saturation panel and select only the color (reds or the blues, or yellows, or whichever color you want). Now any changes that you make to either the Saturation, Lightness or Hue sliders will only affect the color you’ve chosen, rather than all of the image.

Image size and resolution

Now that you’ve completed the basic editing of your photos and you have them looking good, it’s time to save them. You will need to save your photos at an appropriate size and resolution so that they can be used later on. The size and resolution you choose will depend on what you want to do with the photos. For example, if you want to upload these images to social media, you will need to drop the dimensions and resolutions.

Adobe Photoshop guide for beginners
Image Size

The image size is the physical dimensions of the image measured in pixels when used online and cm/inches when printed. This is not the same as file size, which is measured in KB, MB or GB, although the two are directly linked. For example, a larger image size will lead to larger file size.

Adobe Photoshop guide for beginners

To resize your photo, first click on ‘Image’ in the top menu. Then select ‘Image Size’. Keep the link icon highlighted so that when you adjust the height of the image, Photoshop will automatically adjust the width by the same degree. Once done, click on ‘Resample’ to reduce the number of pixels in the picture, which will reduce the image size.

Resolution

Resolution refers to the dots per inch (DPI) an image contains when printed. The DPI will determine the quality of the print, ie. Low DPI means fewer dots spread over the print, leading to a grainy or pixelated image. High DPI means more dots spaced closer together for a more realistic and clean image.

To change the resolution of your photo, click on ‘Image’ once more in the menu. Then select ‘Image Size’. In the panel, deselect ‘Resample’ to preserve the original number of pixels. If you are going to print your images, set the number of pixels per inch in the ‘Resolutions’ field to 300. This automatically changes the width and height fields correspondingly.

Tip: If you have to reduce the image size and/or resolution, make sure to save a high-quality copy first so that you have one available and then reduce the image size and then save it as a separate image.

Photoshop: tips and tricks for beginners

In this guide for beginners, we’ve covered the basics of Photoshop. However, if you want some useful tips, here are a few more helpful guides.

Unleash your creative side!

Armed with the above guide, you are ready to start using Photoshop and master the basic skills. Once you get used to working in Photoshop, you can start using more advanced features and really improve your editing skills.

Code::Blocks Tutorial: What it is and How to Use it

Code::Blocks is an open-source IDE (Integrated Development Environment). It helps you to work on software and programs you are developing, including coding, debugging, testing, and much more. It supports many compilers, such as GNU GCC (MinGW and Cygwin) and MS Visual C++. It is also free to download.

If this is your first time with this development tool, you’re in the right place! We’ll reveal what is Code::Blocks and how to use it.

What is Code::Blocks?

Simply put, Code::Blocks is a free cross-platform integrated development environment for C/C++ and Fortran. Code::Blocks is built around a plugin framework, which means you can extend its core functionality with various plugins. Essentially, Code::Blocks is perfect for building onto because with easy integration with user-made plugins; you don’t need to edit any of the source code to add the functionality you need.

Although the software is open-source, so if you need to edit the code, you can. While Code::Block inherently supports the functionality of multiple compilers and debuggers, it isn’t in itself any of these systems. 

You can think of Code::Blocks as a house. The house itself is an empty shell, but it has rooms that certain functions and systems can use. Not all Code::Blocks installation files contain compilers. Instead, Code::Blocks can use the functionality of whatever compilers you have installed, whether that’s GCC, Clang or Visual C++, or any other compiler that tickles your fancy. While you let the house metaphor simmer, let’s take a look at some of the features Code::Blocks is known for.

Code Blocks tutorial what it is and how to use it

Code Editor

This integrated development environment (IDE) features code folding and syntax highlighting, driven by a Scintilla editing component. It also features a class browser, hex editor, C++ code completion, among various other utilities. The code editor organizes any files you have open into easily accessible tabs and supports personalized syntax highlighting colors, font, and font size selection. 

Compilers

Code::Blocks features support for multiple compilers. Among the most widely used supported compilers are GCC, Digital Mars, LLVM Clang, MinGW, Microsoft Visual C++, Watcom, LCC, Borland C++, and the Intel C++ compiler. Code::Blocks was written in C++ but features decent support for other coding languages such as Fortran and D. The installation file also includes a plugin with support for further programming languages. 

Debugger

The Debugger shipped with the Code::Blocks installation file has full breakpoint support. A Breakpoint refers to an intentional pause or stopping point written into a program. Breakpoints are put in place for debugging purposes to gather more information about a program during its execution and are sometimes simply called pauses.

Code::Blocks streamlines the debugging process by giving you access to the argument display, call stack, thread switching, custom memory dump, CPU registers, local function symbol, disassembly, and GNU Debugger Interface. 

Easy User Migration

Code::Blocks is an increasingly popular integrated development environment. It, therefore, has features specifically designed for users migrating from other IDE’s. Including Dev-C++, Microsoft Visual C++ project import for MSVC 7 and 10, and Dev-C++ Devpak support.

Code::Blocks Tutorial: How to Use it

With any software, before you learn to use it, you need to install it. While most installs are as simple as clicking a download button, accepting a bunch of conditions, and voila, Code::Blocks might require a little thought. 

To condense a long process, if you have a compiler already set up on your system, you simply click the download button, and you’re home free. This version doesn’t come with a built-in compiler, so you’ll just choose the compiler you have installed when it asks you to during use. 

If you don’t have a compiler pre-installed, you’ll need a different installation file. To access this, click the link underneath the Code::Blocks download button, and you’ll get to the official website. Now click ‘Download the binary release,’ which is the easiest way to get the utility installed, now onto the bit that requires thought or at least some reading. You’ll see a list of download links if you scroll down to ‘Microsoft Windows.’ The one you want that includes a compiler is called ‘codeblocks-20.03mingw-setup.exe’. Here you can choose to either download from FossHUB or Sourceforge.net.

The minds behind Code::Blocks think of everything. On the list of downloads is an executable file (.exe) for people who don’t have administrative rights on their PCs, and another exe that includes all the Code::Blocks plugins. They really try to make things as easy as possible, not just within their IDE but also with installation. Here’s an easy guide for troubleshooting Code::Blocks if it misbehaves.

Installing Code::Blocks

To get started, follow these steps:

  1. Download the Code::Blocks installer as mentioned above.
  2. Run the installer. It’s a standard installer for Windows; just press Next after reading each screen. If using another operating system, choose the appropriate option on the downloads page referenced above.
  3. If you’re planning on installing a compiler after you’ve installed Code::Blocks, read the information provided in the installer. Also, see this link for help setting up your compiler.
  4. If you downloaded the installer that doesn’t come with MinGW, you may have to configure the compiler manually (usually Code::Blocks auto-detects the compiler).

Starting your first project

Step 1. Launch the Project Wizard

Select File->New->Project… to start a new project. You can select from many types of templates to help get your project started. For your first project, select Console application, as this is the most common for general purposes. Click Go.

Step 2. Select the destination for your project.

Choose your programming language, (for example C++) when prompted for a language. Then, on the next screen, give the project a title and select a destination folder. Code::Blocks will generate the remaining entries from these two.

Step 3. Choose your compiler.

This is often the default compiler that you use on your machine. The default builds will be debug & release. If another option is needed, select it here.

Step 4. Finish

After selecting Finish, you’re on your way to your first project!

How to Use Code::Blocks for C++

Once you’ve installed Code::Blocks on your PC, all that’s left to do is run it. As soon as you start Code::Blocks up, you’ll see a list of compilers. The utility will detect which one you have and automatically select it. It will ask you if you want to make the compiler the default viewer for C++ files, which you should.

Next, click on File> New >Project, and you’ll see a new window. Select ‘Console application’ and click ‘go.’ You’ll need to click ‘Next’ in succession until the language selection dialog box opens. Choose the programming language you use, and then you’ll be prompted to choose a place to save your project. 

Rather place the project in its own folder because it is likely to create several files. Give your project a name and click ‘Next.’ Now, you will set up your compiler. You don’t need to change any settings you see here, so just click ‘finish’ and open the main.cpp file on the left of the screen. 

By now, you should have your main.cpp file, which you can modify if you wish. Currently, it just says ‘Hello World!’, run it as is. Hit F9, which compiles and then runs the program. You now have a working sample program. The main.cpp code can simply be edited and then compiled and run again using F9.

How to Use Code::Blocks in Google Docs

Code::Blocks is available as a plugin for Google Docs. Simply go to the Google Workspace Marketplace, type in Code::Blocks and click install. Read through and accept all the permissions if they’re agreeable. Otherwise, you won’t be able to use its full functionality. 

Once you’ve completed the install, Code::Blocks is easy to use. Your first step is to create a new document in Google Docs. Next, head to ‘Add-ons’ and choose Code::Blocks from the drop-down menu. Code::Blocks will open up a new panel on the right side; from here, you’ll have access to all the utility’s functionalities. 

Next, you need to write or paste code into the body of the document. Once you have your code in place, select it, and you’ll be able to choose a language from the language drop-down menu or a theme from the theme drop-down menu. Click preview to view your code, and as soon as your code looks exactly how you want it, click Format. Your code should now be formatted perfectly, and you can move on to the next piece of code.

Code to your heart’s content

Now that you know how Code::Blocks works, you can get started on your first project. It may seem complicated, but you should get the hang of it soon. Feel free to show us anything you’re currently working on!

What is Airdrop and how to use it on iPhone or Mac

Gone are the days of struggling to share files, photos and images with others using portable USB devices and CDs. Some files, especially those containing images and videos, are too big to be sent via email, which means resorting to other sharing methods, none that are really easy or convenient.

With Airdrop, your Apple devices can easily share photos, files and more with other Apple devices nearby. Airdrop makes it very convenient to share relevant files, whether you’re at work or just relaxing at home.

What Does Airdrop Mean on iPhone, iPad and Mac?

Airdrop is an efficient and fast way of sharing data between devices. Apple developed it specifically to simplify sharing files, photos, videos, and other forms of data between Apple devices. With Airdrop, you can easily share photos or music from your Mac to your iPhone or iPad and vice versa.

Airdrop was explicitly developed for Apple products and allowed easy sharing between iOS and macOS. You cannot use Airdrop to share with Windows or Android devices.

How Does Airdrop Work and What Is it Used For?

Airdrop uses a combination of Wi-Fi and Bluetooth to send files between Apple devices on the same network. This feature can be used to quickly and almost effortlessly share files, music, photos, videos and more between Apple devices.

You can use Airdrop to share these devices among your own Apple devices, or you can even use it to share data with friends, family and co-workers. To use Airdrop, the devices you want to share have to be connected on the same network and have to be close to each other (within 30 feet).

How to Use Airdrop on Every Apple Device

Let’s take a look at how to use this useful feature in this quick Airdrop tutorial.

Airdrop Setup

To start using Airdrop, it has to be enabled on your device and the device you want to share files with. 

To check that Airdrop is active on your iPhone or iPad, tap on ‘Settings’, and then ‘General’ and finally ‘Airdrop’. If it is not enabled, make sure to activate it. Once you enable this feature, it will remain enabled until you disable it.

What is Airdrop and how to use it on Iphone or Mac

For Mac, click on ‘Finder’, then ‘Go’ and finally click on ‘Airdrop’. Enable Airdrop from this window.

What is Airdrop and how to use it on Iphone or Mac

Remember that any Apple devices that do not have Airdrop enabled will not be able to share or receive files.

Accept Airdrop

To accept an Airdrop on your iPhone or iPad, you will see a notification appear on your screen. This notification will also show a preview so that you can see what is being shared. You will have two options, accept or decline.

By tapping on ‘Accept’, the file will be downloaded to your device. The process will work the same on your Mac computer, and the file can be found in your download folder after it has been downloaded.

Sending an Airdrop

Sending an Airdrop is just as easy as receiving one. On your iPhone or iPad, go to the file, photo or video you wish to share (you’re able to select more than one file at a time). Now tap on the ‘Share’ button, the icon is a box with an arrow pointing out of it.

A new window will open showing all your different sharing options, and Airdrop should be the first one (if Airdrop is enabled). Tap on Airdrop, and you will again see a new window open. The Airdrop screen will show all nearby devices with Airdrop enabled. Simply tap on the device you want to share your files with.

What is Airdrop and how to use it on Iphone or Mac

On your Mac, you can open the file you want to Airdrop and click on ‘Share’ in the app window. Now click on Airdrop to open the Airdrop window. Now you can choose which device you want to share the file with.

Alternatively, you can select multiple files, then right-click and from the drop-down list, click on ‘Share’, and then ‘Airdrop’. This will also open the Airdrop window where you can select the device you want to share to.

What is Airdrop and how to use it on Iphone or Mac

Receiving an Airdrop

As mentioned, when you receive an Airdrop, it will appear as a notification on your screen. From here, you can choose to accept or decline the Airdrop. There is also a preview feature available to see what the file is before accepting it. Once you click or tap on ‘Accept’, the file will be downloaded to your device.

How to Airdrop Pictures

To Airdrop pictures from your iPhone or iPad, you select the pictures you want to send and then tap on the ‘Share’ option. This will open a window with your sharing options. Now, tap on ‘Airdrop’ to open the Airdrop window. Here you will see all the available devices that are in range and have Airdrop enabled. Tap on the device you want to send the pictures to.

What is Airdrop and how to use it on Iphone or Mac

On your Mac, you can select all the pictures you want to share and then right-click. Now, you’ll see a drop-down menu, click on ‘Share’ and then ‘Airdrop’ to access the Airdrop window. Next, choose the device you want to send the pictures to.

How to Airdrop a File

Airdropping a file works the same way as sending pictures. On your device, select the file or files you wish to Airdrop, choose ‘Share’, and select ‘Airdrop’. Now you can choose the device that you want to share the files with.