How to watch a movie on Zoom in 5 easy steps

Zoom is a video conferencing platform used by many companies. It’s helpful for Zoom meetings and other things, but you can also use it to watch movies. It’s an excellent way to watch Netflix or YouTube on your TV screen if you have an HDMI cable or adapter.

Zoom DOWNLOAD

Just download the Zoom app onto your phone or tablet, connect it with the HDMI cable (or adapter) to your TV, and then open up Netflix or YouTube on your device. You’re ready to rock!

How to watch a movie on Zoom

  1. Open the video in a separate application or browser window

    How to watch a movie on Zoom 1

    Open the video in full-screen mode in one browser window, then use Zoom in another window. (remember, not in the same browser as Zoom)

  2. Host or join a Zoom meeting

    How to watch a movie on Zoom 1

    Join a meeting by accessing the app on your phone or computer and clicking “Join” under the main menu screen. Enter the passcode that the person hosting the video will provide to enter the room. 

    If you want to host the event on Zoom:

    – Select “Schedule” at the top of the main menu to start your meeting.

    – Fill in all necessary information for your new event. You can invite participants by selecting them from a list you created through “Personal Contacts” on Zoom.

    – Remember to give the participants the passcode and an invitation link to join the meeting.


  3. Click the Share button on Zoom

    How to watch a movie on Zoom 1

    To share your screen as a host, click “Start.” This selection will open a new window where you can choose which participants to invite from your stored information in Zoom’s “Personal Contacts.”  Tell the participants the meeting passcode and give them the link to join. Click “Share” at the bottom of the screen.

  4. Check the box next to “Share Sound” and “Optimize for Video Clip”

    How to watch a movie on Zoom 1

    On the share screen of Zoom, you’ll find two settings: “Share Sound” and “Optimize for video clip.” Check them both because they are essential if you want the best viewing experience possible. This selection will ensure that your audience can hear the video sound.

  5. Select your video on the pop-up screen

    How to watch a movie on Zoom 1

    Select the window or application that contains your video and choose “Share” on the pop-up screen. If you are watching a YouTube video, you can click the full-screen option underneath the video. You can select pause or play on this screen.

How to Play Rust: Tutorial With the Best Tips and Tricks

Rust can sometimes be intimidating for new players because you might be playing against much more experienced players who will most certainly try to kill you. There are a few strategies you can try to survive longer in these competitive servers. Such as making friends, being communicative, and choosing a server that is set up for beginners.

The multiplayer aspect of Rust is what defines the game, and without it can become quite dull. However, if you want some time to hone your skills, gather blueprints, and explore without other players’ threats, there is a way to do this as a single player. You need to set up your own server that only you have access to.

Bear in mind that creating a private server is the only way to play Rust solo. And since you have to create a server, you are not able to play Rust offline. 

What Is Rust?

Rust is a massive online multiplayer survival game available on Steam. Being a Steam game, Rust is available on both Mac and Windows computers. The game’s goal is survival, and to survive, you’ll need to gather resources like cloth and stone. You can also explore many different areas, such as abandoned cities, wild landscapes, and caves.

You might also need to make friends and allies in the game. Since the multiplayer aspect of this game is so big, it isn’t easy to do well without some help from your friends.

How to Play Rust?

Rust is an online game. As such, you will need to create or join a server to play the game. You can create your own server, which might be useful in the beginning to gain experience without a newbie target on your back. However, playing on your server might become boring, which is why you can also join other servers that have more players to keep things interesting.

It is good to note that there are quite a few beginner-friendly servers that are an excellent place to start. When just beginning in Rust, it is recommended that you collect as many resources as possible to start building your base with a sleeping bag so that you have a respawn point.

Rust tutorial for beginners

While you have a better idea of how to play Rust, the game can still be daunting for beginners. Here’s a quick tutorial on how to get started.

Step 1: Download Dedicated Server

You need to download the dedicated server utility from the official Rust website.

Step 2: Extract and Run Server Utility

Once downloaded, you need to extract the server utility. Then you need to run the “Run_DS.bat” executable and wait for it to install on your system.

Step 3: Open the Game

Open Rust on your computer.

Step 4: Open Command Console

Press F1 to open the command console and then type in: client.connect localhost:28015.

Step 5: Run Command

Run the command and wait for your game to start.

Rust Tips and Tricks

Have you started playing Rust but need some extra tips? Here are some of our favorite Rust tips and tricks to get started. With these, you’ll, hopefully, last your first day in Rust.

Carefully Choose Your Server

When starting Rust, you may be tempted to join a busy server with lots of players. After all, that should mean there’s more going on. However, if you are a beginner in Rust, we highly recommend thinking hard about the server you choose.

Going with a newer server with slightly fewer players will give you a better opportunity to gain some experience without defending yourself from the more experienced players looking for soft targets.

Start Gathering Resources

When you are first dropped into the game, you only have a torch and a rock. Using the rock, you need to start gathering resources to craft other items. An essential resource at the beginning of the game is wood. Wood and stone will be critical components in many of your first creations.

Wood can be gathered by hitting a tree with a rock and eventually an ax. The same goes for rock. However, not all stones are minable, so look for giant boulders with a shiny reflection.

Make the Essentials First

You may be tempted to just start crafting anything you can. However, there are a few essential items that you need to focus on first. These items are a hammer, a tool cupboard, a sleeping bag, a building plan, a wooden door, and a key lock. Once you have these basics, you can scout for a safe place to build your first base.

When choosing a location for your first base, a few things to remember is to make sure it is out of the way and hidden from other players but still close to resources and other points of interest.

Upgrade Your Base

Don’t think that once you’ve built your first base, that’s it. You have to regularly update and improve your base to keep you protected from increasingly strong enemies. Once you have enough stone acquired, you can use the hammer to upgrade your wooden base to a stone one. 

Start Exploring

Once you have a basic shelter and a few basic tools, you can start exploring the world around you. Don’t engage with enemies immediately and try to remain undetected for as long as possible. Only once you’ve gained some experience and have crafted armor and weapons should you consider engaging with enemies.

More Guides to Playing Rust

If you need some more help getting started with Rust, here are a few more helpful guides.

Enjoy the Serenity

Now you can enjoy the peace and quiet of the Rust world without other players. This is great if you are just starting with the game and need a chance to grow your experience and resources.

If you enjoy playing Rust, you should also look at Ark: Survival Evolved and any of the Fallout games.

How to change background in Photoshop

By changing the background of specific images in Photoshop, you can completely transform that photo. When working with images and photos, sometimes you need to adjust the background as well. In some cases, you may want to remove the background altogether. Or maybe just replace parts of it.

Regardless of what you need to do, with Photoshop, it is easy to make changes and edits to your backgrounds. What is Photoshop? It is a very powerful image and photo editing platform that is part of the Adobe Creative Cloud. It is also one of the most popular editing software for both professional photographers and designers and beginners.

Let’s take a look at how to change the background in Photoshop.

How to Edit the Background of Images in Photoshop

Adobe Photoshop is an extremely powerful editing tool. You can work in layers, which makes separating the subject from the background much easier. With it, you can completely transform images and photos. When it comes to backgrounds, you can isolate the subject and change the color of the background, or you can blur it, or even make it completely transparent so that only the subject can be added to other images. 

Let’s look at some of the steps you need to take to edit the background in Photoshop.

How to Remove the Background in Photoshop?

If your photo was taken against a solid background, you can easily remove the background and replace it with any color you want. This is ideal in situations where you want to add a fun pop of color to the subject of your photo.

Step1: Upload Your Image to Photoshop

To get started, you have to upload your image to Photoshop.

Step 2: Select the ‘Auto Remove Background’ Option

To remove a simple background from your image, you can click on ‘Auto Remove Background’ in the ‘Quick Actions’ section in the panel on the right side of the screen. You can also use Photoshop plugins to help with more complex images. The photoshop plugin, remove.bg, is very effective at automatically removing the background, even with more complex photos such as ones with hair.

Step 3: Choose a New Background Color

Now you can easily change the background color by selecting the background layer and choosing a color from the swatches in the right-hand panel.

How to change background in Photoshop

Tip: In some cases, if you have a really solid background color, you can also change the color just by using the paint bucket tool and clicking on the background.

How to Make the Background Transparent in Photoshop?

Sometimes you may want to use only the subject of your photo and use it in other photos or images. You cannot just add it as is, or you will be adding it background and all, and it will not blend in. In this case, we need to make the background transparent so that only the subject is visible when added to another image.

Step 1: Upload Your Image

Upload the photo or image you want to edit to Photoshop.

Step 2: Use ‘Recolor’ to Change a Solid Background to Transparent

For a simple solid-color background, you can click on ‘Picture Tools.’ Next, you can select ‘Recolor’ and ‘Set Transparent Color’ from the drop-down menus. Now you’ll have to choose the color you want to make transparent, i.e., if your background was green, you choose to turn green transparent. 

Step 3: For Complex Backgrounds Use the ‘Quick Selection Tool

If your subject or background is more complex, you will have to work manually. Click on the ‘Quick Selection’ tool from your toolbox to the left of the screen.

How to change background in Photoshop

Step 4: Choose’ Select Subject’

You’ll be prompted to choose between ‘Select Subject’ or ‘Select and Mask.’ Choose ‘Select Subject,’ and the software will automatically try to select the subject.

How to change background in Photoshop

Step 5: Refine Your Selection

The program isn’t foolproof and uses contrast to distinguish between the subject and the background. This means that certain areas may be left out. Using a small brush, click on all the areas that have been missed to include them in your selection. If you need to remove areas from your selection, hold down Alt while clicking on the areas to be removed.

How to change background in Photoshop

Step 6: Choose’ Select and Mask’

Now that the subject has been selected, you can click on ‘Select and Mask.’ This will remove the background from view so that you can see your selection more clearly.

How to change background in Photoshop

Step 7: Use the ‘Refine Brush’

Now you can use the ‘Refine Brush’ around harsher sections that should be softened. This is usually areas such as around the hair of a model and similar. 

How to change background in Photoshop

Step 8: Choose ‘New Layer With Layer Mask’ as Output

Once you are happy with your image, click on ‘Output’ and then choose ‘New Layer with Layer Mask’ and click on ‘Ok.’ This will save a copy of the image with a transparent background so that it can be used in other images.

How to change background in Photoshop

How to Change the Background in Photoshop?

Sometimes you want to change the background of your image to improve the image and enhance the mood. To do this, you will have to make the background of your image transparent (like we discussed above) or use a subject that already has a transparent background.

Step 1: Open the New Background

Open your chosen background image in Photoshop.

Step 2: Open the Subject With Transparent Background

Open the subject you want to add to the background by clicking on ‘File’ in the main menu and choosing ‘Place Embedded.’

Step 3: Resize the Subject

You can move the subject to the desired spot and resize the image to fit in with the new background.

Step 4: Match the Colors

Once you’re happy with the positioning and size, you’re almost done. Choose your foreground image, not just the layer. Once the image is selected, click on ‘Image’ in the menu, select ‘Adjustments,’ and then ‘Match Color.’ A new panel will appear. Go to ‘Source’ and choose the image you are working with, and under layer, select the layer you want to fix. Depending on what you need, you can match the subject to the background or the other way around. 

Now check the ‘Neutralize’ box, and use the ‘Luminance’ and ‘Intensity sliders to match your foreground and background images.

More Photoshop Guides

If you need some more guidance in using Photoshop, here are a few extra how-tos and guides.

Make editing a breeze

Photoshop makes photo and image editing much easier. Once you get used to how the software works and what all the different tools do, you can start creating true masterpieces. Removing, editing and changing backgrounds is one of the features that make Photoshop such a powerful tool.

How to use Google Classroom for Teachers and Students

The pandemic has led to a lot of changes in the way we conduct our everyday lives. From remote working to remote teaching and learning, everything was affected. Luckily, Google Classroom provided a simple way for teachers and educators to continue giving classes online.

With Google Classroom, educators can do everything online. They can take attendance, present lessons, set quizzes, tests, and assignments, and continue to interact with their students all through the platform. 

Let’s take a look at how teachers and students can use Google Classroom.

Google Classroom Tutorial – How to Use It?

Although the world of online teaching and learning may seem daunting, the Google Classroom platform is quite simple to learn. By covering some of the basics, you’ll be well on your way to running your classroom as you did before the pandemic in a virtual setup.

First, you, as a teacher, will need to create your class on Google Classroom. You can press on the ‘+’ sign to create your first class. Next, you’ll need to add more details about your class, such as the class name and description. You can also use the ‘section’ field to split your class into periods. Once this is done, students can start joining the class.

Students can join the class by using the link sent to them by the educator, they can use a class code, or an educator can invite students via email. 

There are also fun ways that you can customize and personalize your class. It is a good idea to take advantage of this before your classes start so that you have a fun profile picture and header waiting for your students.

How to Use Google Classroom for Teachers and Students

Tutorial and Tips for Teachers

Google Classroom has many valuable features that make it a great asset to teachers and educators. From creating quizzes and assignments to using fun and interactive lesson tools to ensure your students stay engaged in the classes.

In this Google Classroom tutorial, we will look at a few other things teachers can do on the platform. We will also be sharing some helpful Google Classroom tips for teachers.

How to Use Google Classroom for Teachers and Students

How to Use Google Meet With Google Classroom

Integrating Google Meet with Google Classroom makes a lot of sense for educators. Google meet is a powerful video-conferencing application that makes it possible to host virtual classes with your students. 

To use Google Meet from within Google Classroom is a straightforward process and can be done from the Stream header. All you do is go to the class you want to schedule the meeting for. Then click on the ‘Stream’ header. Next, select ‘Generate Meeting Link’ and click the button. Choose to save the link. This will now be the link you use whenever you want to schedule a video conference with your students.

Now you can share the link with students. There are two main ways that you can share this meeting link. You can either share the link in announcements, assignments, or any other way you prefer to share links. Alternatively, you can also click on the toggle to make the link visible to students. When doing this, the link will be visible in the student’s Google Classroom header, and they can simply click on it to enter the meeting.

How to Teach Using Google Meet

Google Meet is a video conferencing platform. You can thus use it to host virtual classes via a video call. Google Meet also allows you to share your screen and has a whiteboard option which is great when you need to explain certain topics visually or want to share other video content with your students.

How to Take Attendance in Google Classroom

Taking attendance in a virtual classroom can be difficult, especially if you have more students. Luckily Google Classrooms has an easy way to take attendance despite there not being a built-in feature for this.

To do this, you will be using the question feature. In your classwork tab, you will create a new attendance feature in the form of a multiple-choice question with one simple query to check the box acknowledging that they are present.

How to Use Google Slides in the Classroom

Using Google Slides in Google Classroom is another handy feature that allows educators to create very interactive and compelling lessons. It is also very simple to do, and you can even create the presentation directly from within Google Classroom.

Once you are in your class, you can click on the particular class you want to create a slideshow for. Then choose the ‘Classwork’ tab. Now you can either edit an existing topic that already has material by clicking on the settings represented by the three vertical dots. Or you can create a new topic if needed. Once in the material section, you can click on ‘Add’ to attach an existing Google Slides presentation or click on ‘Create’ to make a new one using Google Slides.

How to Use Google Classroom for Homeschool

Google Classroom is ideal for homeschooling as it provides parents with an ideal platform to set projects, assignments, quizzes, and tests. You can also reuse the lesson plans and assignments, which will save you a lot of time. Another benefit is that your child can see exactly what they need to do for the day if you are busy with another task or another child, so instead of waiting around and wasting time, they can continue working.

How to Use Google Forms in Google Classroom

Google Forms is an ideal way to create quizzes and include them in your Google Classroom. Google Forms lets you create questionnaires with various question types, from short and long questions and even multiple-choice questions. You can create your quiz in Google Forms and choose the ‘Quiz’ option so that you can allocate a point value. Next, you can add the quiz in Google Classroom by creating an assignment and attaching the link to your quiz.

How to Use Google Classroom for Teachers and Students

Tutorial and Tips for Students

Initially, it might be challenging for students and their parents to navigate a virtual classroom setup. However, with this Google Classroom tutorial, you can soon start using the platform effectively. Aside from the tutorials, we will also be sharing some helpful Google Classroom tips for students.

How to Use Google Classroom on Phone

There is a mobile app version of Google Classroom for Android and iOS. This means that you will be able to use Google Classroom on your PC or mobile device. To start using Google Classroom, all you need to do is download the app to your smartphone and then sign in using your Google account.

How to Use Google Classroom on iPad or Tablet

Similar to using Google Classroom on your mobile device, you can also use the platform on your tablet or iPad. All you need to do is download the app and sign in with your Google account.

How to Take Test on Google Classroom

Taking tests on Google Classroom is also an easy task. You simply enter the class, and your quiz or test will show as an assignment. Click on the assignment, and then open the attached quiz link. The test will open, and you can start answering the questions. 

Other Tips and Tricks

There are many more ways that teachers and students can use Google Classroom. To learn even more about the platform, here are some more Google Classroom tips.

Steam Definitive Guide: What It Is and How to Use It

Steam is the world’s most famous and popular online video game platform. Since it was launched by Valve in 2003, it has grown non-stop, amassing the largest selection of digital games on the internet. Gone are the days when you had to go to a store to buy that game you’d been dying to play for so long. Now you can just go to Steam and download it to your PC instantly.

If you still don’t have a Steam account or you’ve never used the platform before, you may not be sure where to begin. Keep in mind that when you open a Steam account, you can do far more than just download games. From the Steam client, you can connect with friends, play games with them online, chat, discover new titles, get all kinds of juicy deals, trade titles, sell video game items for real cash, get refunds, and an endless list of other options… Want to know how?

Today’s article is a basic guide on what Steam is and how it works to help familiarize you with the main features of this excellent platform in the blink of an eye. So what are you waiting for? Let’s play!

What Is Steam Gaming?

Steam is an online video-gaming platform where users can buy, play, create and discuss various PC games. The platform has thousands of games, ranging from big brand names to smaller indie games. There are even free-to-play games available for serious gamers to try out.

Steam not only has games that you can play and buy but there are also many different DLC and bonus content, multiplayer games and even a few hidden gems to discover. At last count in 2020, there were approximately 10 263 games available on the platform.

How Does Steam Work?

Steam is also known as a cloud-based gaming library. This means that once you’ve created an account and started buying/playing games from the platform, your games and progress will also be saved in the cloud. This also means that you’ll have access to the games you own, saved files, etc., from any computer by logging into your Steam account. 

The cloud function also means that players can have an extensive library of games without having each one take up valuable memory on your computer. Gone are the days of having to uninstall a game just to free up disk space and memory for a new one.

First steps: What you need to do to start using Steam

It’s easy to start using Steam. There are just two things you need to do: create a Steam user account and download and install the client on your PC.

How to create a Steam account

Downloading Steam and creating an account is easy and completely free. Enter a valid email address and confirm that you are 13 years of age or older. Then you’ll receive an email to verify and activate your account on the platform. Finally, you need to fill out your profile with a username and protect your account with a password. Your Steam account is ready to go!

How to download the Steam client

Now that you’ve opened your Steam account, you need to download the platform’s client. There you can make purchases, play games, connect with friends, and basically use Steam.

To download and install the Steam client, you have two options. The first is to visit the platform’s website and click the green “Install Steam” button. Then the client will be downloaded to your PC. Once the installation is finished, you can log into Steam with your username and password. Your second option is to download the Steam client quickly and securely from our website. You’ll find the download button below.

How to buy a game on Steam

Step 1: Log into your Steam account

Buying a game on Steam is a piece of cake. The first step is to visit the platform and make sure you’re logged into your account. To do that, click the “Login” button in the top right corner of your screen and enter your account name and password.

Step 2: Find the game you want to buy

Now that you’ve logged into your Steam account, it’s time to find that title you’re looking for. To do that, type the name of the game you want to buy in the “Search the store” bar. If you haven’t decided what to buy yet, you can check out the catalog by selecting “Browse” and, once the dropdown menu opens, choosing a game genre.

Step 3: Make sure your PC meets the system’s minimum requirements 

It happens a lot: you see a game you want to play, get excited and buy it immediately. But if you do this, you could be in for an unpleasant surprise if, after downloading it, you find that your PC is unable to load your game. That’s why we strongly suggest that you check the minimum requirements for each game, which you’ll find in its file.

Step 4: Purchase and download your game

If your PC meets the minimum requirements and you’ve decided to buy the game, just click the green “Add to cart” button. Next Steam will ask you if the game you’re buying is a purchase for yourself, or a purchase as a gift.

Select the “Purchase for myself” option and pay for your item. Done! Now you’ve bought your first game on Steam, and you can download it from the “Library” section.

How to play a game on Steam

Playing a game on Steam is really easy. After purchasing and downloading the game, click the “Library” option. On the left side menu of the Steam client, you’ll see all of the games linked to your account. Click on the downloaded game and then the green “Play” button. It’s that simple!

How to find a good game on Steam

Now you know the basics about buying, downloading and playing that title you’re after on Steam. But what if you don’t know which game you want to play? In that case, it’s a bit more complicated. And Steam has a huge catalog of video games, so it can be hard to find what you want without help.

Fortunately, there are tools that make this task a lot easier: Curators, filters and Discovery Queues. Keep reading to find out how they can help you.

What are Curators on Steam?

Curators are members of the Steam community who have been recognized by the platform for the consistency and quality of their reviews. They have written a large number of reviews, and their recommendations have been praised by other users. That’s why Steam grants these players “Curator” status, giving visibility to their recommendations and reviews, as they are considered to be valid opinions that are useful to others.

One way to find good games on Steam is through Curator recommendations. To start following a Curator, we recommend finding a genre that interests you in the Steam categories. Next start reading the Curator reviews that come up, and if you like their style, start to follow them. That way you can always read their game reviews and find out which titles might interest you.

What are filters on Steam?

Another way you can find a game on Steam without knowing its name is through the filter system. Because even though the platform has a decent game search engine, filters help to narrow down your results and make it easier to find the perfect title.

Using filters on Steam is very easy. First, you have to run a search on the platform, so click “Browse” and then select the kind of video game you’re after. On the results page, you’ll spot the “Narrow by tag” option in the menu on the right side of your screen. Then choose the one that’s the best match for the title you’re searching for.

Then you can narrow down your results even further by using the new filters that will appear in the right-side menu. You’ll find filters by price, language, etc. It’s the perfect way to find the perfect game!

What’s the Discovery Queue?

The Discovery Queue is a great way to find new titles that might interest you on Steam. To access it, first you’ll need to log into the platform. Then Steam will search its catalog for a selection of new and top-selling games that are similar to the other titles in your library. That way, you can quickly find great games that you’ll definitely love.

How to get your Steam games for the lowest price: Special offers

Steam has a fantastic selection of special offers so you can buy your favorite video games on sale. They include seasonal offers, such as Steam’s Christmas sales, and the usual selection of daily or weekend offers.

To view the latest Steam deals, click here. To make sure you never miss any offers on a game you want, we recommend adding it to your Wishlist. That way, when there’s a special deal, Steam will send you an email alert about the price drop.

How to get a refund on Steam 

It’s happened to everyone at least once: right after buying a new game, you realize that it isn’t what you expected. If you’re in this situation, you’ll be pleased to know that if you don’t like a game you purchased on Steam, you can return it for a refund.

To get a refund on Steam, you’ll need to meet the following two requirements:

  • You must request your refund within 14 days of purchase
  • You can’t have played the game for more than two hours.

If you meet both requirements, you can get a refund on Steam without a problem. To do this, visit Steam through the client or the website and click on “Support”. Now find the game you want to return and select it to visit its support page.

On the game page, select “It’s not what I expected” and then “I would like to request a refund.” Then Steam will ask how you want to receive your refund, through the method of payment you used or as credit in your Steam wallet. Select the option you prefer and send your request. Now you just have to wait for Steam to review your request and process your refund.

We hope our basic Steam guide helps you to use Valve’s platform. What’s your favorite game on Steam? Tell us about it in the comments section!

FAQ About Steam

Here are some more frequently asked questions that may help you use the Steam platform.

What Is a Steam Card?

A steam card is like a gift card that can be redeemed for credit on the Steam platform. These cards are usually issued to players for playing games, fulfilling tasks, or just randomly.

What Is My Steam ID?

Your Steam ID is a unique ID given to you upon registration. This ID is linked to your profile and thus very important. Your Steam ID can be found in your profile tab and consists of 17 digits. You can use this ID for various actions, such as linking other people to your account.

How to Use a Steam Gift Card?

Upon receiving a Steam gift card, there will be a unique code that you can redeem to your Steam account to receive the credit from the gift card.

What Is a Steam Link and How to Use It?

The steam link was explicitly designed to take control of all the different devices you have in your home. With the Steam link, you can link your steam account with your smart television and even stream your gameplay through the TV. You can use the Steam link by enabling remote play from the settings menu within your Steam account.

How Does Steam Remote Play Work?

Steam Remote Play allows you to play co-op games online with friends. Only one player has to own and run the game in this scenario, while the other players can just join in. To start Remote Play, you can copy a link for ‘Remote Play Together’ and send this link to your friends.

Your friends can then join you by using the link. This link can also be sent to any device, meaning your friends can join the game from Mac, Windows, iPhone, Android, and more.

How Does Steam Family Sharing Work?

Family sharing is ideal as it allows families to share access to the same library of games and purchased games, while each member still has their own account. This means that family members can play the same games but keep their own saved files, achievements, and more.

More Guides to Using Steam

If you need some more help to start using Steam, here are some more guides to get you started.

What Is Zoom and How Does it Work?

Regardless of your situation, you’ve probably heard of Zoom before. Zoom is a video conferencing platform that can be used on both PC and mobile devices. Since the start of the Covid pandemic in 2020, Zoom has become one of the most popular video conferencing apps connecting people across the world. The conferencing app has made it easy whether you use Zoom to connect with work colleagues or family members.

To start using Zoom can make you flustered, but with this guide, we will show you what is Zoom, how to set up the app, whether you should go for the free or paid version and how to get the most out of the platform. We will also be sharing some helpful tips and guides to make it easy for you to start using Zoom like a pro.

What is ZOOM and how it works

What is Zoom?

So, what is the Zoom app? It is a cloud-based communication and conferencing app that connects users via video, audio, or even instant text messages. If you want to host a meeting with remote working colleagues, or have a virtual convention or seminar or even just connect with family members in other countries, Zoom has you covered.

How Does Zoom Work?

The Zoom app enables users to create, host, and join virtual meetings to communicate with one another via video or audio. Many other features mentioned above give you, even more control over what hosts and participants can do in these virtual meeting rooms. 

Where and How Can You Download Zoom?

The Zoom app is available on Android, iOS, Mac, and Windows devices. For iOS and Android, you can download the Zoom app from the respective app stores. For PC, you can download the Zoom app directly from the Zoom website. 

Alternatively, you can also download the different versions from the Softonic website by using the links below:

Getting Started With Zoom Meetings

As mentioned, you do not need a Zoom account if you only plan to attend meetings and not host or schedule any yourself. If you want to attend a meeting, you can simply click on the Zoom meeting link sent by the host. Alternatively, you can manually join a meeting by entering the meeting ID on the Zoom homepage or by dialing in from a landline (voice-call only).

If you want to host or schedule meetings, you will need to create a Zoom Account first. Once you’ve done this, you can schedule a meeting by tapping the ‘Schedule’ option in the app and completing the steps provided. If you want to jump right into a meeting, you can tap on ‘Host’ to start a new meeting. Once you schedule or start a meeting, you will be given a meeting ID that you can send to other participants to join the meeting.

What Is ‘Zoom Bombed’? How Do You Avoid It?

Zoombombing is a relatively new threat that has arisen. Zoom bombers are individuals who gain access to a Zoom meeting without being invited and, once in the meeting, cause all kinds of chaos. Because of the rising number of cases, Zoom is locking down hard on these types of threats.

To keep your meetings from being Zoom bombed, we recommend not sharing the meeting ID with anyone aside from the participants that need to attend. Also, we suggest using the password feature, which will require participants to enter a password to join the meeting. Finally, if your meeting group is smaller or has co-hosts available to help, you can also use the waiting room feature where the participants wait for a host to give them access to the meeting manually.

Benefits of using Zoom. Why choose Zoom?

Zoom has become an essential tool for anyone who wants to stay in touch. This includes small, medium, and even large businesses around the world. By using Zoom, you can virtually interact with co-workers when face-to-face meetings aren’t possible. 

Zoom has even become popular for social events and connecting family and friends who have been separated due to the pandemic or distance. Zoom parties, games, and movie nights are becoming increasingly popular with the app.

Features of the Zoom App

Many different features make the Zoom app so popular. Many of these features are available on the free basic plan. However, there are also a few that are only included in the paid options.

Zoom Meeting Features

This is the most general use of the app and allows work teams and even individuals to connect. Zoom meetings support HD video and audio, with the option to lower the picture quality if your internet connection is slow. 

With these meetings, you can also see the participants’ camera feed or only allow audio. This is great because, with smaller, more intimate meetings, it is great to see all the participants, but having the camera feed on can be distracting when you host a large meeting or conference with many participants.

Zoom meetings are also cross-compatible so that you can use the app on your desktop, mobile device, or your browser. All versions of Zoom support the cross-platform capability for video, audio, and text messaging.

Other useful features include password protection and end-to-end encryption. This ensures that your account and the contents of your meetings, whether video, audio, or text, will remain confidential.

With Zoom, you can also schedule meetings ahead of time directly from within the app, and you can sync your Zoom schedule with your Calendar to ensure that you never miss an important meeting. By default, you can sync to your Google Calendar or Outlook calendar.

Aside from these basic features regarding Zoom Meetings, there are also many others such as enabling waiting rooms, using custom personal meeting IDs, recording meetings, assigning chat permissions, setting meeting reminders, using Zoom driving features with Apple CarPlay, touching up your appearance, using filters, changing the background, and remote control over a meeting.

Zoom Chat Features

Although Zoom is primarily used for video and audio meetings, such as mentioned above, the app also features an instant messaging feature that allows you to send text messages. Not only can you send instant text messages, but you can also send files using Google Drive, DropBox, OneDrive, and others. You can also conveniently start a meeting directly from a chat and search your chats to find certain information. 

Zoom Phone Features

These features are more complex and usually only available on the paid plan. On plans that include these features, you will be able to call in to join a Zoom meeting, toll-free dial-in where participants can join a meeting from a landline, call-out to other phone numbers during a meeting, and leave voicemail messages up to five minutes long.

Zoom Video Conferencing Features

Some businesses use Zoom to host large meetings and conferences with many participants. The app is geared for this and has quite a few simple features that are especially useful for large groups.

The first of which is the virtual hand-raising feature. This feature will let the meeting host know that you have a question or something to add without interrupting the meeting, and the host can address your questions when they are available.

A poll feature is available that lets you send a poll on Zoom to all the participants to vote on. These polls can be simple single-question or multiple-question polls. There is also an annotation and whiteboard feature which is ideal for teams to collaborate.

Then there is also the breakout rooms feature. How does Zoom breakout rooms work? Essentially it lets you create smaller meeting rooms that you can split your meeting into. This is ideal for training, education, and smaller work sessions. The host can decide who goes into which room and has access to all the rooms. However, this feature can only be managed by the owner of the account or admins with the right permissions.

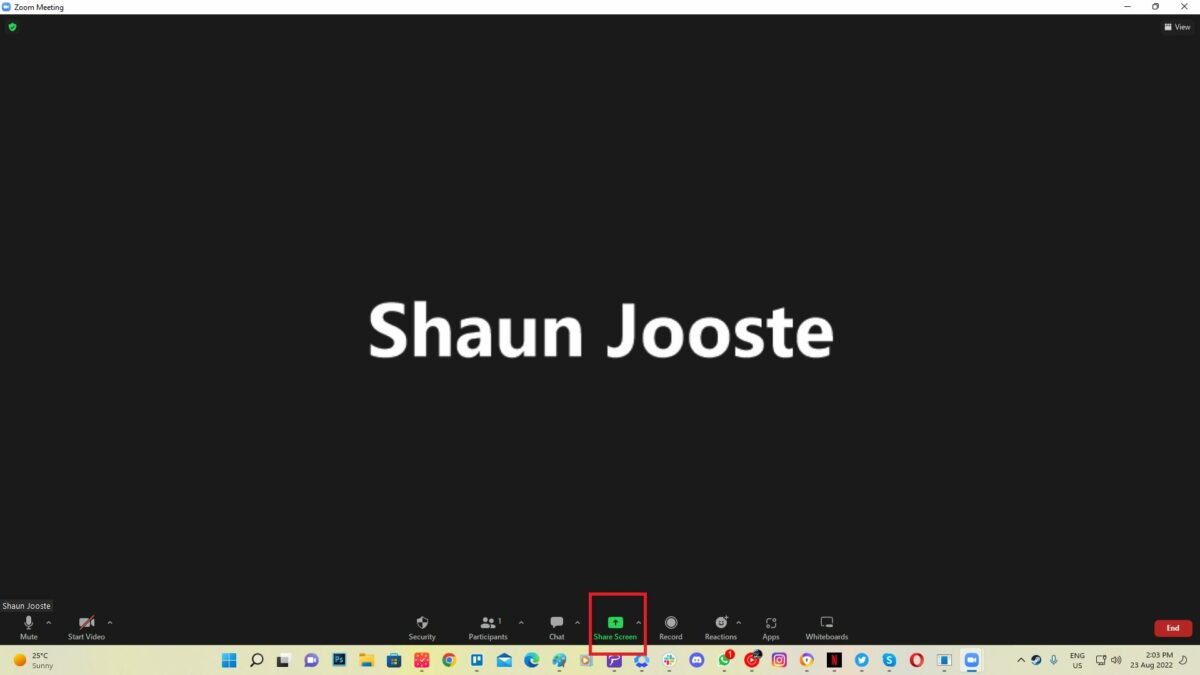
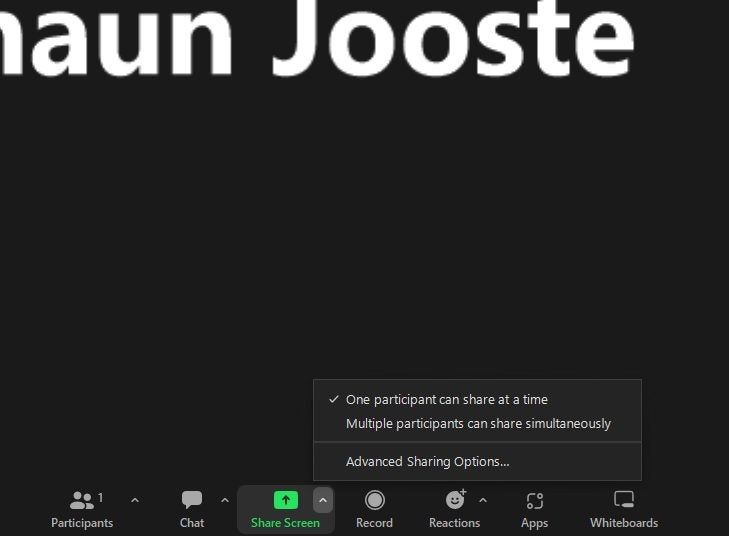
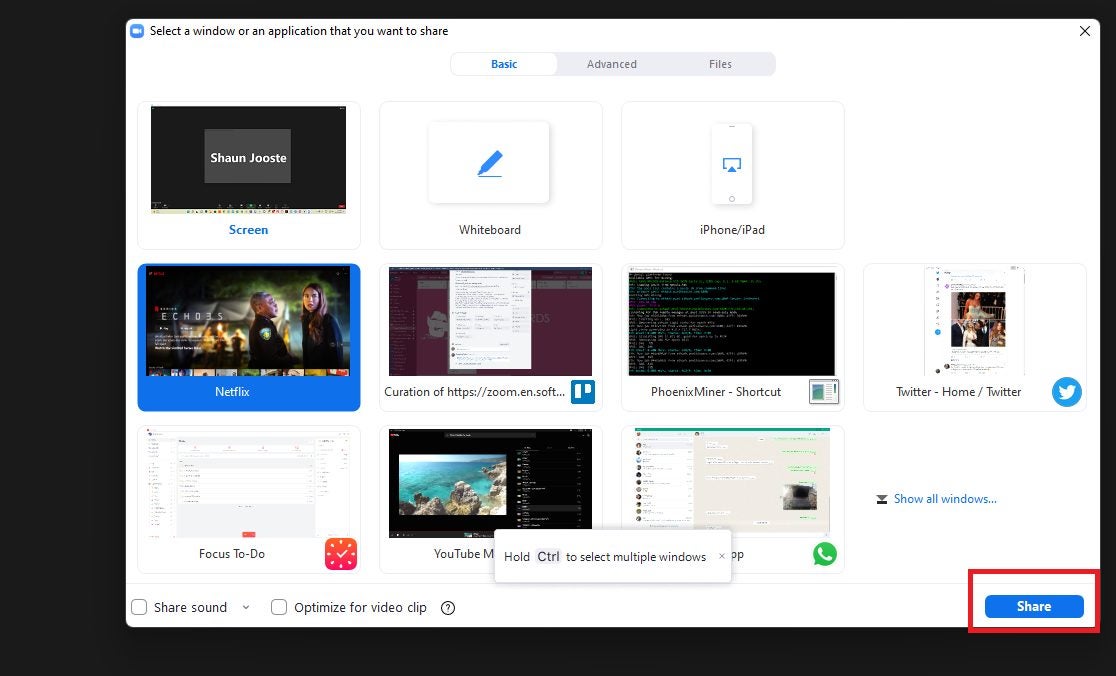
Finally, Zoom also lets you share your screen with participants and even has a multi-sharing feature that allows other participants to share their screens simultaneously during the meeting.

Zoom Rooms Features

Zoom Rooms is a stand-alone extension of Zoom that is specifically designed for managing teams. This makes it an ideal solution for businesses that require video conferencing as well as team managing options. With Zoom Rooms, you will need hardware to create a dedicated meeting environment such as a conference room. 

One of the unique features of Zoom Rooms is the single sign-on feature which allows participants to sign in to a meeting using the company credentials. Touch-control features allow you to easily manage meetings by muting and unmuting participants and more. 

With Zoom Rooms, you can also record meetings and store them in the cloud. The cloud storage available depends on the plan you’ve chosen. This version of Zoom also has a cloud transcript option available where the app transcribes your recorded audio and stores it in the cloud. Zoom Rooms start at $49.99/month/room and would need to be purchased on top of your selected Zoom package.

What is ZOOM and how it works

More Tips and Tricks When Using Zoom

If you are in a position where you frequently use Zoom, whether for work meetings or virtual family gatherings, here are a few tips that will make using the app easier and more convenient.

How to add contacts to Zoom on the app

Before holding any meeting or video chat, we recommend spending a few minutes adding all the contacts you’re going to connect with through Zoom. Just tap “Contacts” and “Add Contact.”

You can sync the contacts in your phone, or alternatively, add them by email addresses (if they are signed up for Zoom). Next, tap “Add” to send your contact a friend request so you can easily add that person to your meetings.

How to create a Zoom meeting on the app

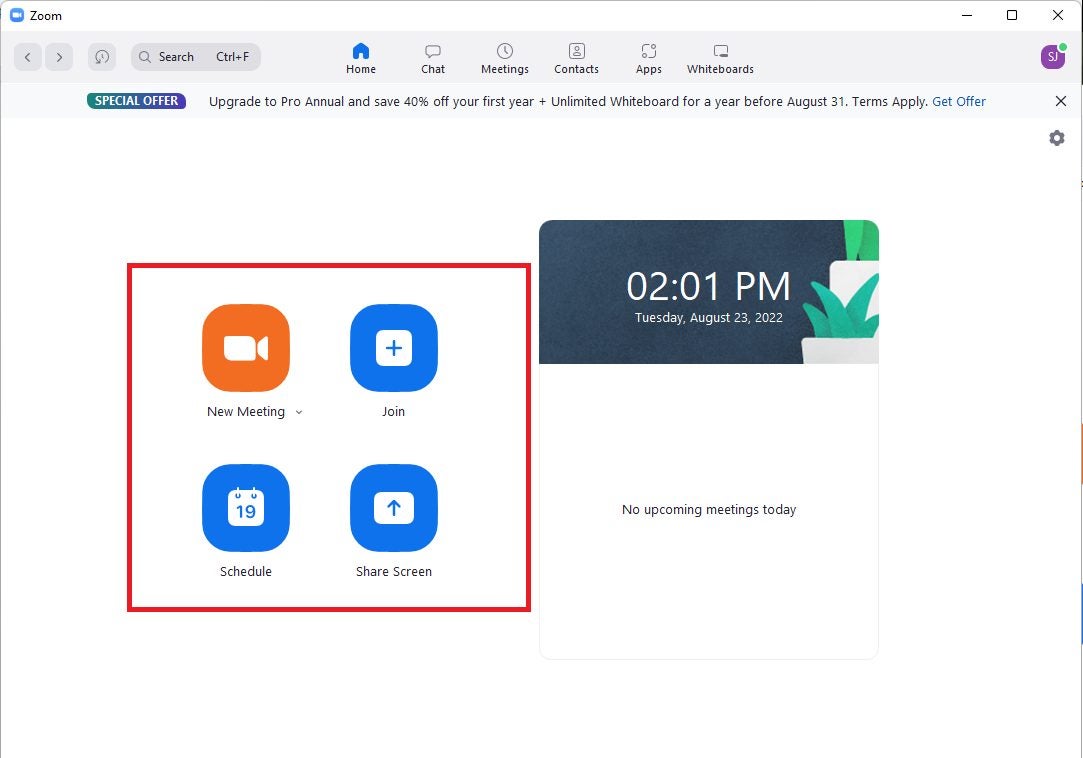
Creating a Zoom meeting is a very intuitive process. Just tap the orange button that says “New Meeting” under the “Meet & Chat” tab. Then decide whether you want to start with video on and share your personal meeting ID with the rest of the participants. Next, just click the blue button that says, “Start a Meeting.”

Then you’ll see your phone’s camera turn on, and you will appear on the app display. One important thing to keep in mind is that if you use Zoom for Android, you’ll have to grant it permission to access your phone’s camera and microphone.

How to add contacts to your Zoom meeting

There are two ways you can add participants to your Zoom meeting or video chat. The first one is by tapping “Participants” and adding people from your contacts list.

The second one is by clicking the meeting ID (at the top of the screen) and sharing the copied URL by email or your favorite messaging service. When your contact clicks the link, he or she will be redirected to the meeting you just started.

How to join a Zoom meeting

Joining a Zoom meeting is even easier than creating one because you don’t need to create an account on the app. If the host has sent you a link to access the meeting, just click it to join automatically.

If, on the other hand, you only have the meeting ID number, tap “Join” and enter the ID of the meeting you’d like to join. Then select whether you want to join it with your microphone and camera on, and finally, enter the password to access the meeting.

Create Recurring Meetings

If you have regular meetings, you can set them as recurring when you schedule the meeting the first time around. Then you can use the same meeting ID and URL to log into the meeting on the next date. This is ideal if you have regular team meetings held on the same day and time each week and makes it so much more convenient as you don’t have to schedule the same meeting individually every week.

Record Important Zoom Meetings

This is a great feature, especially if you or another team member need to reference back to the meeting or if a participant could not attend. These recordings can be stored as a record of what was discussed and sent to participants as needed.

How to Record a Zoom Meeting

Only hosts or co-hosts can record a Zoom meeting, and hosts can permit other participants to record. A participant will not see an option to record unless they’ve been permitted by the host to record. Once the meeting starts, you will see the option to record at the bottom of the screen. Click on it and choose where you want to store the recording. You can choose your local drive, or if you have a paid plan, you can choose to store it in the cloud.

*It is important to note that you can only record from a PC with Zoom installed and not the mobile or web versions.

Mute Yourself When You’re Not Speaking

It can be very annoying if you are in a Zoom meeting and filter through each member’s background noise to hear the host. That’s why it is recommended that you mute your mic whenever you aren’t talking and only switch it on when you wish to say something. 

Hosts can also mute participants’ mic’s from their side and unmute single participants or the whole group when it is convenient for them to take questions, etc.

Sync Zoom to Your Calendar to Stay on Top of Meetings

Zoom has a useful feature that allows it to sync with your calendars (Google and Outlook). This way, you can easily stay on track with all your different meetings in one space without having to jump between different calendars and apps.

How to activate Safe Driving Mode

It may not be the best idea, but at some point, you’ll probably need to use Zoom in the car. To do that, activate Safe Driving Mode by swiping right. This will stop your camera and mute your microphone, and your interface will switch to a large blue “Tap to Speak” button. Tap it to send a message, and tap it again once you’ve finished speaking.

Safe Driving Mode is especially interesting if, for example, you’re going on vacation with a group of friends in different cars and need to be in constant contact. It’s a lot like the internal radio system that many taxis use today.

What is ZOOM and how it works

Which plan will I need?

You do not need a Zoom account to attend Zoom meetings that you’ve been invited too. However, you will need one to host and set up meetings. There are four different plans ranging from the basic plan to enterprise, ranging from free to $19.99. Choosing the right Zoom plan depends largely on what you want the app to do and which features you need. 

  • Basic Plan (Free): With this tier, you receive unlimited one-to-one meetings; however, meeting with more than three participants is limited to 40 minutes. 
  • Zoom Pro ($14.99/month/license): Ideal if you work with a small team with frequent meetings. Group meeting lengths in this tier are extended from 40 minutes to 24 hours, and you can create meeting IDs for those meetings that you conduct frequently, and you can also store video recordings in the cloud.
  • Zoom Business ($19.99/month/license): With the business tier, you get all the basic features, as well as your company’s branding on all Zoom invites, dedicated customer support, and auto-generated transcription services, among others.
  • Zoom Enterprise ($19.99/month/license): This is for large businesses and requires a signup of at least 100 hosts. With this tier, you get access to all the features Zoom has to offer, as well as unlimited storage and a dedicated ‘customer success manager.’

Paid Vs. Free App

You can create a free Zoom account and still attend and host meetings. You will also have access to the basic features. However, group meetings with more than three participants will be limited to only 40 minutes. The free version is the most popular and most widely used version of Zoom currently.

However, if your business is larger and you have frequent meetings with bigger teams that last more than 40 minutes, you may need to look at the paid options. The paid options also provide a few more features that make hosting larger meetings easier.

Zoom guides and tutorials

If you need some more guidance to start using Zoom to its full potential, here are some additional resources to help you along the way.

Connect With Anyone, Anywhere

Zoom is one of the most popular cloud-based communication and conferencing app that lets you connect with people from all over the world virtually through video, audio, and even instant messages. It offers many different features that let you make the most of the app, whether you use it for business or personal reasons.

All about VirtualDJ: what it is and how to use it

VirtualDJ enables users to edit, create and manipulate audio files. This specialized program is available for both Windows and Mac computers. The software was developed by Atomix Productions and has more than 35 years of experience. VirtualDJ is among the favorites when it comes to mixing digital music, along with the likes of Serato, Traktor, and Ableton.

VirtualDJ DOWNLOAD

There is a free version of the program available to give you a good feel for how the software works, and with the free version, you get 10 minutes of using premium functions once a day. So, let’s see what VirtualDJ is and how it works.

What Is VirtualDJ?

VirtualDJ is a Digital Audio Workstation (DAW) and virtual mixer for DJs to edit and manipulate digital audio files using virtual turntables. VirtualDJ first appeared in July 2003. Since its release, the program has undergone many changes in order to develop a fully-featured, virtual mixer that is easy to use and intuitive. The goal of VirtualDJ is to be a completely multideck standalone program that both beginners and experienced DJs can use.

With the highly versatile virtual mixers, it is possible to create music even while on the go. This editing software contains features such as ModernEQs. These can be accurately separated for smoother transitions. There are also Stem Pads available for real-time mixing. This allows you to separate different parts of the audio, which the DJ can then manipulate. For example, using Stem Pad, you can completely mute the drumline of a specific audio file or have the guitar line play solo without the other parts of the audio.

While VirtualDJ has a virtual deck available, users can also add their own DJ controllers to the platform. The software uses plug-and-play to detect any new controllers added to the program.

VirtualDJ to start mixing music 8

What is mixing?

Mixing songs together sits at the heart of the art of DJing. At its most simple you mix songs together in such a way that they sound harmonized as if they were a single song. It’s not as easy as it sounds though, as you’ll need to beat match both songs, slow or speed up the tracks so that the beat on them both is exactly the same, and then line up all the other musical elements so that the songs work with each other. The idea is that you guide your set from one song to the next without breaking the music.

This means that you need more than a simple media player to mix effectively. You’ll need a virtual crossfader to control whether the left deck or the right deck is playing, a virtual equalizer will help too, and a sampler will allow you to add other sound effects and elements on top of your mixes too. This is where Virtual DJ by Atomix Productions comes in, offering a robust package that covers all aspects of DJing. Once you’ve downloaded Virtual DJ and gone through today’s tutorial, you’ll be able to start mixing and take your DJ career to the next level.

VirtualDJ to start mixing music 8

VirtualDJ 2022

VirtualDJ 2022 is the latest release from Atomix Production. While most of the features remain the same, a few new features have been added to make the program even more powerful. There is one notable difference between VirtualDJ 2021 and previous versions. VirtualDJ 2022 has four different layouts (Starter, Pro, Essentials, and Performance).

These layouts can also be customized according to the users’ preferences. The layouts all work a little differently. For example, the Pro layout includes 4-decks instead of the standard two decks. Having multiple decks available makes it easier for DJs to manipulate multiple tracks to create a fresh new one.

Another new feature you can expect in VirtualDJ 2022 is the event scheduler. This handy feature allows you to set presets, playlists, and songs to play at a specific time. Another new feature is that VirtualDJ is now also compatible with Beatport, adding another music library for you.VirtualDJ was already compatible with SoundCloud and Deezer. By linking your Beatport account, you can easily access all your content in VirtualDJ.

How to Use VirtualDJ – the Definitive Tutorial

In this VirtualDJ beginners guide, we will share how to get started with the software. Once you’ve got the basics down, you can start experimenting with more features to create your own music. To begin using any mixing software, Like VirtualDJ, there are a few basics you need to understand. These concepts are how to import your music library, basic controls, prepare your tracks, and finally, mixing.

What you’ll need

As well as a PC or Mac or the Windows operating system, you’ll need hardware including a soundcard with two audio outputs and some headphones if you’re going to really get started. This will allow you to play different songs out of your speakers and headphones at the same time, which will allow you to line them up and beat match them both. It is possible to mix music without this basic setup but it will be next to impossible for beginners to do so. You can also add other DJing hardware to your Virtual DJ setup once you’ve mastered the basics.

Importing your Library

If you’re a new DJ, you’re going to need to organize all your tracks so that they’re easy to access when you want to play them. When you open Virtual DJ Free, start by finding your music library using the file tree on the left. Right-click and choose Virtual Folder, which will create a place you can keep all the tracks, remixes, and playlists you want in Virtual DJ.

Drag a few songs you like into this folder, and then one by one drag them into the decks. This will allow the app to analyze the beats per minute (BPM) of each song. We think it’s a good idea to put any song you play in the app into your Virtual Folder, as it’s more comfortable than the messy Windows file tree. You don’t want to be searching through iTunes while you’re juggling your next beat transition.

VirtualDJ to start mixing music 8

Basic controls

It’s easiest to use Virtual DJ combining some simple keyboard DJ mixing commands with the cursor keys. Here are the three essential DJ mixer keyboard commands you’ll need:

  • Tab – switch between A and B decks
  • C – mark a cue point and play from cue point
  • Space – play/pause.

Steps to use VirtualDJ to start mixing music

  1. Add your tracks to the decks

    VirtualDJ to start mixing music

    Once your music has been added to your library, you can drag the track you want to use onto the deck. Since this is a basic tutorial, we’ll only be using two decks, thus dragging a different song onto each deck. For the best results, choose two songs with matching BPM, which is conveniently shown next to the song’s length.

  2. Set a cue point in track A

    VirtualDJ to start mixing music

    By pressing the spacebar, track A will start to play. You’ll see a waveform moving as the song plays. This waveform is a useful visual presentation of music flow and can help identify a cue point. A cue point is where you want the track to start playing for your remix. Decide where to set your cue point, and click on that area in the waveform. Use the spacebar to start and stop the music until you’re at the precise location. Then press ‘C’ on your keyboard to set the cue point.

  3. Set a cue point in track B

    VirtualDJ to start mixing music

    Now, you’ll want to repeat step 2 above, but on track B. To switch to track B, hit the Tab key on your keyboard. You’ll see that the second deck is highlighted and active.

  4. Use the crossfader to adjust which track is heard

    VirtualDJ to start mixing music

    Press the Tab key again to go back to deck A. In the center of the deck, you’ll see a crossfader. By sliding it out, you can let the song fade out. With the fader in the center, both tracks can be heard, but moving it towards one track will make that one stand out more. Adjust the fader until you’re happy with the results.

  5. Sync tracks

    VirtualDJ to start mixing music

    Press the Tab button to go to deck B. Once here, click on the ‘Sync’ button to automatically sync your songs. If it sounds slightly off, you can adjust the sync manually by pressing and holding ‘C’ and then using the pitch arrows to nudge the track forward or backward until it matches track A.

10 Best Alternative Apps to Tinder

Try these Tinder alternatives to jump-start your love life.

Tinder and its unique way of connecting people have taken the world by storm since its release. Tinder has become well known as a hookup app for more casual encounters, although in essence, it is a dating app at its core. Many individuals have found meaningful connections and relationships on Tinder. 

But maybe you’re looking for Tinder alternatives? While Tinder is available on Android and iOS platforms, maybe it isn’t the app for you. There are many similar apps to Tinder that you can consider.

Why Choose an Alternative to Tinder?

Tinder works hard to keep the app fresh and interesting for users. Whether it is by introducing 48-hour ‘Vibes’ events, or features that protect the LQBTQ users, they keep improving their offers along the way. Unfortunately, the push to monetize the app has caused many people to look for Tinder alternatives. The premium version does have many added benefits, but some want a simple dating app without the hassle of paying for it.

It is not uncommon to get bored of Tinder. Maybe the ‘swipe right’ system is no longer as entertaining as it used to be, and the push to get the premium version can be annoying. Or perhaps you’re no longer getting matches, or the matches you do get end up as disasters. No matter the reason, you can take a break from Tinder and explore some of these other dating apps that some would argue are better than Tinder.

Similar Dating Apps Better Than Tinder

Maybe you’re sick of Tinder, or maybe you’re just wondering if there are any better alternatives out there. Luckily for you, Tinder has a lot more competition now than it used to. If you’re looking for love and a long-term relationship potential dates, or maybe just a meetup, try these Tinder alternatives.

Hinge

If you’re looking for a more meaningful relationship, give Hinge a shot. It claims to have a more thoughtful approach to matchmaking than Tinder or other alternatives. Unlike other dating apps, Hinge uses your Facebook profile to connect you with others, such as friends of friends. These quality matches can be a good option, if you’re nervous about sending that first message to a complete stranger online. But if you’re not into connecting with mutual friends through Facebook, Hinge now offers the option to simply log in with your phone number. Although it’s a free app to use, you can upgrade to a preferred membership with a monthly fee for additional features.

Hinge Download now
9

Badoo

Over 330 million people use this app worldwide, operating in 190 countries in 47 different languages. There’s no pressure, either as you can use this app for more serious dating, casual dating, or for making new friends. Badoo is frequently updated with new features to help you in your dating search, and you can even connect with other users who are currently nearby, whether you’re at a bar or movie theater. The app also has the option to look for celebrity lookalikes, if you’re into that sort of thing.

Badoo Download now
8

Coffee Meets Bagel

Coffee Meets Bagel promises to be a simpler, less time-consuming dating app. Instead of manually going through matches or swiping right, Coffee Meets Bagel uses an algorithm to match you with users who meet your basic criteria or share your interests. The app will even help you break the ice with conversation starters. It’s also LGBTQ-friendly—no need to use a separate app! A premium option is available, too, if you’re looking for more information about your matches or are having issues with ghosting.

Coffee Meets Bagel Download now
7

PlentyOfFish

PlentyOfFish is one of the most downloaded free dating apps, boasting nearly 100 million users worldwide. It’s easy to match with other users and start conversations immediately, though the questionnaire is more in-depth and can be time-consuming. You can take a Chemistry Test to find other personalities with similar, long-lasting emotional needs, or even discover some relationship needs of yours for which you might not have been aware.

Better yet, the app features unlimited messaging, so chat away! If you want to receive better matches, fill out as many personality questionnaires as possible. Like many other alternative dating apps, you can choose to upgrade your account for a fee.

Plenty of Fish Download now
8

Bumble

This free dating app has over 20 million users. It differs from many other options out there in that only women can initiate contact, and men only have 24 hours to respond. Although you might match with fewer numbers on Bumble than other apps, the matches are considered to be better quality, so you’ll likely experience fewer corny pick-up lines.

Like Hinge, you can now log in with a phone number instead of a Facebook account, if you wish. Even better, Bumble is more than just a dating app now. It can also help you to make new friends and network in your field with the help of its Bumble BFF and Bumble Bizz features. If you’re looking for a dating app that can do more, Bumble is the way to go.

Bumble Download now
8

Happn

If you want your love affairs to start with something a little more personal than a swipe with potential matches, Happn could be what you’re looking for. Happn’s unique way of doing things involves a hookup with people you’ve encountered in real life. Unlike other online dating sites, Happn will only let you match with other users you’ve passed in the real world. If that sounds like something you’d be interested in, you can download Happn on Android and iPhones now.

Happn Download now
8

OkCupid

OkCupid is similar to Tinder but more personalized. You start off by answering a fairly extensive questionnaire. The more questions you answer and the details you share, the better your experience on OkCupid will be. Once you’ve answered the questions, the app will match you with potential dates. This app really lets you weed out people with traits that are really a no-go for you, such as those with specific religious or political preferences.

OkCupid Dating DOWNLOAD NOW
8

Elite Singles

Elite Singles is aimed at working individuals who struggle to find time to meet new people. The app includes ice-breaking questions that can be used when first meeting someone new, which is ideal for those that are a little awkward when meeting a new person. With Elite Singles, you will also receive a new match daily, so you’re guaranteed to meet new people making it one of the best Tinder alternatives. All matches are also based on your preferences.

Elite Singles: DOWNLOAD NOW
8

Skout

Skout is a much more open dating app that allows users to connect with a wide range of people. You also don’t have location restrictions, which means you can connect globally. While Skout is still relatively unknown, many users have reported that they prefer Skout to more popular dating apps like Tinder and Grindr.

Skout DOWNLOAD NOW
8

Ship: Dating Matchmaking

Ship: Dating Matchmaking has a fascinating approach to their dating app. Not only can you add your preferences and swipe on any matches received, but you can also allow friends to help with your matchmaking. This means that if you want friends, family or your parents to be involved in choosing your next date, this app is for you.

They can only swipe on matches provided based on the preferences you enter at the start. Once a ‘crew member’ has swiped on a profile they feel matches you; the conversation is opened. However, your crew members will not be able to see your conversations – thankfully. This is one of the best Tinder alternatives.

Ship: Dating Matchmaking DOWNLOAD NOW
8

In a Nutshell

To make the process of finding dating apps better than Tinder, here is a scannable table with our top recommendations for you to consider.

Dating AppIdeal For:Best FeaturesAvailable on Play StoreAvailable on App Store
HingeThose attracted by personalityCan connect with friends of friends. Location-based. Users can like and comment on specific sections of a profileYesYes
BadooThose who enjoy experimentingMeet people close by Video chat function from within the app. Any explicit images are automatically blurred. Can only match with genuine profilesYesYes
Coffee Meets BagelThose looking for the real dealActivity reports. Meet with those who liked you. Can browse through other profilesYesYes
PlentyOfFishThose new to datingSimple interface. Messaging on the app is free. Can live stream and have virtual dates. Can enable or disable messagesYesYes
BumbleProactive datersHave to respond to matches in 24 hours. Verified profiles. Different modes (date, bff, business). Can share musicYesYes
HappnMeeting people you’ve already metCross-path timeline notifications. Location is kept private. Crush-time, similar to super like on Tinder. Send secret likesYesYes
Ok CupidFree datingMatches with those with the same interests. Requires mutual swipe to start messaging. Fun questionnairesYesYes
Elite SinglesWorking individualsIcebreaker questions. Can upload Facebook photos from the app. Receive daily matches. Matches based on preferencesYesYes
SkoutThose wanting to make global connectionsWatch other’s streams. Matches based on preferences and your chosen proximity. Get updates about other users nearbyYesYes
Ship: Dating Matchmaking Those looking for a fun and easy experienceCan set profile as dater or matchmaker. Set matches for yourself or your friends/family. Can arrange group chats with your crew to discuss prospects. Follow crew members dating activityYesYes

How to Know If My Phone Is Hacked and What to Do

Let’s have a look at some of the things you should look out for to make sure your phone hasn’t been hacked.

Have you ever wondered how to know if your phone is hacked? We are all aware of the many cyber threats surrounding us when we use the internet on our PCs. Think of all the measures we take to protect our computers from hackers, antivirus programs, VPNs, proxies, and more. But when it comes to our mobile devices, we aren’t always as careful.

With so much of our lives contained in our smartphones, these devices have become a crucial part of our daily lives. Think about that one time you forgot your phone at home, how utterly lost you felt without it. We store almost everything on our phones these days, important documents, bank details, health care, IDs, and more. If someone were to hack our phones, they’d have access to all of this information.

A lot of the time, you might not even know that you’re being hacked. This type of attack is much more subtle than a robbery. Once the hacker gets into your devices, they can easily access your apps, files and even use your data without you even knowing. This is why it is critical to know the signs of a hacked phone to protect yourself.

Can iPhone Get Hacked? or Is it Just a Matter of Android?

Although iPhones are usually better protected than Android devices, they can still be hacked. Unfortunately, as technology advances, so do hackers. Using a device that seems safe is no longer a surefire way to protect yourself from hackers. If they want to, hackers will find a way through the protective measures, which is why it is essential to stay one step ahead and not assume your safety just because of your device type.

Is my phone hacked? 8 ways to find out

There are quite a few things to look out for that could indicate your phone has been hacked. On their own, these could be simple issues that should be looked at individually. If you’re experiencing a few of them, however, then you should think about dealing with them as a whole.

1. Your device is a lot hotter than usual

phone is too hot

If your mobile phone has been hacked, there will be lots of unauthorized programs running in the background behind your operating system. These could be things like adware, spyware, trojans, etc. all designed to make money for the hacker in different ways. These will be putting extra pressure on your device’s processor and memory. This will, in turn, cause the processor to heat up much more than normal. If your device is hotter than usual, try to find out why. If you can’t get to the bottom of it, something fishy might be going on.

2. Your battery doesn’t last as long as it should

The same that goes for extra heat will also go for extra power. Even if you’re not feeling the heat, you might still notice that your battery is running down much quicker than it used to. Again, this could be because of unknown programs always running in the background.

3. You seem to be using more data than you usually do

This follows on from the other two. Most malicious programs running in the background will connect to the internet to do whatever it is they’ve been programmed to do. This could something like be transferring your data to a third-party server or showing you ads that wouldn’t normally be there. If you’re not connected to Wi-Fi, this will use mobile data. Check your data usage.

4. Your call message records include calls you didn’t make and messages you didn’t send

If the malware infecting your phone has permission to make calls or send messages then this could end up costing you big. Some hackers will program the malware to call their own premium rate phone lines that can cost many dollars a minute to call. The same goes for SMS messages too. If you notice outgoing phone numbers you don’t know or phone calls you don’t remember, check with your network provider immediately.

5. You’re seeing a lot more pop-up ads than you’re used to

As we’ve just mentioned, one way for hackers to make money is through raising ad-based revenue. They do this by forcing their victims to view more ads than they normally would. If you’re noticing more ads than usual, your phone may have been infected with adware and most likely has been hacked.

6. Your phone has new apps that you didn’t install

Always pay attention to the apps you have on your phone. For one of many reasons, hackers could try to install false apps. If something is there and you don’t remember how it got there, it may have been installed remotely by a malicious third party.

7. Your phone isn’t working as well as it should

As we’ve already mentioned, hackers will try to install their secret programs onto your device. These will try to do a number of things but will run in the background without you knowing about it. It stands to reason then that if your phone is running all sorts of extra little programs and protocols in the background, it won’t be able to perform its normal functions as efficiently.

8. Unusual Background Noises

Another telltale sign that your phone may be hacked is if you hear odd background noise. This can either be while you’re listening to the audio or even while making calls. If you hear strange background noises, you should immediately investigate further as it could mean that your phone has been hacked and someone is listening in on your conversations. 

What to Do If Your Phone Has Been Hacked

If you’ve noticed any of the above signs and you suspect that your phone has been hacked, don’t panic. There are things you can do to get rid of the hacker and keep them from coming back.

Check Your Phone Bill

First, you should check your phone bill for any calls you didn’t make. Make sure to check for any unknown number dialed and the length of the calls. Make notes of anything unfamiliar to you. Also, don’t forget to check your messages as well. You should carefully check all your messages for any traces of messages sent to numbers you don’t know or containing texts you haven’t sent. Once you’ve gathered all this data, contact your service provider and discuss the matter with them. You may even get the chance to claim back your losses.

Change All Account Passwords

If you notice any unfamiliar activity on your device, immediately log out of all accounts and change the password. It is best to use a strong, randomly generated password consisting of letters, characters, and numbers when doing this. It is a good idea not to make up a password yourself if you suspect that you’ve been hacked. This is because the hacker potentially already knows you and might be able to guess the new passwords.

Uninstall Any Malicious/Suspicious Apps

Go through all of your apps and delete any ones that are unfamiliar or that you don’t use often. This may take some time, but it is a crucial step as the hacker might be using malicious apps to gather your data, or worse.

Install an Antivirus App

Make sure to install a good antivirus app. As soon as you’ve installed the antivirus, make sure to run a full scan and remove any threats picked up by the app. Also, if your app has ‘Real-Time Protection, ’ we recommend enabling it. This feature will assist in keeping you safe by flagging suspicious websites, links and phishing attacks in the future.

Worse Case Scenario – Restore Phone to Factory Settings

If you’ve done all the above steps and it still seems like your phone has been hacked, you might have to resort to a factory reset. This will return your phone to how it was when you first took it out of the box. Any apps that you’ve installed will be removed. Any messages, emails, and photos will also be removed. This is why the factory reset is the last option on our list. Make sure to backup anything you want to keep before restoring your phone to factory settings.

Know the Signs of a Hacked Phone

In this day and age, we have to stay one step ahead of hackers. With more and more of our lives taking place online and through our mobile devices, we cannot afford to have our data breached. One way to stay safe is to know the warning signs and act immediately if you suspect anything.

VLC Media Player Converter to MP4, MP3 and other formats

VLC Media Player is a free media playback utility created by VideoLAN. This utility plays almost any type of media file, from mp4, mp3, mkv, to mov. What does this mean to someone who doesn’t spend all day muttering to themselves about conversion rates and lossless compression? Well, you know that annoying thing that happens when you try to play certain media formats using Windows Media Player? That won’t happen with VLC. VLC is the same type of utility as Windows Media Player, only better. 

VLC media player DOWNLOAD

You can even use this utility to easily convert videos to other formats like MP4. If you, like me, have an overactive trigger finger when it comes to home videos on your mobile device, you’ll enjoy this guide. In fact, this guide is useful for any video taken on an iOS or Android device, especially when you need to convert formats with VLC Media Player Converter

What Kind of Formats Can I Convert Using VLC?

VLC supports a whole range of different video, audio, and text files. Here is a list of the different formats that are supported by VLC and can be converted.

  • 3gp
  • Avi
  • Flv
  • MOV
  • Mkv
  • Mp4
  • Mpeg1
  • Mpeg2
  • DivX
  • H/I 263
  • Mpeg 2 audio
  • Mp3
  • FLAC
  • PCM
  • A-law

Output Files Using VLC Media Player

You can convert current movies and audio to the following formats:

  • MP4
  • TS
  • OGG
  • WMV
  • DIV3
  • AVI
  • Webm

How to use VLC as a video converter to MP4

  1. Select your video

    How to Convert Media Files Using VLC Media Player

    The first thing you’ll want to do is open your VLC media player and head to the banner at the top of the interface. Now, click on the Media menu and scroll down to Convert/ Save. You should see a new window open up with the header ‘Open Media.’

    Next, you’ll want to use the Add button to select one or more videos to convert. Once you hit Add, you should see a third window open up, this time displaying your file explorer. From here you can select the video you want to convert. I’ve chosen a guide for propagating crassula Ovata posted by the Bonsai Alchemist.

  2. Select the file name for the converted video

    How to Convert Media Files Using VLC Media Player

    In the Destination file box at the bottom of the conversion interface, you’ll want to select the destination folder and the name for the new video file. I’m keeping the name similar, to try and organize the disaster I call my personal filing system. Once you’ve selected a folder and named your new media file, click Save.

  3. Select video format for the conversion

    How to Convert Media Files Using VLC Media Player

    Next, you’ll see that you’re back in the main conversion interface. Scroll down to profile, and then choose the target format from the list of formats. VLC media player easily converts videos into different formats such as MPEG, MP4, AVI, Divx, ASF, WMV, FLV or DVD. Here is a full dropdown list of the video file formats that VLC supports.

    If you want videos for a specific device, there are also a number of optimized profiles with the optimal settings for resolution, framerate, and codec.

  4. Fiddle with advanced settings (Optional)

    How to Convert Media Files Using VLC Media Player

    I’d suggest only messing with advanced settings if you know what you’re doing when it comes to media formats. All you need to do to access these advanced settings, is click on the little wrench icon that usually denotes settings. You should see a new interface open up. From here,  you can choose the supported video codec and audio codecs for your output file and have access to all advanced options like bit rate, resolution, framerate, and audio quality.

    With special filters, you can also change or optimize the video or audio formats during the conversion process. For example, you can rotate recorded videos 90° or add a watermark or logo.

  5. Save your freshly converted video

    How to Convert Media Files Using VLC Media Player

    Once you’ve finalized all your conversion settings, source of the video file, what format you want to convert to, and where to save this new file, you can click on start. Now the media player will start to convert your video to the format you specified.

    Depending on the format you chose, length of the video, speed of your PC, and other settings, it may take a while for the conversion to complete. Luckily, VLC also supports batch conversion so that you can convert multiple files at the same time. You can also continue watching videos in the media player while VLC converts other videos for you in the background.

Get More Out of VLC With These Guides

VLC is a very convenient media player that plays a wide range of video and audio formats and lets you convert video formats. If you want to get the most out of your media player, here are some more tips, tricks, and handy guides.

Do more with VLC Media Player!

So, as it turns out, VLC Media Player isn’t only limited to video playback. VLC video is famous for being an open-source media player, good for playing everything from HD video to AAC (lossless audio).

Now you know, however, that VLC extensions offer new features too, like being a great video converter. If you’re looking to make the most of the program, try using it to convert videos.