What is Airdrop and how to use it on iPhone or Mac

Gone are the days of struggling to share files, photos and images with others using portable USB devices and CDs. Some files, especially those containing images and videos, are too big to be sent via email, which means resorting to other sharing methods, none that are really easy or convenient.

With Airdrop, your Apple devices can easily share photos, files and more with other Apple devices nearby. Airdrop makes it very convenient to share relevant files, whether you’re at work or just relaxing at home.

What Does Airdrop Mean on iPhone, iPad and Mac?

Airdrop is an efficient and fast way of sharing data between devices. Apple developed it specifically to simplify sharing files, photos, videos, and other forms of data between Apple devices. With Airdrop, you can easily share photos or music from your Mac to your iPhone or iPad and vice versa.

Airdrop was explicitly developed for Apple products and allowed easy sharing between iOS and macOS. You cannot use Airdrop to share with Windows or Android devices.

How Does Airdrop Work and What Is it Used For?

Airdrop uses a combination of Wi-Fi and Bluetooth to send files between Apple devices on the same network. This feature can be used to quickly and almost effortlessly share files, music, photos, videos and more between Apple devices.

You can use Airdrop to share these devices among your own Apple devices, or you can even use it to share data with friends, family and co-workers. To use Airdrop, the devices you want to share have to be connected on the same network and have to be close to each other (within 30 feet).

How to Use Airdrop on Every Apple Device

Let’s take a look at how to use this useful feature in this quick Airdrop tutorial.

Airdrop Setup

To start using Airdrop, it has to be enabled on your device and the device you want to share files with. 

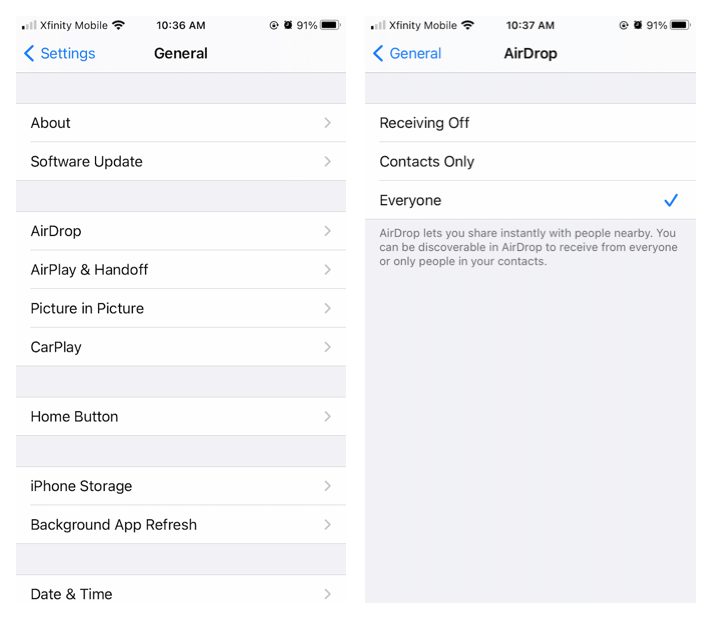
To check that Airdrop is active on your iPhone or iPad, tap on ‘Settings’, and then ‘General’ and finally ‘Airdrop’. If it is not enabled, make sure to activate it. Once you enable this feature, it will remain enabled until you disable it.

What is Airdrop and how to use it on Iphone or Mac

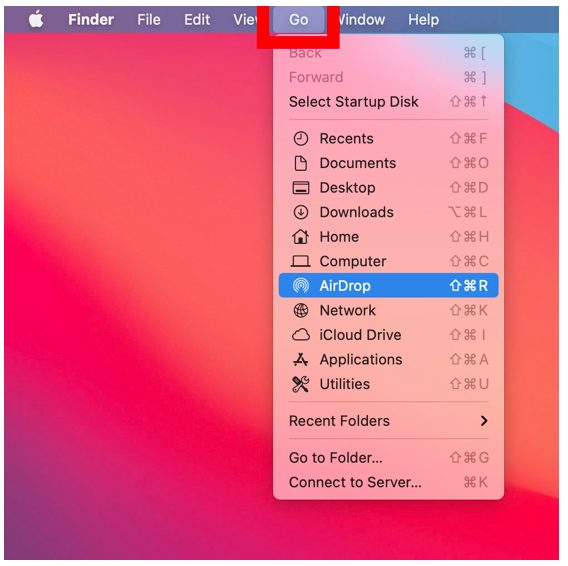
For Mac, click on ‘Finder’, then ‘Go’ and finally click on ‘Airdrop’. Enable Airdrop from this window.

What is Airdrop and how to use it on Iphone or Mac

Remember that any Apple devices that do not have Airdrop enabled will not be able to share or receive files.

Accept Airdrop

To accept an Airdrop on your iPhone or iPad, you will see a notification appear on your screen. This notification will also show a preview so that you can see what is being shared. You will have two options, accept or decline.

By tapping on ‘Accept’, the file will be downloaded to your device. The process will work the same on your Mac computer, and the file can be found in your download folder after it has been downloaded.

Sending an Airdrop

Sending an Airdrop is just as easy as receiving one. On your iPhone or iPad, go to the file, photo or video you wish to share (you’re able to select more than one file at a time). Now tap on the ‘Share’ button, the icon is a box with an arrow pointing out of it.

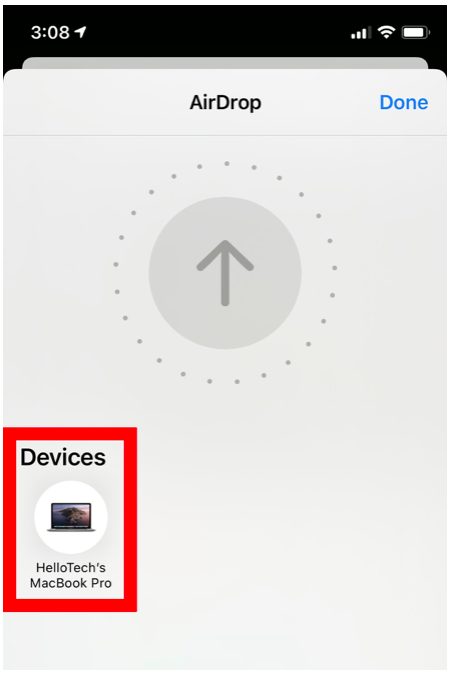
A new window will open showing all your different sharing options, and Airdrop should be the first one (if Airdrop is enabled). Tap on Airdrop, and you will again see a new window open. The Airdrop screen will show all nearby devices with Airdrop enabled. Simply tap on the device you want to share your files with.

What is Airdrop and how to use it on Iphone or Mac

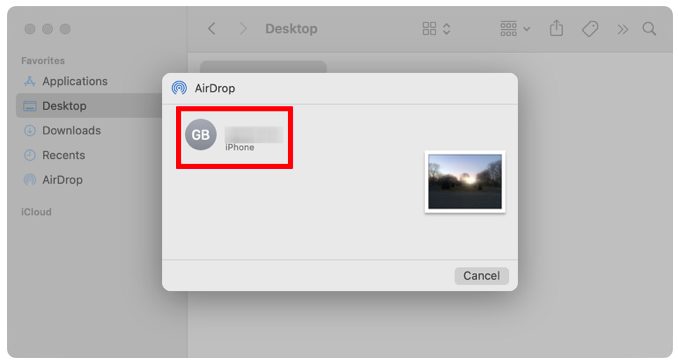
On your Mac, you can open the file you want to Airdrop and click on ‘Share’ in the app window. Now click on Airdrop to open the Airdrop window. Now you can choose which device you want to share the file with.

Alternatively, you can select multiple files, then right-click and from the drop-down list, click on ‘Share’, and then ‘Airdrop’. This will also open the Airdrop window where you can select the device you want to share to.

What is Airdrop and how to use it on Iphone or Mac

Receiving an Airdrop

As mentioned, when you receive an Airdrop, it will appear as a notification on your screen. From here, you can choose to accept or decline the Airdrop. There is also a preview feature available to see what the file is before accepting it. Once you click or tap on ‘Accept’, the file will be downloaded to your device.

How to Airdrop Pictures

To Airdrop pictures from your iPhone or iPad, you select the pictures you want to send and then tap on the ‘Share’ option. This will open a window with your sharing options. Now, tap on ‘Airdrop’ to open the Airdrop window. Here you will see all the available devices that are in range and have Airdrop enabled. Tap on the device you want to send the pictures to.

What is Airdrop and how to use it on Iphone or Mac

On your Mac, you can select all the pictures you want to share and then right-click. Now, you’ll see a drop-down menu, click on ‘Share’ and then ‘Airdrop’ to access the Airdrop window. Next, choose the device you want to send the pictures to.

How to Airdrop a File

Airdropping a file works the same way as sending pictures. On your device, select the file or files you wish to Airdrop, choose ‘Share’, and select ‘Airdrop’. Now you can choose the device that you want to share the files with.

Smart Deletion App: Get Rid of the Leftovers

It’s easy to find users who don’t have much free space on their Macs when you’re surfing through the Apple discussion forums. Sure, there are many reasons for this but the most common one is the improper uninstallation of apps. You have, probably, come across these difficulties yourself when simply deleting some apps hasn’t freed up the desired space on your Mac.

The fact is, that the uninstallation process isn’t easy like the installation of the application in the first place. Applications for Macs have some peculiarities you should know about so that you can manage your Mac like a pro. Let’s talk about ways to overcome the difficulties associated with getting rid of unwanted or outdated apps.

We prefer to think that whenever we delete an app, everything goes in the trash with it. Obviously, however, the simple moving of a piece software to the Trash bin doesn’t mean it’s completely deleted. Maybe it will be a surprise for some users but when we try to “uninstall” software, there is some invisible part of it that is left on a Mac even after emptying the trash. Every app, intentionally or not, leaves various left-over traces.

1 (1)

What are leftovers? These are the app associated files and folders which can include different languages, log files, agents or processes etc. These components are installed onto the Mac with the app and left there after you delete it. Usually, this process is natural and is a part of functioning system.

However, often program developers can hide some ads or unnecessary apps in these leftovers. It’s like a sloppy program, IT guys call it “software rot”. It is recommendded that you delete these unnecessary leftovers in order to keep your Mac clean, increase its performance and free up the space for more useful programs.

Well, let’s figure out how to get rid of leftovers, save you some money and save you some time. There are two scenarios depending on the apps specifications. Sometimes, you won’t even notice any changes. In this case, it’s better to do nothing unless you are experiencing some sort of problems. Otherwise, it’s better to keep your Mac clean. If you see your computer  has slowed down slightly or considerably or has any other issues, you should get a special app that will track the app deletion process until the very end.

Of course, you can track the leftovers manually if saving money is a priority. Some applications may install components in the ~/Library/Applications Support/ folder. So, you can check there to see if the application has created a folder. You can also delete the folder that’s in the Applications Support folder. Notably, these don’t do anything but waste disk space until the application is trashed.

Sometimes, software uses startup daemons or agents that are OS features. They can be found in /Library/LaunchAgents/ and /Library/LaunchDaemons/ or in ~/Library/LaunchAgents/.

The process seems to be simple, except one thing. Do you know the interesting fact, that according to the Compuware study* between 80 and 90 percent of all downloaded apps are used once and then eventually deleted by users.

2 (1)

*http://www.compuware.com/

Can you imagine, all the leftovers that there must be on your Mac?! That’s why developers keep on inventing apps especially designed to manage the complete uninstallation process. Depending on the application and the quantity of settings or customizations, this can be a huge time saver. Sadly, there aren’t many really good uninstallers out there. On top of that, uninstall programs often get the least attention of all when software is developed.

The result is that besides not always having all the features and options we might want, they often handle failure or unexpected situations poorly, leaving “stuff” behind.
There are plenty of different uninstallers. You might have heard about Hazel, CleanApp, CCleaner, Spring Cleaning and Autoruns, which are among the most popular. Using these apps gives the advantage of avoiding a daily routine that takes up a lot of time. The cost of these apps differs as well as their algorithm and additional functions.

3 (1)

But what about saving time and money simultaneously? Would you like to get software that would scan your Mac at a scheduled time not only for leftovers but other junk files that have accumulated in your system? If yes, you should try MacKeeper. All you need to do is to activate it and customize it to your needs.

Moreover, this app embraces up to 17 useful features for improving Mac performance and simplifying the user experience. With a variety of different types of licenses offered you can choose the best one for you.

Read more information about features and prices on the official site https://mackeeper.com/.

4 (2)

Now you know everything about leftovers and ways to get rid of them. So, you can choose the program that best meets your priorities. Our aim was to make your time on the computer computer more pleasant and efficient. We hope you liked this article.

Don’t Believe the Most Popular Myths about Private Data Security

Reading articles about cyber crimes, people often think this is something that only happens in Silicon Valley or among huge IT corporations. In fact, cyber crimes may affect the lives of every Internet user. Most users don’t even understand how their private data can be exposed without their permission and knowledge even though the level of invisible cyber attacks increases every day. According to the latest statistics, the estimated annual cost of cyber crime committed worldwide adds up to 100 billion dollars! Besides companies and banks, this amount also includes individual users.

1

*2016 Cost of Cyber Crime Study & the Risk of Business Innovation – Ponemon Institute – Cyber Security Analysis

Every day many people jauntily connect to the Internet thinking they are totally secure. How then, do cyber criminals go on to earn huge amounts of money?

We are going to eliminate the 3 main myths about users’ private data security and show you the best way to stay protected whilst surfing the Internet.

1. Social Media provides you with a trusted circle of online friends

As the statistics show, the number of internet users using social media services online is up to 64%. That’s why they are the first to be targeted by cyber attacker. These are the most popular types of internet fraud:

Like-jacking and link-jacking: When you click the “like” button or follow the fake link posted by a hidden criminal, you are redirected to malware infected websites that may affect your system by installing malware or spyware.
Phishing: Attempts to obtain sensitive information such as usernames, passwords, and credit card details, often for malicious reasons, by masquerading as a trustworthy site in an electronic communication.
Social spam: Unwanted spam content appearing on social networks or any websites that have user-generated content like comments, chat, etc. and can include personally identifiable information

2

According to Statista* as a result of the above more than 600.000 Facebook accounts are compromised every single day!

*The Statistic Portal

2. Out-of-date system is not vulnerable

The point here is that software like Java or Adobe is often out-of-date and can be extremely vulnerable. They’re then vulnerable to being hit by exploit kits (software kit designed to run on web servers, with the purpose of identifying software vulnerabilities in client machines communicating with it, and discovering and exploiting vulnerabilities to upload and execute malicious code on the client).

This has become popular because Java and Adobe Flash are installed on almost every computer. All a hacker needs, to get a full access to your computer is a single click on an infected advertising banner.

3

To avoid this type cyber attack you should keep your software updated all the time; keep your operating system up to date; have a reliable AV installed on your computer.

3. Deleted files cannot be recovered and used without your permission

Do you know that when you “delete” files from your computer, they can remain on your hard disk? Actually, every deleted file can be recovered. In many cases, deleted files can be recovered with little effort because most computer operating systems will only delete links to the data so you can no longer see them, but the actual data remains on the disk.

Getting access to the deleted data is as simple as restoring the links. Whether it’s sensitive financial data, business documents, or scandalous photos that could be used for blackmailing you probably don’t want people getting their hands on your private stuff.

4 (1)

Fortunately, there are some steps you can take to protect your data by deleting files for good. Use Secure Empty Trash on a Mac. Files deleted this way are completely overwritten by meaningless data. Just drag the items into the Trash, then choose Finder > Secure Empty Trash. Unfortunately this option is no longer available for mac OS X 10.10 and later. However, you can do this another way if you install special software.
Now that you know the main delusions concerning surfing the Internet safely you should follow our advice so that you can feel more confident getting involved in social networks or dealing with sensitive and private information. Always remember, you are the one who is ultimately responsible for your online security. Fortunately, there are many programs that can significantly simplify a user’s digital life.

How to Order an Uber from your PC

You know the feeling. You’re busy and you’re running late but you’ve got to finish up one last job before you can leave. You need to order an Uber but you haven’t got your phone. What are you going to do?

Click Here to sign up for Uber Now

Although Uber has no desktop program you are able to call yourself a cab directly from your desktop PC. Let us have a quick look at how to do it so that in the future, if you’re ever caught in a rush, you can order yourself a cab without having to hunt down your mobile phone.

Use the Uber Mobile Website

If you go to m.uber.com you’ll be asked to enter your mobile number and log in to your account. You can’t do this from a desktop web page, only the mobile version. You’re bypassing the system here but the mobile webpage will give you quick, clear and easy to understand instructions for ordering an Uber using the account that is linked to your smartphone.

Once you’re in, simply order a cab using your PC’s location and finish whatever you were up to.

uber desktop

With this simple tip, you’ll be able to order that cab before getting yourself together to leave the house or having to first find your smartphone.

Click Here to sign up for Uber Now

For more handy tips check out the video below:

Our users have been talking about the best ways to set up your own app based taxi service. Join the conversation now!


Windows 10 Fall Creators Update: Date and Features of the next update

The Fall Creators Update will be the second Windows 10 Update of 2017 and we now have the launch date. From the 17th October it will start arriving on all compatible PCs. As well as the launch date, we also know what the main features will be so let’s have a quick look at them.

Principally, the Fall Creators Update will give more power to Cortana, will improve Windows Shell (which comprises of the Start menu, the Taskbar, the File Explorer and the Action Center) and give new features to Edge.

Download Windows 10

Improvements to Cortana

  • If Cortana is linked to an Android Telephone, you will be able to see notifications and missed calls on your desktop.
  • Cortana will be able to block, close sessions, turn off and turn on equipment based on voice commands.
  • Cortana will also get her own system settings section.

A Better Windows Shell

  • New icons in the Start menu
  • Scroll bars will reduce if the cursor isn’t near them.
  • You will be able to see files saved in the cloud through OneDrive with “On-Demand Sync” in the file explorer.
  • You will be able to share files more easily through the Share option in the Context Menu.
  • New icons and designs.

A Boost to Microsoft Edge

  • Better management of PDF and EPUB files, including annotations.
  • Inactive tabs will have a translucent icon.
  • You’ll be able to anchor pages to the taskbar.
  • You will be able to save Favorites in different locations directly from the Favorites menu.

Other Interesting Improvements

  • The Photos app will allow you to create videos form your photos.
  • It’ll be possible to recover your Microsoft account password directly from the lock screen.
  • Emoji 5.0 support and a new visualization panel.
  • New option to link Android and iOS mobiles to your PC.

What do you think is missing from Windows 10 and what would you like to see added to Microsoft’s flagship operating system?

Keep your PC safe from Ransomware attacks with these simple tips:


How to view your Friend’s Instagram Stories without them Knowing

Instagram Stories are one of the best features of the app but they do have certain problems and limitations. For a start, they’re only available for 24 hours before they disappear completely. Also, whenever you watch a friend’s story it notifies them that you’ve seen it.. Well, what if I told you that there is a way you can watch Instagram Stories without your friend knowing that you’ve done so?

Instagram doesn’t have the function for doing this so you’re going to have to use a 3rd party app. This is where Story Saver comes in and now I’m going to show you how to use it.

How to save your Contact’s Instagram Stories

1. Download and Install Story Saver

Go to the Google Play Store and install Story Saver on your mobile. Unfortunately for iOS users, this program is currently only available for Android so this tutorial will be geared towards to Android users but there is an iOS option called Stories Repost.

2. Enter your Account Details

Open the app and introduce your Instagram username and password.

3. Search for your Friends’ Stories… or for anyone else’s for that Matter

The main menu of Story Saver will, by default, show you a list of your friends latest stories in order of their publication. You can select any of these or you can also search for stories of people who aren’t in your contacts list. You simply type their name into the search bar at the top and press “Go”.

Keep in mind that you need to know the exact name of the user you’re trying to find. No spelling mistakes errors.

c91bda94-8464-4aa8-aef0-248f0256a1da

4. Choose a story and save it

Once you’ve found who you’re looking for, the next page will give you 3 options:

  • Repost gives you the option of reposting the story to your Instagram account. We don’t recommend this option unless you want everybody to think that you’re happy to steal somebody else’s content.
  • Save (Recommended) allows you to save the story as a video on your phone so that you can watch whenever you want to.
  • Share also saves the video on your phone but gives you the option to share it with friends via WhatsApp for example.

SAVE-768x467

5. Enjoy Watching the Videos without being seen

If you follow these steps you’ll be able to watch all of your friends Instagram Stories without them knowing that you’ve seen them.

Make sure you don’t use Story Saver with bad intentions, like stealing somebody else’s content or reposting things without permission.

Need some more Instagram influence> Check out the best photographers on Instagram below:

The top 10 photographers on Instagram


Watch out for this virus spreading via FB Messenger

Has a friend recently sent you a video link via Facebook Messenger? Be careful, it could be a virus. At least according to security experts at Kaspersky Lab. Below, we’ll tell you everything you need to know about this threat, and how to prevent it.

The virus is passed through a Facebook message from a friend. On his/her behalf, you’ll receive a shortened link (usually from the domain bit.ly) with the text “<your friend’s name> Video.” It looks like the image below:

virus-1

Obviously, your friend David didn’t send you this message. Rather, a hacker took advantage of a vulnerability in his account to try to spread the virus to you.

If we click on the link, it takes us to a Google doc with an image based on one your friend has on Facebook, posing as a video. If you click it, it takes you to another site depending on the browser and the operating system used (yeah, nobody’s in the clear, as it affects Windows, Mac and Linux).

virus-2

For example, if you’re using Firefox on Windows, by clicking the fake video, you’ll be redirected to a site with a fake window to update Flash Player and an .exe file that mimics the actual update.

virus-31

Instead, if the victim accesses it from Chrome, he/she will be redirected to a page that looks like YouTube and displays an error message that prompts us to download a browser extension. This extension is actually a “downloader” that lets a malicious file enter your PC.

virus-4

Hackers’ reasons for this malicious act seem to be purely economic: the files installed without our permission are adware, i.e. a means to show us unwanted ads that hackers profit from.

How can I prevent this virus?

As always, common sense is the best antidote to any virus. Be cautious of any strange links: if a friend sends you something, he/she will message you more personally than hackers using bots.

In addition, always keep your PC updated and use antivirus and other security programs. In most cases, this will prevent any infection.

To wrap up this article, we’ll leave you with several security tips you should keep in mind if you’re a PC user (things you should never share on Facebook!).

7 things you should never share on Facebook by softonic-en


Source: The Hacker News


Related Links

The baffling truth behind the AI Facebook shut down “out of fear it was conspiring against humanity”

Facebook’s mobile site gets a makeover: say goodbye to blue bars, and more 

This is how Facebook spies on you even if you don’t use Facebook

How to take 360º Photos on Facebook

Can You Play Minecraft in Virtual Reality? Yes!

Virtual reality is a popular topic for 2016. More tools, platforms, and content are now available to give users a wildly immersive, integrated, and powerful experience. From YouTube videos to search engines, virtual reality is becoming more and more the norm.

The same is true for one of the most popular video games of all time: Minecraft.

To play the virtual reality mode, players need to be wearing a Samsung Gear VR device. For best results, players should also turn on 3D rendering. A brush of the gamepad puts the game in full virtual reality mode.

minecraftvr

The virtual reality version benefits in many ways from the original game’s simplistic design. The original Minecraft is a rather pixelated visual experience…intentionally. For players who are used to seeing rather flat renderings of the mountains, airplanes, battleships, and castles they build, the virtual reality mode brings those structures to life. Mountains tower over users. The scale and scope of larger items becomes far more dramatic.

John Carmack, chief technology officer at Oculus, praises the game, stating, “Experiencing (Minecraft) in virtual reality changes it from an abstract activity to a visceral one,” Carmack wrote in a blog post that announced the game in April 2016. “It goes from a sense of playing the game to one of being inside your world, and spinning around to find a creeper sneaking up on you leaves a powerful impression.”

The game includes all the features of the Minecraft Pocket Edition, including the Creative and Survival modes. Skins and multiplayer functions transfer as well to Minecraft: Gear VR.

minecraftvr2

Reviewers rave about the sensory experience of the new game. “Minecraft in VR can throw you for a serious loop. You’re standing inside a world you know is not real, and yet you’re being blasted with stimuli telling you otherwise,” writes Nick Statt for theverge.com. “It’s the sensation of presence, the feeling that you’re physically somewhere else.”

To play Minecraft using the Gear VR, you’ll need one of a handful of specific Samsung phones, the list of which is growing. This version also requires a paired gamepad in order to take full advantage of the features used to build structures and fight off creatures.

Check out this Minecraft Crafting Guide Video to learn more about building in Minecraft!

This article was originally published on 4th August 2016.

How to recognize suspicious emails

A virus-infected email...
Last week, I found out that my long lost grandfather, King Nelson Mandela of the Federal Republic of Benin, left me an inheritance of 50 billion dollars. True story.

While you may laugh off these obvious spam emails, criminals are getting smarter and their latest modus operandi is to dress their malicious emails up to look like they come from reputable brands.

Looks legit? It’s not. 

bogus-paypal-phishing-scam-1

To avoid dangerous emails that could have disastrous consequences, follow the tips below! Continue reading “How to recognize suspicious emails”