Did ‘Daredevil’ just deliver our first X-Men tie-in?

Is Disney setting up a reunification of all its heroes? Here’s the big clue.

If you’re a Marvel nerd, you probably already know your reality gem from your space gem, your Lizard from your Chameleon, and your adamantium from your vibranium. That means you probably also didn’t miss that name drop at the end of the newest season of “Daredevil.”

** SPOILERS BELOW **

Benjamin Poindexter is introduced in the third season of Daredevil as one of the top henchmen for Kingpin. The former FBI agent has a wary, alert demeanor, lethal dexterity that surpasses even Daredevil’s own at long range, and a stewing hatred for our hero, the devil of Hell’s Kitchen.

If it isn’t clear enough, we’re talking about Bullseye. But he’s not an X-Man and therefore isn’t the tie-in we’re talking about. But here’s why he’s important:

Benjamin Poindexter ca. Daredevil Season 3

By the end of the season, Poindexter suffers a broken spine and is seen being operated on by two surgeons. In the comics, Bullseye suffered this injury as well and recovered thanks to implants made of … adamantium. Frustratingly, the Marvel Cinematic Universe is still not allowed to reference the fictional alloy made famous by Wolverine, so instead drew upon another mythical Marvel metal “cognium steel.”

Pay attention to the guy on the right ...

One of the surgeons quietly says in an almost throwaway line that you “can’t replace pulverized vertebrae, Dr. Oyama.” For the Marvel nerd, this is when sirens start flashing. In the comics, Kenji Oyama is Lord Dark Wind, a Japanese crime boss. He’s the one who discovered the process to bond adamantium to bone – the same process famously used on Wolverine.

Was Lord Dark Wind the surgeon at the end of Daredevil Season 3?

Cognium steel is not the same thing as adamantium, we know, but adamantium itself is not a metal. Rather, it’s an alloy. It could be that cognium steel is not enough to satisfy Oyama’s studies, so he goes about using it to create the famous adamantium, which would open a whole can of worms and tie-ins with the X-Men universe galore. The acquisition of Disney with 21st Century Fox is set to occur on January 1, 2019, which means we could be seeing the fruits of this reference well before the next season of “Daredevil.”

As for whether we can expect to see Lord Dark Wind in the future, that’s not out of the picture either: Considering the influence of The Yakuza, The Hand and Lord Nobu in earlier “Daredevil” seasons, “Iron Fist,” and “Defenders,” we wouldn’t be surprised to see this manipulator of Japanese politics try and squeeze in the power vacuum left after Fisk’s return to prison at the end of the season.

Dr. Oyama is also the father of Yuriko Oyama, the infamous Lady Deathstrike – another huge tie-in to the X-Men universe. With adamantium grafted to her skeleton as well, she commonly served as a counterpoint and foil to Wolverine, believing him to have stolen her father’s work on adamantium for himself. Oyama views adamantium as a powerful weapon while Wolverine was forcibly put through the Weapon X program and views the whole corporation as a bunch of sadists and butchers.

Oyama's daughter is a frequent nemesis for Wolverine

Daredevil and Lady Deathstrike did once team up in the comics to fight Bullseye, so that’s on the table as well, though admittedly less likely. Do you think Oyama will serve as a pivotal way to introduce a famous element of the X-Men? Let us know in the comments below!


3 e-commerce sites that are perfect for your wedding registry

You’re engaged! Here’s how to knock out your wedding registry in no time.
wedding registry

A wedding requires an abundance of planning, coordination, and attention to detail. And even if you do all of that, some estranged great aunt is going to try to crash the party with 24 hours notice. Breathe, brides and grooms. Breathe.

One of the most fun things about planning the big day is creating the wedding registry. However, this can also be a long (and sometimes stressful) process.

Luckily, many e-commerce sites have made this process simpler. You can knock out your entire registry while sitting on your couch. And your guests can buy everything for you while they sit on their couches. It’s a win-win for everyone who enjoys the couch.

3 e-commerce sites that are perfect for your wedding registry

1. Amazon

Amazon is the 400-pound gorilla in the online shopping industry, so it naturally makes for a terrific choice for a wedding registry. As the top registry choice across almost half the nation (24 states) it offers a wide range of advantages.

First, Amazon offers the most options in all categories. Also, the company offers world-renowned customer service, which is great in the case of questions or a snafu. Additionally, Amazon Prime’s free shipping makes it convenient, and Amazon is known for keeping items in stock.

This is a guest favorite, too, because it’s a site that virtually everyone is familiar with and has used. Finally, this platform allows the bride or groom to write personal notes about different items they registered for in order to explain why they make the cut.

2. Zola

Zola is relatively new to the registry scene, but it’s a strong contender. Here, couples register on the central hub of Zola. Almost-married couples can add items from virtually any site.

There are many benefits. Zola offers a clean and easy-to-use aesthetic that the couple and guests love. Zola offers notifications when items are purchased and allows the couple to choose delivery times. The company also offers a simple exchange policy.

3. Wayfair

A home store giant, Wayfair is another excellent choice for a wedding registry. Couples love it because the company offers virtually everything anyone could want, all in one place, featuring thousands of items and brands.

Additionally, this platform allows guests to chip in to buy joint gifts, which is great for big-ticket items.

These sites are all fun to use and make registering that much easier and more fun for couples. Give your guests a break and go e-commerce — they’ll thank you!

How to use Google Keep to take notes while you work

Never used Google Keep? Here’s why you should.

Keep track of your life with Google Keep

How many times do you browse the internet, find something interesting, and then (within a matter of minutes) forget all about it? If you ever thought you needed a simple way to take notes, you’re not alone. That’s why Google Keep may be just what you’re looking for.

How to use Google Keep to take notes while you work

What does Google Keep do?

Google Keep is a simple tool, but that’s what people love about it! Once you download it, you can create a title and start taking notes. It really is this simple to use.

You may have heard about it previously (or its biggest rival, Evernote). But, Keep is a bit unique in the features it offers, and the tool makes it possible for users to easily create and track notes.

You can use it on your personal computer and any device using iOS or Android. If you use it with your Google account, it will sync to your account for easy access. Do this through this Chrome extension.

Google Keep Download Free ►
8
7

So what can you do with it?

Once you download Google Keep and open it, you’ll find it easy to get started. But how can you benefit from it? Use it for just about anything, including planning your to-do lists, meals, work ideas, project notes, and so on. Once you start using it, you’ll appreciate how easy it is to make it work for you.

For example, in a matter of seconds, you can color-code your notes. That way, you can easily move through them to find exactly what you are looking for. Keep allows you to change the color easily so you can just link similar topics. For example, you can keep all of your meal ideas in one place with a single color. You can also label your notes, which then allows you to browse through all notes with the same label.

Google Keep is full of other features, too. For example, you can create a to-do list for a project with little boxes next to each item. Check them off as you go — and you can even share them. Why not send that to-do list to your spouse so they’re on top of the tasks?

This feature is also fantastic for work collaboration. Plus, you can set up reminders, so you’ll receive a notification when something needs to be done. You can also customize your notes with images, memos, voice messages, and much more.

As you can tell, this is the type of note-taking you want to do but don’t have time to do. Google Keep is simple, and you’ll love using it once you get started.

8 ways sellers can make the most of Facebook Marketplace

Increase your chances of selling your stuff on Facebook. Just follow our guide!

online selling

Facebook is more than a social tool: It’s also a great place to make some extra cash! Selling items on Facebook Marketplace has never been so easy, and its popularity continues to grow. To simplify the sales process and help you put more green in your pocket, we’ve rounded up the top eight tips for making the most out of the selling platform. Read on to learn the ropes.

8 ways sellers can make the most of Facebook Marketplace

1. Spruce up your items

Your items should be in their best possible condition before you list them for sale. Clean them thoroughly to ensure they’re appealing to buyers and worth their money!

2. Take high-quality photos

The photo of what you are selling has the power to really grab a buyer’s attention! When you take photos, ensure the item is well lit and minimize background clutter. Also, get the entire item in the shot, perhaps from different angles. Try to show the size of the item in the photo.

3. Price your items high

You definitely need to turn a profit. One easy technique is to price items on the higher end to prepare yourself for negotiations. If you mark up your item, then you have more wiggle room to make buyers happy!

4. But ensure your prices are reasonable

Although you want to mark up your item to turn a profit, you also want to ensure that you don’t go overboard. Do your research to see how much the product sells for online (both used and brand-new). Stay in the ballpark to ensure you offer a deal that will actually appeal to buyers.

5. List items individually

When you have a large number of items to sell — perhaps from a move — it’s easier, in theory, to post them as a group. However, that may not prompt the most sales. Instead, list each item individually with their own photos and details.

6. Be forthcoming and honest

If you’re listing anything with problems, defects, or imperfections, be honest about the condition of the product. This will help your reputation as a seller and will make you more trustworthy on the Marketplace.

7. Respond to potential buyers quickly

You don’t want to sit too long on inquiries from buyers. Reply within 24 hours to ensure that they don’t lose interest or take their business somewhere else.

8. Mark categories appropriately

The selling categories exist for a reason! You don’t want to mark every category under the sun just in the hopes of making a sale, as it’s a bad look for a seller. Mark them appropriately to get the most out of the platform.

These tips are easy to follow and will be effective in helping to make stellar sales. Happy selling!

4 best food delivery apps

What’s the best way to get dinner delivered to your door? We’ve got 4 great options.

food delivery app

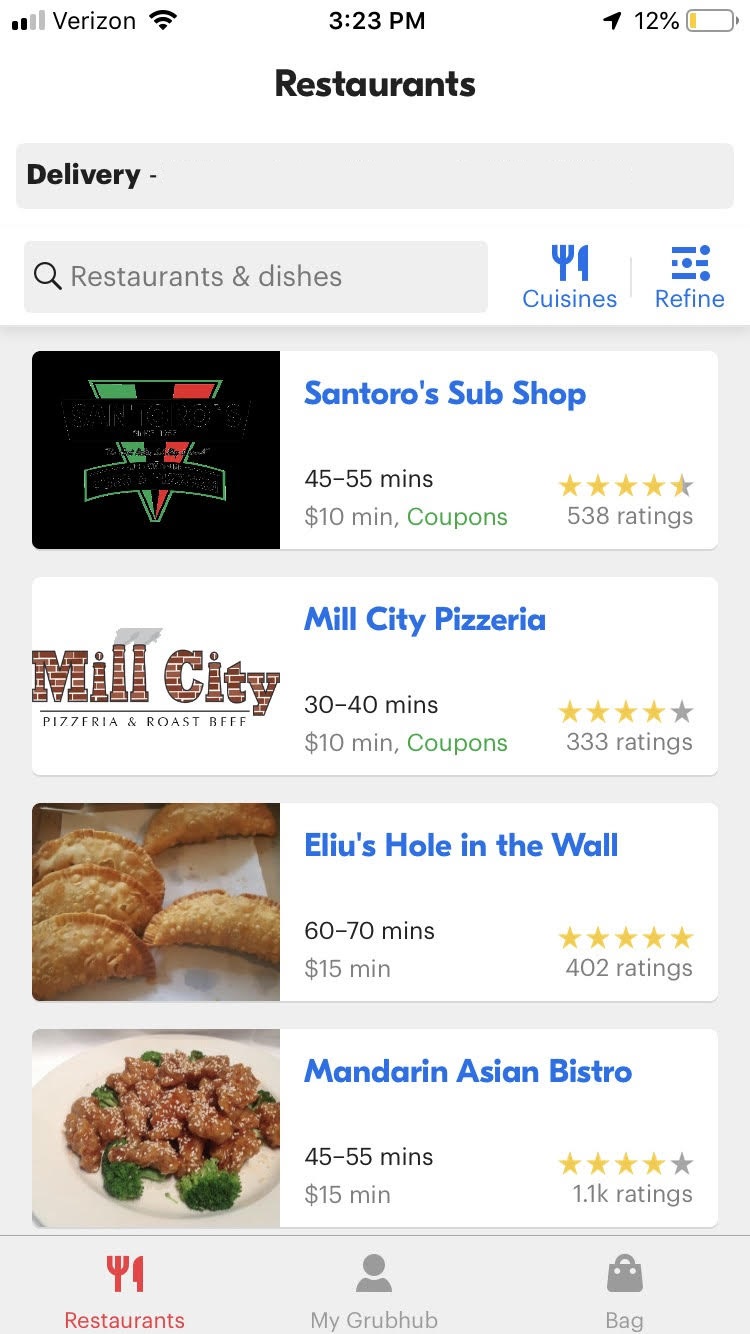
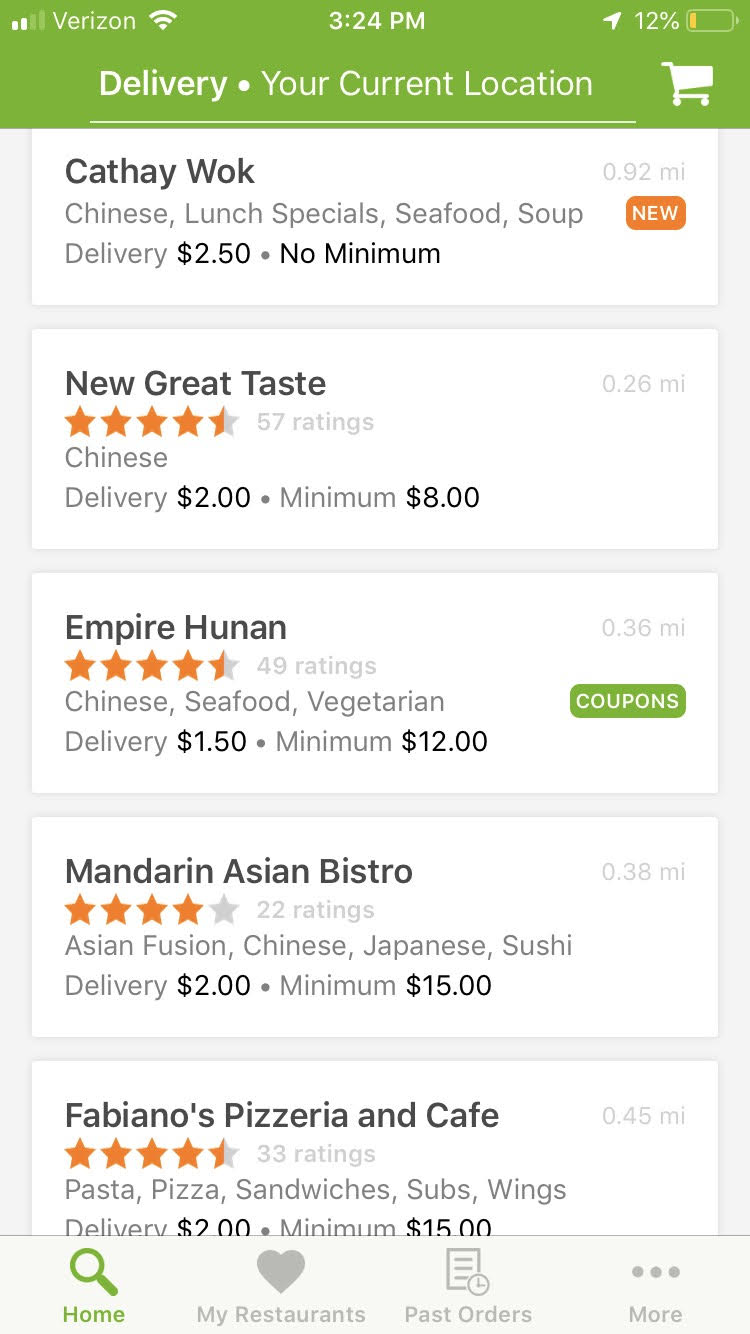
If you live in a major city such as New York or Los Angeles, then you’ve probably heard of Postmates or Grubhub. These apps, along with UberEats, are the perfect way to get delivery meals from any restaurant, not just the ones that offer their own delivery service. With a variety of options to choose from, it can be tough deciding which app is the best for you. Here is some info to help narrow down your choice.

4 best food delivery apps

Grubhub (and by extension, Seamless and Eat24)

GrubHub

Grubhub is one of the largest companies in this industry, with restaurant deals across the country. It was one of the first companies to start the trend of food delivery, and it has grown substantially over the years. As a free service, Grubhub is pretty much the perfect choice for anyone looking to grab a bite without calling in your order. While not all locations have access to Grubhub, it has a larger range of choices than almost any other food delivery app. It’s also important to note that Seamless and Eat24 are both owned by Grubhub now, and are essentially the same app. They even have the same interface and menu options.

7

Postmates

Postmates

While Postmates is a bit limited in terms of location compared to the others on this list, it has a leg up in its limitless possibilities. While most food-delivery apps partner with local businesses and restaurants to provide a free service, Postmates charges its own fee in exchange for practically unlimited delivery options. They will pick up your food, groceries, and any other shopping you have to do, for a pretty reasonable price. The biggest drawback of this, however, is definitely the small number of locations available. While it still encompasses around 100 cities, if you don’t live somewhere with a high population then you most likely won’t be able to use this service.

Postmates Free Download ►
7

UberEats

UberEats

As the name implies, UberEats is owned by Uber. If you’re familiar with its parent app at all, then it should come as no surprise that UberEats uses a similar interface and tracking system that make it easy to know how far away your food is. It also features a great browsing system, and is definitely the best option if you’re not sure what’s in the area, or are unsure of what type of food you want at any given time. The delivery charge is $5, which can be reasonable, depending on how much food you plan on buying.

9

BeyondMenu

BeyondMenu

BeyondMenu is much smaller compared to the others on this list, but it has one of the smoothest and simplest interfaces of every food-delivery app out there. It has a decent array of options depending on where you live, and ordering on it is simple and easy. Definitely worth using if it has decent options in your area.

BeyondMenu Food Delivery Download Free ►
7

If you’re looking for more options, be sure to check out our Softonic Solutions page where our community has even more ideas to satisfy your hunger. Share your favorites there!

How to customize the Control Strip on your MacBook Pro

If you have a MacBook Pro, make that toolbar your own! Just follow our guide.

Did you know that customizing the Control Strip on your MacBook Pro can greatly improve your internet experience? You can edit the Control Strip to make it look however you want it to look! Just follow these simple steps to customize the Control Strip on your MacBook Pro.

How to customize the Control Strip on your MacBook Pro

1. Open System Preferences

First, you will need to click the Apple menu icon that is located in the upper-left corner of the screen of your MacBook Pro. Then, once you’ve opened the Apple menu, you need to click on the System Preferences option.

2. Select Customize Control Strip

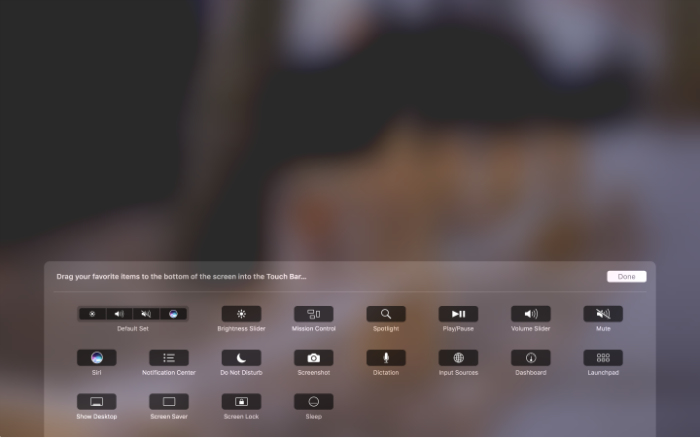
Now that you’ve selected System Preferences, click on the Keyboard option. After that, simply select the Keyboard tab. Now that you’ve gotten this far, you can select the Customize Control Strip option toward the bottom of the window. Once you’ve done that, your screen will briefly become blurry, and the customization panel will appear. In addition to that, the buttons on the Touch Bar will also enter jiggly mode.

3. Customize your Control Strip

If you want to customize the tools in the collapsed Control Strip, then you will click the Collapse button that’s located far left of the Touch Bar. If you choose to customize the full Control Strip, then select the Expand button that is found directly left of the tools in collapsed mode. You would do this if you want to move a tool from the screen into the Touch Bar to add it directly to the Control Strip. Just drop the tool into the Touch Bar and it will appear there.

4. Remove unwanted tools and finish

If you want to remove a tool from the Control Strip on your MacBook Pro, you can move the cursor into the Touch Bar and select a tool to remove it from the Control Strip. Simply click on a tool on the Controls Strip and drag it to a new location on the Touch bar to rearrange the order. Finally, once you’re finished with customizing your Control Strip, click Done and your changes will be saved.

How to create your own geotags and geofilters on Snapchat, Facebook, and Instagram

Did you know you can make your own geotags and geofilters on social media? Here’s how.

geotag

Geotags can be a really useful tool that a variety of social media sites have begun to adopt. It started on Snapchat, but has since made its way to Instagram and Facebook as well. It can be perfect for promoting a business event, or even just helping to celebrate a friend’s birthday celebration. If you’re interested in understanding how you can use geotags and geofilters, here is an easy explanation of what they are and how to use them.

How to create your own geotags and geofilters on Snapchat, Facebook, and Instagram

What are geotags and geofilters?

Facebook “check ins” are the easiest example of a geotag. Essentially, a geotag links a particular location to a social media post. Similarly geofilters are photo-filters built into Snapchat and Facebook that are location-specific. This makes both of these great for sharing your location with friends and family on these social media sites.

Snapchat Free Download
7

How to create a geofilter on Snapchat


Snapchat makes it pretty easy to create geofilters, which makes sense since they were the ones to start the trend. The first thing you want to do is go to their create your own filter/lens site.

Snapchat filter

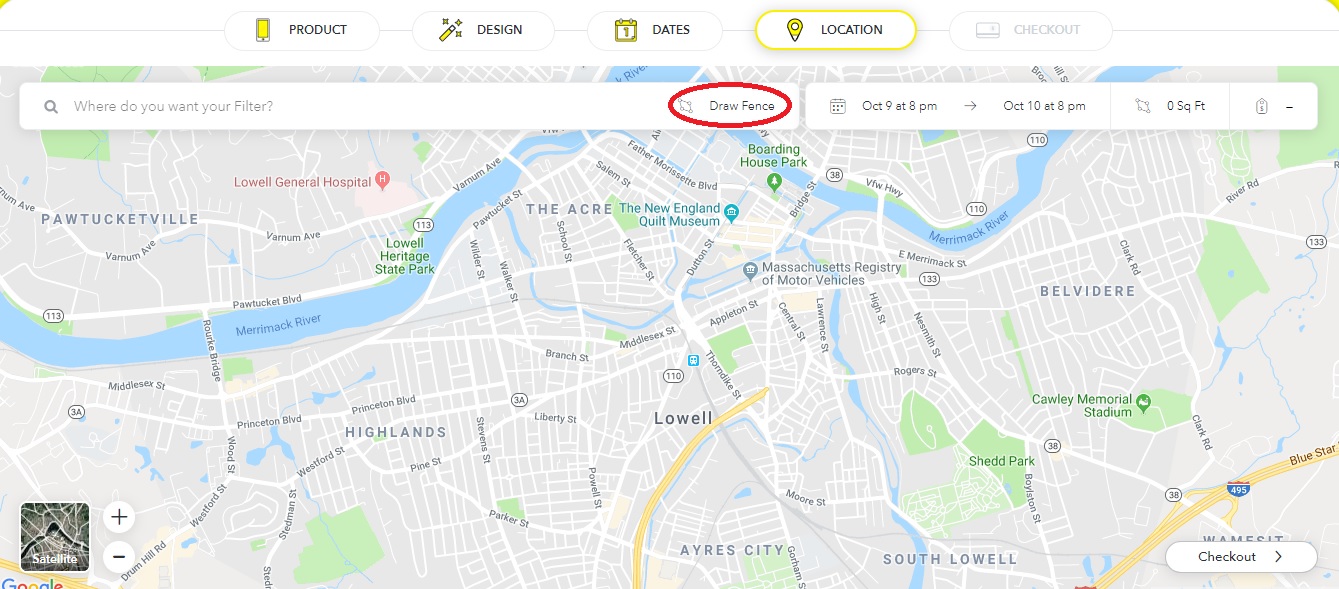
From here, you can choose to create your filter, and then customize it however you want. You can either upload your own art or use the filter creator that Snapchat has itself. Afterward, you can choose the dates and location of the event. Make sure to press “Draw Fence” and then click the points you want the location to be in.

Snapchat

You do (unfortunately) have to pay to create your own Snapchat filters. However, thankfully, it’s a relatively cheap cost, at roughly $5 per 20,000 square feet. So small events won’t end up paying a fortune, but larger ones may be a bit pricey if you don’t have a business paying for the expense.

Note that it may take a bit for Snapchat to process your request, since they have to make sure that the filter is appropriate.

How to create a geofilter on Facebook

The process for creating frames on Facebook is similar to Snapchat. First, you’ll have to go to Facebook’s frame studio page, that gives you roughly the same options as Snapchat did. Choose “Create Frame” to get started. 

Facebook

Unlike Snapchat, you’ll have to create your filter outside of Facebook before being able to upload it. Afterward, you can name, give it a specific location (using Facebook’s “place” pages), and create keywords for people to search for it online. Once you’re done, you can publish the filter and make it available for anyone to use. Also, unlike Snapchat, these filters are completely free!

Instagram Free Download
7

How to create a geotag on Facebook and Instagram

Most people know how to geotag on both of these sites by simply using the “check in” or “add a location” features. However, creating your own geotag can be a bit confusing, especially on Instagram, since you can’t create one on the site itself.

Thankfully creating a geotag on Facebook actually creates one for Instagram as well. You can do this by pressing the “check in” button on the Facebook mobile app (it won’t work on the browser version of the site). From here, type in the name of the location you wish to add. Then press “add ‘Location name’” at the bottom of the “places” list. From here you can fill in details about your location, such as what type it is, and where it’s placed. Once this is done, you’ll be able to publish the location to both Facebook and Instagram for future use. Note that the location information becomes public after you publish, and you won’t be able to edit it in the future.

IRL Glasses prevent you from seeing LCD and LED screens

Sick of screens everywhere you look? These glasses could be the ticket.

Every day, we’re bombarded with media. You go to a bookstore to read and there are TV screens playing the news, or you ride your bike to the park and see LED screens advertising the newest weight loss supplements. Suddenly, your day of being screen-free and unplugged goes right out the window. Luckily, a new set of stylish glasses could help you get back on track.

IRL Labs are the creators of these cool new IRL (in real life) Glasses which are made to block out LCD and LED screens. This way, if you want to catch up with a friend, you can go out and enjoy your day without the glaring distractions of computer and television screens. The glasses are marketed toward people who are addicted to tech and want to go back to the good old days where face-to-face communication was valued more – it gives a whole new meaning to “facetime.”

irl glasses screenshot

Not only do they block out screens, but they’re UV 400, which essentially means that they work as a regular pair of UV blocking sunglasses as well.

The creator of the glasses, Ivan Cash, says that he spent over a year researching the proper materials to make the glasses. The Kickstarter page had a $25,000 goal that was reached and quadrupled in less than half the time set aside to earn the money – at the time of this article, $131,000 in just over a week from launch.

The inspiration for the glasses came after Cash saw the 1988 film “They Live.” In the movie, an unnamed traveler realizes that people are being controlled by aliens, who are pumping them with subliminal messages placed in ads and mass media.

We’re nice and comfy having free will, so we’ll definitely be checking these glasses out when they’re out on the market.

How to make a gif

Want to make your own gif? It’s easier than you think.

Ah, gifs. Whether you pronounce it “jiff” or “giff” (the way heathens do), it’s hard not to recognize the popularity of gifs after some time on the internet.

Backwards bike flip from gifs

In this article, we’d like you to help you start making your own! Working with Graphic Interchange Format doesn’t need to feel like dealing with the devil. There are a few simple ways to create Gifs and work with the format, if you know where to turn. Fortunately, we do!

If you’re looking for the answer, skip down to “Using Giphy” or “For More Control.” Otherwise, let’s take a quick walk through gif basics.

How to make a gif

What a gif is

Graphic interchange format is a bitmap image format (image made of dots on a rectangular grid) that uses a lossless data compression technique to reduce file size while maintaining the quality.

Long story short: gif files look good, can be viewed almost universally, and don’t take up too much file space. Boom.

There are two ways to create a gif: from photos or video. A gif made from photos will display the pictures at designated times, as dictated by the user. Videos, which are already series of photos played one after the other, are simply changed into the bitmap image format to reduce size.

This may sound hard. In fact, it would be if there weren’t a number of services prepared to help…

Using Giphy

Head over to Giphy!

Giphy

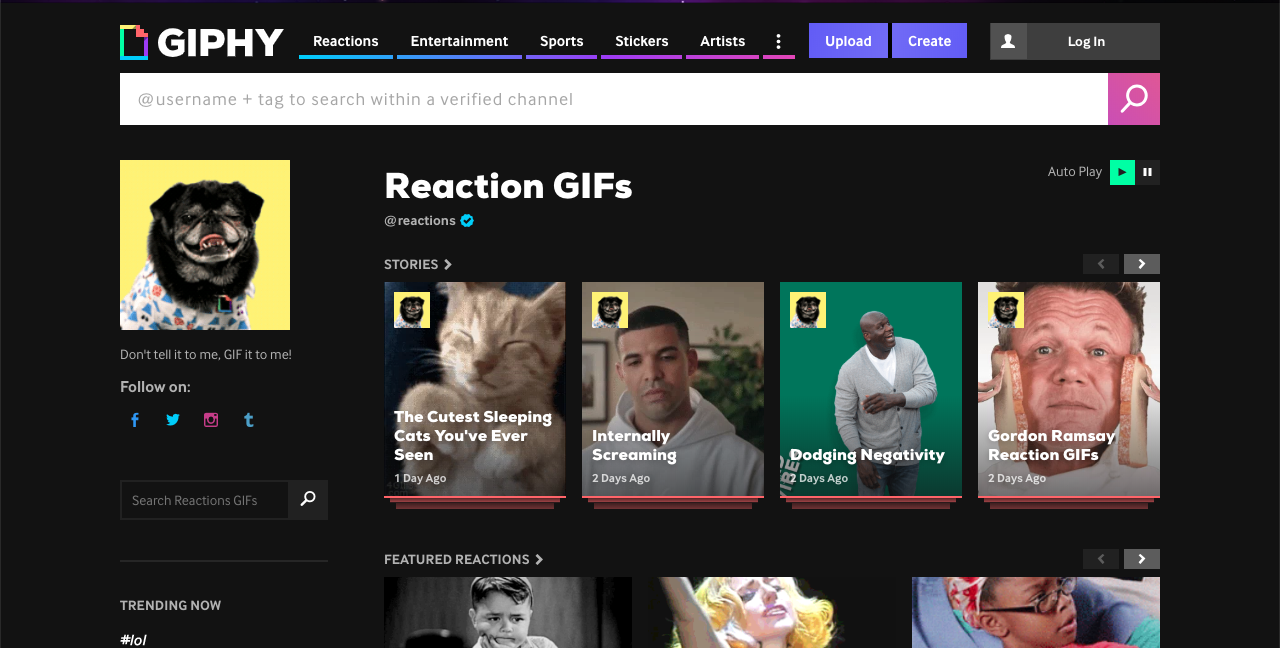
To the average user, Giphy is a repository of gifs which can be searched and accessed.

But we’re not the average user: rather than finding a gif, we want to create our own! (You don’t even need to make a profile to start, how great is that?) Hit the “Create” button at the top right:

Create

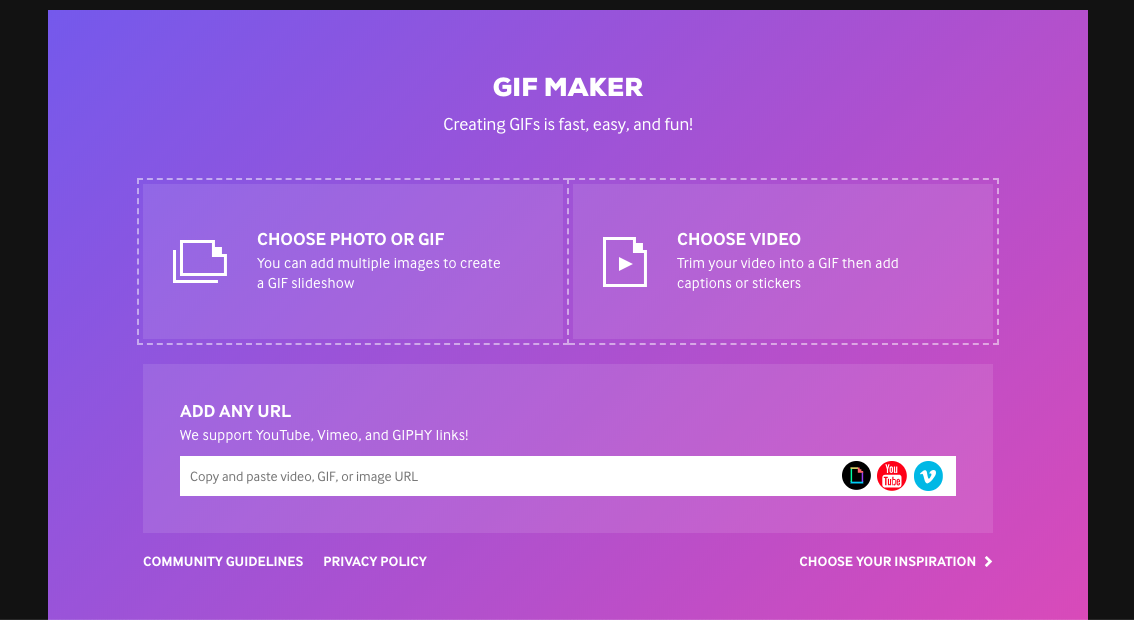
You’ll be greeted by this user-friendly page:

Options
“So easy. So simple.” – Bane

Would you look at that? There are three options: photos/gif, video, or URL.

Photos/gifs

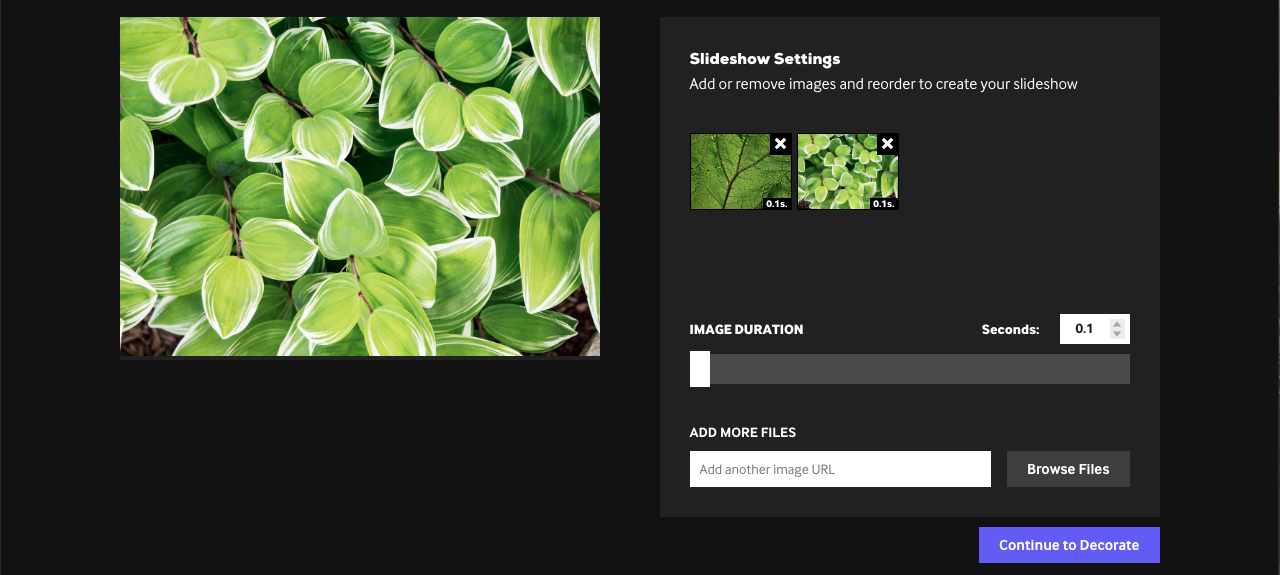
Selecting “Choose Photo or Gif” prompts the user to select at least one photo or pre-existing gif. The selected material lands in a creator environment:

giphy

Here, you can add more files, or adjust how quickly the gif moves from one photo to the next! Your options are .1 second to 5 seconds.

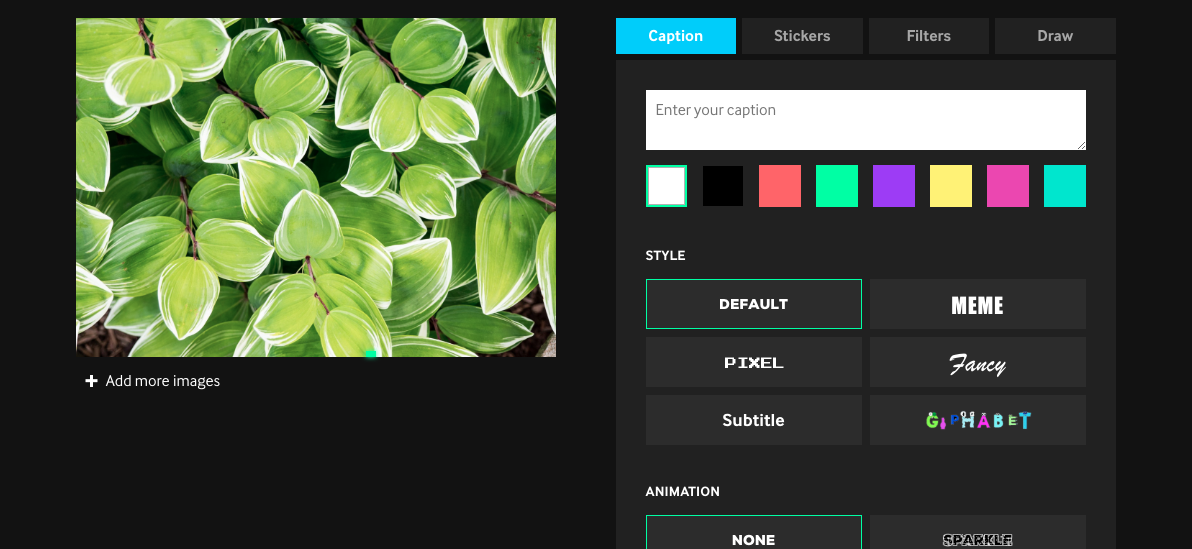
Pressing “Continue” brings us to the decorating section:

giphy

Here, you can add captions, stickers, filters, or drawings! It’s a lot to take in at first, so come ready to play around. That, or have an idea in mind and then use that as a guide.

Once you’re finished, hit the upload button at the bottom. You can create tags or acknowledge source content, or simply finalize your creation: here’s ours. [seizure warning]

My Gif

Video

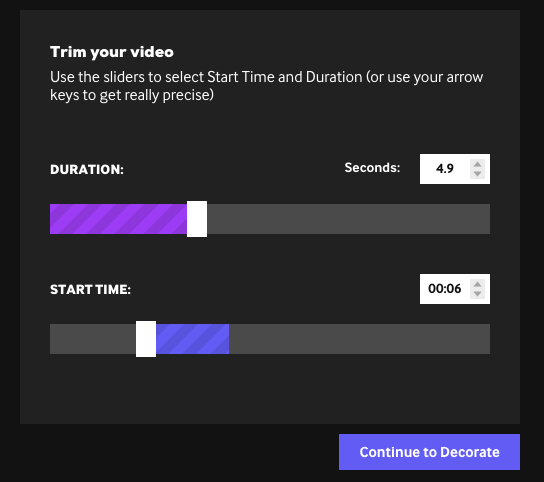
Like the photo/gif option, video prompts you to select a file. Once that’s finished, your creator studio allows you to select 1 to 15 seconds from anywhere in the video:

Once that’s finished, the “Decorate” options are the same as before. Have a blast!

URL

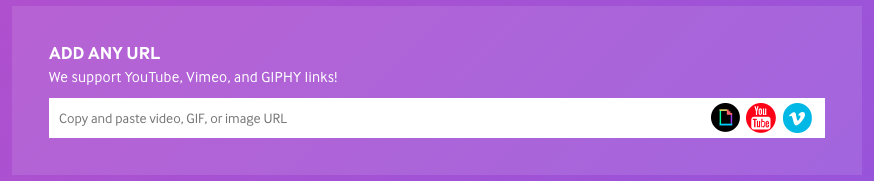
Giphy also makes converting online files easy. If you’re hoping for a YouTube or Vimeo clip, just grab the video’s URL and paste it into the designated bar:

giphy

From here, the video selector will look the same as the video window above. After that, the “Decorate” section will be the same as all others!

So, if your video happens to be from a clip of Halo 5, it might look something like…

My other gif

For more control

An article by Lindsay Kolowich noted that programs like Photoshop allow you to create gifs with a greater degree of control: prepare to set photo duration times for each slide and set a number of image repeats to extend certain moments. While Giphy makes things easy and simple, there are a few great applications that can do even more.

ADOBE CREATIVE CLOUD get it now ►
10

Last laugh

Whether you need graphics for a presentation or plan on being the next great memelord, Giphy works wonders! There are other programs that may offer greater control, but no matter what you use, keep the basics in mind: gifs are compressed files that generally play a series of images within a short time frame. Before you start, it’s always a good idea to have an idea for your gif in mind, or better: prepare photos and videos in advance.

Have fun creating gifs, we hope this helps you get started! When you finish your first gif, send a link in the comments; we’d love to see your creation.

How to use Garageband to edit songs

If you have an iOS or Mac device, you’ve got an amazing free audio editor. Here’s how to use it.

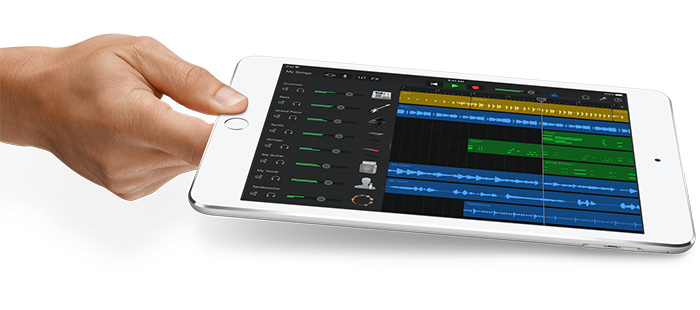
Making music and need to rework your creations? Or do you have a purchased song that you need to edit? Garageband offers a free environment for macOS users to rework their audio projects!

If your device came from Apple, it should already have Garageband downloaded and updated. If not, try our easy download:

Apple Garageband FREE DOWNLOAD
8

Got it? Let’s get started.

How to use Garageband to edit songs

The Beginning

First, open the Garageband app.

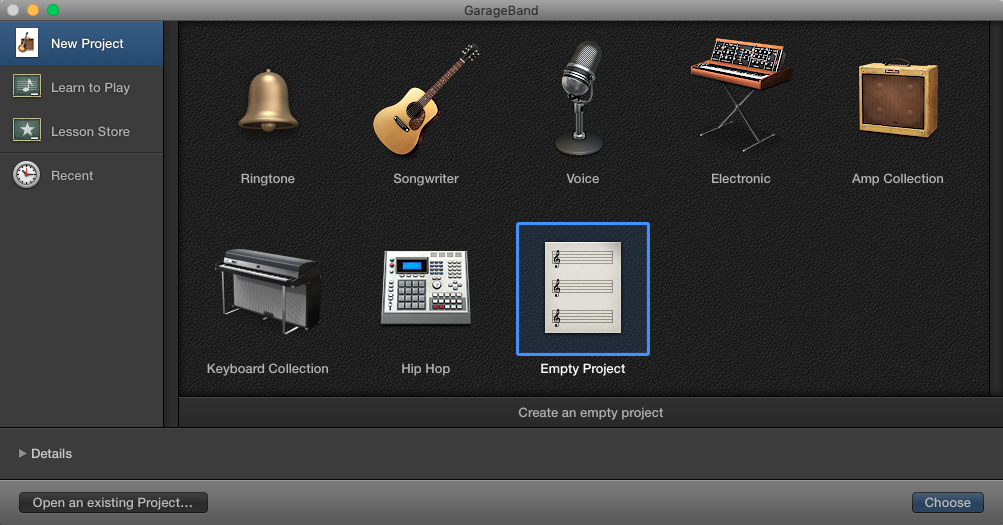
You’ll be met with a few options. For editing pre-existing tunes, we recommend “Empty Project.” The others often include audio presets, meant to improve the recording of works in progress. For example, the “Voice” setting applies a “Bright Vocals” effect to whatever audio lands in its main track. The unaware user may become frustrated when their recording doesn’t sound natural at all!

Trust us: start with a blank slate.

Even if you’re recording, we’d still suggest “Empty Project”.

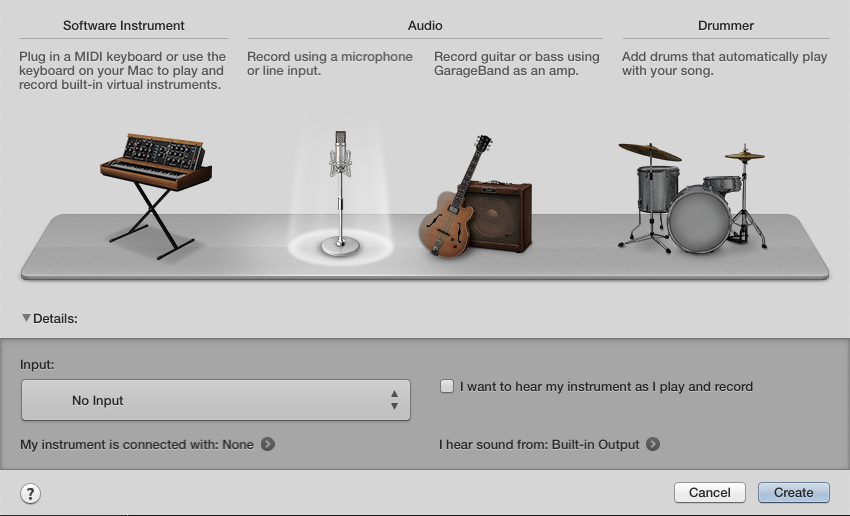
From here, you’ll meet another options screen: instrument choice. Since you’re coming with audio already recorded, use the basic “Microphone” setting. Then click “Create.” We’re on to the studio!

(If you’re going to record something as well, select the instrument that best fits your needs. Forewarning: using a guitar or other instrument may require specific cords to interface with the computer, but will get better audio quality than, say, a USB microphone.)

Into Garageband

Allows us to introduce…the creator environment!

If it looks too packed, head to the top left buttons:

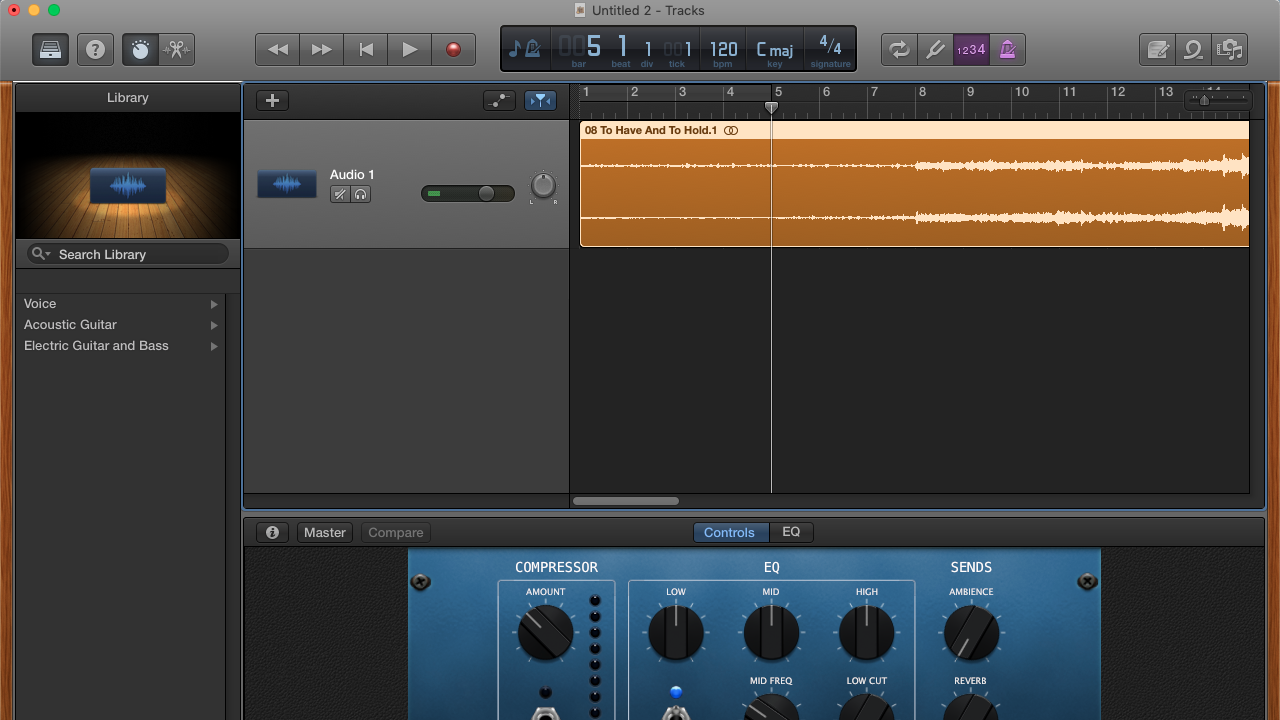
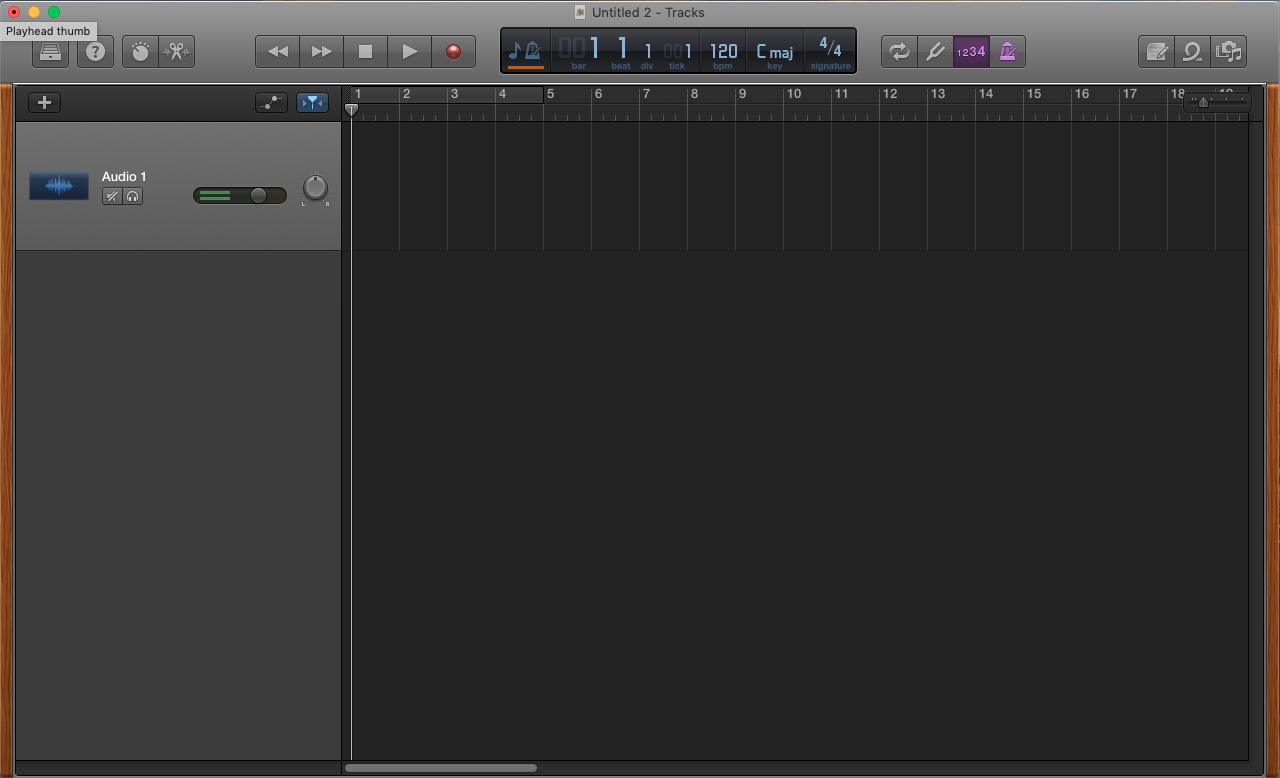
Hitting “Folders” on the left removes the sound settings, which reside in the leftmost bar – normally, these settings add a new audio track with different sound qualities.

Hitting the “Knob” icon reduces the EQ  bar, which can be seen at the bottom of the picture – EQ stands for equalization and allows you to manually alter music filters and frequencies.

Your simplified environment will now look something like this:

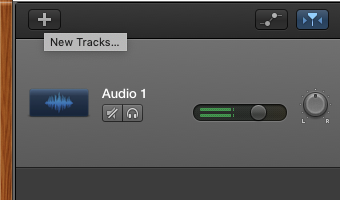
If you need to add more audio tracks, click the “New Tracks” button:

Surprise surprise! A new track appears:

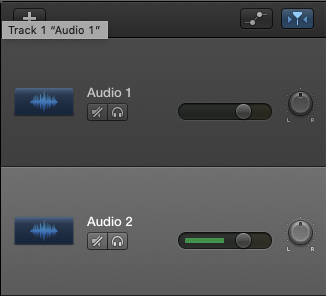
Just remember that working with multiple tracks can become difficult. Hitting the noise cancellation button will silence one track to make listening easier. Also, you can use the volume adjustment knob to increase the output of one section, and the “Left/Right” adjustor will place your selected track further to one side or the other.

Use these settings to your advantage!

At last, drag and drop your audio files into Garageband’s window. With that simple step, you’re ready to get down to business.

Editing

Here are the most useful tools:

Audio Manipulation

Casual audio recordings may require little more effort than moving, cropping, and clipping:

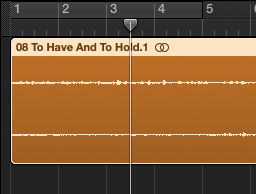
To move a piece of audio, simply grab the middle and then drag it left or right to move the position within a single track. Going up or down will allow you to pull your selection onto other tracks.

To crop, click either side of an audio track. A special cursor will appear. Use this to shorten a track, but note: everything you overwrite disappears.

Cursor

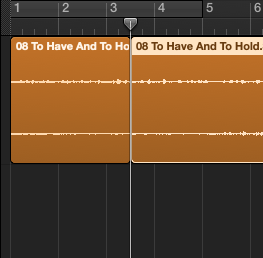
To clip a track, click on your audio segment. Move the cursor to whatever spot you wish to clip. Finally, click “Control-T” to divide the area. (We assume the “T” refers to “Trim”.)

Volume Adjustment

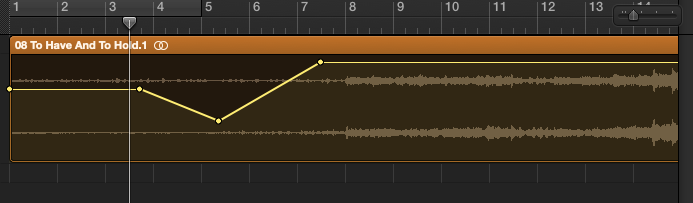
The volume adjustment button can be found over the tracks tab. Using this button shows the volume settings for each track:

Click the yellow line to insert a “handle”. Once you have two or more, you can begin to raise or lower the volume in specific areas.

EQ

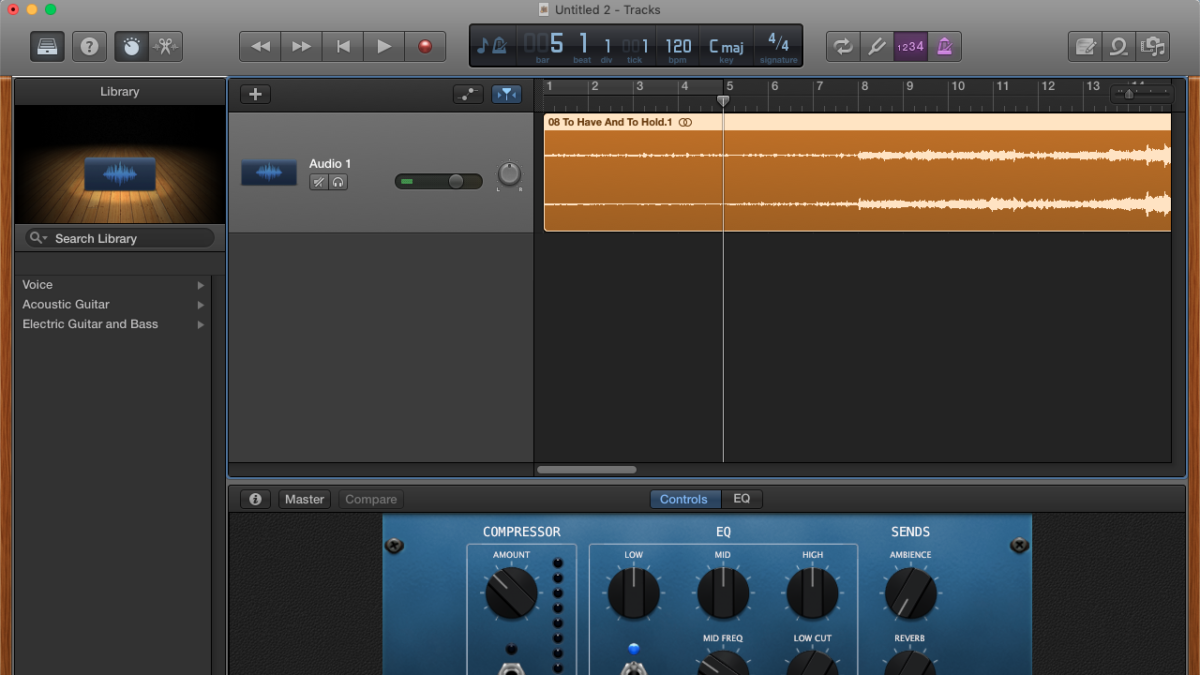
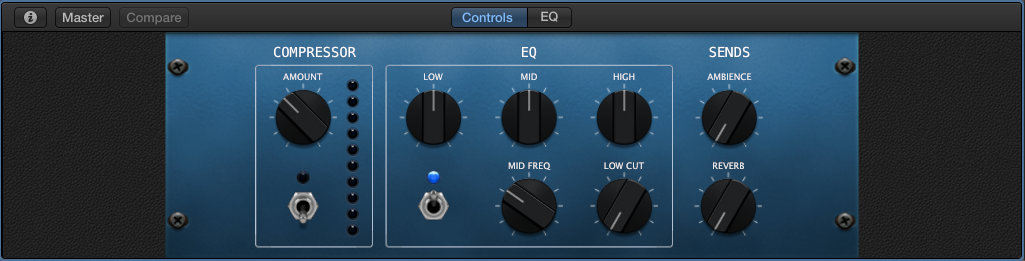
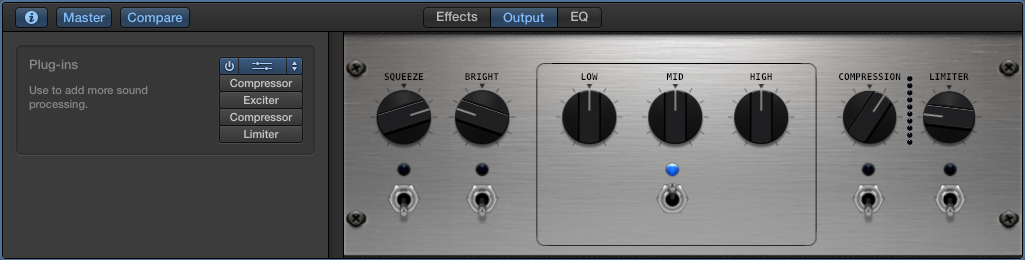
While Garageband offers preset options for EQ, you can play around with the settings yourself. Hitting the icon opens the settings:

As you can see, Apple designed the knobs to look like those of a real amp. Adjust levels for low, mid, and high frequencies, increase reverb, and more! Both the “Info” and “Compare” buttons provide more options.

Exporting

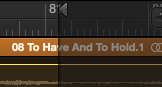
To export, first make sure your song “ends” where you wish. A small arrow delineates where the export will finish:

Often, this lands much too far to the right, so be careful! You don’t want the export to end too late, or too soon. Grab the arrow and drag left or right. Let go to set the ending in the position you’ve selected.

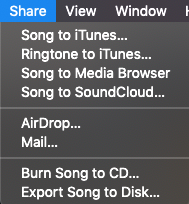
Next, visit the “Share” tab at the very top of the screen:

We recommend “Export Song to Disk,” which creates an MP3 file on your desktop or within a folder on your computer. From there, you can perform all the other actions: place it in an email, burn it to a CD, or drop it into iTunes!

Bonus: Editing Purchased Songs

Uh-oh!

You just purchased a song on iTunes, but found that one terrible part! Maybe it’s an opening that takes forever, a randomly silent area, or an addition that has nothing to do with the rest.

What? You need an example? Well…

The soothing song “Music of the Night,” from “Phantom of the Opera”, has a thunderous organ solo at the end. At best, you skip this moment of pure cacophony and move on with your life. At worst, it sneaks into your “calm study” playlist and gives you a heart attack at 3 a.m. Not that we have personal experience with such an event.

The good news is: you can edit these songs just like you edited your own music! Follow our steps in “The Beginning,” but drag and drop your song straight from iTunes rather than using a file from a folder. Then, use your audio manipulation skills to remove that terrible organ solo!

Once you’re finished, export the song back to iTunes with a title like “Music of the Night (Improved),” and replace the old version.

You may be wondering: is this okay? Can I legally alter the music? The answer is yes… as long as you legally purchased it in the first place, and don’t try using either version for professional use. Please obey copyright laws, for everyone’s sake!

Final Words

If you’re planning to record and develop original music with Garageband, there’s a lot more to learn. A whole lot more.

However, you don’t need a sound engineering background to appreciate the convenience of music editing, whether you’re making a quick recording or deleting an organ solo that sent your blood pressure skyrocketing.

Stay safe, obey the laws, and have fun improving your music!