How to clean up your Google storage

Is your Google account overflowing? Here’s how to cut down the clutter.

Google Drive

Modern life revolves more and more around data and data storage: with rapidly growing files for movies, video games, photos, and all the high-quality digital programs we know, love, and live on, the question becomes: how do we make everything stack together? How can we not send some of it to the trash folder and even worse delete forever when we empty trash! We all have a storage limit on our devices.

If you’re like us, Google provided a solid answer with Google Drive storage, our favorite online storage database. Once you have a Google account, Drive gives you access to all sorts of cool features like Google Docs, Google Sheets, and more. It’s the free space your Google Drive account gives you that we love the most, though, but…

There is a limit!

Specifically, a 15 Gigabyte limit, which can be seen at the bottom left corner of your Google Drive page:

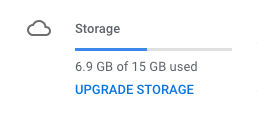
If you’re like us, it seems like only yesterday the bar showed just megabytes taken up. Now it’s 6.9 gigabytes! Where did all of that data come from? Where did all your Google Drive Space go?

We’re going to answer that crucial question, and help you manage this cloud space easier and free up space you need.

How to take care of your Google storage

What Makes Up Google’s Storage?

First things first; what is Google Drive made of? The simple answer is that it is comprised of just three things:

  1. Google Drive
  2. Gmail
  3. Google Photos

Looking at storage in Google Drive alone, you may have been surprised at the amount of data you use! Alternatively, in Gmail, you may suddenly run up against an unexpected data limit. If that’s the case…

First, let us help you get a better visual. Head into My Drive and right-click and then click “UPGRADE STORAGE” on the data graphic:

You’ll be shown a far more useful graph:

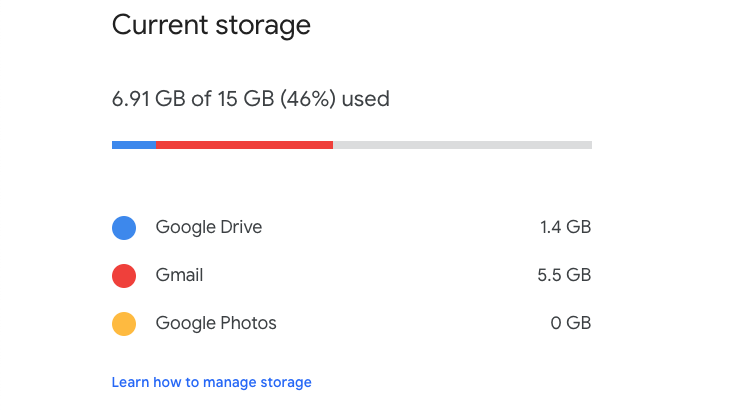
Doesn’t that make more sense?

There are now two options: manage storage, or upgrade storage. We’ll first focus on how to manage Drive, Gmail, and Photos in the coming section. Then, just in case, we’ll quickly mention the possibility of a storage subscription!

If you really want to make your computer run faster, we would recommend MacPaw. Don’t be fooled by the name, MacPaw products are available for both Mac and PC. 

Google Drive

Manually check through Drive to see which things you want to get rid of. If you’re not sure how to start, we have a few suggestions:

1. By date used: on the main Google Drive page, within any folder, you can arrange files by their “Last modified” date. There’s a general rule that older files are often less important! (On the other hand, if you don’t want to throw away your copy of 2014 tax returns, there are other ways…)

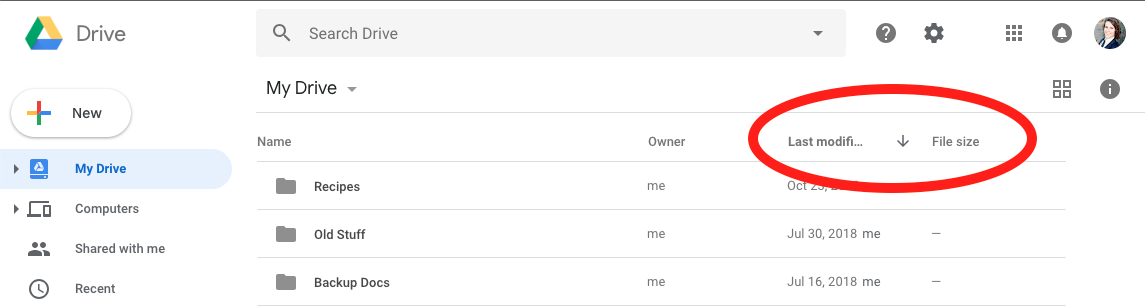
2. File size: an even better option, located right next to the Last-Modified button! While some files may be more important, you may not want to clear up Google storage kilobytes at a time… so organize them by size, and see if there’s anything you no longer need!

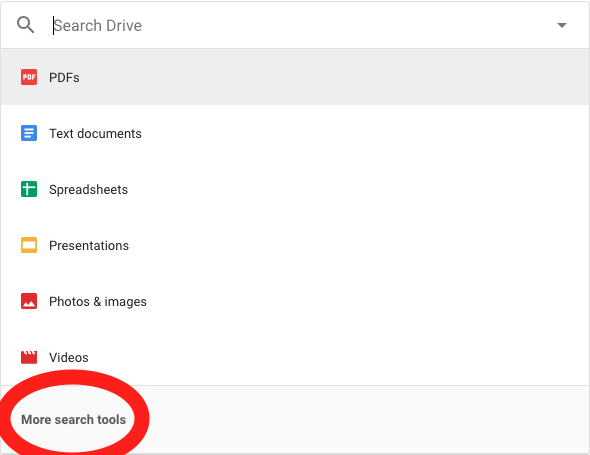
3. The Search Bar: if you’re looking for something more specific – perhaps documents shared with certain people, or keyword specific – the search bar has some cool stuff!

7

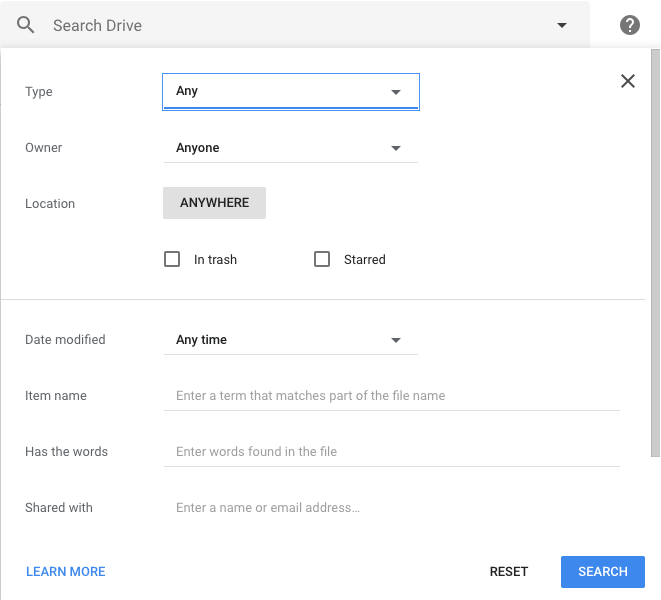
For the full experience, make sure to check out “More search tools” at the bottom of the drop-down menu:

Gmail

Gmail has fewer tools to find files for a number of reasons. For example it’s hard to tell what emails will become important later, and they generally are small messages that take up little space.

However, emails pile up quickly!

If you need to keep the storage down, there are functions called search operators, which help you look through the Gmail inbox by altering the results of a Gmail search. For an extensive list of search operators, visit this page.

However, we recommend this one:

In the Gmail search, enter “size:” and then a number. Gmail brings up all messages larger than that number, in bytes! Now, you can search for files of any size, and get rid of the most cumbersome emails.

(And if you need an easy conversion calculator, try this!)

Finally, Gmail storage management can be a defensive rather than an offensive act. Proactively create a system to stop your inbox from overflowing with unnecessary mail:

1. Block spam, and periodically empty the folder completely. While “spam” blocks certain messages from reaching your inbox, they still take up storage space.

2. If you think an email will be important in the future, mark it as “important” or “flagged”. This will ensure you don’t erase it in the future, leaving you free to delete less pressing messages.

The key here is to make sure you block unnecessary emails ahead of time. If they pile up into the thousands, it will be time-consuming to go through everything and sort the good from the bad!

Google Photos

Ah, finally! Google photos…

Frankly, it’s better that you organize photos however you see fit. Pictures are often precious to people: look at each image individually and decide if you should throw it out. A picture of family? Probably keep. An old recipe screenshot? Probably throw away.

Google Photos Download Google Photos
7

In the end, the decision’s yours.

If your storage reaches the 15-gigabyte limit due to photos and other documents you can’t part with, you may want to upgrade your cloud storage, our final option.

Upgrade Storage

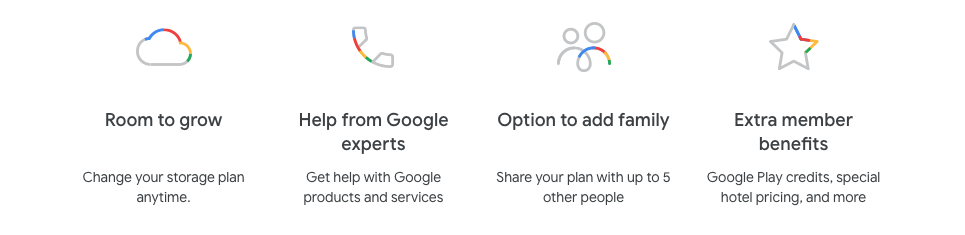
While we’re still scraping the underside of Google’s copious 15-gigabyte allowance in the “Free” category, the upgrade to 100 gigs doesn’t cost too much, possibly just $20 a year.

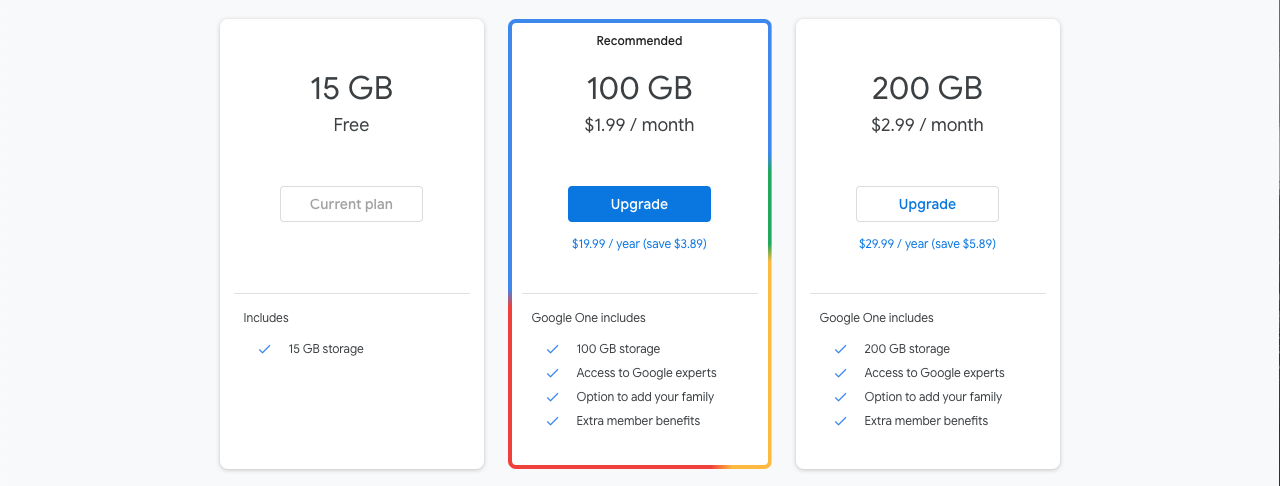
If that sounds good, there are additional benefits to the subscriptions beyond storage! Get advice from Google professionals, add family members that can share your cloud data, and more!

Thanks for reading!

What would it take for the cloud to fail?

Life is pretty much in the cloud nowadays.

Information, money, stastistics, websites, Steam’s video game data…all of these things are stored in the internet, which means the destruction of the cloud would probably lead to some level of worldwide chaos!

So, who doesn’t enjoy imagining the chances of an apocalypse? We’re going to spend some quality time considering…

What would it take for the cloud to fail?

What the Cloud is

Data Bank

Hopefully it’s becoming common knowledge to internet users that the actual “internet” is comprised of huge data centers that are owned and operated by some of the world’s largest corporations: Facebook, Microsoft, Amazon, Google, etc. Want to visit a website? Your computer locates the information inside the data centers using the web address, it “requests” the website, and the server sends data to your computer…

Hence why our Computer and Information Sytems teacher always said: “You don’t visit a website, the website visits you.” (Side note: that’s also why you should never visit a malicious site, viruses can enter before you choose to “download” anything at all!)

Now, while it may seem scary that large companies run these data centers, we promise it’s a very good thing for a specific reason: safety! Before the cloud can fail, something would need to happen to these data centers, but thankfully they’re built at top of the line facilities, in safe locations near large population centers (and apparently the ocean, soon enough).

Which brings us back to the question: what would it take for those cloud servers to fail?

The Disasters

Massive Gray Failure
Gray
GRAAAAAY

Surprisingly, the internet isn’t perfect! Get this: the software, the coding itself, that organizes information in the cloud is constantly being updated and improved, which means slight failures happen. Even more surprising, the hardware itself (the physical data banks) can experience issues like data loss, shutdown, and more!

Some of those issues, considered “normal” failures, are detected and rectified regularly (like bank shutdown caused by overheating). However, other problems like data loss aren’t always so easy to track!

These are “gray failures”: problems that cloud creators cannot track. However…users are often quick to notice! Their computers are slow, their email is offline, their information is missing. This difference between the perceptions of users and creators is called differential observability, and it can lead to pretty large meltdowns.

What are the odds?

For this flavor of failure, we’re still going to give it a highly unlikely. Gray failures are usually isolated issues that slow internet service and drop data rather than shut down entire facilities. Also, given the fact that there are many data centers around the world, this just doesn’t have the power to wipe away the cloud. However…

Natural Disasters

Volcano

Hurricanes, fires, floods, volcanos, earthquakes, and more! We’ll assume you understand the basics of these events and go right to…

What are the odds?

Luckily, the odds are still pretty small, for a few reasons. First, as we mentioned, data centers are often located in areas known for having relatively few natural disasters, which reduces the overall potential of widespread failure from one or two earthbound cataclysmic events.

Also, thanks to the sturdy construction of the facilities, we can likely rule out hurricanes, fires, and floods, even in their most powerful incarnations. While these may shut down the servers temporarily and destroy a tower of two, they’re probably not even going to wholly destroy a facility.

Earthquakes of sufficient size could permanently destroy a data center! But once again, these are isolated incidents that would only hit maybe a few centers at a time. San Andreas would have to really ratchet up that seismograph and bring Yellowstones to the party, because…

Volcanoes could easily destroy a data bank, but it’s unlikely they’re going to suddenly rear up from the ground for pinpointed strikes on all data banks collectively! So lame.

When it comes down to it, there would need to be a bunch of biblical floods, world-ending tornadoes, tactical volcanoes, and shattering earthquakes to bring the entire cloud down to earth. Of course, at that point, we’re looking at armaggedon by natural disasters anyway, so what’s really the point?

THE SUN!

SunDoesn’t count as a natural disaster? Sweet! Becuase this is cool.

Some background and vocab: every once in a while, a solar flare (bright flash on the sun’s surface), is accompanied by a coronal mass ejection (big burst of plasma with a huge magnetic field). This acts like electromagnetic pulses (EPM’s) when they hit earth, and are called “solar storms“.

Remember the disaster from the Maze Runner trilogy? Totally possible. Except maybe for the Cranks.

What are the odds?

Actually pretty decent. A solar storm could put many data centers out of order, and a sufficiently large one could even torch the planet! But…

We presume the magnetic field wouldn’t pass through earth, so it’s likely a lee would be created on the side our planet that is opposite the solar storm’s landing zone, meaning not everything would be destroyed.

Also, ONCE AGAIN, if the solar flare really was that powerful it’s possible we’d be looking at a Maze Runner situation, where some parts of the earth are doomed to experience a sun-scorched apocalypse anyway. So again…the cloud failing is the least of our problems there.

Finally, coronagraphs can spot these jets of plasma, so it’s likely data centers would scramble to insulate their hardware somehow (“If we can stop Superman’s x-ray vision, we can stop the sun!” – probably the U.S. president at the time).

Still…with the right-sized storm, maybe drawn out successive waves to make sure all of earth is good and EMP’d, the cloud could be destroyed!

Human Involvement

In the end, the most likely enemy of the internet is, well, us.

Maybe a mom’s Facebook group gets tired of their kids’ video gaming and decides to truly shut down the internet. Maybe the “Storm Area 51” crowd declares a march on the data banks next. Or perhaps the companies in charge of these information centers randomly decide they want to commit corporate suicide and take humanity to the stone age in a handbasket.

You know, those incredibly likely situations. Because, when it comes down to it, it would literally take an act of God to destroy the cloud all at once through system failure and assorted environmental mayhem.

So, in the end, humans more likely than anything else (even the sun) to decide the cloud needs to die…

And on another note, “The Cloud Needs to Die” sounds like a pretty decent James Bond title!

Conclusion

Any type of technology can fail, it’s only a matter of what kind of catastrophe is required to keep it down. If you’re truly concerned about such a thing happening, remember this key piece of tech advice: always back up your important files. Family photos, your novel, and that graphic design project. Stay safe, friends!

How to make your own costume for Halloween or cosplay

Making your own Halloween costume (or a costume for someone else) earns an indescribable sense of satisfaction. Especially when October 31 comes around and you see the assorted plebs with store-bought jammies!

Heh. Casuals.

The fact is: Halloween is a yearly opportunity for wannabe costume makers to give it a good ‘ol try, and a chance for veteran designers to impress their friends with wonderful creations! This guide offers suggestions for newbies and some pro tips to boot.

So, welcome to the party! Let’s chat about…

How to make your own Halloween costume

Planning the Costume

“A problem well-stated is half-solved” – Charles Kettering.

Figuring out what costume you’d like to make and how to do it is certainly half the battle.

Step 1: what is your costume?

Hopefully, you came to this article with an idea in mind. But if you didn’t…

There are some basic questions everyone should ask themselves: what characters do you like? What clothes/accessories/props do you have around the house? Do any of your friends want to make a group costume? Do you want to try a particular form of costume making? Finally, do you look similar to any of the characters mentioned?

(Looking like a character is NEVER required, but zoiks! If you bear a particularly strong resemblance to Shaggy and like his character, why not?)

Keep a log of character ideas and narrow down the list by asking a few more questions: how long will each costume take? How long do you have? What is your estimate of the cost? Which one excites you the most? Most importantly, which of them allow you to use the restroom easily?

Hopefully, these questions vastly narrow down the playing field so you can choose the perfect costume!

Step 2: How are you going to make it?

There are a couple of common ways we’re going to discuss. However, you should take a good look at your costume now and start deciding: which parts of this outfit would be best attained by…

  • Gathering items from your house or friends or family
  • Shopping
  • Sewing
  • Foam work
  • Electroluminescent lights
  • Crafty business

Sometimes, costumes require many of these skills! Take, for example, a knight. The process may involve wearing your own shoes, buying a prop sword, sewing a tunic, designing fitted foam armor, or crafting a sword with woodworking expertise. Who knows! Because…

When it comes down to it, the process depends on how you want to make this thing and how you want the costume to look. Admittedly, a purchased product will sometimes be faster, cheaper, and better looking! Other times, you can save money and design a fabulous accessory that makes you feel like a costume boss.

Just remember: you don’t have to set your plan in stone yet. You can take each piece as it comes.

Hunting and Gathering

Never be discouraged from using what you already have.

Have an old tuxedo that could work for your cel-shaded Archer cosplay? No problem there! Have the crimson pants, black shoes, and green shirt for a Shaggy cosplay? Done! Do you have a Master Chief helmet lying around? That’s one step you don’t have to worry about!

Archer cosplay at NYCC from pics

Of course, if you don’t have the particular clothing item yourself you can always ask friends and family for something to borrow or keep (if you’re cel-shading your Grandpa’s coat, he probably won’t want it back).

NOTE: this step and the next are best for clothing items that were popular during the 20th and 21st century, things that are often still around. If you can’t buy or borrow, you may want to build. BBB!

Thrift Shop

Thrift Shop

Okay, we admit this is a stretch, since shopping isn’t exactly “making” your own costume…but hear us out! We give a free pass for you to purchase a costume and call it self-made if your costume requires normal clothing (this pass doesn’t apply if it violates the rules of a costume contest).

Look at Archer, Shaggy, the Addams Family, a mad scientist, a Mafia group, Walter White. All these outfits require components that will likely be easier, cheaper, and less time consuming to purchase. Why reinvent the dress when Goodwill may have something perfect?

Still, if you’re dead-set on learning to tailor your own coat or can’t find what you need…

Sewing

Sewing

Some days you just can’t find the perfect Jedi cloak.

When that day comes, or you’ve simply decided to become a creative badass, it’s time to take up the pedal and become a sewing legend.

This requires, first and foremost, access to a working sewing machine. Weird side note: our local library lends them out. Does yours?

Almost every project under the sun goes through these steps: planning, material gathering, pre-prep, and execution. Have a good time with it!

1. Plan how you want to create your article of clothing. For some costumes, this may require looking at your character and doing some mental math. For others, it may require purchasing a clothing pattern, helpful design kits available at any sewing store!

2. Gather the materials. You’ll require at least two things: the fabric itself and the thread, which should usually match the fabric color. If your sewing machine needs new needles or bobbins, those can be helpful as well. We recommend trying Joann, but there are plenty of other sellers!

While you’re at the store, find fabric that matches the color and material you’re looking for. Take comfort into consideration! If the material will be close-fitted, wearing coarse fabric may be itchy. If it’s warm outside, using faux leather can be incredibly hot. Think ahead!

If you’re new to this process, please note: you purchase fabric by taking the full wrap to your store’s cutting counter (usually in the middle) and request a certain number of yards (fractions are acceptable). After your fabric is cut, you’ll take your snip to the front and purchase it afterward.

Also: we recommend buying a little more than you think you’ll need to save an unwanted trip back to the store.

3. Pre-prep. First things first, learn how to sew by hand and/or operate your sewing machine (yeah, that’s a whole different lesson). You should know how to prepare your thread and bobbin, then sew fabric on the platform.

Remember, it’s a journey! We dealt with terrible thread issues until reading our manual and discovering that a SINGLE KNOB controlled how tight the thread is pulled, which was leading to thread snafus. That simple detail changed everything, and got us back on track. Stay wary!

4. Cut your fabric. If you’re using a pattern, go by the design. If you’re playing it by ear by holding your clothes to the fabric or laying down on it or placing your hand over the glove material…best of luck. Just make sure to leave extra space! You can always sew the fabric so it’s tighter. Loosening up areas requires a large amount of painful de-threading.

5. Sewing! You have the pieces of clothing, you know how to sew, you’re ready to go!

Just remember: as you’re completing the pieces, make sure to try them on everyone once in a while to make sure everything’s coming together. When it’s all attached, you may want to fit it better in certain places.

Tip: if you fold the edge and sew it, your costume will look crisper and be far more durable. If you fold it twice, the unraveling edge is safely tucked inside the fold, never to be a problem again! Mwahaha!

Foam

Honestly, foam armor is still a dream of ours. A “someday” kinda deal.

In the meantime, if you’re making a costume that requires some foam work, there are some other great tutorials online! We watch this video occasionally and dream about the creations that could be…

Electroluminescent Lights

Strings of neon are a great way to make any costume pop out on a dark Halloween night, and they’re even better when they actually make sense for your costume! But hey, why can’t Little Red Riding Hood look like she’s going to a rave?

Fortunately, we already made a nifty guide for these lights:

Getting Crafty

When all’s said and done, there are a ton of different ways to make any costume, accessory, and prop. Armor alone could be made from foam, hot gluing popsicle sticks together, or blacksmithing a legit metal cuirass. For a costume sword, make a wood replica or borrow from THAT friend!

You know which of your friends has the sword.

The point is, when you’ve finished finding, buying, borrowing, sewing, and lighting your costume, there are almost bound to be things that are difficult to find or create through these means. Perhaps it’s a Caesar‘s crown of olives, Palutena‘s staff, or Loki‘s helmet.

When these type of things pop up, get crafty: snap a branch off and call yourself Ceaser. Use hair gel and a mop to form Palutena’s staff (no idea if that’d actually work, but that’s the point). Paper mache yourself into the persona of Marvel’s best on-again, off-again antagonist!

You can do it.

Final Step: Rock It

I dressed as Amazon Prime and won my office Halloween costume contest today! from halloween

Some people put on a costume, others WEAR a costume.

If you go as Jake, from State Farm, you’d better be ready to confusedly say: “Ahhh…khakis?” If you’re a Borderlands psycho, you should be ready to maniacally scream, “I’m already dead tomorrow!” And finally, if you’re Fat Amy from Pitch Perfect, you’d better gosh darn be ready to say, “I’ve wrestled crocodiles and dingos simultaneously”!

Among any other catchhprases of your character.

The point is, the single most important part of costume is your personality and what you bring to the table. If you want to truly “make” your character for Halloween, have yourself a grand old time playing the part.

We hope you have a happy Halloween!

Best sites for making and printing your own calendars

There are a lot of reasons to make calendars!

In 2018, we created our own “mustache calendar”, using 12 fake mustaches with 12 costumes in 12 different locations, and gave the result to friends at a Christmas party so they could remember us year-round. Frankly, they were ecstatic:

However, there are plenty of other reasons to make a calendar: you might be giving non-mustache related gifts, you could be an artist looking for new ways to monetize your skills, or perhaps a new year is coming and there are simply no commercially available calendars you enjoy! Occasionally, if you want something done perfectly you must do it yourself.

So, let’s talk about the…

Best sites for making your own calendars!

Snapfish

SnapfishWe chose Snapfish for our calendars! Like Mixbook, our other option, their core business runs on the sale of quality photo prints. However, that ability lends itself well to calendar making…

Head on over to the website!

Snapfish Website
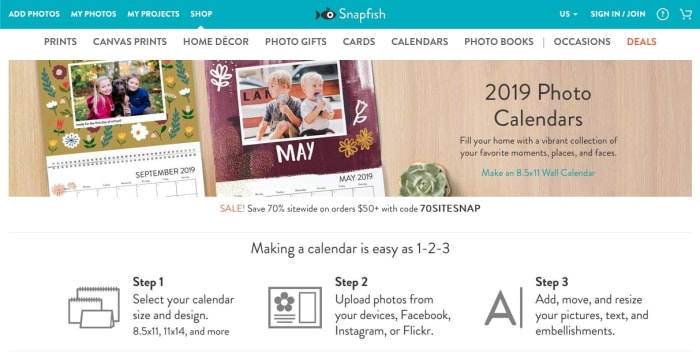
The front page offers a great example of why we loved Snapfish: the system is easy. You select your calendar design, upload your photos, then finaegle with the program to make your perfect creation!

What are the options, you ask? Snapfish has a good number: various sizes of wall calendars and even 2 iterations of desk calendar! (Including the popular wood block version.)

Calendar Types 1Calendar Types 2

Compared to Mixbook, Snapfish does have cheaper prices. The 8.5×11 wall calendars are $19.99 here and $24.99 with Mixbook. We still recommend looking into Mixbook despite the cost difference: their customization program has a lot to offer, and the quality may be worth the price!

Let’s say you start with an 8.5×11 calendar:

S Calendar

Here, you can change to another calendar size or even (this is important) choose the starting month! This unusual option will be helpful for some, but everyone else should remember to change the setting to January.

When you hit “Make this Calendar”, you’re off to the creation environment!

SF Creator
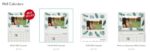
We love this user interface! Aside from the cool, minimalistic design, it’s one of the easiest programs to use: backgrounds are easily chosen on the left. Once photos are uploaded, they can be dragged and dropped. You move and resise photos in the month view, easy as that. Every date can have events added and pictures placed on specific dates!

We recommend playing around: it’s fast, it’s intuitive, and it’ll look great in no time flat. After that, you can order your calendars and expect them within two weeks, or one week if you get speedy shipping! We can say from experience: these are quality calendars with good materials and crisp print.

Mixbook

Mixbook

If snapfish isn’t your cup of tea, Mixbook has a robust offer as well! They’re a trusted company that produces excellent photo calendars at great cost (your first print comes with a good coupon deal, too). Head over to their website to begin:

MixSite
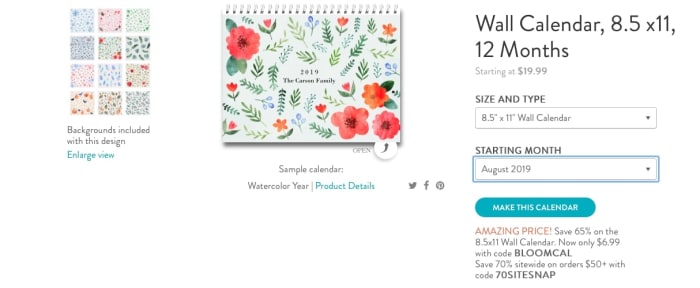
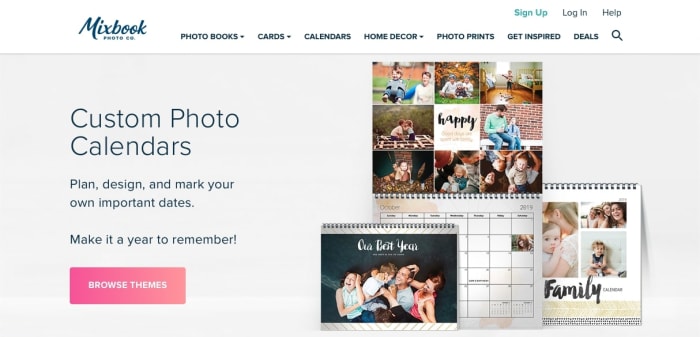
You can jump right into the themes page or scroll down to visit their three options: 12×12, 8.5×11, or 11×17:

MixOptions
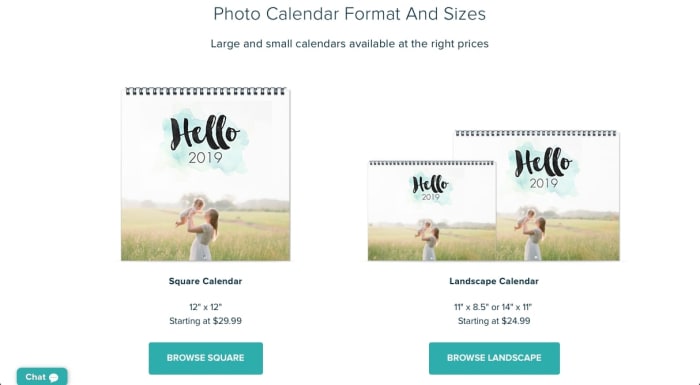
We should note: while these prices are higher, Mixbook does offer more discounts. Unfortunately, when deals aren’t explicity stated on a website, most people will assume the price is explicitly as stated. So, keep in mind: you should be able to reduce the price on your first visit.

When you select one of these options, you go to the themes page. The search is narrowed for your size selection, but you can restrict it further with a few filters:

MixThemes
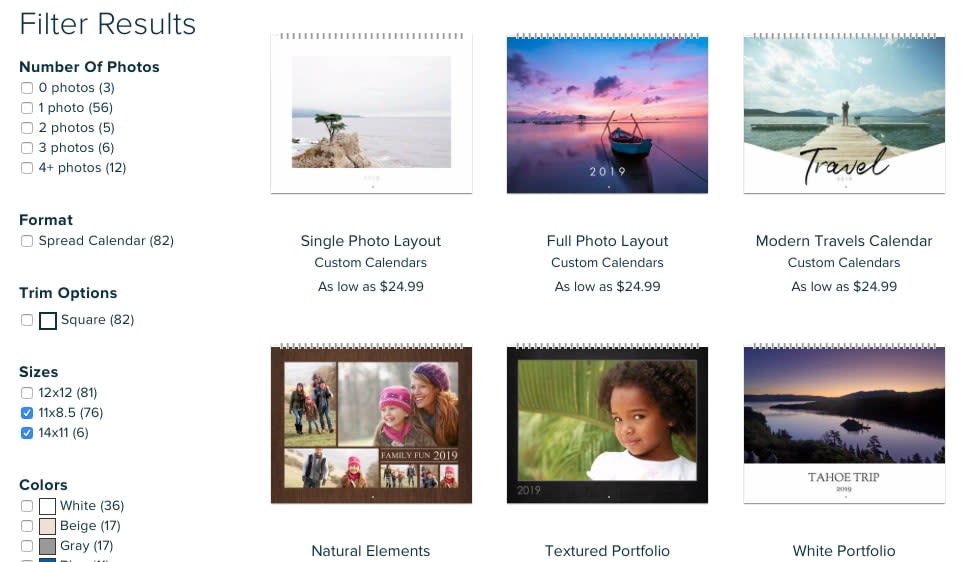
Note: what you see doesn’t have to be what you get, these are just examples. You can change everything about the calendars once inside the creation environment, so feel free to find something close to your vision!

Then, enter the next phase: photos.

MixPhotos
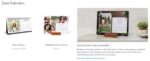
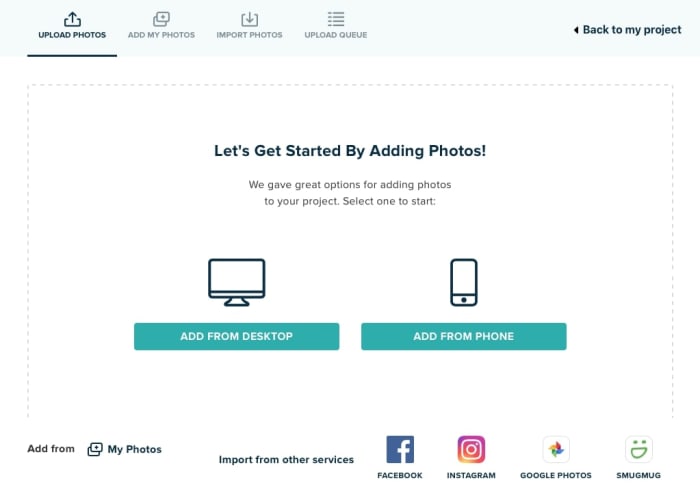
Mixbook is clever! They insist you add a few pictures before creating a calendar, and give a number of easy options for doing so. It’s a great way to introduce you to the program before you enter the full window:

CalendarMix
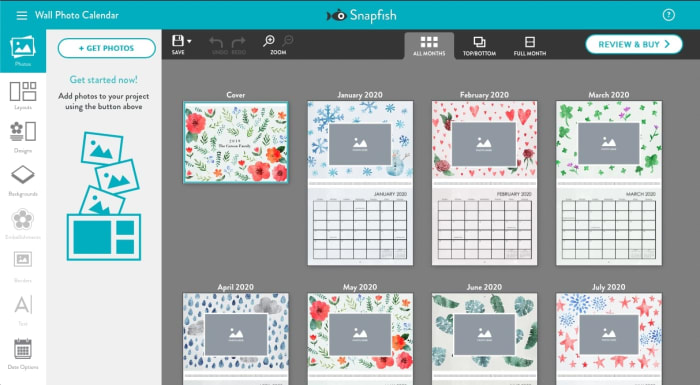
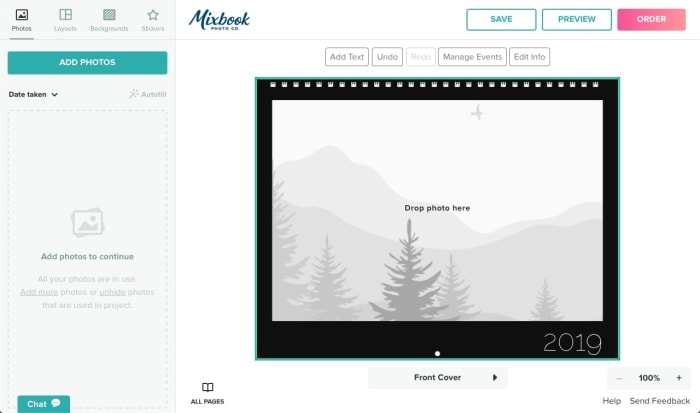
Here we are! Like Snapfish’s creation environment, we love the simplistic nature of this application: pictures are on the left, along with your layouts (very useful when rearranging each month), backgrounds, and stickers. Photos are still easily dragged and dropped, but you must cycle through the months without an overview. Also, to manage month events and more, you must use the tabs above the month view, which could be better or worse depending on your personal taste.

Whatever the case, when you’re finished you can add your creation to the cart and proceed to checkout! With a little effort, your calendar will look absolutely amazing.

Conclusion

Making calendars yourself works as a great gift for others or yourself: the turn of every month marks an exciting reveal of your own personal effort. We hope you enjoy customizing a calendar with one of these excellent sites, have a good time with it!

Legend of Zelda love interests, ranked from worst to best

Legends of Zelda Love Interests Wallpaper

Despite the fact that Link constantly voyages to save Princess Zelda and stop the evil Ganon/Ganondorf/Calamity Ganon, he actually has a plethora of love interests throughout the series!

As everyone knows: love makes the world go ’round, and we’re certainly suckers for romances stories. And guess what? Link’s relationships are fun to follow and make his grand adventures all the more interesting!

Before going on, we should be clear about two things:

1. “Worst” doesn’t mean bad. Even the lower relationships have their merits. Usually…

2. This isn’t shipping. There’s nothing wrong with shipping, of course, but there is a difference: shipping combines any two random characters for the pleasure of adoring fans, while we’re examining relationships that have been canonically established. Usually…

Now that’s finished, let’s get to it and check out the-

Love interests in Legend of Zelda from worst to best!

(And yes, many of these will be different Zeldas)

Just Friends – The Kiddos

Sometimes, Link is a kid! Since there could clearly be a relationship with these folks when everyone grows up, we’ll give them recognition. However, until they’re older, these are simply Link’s candidates for BFF:

Medli (Wind Waker)

I’ve been looking for a cute wallpaper and i found this. I instantly fell in love. from zelda

Medli has a great story that we find incredibly sad: after saving Dragon Roost Island and helping her brother find courage, Link realizes that sages need to constantly worship the gods to actualize the Master Sword’s power. Poor Medli is then dropped in an underground temple indefinitely, likely to become one of the withered sages from Breath of the Wild.

But if that wasn’t the case, Link could’ve been great friends with this adorable Rito kid. Hopefully, Link will bring the pirate ship around every once in a while to say “hello” and “thanks for saving us”!

Oh, and for Makar as well.

Purah (Breath of the Wild)

Ah, one of Link’s many platonic Breath of the Wild crushes! It becomes especially platonic when she turns herself from a 100-year old woman into an intelligent and peppy child of, what, 7 years?

Still, now that Link and Zelda are back together and scouring the land for new horizons, we’re sure they’ll enjoy the occasional visit to Hateno Ancient Tech Laboratory every once in a while.

Tetra (Wind Waker)

TETRAAA

Yeah, she’s also Zelda. However, we call her Tetra because – much akin to Sheik’s character switch – she has an entirely different personality in and out of costume! Tetra plays up the swank, smack-talking pirate queen role and constantly jokes with Link. Frankly, she’s pretty badass for a kid! The moment she becomes Zelda in Hyrule’s ruins, Tetra suddenly reverts a delicate princess in need of saving.

For that reason, Tetra, not Zelda,  is our top choice for Link’s friends!

Relationships

Now begins the true quest!

Princess Ruto (Ocarina of Time)

Overly Attached Ruto from zelda

Full disclosure: while relationships with Zoras like Ruto and Mipha are blantantly obvious, they make us a bit sad. Why, you ask? Because their love is almost totally unrequited and yet they’re unswayed regardless! We might even consider this particular relationship “bad”…

Here’s why: Princess Ruto sees Link for the first time and says, “You’re gonna be my husband, deal with it, yo”. That would be okay if the decision was passed off as the capitulations of a strong-willed young princess, but when they grow up she’s still chasing the pipe dream of a relationship. Link had a relationship with Mipha, but no love has formed here. 

The necessary time to develop a connection is important for story and relationships in general.

Now, we aren’t going to claim this relationship only gets attentions because some fans find adult Princess Ruto hot… We WILL say that she was intended to be comedic relief and works well as such! It can be pretty funny to watch her chastise Link for taking his time showing up to save Hyrule.

But is this a good, healthy relationship? No. Absolutely not.

Zelda (Zelda II: The Adventure of Link)

Zelda II

Zelda from “Zelda II” is the only one we’ve included from the originals. Why? Because most of these titles don’t show anything between Link and the princess! In the first game, you simply quest to find Zelda as a heroic night, and in “A Link to the Past” the princess telepathically butt dials calls you to her aid shortly before your uncle gets brutally killed in Hyrule’s defense.

So, yeah, not much there…

At the very end of Zelda II, however, Link gets a solid hug from Zelda, which is enough to imply there’s something romantic happening. It’s happens quick, it’s at the very end, but it’s there!

And sorry about your uncle, Link. Press F.

Saria (Ocarina of Time)

Always Saria over Zelda from gaming

Ah, poor Saria.

Aside from having a great song and taking care of the Kokiri people, Saria supports Link with the other sages. Similar to poor Medli, that means she’s destined to be a sage for a very, very long time.

Still, she’s a great character that takes care of others and even journeys to the Forest Temple in response to spirits calling her to help. Props to her!

Unfortunately, once she becomes an adult there’s not much between Saria and Link. They meet briefly and he helps her before she’s sage-ified. Otherwise, this relationship would have way more potential!

Ilia (Twilight Princess)

Sometimes, Link has a relationship with Zelda. But in “Twilight Princess” he had an actual girlfriend and only meets Zelda a few times for frivolous things like getting info, saving Midna, and defeating Ganondorf!

Saria and Link start the game in Ordon village, where her father is the mayorchief. Long story short, she gets captured and loses her memory, then spends much of the game helping out in a bar and being used to torture Link with creepy visions, the weirdness of which rivals Major’s Mask!

Still, what screen time she gets is actually pretty good: Saria helps Link, makes sure he takes care of his horse, and helps save Prince Ralis, a wounded Zora. After Ganon is defeated, love is entirely possible!

Mipha (Breath of the Wild)

Mipha’s Grace from zelda

Aw yeah, Mipha’s awesome!

A great trident wielder with unrivaled fluidity and grace in battle, Mipha brings the bearing of a princess and the sweetness of a soft-spoken battle medic to this metaphorical table of romance.

So why does she fall so low?

Well, for one, she’s dead. Two, Link clearly has a relationship with Zelda that begins before and ends after his relationship with Mipha, making love a little difficult. Finally, like Princess Ruto, she declares Link to be her husband of choice! To be fair, though..

Mipha doesn’t delude herself: she understands Link cares deeply for Zelda and opts for helping him when possible, with healing and fitted Zora armor (a symbolic gift from a Zora to her beloved). We’ve decided to accept these actions as a commendable acceptance of their relationship status.

That’s very mature of you, Mipha!

Ghirahim??? (Skyward Sword)

Ghirahim is fabulous from zelda

Haha! Just making sure you’re paying attention.

Ghirahim is a ship, folks: there’s no reason Link would get together with this flamboyant, closeted demon sociopath. Still, he does have the Joker’s odd lovability, along with a few great boss fights, so we’ll give him that.

But only that. Don’t lick Link, dangit!

Zelda (Skyward Sword)

Skyward Sword Zelda

Zelda and Link begin the game as good friends with romantic inclinations, and they end with the decision to leave their floating home in Skyloft so they may live together happily on the surface world until the end of their days…

Which is AWESOME! It’s nice to have a relationship in Legend of Zelda that ends successfully with a loving companionship.

Of course, let’s address the elephant: Skyward Sword is hated by a lot of people. It’s one of the easiest Zelda titles and the controls (many of them being tested in preparation for the beloved Breath of the Wild, like the stamina mechanic) were a tad wonky, but…frankly, we thought it was nice!

It’s a good-looking game, we enjoy the pastel artwork, there are some good new characters introduced, the background into Hyrule’s past fills in some gaps, and the romance between Zelda and Link is wonderful!

Midna (Twilight Princess)

Midna and Link from RoleReversal

What can we say? Twilight Princess, despite all odds, is a favorite!

Midna is the twilight princess, a member of the Twili people, who were sent to a prison realm that was created by the gods to punish ancient wannabe triforce thieves. You meet her in an impish form as she accompanies you on a journey to stop Zant from bringing endless Twilight. In the end, the two worlds are separated once more and Midna, in her full form, gives Link a sad farewell before closing off a portal between the worlds.

Not only did we like their transition from arguing couple to good friends, we found her sacrifice impressive and sad. Anyone who’s played the game (and enjoyed it) probably found her departure as sad as Fi’s.

But hey, sometimes sadness can be a good thing.

Marin (Link’s Awakening)

I made Link and Marin at the beach! (22,000 perler beads and 6 full days of my life) from zelda

While one of the handheld games, we needed to include Marin for obvious reasons! She and Link have a worthy, well-formed relationship that ends with tragic beauty.

Link meets Marin on a mysterious island and they form a budding relationship before realizing the world is a dream formed by the Wind Fish. Basically, their quest to awaken it will terminate in the destruction of their universe! Still, they complete their noble quest and share a tearful farewell as the world disappears. Link is saved at the last moment…

When he awakens, the Wind Fish says his memories will always exist in his heart, and a secret ending reveals Marin has been granted her wish of becoming a seagull, truly free as a bird.

We might’ve cried. Seriously, no lie.

Zelda (Breath of the Wild)

Link and Zelda sleeping together [BotW] (crosspost from r/gaming) from Breath_of_the_Wild

Ah, a relationship 100 years in the making!

This particular Zelda met Link when he became her personal guard and the champion of Hyrule after being chosen by the Master Sword. From then on, they were inseparable and went on numerous quests together. Finally, at the end of Breath of the Wild, they’re reunited a century after their bitter defeat at the hoofs of Calamity Ganon!

Aside from being an amazing game, the relationship between Link and Zelda is well-established in the numerous flashbacks gathered throughout the game. Link may not talk, but their mutual love is clear to everyone, including the other members of the Divine Beasts Riders.

Finally, though this probably shouldn’t be permissible as evidence, the teaser trailer for Breath of the Wild’s Sequel shows the two back on the trail of mystery. While it probably won’t go well for them, we sure hope it ends happily this time around. Happy trails, you two!

How to schedule emails in Gmail (and more!)

Sometimes, you need to send an email at a specific time.

Maybe you’re delivering a letter to a significant other and don’t want them to know you were up writing it at 3 AM. Maybe you’re submitting for a job interview and want your application to arrive at the start of the next work day. Finally (hear us out), maybe you’re a freelance writer looking to pitch article ideas you made Sunday on Monday morning…

Whatever your reasons, sometimes it’s necessary to plan emails in advance! If that’s the case, let’s talk about…

How to schedule emails in Gmail (and more!)

First things first, you’ve got to create a new email in Gmail. (We’re going to assume you know nothing of Gmail for the moment.) When you get to the website, hit this button to create a new message:

New Message
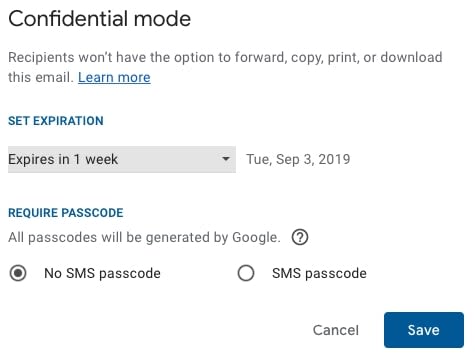
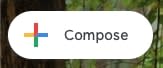
Once you do that, you’ll have the friendly composition pop-up:

Window

Follow our red arrow to the small blue sliver attached to the “Send” button. While seldom used, this link contains the useful Schedule Send option!

Schedule Send
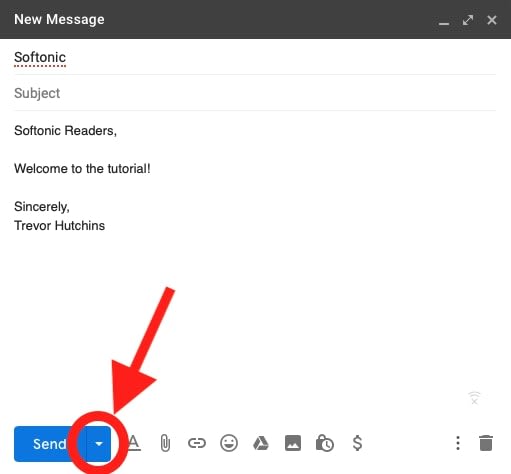
Clicking this new button opens a pop-up window that should look like this:

Options

Generally, these options will be attributed to either commonly used times of day, or settings you’ve used in the past. If none of these suggestions work, you can venture in the the “pick date and time” zone:

Calendar
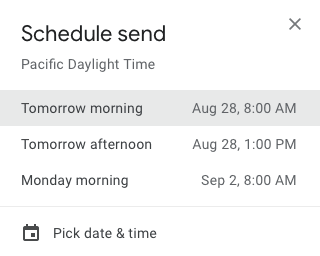
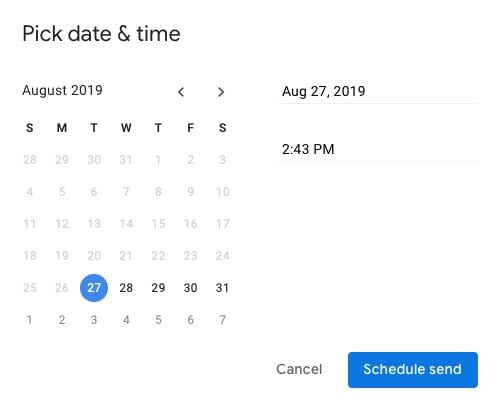
Here, you can choose to send the email at any date and time in the future! But only the future, because Google is silly and won’t let you fire messages back into the past.

LAAAME.

Once you have your date selected, you can select Schedule Send from this menu, and your message will be ready to go!

A Few More Email Tricks

How could we let you go without a few more tidbits? If you’re working on an email in Google, check out these additional “hidden” features:

With the lock button, you can set confidentiality preferences that allow you to stop all forwarding, copying, printing and downloading of your email! You can even make the ban last a certain amount of time.

Security

Upon opening the option, you’ll find this window:

G SecurityThe next button right of the Lock, a money symbol, has Google’s payment options! If you need to send money, you have the option to quickly do it through your personal Gmail..

MoneyGmailWhen you hit the button, you’ll see this friendly payment screen: use it to deliver money as you would with Venmo or PayPal!

GmailPayment

While two of our favorite options, these functions are accompanied by other fun features that you can use to enhance the way you send emails! Pick through the option bar, you never know what you’ll find.

Conclusions

Want to know another great reason to schedule messages? Fights. If you’re writing an angry email, maybe schedule it for lunchtime tomorrow, and revisit it when you’re feeling more level-headed…

Life pro tip!

We hope you enjoy using this guide, best of luck with the scheduling.

How to save money with Ibotta

Hopefully, this article can help give Ibotta some of the attention it deserves.

Gen X had Pong, while Millenials have Halo, Uncharted, and now Fortnite! Once there was The Brick (yeah, we know what that is) and dial-up telephones, now we have powerful cell phones with relatively godlike internet capabilities in our pockets.

There once were coupons…now there’s Ibotta.

Ibotta is the natural, digitized step up from coupons and coupon books: by partnering with hundreds of stores both physical and online, it’s able to give buyers considerable savings in a user-friendly way! For older users, it’ll be an upgrade. For younger users, it’ll be a fresh experince with savings.

And if you still don’t believe us, check the all-knowing reviews on the Apple store: 5 stars from over 600k responses! That’s a TON!

How to save money with Ibotta!

Getting the App

Ibotta Download


We have the app in our Softonic catalog. Click here to download Ibotta.

Making Your Account

Start
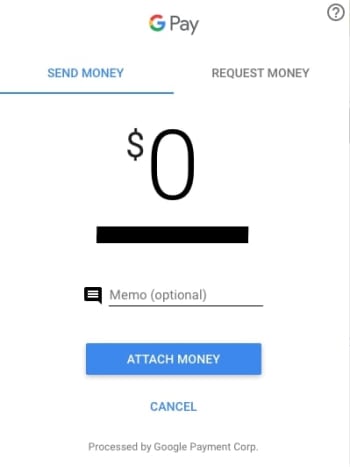
There are two options: email and Facebook.

You don’t even need to enter your bank information at this time, so that’s really all there is to it! Once that’s finished, you’ll find yourself in:

The App

Start

Welcome to the Ibotta app! Everything happens here.

We recommend poking around and exploring the offers available. At the top, you’ll find links to online retailers, where you can engage in some realtime Ibotta refunds. Below that, there will be specific deals for products (like the bananas) and finally, if you scroll further down, you’ll discover seller categories, deals of the week, events, and more!

More Ibotta

Honestly, we were a little intimidated at first. The Ibotta system looks and feels a lot like a shopping app, but don’t worry: while some of these buttons will link you to other places (after asking for your permission), you can press whatever you like and add whatever coupons necessary without expecting a penalty. It’s safe, so have a good time with it!

Saving Money

Options
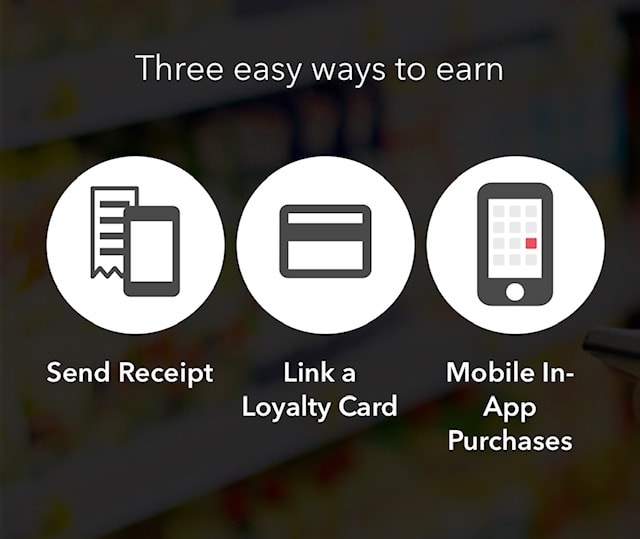
The important stuff! There are three ways to save:

  1. Sending a receipt: when you find a deal you want to use, save it for later. After buying the product, simply scan your receipt! This may feel a lot like using coupons, with a few notable benefits: rather than dragging out tons of papers at the cash register, you can save your deals beforehand and apply them by scanning your receipt in a second.
  2. Link a loyalty card: this works like your average loyalty card. You use the card with supported retailers, and get the Ibotta discount through the app.
  3. Mobile App Purchases: Ibotta offers links to many supported retailers. When you select their icon, you’ll be greeted by a few categories to choose from. Once you’ve decided upon one, you can select “Shop” to open the shopping app within your Ibotta session:

Amabotta

In this case, you can then shop on Amazon’s services with the expectation of a discount!

How does this Work? Why does this work?

It’s only natural to pose the question: who’s losing out here? And while it may be surprising, we believe Ibotta has created a clever win-win-win situation (which would account for the love it’s received through user reviews). Here’s how it works: retailers that partner with Ibotta win thanks to the increased traffic in their stores and on their websites. Ibotta wins through partner contracts. Finally, shoppers win when, at the end of the month, they get money back from expenses paid and discounts used!

Conclusion

Ibotta works as well as the reviews suggest, give the app a try if you haven’t already!

Why you should be using 2-factor authentication

Lock

Cybersecurity is no joke; there are people online trying to get the information of others, and if you’re not paying attention you can open yourself to a world of hurt.

Now, while that opening may sound scary and probably clickbaity-y, the intentions are good: this is leading to a simple suggestion that can greatly decrease your chances of a run-in with account theft!

Let’s talk about…

Why you should be using 2-factor authentication

What is 2-Factor Authentication?

As the name implies, 2-Factor Authentication (2FA) doubles the number of steps a new device must undergo to gain control over an online account. It’s a %100 increase from 1 to 2…

That’s actually a big deal, we promise.

How does it work, you ask? That depends on which program you’re using, since there may be a range of available methods. Sometimes, you’ll receive a verification text on your phone. Other programs allow an authentication app. Whatever the case, it adds another level of security beyond the password alone.

And, why is that important? 

Most “hacked” accounts occur due to data breaches on company sites, social engineering, easily guessed passcodes, and the everyday bad choices of internet users, and 2-Factor Authentication greatly increases the chances that those tactics won’t work!

You could verbally give your password to a stranger (please never do that, regardless) and they wouldn’t be able to enter your account without access to your cell phone or laptop… (Just so long as you don’t have multiple accounts with the same password that aren’t protected by 2FA. Remember to use various passwords and keep them on record somewhere safe!)

The Reasons Against 2FA

So, why wouldn’t someone use 2FA? Two reasons: lack of trust and the time spent setting up/using the new system. Let’s discuss those.

2-Factor Authentication may sound scary and unusual to those still building tech savvy, but we can assure you there are almost zero downsides. You’re not giving any more information to the website, you’re only making it safer by linking your phone, a tried-and-tested application, one-time-use passcodes, and more.

As for time, we promise the setup process should take less than five minutes, and the hassle of new logins is one thousand percent worth avoiding an account breach! We know from personal experience.

Still, if you’re not ready to put 2FA everyone, we strongly advise setting it up on at least one account: your email. Since emails are often used for recovery of accounts with lost passwords, they are the central hub of security for modern users. So at the very least, protect that account.

And to show you how, we have an…

Example: 2FA on Gmail

If you use, Gmail, congratulations. We have a quick tutorial on establishing 2FA on your account to demonstrate its ease. First, head to “my account” at Google and choose Security from the bank on the left:

Options

Here, you’ll be able to find the settings 2-Factor Authentication (called “Verification” here). Look for the “Signing in to Google” menu.

2FA

Google has the two main options: you can link a cell phone or download their Google Prompt application. However, they also allow secondary options: create one-time use passcodes or register USB-connected devices that act like keys. Cool stuff!

For our personal email, we chose the phone option, as you can see below. This process takes about ten seconds to enter your number, but ensures nobody can log in without the code, which is sent by text message!

If you want to skip that process, Google’s authenticator app takes longer to download but will allow you to log in quicker by simply hitting “yes” to greenlight an account login.

2FA FinalSee? It’s as easy as that!

Conclusion

We don’t want anyone to lose access to one or more of their profiles, especially not an all-important email account. Please consider protecting your information with 2-Factor Authentication! It’s a solid line of defense that can ensure your data stays under lock and key. We wish you the best!

Test Minecraft Beta features on Xbox

World

Ever want to know what’s on the cutting edge of Minecraft technology? Want to experience the upcoming updates before they happen on Xbox?

If so, you should join Minecraft Beta testing!

By doing this, you’ll be a few updates ahead of everyone else. Mind you, it does require sending information to the creators so they can improve the system and there are a few compatability drawbacks (and the occasional bug). We’ll address these soon enough!

If you’re ready to dive in, let’s talk about how to…

Test Minecraft Beta features on Xbox

Step 1: Have Minecraft

Minecraft Xbox One

Yeah, as you might imagine, this is one of the larger requirements for getting Minecraft Beta. The vanilla version will cost about $20 unless you’re lucky enough to drop by during a sale (best of luck).

Now: we did hear from a friend that you could get Minecraft for free by joining the Minecraft Insider Hub, but we haven’t been able to prove that. When we were younger, people also told us there was a secret way to get Paper Mario in Super Smash Bros Melee, but sometimes these things are just hearsay…

Which is really sad.

Paper Mario

Step 2: The Minecraft Insider Hub

MIH

Now comes the hard part, which also happens to be pretty easy.

Mosey over to the Xbox store and download the Microsoft Insider Hub, a tool for testing new features and sending feedback to the developers when you wish. If you’re like us, however, you’ll just use it as a place to activate Minecraft’s Beta features…

Step 3: Activating Beta

Within the Insider Hub, go to the “Insider Content” menu, one of five options that’ll likely be under “Rate Content” and above “Report Problem”.

Not much to it!

The games available for testing here rotate out, but Minecraft will almost always be available among the approximately three options. Once you do that, you’ll see a screen appearing something like this:

Minecraft

You’ll see something slightly different. Rather than “Manage”, along with these other options, your screen will say “Join” only. Hit that button and your copy of Minecraft copy will automatically update to include the experimental features!

The Drawbacks

There are two we know of.

First, you have to send information to the Insider Hub, which many people aren’t overly fond of. However, since that’s a matter of personal preference, we’ll allow you to decide if you’re good with this modest tradeoff.

Second, compatibility issues will arise, which generally means:

If you created Minecraft worlds without the Beta testing activated, you will no longer be able to play those worlds and vice versa: when you deactivate Beta, worlds created during that time will also be unavailable. Additionally, users of the Beta features and vanilla Minecraft aren’t able to join each other’s worlds, which totally stinks.

When you experience these problems, you have two options: do nothing and say “goodbye” to those worlds/friends, or change back to normal Minecraft!

And how does that work?

Step 1: Deactivate Minecraft Beta in the Insider Hub

Once again, head back into the Insider Hub and find Minecraft. When you pull up the screen, you’ll want to choose the “Manage” option and opt out of the Beta program. Easy as that!

Except, you have one more step to ensure compatibility, since leaving the program doesn’t actually change your digital game copy:

Step 2: Delete and Re-download Minecraft

If you purchased Minecraft online, we recommend finding the game in your library, deleting it, and re-downloading from the store. Some other tutorials recommend a full reset, but we found that to be unnecessary.

After you’ve re-downloaded, the game will work fine and you’ll be able to re-join all players in vanilla Minecraft and visit your old worlds!

Even better news? Once you’ve got the process down, these steps should only take a couple of minutes. Although downloading Minecraft over again might sound bothersome, the full game measures up to less than half a gigabyte, so re-downloads are refreshingly fast!

Minecraft Download now ►
7

Conclusion

We hope this guide helps you jump into the world of upcoming features with ease, and transition back if you need to join friends and explore your old files in the currently released update. Have a great time mining!

Best DnD dice makers

So, you decided to start playing DnD, huh? Or maybe you’re starting a new game after a long wait? Maybe you lost the d20 and want an entirely new set this time around? Or perhaps you just want a new, high quality set of dice to make your friends’ mouths water the next time your dungeon master calls to the troops to order? Whatever the case…

Shopping for dice is great!

Dice are one of the few real-life items absolutely necessary for a game of DnD, and aside from being the backbone of random chance that gives shape and excitement the outcome of your decisions, they’re often freakin’ cool looking! Veterans likely know the feeling: you get attached to your dice sets like a proud parent of a successfully well-adjusted child.

So, if you’re ready to begin the pre-DnD journey of dice shopping, let’s talk about the…

Best DnD dice makers!

Par-tay Dice (The Cheapest)

Sometimes, you don’t want any specific set of dice, you want 9,000 options for $20, so both the cost and the dice can be shared amongst your whole party. Want a specific color? Take it. Want to draw a set of options as colorful as your salty, dragonborn bard? Go for it.

Our first set is an all-time fan favorite from Smartdealspro (an appropriate name). You get five dice sets for just $10, which means just two bucks per set. If you have five people willing to split the cost…

On the other hand, maybe you’re looking for more dice for more players! If so, QMAY has a “Big Bag-O Dice” (why is that not a product?), which provides four times the dice for about 1.5x the cost!

We have to admit…that’s a TON of dice.

Low Cost and Mid Range

If you’re like us, walking into your first game of DnD, it’s possible everyone around the table already has their own set of dice. If so, no problem! You can find a lot of excellent choices for a decent price.

Our eventual choice came from eBoot, a tried-and-tested company that has a large number of choices in the Amazon system. Just be careful, the costs are different for each set: our favorite silver blue version goes for $4.99, but the transparent glitter dice are over $10.

While you’re there, you may also want to check out Chessex, another company known for making a solid range of low-cost sets.

Heavy Metal

Let’s be honest: the five to fifteen dollar range has great plastic dice, from the see-through to opaque to glow-in-the-dark, but if you’re reaching the $20 range, you’re probably getting a set of awesome, metal dice!

Why metal? For starters, they last longer, look cooler, and feel amazing when held in your hand. Not only that, but you could probably throw them in a slingshot and put a hole through the drywall, which we’re not recommending but it’s totally a plus.

Haxtec has a great number of dice that generally fall into categories based on the trimming: gold, silver, or rainbow. If you check through their options slider, however, there are even a few options like ancient bronze.

Alongside Haxtec, Hestya has an enormous range of metal dice. They tend to be slightly more expensive, but there’s a greater range of classic options along with a few interesting designs. Check through their offers!

The Others – Craaaazy Stuff

Finally, if you search the web, there are a great range of interesting dice from different makers. While some of these are highly specific, many of them come with unusual cases or boxes for easier rolling.

To start, enjoy these metal dice from TecUnite, which just look awesome with their blend of gray and turqoise.

The aptly named Darksilver Forge makes impressive dice with tech font on a great design.

If you’re looking for interesting writing, perhaps try Q WORKSHOP’s Cthulu Horror set? They also have a large numer of interesting and specific designs that can be found from their Amazon page.

Finally, check out this set from UDIXI, another popular manufacturer!

Conlusion

Are none of these sets to your specific liking? No problem! We hope they’re  a useful tool, a springboard, for discovering the dice set that’s perfect for you. If anything, we hope you enjoy looking at the many designs. Best of luck with the quest, and enjoy your game of DnD!