How to Unblock Plug-In Safari

Safari is a powerful web browser for Apple devices, and older versions of the Windows 10 operating system. This browser lets you synchronize passwords, history, bookmarks and other core features of your browsing activity across your Apple devices. This means you can switch between devices with ease and expect to have all your favorite content at your fingertips, no matter which device you use. 

From time to time, however, you may see the dreaded ‘missing’ or ‘blocked plug-in’ pop-up, which can throw a spanner in the works where your browsing pleasure is concerned. To mitigate the prevalence and impact of these dreaded pop-ups, we’ve formulated 5 simple steps by which to unblock your Safari plug-ins. 

What is a Safari plug-in?

Plug-ins on Safari are essentially like extensions on Google Chrome. Just like extensions, plug-ins are utilities that you can download onto your Safari browser that increase your browser’s functionality and often the convenience with which you can perform certain tasks within Safari.

There is a wide array of plug-ins for Safari and each is specifically designed to make certain processes easier or extend the usability of your browser. Plug-ins also often let you personalize your browser in ways that are natively not possible, resulting in streamlined browsing experience that specifically caters to your individual needs. 

What does ‘missing plug-in’ mean?

If you use any plug-ins on Safari, you’ll notice that you usually see this message pop up after an update. When you update your system, either your macOS software or your Safari utility, your browser is likely to disable any additional content like plug-ins. This is a setting that a lot of software manufacturers put into their products.

Essentially, this stops any outdated plug-ins, mods, add-ons, or other custom content from conflicting with the updated software and causing massive issues with either the software or your device on the whole. In some cases, only specific plug-ins that are no longer supported or might be out of date are disabled. 

How to unblock plug-ins on Safari in 5 simple steps

Luckily, unblocking plug-ins on Safari is a really easy process. All you need to do is follow the 5 steps below and you’ll be browsing happily again in no time.

  1. Head to Safari

    How to Unblock Plug-in on Safari

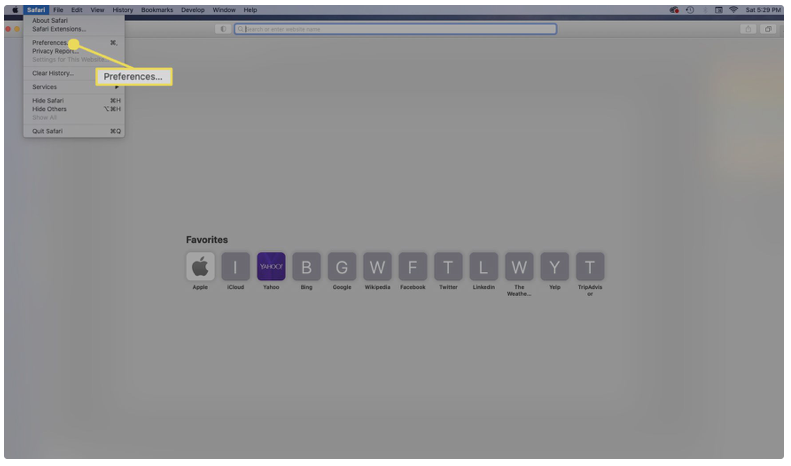
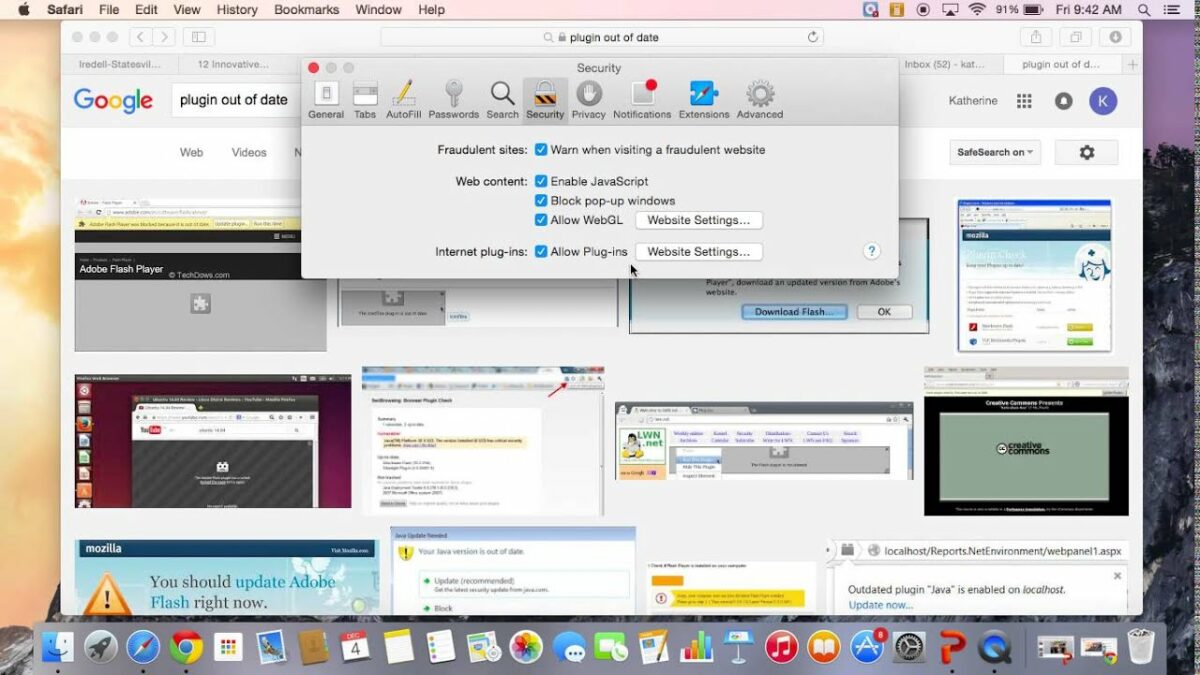
    The first step is to open your Safari browser and head to your browser preferences. You’ll find the preferences option in the top left-hand side corner of your browser interface.

  2. Security

    How to Unblock Plug-in on Safari

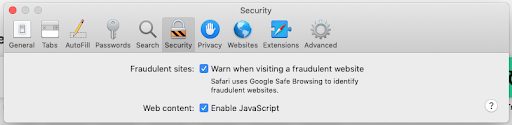
    Next, you’ll want to navigate to the Security option and click it. Here, you’ll find all of the security-related settings and features that your browser has to offer.

  3. Website settings

    How to Unblock Plug-in on Safari

    Once you’re in the security settings, you’ll need to head to Website Security. This is where you’ll find your plug-in management options and settings. Once there, click on Allow Plug-ins.

  4. Plug-ins

    How to Unblock Plug-in on Safari

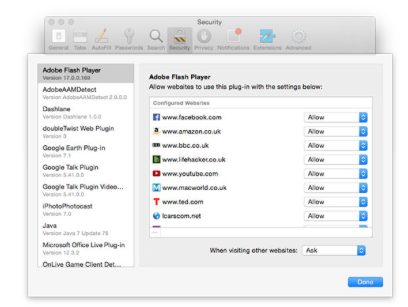
    Now, you should see a list of all of the plug-ins you have installed in your browser. From here, you can click on the plug-in that you want to reactivate or enable.

  5. Done

    How to Unblock Plug-in on Safari

    Once you’ve reviewed the activation status of all the plug-ins in question, you can exit the settings interface and resume browsing. For good measure, restart your Safari browser to ensure that the settings you’ve changed take effect properly.

Why are so many plug-ins getting blocked? 

There’s a very good reason a lot of plug-ins are facing blockage by Safari lately. Recently. Apple made the decision to block all outdated versions of Adobe Flash. Adobe Flash is a multimedia software utility required to run animations, desktop applications, mobile apps, games, and rich web utilities. Adobe Flash is also integral in the operation of utilities like browser plug-ins.

The decision to block outdated versions of Adobe Flash is one that Apple hasn’t made lightly. Older versions of the utility tend to crash various processes and other utilities that it can no longer support. Newer utilities and plug-ins require newer versions of Adobe Flash, and the older versions are more prone to crashes and bugs. Every time software is updated, holes are patched and the utility becomes more secure for users to interact with. 

The fact that so many plug-ins are being blocked from time to time basically forces Apple users to update their Adobe Flash players, therefore making their devices and the apps they interact with safer and more secure. In fact, in numerous instances, if you follow the ‘blocked plug-in’ dialogue, you’ll be redirected to a page where you can update your version of Adobe Flash.

How to Downgrade GTA V In 3 Easy Steps

Grand Theft Auto V, or GTA V, has gathered a massive following worldwide because of its fun and chaotic gameplay. A few patches have recently thrown out errors when you try to start the game and force you to sit and look longingly at that Play button while cursing profusely at the developers who released a bad patch. Luckily, there is a way to downgrade your game to an earlier version, and it’s pretty simple. So in this guide, we’ll show you how to downgrade GTA V to a previous version.

How to Downgrade GTA V

This guide covers the Steam and Social Club versions of the game as, so far, there isn’t a way to do this for the Epic Games version. Let’s jump right in!

Step 1: Download files

Firstly, you’ll need to download the files of the previous version of your game. You can get the Steam files from this link and the Social Club files from this one. Once the download is finished, extract the files to your desktop (for ease of access.)

Step 2: Delete files

Now, navigate to the location of your GTA V installation and delete the GTA5.exe and GTAVLauncher.exe files.

Step 3: Update folder

Go and copy the GTA5.exe, GTAVLauncher.exe and update folder from the folder you extracted earlier and paste them into your GTA folder. Also, make sure that you set your respective launcher to manually update the game to not undo all the work you just did.

Getting Back to Los Santos

GTA V is patched pretty regularly and, should you run into issues with the current version, you won’t need to wait too long for a new patch to be released. But, we all know how frustrating it is not to play a game because something decided to break, and luckily this method circumvents that and allows you to get back to causing mayhem on the streets of Los Santos within minutes.

How to Change the Default Language on Microsoft Word in 4 Fast Steps

From classrooms to corporate offices, from PCs to Android devices to iPhones, Word is a vital part of everyday life for most people. With its international appeal, though, people often run into a problem in that Word is always installed with English as its default language, and it can be a bit of a struggle to change this. Well, not to worry because this guide will show you how to change the default language on Microsoft Word.

How to Change the Default Language on Microsoft Word

You will need a licensed copy of Microsoft Word to do this, as you will need to download the language pack for Office from Microsoft’s website. Let’s get started!

Step 1: Open language options

First, open Word and click on File → Options → Language. Then select Get more display and help languages from Office.com.

Step 2: Download language pack

This will open your browser to the webpage that you need to download the language you’re looking for. Scroll down until you see a dropdown menu that asks what language you need. Click this and select the language that you’re looking for. Then choose the version you want to download; this depends on whether you are running a 32- or 64-bit version of Office.

Step 3: Install language pack

Now run the installation file that you just downloaded, select Yes from the pop-up and let the installation run. Once complete, completely restart Word.

Step 4: Set language as default

Follow Step 1 again to go back to your language settings, and you’ll see that the language you downloaded is now listed in the window. Click on it and use either the arrows to move it to the top of the list or click Set as default.

Words, Words, Words

Microsoft has included hundreds of languages in their Office suite, making it a perfect tool for people working as translators and the like. However, sometimes the settings and options can feel a little overwhelming, but luckily, that’s why we’re here to help.

How to Delete Safari on Mac in 5 Fast Steps

There are many different internet browsers available on the market today: Firefox, Chrome, Edge, and Safari, to name a few.

Every device that can connect to the internet comes with a default browser already installed. However, sometimes, the browser can be overly slow, the interface is unappealing, or you have had the browser for too long. 

For most devices, uninstalling a browser that you’re not using is very straightforward but removing Safari from a Mac is a somewhat tricky process. This is because Apple has hard-coded Safari into the operating system. In other words, if you remove it, it could damage the OS.

In this guide, we will show you how to remove Safari safely from your Mac. Although we must mention that this is ideal for those who are comfortable working around computers.

How to Delete Safari on Mac

This is quite a complex process. We highly recommend that you only proceed if you possess extensive knowledge of the inner workings of macOS and computers as a whole.

Step 1: Disable the SIP

We will first need to disable the System Integrity Protection (SIP). To do this, boot up your Mac while holding in the Command+R keys.

This will allow you to start up in Recovery mode. Click on Utilities in the Menu bar and select Terminal.

Step 2: Restart your device

Type “csrutil disable” into the Terminal window and press Enter, disabling the SIP. Restart your machine normally and log in with the admin account.

Step 3

Launch the Terminal from the Launchpad and type in “sudo mount -uw /System/Applications” and press Enter.

You will be asked for a password as well.

Now you’ve enabled Read/Write permissions on the Applications folder.

Step 4

Now type in “cd /Applications/” and press Enter to display the Applications folder and then type “sudo rm -rf Safari.app/” and hit that Enter key one more time to remove Safari.

Step 5

Your last step is to switch SIP back on. To do this, follow the steps in Step 1 and type “csrutil enable” into the Terminal window.

One Browser to Rule Them All

We all know how annoying it can be to open a link and the wrong browser starts up.

Sometimes, it’s better to have one program installed that does the job than having an array of browsers that bog down your system. In that case, though, Safari has proven to be a rather popular browser and it may be worth having on the computer. 

It’s available on both Mac and Windows. 

Mobile Legends Freya Build – Top 3

Freya is a fighter class hero available in Mobile Legends on Android and iPhone. She is a powerful and tank-like hero with excellent attack speed, and she can cause a lot of damage. It’s essential to note that players can only get Freya’s first diamond recharge in the game. 

Are you wondering how to counter Freya? You can use heroes like Karina and Natalia, as Freya is weaker against magic attacks and both these heroes also have strong abilities to survive attacks. 

Mobile Legends Freya Build

Build 1: Freya Guide

This is a very balanced skill build and is one of the most powerful builds in most situations. Freya will be able to do significant damage but also has defensive capabilities. Here are the items needed for this build:

  • Tooth of Greed
  • Warrior Boots
  • Blade of Destruction
  • Scarlet Phantom
  • Blade of Despair
  • Immortality

Build 2: Burst Damage

This build is a good option if you want to focus on building Freya’s attack power and increase the damage she inflicts to the maximum. These are the items needed for this build:

  • Tooth of Greed
  • Blade of Destruction
  • Scarlet Phantom
  • Blade of Despair
  • Dominance Ice
  • Immortality

Build 3: Damage Jungling

This build is great if you want to build your attack speed and strength by attacking other monsters in the jungle and gathering gold before going after the enemy team. These are the items needed for this build:

  • Tooth of Greed
  • Magic Shoes
  • Blade of Destruction
  • Scarlet Phantom
  • Rose Gold Meteor
  • Immortality

Build a Formidable Freya

These are some of the best item builds for Freya in Mobile Legends. When using them, you are sure to end up with a powerful fighter type.

Do you like Mobile Legends? You might also like Wild Rift and PUBG Mobile.

How to Reset Safari in 10 Easy Steps

Safari is the default browser on Apple devices such as Mac, iPad, and iPhone. The Safari browser is a safe and fast graphical browser.

There may be times when you need to reset your Safari. This can be when your safari browser becomes slow and doesn’t work correctly anymore. 

You need to do four things to reset your Safari browser; clear your history, clear your cookies, clear your caches, and disable your extensions. If you follow our steps below, you’ll find it is pretty simple.

Steps to Reset Your Safari

Below we give you the steps to follow to reset your Safari on your Mac. These steps will work for Safari versions 11 through 14, but not for Safari on iPhone or iPad.

Step 1: Launch Safari

Open your Safari browser on Mac.

Step 2: Clear History

Open the Safari menu by clicking on Safari in the menu bar found at the top of your screen. Now click on the ‘Clear History’ option in the list.

Step 3: Select ‘All History’

In the drop-down list, choose ‘All History.’

Step 4: Confirm Your Selection

In the dialogue box, confirm that you want to clear all your browsing history.

Step 5: Go to the Safari Menu and Select ‘preferences’

In the Safari menu, click on ‘Preferences’.

Step 6: Remove All Website Data

In the new window that appears, you need to click on ‘Privacy’ and then click on ‘Manage Website Data. A dialogue box will open where you need to click on ‘Remove All’. And accept by clicking on ‘Remove Now’.

Step 7: Enable ‘Develop’ Mode

Now in the preferences section of the Safari menu, click on the ‘Advanced tab. In the menu that appears, enable the checkbox ‘Show Develop Menu in Menu Bar’.

Step 8: Empty Cache

From the menu bar, you should click on ‘Develop’, and then from the list, choose ‘Empty Caches’. Remember to accept the command in the pop-up message.

Step 9: Disable Safari Extensions

Go back to the ‘Preferences’ option in the Safari menu and click on the ‘Extensions’ tab.

Step 10: Select the Extension to Disable and Uninstall It

In the extensions tab, select the Extension on the left and deselect the checkbox next to it; to disable that Extension, now you can uninstall it.

Enjoy a Faster Safari Browsing Experience

Now that you have reset your Safari browser, it should work faster and without any issues the next time you use it.

If you are looking for another fast and secure browser, you can look at Google Chrome or Firefox as well.

How to Enable Cookies in Chrome in 3 Easy Steps

We always hear people speak about their internet cookies and how you should clear them now and then, but not many people know why or what exactly they are. “Cookies” has become a term that people throw around to seem knowledgeable about technology, much like “LAN” or “CPU.”  In this article, we’ll show you how to enable cookies in Chrome for  PC, Mac, iPhone, and Android.

What are Cookies?

Cookies are text files that are saved while you browse the internet. These files store data like usernames and what you’ve been browsing to improve your browsing experience online. For example, when you browse shoes on Amazon, you may see an ad for those shoes on a different website. This ad is generated for you using the cookies that the server created while you were browsing Amazon.

How to Enable Cookies in Chrome

Cookies can be beneficial in that they exist to offer you a fully customized online experience. However, caution should always be taken as they can also weaken your privacy settings on your PC. On that note, let’s jump into the guide!

Step 1: Access Settings

Open your Chrome, click on the three dots in the top right-hand side of the screen, and select Settings.

Step 2: Open Privacy Settings

Now select Privacy and Security on the left-hand side and then click on Cookies and other site data.

Step 3: Allow Cookies

Select the Allow all cookies option from the menu and exit your settings. You can also disable them by selecting the appropriate option from the list, or you can customize which websites should be allowed to generate cookies and which should not.


“C is For Cookie, That’s Good Enough For Me!”

Cookies are what allow you to save your passwords and usernames for various websites and accounts. They also try to make sure that you see ads that will be of interest to you based on the sites you tend to browse. Overall, they have tremendous advantages and are pretty useful to keep active, but they can also become rather annoying as they can increase the number of notifications you receive from Chrome.

How to Make Sims 4 CC in 2 Easy Ways

The Sims 4 has come a long way on Windows and Mac, expanding with new DLCs and game packs that are loaded with official content.

However, there are gamers that have a skill in developing new clothes, items, and furniture as mods that you can install. If you want to join the club and boast the same capabilities, take a look below!

Today, we’ll explain how you can make Sims 4 CC (custom content) to sell or hand freely to your friends.

How to Make Sims 4 CC

There are two platforms that are popular for creating The Sims 4 CC.

You may need other image editors such as Adobe Photoshop. However, these programs set the stage for setting out the dimensions and textures, as well as compressing them for the game.

Method 1: The Sims 4 Studio

The Sims 4 Studio is one of the most popular methods of making custom content. You can select several options in the main menu, such as:

  • Animations
  • Item builds
  • Objects
  • CAS. 

Once you select what you want to create, the studio will ask you to choose a type and name the file. It has an intuitive interface that makes the entire process easy to use.

You’ll then save the final edited item in a package file, which you’ll load in your The Sims 4 Mods folder to see how it looks in the game.

Method 2: TSR Workshop

TSR Workshop is another reputed developer for The Sims 4 CC. You aren’t restricted in the item types you want to design, and you can even add new appliances and furniture not listed in any of the official categories.

What makes this studio stand out is that there’s a 3D viewer. This means that you can see how it will look in the game. There’s also a Geostates editor with which you can arrange how items in an object look, such as the placement of books in a bookrack.

Crafting your own simulation mods

You now have the power to go forth and create your own The Sims 4 CC.

Be creative and show the world your inventive capabilities. You can also check out our guide on how to install mods in The Sims 4 once you are done crafting objects.

Loop Hero Tips – Top 3

Loop Hero is a unique game, and although it seems simple enough, it can be a rather difficult game to understand in the beginning. Unlike many newer games, Loop Hero doesn’t explain itself. This leaves the player to explore and discover the best ways to play the game for themselves.

If you are thinking of starting Loop Hero, or if you are stuck, we will be sharing some tips and tricks to help you through the beginner stages of the game.

Loop Hero Tips

Below we will go over a few tips to help you navigate the start of your Loop Hero game. Whether you are a beginner or if you’ve been playing already, you should find some helpful advice to make the game more enjoyable. 

Tip 1: Stats to Focus on Different Classes

There are three different heroes classes in Loop Hero. These classes are Warrior, Rogue, and Necromancer. As in other games, these classes all have different stats, strengths, and weaknesses. Here are the stats you should focus on based on the hero chosen.

  • Warrior: focus on HP (Health Points) and HP regeneration.
  • Rogue: focus on attack speed, evasion and improve your chances for critical hits.
  • Necromancer: focus on your maximum Magic HP, maximum skeletons, and attack speed.

Tip 2: Double-Check the Gear You Choose to Use

In this game, there are times where you may get higher-level gear. And, of course, your first instinct would be to swap it out for lesser leveled gear immediately. However, be careful, as sometimes the higher-level gear may not have the best effects on your game. Consider all the stats carefully before making a decision.

Tip 3: Learn About Synergizing Tiles

There are a lot of secret tiles waiting to be discovered. When placing new tiles, they all behave differently based on where you place them. For example, when placing a meadow next to another different tile (not another meadow), you will get a blooming meadow, which gives more HP than a regular meadow.

Can You Survive the Loop?

The above tips should help you to get started and survive longer in Loop Hero. Why not try surviving the loop now.

How to Play Rust: Tutorial With the Best Tips and Tricks

Rust can sometimes be intimidating for new players because you might be playing against much more experienced players who will most certainly try to kill you. There are a few strategies you can try to survive longer in these competitive servers. Such as making friends, being communicative, and choosing a server that is set up for beginners.

The multiplayer aspect of Rust is what defines the game, and without it can become quite dull. However, if you want some time to hone your skills, gather blueprints, and explore without other players’ threats, there is a way to do this as a single player. You need to set up your own server that only you have access to.

Bear in mind that creating a private server is the only way to play Rust solo. And since you have to create a server, you are not able to play Rust offline. 

What Is Rust?

Rust is a massive online multiplayer survival game available on Steam. Being a Steam game, Rust is available on both Mac and Windows computers. The game’s goal is survival, and to survive, you’ll need to gather resources like cloth and stone. You can also explore many different areas, such as abandoned cities, wild landscapes, and caves.

You might also need to make friends and allies in the game. Since the multiplayer aspect of this game is so big, it isn’t easy to do well without some help from your friends.

How to Play Rust?

Rust is an online game. As such, you will need to create or join a server to play the game. You can create your own server, which might be useful in the beginning to gain experience without a newbie target on your back. However, playing on your server might become boring, which is why you can also join other servers that have more players to keep things interesting.

It is good to note that there are quite a few beginner-friendly servers that are an excellent place to start. When just beginning in Rust, it is recommended that you collect as many resources as possible to start building your base with a sleeping bag so that you have a respawn point.

Rust tutorial for beginners

While you have a better idea of how to play Rust, the game can still be daunting for beginners. Here’s a quick tutorial on how to get started.

Step 1: Download Dedicated Server

You need to download the dedicated server utility from the official Rust website.

Step 2: Extract and Run Server Utility

Once downloaded, you need to extract the server utility. Then you need to run the “Run_DS.bat” executable and wait for it to install on your system.

Step 3: Open the Game

Open Rust on your computer.

Step 4: Open Command Console

Press F1 to open the command console and then type in: client.connect localhost:28015.

Step 5: Run Command

Run the command and wait for your game to start.

Rust Tips and Tricks

Have you started playing Rust but need some extra tips? Here are some of our favorite Rust tips and tricks to get started. With these, you’ll, hopefully, last your first day in Rust.

Carefully Choose Your Server

When starting Rust, you may be tempted to join a busy server with lots of players. After all, that should mean there’s more going on. However, if you are a beginner in Rust, we highly recommend thinking hard about the server you choose.

Going with a newer server with slightly fewer players will give you a better opportunity to gain some experience without defending yourself from the more experienced players looking for soft targets.

Start Gathering Resources

When you are first dropped into the game, you only have a torch and a rock. Using the rock, you need to start gathering resources to craft other items. An essential resource at the beginning of the game is wood. Wood and stone will be critical components in many of your first creations.

Wood can be gathered by hitting a tree with a rock and eventually an ax. The same goes for rock. However, not all stones are minable, so look for giant boulders with a shiny reflection.

Make the Essentials First

You may be tempted to just start crafting anything you can. However, there are a few essential items that you need to focus on first. These items are a hammer, a tool cupboard, a sleeping bag, a building plan, a wooden door, and a key lock. Once you have these basics, you can scout for a safe place to build your first base.

When choosing a location for your first base, a few things to remember is to make sure it is out of the way and hidden from other players but still close to resources and other points of interest.

Upgrade Your Base

Don’t think that once you’ve built your first base, that’s it. You have to regularly update and improve your base to keep you protected from increasingly strong enemies. Once you have enough stone acquired, you can use the hammer to upgrade your wooden base to a stone one. 

Start Exploring

Once you have a basic shelter and a few basic tools, you can start exploring the world around you. Don’t engage with enemies immediately and try to remain undetected for as long as possible. Only once you’ve gained some experience and have crafted armor and weapons should you consider engaging with enemies.

More Guides to Playing Rust

If you need some more help getting started with Rust, here are a few more helpful guides.

Enjoy the Serenity

Now you can enjoy the peace and quiet of the Rust world without other players. This is great if you are just starting with the game and need a chance to grow your experience and resources.

If you enjoy playing Rust, you should also look at Ark: Survival Evolved and any of the Fallout games.