How to Script on Roblox in 5 Simple Steps

Roblox is a popular online game where you play games with other players or make your own games. Once you have made your own Roblox game, you can upload it to the community for other players to enjoy.

Figuring out how to script on Roblox is another way that you can make your game better. Roblox has taken many steps to make it easy to make your own game, and that includes scripting. As long as you start slowly and carefully, it isn’t too hard to use scripting to make your games even better.

Roblox APK Download it
9

How to Script on Roblox

We will look at how you can go about accessing scripts in Roblox Studio for beginners. This is legal to do and you won’t get banned as long as you act responsibly.

Step 1: Open Roblox Studio on Your Computer

Open Roblox Studio and log in to your account.

Step 2: In the Explore Menu, Go to ServerScriptService

In the ‘Explore’ menu, scroll down to ‘ServerScriptService’. There should be a blue + sign next to it.

Step 3: Click on the ‘+’ Sign

Click on the ‘+’ sign and right-click on ‘Script’.

Step 4: Rename the Script

Now you need to rename the script to something like ‘Practice Script’. Make sure your name is clear so that you can remember what it does. We are using ‘Practice Script’ as an example.

Step 5: Script Editor Will Open

Whenever you open a new script, the Script Editor will automatically open. This is the platform where you will type in your code.

Let Your Imagination Run Free

Now that you know how to script, all that is left is for you to get started. Let your imagination go and create a fantastic new Roblox game for other players to enjoy. Learning to code in Roblox can be a great goal for 2021.

How to Type in Adobe Reader in 7 Simple Steps

Adobe Reader remains at the forefront when it comes to managing pdf (portable document format) files on Windows, Android, iPhone, and Mac. When it comes to a pdf document, the base content such as the text and images cannot be altered. Adobe Reader is equipped with tools to help you to add text and signatures, highlight text, and much more. It didn’t take us long to work out how to type in Adobe Reader, which we’ll share with you today.

How to Type in Adobe Reader

Below we share the steps on how to use Adobe Acrobat to add text to your document.

Step 1: Open Adobe Reader

Open your version of Adobe Acrobat or Adobe Reader DC on your computer.

Step 2: Click on Tools

Click on the ‘Tools’ tab at the top of the window.

Step 3: Click ‘Fill and Sign’

Click on ‘Fill and Sign’. A pencil icon represents it.

Step 4: Select Your Pdf

Select the pdf that you want to add text to.

Step 5: Confirm Your Selection

Confirm that you want to fill and sign this document.

Step 6: Click the AB Icon

Click on the blue AB icon in the toolbar just above the pdf.

Step 7: Click the Area Where You Want to Type

Click on the area in the document where you want to type, a text box will appear. You can adjust the text’s size by clicking on the smaller or larger A in the toolbar underneath your textbox.

Type to your heart’s content!

Now you can easily add text, get signatures, or complete forms that are in pdf format.

No Size Limits: Send Your Large Files with this Unique Tool

One of the trends we’ve been noticing here at Softonic is that software makers are beginning to bundle more and more features into their offerings. So a piece of antivirus software might also offer optimization services, and VPN software could come bundled with anti-ransomware protection. For the most part, this has been good news for consumers, who wind up getting a lot more functionality for their money. However, what if you only need a program to do one thing and do it perfectly? Could that actually save you money? That’s the thinking behind the newly released FileWhopper, a service that does one thing really well: securely transfer large files from point A to point B. 

Pay-As-You-go Savings

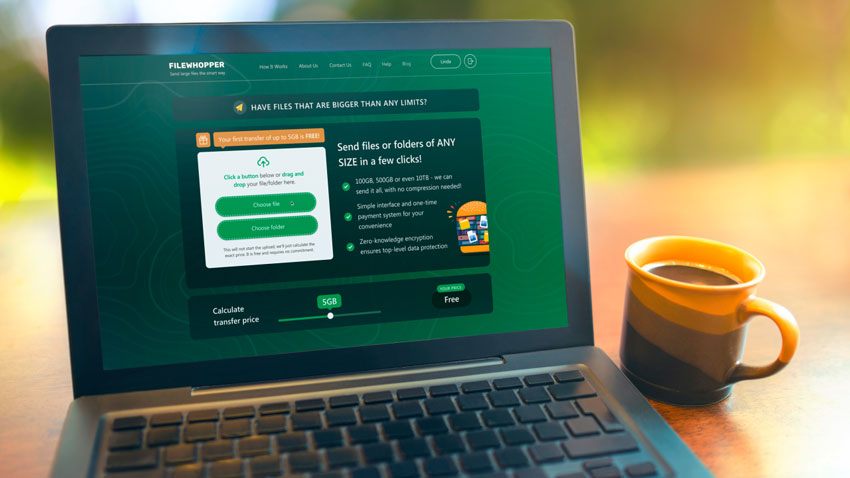
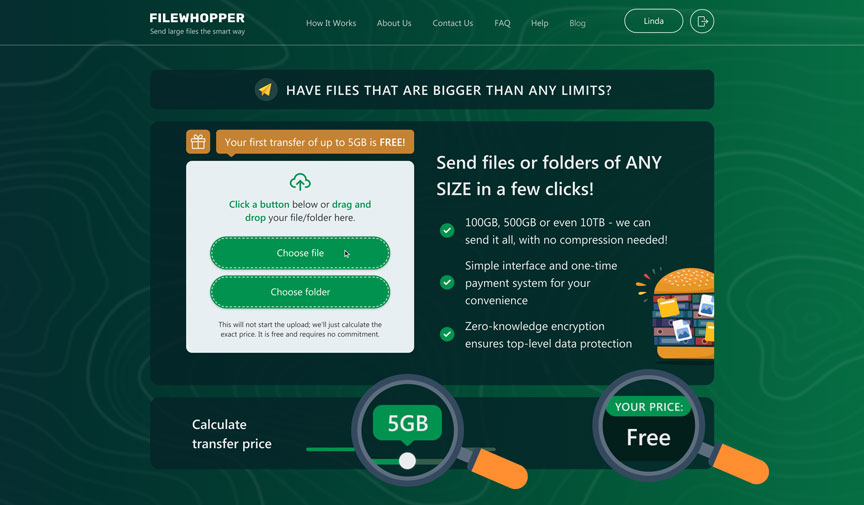
FileWhopper is bucking another industry trend as well: the monthly or annual subscription model. Instead of charging your credit card every 30 days or asking you to commit to the service for a full year, the company allows you to pay each time you transfer files. The best part? Your first file or folder up to 5 GB can be sent and received completely free. After that, the service calculates the cost you’ll pay based on the file size. Before you get started, you head to FileWhopper’s website where you can drag a handy slide indicating the size of the file you want to send and see the price on the screen instantly. There are no hidden charges – what you see is what you pay. A 10 GB file, for example, costs just $1.99, while a 50 GB file would run you $9.99. 

Unique Self-Deleting App

Another standout feature offered by FileWhopper is the fact that each time you want to send a file, you need to download the company’s app and use it to complete your transfer(s). Once you are done sending files, the app deletes itself from your computer, freeing up system resources.

But a cleaner hard drive isn’t the only reason FileWhopper uses a self-deleting app to handle transfers. According to the company, there simply is no way to send files fast enough and securely enough using any browser. The FileWhopper app uses multi-thread data transfer technology that works in the background, letting you continue doing other tasks as your file gets processed.

Safety First

Finally, FileWhopper offers users enhanced security protocols on all transfers. When you begin your file upload, the system generates a unique password (or it lets you choose your own) which is not stored on FileWhopper’s servers. The file you transfer is automatically encrypted and a transfer ID is generated to identify it, meaning that the actual name of the file is also not stored on the server. As only the file is being started uploading, all you need to do is share the custom link and password with the recipient who can then download it when ready. Recipients have up to 14 days to download a file after which time it is deleted from FileWhopper’s servers, so there’s no headache to find and delete the files which are already downloaded and not needed anymore.

Add-Ons

While FileWhopper works easily, quickly, and exceedingly well in its base form, the company has also built in certain add ons that can come in handy – especially for power uses. You have the option to add an additional 14 days of file storage (for a total of 28) or five additional downloads (or both) for just $.99 each, or you can purchase something called file insurance for $1.99 which ensures that your file is stored for 90 days and can be downloaded up to three times. This adds the storage benefits of some of the online cloud services like Google Drive while also keeping your information safe thanks to the fact that your files are not stored indefinitely. It also provides you even more flexibility in terms of paying only for the services you need and not having to fund those you don’t. It’s a true win-win.

How to Use MyHeritage Deep Photos to Animate Old Pictures in 3 Easy Steps

Have you ever wanted to alter pictures from the past to make them look more lively? Fortunately, you can use MyHeritage Deep Photos to animate old photos from PC, Android, and iPhone with some exciting effects. We had so much fun taking our childhood images from the 80’s and giving them new life, and we know you’ll have a good chuckle, too.

MyHeritage Deep Photos Visit the website
8

How to use MyHeritage Deep Photos to animate old pictures

After you download and install MyHeritage, you’ll need to follow a few basic steps to get started. We promise that there’s nothing complicated about it, and you’ll be animating images in no time.

Step 1: Sign up for an account

Firstly, you’ll need a free account before you can use the MyHeritage app. Once it loads on your screen, it will prompt you to insert your email address, user name, and password. You’ll also need to confirm the email with a link.

Step 2: Upload a photo

Before you can animate an image, you need to upload it. You’ll need to scan it into your computer or take a pic with your mobile device. Ensure that the photo is crisp and clear so that the A.I. has an easier job creating the movements and effects for you.

Step 3: Animate the image

Now the fun begins. Tap the image where you would like the animation to occur, and then select the icon at the top. You may have to wait a few seconds or minutes for the A.I. to complete the animation. You can complete this step a few times until you find the effect that works the best.

Bring the past back to the present

We’re sure many of you will have an enjoyable experience animating your grandparents’ images from your old photo albums. Instead of letting them gather more dust, it’s time to bring some life back into them. Feel free to also share the effects with your friends on Instagram, Facebook, and Twitter.

How to Trade in Roblox in 4 Simple Steps

Roblox is a world-building game, similar to Minecraft. Its limitless potential has pulled thousands of players since its release in 2006, and it still carries a large, dedicated player base. While the game itself is fun and easy to understand, there are a few things in Roblox that have confused and baffled people for over ten years, such as the censorship of numbers or how to trade items in Roblox

Trading has always been a big part of online games; many people make their money in-game by farming or crafting rare cosmetics and selling them for an astronomical amount of in-game currency. Trading is part of the lifeblood of any game, which is why we’ll show you how to trade in Roblox with this guide.

Roblox (Android) Download it
9

How to trade in Roblox

Luckily, this process is quite simple but it can take a while. Let’s jump in and see what we’re dealing with!

Step 1: Sign up for Premium membership

You’ll need to be a Premium member of Roblox to trade. If you already have Premium, then feel free to skip this step. If you don’t, then select the Premium option in the Roblox shop and choose the plan that works for you. Follow the prompts to activate your Premium. You should also note that you can only trade items listed as Limited; these can be purchased in the Avatar Shop.

Step 2: Find a player to trade with

Now that you’ve got your Premium set up and your Limited collectibles ready to trade, you’ll need to type the name of the player that you want to trade with into the search bar. Once you’ve found them, then click on their account to bring up their profile.

Step 3: Select ‘Trade Items’

On the right-hand side of their profile name, you’ll see three dots. Click this and select Trade Items from the dropdown menu.

Step 4: Select items to trade

You’ll now see the trade screen. Select the item/s that you want to trade and then scroll down until you see the Make Offer button. Click it, and now you need to wait for the other person to either accept, counter or decline your trade request.

Trading your life away

While this may not be the most obvious process, it’s effortless once you’ve figured it out. Now you can be a proper upstanding member of the Roblox community who contributes to the economy in the best way possible.

How to Sign Out of Netflix in 4 Simple Steps

Why do you even have to know how to sign out of Netflix? Logging out of your Netflix account isn’t necessary if you’re logged in on your own device. It may be needed for specific situations, though.

Maybe you have to switch devices to Windows, Mac, Android, or iPhone. Or you logged in on a public computer that other people use? Or perhaps you logged into your Netflix account on a friend’s Smart TV, and now need to log out?

How to sign out of Netflix

Let’s look at how easy it is to log out of Netflix on one device, including your Smart TV and mobile devices.

Step1: Open Netflix

Open your Netflix on your tv, computer, or mobile device. You can do this by going into the app or visiting the website on your computer.

Step 2: Go to the Menu and click on ‘settings’.

Navigate to the menu, usually on your left side, and click on ‘Settings’ or the gear icon.

Step 3: Sign out

An option to sign out will appear; click on it.

Step 4: Confirm your sign out

Click on ‘Yes’ to confirm you want to sign out.

Finding the exit

You will be signed out instantly. Now you are free to sign up or in on another device when you want to watch Netflix again. 

How to Sign up for Netflix in 4 Easy Steps

Netflix is a popular streaming service that offers a wide range of award-winning movies, documentaries, and tv shows, available on Windows, Mac, iOS, and Android.

Netflix offers exciting content to all new subscribers. It is also effortless to downgrade, upgrade or cancel your plan at any time.

How to Sign up for Netflix

Let’s take a look at how easy it is to sign up for Netflix with a free trial month.

Step 1: On the app or website, click ‘start your free month.’

If the app is not already installed, download it first. Once you open the app or visit the website, click on ‘Start Your Free Month.’

Step 2: Select your plan

The basic plan lets you watch on one device. The standard plan grants you access to view on two devices. Then there is the premium plan that allows up to four devices.

Step 3: Create your Netflix account

Input your email and a password to create a Netflix account.

Step 4: Enter your payment details.

You can’t sign up without a credit/ debit card.

Enjoy streaming your favorite shows

Now grab your favorite snacks, cuddle up and enjoy the award-winning entertainment on your new Netflix account. If you want to add devices, you’ll need to first sign out of Netflix from the other linked ones.

How to Change Minecraft Username in 3 Simple Steps

You may be having loads of fun in Minecraft crafting new homes, obtaining honey, or taming cats. However, that username ‘sexybillyfunkybob2045’ isn’t working for you anymore. Working out how to change your Minecraft username can be challenging, as the game doesn’t permit you to do it in the settings.

How to Change Minecraft Username

The only way to change your Minecraft username is by accessing the account settings on the internet. We’ll show you the shortest route here below.

Step 1: Sign into your Mojang account

Firstly, head to the website that provides access to your Mojang account. You’ll need to log in with your details or migrate your old account to the new version.

Step 2: Access your profile name

Once you’re in your account, look around at the Minecraft Services page for the ‘Profile Name’ option.

Step 3: Change your Minecraft username

To the right of the ‘Profile Name’ option is the ‘Change’ button. Click on it and insert the new name you want. The system will check the availability first before you can save it.

What’s in a name?

Are you happier now that you have a better name? Keep in mind that you can’t change the username again for the next 30 days. So, if you changed it for a new girl you fell in love with, you better make sure the feelings last for at least a month.

How To Clear History on Chrome in 6 Simple Steps

We all love the convenience of having world-class information available at our fingertips. Chrome is one of many superb browsers you use daily to browse the Web and find whatever you need. You can download Chrome free and fast for Android, iPhone, Windows, and Mac.

If you’re the ‘60s or ‘70s baby, you indeed have more awe for technology than most. Understanding what a paper-search entailed is lost to millennials and beyond. That said, it was easier to erase any trace of your research when all you had to do was close the pages of a book. 

You should leave some online searches in the past, never to be seen again. Yes, we agree. But it’s not the only reason you should learn how to clear history on Chrome. It also benefits your device security, and it clears up loads of space on your hard drive.

How To Clear History on Chrome

Fortunately, you can do it in a few quick steps.

Step 1: Open Chrome

You can follow the same steps on PC and mobile. Open your Chrome on whatever device you want to clear the search history.

Step 2: Click on the ‘More’ button

The ‘More’ button is in the top right corner of your screen.

Step 3: Go to History

Click on the ‘History’ button > ‘History.’

Step 4: Clear data

Now you can navigate to the left and select the ‘Clear Browsing data’ option.


Step 5: Select what to delete

You can select how much space you want to clear up by choosing precisely what you want to delete from the history. You can tick every box that you prefer Chrome to clear. Remember also to tick ‘browsing history’ here.

Step 6: Finish clearing

You can finish the action by clicking on ‘Clear data.’

Gone in a flash!

Just like that your search history is cleared, and you can enjoy a fresh start to building up a search history again.

How to Make a Fence in Minecraft in 3 Fast Steps

So, you’ve built your home, made your bed, tamed a few cats and horses, and started collecting some honey. Life’s good, yes? What about those monsters at night threatening your crops or chasing your pets away? You’ll need to learn how to make a fence in Minecraft if you want to protect all you’ve worked so hard to achieve.

Minecraft Read more
9

What you need before you start

Tools needed

1 x Crafting table

Materials needed

2 x Sticks

4 x Wood Blocks

Time estimation

Immediate

How to Make a Fence in Minecraft

Crafting fences is one of the easiest tasks you’ll perform in Minecraft. Sure, you can also run to the closest village and chop some to take home, but what’s the fun in that?

Step 1: Find some wood

Head out to the closest trees and start chopping them down. You need enough to make four blocks of wood planks and two sticks per fence. Remember, the fence type will depend on which trees you harvest.

Step 2: Prepare your resources

Now that you have your resources, go to your crafting table and start setting it up. You need two planks in the bottom of the left and right columns, with the sticks between them.

Step 3: Craft your fences

You have a choice of crafting each set of fences once, a few times, or all at once. Ensure that you press the appropriate button, as the final selection will use all available resources for the max amount.

Setting your de-Fences

Not only do fences look fantastic around your property, but they will keep your animals and crops in one place. Play around with different ideas, and don’t forget you can also make Nether fences for that extra touch.