How to Mute Zoom in 3 Easy Ways

By now, you would’ve probably heard Zoom mentioned a lot. Zoom offers users great video chat and conferencing capabilities. This means that no matter where in the world you are, you are still able to connect with people. Whether you’re meeting via a Windows computer, Mac, Android device or iPhone, you might want to mute your mic. Let’s show you how.

How to Mute Zoom

Let’s face it; there are times where you may want to mute your Zoom meeting without muting your computer. Consider that you are part of a meeting with multiple people. If all of those participants’ audio is on, there will be disturbances during the session and turning down the volume might not help.

Be aware that you will only be able to mute others if you are the meeting host. However, you can mute yourself regardless of whether you are the host or not.

Method 1: Mute Yourself

Click on the ‘Mute’ or blue microphone button at the bottom of your screen. Clicking on this button will mute only you. Clicking on the same button again will unmute you.
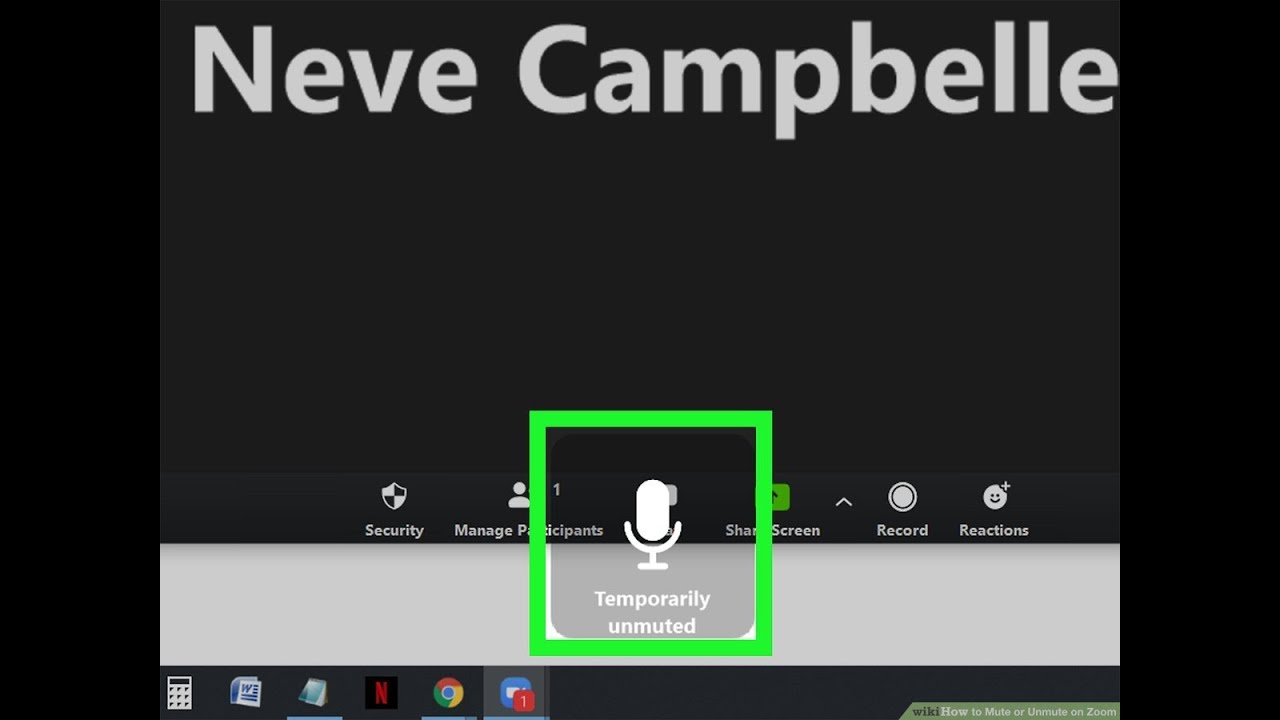
Method 2: Mute Another Participant

If using a computer as the host, hover over the participant at the top of the screen, click on the ‘Mute’ icon that appears blue. On your phone, tap on the participants’ section; this will open a list of all the participants. Tap on the person and select mute.
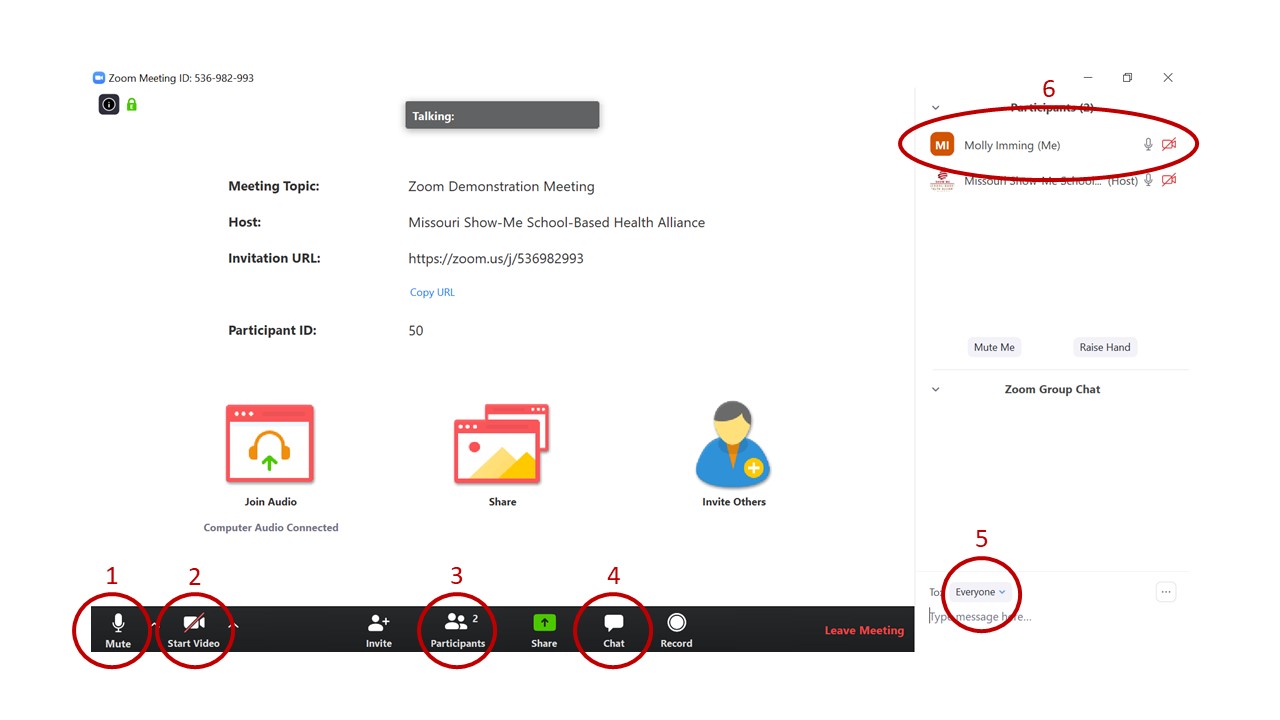
Method 3: Mute Everyone

On the computer, you as the host can click on ‘Manage Participants’ at the bottom of the screen. A new window showing all the participants will open to your screen’s right; from here, you can click on ‘Mute All’ at the bottom of this section. On the phone, you tap on the ‘Participants’ button again and right at the bottom of the list will be a ‘Mute All’ option. Tap on it to mute everyone.
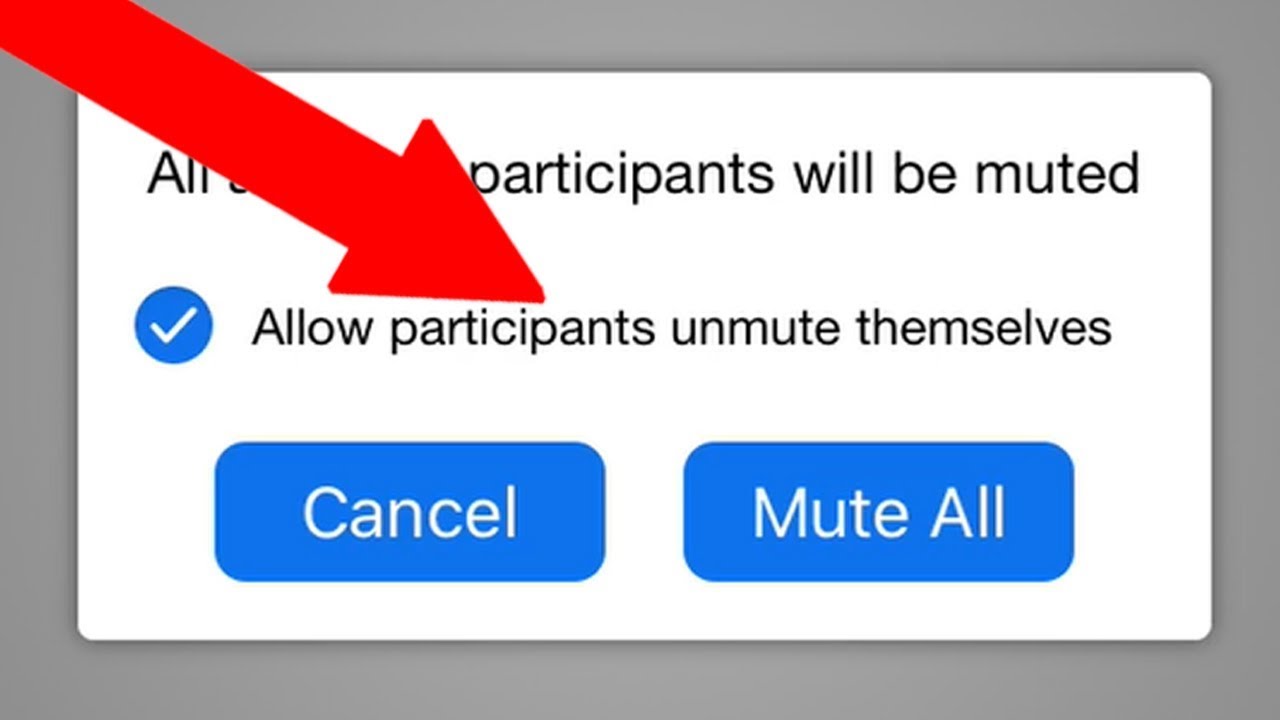
Conduct Meetings in Silence

As you can see, it is very straightforward to mute yourself or others in Zoom on the phone or computer. This can also be a handy function, especially if you are part of a big meeting, to enable you to hold the meeting without constant interruptions and distractions from other environmental noises. 

Zoom is popular because it is user-friendly and has different functions to help you make the most of your meetings. We have set up a helpful guide for those wanting to learn how to use Zoom more effectively.
How to Move Steam Games To Another Drive Without Redownloading Them in 5 Easy Steps

We all know the frustration of trying to install a Steam game and being greeted with that dreaded pop-up window saying that we’ve run out of space. This usually leads to a “Sophie’s Choice” type decision of which games get to stay and which ones need to be uninstalled, but there is another option. You can move your Steam Library and the installed games to another drive without needing to redownload anything. We’ll show you exactly how to achieve this in this guide.

How to Move Steam Games To Another Drive Without Redownloading Them

Step 1: Access settings

You’ll need to make a new Steam Library folder first before you can move any of your games. For this, click on Steam at the top of the screen, and then select Settings.

Step 2: Open Steam Library Folders

Now select Downloads from the menu on the left, and then click on the Steam Library Folders button.

Step 3: Add a new folder

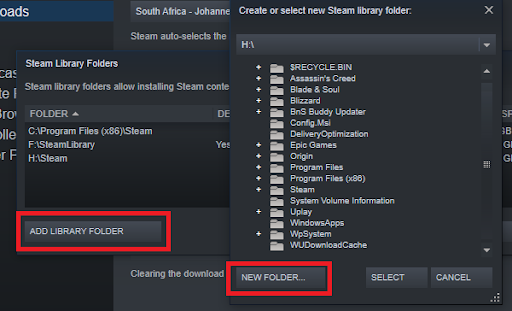
Click on the Add Library Folder button, browse to the drive and location where you want to put the new Steam folder, click on the New Folder button and name your folder.

Step 4: Open Properties

You’ve created the new Steam folder now, so close all of the Settings windows. Select the game that you want to move from your library, right-click on it and select Properties.

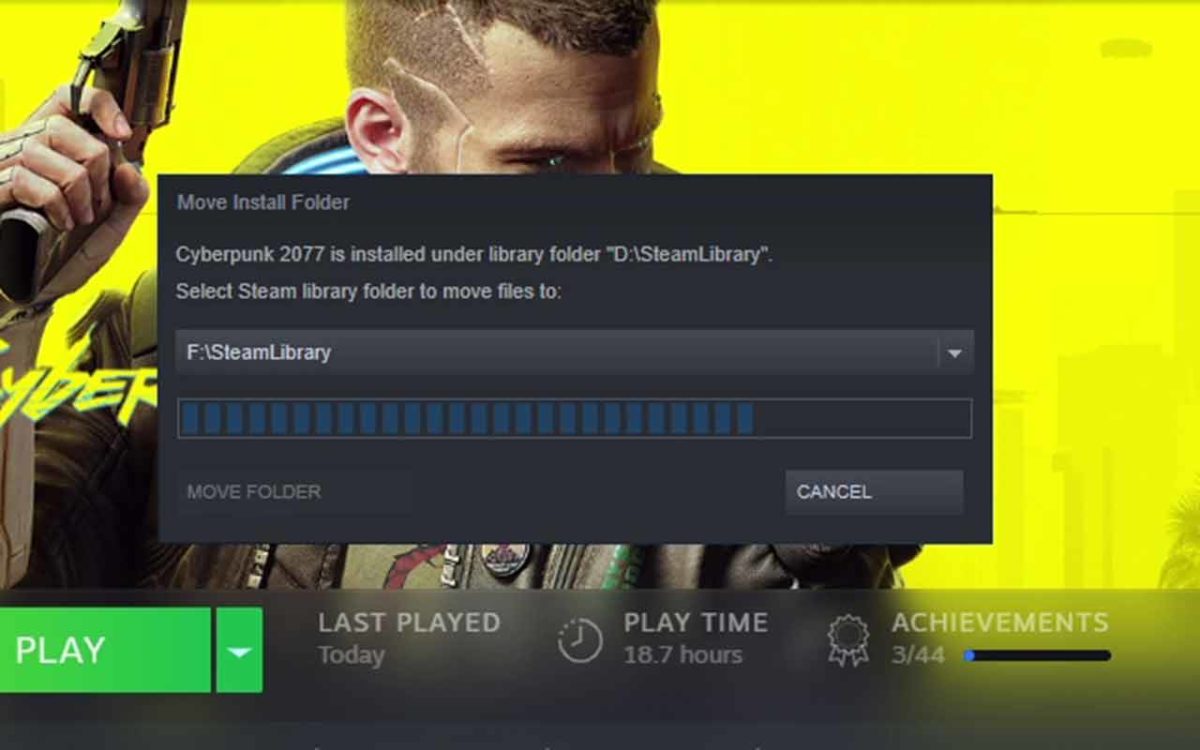
Step 5: Select Move Install Folder

Click on Local Files on the left-hand side, then select Move Install Folder. Browse to the new Steam folder, select it, and your game will be moved.

No Downloads, No Reinstalls!

Steam has been commended time and time again for its incredible functionality and exceptional quality of life settings, and this solution shows the validity of these reviews. In times past, we would have needed to reinstall the entire game from a disc and risk losing our saved games or redownload the game from scratch, which would take hours and also risk the loss of your saved games. Fortunately, Steam has addressed this effortlessly and reliably so you can carry on buying and installing games in blissful comfort.

How to Make Tickets on Microsoft Word in 3 Fast Steps

Microsoft Word is part of the Office package that assists you with word processing. Using Word, you can easily create a wide range of documents such as resumes, labels, instructional guides, and more. They also offer an extensive range of ticket templates and are adding to these regularly. 

There is a learning curve to using Microsoft Word to its full potential. There are also many keyboard shortcuts you can use to speed up the process of creating and designing new documents.

How to Make Tickets on Microsoft Word

Step 1: Launch Microsoft Word and Search for Tickets

Launch Microsoft Word, and in the search bar, type in ‘Tickets.’ This will then load all of the templates that Word has available for tickets. You can narrow down your search by being more specific, for example, searching for ‘Event Tickets.’ Decide which template you want to use.

Step 2: Change the Placeholder Text

You will see that there are some placeholder text boxes on the ticket. These will usually display text like ‘YOUR EVENT NAME HERE’ or ‘COMPANY NAME.’ Update these boxes with the relevant information for your event. If you want to add numbers to your tickets, the easiest way is to do a mail merge, where you have all the numbers listed in an Excel sheet.

Step 3: Add an Image

This can be the event logo or any other image to draw attention to the event. If the template you chose already has a picture, you can right-click on the image and then click on change picture from the dropdown list. Then you select the image you want to use. If the template does not have an existing image, you can simply insert one using the insert function at your screen’s top menu.

Step 4: Copy Ticket Over to Others

Now highlight the ticket you’ve just created and right-click and choose ‘Copy’ (or use the keyboard shortcut Ctrl+C). Then highlight the next ticket that still contains the generic template information and right-click and select ‘Paste’ (or use the keyboard shortcut Ctrl+V). Do this for all the tickets on the page.

Design and Create

Use these templates to your advantage and start making your event tickets from the comfort of your computer. There’s no reason you need to pay someone to do it for you with Microsoft Words’ extensive range of templates.

How to Merge Videos in VLC Media Player in 5 Fast Steps

One of VLC Media Player’s features enables you to merge multiple videos into one and, while this process can seem a bit complicated at first, it’s fast and efficient and will make you look like a media professional. So in this guide, we’ll walk you through the process of merging videos in VLC.

How to Merge Videos in VLC Media Player

You’ll need to make sure that the videos are all the same format and frame size; otherwise, the process won’t work. Also, note that this will work on the Windows and Mac versions of VLC but not on the iPhone and Android versions. 

Step 1: Rename video files

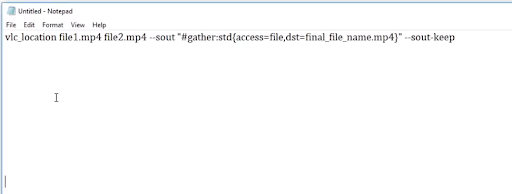
Rename your video files to “1.mp4”, “2.mp4”, and so on; this will make things easier later. Then open up your Notepad and paste the following script into it:

  • vlc_location 1.mp4 2.mp4 –sout “#gather​:std{access=file,dst=final_file_name.mp4}” –sout-keep

You’ll use this code whenever you merge videos using VLC.

Step 2: Change properties

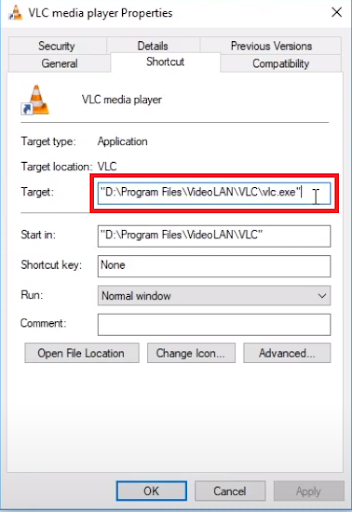
Now navigate to your VLC’s installation file, right-click on VLC and select Properties. Copy the Target field’s path location and paste it into your code, replacing the first part that says “vlc_location”.

Step 3: Alter code

Now take a look at the next part of the code, after the VLC location path and make sure that the file names are correct (if you used our naming convention, then they will be) and add names if you’re merging more than two videos.

Step 4: Edit file details

The last part of the code that you need to edit is the part after “file,dst=”. This will be the name of the merged video.

Step 5: Access Command Prompt

Now type cmd into the search bar in your file explorer and press Enter; this will open up your Command Prompt. Copy and paste the line of code from your Notepad into the Command Prompt and press Enter. This will run the process and merge the videos.

It’s All Coming Together

This may seem like a lengthy and complex process, but it’s pretty simple and will make your video editing experience much more straightforward. Now you can impress your colleagues with your insane editing skills, all while letting VLC do the work for you!

How to Edit Sims in The Sims 4 in 3 Easy Steps

Have you been playing The Sims 4 on Windows and Mac for a few months and want to edit your Sim? As you know, you can only alter them when you start the game, creating them for the first time. Or can you? There’s actually a way to do so long after the creation process, and we’re going to show you how.

How to Edit Sims in The Sims 4

The only method available to edit Sims on The Sims 4 after you’ve already started playing is by cheating. It’s called CAS mode, letting you make changes as you did during character creation before returning to your simulated life. You can alter your appearance, traits, and relationships as you wish.

Step 1: Open the cheat console

First, you’ll need to open the cheat console so you can put in the relevant codes. On PC, hold in control, shift, and C. You’ll see a white window appear on the top of the screen.

Step 2: Enable cheating 

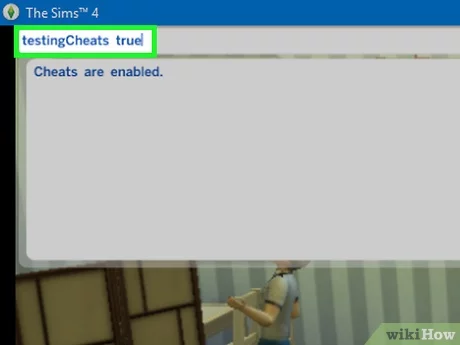
Next up, it’s time to enable cheats. Without this step, cheat codes won’t work and you’re wasting your simulated breath. The code you need is ‘testingcheats true’. You should see the message “Cheats are enabled” to prove that you’ve succeeded. 

Step 3: Edit your Sim in CAS mode

Finally, enter the code ‘cas.fulleditmode’ to enable the CAS mode. If you’re wondering why nothing is happening, it’s because you still need to hold shift and select a character. As soon as you click on one, your Sim will enter the edit mode that you’re familiar with. Now you can change your appearance and alter the traits that have been annoying you.

A change is as good as a holiday

Editing your Sim in The Sims 4 is a fun experience for many players. As a matter of fact, we’ve seen children spending hours merely creating characters for the purpose of dressing them and playing with different personalities. Now you can do the same if you have a Sim you’ve had for a while.

How to Make Smooth Stone in Minecraft in 3 Easy Steps

Crafting homes and fortresses is a fun hobby on Minecraft, whether you’re playing on Windows, Mac, or Android. We often enjoy creating wonderful walkways and castles from stone, as it brings that medieval flavor to the sandbox building game. However, you may want to try making smooth stone for that superior, polished look.

How to Make Smooth Stone in Minecraft

Smooth stone gives the block an extra gloss finish that makes the structure look more appealing and robust against mob attacks. There’s no fast way, 1-pony trick to make smooth stone in Minecraft, though. You’ll need to follow these steps.

Step 1: Collect cobblestone and coal

Your first step is to collect cobblestone, as we’ll transform this at a later stage. If you don’t have a furnace yet, you’ll need about eight cobblestone blocks to craft one, so keep this in mind. You should also look for any coal lying around, as we’ll need this for the fuel.

Step 2: Craft stone

You’ll receive one stone block for every cobblestone block you place in the furnace. The coal block should make a few stone blocks at a time, but you may need more if you plan on crafting in bulk. When the stone is done, you need to move it into your inventory.

Step 3: Craft smooth stone

Now that you have the ordinary stone that you chopped originally, it’s time to polish it into smooth stone. You’ll follow the same process as before, placing the stone back into the furnace and ensuring you still have coal remaining. When the process is complete, you’ll have a block of smooth stone to build with.

The Fortress of Stonitude

We love crafting smooth stone in Minecraft. As a matter of fact, we’ve made over 50 furnaces so that we could make them in bulk for faster bridge, tower, and castle construction. Using one furnace takes way too long, so this process is much more efficient. Of course, when you’re done building, there’s a small amount of fun using TNT to blow up all the furnace blocks afterwards.

How to Watch the IPL 2021 Cricket Season Live From Anywhere in 2 Easy Ways

The Indian Premier League has begun and the excitement is streaming worldwide for cricket fans to watch. The challenge is knowing the best ways to view the clash of the titans in this epic sports event, as not all countries have broadcasting plans in place. Don’t worry; we have two methods you can use so as not to miss the action.

How to Watch the IPL 2021 Cricket Season Live From Anywhere

Method 1: Live Streaming

The first option is watching a live stream of the IPL 2021 cricket season. While there are plenty of websites that offer this opportunity at a cost, not everyone can hang around a PC all day. We recommend using a mobile app to take the sports event with you wherever you go. Two applications worth looking at are Hotstar and JioTV.

Method 2: Virtual Private Network

There are applications and broadcasters that don’t permit certain countries to access their content. Even if you try to sign up to watch the IPL 2021 season, the region will geo-block you before you can create an account. Fortunately, there is a way around this called a virtual private network (VPN).

VPN providers like ExpressVPN have servers in numerous locations that hide your IP address and location while making it appear as if you’re residing in a different country.  They have fast streaming speeds with low buffering, while they won’t log your activities. Alternatives you can look into include CyberGhost, NordVPN, and Hotspot Shield.

Watch the cricket season live no matter where you are

In the modern age of technology, there’s no reason you have to miss the IPL cricket season this year. Tune in to the events every day to see who will come out on top, and make sure you check the calendar to view your favorite teams and matches.

How to Cast a Video to Your TV Using VLC and Chromecast in 3 Easy Steps

VLC Media Player is one of the most popular media players on the market, specifically for videos, because of its reliability and ability to play almost any format. One of the most recent features that the developers added to it is to cast a video playing in VLC to your SmartTV from another device. Considering that VLC runs on Windows, Mac, iPhone, and Android devices, this is quite a handy tool because you can cast from almost any device instantly. In this guide, we’ll show you how to set this up because the option can be a bit difficult to find.

How to Cast a Video to Your TV Using VLC and Chromecast

You will need to ensure that your TV and the device you’re playing the video on are connected to the same Wifi connection. Please also note that this tool is relatively new and can still be a bit erratic, but with a bit of patience and persistence, it will work.

Step 1: Configure VLC Media Player

First, start up your VLC player and click on Playback in the top menu. Then select Renderer from the dropdown menu; you’ll see that it will automatically scan for devices.

Step 2: Select TV

VLC might take a few minutes to pick up your TV but if it’s struggling, try disconnecting and reconnecting the device and the TV from the Wifi. When it works, your TV will pop up in the list, select it, and VLC will begin casting to your TV.

Step 3: Open video

Now click on Media in the top menu and select Open File from the dropdown. Navigate to the video that you want to play and double click it, it will begin playing on the TV, and you’ll be able to use the VLC controls on your device to control the video.

Going Live in 3… 2… 1!

This process will work on both Windows and Mac PCs and should allow for seamless streaming once the two devices are connected. There are many features and perks to using VLC over other media players, but this definitely ranks as one of the best because of its functionality. Not to mention the technological high you get from moving between screens with the mere press of a button.

How to Cheat in Sims 4 in 3 Easy Steps

Playing Sims 4 on Windows and Mac can become a tedious adventure, especially if you’re waiting for your characters to progress in their careers. The best items are expensive, and friends are challenging to make. Fortunately, you can use cheats to make your simulated life more enjoyable. 

How to Cheat in Sims 4

Whether you’re playing Sims 4 on PC, PlayStation, or Xbox, you can access the cheat console to insert specific codes for more simoleons or to change gameplay mechanics. There’s also a shift-click mode where you enter ‘testingcheats true’ and then clock on a character to adjust their behavior or moods. 

For now, let’s look at how to use cheat codes instead.

Step 1: Open the cheat console

Before you can start using Sims 4 cheats, you need to open the cheat console. This process includes holding specific buttons together on your keyboard or controller. Here’s a list of the relevant keys:

  • PC: Ctrl +Shift + C
  • Mac: Command + Shift + C
  • PlayStation: R1 + R2 + L1 + L2
  • Xbox: LB + LT + RB + RT

Step 2: Insert the cheat codes

With the cheat console open, the fun begins! There are so many cheat codes available, you can become rich and obtain items within seconds. One common cheat is receiving millions of simoleons, but you can also make all the plots free and move in without paying.

Step 3: Enjoy your cheats

Once you have entered the relevant code, you’ll instantly receive your rewards. If nothing has happened, there’s a chance that you didn’t insert the cheat code correctly. Remember to also enable cheats by typing ‘testingcheats true’ first. It permits all forms of cheating in Sims 4, no matter which platform you’re using.

Shortcut to riches

Who says life can’t be easy? Well, the simulated life anyway. You don’t need to struggle for months with a new character if you’ve already played the game several times. Plus, it’s a fun way to enjoy new DLC and Stuff Packs that have recently launched.

How to Make Adobe Reader the Default PDF Program on Mac in 4 Easy Steps

Why is it that both Microsoft and Apple refuse to acknowledge Adobe’s dominance in the PDF reader pool, whether on Windows PC, Android device, or iPhone? Both of these companies insist on installing their own PDF readers and making them the default program so that even after you’ve gone through the whole rigmarole of installing Adobe Reader, your PDFs still insist on opening with one of the other programs. Microsoft has made it relatively easy to change your default programs with pop-ups and simple settings, but many people find themselves confused with Apple. 

How to Make Adobe Reader the Default PDF Program on Mac

You will need to have Adobe installed on your Mac before you begin this process. When that installation is complete, then please continue with the guide.

Adobe Reader for Mac Download
9

Step 1: Select a PDF file

Startup your Finder and navigate to any PDF file.

Step 2: Click on ‘Get Info’

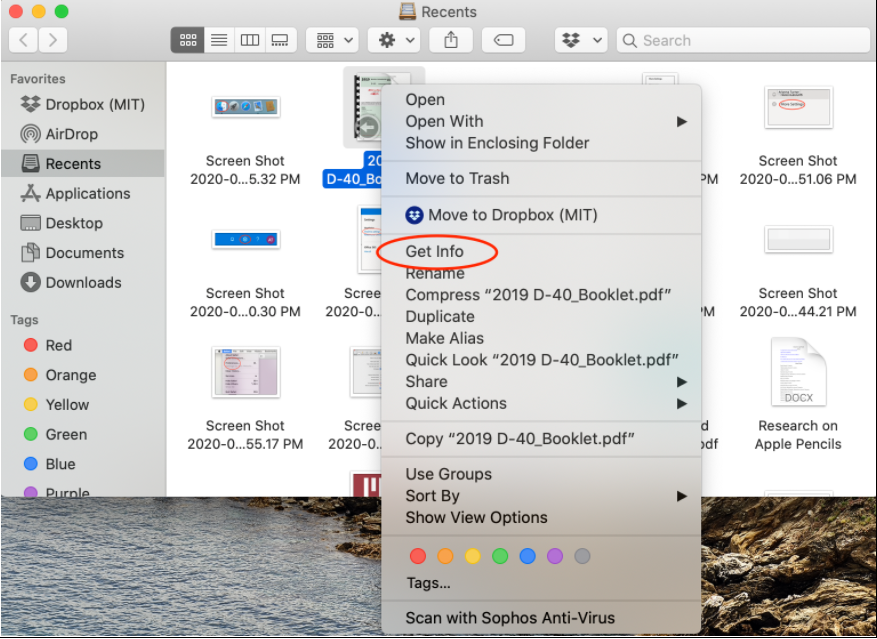
Ctrl+Click, or right-click if you’re using an external mouse, on the PDF and select Get Info from the menu.

Step 3: Open with Adobe Reader

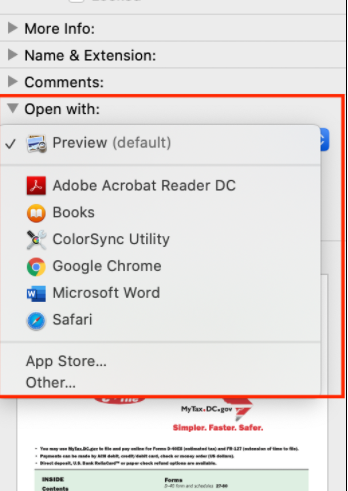
Click on the dropdown arrow in the Open With section of the menu that opens and select Adobe Reader from the list.

Step 4: Change the default PDF program

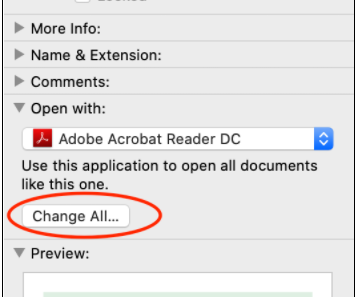
Finally, click on the Change All button just underneath the dropdown menu and select Continue from the box that pops up.

Making “Comfortable” Your Default Setting

Small things like this can be extremely frustrating; we all want our files to open in the correct programs automatically, and they often don’t. The beauty of this process is that it works for other programs as well; do you want to make sure that your videos open in VLC automatically or that your images open in Photoshop every time? Then this is the way you do that. Before you know it, you’ll have everything working with the correct programs, and you’ll be able to work comfortably and peacefully without manually opening everything in your preferred programs.