Instagram Tests Turning Public Likes Off and On

Instagram Empowers You To Decide Whether Or Not You Want Public Likes To Be Visible

Instagram has been testing the visibility of public post likes since 2019. Formerly, it removed the option completely so that no one could see how many people actually enjoyed seeing your images and reels. Facebook had also mentioned a similar test in the past, which changed some of the functionality.

Two years later, Instagram is now giving you the option to decide if you want others to see post likes. Furthermore, you can toggle viewing likes on other Instagram posts if it annoys you. In this way, users can focus more on the actual content and not how much of the public actually enjoyed it.

Of course, this method won’t stop people from posting merely to garner likes. What it will do is let content creators freely interact with its followers and partners without worrying about how much attention they get as opposed to other profiles. We’re looking forward to seeing if Instagram reveals the results after this new testing phase and what it means for the platform’s future.
How to Password Protect a PDF in Adobe Reader in 3 Easy Steps

Adobe Reader DC is free to download and use, although some functions are only available on the Pro version. Currently, Adobe Reader is available on Windows, Mac, Android devices, and iPhone.

The Acrobat software also provides you with tools to secure and protect your PDF documents. This means you can keep confidential information such as tax and medical information, payslips, and more secure. One of the simplest ways to do this is by activating password protect on your PDF. This way, only people with the password would be able to access the document.

Be aware that if you do not have Adobe Reader Pro, a paid-for version with all the functions available, you will have to use the online Adobe site to password protect your PDF.

How to Password Protect a PDF in Adobe Reader DC Pro

Step 1: Open Adobe Reader DC Pro and Your PDF

Open Adobe Reader Pro on your chosen device and open the PDF file you want to secure.

Step 2: Click on ‘Protect’ in the Sidebar

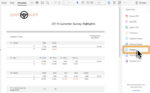
Click on the ‘Protect’ option in the right sidebar.

Step 3: Click on ‘Protect Using Password’

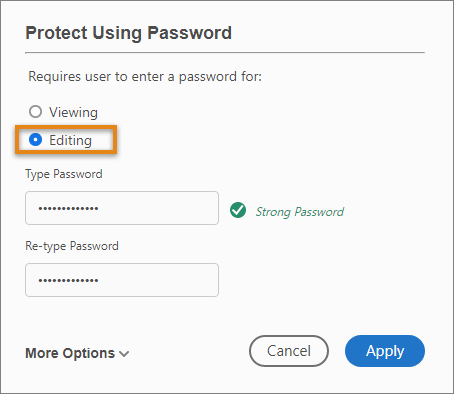
At the top of the screen, click on ‘Protect using Password’. Choose whether you want to lock the document so people cannot open it without the password or if you want to block edits. Then put in your chosen password and click on ‘Apply’ to finish.

How to Password Protect a PDF in Adobe Reader Online

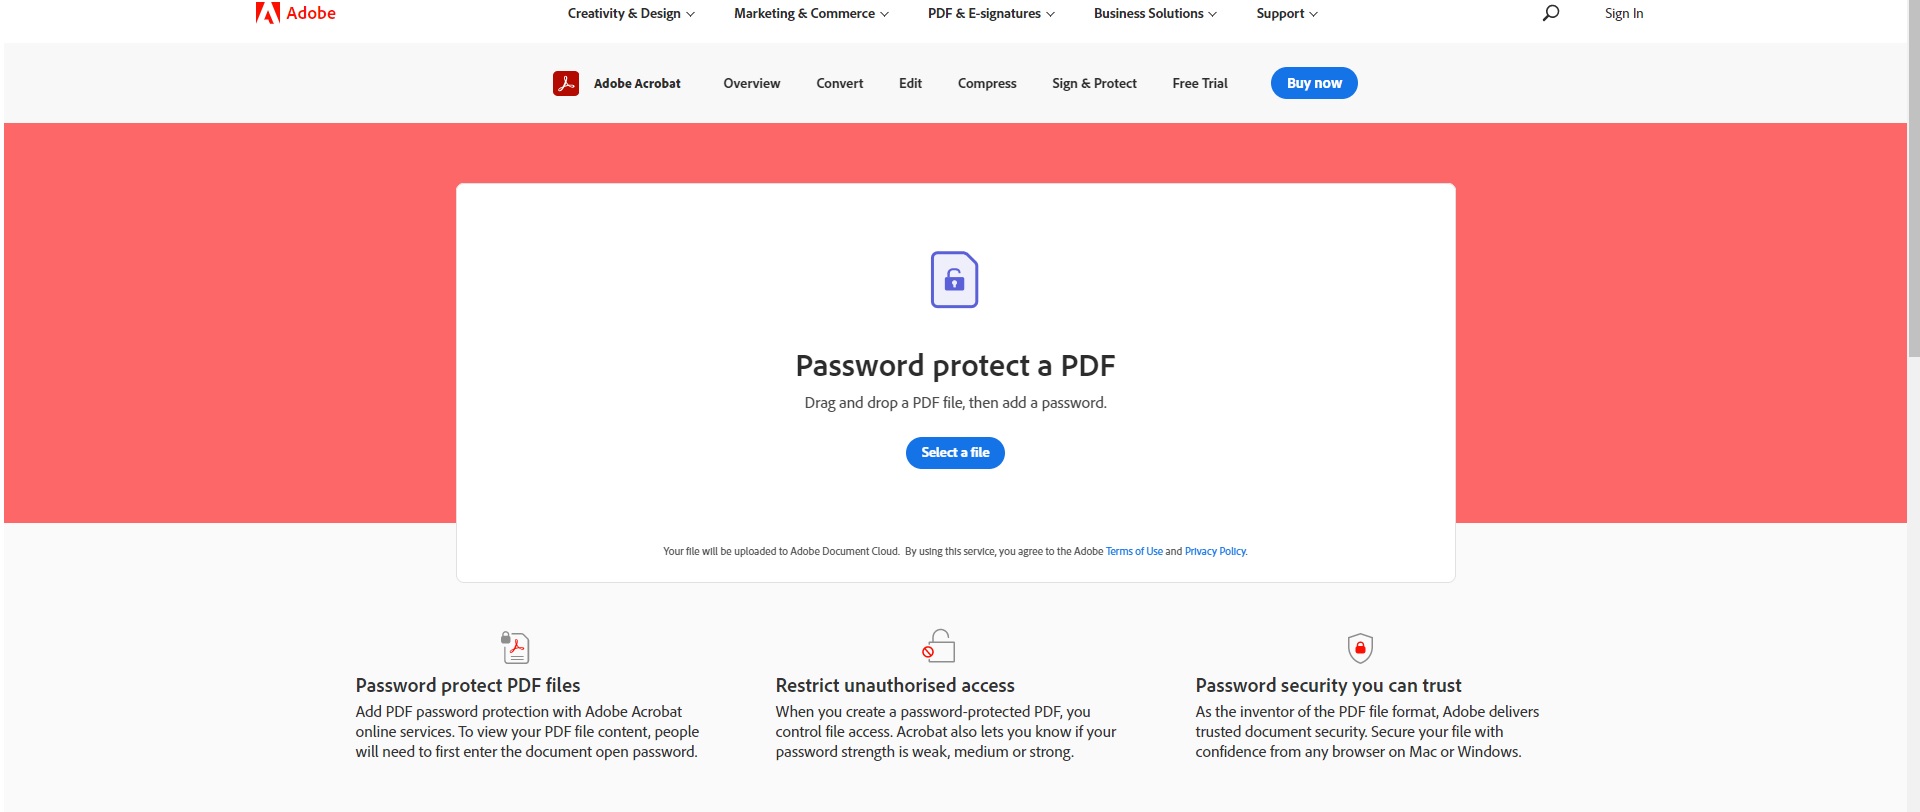
Step 1: Go to Adobe’s Site

Go to the Adobe site to use the free online services that include password protection.

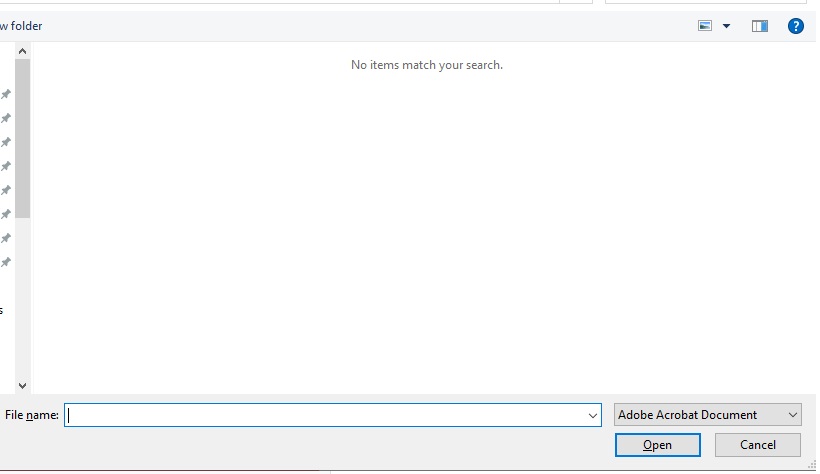
Step 2: Choose File

Choose the file that you want to password-protect.

Step 3: Set Password

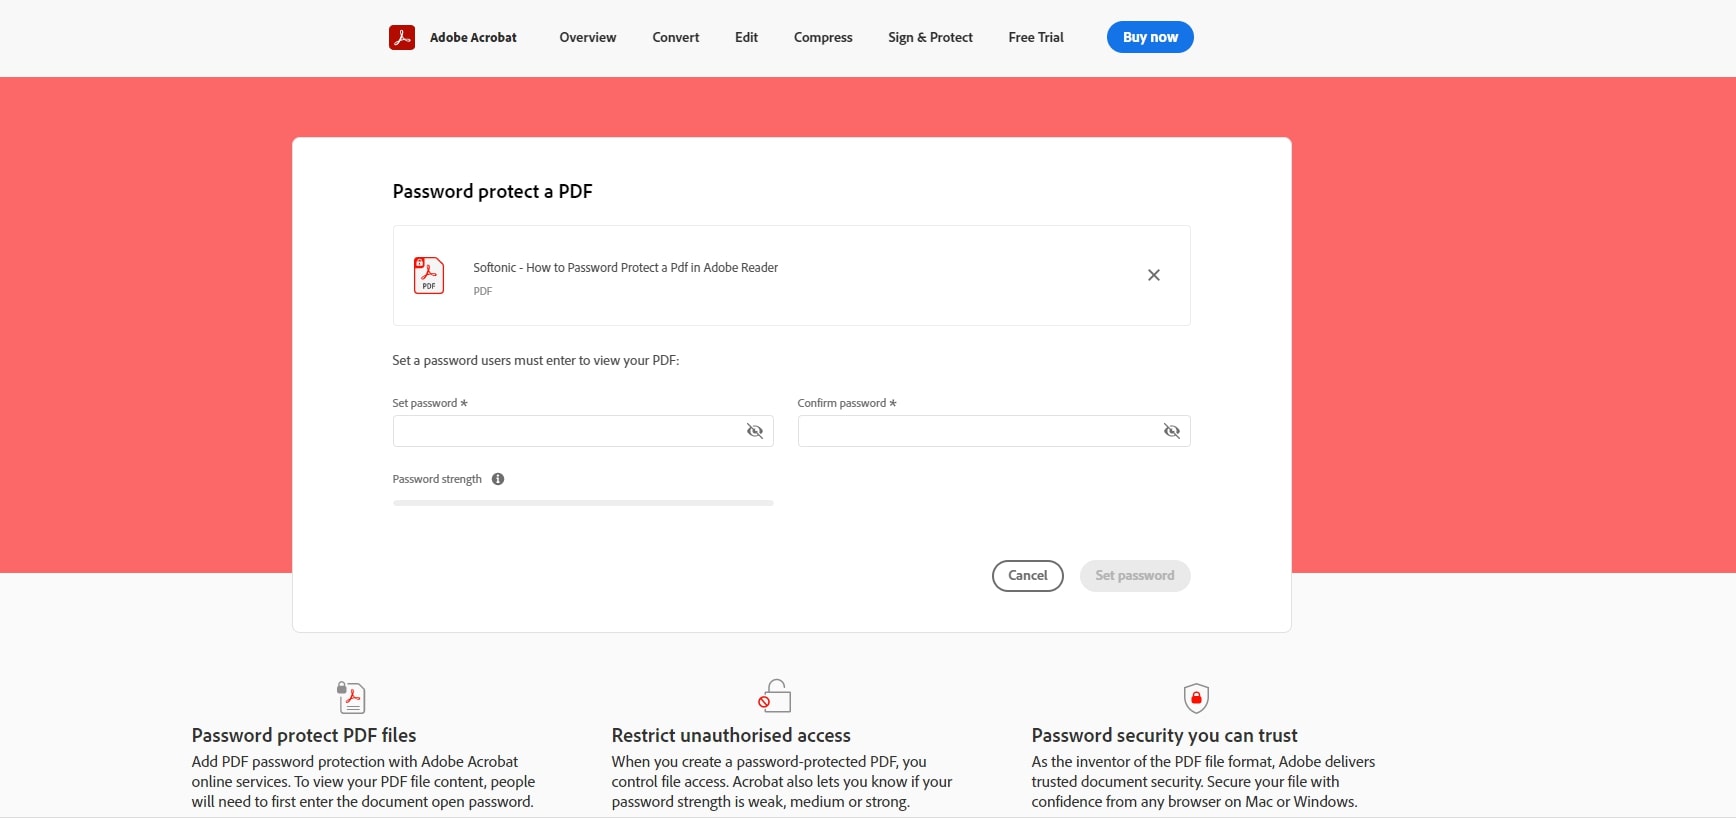
Enter and confirm your chosen password and set it.

Step 4: Download Password-Protected PDF

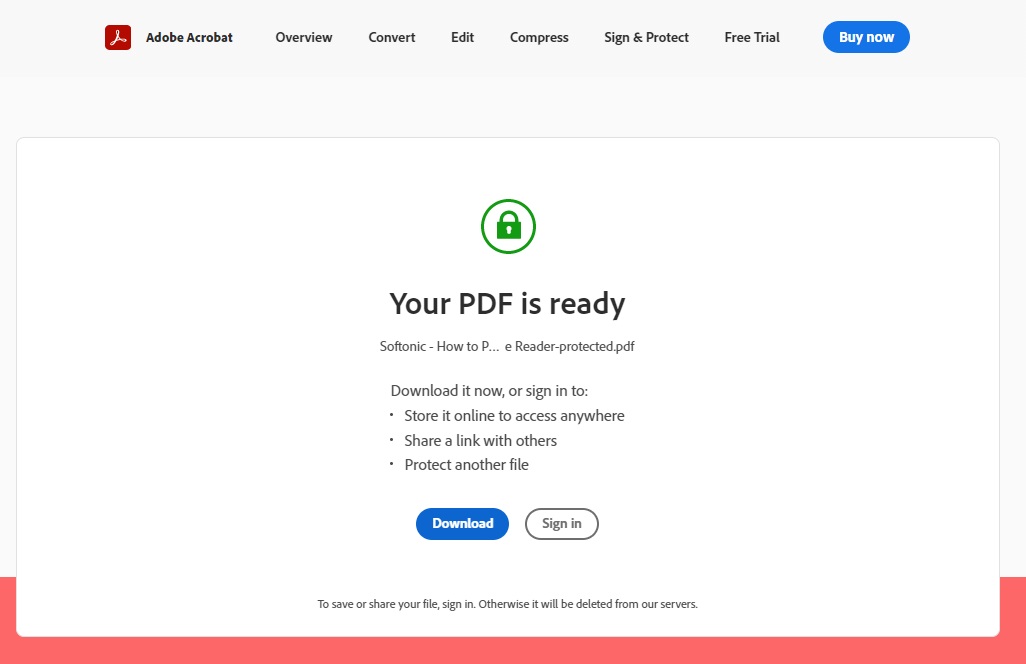
Now download your password-protected PDF.

Add More Security to Your Confidential Documents

As you can see, the process to protect your PDF with a password is easy to set up, and there’s a way of doing it for free. Use this option to keep your confidential documents safe and secure.

Spotify Launches In-car Voice Command “Car Thing”

Spotify’s new “Car Thing” Brings you News, Music, and Entertainment while you Drive

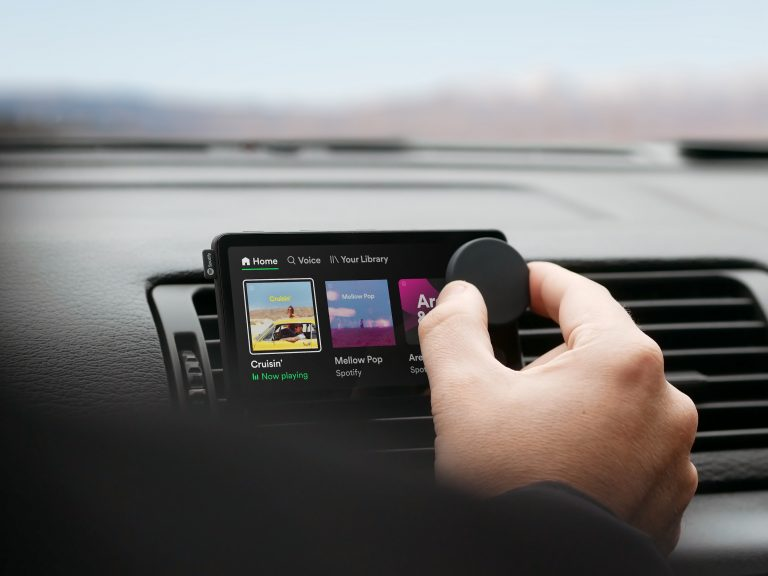
Spotify has recently launched a new hardware device that promises to make your daily road trips and errands more entertaining. Called “Car Thing”, you can tune into fun playlists like “Songs to Sing in the Car.” While no one will record you like in Carpool Karaoke, you can still enhance your driving experience in peak traffic.

At the moment, Car Thing has a limited release in the United States while the developer tests the launch’s success. You can manage settings and choose which media you want to listen to. It lets you listen to talk shows, news broadcasts, the latest sports updates, and so much more.

Car Thing testing began in 2019 when the concept first arose from the developers’ minds. Instead of listening to the daily news and music that your car’s radio provides, it gives you the power to decide what you want to hear. You can also use voice control to choose your playlist so that you don’t need to take your hands off the wheel. If you’re a Spotify Premium member, you have the opportunity to claim one for free.

How to Transfer Destiny 2 to Steam in 3 Easy Steps

Destiny 2 is available on Playstation 4, Xbox One as well as Steam. The game used to be available on Battle.net for computers, but after Bungie and Activision split, the game has been moved to Steam on Windows and Mac. You can also use the handy Steam Android app to download content related to Destiny 2 and other valuable tools.

Can I Still Transfer Destiny 2 to Steam?

You can still transfer any characters or silver from other platforms, such as PS4 to Steam. However, for PC, unfortunately, no, Bungie offered a handy tool to transfer all your data from their webpage to Steam easily. However, this period was only available until December 1, 2020. So if you missed it, you would not have access to Battle.net for Destiny 2, and thus your data stored here will no longer be available. 

This means that you will have to start over and download the game directly through Steam. Luckily though, Destiny 2 is now available for free on Steam, so you will not incur costs when getting the game again.

Steps to Transfer Destiny 2 to Steam

Let’s look at how you can transfer data from Destiny 2 on PS4 or Xbox One to Steam. Please note that you will only be able to transfer characters between platforms and not any silver.

Step 1: Go to Bungie’s Website and Sign In

Head over to Bungie’s website and log in with the account you have your main character tied to. The one you want to transfer.

Step 2: Next, Log in to Steam

Now you will need to log in to your Steam account.

Step 3: Follow the On-Screen Instructions

Follow all of the on-screen instructions and accept the terms and conditions. Once this is done, you can view all available platforms from your account on Bungie.

Enjoy Playing Destiny 2

As you can see, it is easy enough to transfer your character across different platforms. If you missed the Battle.net transfer to Steam, this data is lost, and you will have to start a new game on Steam. Luckily it’s a good game, so why not start over and explore anew

How to Rotate Videos with VLC Media Player in 7 Easy Steps

VLC Media Player is a longstanding favorite media player available on Windows, Mac, and mobile devices such as Android devices and iOS devices. VLC Media Player offers a lot more than just playing media, though. You are also able to convert videos to other formats, stream videos from online sources, and you can even flip and rotate videos.

How to Rotate Video with VLC Media Player

Step 1: Open VLC Media Player

Open the VLC Media Player from your chosen device.

Step 2: Access ‘Tools’

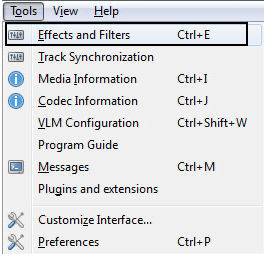
From the VLC Media Player menu at the top of the screen, click on ‘Tools’ and then ‘Effects and Filters.’

Step 3: Go to the ‘Video Effects’ Tab

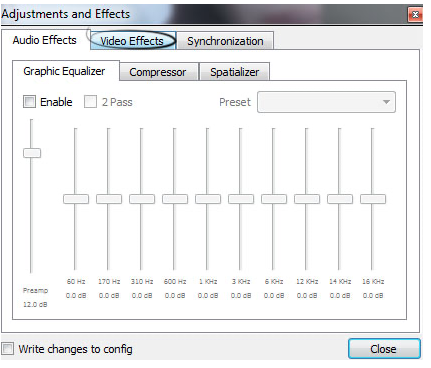
In the ‘Effects and Filters’ window, click on the ‘Video Effects’ tab.

Step 4: Go to the ‘Geometry’ Tab

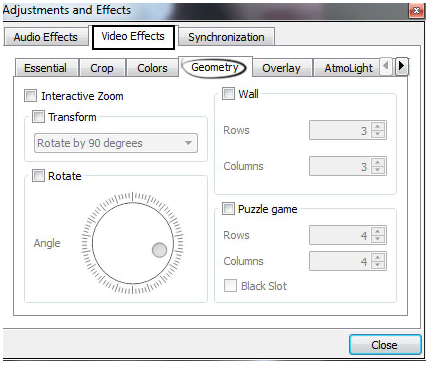
In the next section, click on the ‘Geometry’ tab.

Step 5: Check the Textbox That Says ‘Transform’

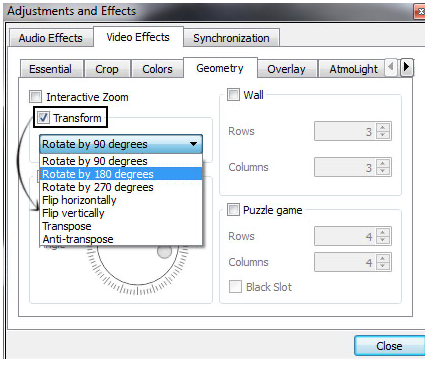
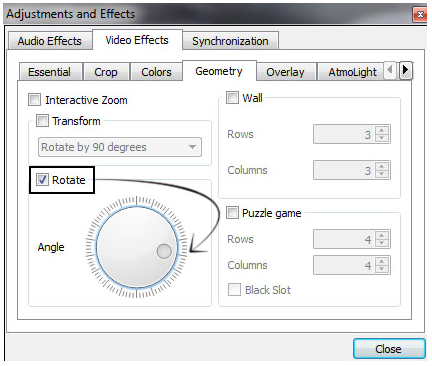
Check the textbox that says ‘Transform’. Once you do that, you will see a list of options that you can use to rotate your video. Rotation options include turning a video at 90 degrees, 180 degrees, or even 270 degrees.

Step 6: Alternatively, Check the ‘Rotate’ Option

You can also decide to check the ‘Rotate’ option. Then you can use the dialer to rotate to an arbitrary position if you do not want a set rotation such as 90 degrees.

Step 7: Save to Make Your Changes Permanent

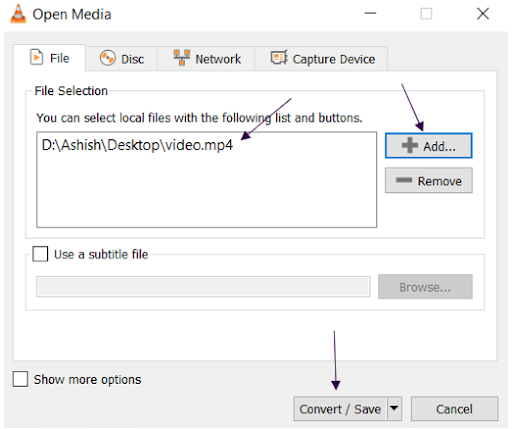
From the menu, click on ‘Media’ and then ‘Convert/ Save’, next click on ‘Add’ to add the rotated video, and then click on ‘Save’ to have the video permanently rotated.

Be aware that you will need to reset them before playing another video if you change these settings. If you do not reset the settings, all the future videos you watch will be rotated to the option you selected.

Rotate, Flip, Stream and Enjoy Your Videos

VLC offers so many different options to adjust and alter your videos. As you can see from our above guide, it is straightforward to rotate your videos and save them. And you can also do so much more with VLC.

How to Archive Your Classes in Google Classroom in 3 Easy Steps

School vacation: the time of year that both teachers and students alike live for. You’ve finally hit the end of the year, and now you need to prepare your content for next year, and you want to reuse a few of the assignments and lessons from the course that you just taught. We’ll show you how to archive and reaccess your classes in Google Classroom on PC, iPhone, and Android.

Google Classroom Free download
9

How to Archive Your Classes in Google Classroom

If you choose to leave the students in the classroom when you archive it, then they will be able to access the content, but they won’t be able to interact with any of the assignments so, if you want to avoid any confusion, remember to either remove the students before you archive or notify them of the changes that you’re making. 

Step 1: Log into your account

Log into your Google Classroom and navigate to the class that you want to archive.

Step 2: Select Archive

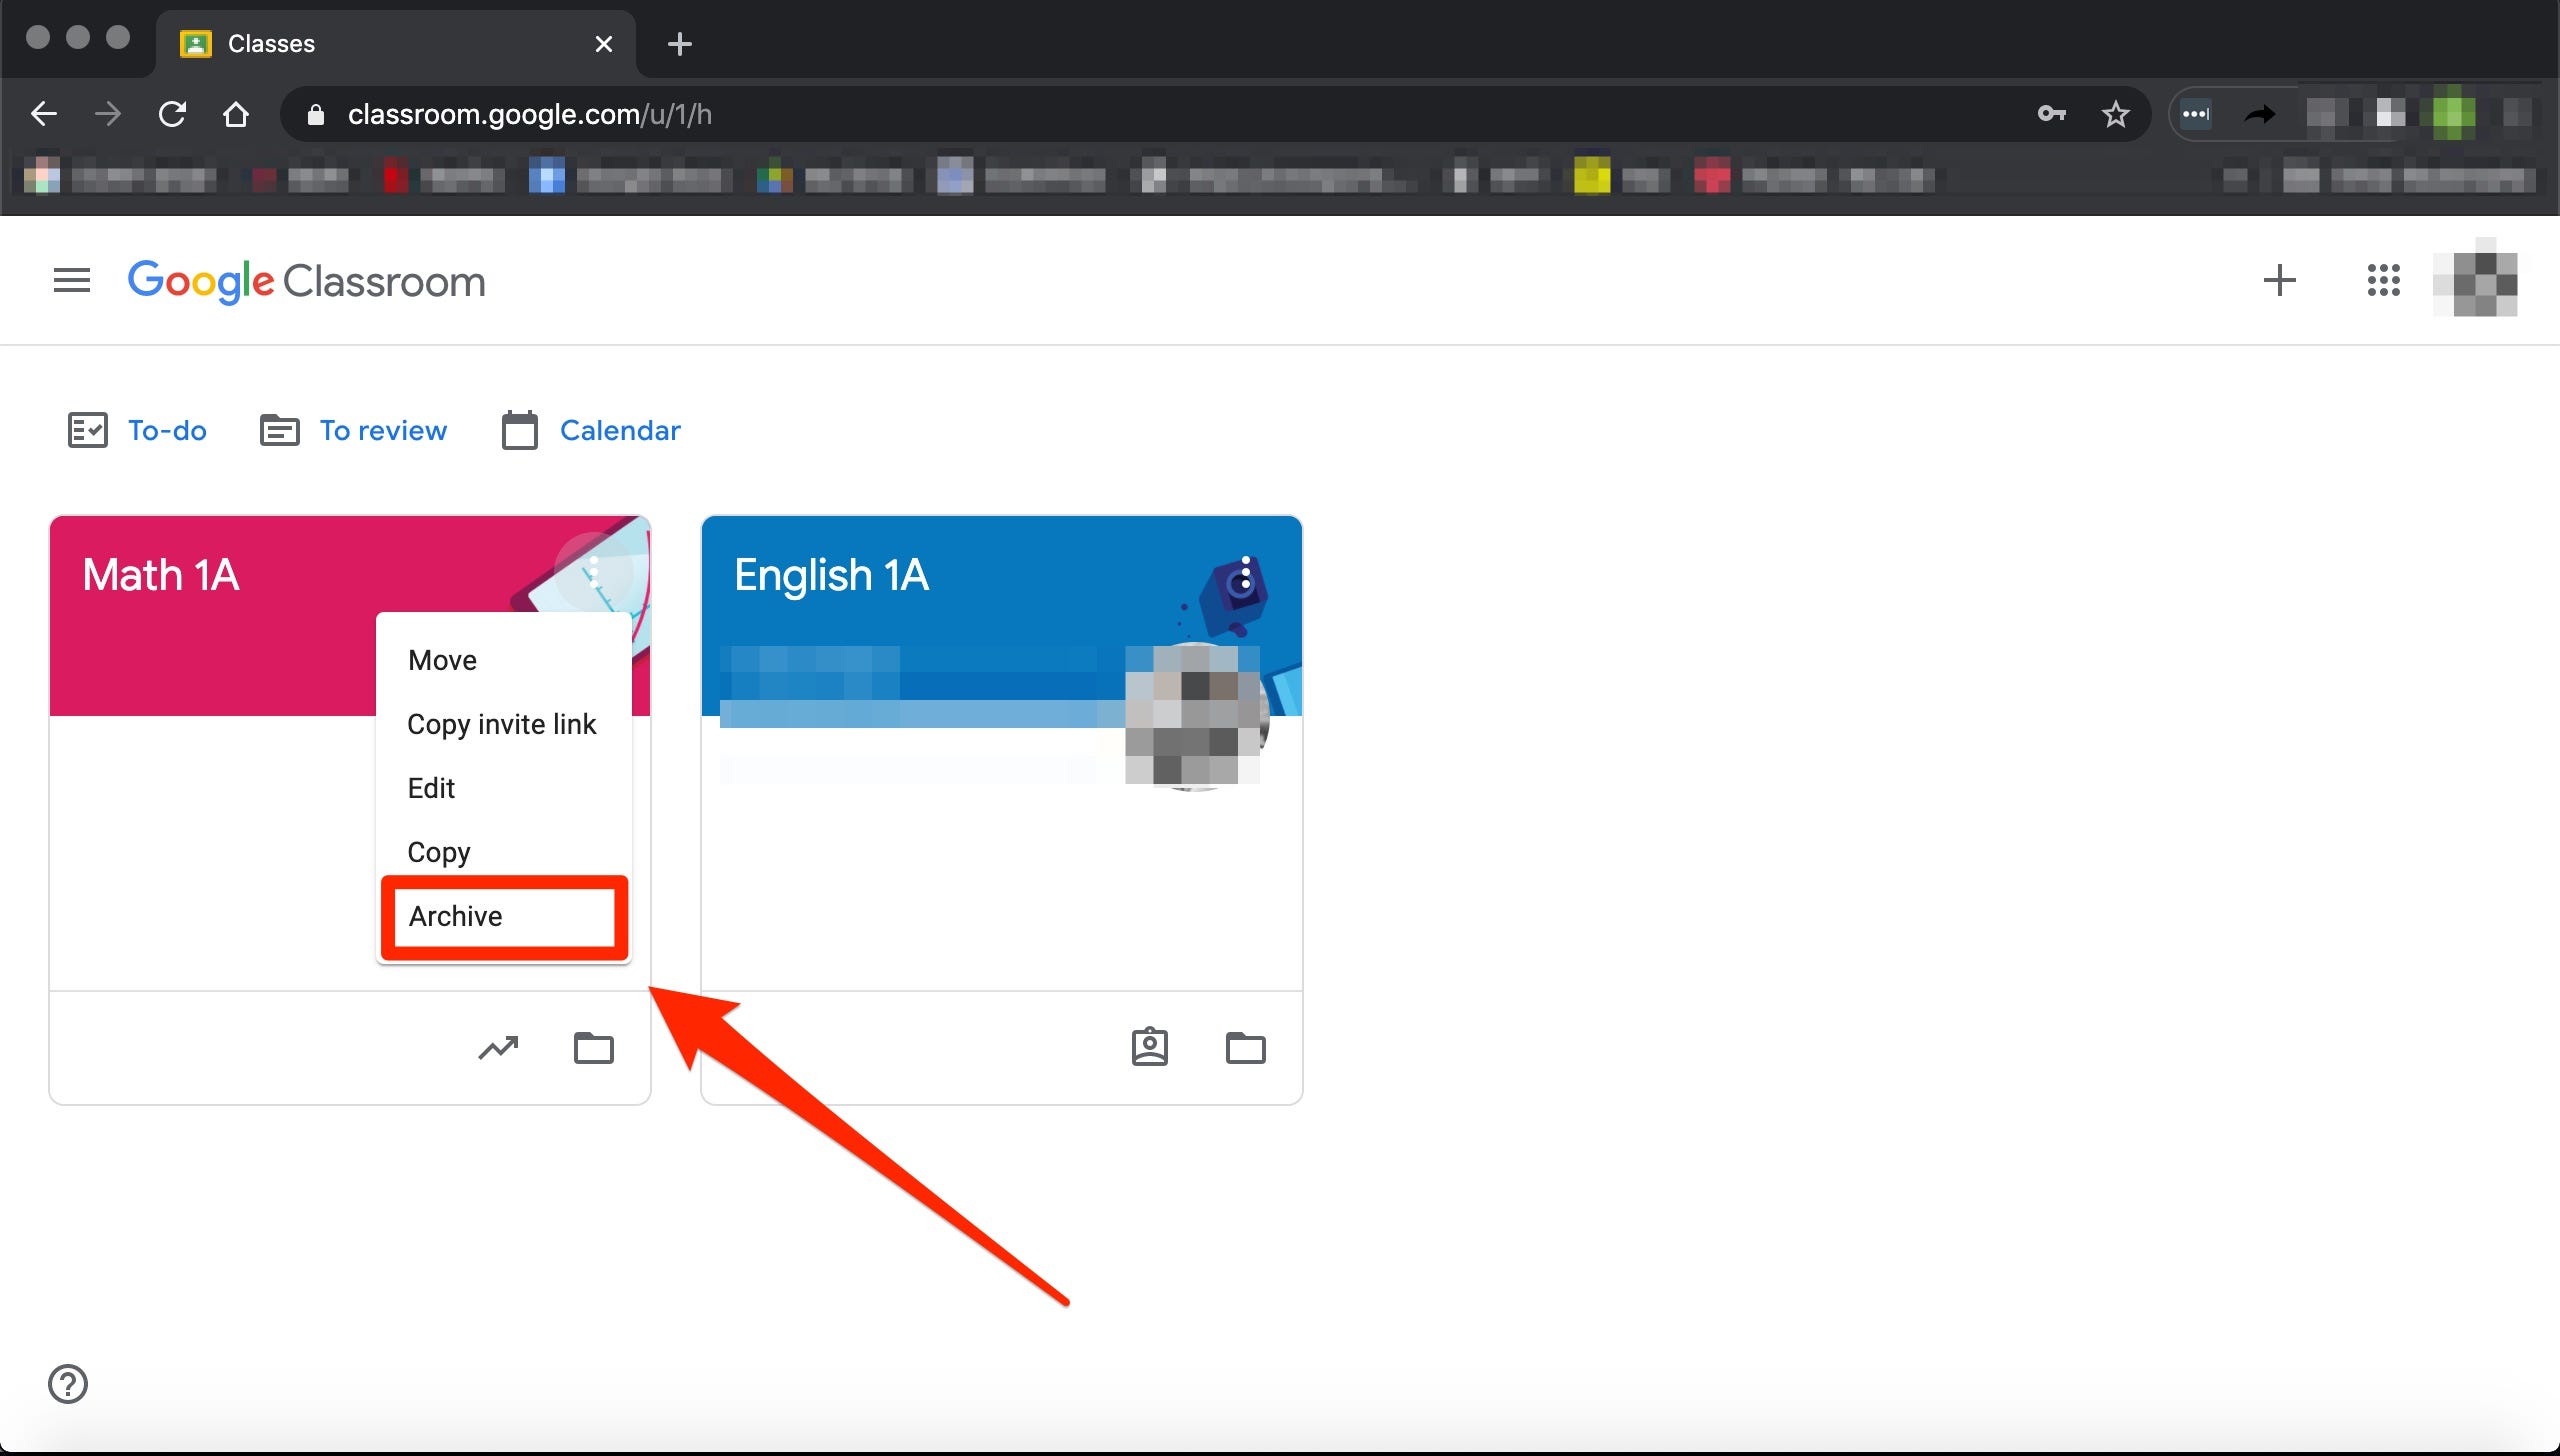
Click on the three dots next to the name of the class and select Archive from the drop-down menu. This will send the class to the archive.

Step 3: Find archived classes

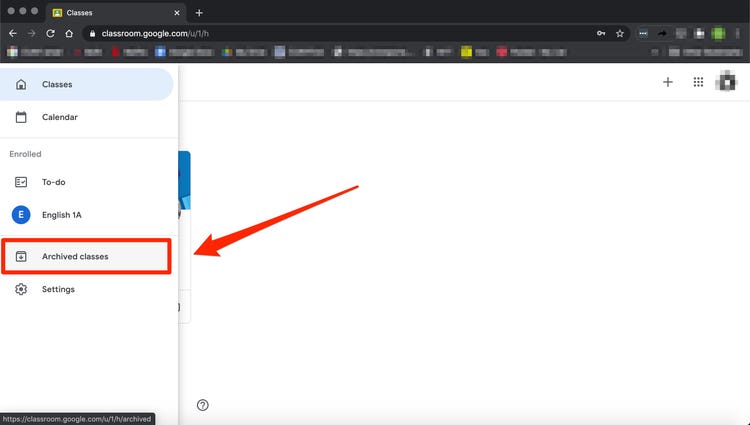
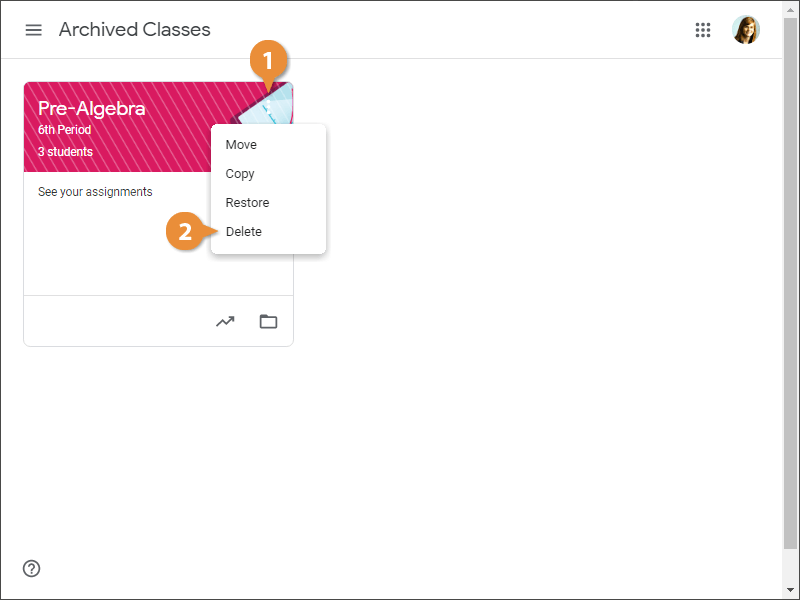
If you want to find your class in the archives, click on the three lines in the top left-hand corner, next to the Google Classroom text, and scroll down until you see the Archived Classes option. Click on this, and it’ll show you the archive, along with any classes that you moved there.

Building Your Academic Archives

Google Classroom has become one of the most valuable tools in every teacher’s toolkit for various reasons, particularly the ease with which it can be accessed on PC, iPhone, and Android devices from anywhere in the world. This archive feature offers teachers another incredibly handy tool because it allows you to store your previous lessons and teaching materials for future reuse.

How to Use Tubemate to Download Youtube Videos in 3 Fast Steps

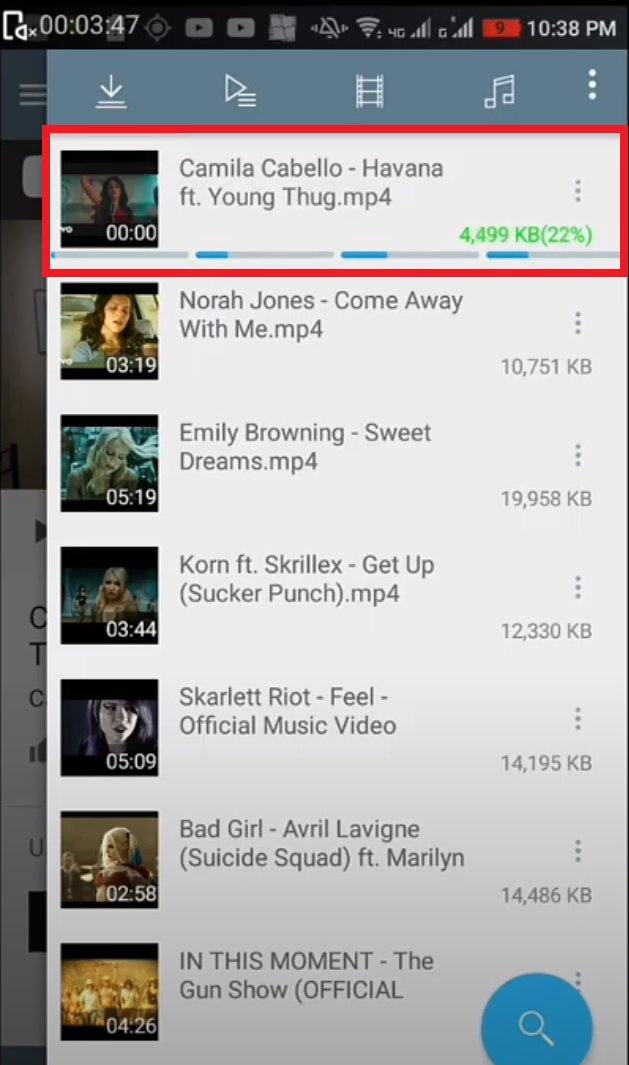
We all know how easy it is to get lost on Youtube. You go in to watch the latest trailer for a movie, and next thing you know, it’s 2 am, and you’re watching a video on how cheese is made. Luckily, Tubemate allows you to easily download videos directly from Youtube and store them on your phone as an mp4 file. In this guide, we’ll show you how to use Tubemate to download videos safely.

How to Use Tubemate to Download Youtube Videos

Please note that this app is not available on the Google Play store, but it can be downloaded on Softonic. Once you’ve downloaded and installed the app, you can jump right into the next steps of our guide!

Step 1: Search for videos

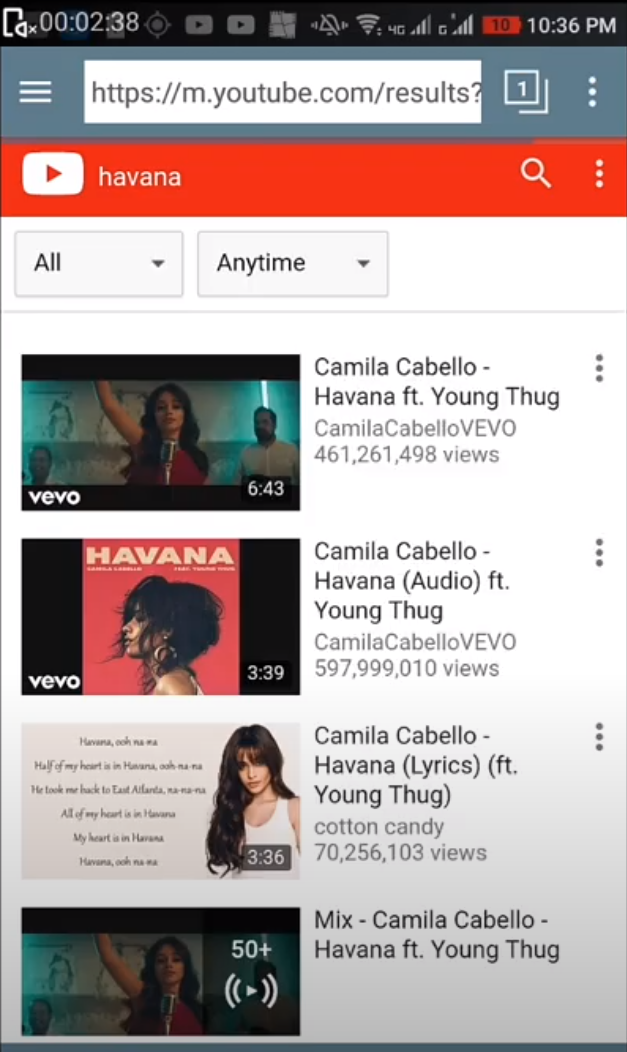
Startup your Tubemate app, and it should automatically take you to Youtube within the app. Use the Search function in the top right-hand corner to search for the video that you want. Then tap on it to open it, the same way you would when browsing Youtube normally.

Step 2: Start the download

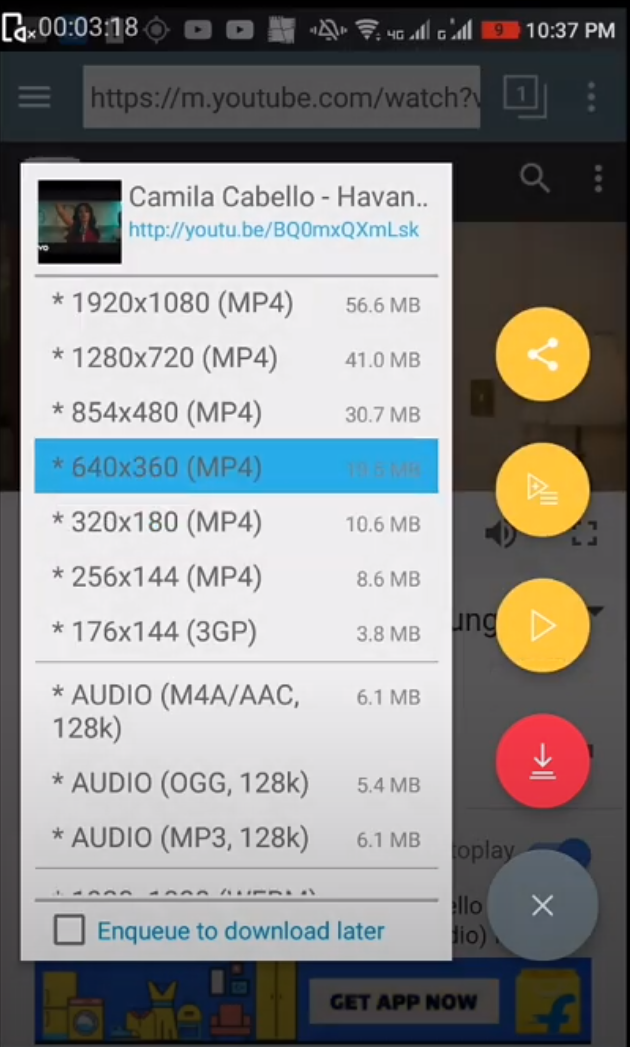
Tap on the red download button on the right-hand side of the screen and, when it’s finished parsing, select the quality that you want to download in. Then tap the red download button again, and your download will start.

Step 3: Play the video

Swipe left to monitor the status of your download. Wait for it to finish and unpack the files, then you’ll be able to scroll to your phone’s native video library and play it through the video player, entirely offline.

Youtube Wherever You Go

This app is a game-changer for anyone who doesn’t have access to the internet 24/7 because it allows you to store the videos safely on your phone to watch whenever you want. Of course, you should always take caution when downloading anything from the internet because viruses and copyright infringements are a thing, but Tubemate allows you a layer of safety from the scary stuff lurking on the internet while allowing you to download your favorite Youtube videos in peace.

How to Share Screen on Zoom in 3 Easy Steps

Screen sharing or screen mirroring is a valuable tool in Zoom as it allows you to share what you’ve been working on with others in the meeting. The trick is knowing how to do it on Windows, Mac, Android and iPhone devices. 

You can start the meeting immediately by sharing your screen from the start, or you can decide to share your screen once already in the session. The host may disable screen sharing when setting up the meeting. In this case, you will not be able to share the screen unless the host changes the permission.

How to Share Screen on Zoom From the Start

This is probably the simplest way to start sharing your screen, but it might not be useful in every situation. 

Step 1: Open Zoom and Log In

Open Zoom on your computer or phone and log into your account.

Step 2: Select ‘Share Screen’

On the main page, click or tap on ‘Share screen’.

Step 3: Input Your Meeting ID or Sharing Key

You will be asked to input either of these identifiers to join the meeting and immediately share your screen with other participants.

How to Share Screen on Zoom Within a Meeting

Step 1: Join a Zoom Meeting

Join or host a Zoom meeting.

Step 2: Select ‘Share Screen’

Once in the meeting, you will see the meeting control. These are all tools used within the meeting, such as muting or playing with the audio. You can also choose to ‘Share Screen’ from these settings.

Step 3: Choose Which Screen to Share

Now you can choose which screen you would like to share. This is useful if you have multiple screens open but only need to share one or two. This process works the same on phones, but you need to be aware that your screen share will show everything currently visible on the phone, and you don’t get the option to choose which screen to share. So be careful when using this option on your phone.

Welcome the New Way of Sharing Information

Sharing your screen in a Zoom meeting can be a handy and vital tool. Luckily it is simple enough to do, and you have a few options when using this function. Why not try sharing your screen in your next meeting?

Getting started with Zoom is simple, but getting used to the different options they offer can take some time. That’s why we have set up a Zoom guide. We also have a guide with helpful tips and tricks for beginners and more advanced Zoom users.

How to play Clash Quest – 5 Tips

From the creators of Clash Royale and Clash of Clans comes a new turn-based strategy game called Clash Quest. There are so many tactical and battle elements for both the Android and iOS platforms that you might not know where to begin or how to succeed in puzzles and objectives. We’re going to give you a few tips for how to play Clash Quest so that you can feel like a winner!

How to play Clash Quest

Tip 1: Army upgrades

If you want to cause severe damage to opponents, you’ll need to upgrade your armies. The attack level needs to be higher than the defense, granting you more power to clear the battlefield. Remember to upgrade each unit in your army for the ultimate in offensive power.

Tip 2: Effective spellcasting

You should always aim for the maximum effect when using spells. For instance, the fireball power deals damage in a 3×3 area. You can cast it against one defensive hut and watch the neighboring ones catch alight.

Tip 3: Army tactics

When you select your army units, Clash Quest reveals how much damage you’ll inflict on the opponent. Sometimes, it pays to combine troops in an effort to deliver a far greater attack. Always weigh your options before launching an assault.

Tip 4: Reach the ranks

The Leaderboard has ranks that match players against each other. Once you have 70 stars, you unlock this feature and can compete in 7-Day Battle Seasons against pocket gamers online. With every challenge you complete, you receive rewards that will make your army stronger.

Tip 5: Free shops rewards

You may run out of energy to enter more battles. The shop gives away free rewards now and again, which includes energy tokens to continue the fight. You can also receive buffs to upgrade your troops.

There’s a battle in your pocket

Now that you have a better idea of how to play Clash Quest, let the war begin! While it can be engaging to upgrade your armies and battle daily, remember to have as much fun in the process!

Where to Watch IPL 2021 Live with THOPTV and GHD Sports Apps Not Working

Alternatives to THOPTV and GHD Sports for IPL 2021 Season

The excitement of the Indian Premier League is back with the season hitting off on 9 April. This exhilarating sports event follows a two-month England tour, with the tournament finally returning to India after two long years. There’s loads of excitement as everyone gets ready to watch the games live at home or on their mobile apps. 

Of course, fans have been struggling to find downloads for THOPTV and GHD Sports, as it appears that they’re no longer available. Cricket viewers who loved streaming from these apps were left disappointed when they discovered that they wouldn’t be able to watch the IPL season on them this year. 

Fortunately, there are other live cricket streaming apps you can rely on for IPL 2021 and many other sports games. For instance, DAZN is a UK-based application that provides live sports broadcasts from around the world, including India. You can also try WSS 2.4 World Sports Streams to view the schedule of matches that’s listed on its servers.

8

Whatever you do, ensure that you don’t miss out on any of the IPL 2021 action.