God of War hits 1 million PC copies

God of War went on sale for PC on January 14th, and since then, this traditionally Playstation exclusive sensation has reportedly hit a major milestone. The past two weeks have seen GOW become Sony’s biggest Steam launch, beating Horizon Zero Dawn hands-down.

It’s worthy to note that merely a day after the launch, 75000 people were playing God of War on Steam at the same time. God of War is also, at present, the best-selling game on Steam with indications that the game has even surpassed 1 million copies on PC. 

SteamSpy bases its estimates on how many people own the game and have a public profile. Players who own the game but have private profiles are not counted toward the estimate. Another factor is that God of War is available on other digital PC gaming services like the Microsoft Store, Epic Games, and Humble Bundle. This means that the actual number of sales is likely much higher than 1 million

God of War went on sale for PC on January 14th, and since then, this traditionally Playstation exclusive sensation has reportedly hit a major milestone. The past two weeks have seen GOW become Sony’s biggest Steam launch, beating Horizon Zero Dawn hands-down. It’s worthy to note that merely a day after the launch, 75,000 people were playing God of War on Steam at the same time. God of War is also, at present, the best-selling game on Steam. SteamSpy suggests the game has even surpassed 1 million copies on PC.   SteamSpy bases its estimates on how many people own the game and have a public profile. Players who own the game but have private profiles are not counted toward the estimate. Another factor is that God of War is available on other digital PC gaming services like the Microsoft Store, Epic Games, and Humble Bundle. This means that the actual number of sales is likely much higher than 1 million.   Honestly, these numbers don’t come as much of a surprise as the PC version of God of War is as good as it gets. PC has an incredible track record of bringing out the best in console games. God of War is no exception. Paramount visual and control setups further enhance the intricately woven storyline, complete with skill trees, tiered loot, and god battles.   Keep in mind that this latest release is basically a monumentally skillful reboot of a 2000s relic, proving that it’s possible for games like this to age brilliantly and still be relevant and impactful so many years later.   This latest feather in Sony’s cap is proof of the company’s investment in bringing forth earth-shattering story-driven RPGs in such a competitive market. It seems clear that God of War and PC are a match forged in the scorching depths of the Methana volcano, and the game is poised to deliver even more successes as time goes on. We look forward to more playtime of this paragon of console gaming. Check out our in-depth analysis for everything you need to know about this latest installment in the God of War franchise.

Honestly, these numbers don’t come as much of a surprise as the PC version of God of War is as good as it gets. PC has an incredible track record of bringing out the best in console games. God of War is no exception. Paramount visual and control setups further enhance the intricately woven storyline, complete with skill trees, tiered loot, and god battles. 

Keep in mind that this latest release is basically a monumentally skillful reboot of a 2000s relic, proving that it’s possible for games like this to age brilliantly and still be relevant and impactful so many years later.

This latest feather in Sony’s cap is proof of the company’s investment in bringing forth earth-shattering story-driven RPGs in such a competitive market. It seems clear that God of War and PC are a match forged in the scorching depths of the Methana volcano, and the game is poised to deliver even more successes as time goes on. We look forward to more playtime of this paragon of console gaming.

If you haven’t had a chance to download and play the game yet, check out our guide on the 5 things you need to know about God of War on PC.

Change idle time in Microsoft Teams

Microsoft Teams is an excellent platform for facilitating, hosting, and organizing visual meetings. However, as with any program, there are some bugs that may crop up. One of these is the idle time status. The idle feature allows the user to put the application to a sleep state when not in use.

Microsoft Teams DOWNLOAD

If you use Teams on your smartphone, the Teams app will change to idle mode whenever your phone goes into sleep mode. By interacting with the Teams app, you can reset the idle status to active. Sometimes your Teams status would change to idle when you don’t want it to. In this case, it’s nice to know how to change your idle time status.

How to change idle time in Microsoft Teams

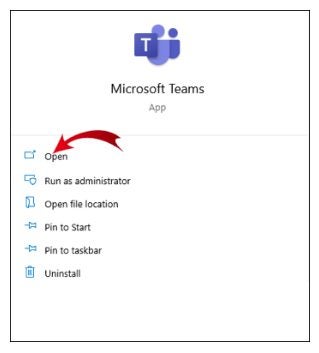
  1. Open Microsoft Teams

    How Do You Change Idle Time in Microsoft Teams

    First, you’ll want to open the app. The app is available on computers and mobile devices, so all you need to do is look for the app in the application or program menu on the device you’re using. If you don’t have the app yet, simply head to the Microsoft Teams download page on our website.

    Downloads on our website are 100% safe and screened for viruses. You’ll be presented with an additional app download, if you don’t require this app, simply skip it and continue to the Microsoft Teams download.

  2. Click on your profile

    How Do You Change Idle Time in Microsoft Teams

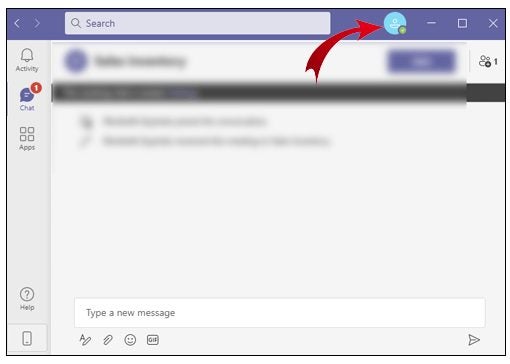
    Once the Microsoft Teams app has opened on your computer, click on your display photo to open up your profile. If you haven’t set a display photo yet, you’re looking for the little person icon at the top right-hand side of the screen, directly next to the Minimize button.

    You can access your profile on your mobile device by tapping on the hamburger menu (three horizontal lines) found at the top-left corner of your screen.

  3. Select your status

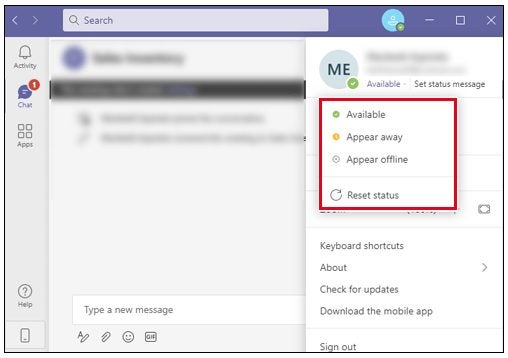
    Once in your Microsoft Teams profile, select your current status.

    • Available: You’re online and ready to receive and respond to messages and requests.
    • Busy: You’re online but busy with something such as a call or meeting. You’ll still be able to receive messages and notifications.
    • Do Not Disturb: You’re online but cannot be disturbed. This status will turn off all notifications to avoid any disruptions.
    • Be Right Back: You’re away from your computer and will return shortly.
    • Away: You’re not available. This status will appear automatically on the mobile app if you close the app or move it to the background.
    • Offline: Appears when you log out or turn off your device.
  4. Click on duration

    How Do You Change Idle Time in Microsoft Teams

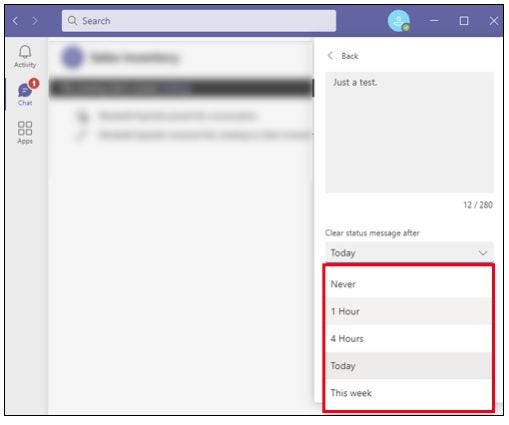
    Now, we’re going to set the duration for which your status will appear as you selected in the previous step. Next to your status, click on the arrow below the “Clear Status Message After” option to set the duration of your current status. You should now see a drop-down list of available options. These options allow you to set your current status for 30 minutes, a few hours, the whole day, or a custom time.

    Setting the duration can be very helpful in situations where you know how long you’ll need. For example, if you know you’ll be presenting a class for two hours, you can set the “Do Not Disturb” status for those two hours and avoid any premature interruptions.

    You can also add a custom message that will appear to anyone trying to contact you when you aren’t available. Between this option and the color-changing indicators, no one has any reason to try and reach out to you on Microsoft Teams when you’re not in a position to answer calls.

  5. Click on “Done”

    How Do You Change Idle Time in Microsoft Teams

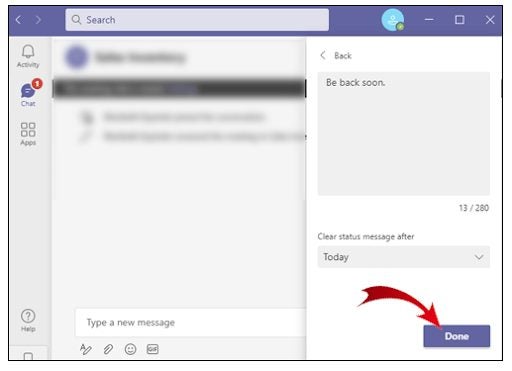
    This is the last and easiest step of all. Once you’ve set your status and duration to whichever options are most applicable in your current situation, all you need to do is click Done, and you’ll be – for lack of a better word – done!

No time for being idle

Let’s face it, we all know what’s expected of us. However, with the world in the state that it is, it’s sometimes really difficult to focus on what needs to be done. In those cases, it’s okay to take a short break to get yourself back into a productive space. Get up, move around, have a drink of water, and breathe deeply. Once you’ve got your mind back in that productive space, return to your obligations and do your level best.

Now that you know how to change idle time, you’ll be able to step away from your desk without your co-workers wondering why you aren’t answering calls. Simply set your status, do what you need to do, and return when you’re back to your best. That’s, of course, if you’re not having to fix error code 500 in Microsoft Teams.

If you’re still new to this platform, we suggest you learn more about what Microsoft Teams is and how to use it. Be sure to also check out some of the latest updates, like how Microsoft Teams has a new section like Facebook.

Finally, take some time to learn how some of the meeting features work. Here are some guides worth checking out:

What is WINDOWS 10, and how it works

If you use a personal computer for work or play, chances are you’re either using macOS, Linux, or the ever-evolving titan of personal computing operating systems, Microsoft Windows. Windows is possibly the most iconic operating system in human history and has dominated the industry since its inception. Its latest version, Windows 10, continues this proud legacy by dominating over 70% of the personal computing industry. With figures like that, you’re probably wondering what Windows 10 is and how it works

You’re in luck; below, we’ll explain Windows 10 for first-time users, as well as sink our teeth into this feature-loaded successor to Windows 8.1. Discover why Microsoft is the preferred operating system provider and why Windows 10 is so successful. We’ll also give you insight into how to use Windows 10 to its full potential. 

What is Windows 10?

Windows 10 is the next major release of the Microsoft Windows NT operating system. It succeeded Windows 8.1 and set a new standard for what windows could achieve. Shipped as standard with most new computers and laptops, Windows 10 is easy to use, quick to set up, and features a host of programs and functions that generally make computers easier to use

The birth of Windows 10

Windows 10 is easier to use than its predecessor, Windows 8.1. Windows 8 came under heavy media and public fire for being a little too controversial. Throughout the history of Windows, there has been a theme of progress without trying to reinvent the wheel.

Windows 8 emerged onto the market just as touchscreen systems became more popular. Microsoft wanted the new OS to be purpose-built for these new devices, and Windows 8 was born. Unfortunately, not many people were on board with the innovative, bold reinvention of Windows

Windows 10 is a valiant and successful effort to take Windows OS to a refreshed but familiar state. In a nutshell, Windows 10 has many of the features and functions Windows 8 introduced, but in a more familiar package. You ultimately have seamless touch screen functionality without sacrificing usability on none touchscreen devices, which is one thing Windows 8 was criticized for. 

What is WINDOWS 10, and how it works

How to use Windows 10

Windows 10 is one of the easiest systems to familiarize yourself with. With Windows dominating the market, chances are you’re simply moving from one Windows system to another. However, even if this is your first time using a Windows operating system, Windows 10 has a step-by-step guide to help you as you set your PC up. This guide takes a few minutes to follow, and we’ll review the entire process below. 

Because we understand not everyone’s situation is the same, we’ve included short guides on how to install Windows 10, upgrade to it from an earlier version, and set it up on a new PC where it is already installed. 

Upgrading to Windows 10 from Windows 7 or 8.1

Before you take any steps toward upgrading, check that your device is compatible with it and able to run it properly. Also, check for any manufacturer-specific driver update information for your device. 

From 2015 to 2016, if you were using Windows 7, you’d see a popup on the bottom right-hand side of your screen prompting you to ‘try Windows 10.’ This was a period when it was completely free to switch from Windows 7 or 8.1 to Windows 10. The process was guided by prompts and was easy to complete. 

Jump to years later, and Windows 10 is still free to upgrade, provided you have a valid product key for Windows 7, 8, or 8.1.

To check if your copy of Windows 7 has been activated and is valid, click on the start button at the bottom left of your screen, right-click on ‘computer’ in the sidebar, and click on ‘properties.’ This will open up a section of the control panel and gives you an overview of your version of Windows. Scroll down until you see ‘Windows activation.’ Under this section, it should say ‘Windows is activated, and you’ll also see your product key.

To check the activation status of your copy of Windows 8 or 8.1, right-click or tap the bottom left corner of the screen and select ‘system’ from the quick access menu. Scroll to the bottom of the window and check that it says ‘Windows is activated.’

Now that you’re sure you have a licensed copy of Windows, you’re ready to start preparing for the upgrade. Now you need to head to Microsoft’s website and type ‘Windows 10’ into the search bar at the top right-hand side of the screen. You’ll be taken to a screen with all the relevant entries on the website. The first two options are ‘Download Windows 10’ and ‘Get Windows 10.’ Clicking on the second option will take you through a quiz before the download to determine whether you should upgrade to Windows 10 on your existing system or whether it would be better for you to buy a new Windows 10 device.

To access the upgrade files, click on the option that says ‘Download Windows 10’. This will take you directly to the update page. It’s important to note that there are a few different ways to upgrade. You can either click on ‘Update now,’ which will activate the Windows 10 Assistant to help you upgrade, or you choose to create Windows 10 Installation media. 

The installation media creation tool is the best option because you’ll have the files on hand if you ever need to perform a clean installation of Windows 10 again or if you need to install it on a new system. On the off-chance that you are still running Windows XP or Vista and would like to upgrade, you’ll need to use the installation tool as well, but you’ll need to use a different PC to access the tool. This tool is only useful if you upgrade from Windows 7, 8, or 8.1

Install to Current Device

This is the easy bit. Select ‘Download tool’ and then click on ‘Run.’ If you don’t have administrator access on the device, you won’t be able to run the tool. Read and accept the license terms on the end-user license agreement page. If you don’t accept the terms, you won’t be able to run the tool. Now, you’ll get to a page that asks, ‘What do you want to do?’. Click ‘Upgrade this PC now, and then hit ‘Next.’

Once you’ve downloaded the tool, open it and follow the step-by-step walkthrough of how to install Windows 10 onto your computer. You’ll be able to choose any version of Windows 10 except for the Enterprise edition. When Windows 10 is ready to install, the tool will show you a recap of the choices you’ve made and what is automatically kept during the upgrade. 

There are three options of what to keep. To access these, simply click on ‘Change what to keep.’ You can either select ‘Keep personal files and apps, ‘Keep personal files only, or ‘Keep nothing.’ Save and close any files you have open and anything you’re working on. You are now ready to click ‘Install.’

It’ll take some time to install the new horizon that is Windows 10, and your PC may restart several times. So take some time for yourself, make yourself some coffee, grab a comfy seat, and why not read through some of our other articles? 

Create Installation Media

You’ll need a USB flash drive, DVD, or ISO file handy for this. 

Before you attempt to download the media creation tool, check that you have the following:

  • A stable internet connection
  • Sufficient space on your PC, external drive, or USB for the download
  • A blank USB drive with at least 8GB of free space or a blank DVD if you choose either of those options for the download
  • If you use an ISO file, you might need to use Dual Layer (DL) DVD Media

There are some other things you might want to check before continuing: 

  • Whether you have a 64-bit or 32-bit processor (CPU), this is important because you’ll either choose to create a 64-bit or 32-bit version of Windows 10. Go to your control panel in ‘Settings’ and look for the type of system you have. 
  • Check the language of your current version of Windows; you’ll want this and the region to be the same on Windows 10.
  • Check your edition of Windows in the control panel. All editions except the Enterprise edition are available in the media creation tool. You’ll want to select the same version of Windows 10 as the Windows version you currently have a product key for. 

Once you’ve made sure you can run Windows 10 and that your system meets the requirements, you’re ready to start the installation process. 

Select ‘Download tool now, and then click on ‘Run.’ This follows the same initial procedure as installing on your current device, but when you get to ‘What do you want to do?’ you’ll click on ‘Create installation media for another PC.’ Select ‘Next,’ and you’ll be prompted to choose the architecture (64-bit or 32-bit), edition, and language. 

Next, you’ll need to choose whether you’re downloading the tool onto a flash drive, ISO file, or DVD. Once the installation media is created, you can install Windows 10. 

Using the installation media

Before installing Windows 10, ensure that you’ve saved and backed up any work you were busy with. If you used the ISO option to create the installation media, you’d need to burn it to a DVD. 

Insert the flash drive or DVD into the computer. Next, you need to restart the PC. Changing the boot order in your PC’s BIOS or UEFI settings might be necessary if your PC does not automatically boot from USB or DVD media. As soon as you turn on your PC, you will typically need to press a key (like F2, F12, Delete, or Esc) to open a boot menu or change the boot order. To learn how to access your PC’s boot menu or change the boot order, refer to the documentation that came with your PC or visit the manufacturer’s website.

 A PC manufacturer may be able to provide you with instructions on temporarily disabling Secure Boot in your BIOS settings if you do not see the USB or DVD media device listed within the boot options. Your PC might not have fully shut down if it boots directly into the OS you’d like to replace after changing the boot menu or order. The best way to ensure the PC completely shuts down is to select the power button on the login screen or the Shutdown option from the Start menu.

When you get to the ‘Install Windows’ page, choose your time and keyboard layout, click ‘Next,’ and install Windows.

Getting Started

Once Windows 10 has been installed, you’ll be prompted to sign in with your Microsoft account and take care of a few more easy steps like connecting to a network and setting up your new PC.

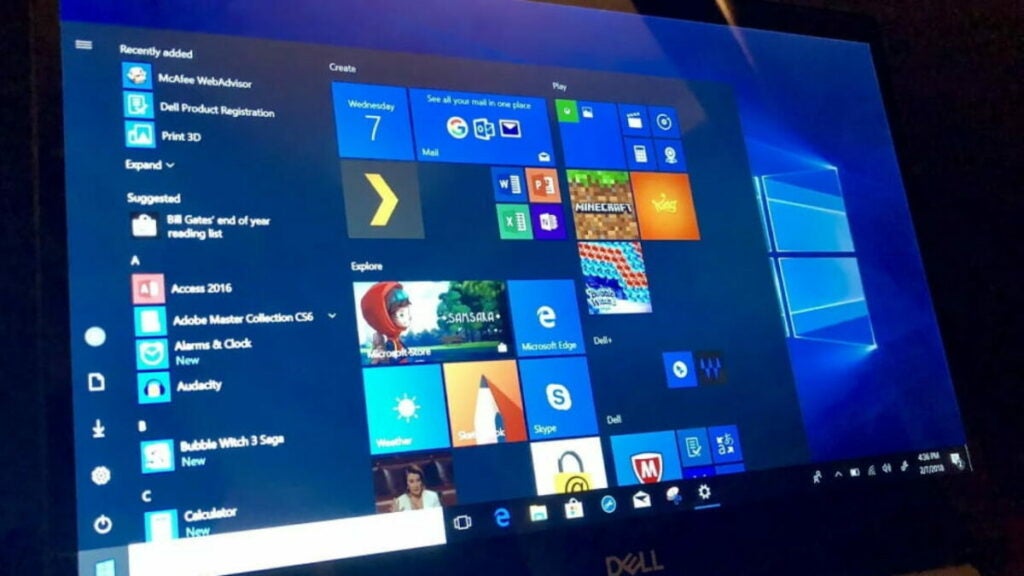
Once your PC is ready for work, you’ll be taken to the new Windows 10 home screen. This is where you’ll open apps from and access all the amazing features of Windows 10. Your first stop will be the newly designed Start button at the bottom left-hand side of the screen. If you’re using a new laptop, you’ll notice a matching symbol on a key in the bottom row of your keyboard. This is a quick access feature for the Start menu from any app you’re using. Tapping this button will instantly open up the start menu and its increased functionality. 

The start button will open up your new start menu; from here, you can open any app installed on the PC. You’ll see that the start window is divided into three sections. You’ve got File explorer, settings, power options, and All apps in a list at the bottom. Then you’ll see a list of applications at the top.

The third section is a tile interface displaying various apps installed on the PC. Right-clicking on any app allows you to pin it to the taskbar at the bottom of the screen, pin it to the start tiles if it isn’t already there, and even uninstall it directly from the start menu. 

Microsoft Edge

One of the new apps is Microsoft Edge. This is Microsoft’s brand new web browser, replacing the controversial Internet Explorer. While most people only use Edge is to download Google Chrome or Mozilla Firefox, the app does come with its own unique features. These features actually make Edge a better, more integrated browser for Windows users.

Sidebar Search

Edge lets you highlight text on a website and search for results in a new dedicated sidebar. This is similar to Safari’s ‘Search with Google,’ but for Windows, and some argue better optimized. This means you no longer have to open hundreds of new tabs to search for more info; just do it in the sidebar. 

Install Websites as Apps

We all have our favorite websites that we visit religiously. Whether virtual house tours, recipes, or our favorite social media sites, you can now install these websites onto your computer with Edge. Edge lets you pin websites to your start menu either in the list or as a tile. Pinning tabs to your taskbar also means you no longer have to go into the browser to visit the websites you use most often. 

Pin Tabs

Edge also lets you pin tabs to your browser so that they don’t take up as much space. This means you can open more tabs at a time without sacrificing performance or space. Pinned tabs are also out of the way, so it’s not as easy to accidentally close them. 

What is WINDOWS 10, and how it works

Windows 10 Features

Windows 10 is packed with features that give it far more functionality than its predecessors. Integration is the buzzword Microsoft seems to have had on a mood board when designing Windows 10 because that’s what it is. In its simplest form, it is the seamless integration of the touch screen functionality of Windows 8 with the user-friendliness and versatility of Windows 7. 

Windows 10 and Android

Windows Mobile was an interesting time. Microsoft powered a number of smartphone models around the release of Windows 8 and 8.1. The idea was to create better integration between your desktop, tablet, and mobile devices, but like Windows 8, Windows Mobile was reinventing the wheel. Smartphones existed, and most already ran on Android.

The way to integrate Windows and mobile phones was not to create mobile OS, but rather to build cross-platform functionality between the desktop OS giant and that of the mobile OS industry; Android. 

Windows 10 is compatible with the Microsoft Launcher App available on Android devices and gives you many ways to synchronize your Android mobile device with your Windows 10 PC. With this app installed, you can send photos, websites, and apps between your PC and mobile phone and even send text messages from your phone using your PC. This merges productivity on your phone and your desktop into one integrated space.

Snip & Sketch

This app takes the functionality of the modest print screen button to new levels. Activated by pressing ‘Shift-Windows key-S,‘ Snip & Sketch means you no longer have to capture an entire screen and then cut it later in a different window. Choose to drag out rectangular captures or switch to freehand mode and draw around objects on your screen to snip them.

Snip & Sketch automatically saves the most recent snip to the clipboard, which can be pasted into a document with ‘Ctrl-V.’ You can also now make your own notes directly on a snip and even do a bit of sketching over it. 

Voice Typing

In the past, voice dictation was something you had to purchase expensive software to use. With Windows 10, you can use voice dictation for free. Voice typing and speech recognition are now integrated directly into Windows 10.

It is as simple as clicking ‘Settings,’ clicking ‘Speech,’ and then enabling ‘Online speech recognition. When this is enabled, you can use the ‘Windows key-H’ to type with your voice instead of typing text whenever you have an application that requires text-typing.

It is convenient to use this feature in Microsoft Word because it automatically capitalizes sentences and inserts the terminating period. You can also use this feature to dictate emails or chat with friends through instant messaging.

Task View

Even though Task View has been a part of Windows 10 for a while, many people are unaware of its existence. The people that do know about it report some significant productivity gains.

Next to the Cortana search field is an icon for Task View on the taskbar. The icon looks like a film strip.

The list of open applications you see when you click it will include all files and applications you had opened earlier, as well as any documents you have open at the time. Just click on any open (or previously open) app or file in the task view to switch to it.

Xbox One

It’s odd seeing an independent gaming console on a list of Windows 10 features, but that’s the world we live in now. Windows 10 and Xbox are no longer separate entities. Here’s another prime example of the kind of integration Windows 10 has introduced. 

Windows 10 comes with the Xbox app pre-installed. This app creates beautiful synergy between your Xbox games, accomplishments, and friends and does it all from your Windows 10 PC. While there is still a ways to go before true cross-platform play is possible, in other words buying games on Xbox One and playing them on your PC, the groundwork has been laid. Currently, games with cross-platform multiplayer functionality like Minecraft for Windows 10 and Xbox let players play together no matter which platform they’re playing on. 

Virtual Desktops

You can increase your productivity by dragging any open app up to the New Desktop icon at the top of the Task View. As a result, you’ll be able to switch to a new virtual desktop session and focus on the current task. Using this tool, you can create a desktop session for social media and browsing the web and another for work. Press ‘Ctrl-Windows key-Left/Right Arrows’ or use the Task View window to switch between desktops.

Windows 10 User Experience

Because of the seamless integration of innovations in Windows 8 with the familiar functionality of Windows 7 and before, Windows 10 appeals to most computer users. Prime evidence of this integration is in the Windows 10 Start feature. If you left-click on the start logo, you’ll see the tile menu introduced in Windows 8.

However, if you right-click on the logo, you’ll be greeted with the familiar list-style menu found in Windows 7 and before. Both menus give you access to power options, apps, and features, device management, and the handy search function. This means that whether you have a touch screen system or not, you can use Windows 10 comfortably. 

Overall, the Windows 10 user interface is innovative without being too different to become familiar with easily. The visual aspects are even more customizable than Windows 7, and the entire system is powered by better AI than Windows 8 and 8.1. For instance, when you change your desktop background, you can toggle an option that lets Windows 10 choose the most visually appealing and least obtrusive accent color from the dominant colors in your chosen background. 

Even the notification area is less intrusive than notification panels usually are. Almost everyone receives notifications on their mobile phone, but many Windows 10 users are unaware they also have a convenient notifications area on their PC.

If you click the comments icon in the lower right corner of the screen, you will be able to see your notifications. It displays notifications from your apps like your calendar and your mobile notifications if your phone is synced, as well as buttons so you can quickly enable Wi-Fi, Bluetooth, and access Settings.

What is WINDOWS 10, and how it works

Window to a new world

Windows 10 is the next stage in Microsoft’s evolution. While it isn’t perfect software, it more than does what it’s designed to do; streamline and increase productivity. As much as Microsoft dominates the market, they also go the extra mile with each new update. Windows 10 adds even more functionality as Windows 8 did but does so with the finesse and recognizable charm of Windows 7 and earlier. Using the system, you know it’s new.

But you can’t help but feel it’s a return to the good old days of Microsoft. With its mobile and gaming console integration, in addition to all the other features we highlighted, Microsoft Windows 10 is, in a word, synergy.


What is Facebook Messenger, how to use it?

Facebook Messenger is a free messaging app from Meta’s stable of communication and productivity software. Basically, the messaging function on Facebook was so successful that Meta decided it needed to be a standalone, more functional application. So apart from a way to send messages, what is Facebook Messenger, and how do you use it?

This article will take a peek under the iconic blue Facebook Messenger symbol and explain what this messaging app can do. We’ll take a look at features, functionality, aesthetics, and even list a few things you may not have known the app can do. Prepare to see Facebook Messenger as you’ve never seen it before.

What Is Facebook Messenger?

Facebook Messenger is a messaging and communication application for keeping in touch with your nearest and dearest. Send text messages, photos, videos, voice notes, and even location pins, and do it all for free. 

What is Facebook Messenger, how to use it

How Does Facebook Messenger Work?

Facebook Messenger uses your Facebook friends list as an address book. That way, you don’t need to import or add contacts or even manually input mobile numbers. Facebook Messenger even lets you use it as your default SMS app. You can do everything in one easy-to-use interface. 

The Basics of Facebook Messenger

Using Facebook Messenger is as easy as downloading the app for your mobile device. Once the app is downloaded to your device, you can log in with your Facebook credentials. If you’re already logged in to Facebook on your device, Messenger will give you an option to just click the ‘continue as’ button.

If you want to sign in with a different username, click the button underneath that says ‘this isn’t me.’ From here, you’ll be able to enter the credentials of the Facebook account you want to log in to, and you’re good to go. 

What is Facebook Messenger, how to use it

How to use Facebook Messenger

You probably read that Facebook Messenger is a messaging app and are now thinking, ‘I have a messaging app; why do I need to download another one?‘ For starters, most messaging apps require you to enter your phone number to get started, which means waiting for an OTP to reach your phone, setting up a whole new app, choosing the perfect photo for your profile, and a cute and informative ‘about’ message.

Facebook Messenger lets you skip this process. Your contacts are your Facebook friends, your verification and login information are your Facebook credentials, and your profile photo is imported automatically from Facebook. 

Functionality Features

As you’d expect from a modern messaging app, Facebook Messenger gives you much more than just texting. You have access to all the staples available on other platforms, like texting, video calls, voice notes, location pins, and emojis. But Facebook Messenger is in its own class. For a start, phone calls are now free. 

Any calls you make through Messenger carry the same charge as messages you send; no charge at all. While calls are limited to Facebook contacts at this stage, some features below lead us to believe Facebook might be messing with the default general phone call function in the near future. Let’s take a look at what else makes Messenger unique. 

Default Texting Facility

Facebook Messenger can take the place of your phone’s default short messaging system or texting functionality. This is groundbreaking; you no longer need that pesky message icon that relies on a dedicated SMS bundle in your data plan. And we all know if you need to send an SMS and you don’t have it worked into your monthly plan, you fork out a small fortune for each tet you send. This is because texts don’t use your data balance. Facebook Messenger, however, does. 

Send texts to anyone, anywhere from the Messenger app, and use your data. There is no more need for a dedicated texting plan and no extra costs from texts you sent but didn’t work into your budget. When you open Messenger the first time, it will ask you if you want to use it as your default messaging system. Should you say yes, your texts will be diverted to your Messenger home interface. There is, however, a separate tab for texts so that you don’t have to scroll through Facebook chats to get to a particular message. 

Hidden Messages

Tired of being bombarded on other messaging apps by people you don’t know? Switch to the safety of Facebook Messenger. Messages from people you don’t have any connection with on Facebook are moved to a dedicated folder in your Messenger app. You can easily access this folder through the app’s main interface, but you won’t receive notifications that they’re there. Check on them from time to time to see if it’s anything worthwhile, and instantly delete those you’re not interested in replying to. 

With social media giving people so much access to each other’s lives, cyberbullying has become an even bigger problem. A well-known tactic is for someone to message you because they enjoy your content and get increasingly nasty and abrasive if you don’t respond.

Now you can simply delete offensive messages before they can affect your inner peace. Another brilliant feature is that the other person won’t know that you’ve read their message or that it’s been deleted unless you respond. 

Aesthetics

Aesthetics are important in the digital age. Not only do we want apps and programs to perform well, but we also want them to be less intrusive and have a better effect on our moods. Researchers have studied the profound impact colors have on the human psyche, and now, you can benefit from that research. 

The ability to change chat colors is something not all messaging apps have. Facebook Messenger lets you select between flat colors and themes for your chats. Another reason this is an incredible innovation is that you can now color-code your conversations, using a different color for family, friends, workplace colleagues, or international penpals you’ve made on Facebook. The choice is completely yours.

Innovatively, Facebook Messenger now offers specifically curated themes with each update. One update featured themes inspired by Olivia Rodrigo’s debut album Sour, and another used beautiful blues and turquoise hues to celebrate Worl Oceans Day.

You also now have access to animated and static stickers. Over and above the well-known emojis, stickers are a way to communicate without words. Fun animations are another way Facebook Messenger rewards the senses of its users. Each animation comes with its own sound effects, and you activate them by using select emoji.

For instance, using a singular heart emoji will briefly send hearts and bubble effects over your screen. The same effect happens on the other side when someone opens that message. You also now have the option to frame your texts with dynamic animation. 

Due to it being the Messenger powered by Facebook, your Facebook avatar, a little cartoon likeness of yourself that you make, can be used as a sticker in your chats. All visual add-ons like gifs, stickers, and frames are obtained through the ribbon directly above the text box.

Another nifty feature is the ability to use nicknames on Facebook Messenger. We all have nicknames, and if you cant use them, what’s the point, right? Now you can. You can set your own nickname and funny nicknames for people you talk to. Nicknames take effect across Facebook once set. Think of it as a little inside joke between you and your closest. 

Entertainment

Facebook Messenger lets you set a go-to emoji. The default setting is the classic Facebook thumbs-up, but you can set it to anything you like. Here’s a hint: Set the emoji to the basketball and start an actual game of basketball with your friends or family. You can even initiate this basketball game on a group chat. 

If you don’t want to miss out on the latest news, views, and how-tos, why not initiate a conversation with one of Facebook Messenger’s dedicated chatbots? Choose between news updates from your favorite media platforms to bots that give you daily horoscopes, recipes, celebrity updates, and even bots inspired by celebrities themselves. Use the bot search function, and maybe you’ll be able to chat to one of your favorite celebrities, historical figures, or characters from literature and popular culture. 

If your device is a little heavy on used space already, you can simply select the Facebook Messenger Lite app and get the same easy free messaging functionality for a fraction of the space. Because it’s much smaller, it does have slightly reduced functionality, but it works smoothly and is one of the best ways to keep in touch with friends, family, and co-workers.

What is Facebook Messenger, how to use it

Facebook Messenger Lite: As Good as Messenger?

The team at Meta loves giving users access to smaller lite versions of their most successful apps. Facebook, Messenger, and Instagram have all been given the lite treatment. Even apps not owned by Meta have gone to the lite side. Apps like Skype, Google, Pinterest, and even many browsers all have lite options. While lite is marketed as a space-saving option, lite apps work better than their full-size variants in poor network conditions and low-cost devices. So what’s the difference?

Animations

Messenger Lite doesn’t support animations. This isn’t a massive concession when you get better connectivity in all network conditions, but it matters to some. Animations require stronger connections and more memory, so, understandably, the lighter version of the app doesn’t support them. 

Stories

Stories are a way to keep track of your Facebook friends’ lives. Offered by Instagram and Whatsapp as well, stories are short-form videos that you can upload. These have proved brilliant ways to advertise products and get the word out about any business you’re doing, as well as a great way to share moments from your daily life. Messenger Lite doesn’t support stories. This is also largely due to the memory chunk needed to process videos and the network strength videos require. 

Chat Heads

Chat Heads is a nifty feature of Facebook Messenger. Any chats you have open will appear as little head icons on your device’s home screen once Messenger is minimized. You can move these aptly named Chat Heads around and essentially have one-touch access to any number of active chats. To save space, Messenger Lite does not support Chat Heads. While it’s sometimes fun to flick faces around your screen, this is not the end of the world. 

The fact is that Messenger Lite is just as functional as its feature-loaded alternative. All critical functions, including messaging, phone calls, video calls, and the ability to send location pins and various media, are still very much a part of the Messenger Lite experience.

Facebook Messenger tips, tricks, and guides

For even more amazing features of Facebook Messenger, check out the links below:

Send messages to your contacts

While Facebook Messenger has been around for a long time, many new features have appeared to help it compete with other messaging apps. It still remains one of the top ways to connect with your FB contacts and keep in touch with family.

How to play THE WITCHER 3

Open World RPGs are hugely popular. And thanks to the massive global success of the Witcher Netflix adaptation, whole new demographics are getting attached to Geralt of Rivia in ways gamers have been doing since 2007. With hordes of monsters to vanquish, and of course, the search for Geralt’s long-lost love, Yennefer, you’re justified in wondering what The Witcher 3 is and how to play it. 

So lace up your leather tights and pick up your swords because we are about to give you the full Geralt of Rivia experience. We’ll take you through the lore and storylines and give you tips and tricks to help you in your exploration of this massive and frankly iconic, open-world role-playing game. 

The Witcher 3: A Comprehensive Guide

The Witcher 3 is hailed as one of the most complex and, at times, overwhelming RPGs around. Even experienced RPG players find it to be a difficult title to immerse themselves in fully. This is why we’ve decided to tell you as much as possible without spoiling the experience. We’ll start with a deep dive into the lore as this will likely be the first time you’re experiencing the vast world of The Witcher game series. 

How to play THE WITCHER 3

The Continent

The Continent is the name of the word in which The Witcher 3 takes place. The game is set during the same time as the Netflix series, so you’ll have ample opportunity to visit your favorite locations. Some of these locations include the Empire of Nilfgaard, the Northern Kingdoms, Redania, the free city of Novigrad, the recently conquered Temeria, the no man’s land of Velen, the Skellige islands, and the Witcher stronghold, Kaer Morhen.

We agree that these names are quite a mouthful, but for the most part, you’ll be too focused on the beautiful scenery each has to offer to be thinking about the Slavonic roots of their etymology. 
Enter A World of Conflict

Surprise! This world is in turmoil too. But there are elves, monsters, and dwarves, so it’s still a good escape from real life. The Continent is the battleground for a war between the Empire of Nilfgaard, ruled by Emperor Emhyr var Emreis, and Redania, governed by King Radovid V. Temeria has recently been conquered. Its capital, Vizima, functions as Emperor Emhyr’s city of residence. 

Your Quest Begins

To everyone’s excitement, you play as Geralt of Rivia, a ruthless but lovable monster hunter – or Witcher – who receives a letter from his long-lost lover, Yennefer of Vengerberg. The letter leads Geralt to meet with Yennefer and travel to Vizima for a rather urgent audience with the Emperor. As it turns out, and here’s where it gets a little complicated, Geralt and Yennefer have an adoptive daughter, Ciri, who is the Emperor’s biological daughter and has gone missing.

Ciri is a Child of the Elder Blood, which basically means she is really important to the Empire because she’s the last heir to an ancient Elven Bloodline. There are thus many creatures, humans and interdimensional beings who want her for various reasons. 

Geralt spends the largest part of the storyline following clues to find Ciri. Most of this involves side quests to find various belongings for other characters in exchange for information on Ciri’s last known location. This is probably the most complex, intriguing, and astoundingly beautiful game of hide-and-seek anyone has ever played. 

Now that we’ve covered the basics of where you are and what you need to do, let’s delve into the actual gameplay. 
How to play THE WITCHER 3

How to play The Witcher 3

Sometimes it’s fun to stumble around a new world in the dark, but in a world as vast and detailed as The Continent, it’s best to have a few tricks up your sleeve. We’ll also give you a rundown of special features in The Witcher. Even if you have the story, character, and political background from the Netflix series, it’s definitely beneficial to know some spells right from the beginning. 
Spell Signs

Witchers are magical beings. Therefore there are spells that you can use to get the upper hand during combat. The Witcher 3 has five spell signs that pack a punch. 

  • Yrden: This is the in-game variant of a casting circle. Once cast, it forms an ensnaring ring around whatever you cast it on and deal damage to its target. 
  • Quen: This is a protective shield that will protect you during battle. 
  • Igni: This one is a short-range projectile blast of fire. You can use this effectively against anything that can burn and any creature that feasts on the dead. 
  • Axii: You can use this spell sign to influence minds. It can incapacitate your enemies in combat and is useful to extract more information than anyone’s willing to give during character interactions. 
  • Aard: Functioning as a telekinetic power, you can use Aard against enemies during combat and blast certain doors and walls open to access special hidden areas. 

Oils

Oils are really useful and are distilled from various natural ingredients and bits and pieces from creatures you’ve killed. Weapons can be anointed with oils to increase their efficacy against certain creatures during combat. Once made, oils are infinitely reusable, but you’ll need to reapply them to your weapons now and then. 

Beast Oil

  • 1x Dog allow
  • 1x Wolf’s liver
  • Gives 10% attack power against beasts

Cursed Oil

  • 1x Dog tallow
  • 4x Wolfsbane
  • Gives 10% attack power against Cursed Ones

Draconid Oil

  • 1x Dog tallow
  • 4x Ergot seeds
  • Gives 10% attack power against Draconids

Elementa Oil

  • 1x Dog tallow
  • 4x Puffball
  • Gives 10% attack power against Elementa

Hybrid Oil

  • 1x Dog tallow
  • 4x White myrtle petals
  • Gives 10% attack power against Hybrids

Insectoid Oil

  • 1x Dog tallow
  • 4x Ranogrin
  • Gives 10% attack power against Insectoids

Necrophage Oil

  • 1x Dog tallow
  • 4x Blowball
  • Gives 10% attack power against Necrophages

Specter Oil

  • 1x Bear fat
  • 4x Arenaria
  • Gives 10% attack power against Specters

Vampire Oil

  • 2x Dog tallow
  • 4x Ducal water
  • Gives 10% attack power against Vampires

Hanged Man’s Venom

  • 1x Dog tallow
  • 4x Arenaria
  • Gives 10% attack power against humans and non-humans
  • Each oil also has an Enhanced and Super Enhanced recipe which requires more ingredients and deals greater damage.

Potions

Potions are consumables that, like oils, don’t need to be remade once you make them. You can replenish them with alcohol by meditating. Potions enhance your performance during tasks and missions once taken. However, they come with a warning; The Witcher 3 has an interesting toxicity mechanic.

So while you can use potions to enhance your performance, you can’t down too many at a time and expect to be okay. Use them with caution. 

How to play THE WITCHER 3

The Witcher 3: Tips and Tricks

With a better idea of how to play The Witcher 3, you should be able to handle the basics. Here are some tips to make sure you succeed in all your missions.

1. Do the Tutorials

The tutorials are there to help you get used to the game’s controls. You’ll learn a few attack functions and how to interact with NPCs and the world around you, so you shouldn’t skip the tutorials. While the controls are fairly standard, The Witcher 3 has more functions and controls than most other open-world RPGs. If you struggle with the PC control layout, try switching to a console controller and see if that makes the gameplay easier. 

2. Do the Side Missions

Some players say that they enjoy the game more when they abandon the storyline and go off on their own. While we suggest this once you’ve played the storyline through, it’s important to remember the value of side missions. These missions are specifically designed to give you loot.

You can pick up loads of cool weapons, upgrades, and ingredients to make potions and oils with. Anything you don’t need, you can sell. Either take the loot to a merchant to get coins in return, or take them to a blacksmith so that he can take them apart and maybe give you pieces you need to upgrade the rest of your weaponry. 

Side missions also give you experience points in the form of levels to give you a better chance when you face off with the really tough monsters. 

3. Keep an Eye on the Bounty Board

The bounty board, a yellow blip on your HUD, is where you can see the contracts you can do. These sometimes stand apart from the storyline and advance your levels just like the side missions do. 

4. Keep Track of Your Bestiary

Your Bestiary is a guidebook of the monsters in the game. Once you confront a monster, it’s added to your Bestiary, sometimes with information on how to beat it and what it’s vulnerable to. Not every monster will have its vulnerabilities so easily laid out, but the Bestiary also contains additional interesting information about the monsters you face. 

5. Repair and Enhance Your Weapons

It should come as no surprise in a game as well thought out and complex as The Witcher 3 that your weapons don’t have infinite durability. You need to upgrade your weapons whenever you can to give yourself a better edge against enemies. Also, keep track of how much of a beating has taken. The last thing you want in battle is to be let down by your trusty blade. 

6. Use the Right Sword

This is a new one for anyone exploring The Witcher for the first time. Geralt carries two swords on his back. One is a pretty standard longsword; the other is made from silver. The silver sword is effective against monsters; Your longsword is effective against humans. So if you’re wondering why you aren’t doing much damage to your enemies, you might be using the wrong sword.

How to play THE WITCHER 3

Netflix’s The Witcher TV series

There’s some history to how The Witcher spread from the original books by Andrzej Sapkowski. The games are seen as sequels to the books, continuing the stories for the fans.

When it comes to the Netflix show, it mostly covers scenes and events from the books, which is why the timeline with the games isn’t exactly the same. However, there are some inspirations from the games, such as Geralt’s deep voice and some of the fight scenes.

The Game that Has it All

The Witcher 3 is about as comprehensive as an open-world role-playing game gets. You won’t regret trying this game out with a seemingly infinite world that is fine-tuned to the most minute detail to explore and weather effects, reflections, and mechanics to bring it all together.

There’s a reason it’s one of the most highly-regarded RPGs in existence. Hopefully, we’ve given you enough reasons, tips, and tricks to pick up your sword and help Geralt on his quest to find Ciri.

Easily fix 3 problems with VLC Media Player

VLC Media Player is one of the most powerful and capable media player tools available for Windows. This utility is usually the utility of choice when it comes to formats of video playback files that Windows Media Player simply doesn’t support. In fact, many users end up making VLC Media PLayer their default media player.

VLC Media Player DOWNLOAD

While VLC Media Player usually delivers outstanding quality playback of various video and audio formats, the tool is not completely exempt from error. In the article below, we’ll highlight the three most prevalent issues that you may encounter while using VLC Media Player. We’ll also show you how to fix them and prevent them from happening again in the future.

The 3 most prevalent VLC Media Player Issues

It would be pointless to give you a guide on how to fix the various issues we’ve found with VLC Media Player without first giving you an overview of what those issues are. We won’t spend long on this section, though. 

All three of these issues may present themselves while you’re trying to play a media file, which makes them even more frustrating. The three issues are:

  • VLC Media Player causing media files to lag, skip, or stutter.
  • Media files in VLC Media Player becoming scrambled.
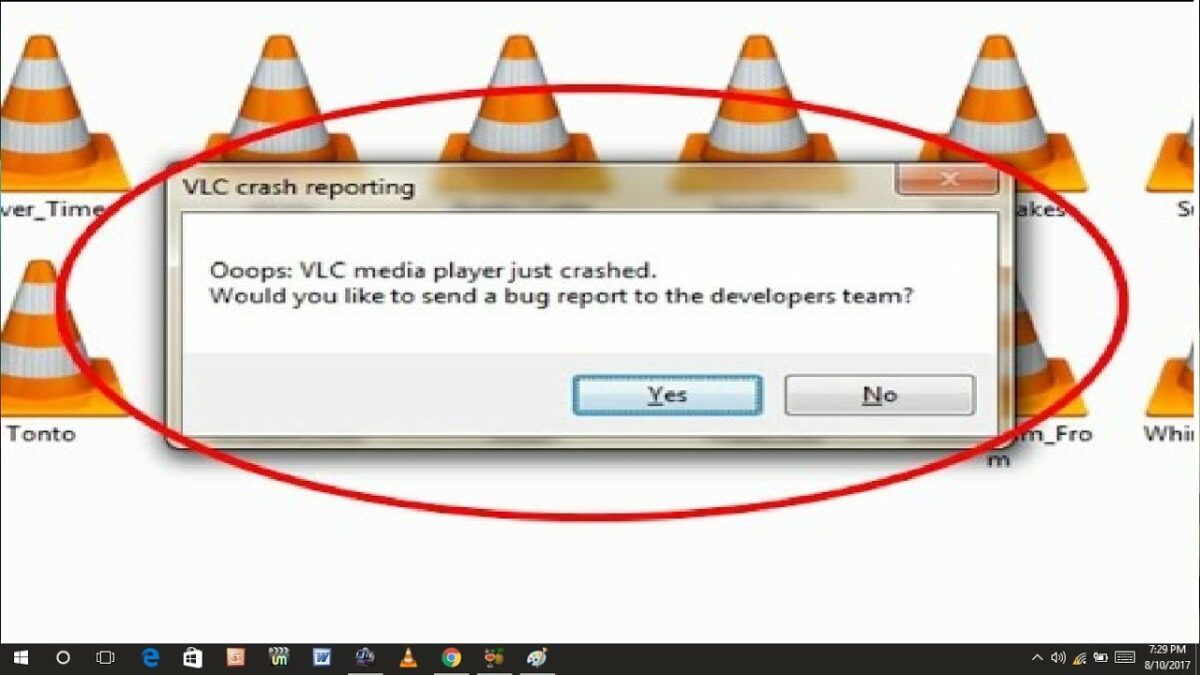
  • VLC Media Player crashing during playback or simply not starting at all. 

Below, we’ll take a look at how to fix these issues and ensure that they never plague your VLC Media Player playback experience again. We’ve got multiple solutions for each failure, so if one doesn’t work, just go ahead and try the others. You should find at least one solution that works for whichever instance of failure you’re experiencing.

How to fix these 3 VLC Media Player problems

  1. Stuttering, Lagging and Skipping

    How to Fix 3 Problems With VLC Media Player

    – First solution: Look for the File Caching option in Settings under Input/Codecs. Change the value from 300 to 1000 and save.

    – Second solution: Open the VLC media player, press CTRL + P to show Settings. Select All. Go to Input/Codecs. Disable hardware-accelerated decoding.

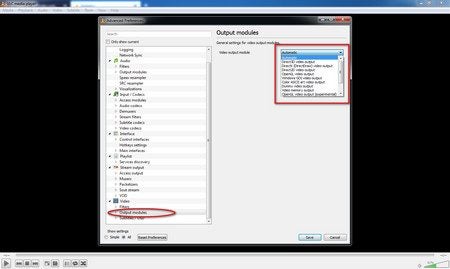
    – Third solution: Open the VLC player, press CTRL + P to show Settings. Go to the Video Output module and try the options until you find one you like.


  2. If Video Playback is Scrambled

    How to Fix 3 Problems With VLC Media Player

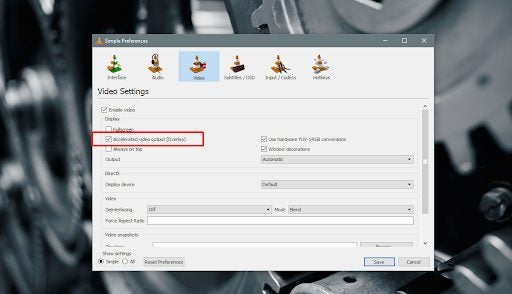
    – First solution: Open the VLC media player and press CTRL + P to open Preferences. Select Video. Under Display turn off Accelerated video output and save.

    – Second solution: Open the VLC player, press CTRL + P to show Settings. Select Input/Codecs. Find Advanced and Network Caching. Increase the caching value.

    – Third solution: Instead of playing the video from a network drive or DVD, copy it onto your desktop. This often works if nothing else will.


  3. The VLC Player Crashes

    How to Fix 3 Problems With VLC Media Player

    – First solution: Exit the VLC. Double click This PC/My Computer. Click View and Check for Hidden files. Open C:\User\User_Name\AppData\Roaming\VLC. Right-click VLCC and rename it.

    – Solution 2: In File Explorer in Windows 10, find the right 64-bit or 32-bit Program File, click on exe, select Properties and run it in Compatibility Mode.

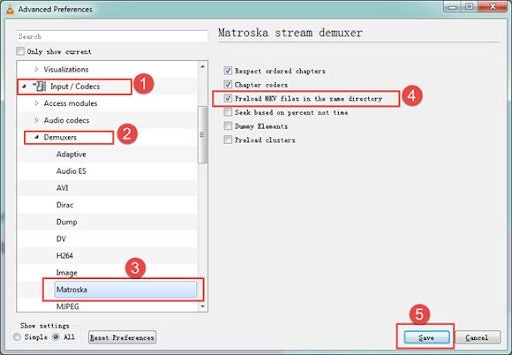
    – Solution 3: Try Disabling Pre-loading MKV Files. If that fails, reinstall the VLC player. Uninstall it in Apps and Features, reboot your computer and reinstall the VLC setup from the official website.


Keep Your VLC Player Operating Smoothly

VLC Media Player has become somewhat of a staple for people who need a tool that can play various media formats. Even though the tool works well most of the time, it has been known to present users with issues every now and again.

Despite this, VLC Media Player has been around for quite a while and is still one of the most reliable such programs for Windows. You can even record with VLC Media Player these days.

If you run into any issues, try the solutions we’ve outlined above, and you should be good to go again. If you’re looking for other guides for VLC Media Player usage, try our guide on how to edit videos within VLC Media Player.

How to Edit Video in VLC Media Player READ MORE

How to Auto Connect AnyDesk in 3 Simple Steps

AnyDesk lets you connect to and interact with other desktops and devices remotely. This is an invaluable tool to have if you work from more than one device. Left your laptop at home and need a file not stored on the cloud? Simple! Just log into AnyDesk and browse your laptop’s files remotely with ease.

AnyDesk DOWNLOAD

It can, however, be a little inconvenient to have someone else on the other side to allow access to the other device. The way AnyDesk works is that you need the device’s address or ID to establish a connection. You’re up the creek without a paddle if you don’t have access to these two resources. In the article below, we’ll show you how to auto-connect to any of your devices with AnyDesk in 3 simple steps.

Steps to auto connect to AnyDesk remotely

  1. Have AnyDesk installed on applicable devices

    How to Auto Connect With AnyDesk

    Before you can use AnyDesk, you’ll need to make sure that you have the utility installed on both the devices you wish to connect. If you intend to create a network of various connected devices, each of these will need to have the app installed.

    No matter which device you have, or want to connect to, the installation process is painless and quick to complete. The added benefit of AnyDesk is that you can connect to any supported OS, even if each device runs on a different system. Cross compatibility at its finest.

  2. Set Password on Remote Device

    How to Auto Connect With AnyDesk

    Now, you need to open AnyDesk on the remote device you wish to connect to. Yes, this means that the remote device still needs to be local for this step. Do this before you forget your laptop or phone at home. 

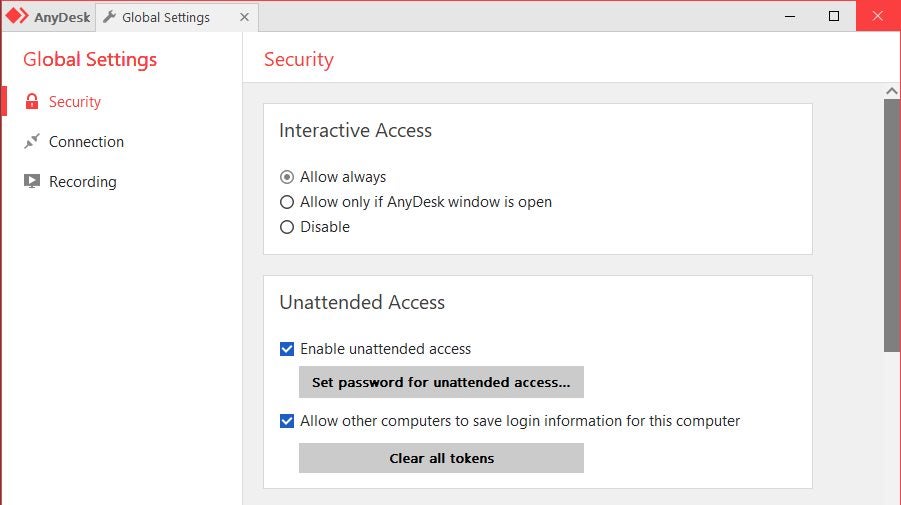
    Next, navigate to the Security tab within the AnyDesk menu on the left-hand side of the screen. You’ll want to make sure that the option for unattended access is enabled, and then you’ll want to set a password for unattended access so that only you can access the remote device unattended.

    Click on ‘Set Password for Unattended Access’ and enter a password of your choice. Note: ‘Password’ has never been a safe password and ‘1234’ should have been made illegal a long time ago. While we’re on the subject, if you’re required to use a special character, get creative. The exclamation mark is not the ‘special’ character you think it is.

  3. Connect remotely from your local device

    How to Auto Connect With AnyDesk

    This step is for once you’ve inevitably left an integral piece of tech at home, work, or anywhere else. 

    Now that you have remote access set up with a password on the PC you want to access, you can connect to it. To do this, all you need to do is launch AnyDesk and then start a remote session.

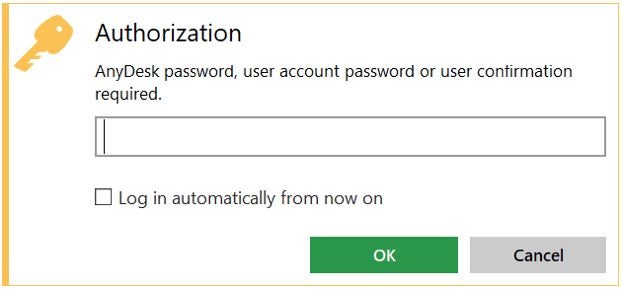
    You should see the Authorization dialogue appear. Here, you’ll be able to input the password you set up for the remote device when it was still a local device.

    Next, check the box ‘Log in Automatically From Now On’ if you plan on leaving your devices anywhere apart from where you need them again. (Who plans that? Just check the box for safety’s sake)

    Now you can click on ‘OK’ to connect to the remote computer and control that device. It is essential to know that if you have selected the option to log in automatically, AnyDesk does not save the password. Instead, it generates a specific token for that connection.

    This means that even if someone else has access to your computer, they will not be able to see the password to the other computer. This keeps the information safe and secure. So please, remember your password; AnyDesk isn’t Google and won’t do it for you.

Connect Remotely With Unattended Access

Welcome to the future. You can now connect to any of your supported smart devices with the click of a button. Better yet, you don’t need an assistant, messy roommate, or nosey relative around to give you access to your remote devices.

All you need to do is log in and connect. With AnyDesk, it really is that easy. If you’re using a phone, here’s a quick guide on how you can connect to AnyDesk from your mobile device.

How to Use AnyDesk on your Phone READ MORE

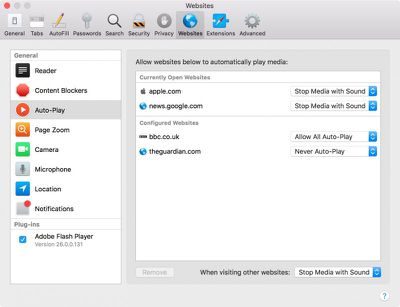
How to Unblock Plug-In Safari

Safari is a powerful web browser for Apple devices, and older versions of the Windows 10 operating system. This browser lets you synchronize passwords, history, bookmarks and other core features of your browsing activity across your Apple devices. This means you can switch between devices with ease and expect to have all your favorite content at your fingertips, no matter which device you use. 

From time to time, however, you may see the dreaded ‘missing’ or ‘blocked plug-in’ pop-up, which can throw a spanner in the works where your browsing pleasure is concerned. To mitigate the prevalence and impact of these dreaded pop-ups, we’ve formulated 5 simple steps by which to unblock your Safari plug-ins. 

What is a Safari plug-in?

Plug-ins on Safari are essentially like extensions on Google Chrome. Just like extensions, plug-ins are utilities that you can download onto your Safari browser that increase your browser’s functionality and often the convenience with which you can perform certain tasks within Safari.

There is a wide array of plug-ins for Safari and each is specifically designed to make certain processes easier or extend the usability of your browser. Plug-ins also often let you personalize your browser in ways that are natively not possible, resulting in streamlined browsing experience that specifically caters to your individual needs. 

What does ‘missing plug-in’ mean?

If you use any plug-ins on Safari, you’ll notice that you usually see this message pop up after an update. When you update your system, either your macOS software or your Safari utility, your browser is likely to disable any additional content like plug-ins. This is a setting that a lot of software manufacturers put into their products.

Essentially, this stops any outdated plug-ins, mods, add-ons, or other custom content from conflicting with the updated software and causing massive issues with either the software or your device on the whole. In some cases, only specific plug-ins that are no longer supported or might be out of date are disabled. 

How to unblock plug-ins on Safari in 5 simple steps

Luckily, unblocking plug-ins on Safari is a really easy process. All you need to do is follow the 5 steps below and you’ll be browsing happily again in no time.

  1. Head to Safari

    How to Unblock Plug-in on Safari

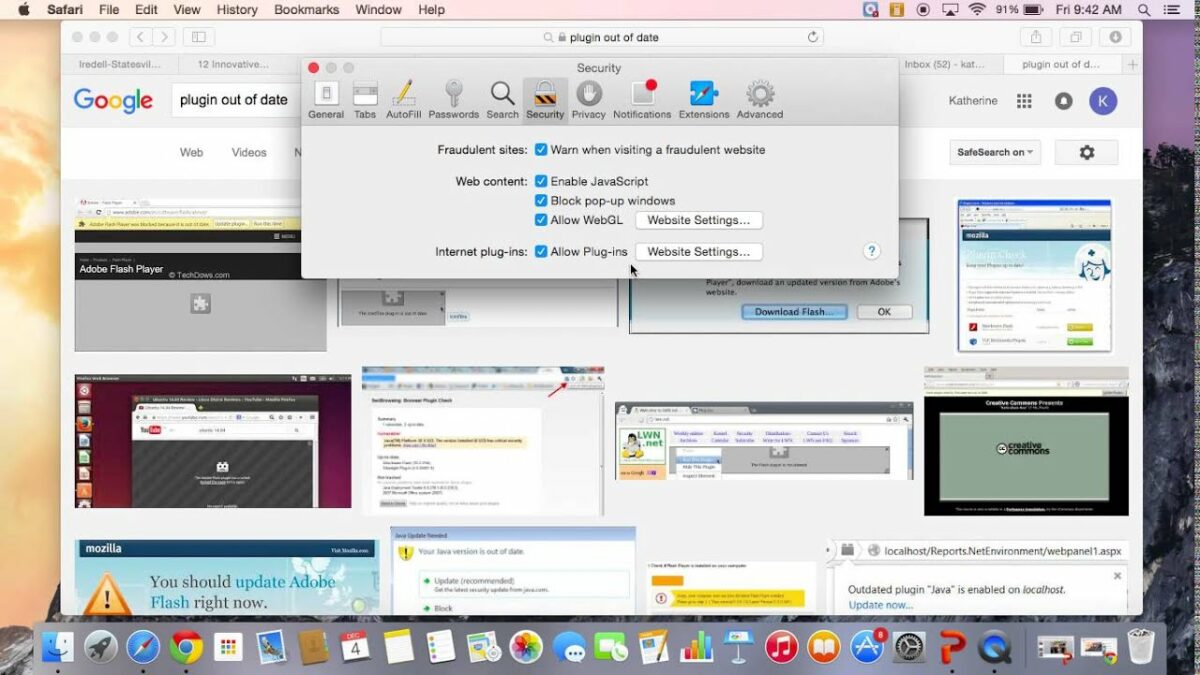
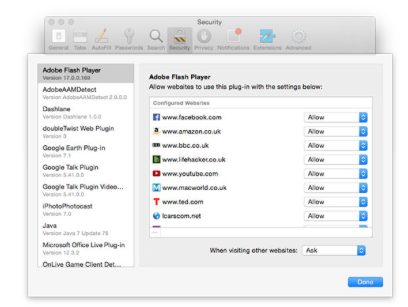
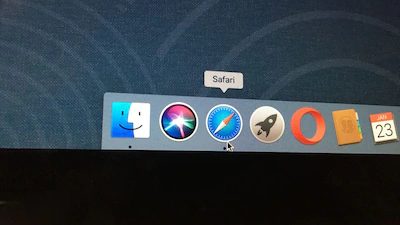
    The first step is to open your Safari browser and head to your browser preferences. You’ll find the preferences option in the top left-hand side corner of your browser interface.

  2. Security

    How to Unblock Plug-in on Safari

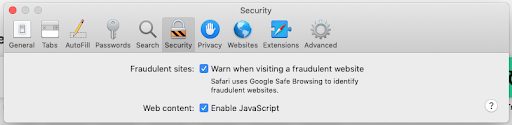
    Next, you’ll want to navigate to the Security option and click it. Here, you’ll find all of the security-related settings and features that your browser has to offer.

  3. Website settings

    How to Unblock Plug-in on Safari

    Once you’re in the security settings, you’ll need to head to Website Security. This is where you’ll find your plug-in management options and settings. Once there, click on Allow Plug-ins.

  4. Plug-ins

    How to Unblock Plug-in on Safari

    Now, you should see a list of all of the plug-ins you have installed in your browser. From here, you can click on the plug-in that you want to reactivate or enable.

  5. Done

    How to Unblock Plug-in on Safari

    Once you’ve reviewed the activation status of all the plug-ins in question, you can exit the settings interface and resume browsing. For good measure, restart your Safari browser to ensure that the settings you’ve changed take effect properly.

Why are so many plug-ins getting blocked? 

There’s a very good reason a lot of plug-ins are facing blockage by Safari lately. Recently. Apple made the decision to block all outdated versions of Adobe Flash. Adobe Flash is a multimedia software utility required to run animations, desktop applications, mobile apps, games, and rich web utilities. Adobe Flash is also integral in the operation of utilities like browser plug-ins.

The decision to block outdated versions of Adobe Flash is one that Apple hasn’t made lightly. Older versions of the utility tend to crash various processes and other utilities that it can no longer support. Newer utilities and plug-ins require newer versions of Adobe Flash, and the older versions are more prone to crashes and bugs. Every time software is updated, holes are patched and the utility becomes more secure for users to interact with. 

The fact that so many plug-ins are being blocked from time to time basically forces Apple users to update their Adobe Flash players, therefore making their devices and the apps they interact with safer and more secure. In fact, in numerous instances, if you follow the ‘blocked plug-in’ dialogue, you’ll be redirected to a page where you can update your version of Adobe Flash.

10 hidden WhatsApp tricks for desktop

Learn keyboard shortcuts as well as other tricks on WhatsApp for desktop!

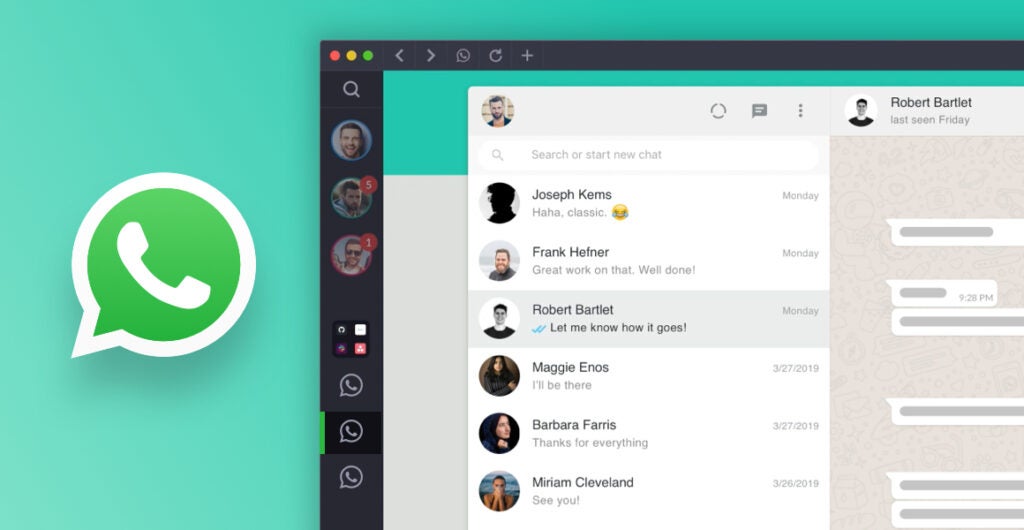
WhatsApp is one of the world’s favorite means of communication. Since the events of 2020, much of the world’s population has moved into a new work-from-home normal. The shift in how the world operates has seen an increase in their reliance on communication software like WhatsApp. However, people aren’t just using WhatsApp on their phones anymore.

WhatsApp DOWNLOAD

One of the most convenient ways to use the app is through the WhatsApp Web portal. Apart from letting you communicate while working without having to look at your phone, WhatsApp Web offers many distinct advantages to the conventional mobile app. Below, we will give you five quick tricks to get the most out of your WhatsApp Web usage. 

Opening WhatsApp Web properly

The first WhatsApp Web-associated trick we have for you is how to open the utility. If you think about it, no trick we share with you would be worth anything if you don’t know how to open WhatsApp Web. 

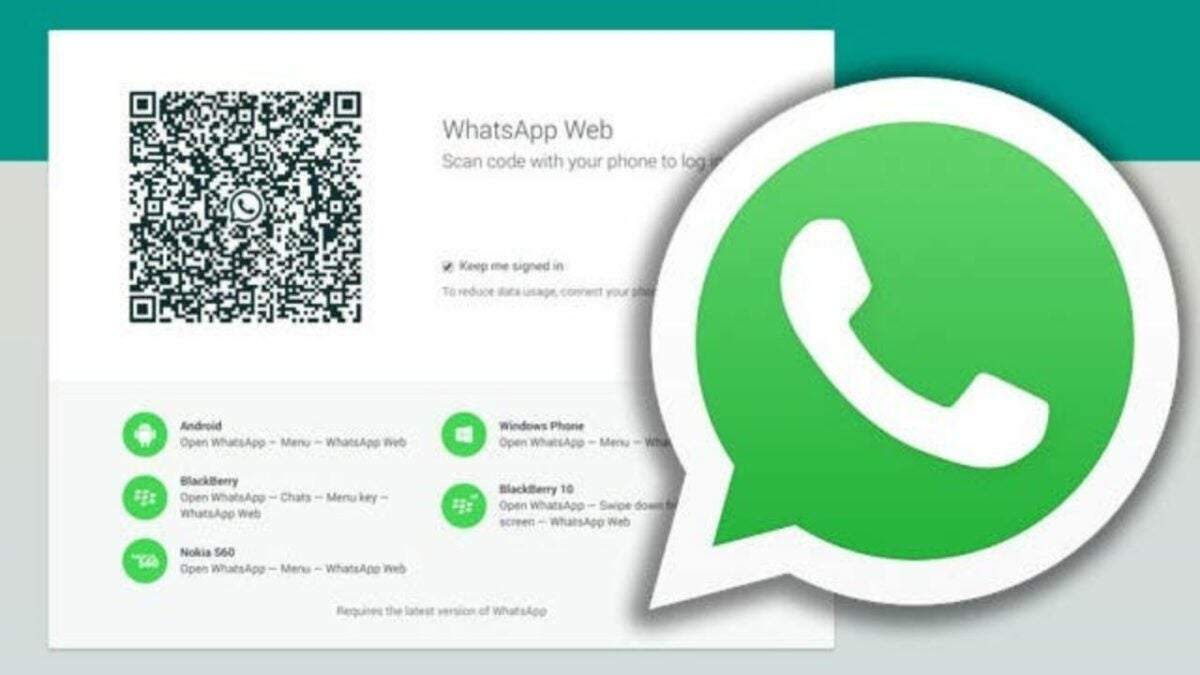
Open your desired browser and head to web.whatsapp.com. This is the official portal for WhatsApp Web. Here, you’ll see a QR code with the WhatsApp logo at its center. 

Get your phone out and open up WhatsApp. Click on the kebab menu at the top right-hand side of the screen and click on Linked devices. Click on the green Link a Device button and then point your camera at the QR code on your computer screen. 

You’ll need to wait a few seconds for WhatsApp Web to initialize, but you’ll now have access to all the functionality of Whatsapp, but from the comfort and superior typing capabilities of your computer. Neat!

Keyboard shortcuts

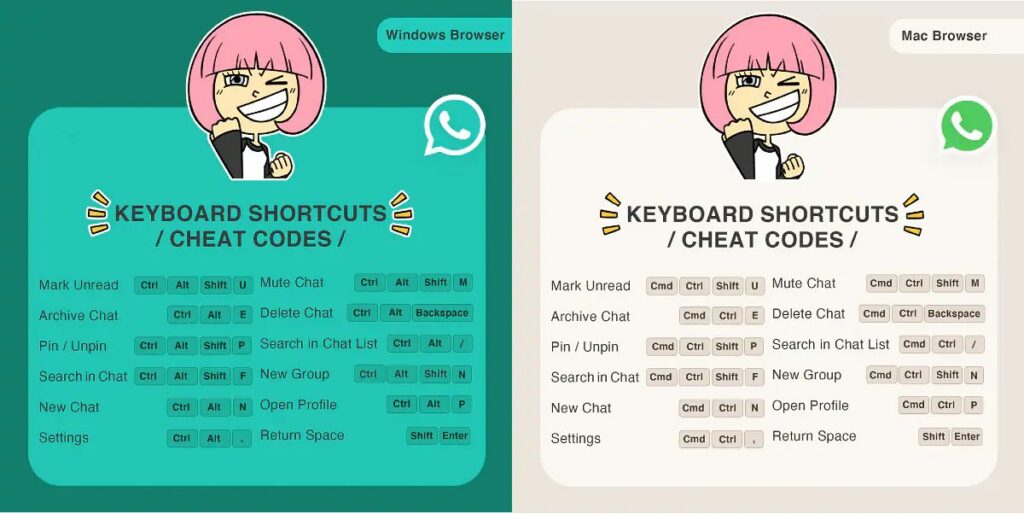
Keyboard shortcuts are the biggest advantage that WhatsApp Web has over its mobile-based counterpart. Claiming mastery over the shortcuts listed below will unleash the typing ninja within you and increase your productivity as you ditch your mouse for keyboard-only control of your WhatsApp Web environment. 

  • Ctrl + Alt + Shift + U: Mark as unread
  • Ctrl + Alt + Shift + M: Mute
  • Ctrl + Alt + E: Archive chat
  • Ctrl + Alt + Backspace: Delete chat
  • Ctrl + Alt + Shift + P: Pin chat
  • Ctrl + Alt + / (forward slash): Search
  • Ctrl + Alt + Shift + F: Search chat
  • Ctrl + Alt + N: New chat
  • Ctrl + Alt + Shift + N: New group
  • Ctrl + Alt + P: Profile and About
  • Ctrl + Alt + , (comma): Settings
5 quick tricks for WhatsApp Web

Multiple WhatsApp accounts from one PC

Many people have multiple mobile devices for work and private use and therefore may have two or more WhatsApp accounts. If this is the case, it’s more than possible to run separate accounts on WhatsApp Web as well. Unfortunately, you can’t just open WhatsApp Web in two different browser tabs. WhatsApp Web isn’t able to open two different profiles in one browser. There is, however, a workaround for this.

You could get around this bug by opening up one standard tab and one incognito tab. WhatsApp will register the two tabs as separate entities and therefore allow the usage of separate accounts. However, WhatsApp will only let you use the service from an incognito tab for an hour before automatically logging you out. 

Another workaround is to use a separate browser altogether. I have Brave installed for this and other reasons. However, most people who use Google Chrome will already have Microsoft Edge installed natively on their PCs. 

5 quick tricks for WhatsApp Web

Format WhatsApp messages

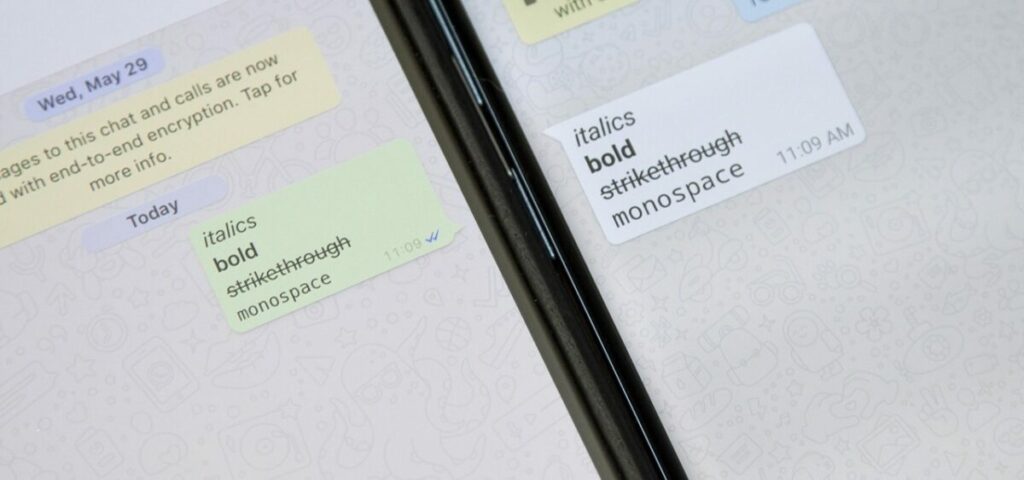
Formatting is a means of applying emphasis to various parts of a message. Whether you embolden certain words to draw attention to them or need to italicize quoted content, it’s always handy to know how to add more depth to a text on WhatsApp Web. Here are the four ways in which you can format WhatsApp texts: 

  • Bold: Place an asterisk (*) on either side of your text.
  • Italic: Place an underscore (_) on either side of your text.
  • Strikethrough: Place a tilde (~) on either side of your text.
  • Monospace: Place three backticks (“`) on either side of your text.
5 quick tricks for WhatsApp Web

WA Web Plus

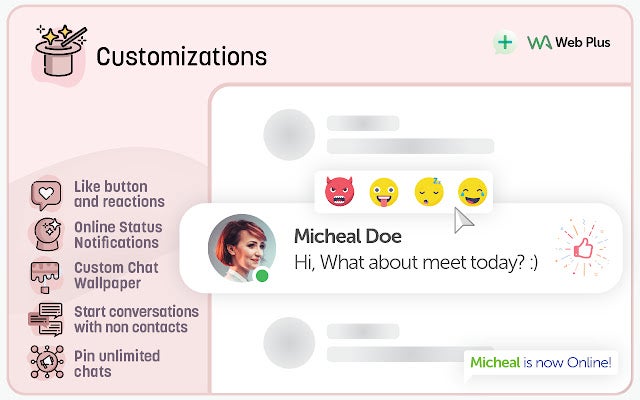
This is a fantastic extension for WhatsApp Web that you can pick up from the Chrome Web Store. WA Web Plus brings in so much functionality from the mobile variant of WhatsApp in addition to introducing completely new content and customization options. 

Privacy options

WA Web Plus lets you blur out your private information so that anyone looking over your shoulder can’t see what you don’t want them to be able to. You’re also able to restore deleted messages and lock your WhatsApp screen without locking the rest of your device with this utility. This ensures your privacy like not many other extensions for WhatsApp Web can. 

Customization options

With WA Web Plus you can have the mobile like and reaction buttons on WhatsApp Web as well as the ability to see whether your contacts are online. This utility also gives you the ability to customize your chat screen wallpaper. You can also start conversations with people not on your mobile contact list and you can pin unlimited chats. 

Business tools

The best thing about WA Web Plus is that it adds numerous business tools that you can use to streamline how you use WhatsApp Web in a professional setting. With this utility, you can export contacts, chats, groups, and labels to excel spreadsheets, implement smart auto-replies, and initiate multiple message broadcasting

5 quick tricks for WhatsApp Web

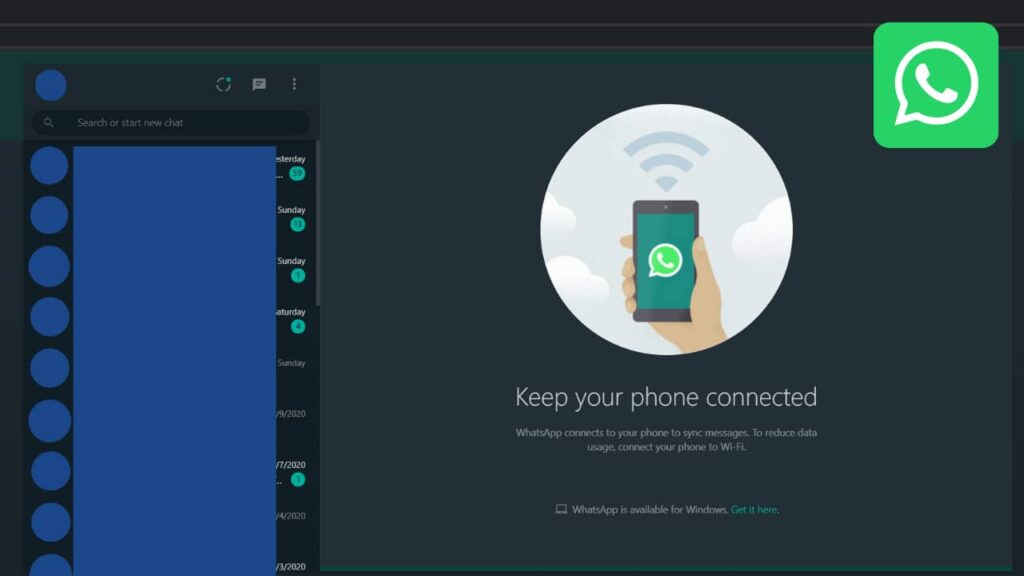
Dark mode for WhatsApp Web

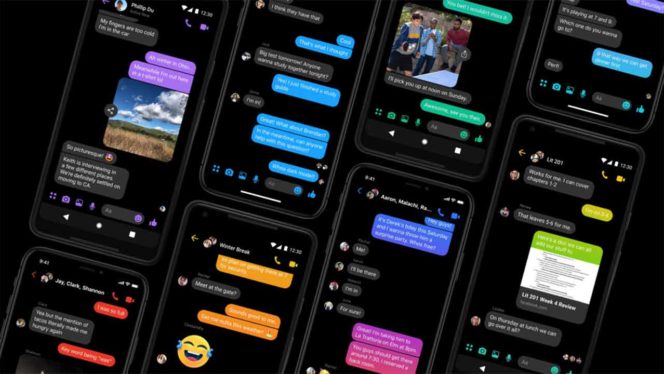
Dark mode is one of the most important innovations to hit WhatsApp in the last few years. This mode means you can use WhatsApp at night or in low light conditions without detrimental effects on your ocular health. Now, you can use dark mode on WhatsApp Web too! Here’s how:

  • Click the kebab menu to open the options list.
  • Click Settings.
  • Click Theme.
  • Select Dark.
  • Click OK.

Here’s a guide on how to activate dark mode for Whatsapp on your phone:

How to activate dark mode in WhatsApp and Messenger READ MORE
5 quick tricks for WhatsApp Web

WhatsApp for work

This featurette is thanks to another useful Google Chrome extension for WhatsApp Web. Cooby gives you access to far superior organizational tools and options than WhatsApp Web natively has, and makes it easier to keep track of important messages and text threads. So many users have already used WhatsApp to launch and operate their businesses.

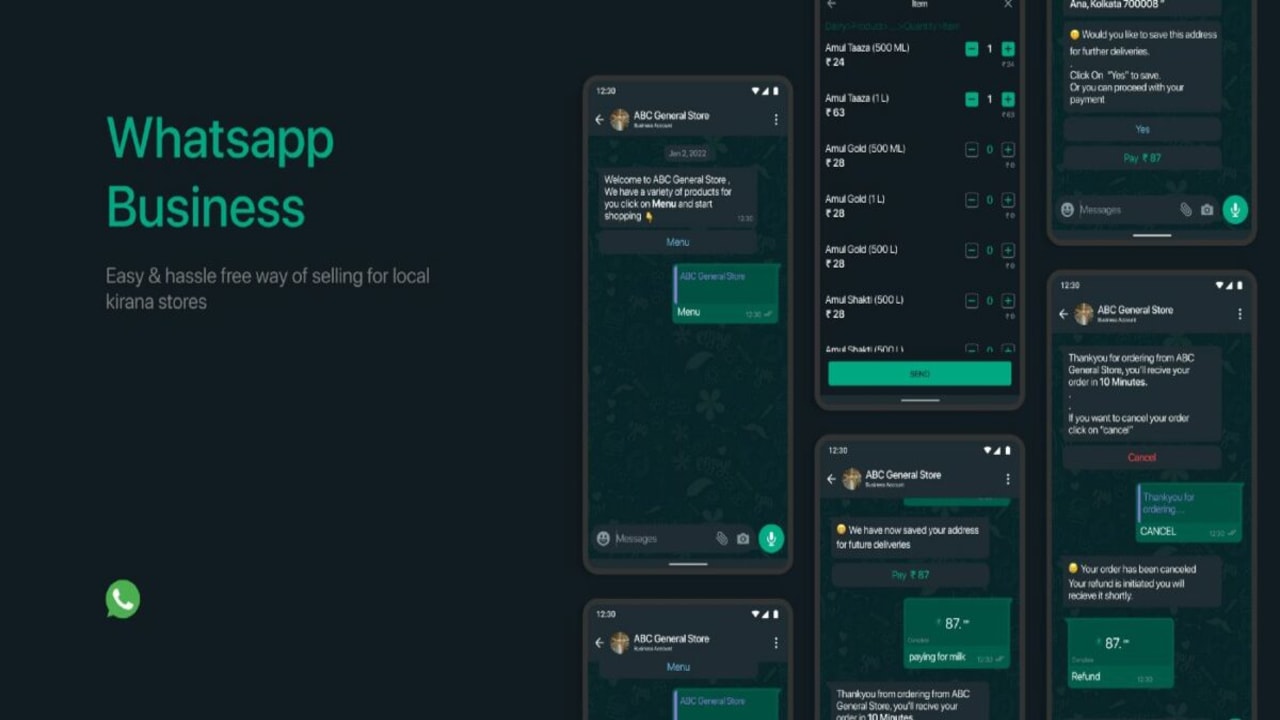
Such is the case with a lot of the local Kirana stores in India. Cooby makes this WhatsApp x Business idea a reality for users who primarily use their desktop or laptop devices for work. 

India’s famous Kirana Stores could see a 21st century Whatsapp-based revamp READ MORE
WhatsApp tricks for desktop

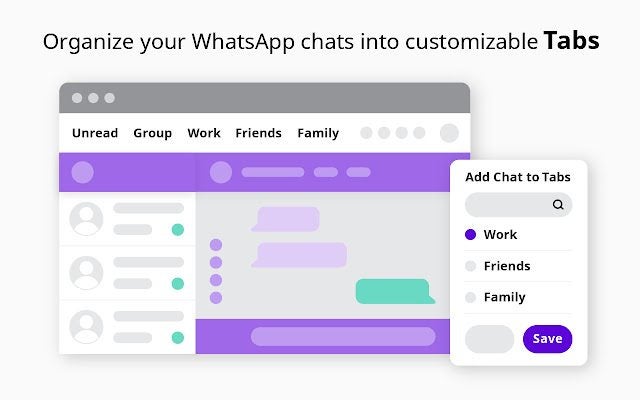
Tabs!

Cooby introduces the ability to sort your chats into tabs, according to your needs. This means you no longer have to undertake those endless scrolling missions while trying to find an important chat thread. 

Productivity boost

Nothing eats away at productivity like an inefficient organizational scheme. If WhatsApp Web is your primary means of doing business, you need an organizational system that keeps you operating at peak functionality without having to dedicate too much time to your busy schedule to keep organized.

Enter Cooby’s Notes, Reminders, Share conversations, and Schedule events features. Take down important chat-or-contact-specific notes, synchronize events with Google Calendar, share conversations with a simple link, and so much more!

Be sure to check out our guide on using WhatsApp to be more productive.

WhatsApp pop-up

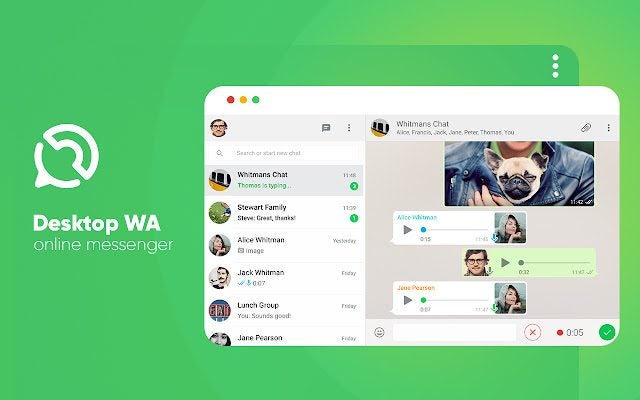
Instead of having WhatsApp Web open permanently in a tab – we know how temperamental Google Chrome can be with too many tabs open – try using WhatsApp Web as a convenient pop-up. Desktop WA is another really cool extension for Chromium-based browsers if you want more flexible WhatsApp Web usage.

This extension opens WhatsApp Web up as a pop-up every time you click on the extension. This means that WhatsApp Web is only open when you need it. As soon as you’ve conducted your WhatsApp-based business, simply click on the extension panel again the pop-up will vanish. No more tab wastage in Google Chrome! 

WhatsApp tricks for desktop

Avoid the dreaded blue-tick-of-death to your snooping habits

Let’s face it, sometimes we want to be able to read messages without having to respond immediately or provide instant acknowledgement to the neurotic texter on the other end of the line. An even more practical example is when you’re communicating with that person that can’t say what they need to say in one message and splits their transmission over 400 messages and give-or-take 3 hours of your life. If you want to read their rant without them knowing that you’ve been reading it the entire time and thus expecting an instant reply, here’s a trick.

Leave your Whatsapp Web tab open, but drag another tab partially over it. This is to trick your device into thinking you have no interest in what’s going on within the confines of your WhatsApp Web tab, even though your eyes are glued to the screen as if it’s a presidential debate or the Detroit Lions getting thrashed, again. It’s human nature to not be able to look away from a trainwreck, pick your poison. 

You’ll need to have your mouse pointer on the upper tab though. If your pointer is on the WhatsApp Web tab, it’ll register as the active tab and the trick won’t work. Essentially, if the WhatsApp Web tab is obscured and doesn’t register as the tab currently in use, the messages coming through won’t be blue ticked on the other side of the screen, even though you’re reading through them all, popcorn in hand. 

WhatsApp tricks for desktop

Drag & Drop

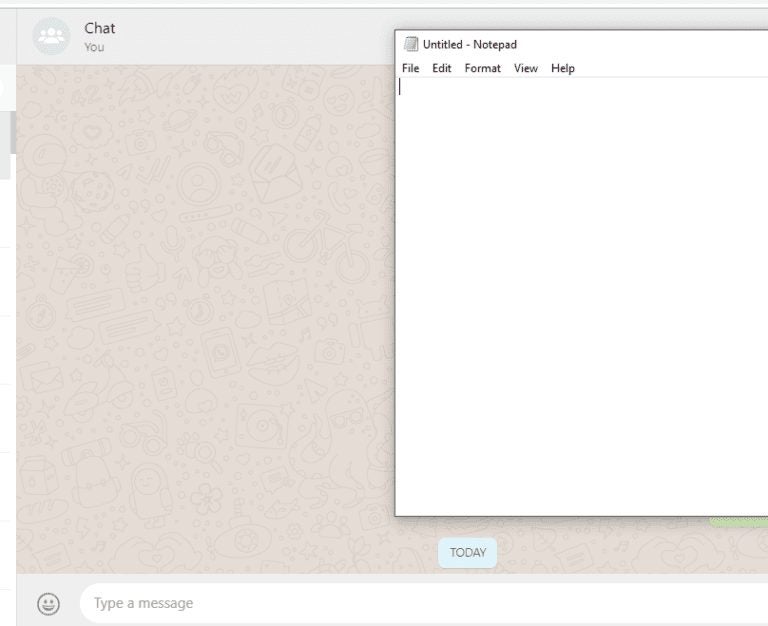
Being able to drag & drop content is one of my favorite functions of any desktop-based utility. WhatsApp Web is no different. The WhatsApp chat interface is as easy to navigate as that of the mobile variant and even looks almost identical, apart from the proportion adjustments to make the app more functional from a bigger landscape-oriented screen. In the same way that you click on the paper clip icon to send an extended selection of content formats in the WhatsApp mobile app, you do the same on WhatsApp Web. 

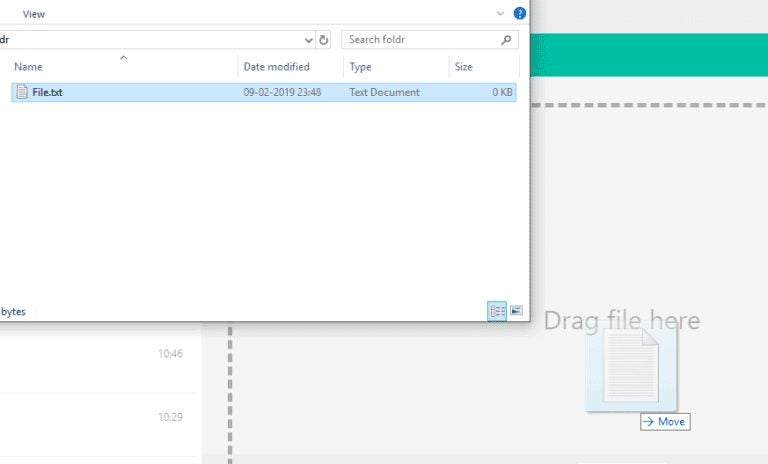
When you click the paper clip, located on the bottom right-hand side of the screen, you should see a new interface open up. This new interface will resemble your file explorer, and you’ll be able to search for files here. You’ll also see a broken-line frame in the chat interface. When you’ve found the file you want to send, simply click on it and drag it to anywhere within the broken-line frame. When you drop it here, it’ll be sent as an attachment

Just bear in mind that WhatsApp has increased the size of file transfers, so you can send larger files now.

WhatsApp becomes a little bit more like Telegram READ MORE
WhatsApp tricks for desktop

Make the most out of Whatsapp Web

The quick tricks we showed you above are bound to turn you into a WhatsApp Web wizard and drastically increase how productively you use the web-based WhatsApp utility.

Make sure you don’t miss out on any of our other handy WhatsApp guides:

What is Apex Legends and how to play: the definitive guide

Here’s everything you need to know to win Apex Legends.

Both battle royale and first-person shooter (FPS) games are increasingly popular. The opportunity to engage in battle against enemy combatants either solo or as part of a team appeals to gamers worldwide. Among the most well-known titles is Apex Legends. But if you’re new to the FPS scene, you might be wondering what exactly Apex Legends is and how to play it

Don’t wander any further; we don’t want you to get lost. Instead, carry on reading, and we’ll answer those questions and many more in our definitive guide to the FPS battle royale wonder that is Apex Legends. 

What is Apex Legends?

Apex Legends is a multiplayer battle royale first-person shooter phenomenon published by the gaming giant Electronic Arts. As suggested by the name, Apex Legends works a little differently from most other battle royale or FPS games. Instead of spending hours customizing every detail of a character of your own creation, you choose from a set selection of fighters called Legends. Each Legend has distinctive abilities and complements various play styles, no matter your level of experience. 

Apex Legends

How to play Apex Legends

If you’re eager to play Apex Legends, you simply need to download the free file onto your platform and install it. You’ll need to have enough space and the minimum requirements for your device, which differs between PC, Xbox, PlayStation, and Switch. Remember to keep the game updated, as you won’t be able to play the multiplayer battle royale matches with outdated software.

As soon as you have Apex Legends, you’ll need to follow our guide below to beat other online players and become victorious. There are plenty of customization options, and you’ll have to enter a lobby before you can start the battle.

What is Apex Legends and How to Play

Apex Legends complete guide with tips and tricks

Now that you’ve seen what Apex Legends is and how to play it, it’s time for us to show you some tricks to becoming the best player. 

Choosing a Character

At present, there are 18 Legends to choose from. However, new characters are added periodically, so there’s always hope to see a few new exciting faces on the battlefield. One thing to note is that the detail that has gone into each character is unparalleled and lends itself well to creating a diverse team, should you choose to play teams. 

There are numerous characters to suit your play style, whatever that may be. Below we’ll highlight five diverse characters that make excellent choices for team setup. 

Ash

Ash is a silent assassin. If you like hunting down enemies with little chance of them realizing before it’s too late, Ash is perfect for you. 

  • Tactical ability: Arc Snare – Ash throws a spinning snare that damages and tethers the first enemy that gets too close to her. 
  • Passive ability: Marked for Death – Ashe’s map shows the location of all recent deathboxes. Press on a deathbox to mark surviving attackers; you can do this once per box. 
  • Ultimate ability: Phase Breach – Ash can tear open a one-way portal to a targeted location. 

Bloodhound

Bloodhound is a reconnaissance master. If you like to track trace and hunt your enemies down with precision rather than blind luck, Bloodhound should be your choice. 

  • Tactical Ability: Eye of the Allfather – briefly reveals hidden enemies, traps, and clues throughout structures in front of Bloodhound. 
  • Passive Ability: Tracker – see tracks left behind by Bloodhound’s foes.
  • Ultimate Ability: Beast of the Hunt – enhances Bloodhound’s senses, allowing it to move faster and highlighting its prey.

Gibraltar

Gibby is a tank. Should you prefer to ram your way into battle and overpower enemies with sheer size, strength, and brute force, Gibby is your guy. 

  • Tactical Ability: Dome of Protection – Gibby throws down a dome shield that blocks attacks.
  • Passive Ability: Gun Shield – Aiming down sights deploys a gun shield that blocks incoming fire.
  • Ultimate Ability: Defensive Bombardment – Gibby can call in a concentrated mortar strike on a marked position.

Lifeline

This is your team’s designated healer. Lifeline lets your team stay kitted out and healthy. 

  • Tactical Ability: D.O.C. Heal Drone – Call Lifeline’s Drone of Compassion to heal nearby teammates overtime automatically.
  • Passive Ability: Combat Medic – Deploy D.O.C. to revive teammates, leaving Lifeline free to move and defend.
  • Ultimate Ability: Care Package – Call in a drop pod full of high-quality defensive gear.

Wraith

Wraith is a fan favorite and simply had to be included in this list. Players love her teleportation ability and her tiny hitbox, making her more difficult to wound. 

  • Tactical Ability: Into the Void – Reposition quickly through the safety of void space, avoiding all damage.
  • Passive Ability: Voices from the Void – A voice warns Wraith when danger approaches.
  • Ultimate Ability: Dimensional Rift – Wraith can link two locations with portals for 60 seconds, allowing the entire team to use them. 

Choosing the right character for your role in the team is incredibly important, but so is choosing the right weapon. 

What is Apex Legends and How to Play

Guns and Weapons

Apex Legends comes equipped with more original weapons than you’d ever need in combat. It’s always nice to be spoiled for choice, though, and with the weapons below, you certainly will be. The availability of firearms in Apex Legends differs between game modes.

In Battle Royale, Legends drop into the game without weapons and get them from any suitable loot source. In Arenas, players purchase weapons before the match begins. No matter which game mode you choose, your Legend can carry two weapons simultaneously. 

Guns

There are seven classes of guns in Apex Legends. Each class has assorted firearms to choose from, each with slightly varied characteristics. The classes are as follows:

  • Assault Rifle
  • SMG
  • LMG
  • Marksman Weapon
  • Sniper Rifle
  • Shotgun
  • Pistol 

Each gun has specific types of ammo it accepts. There are six types in total. Every type of ammo has a different likelihood of spawning. Some are much rarer than others, but they usually spawn near the weapon they’re suited to load. Here are the six types of ammo:

  • Light rounds
  • Heavy rounds
  • Energy ammo
  • Shotgun shells
  • Sniper ammo
  • Arrows

Every gun also has a specific firing mode. These are either automatic, single shot, or burst shot. Some firearms can cycle through different firing modes, but most only use one. Automatic lets the weapon fire rounds as long as the trigger is pulled, and single-shot means the weapon only fires once with each trigger pull. Weapons with burst shot fire multiple rounds per trigger pull. 

All weapons, guns or otherwise, slow players down by a uniform 13.333%. Weapons also reduce players’ movement speed further while aiming down sights. The amount of the additional speed reduction is dependent on the size of the weapon. 

Other Weapons

Your Legend can carry and throw various types of ordnance; these take up inventory space and are listed as consumables. The three types of ordnance are Arc Stars, Frag Grenades, and Thermite Grenades. 

Melee weapons aren’t of any use in Apex Legends. None among the formidable selection of Legends carries a melee weapon by default, and those equipped by unlocking your Legend’s heirloom skin set are purely cosmetic. Gameplay is only affected by ordnance and firearms. 

How to Get Better at Apex Legends

There are many reasons you might not be progressing in Apex Legends like you want to be. The most important reason to tackle is an age-old philosophical argument; doing the same thing repeatedly and expecting a different result is quite plainly the definition of insanity. We all get into a rut, whether in our daily lives or how we play a game. We go down certain paths, choose certain weapons and employ certain tactics. 

These are most often the comfortable choice and something we feel safe doing. But if you’re playing the same way you were a few months or years ago and haven’t seen any improvement, what you’re doing might not be working for you as well as you think. Fortunately, the advice is the same for Apex Legends as it is for daily life; Get up, get out and take a break. Give yourself a moment to evaluate your choices and realize that your play style isn’t getting you anywhere. 

 Maybe you aren’t challenging yourself enough. Perhaps you’ve gotten a little complacent with how you play and the choices you make. Switch things up. Try a new weapon, research some new tactics and maybe even pick a new Legend. We all have our favorites, but sometimes your favorite isn’t the one that will serve you the best. 

Maybe the problem lies with your position in the team. Are you performing at your peak in your current role? Perhaps instead of being the last in a fight, you should be leading the charge. So try and expand your role in the team and thereby expand your skillset. Maybe you’ve been stuck too long in the backseat with a pistol when you should have been in the driver’s seat with an assault rifle or machine gun. 

So, to sum up, the ways to get better at Apex legends are to try something different, keep trying and practicing, and occasionally take a break so that you can renew your perspective and see where you’re falling short so that you can improve on it. 

What is Apex Legends and How to Play

Apex Legends Tips and Tricks

Here are a few last tips on Apex Legends before you leave. We found these tricks to be helpful and set us apart from the noobs.

Drop Hot

Dropping into a hot zone is the best way to secure a good kill streak and up your skills. While you might fail a few times, you’ll learn to be more observant, and you’ll learn to better recognize players that you can take down quickly. Dropping in hot doesn’t mean dropping right on top of three enemy combatants; just try to be as close to where most players choose to drop as possible.

Wandering around for hours trying to find players to kill because you’ve essentially dropped into the middle of nowhere isn’t going to up your kills or your skill. 

Loot Where You Land

Many beginners spend most of their time exploring to try and score the best loot. This isn’t the way to increase your kills. Don’t waste your time looking all over the map for the best gear before you start fighting. Instead, loot around where you drop; even if you don’t get the best gear, you’ll likely have more time to play if you spend less time wandering around.

Don’t Look Back

Hindsight will always be 20/20. Looking back and saying that you should have handled a specific fight or battle differently won’t necessarily do you any good. Beating yourself up about an outcome not being in your or your teams’ favor isn’t the best idea.

Taking it out on your teammates is even worse. Don’t let regrets tear your team or your confidence apart. Instead, acknowledge that a specific play didn’t work and try something different next time, or try the same play from a slightly different angle.

Watch and Learn

Watching other players’ videos on how they play is always a good idea. What we tend to do, however, is focus on the videos that showcase their best tactics and try and learn from those. While learning from other players’ successful plays is valuable, so is learning from their failures.

Don’t be afraid to watch a few fail clips. See if you can pick up on what went wrong and how to prevent it and implement that into your play style. Also, don’t just stick to watching the pros. Sometimes beginners have a thing or two to teach as well, even if it’s just the way not to handle a situation.

Become the apex predator

When you’re ready to rumble in a Battle Royale arena, Apex Legends delivers that exciting science fiction atmosphere you’ll enjoy. Of course, you’ll need to gear up for the seasons if you want to achieve as many victories as possible.